1
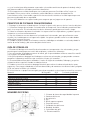
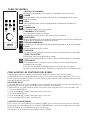
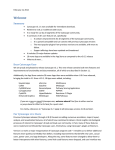
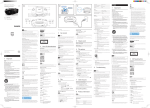
ES Horno Microondas Manual del usuario
GB Microwave Oven Owner's Manual
Por favor, lea cuidadosamente estas instrucciones antes de instalar y hacer funcionar el horno.
Anote en el espacio de abajo el Nº DE SERIE que aparece en la placa del nombre de su horno y guarde esta información para futuras referencias.
Nº DE SERIE
Please read these instructions carefully before installing and operating the oven.
Record in the space below the SERIAL NO. found on the nameplate on your oven and retain this information for future reference.
SERIAL NO.
E
PRECAUCIONES PARA EVITAR LA POSIBLE EXPOSICIÓN A LA ENERGÍA DE
MICROONDAS EXCESIVA
1. No intente utilizar este horno con la puerta abierta, puesto que el funcionamiento con la puerta
abierta puede producir una exposición peligrosa a la energía de microondas. Es importante no
manipular ni forzar los enclavamientos de seguridad.
2. No coloque ningún objeto entre la parte frontal del horno y la puerta ni permita que se acumule
suciedad o residuos de limpiadores en las superficies herméticas.
3. No utilice el horno si está dañado. Es especialmente importante que la puerta del horno cierre
correctamente y que no haya daños en :
a. la puerta ( deformada ),
b. las bisagras y pestillos (rotos o flojos).
4. Las juntas de la puerta y las superficies de obturación.
5. El horno no debe ajustarlo ni repararlo nadie, excepto personal de servicio con la preparación
adecuada.
ÍNDICE
PRECAUCIONES PARA EVITAR LA POSIBLE EXPOSICIÓN
A LA ENERGÍA DE MICROONDAS EXCESIVA
DATOS TÉCNICOS
INSTALACIÓN
INSTRUCCIONES DE PUESTA A TIERRA
INTERFERENCIA DE RADIO
INSTRUCCIONES DE SEGURIDAD IMPORTANTES
PRINCIPIOS DE COCINADO CON MICROONDAS
GUÍA DE UTENSILIOS
NOMBRES DE PIEZAS
PANEL DE CONTROL
CÓMO AJUSTAR LOS CONTROLES DEL HORNO
AJUSTE DEL RELOJ
COCINADO CON MICROONDAS
GRILL
COMBINACIÓN 1
COMBINACIÓN 2
DESCONGELACIÓN AUTOMÁTICA
MENÚ AUTOMÁTICO
FUNCIÓN DE PREAJUSTE
CIERRE PARA NIÑOS
LIMPIEZA Y MANTENIMIENTO
ANTES DE SOLICITAR ASISTENCIA TÉCNICA
DATOS TÉCNICOS
Consumo de energía:
Salida de potencia nominal del microondas:
Frecuencia de funcionamiento:
Dimensiones externas:
Dimensiones de la cavidad del horno:
Capacidad del horno: Uniformidad de cocinado:
Peso neto: 230V~50Hz, 1200W (Microondas)
900W (grill)
700W
2450MHz
262mm(A)×452mm(a)×333mm(P)
198mm(A)×315mm(a)×279mm(P)
17 litros
Sistema giratorio Aprox. 11,3kg
INSTALACIÓN
1. Asegúrese de retirar todos los materiales de embalaje del interior del horno.
2. ADVERTENCIA: Compruebe que el horno no presente daños, como por ejemplo, que la puerta
esté mal alineada o deformada, que las juntas de la puerta y la superficie de obturación estén dañadas, que las bisagras y los pestillos estén rotos o flojos y que haya abolladuras en el interior de
la cavidad o en la puerta. Si detecta algún daño, no ponga en funcionamiento el horno y póngase
en contacto con personal técnico cualificado.
3. Este horno microondas debe colocarse en una superficie plana y estable para soportar su peso
y la cantidad máxima de alimentos, que puedan cocinarse en el horno.
4. No coloque el horno donde se generen calor, humedad elevada ni cerca de materiales combustibles.
5. Para un funcionamiento correcto, el horno debe tener una circulación de aire suficiente. Deje
un espacio de 20 cm por encima del horno, 10 cm en la parte posterior y 5 cm a ambos lados. No
cubra ni bloquee ninguna abertura del aparato. No retire las patas.
6. No ponga en funcionamiento el horno sin la bandeja de vidrio, soporte giratorio y eje en sus
posiciones correctas.
7. Asegúrese de que el cable de alimentación no esté dañado y no pase por debajo del horno ni
sobre ninguna superficie caliente o afilada.
8. La toma debe ser fácilmente accesible, de forma que pueda desconectarse con facilidad en
caso de emergencia.
9. No use el horno en el exterior.
INSTRUCCIONES DE PUESTA A TIERRA
Este aparato debe conectarse a tierra. Este horno está equipado con un cable que tiene un conductor de toma de tierra con un enchufe de toma de tierra. Debe conectarse en un receptáculo
en la pared, que esté correctamente instalado y puesto a tierra. En el caso de que se produzca un
cortocircuito eléctrico, la toma de tierra reduce el riesgo de descarga eléctrica, proporcionando
un conductor de escape para la corriente eléctrica. Se recomienda un circuito independiente sólo
para el horno. La utilización de alta tensión es peligrosa y puede provocar un incendio u otro accidente que cause daños en el horno. ADVERTENCIA El uso incorrecto del enchufe de toma de tierra
puede producir un riesgo de descarga eléctrica.
Notas:
Si tiene alguna pregunta sobre la puesta a tierra o las instrucciones eléctricas, póngase en contacto con un electricista o un técnico cualificado.
Ni el fabricante ni el distribuidor aceptan ninguna responsabilidad por daños en el horno o daños
personales, resultantes de la inobservancia de los procedimientos de conexión eléctricos.
Los conductores de este cable están coloreados según el código siguiente:
Verde y amarillo = TOMA DE TIERRA
Azul = NEUTRO
Marrón = TENSIÓN
INTERFERENCIA DE RADIO
1. El funcionamiento del microondas puede producir interferencias en su radio, TV o equipo similar.
2. Cuando existe una interferencia, puede reducirse o eliminarse adoptando las medidas siguientes:
a. Limpie la puerta y la superficie de obturación del horno.
b. Reoriente la antena de recepción de la radio o de la televisión.
c. Cambie de posición el horno microondas con respecto al receptor.
d. Aleje el microondas del receptor.
e. Conecte el microondas en una toma diferente, de forma que éste y el receptor estén en circuitos
de ramales distintos.
INSTRUCCIONES DE SEGURIDAD IMPORTANTES
Al utilizar un aparato eléctrico deben seguirse unas precauciones de seguridad básicas, incluyendo las siguientes:
ADVERTENCIA: Para reducir el riesgo de quemaduras, descarga eléctrica, fuego, daños a las
personas o exposición a energía microondas excesiva:
1. Lea todas las instrucciones antes de usar el aparato.
2. Use este aparato sólo para su finalidad prevista, tal como se describe en este manual. No use
productos químicos corrosivos ni vapores en este aparato. Este tipo de horno está específicamente diseñado para calentar, cocinar o secar alimentos. No está diseñado para uso industrial ni de
laboratorio.
3. No ponga en funcionamiento el horno cuando esté vacío.
4. No ponga en funcionamiento este aparato si tiene un cable o enchufe dañado, si no funciona
correctamente o si se ha dañado o caído. Si el cable de alimentación está dañado, debe sustituirlo el fabricante o su representante de servicio o una persona con una cualificación similar para
evitar peligros.
5. ATENCIÓN: Cuando el aparato esté funcionando en el modo combinación, debido a las altas
temperaturas generadas, los niños deberían utilizar el microondas solamente bajo la supervisión
de un adulto.
6. ADVERTENCIA: Los niños sólo pueden utilizar el horno sin supervisión cuando se les hayan
dado las instrucciones adecuadas, de forma que puedan usar el horno de manera segura y comprendan los peligros de un uso incorrecto.
7. Para reducir el riesgo de incendio en la cavidad del horno:
a. Cuando caliente alimentos en un recipiente de plástico o papel, vigile el horno dado que existe
posibilidad de incendio.
b. Retire los cierres de alambre de las bolsas de papel o de plástico antes de colocarlas en el
horno.
c. Si se observa humo, desconecte o desenchufe el aparato y mantenga la puerta cerrada para
sofocar las llamas.
d. No use la cavidad para fines de almacenamiento. No deje productos de papel, utensilios de
cocinado ni alimentos en la cavidad cuando no se esté utilizando.
8. ADVERTENCIA: El líquido u otros alimentos no deben calentarse en recipientes herméticos, ya
que pueden explotar.
9. Si calienta bebidas en el microondas puede producirse una ebullición eruptiva posterior, por lo
tanto, debe tenerse cuidado al manejar el recipiente.
10. No fría alimentos en el horno. El aceite caliente puede dañar las partes del horno y los utensilios e incluso producir quemaduras en la piel.
11. Los huevos con su cáscara y los huevos duros no deben calentarse en los hornos microondas, ya
que podrían explotar incluso después de que haya finalizado el calentamiento en el microondas.
12. Perfore los alimentos con una piel gruesa, como las patatas, calabazas enteras, manzanas y
castañas antes de cocinar.
13. El contenido de los biberones y los tarros infantiles debe removerse o agitarse y tiene que
comprobarse la temperatura antes de servir, para evitar quemaduras.
14. Los utensilios de cocinado pueden estar muy calientes debido al calor transmitido por la comida calentada. Pueden ser necesarios cogedores para manejar el utensilio.
15. Tienen que comprobarse los utensilios para asegurarse de que son apropiados para usarlos
en el horno microondas.
16. ADVERTENCIA: Es peligroso para una persona que no esté cualificada, el realizar el mantenimiento o la reparación que implique abrir alguna tapa que proteja contra la exposición a la
energía de microondas.
17. Este producto es un equipamiento ISM Clase B Grupo 2. La definición del Grupo 2, el cual
contiene todos los equipamientos ISM (Industriales, Científicos y Médicos), en los cuales la
energía de radio-frecuencia es generada intencionalmente y/o utilizada en la forma de radiación
electromagnética para el tratamiento del material, y equipamiento de electroerosión. Referente al
equipamiento clase B, se trata de un equipamiento adecuado para instalaciones de uso domésti-
co, y en instalaciones directamente conectadas a la red de suministro de potencia de bajo voltaje
que abastece edificios utilizados para fines domésticos.
18. Este aparato no está destinado para ser usado por personas (incluidos niños) cuyas capacidades físicas,senso-riales o mentales estén reducidas,o carezcan de experiencia o
conocimiento,salvo si han tenido supervisión oinstrucciones relativas al uso del aparato por una
persona responsable de su seguridad.
19. Los niños deberían ser supervisados para asegurar que no juegan con el aparato.
PRINCIPIOS DE COCINADO CON MICROONDAS
1. Disponga los alimentos cuidadosamente. Coloque las partes más gruesas hacia el exterior del plato.
2. Controle el tiempo de cocinado. Cocine durante el tiempo más corto indicado y auméntelo después si es necesario. El cocinado excesivo de los alimentos puede provocar humo o fuego.
3. Cubra los alimentos durante el cocinado. Las tapas evitan las salpicaduras y ayudan a que los
alimentos se cocinen uniformemente.
4. Gire los alimentos una vez durante el cocinado en el microondas, para que alimentos como
el pollo y las hamburguesas se hagan más rápido. Las piezas grandes como los asados deben
girarse por lo menos una vez.
5. Cambie la disposición de los alimentos como las albóndigas a mitad de su cocinado, dando la
vuelta de arriba a abajo y del centro del plato hacia fuera.
GUÍA DE UTENSILIOS
1. El material ideal para un utensilio de microondas es transparente a las microondas, ya que
permite que la energía pase a través del recipiente y caliente los alimentos.
2. Las microondas no pueden atravesar el metal, por lo que no deben utilizarse utensilios metálicos ni platos con borde metálico.
3. No utilice productos de papel reciclado para cocinar en microondas, ya que pueden contener
pequeños fragmentos metálicos que causarían chispas y/o incendios.
4. Se recomienda utilizar platos redondos / ovales en lugar de cuadrados/ oblongos, ya que los
alimentos de las esquinas tienden a sobrecocinarse.
5. Pueden usarse tiras estrechas de papel aluminio para evitar el sobrecocinado de las zonas
expuestas. Pero tenga cuidado de no utilizar demasiado y de mantener una distancia de 1 pulgada
(2,54 cm) entre la lámina y la cavidad.
En la lista inferior se proporciona una guía general para ayudarle a seleccionar los utensilios correctos.
Material
Microondas
Grill
Cocinado combinado
Vidrio termorresistente Sí
Sí
Sí
Vidrio no termorresistente
No
No
No
Cerámica termorresistente Sí
Sí
Sí
Platos de plástico aptos para microondas Sí
No
No
Papel de cocina
Sí
No
No
Bandeja metálica
No
Sí
No
Estante metálico
No
Sí
No
Recipientes de lámina y papel aluminio No
Sí
No
NOMBRES DE PIEZAS
1. Sistema de cierre de seguridad de la puerta
2. Ventana del horno
3. Aro giratorio
4. Eje
5. Botón apertura puerta
6. Panel de control
7. Salida de aire del horno
8. Bandeja de vidrio
9. Calentador del grill
10. Estante metálico
PANEL DE CONTROL
• PANTALLA ACCIÓN MENÚ
Se muestra el tiempo de cocción, potencia, indicadores de acción y hora.
• POWER
Pulse este botón varias veces para seleccionar el nivel de potencia de cocina
do del microondas.
• GRILL
Pulse este botón para ajustar un programa de cocinado en el grill de hasta 95 minutos.
• COMBINACIÓN
Cocción que combina grill y microondas.
• TIME/MENU (TIEMPO/MENÚ)
Gire el dial para introducir el tiempo.
Gire el dial para seleccionar un menú de cocción automática.
• AJUSTE PESO
Después de seleccionar un menú de cocinado automático, púlselo para especificar los pesos de los alimentos o número de raciones.
• PESO DESCONGELACIÓN
Pulse para ajustar el programa de descongelación basado en el peso introducido.
• CLOCK
Pulsar este botón para fijar la hora
• PREAJUSTE
Pulse para fijar un programa de cocción que se iniciará automáticamente a la hora fijada.
• START / QUICK START
Púlselo para iniciar un programa de cocinado.
Pulse para fijar un programa de cocción que se iniciará automáticamente a la hora fijada.
• STOP/CANCEL
Pulse este botón para cancelar el ajuste o reiniciar el horno antes de ajustar un programa de cocinado.
Pulse una vez para detener temporalmente el cocinado o dos veces para cancelar el cocinado totalmente. También se usa para ajustar el cierre para niños.
CÓMO AJUSTAR LOS CONTROLES DEL HORNO
Cada vez que se pulse un botón, sonará un pitido para reconocer que se ha pulsado.
Después de finalizar un programa de cocción, el horno emitirá un pitido y aparecerá “Fin” en la
pantalla como recordatorio para el usuario. Pulse cualquier botón o abra la puerta para finalizar
antes de ajustar otra función.
AJUSTE DEL RELOJ
Es un reloj de 24 horas. Para comprobar la hora mientras que el horno está funcionando, pulse el
botón RELOJ y la hora aparecerá durante unos instantes en la pantalla.
POR EJEMPLO: Se supone que se quiere fijar la hora en el reloj del horno a las 8.30 (AM o PM)
1. Pulsar el botón RELOJ
2. Girar el mando de Tiempo / Menú para fijar las 8 horas
3. Pulsar el botón RELOJ
4. Girar el mando de Tiempo / Menú para fijar los 30 min.
5. Pulsar el botón RELOJ para confirmación.
COCINADO CON MICROONDAS
Para cocinar con microondas, pulse el botón POWER varias veces para seleccionar un nivel de
potencia de cocinado y después use el botón TIME/MENU para ajustar el tiempo de cocción que
desee. El tiempo de cocinado más largo es 95 minutos.
Seleccione el nivel de potencia pulsando el botón POWER.
PULSAR EL BOTÓN POWER DISPLAY
POTENCIA DE COCINADO
una vez
100
100%
dos veces
80
80%
3 veces
60
60%
4 veces
40
40%
5 veces
20
20%
6 veces (ajuste del temporizador)
0
0 Por ejemplo, suponga que desea cocinar durante 1 minuto al 60% de potencia de microondas.
• Pulse el botón NIVEL DE POTENCIA varias veces hasta mostrar la potencia del 60%.
• Gire el dial MENÚ/TIEMPO a10:00.
• Pulse INICIO/INICIO RÁPIDO.
GRILL
El tiempo de cocinado más largo es de 95 minutos. El cocinado en el grill es especialmente apropiado para filetes finos de carne, bistecs, chuletas, kebabs y salchichas, o trozos de pollo. También
es apropiado para sandwiches calientes y platos gratinados.
Por ejemplo, suponga que desea cocinar los alimentos en el grill durante 12 minutos.
• Pulse el botón STOP/CANCEL.
• Pulse el botón GRILL.
• Gire el botón TIME/MENU a las 12:00.
• Pulse el botón START.
COMBINACIÓN 1
El tiempo de cocinado más largo es de 95 minutos.
30% de tiempo de cocinado en microondas, 70% de cocinado en el grill. Utilícelo para pescado,
patatas o para gratinar.
POR EJEMPLO: Suponga que desea ajustar el cocinado de la combinación 1 durante 25 minutos.
• Pulsar el botón COMBI una sola vez
• Gire el botón TIMER a 25:00.
• Pulse el botón START.
COMBINACIÓN 2
El tiempo de cocinado más largo es de 95 minutos.
55% de tiempo de cocinado en microondas, 45% de cocinado en el grill. Utilícelo para puddings,
tortillas, patatas asadas y aves.
POR EJEMPLO: Suponga que desea ajustar el cocinado de la combinación 2 durante 12 minutos.
• Pulse el botón COMBI dos veces
• Gire el botón TIMER a las 12:00.
• Pulse el botón START.
PESO DESCONGELACIÓN
El horno permite descongelar alimentos basándose en el peso introducido por el usuario.
El tiempo de descongelación y el nivel de potencia se ajustan automáticamente una vez se han
programado la categoría de los alimentos y el peso. El peso de los alimentos congelados va de
100g a 1800g.
POR EJEMPLO: Suponga que desea descongelar 600g de gambas.
• Pulse el botón STOP/CANCEL.
• Pulse el botón PESO DESCONGELACIÓN.
• Pulse AJUSTAR PESO para seleccionar el peso de alimento que hay que descongelar.
• Pulse el botón INICIO/INICIO RÁPIDO.
Nota: el horno se para durante la descongelación para permitir al usuario girar el alimento para
conseguir una descongelación uniforme y pulsar después INICIO/INICIO RÁPIDO para descongelar el resto del tiempo.
FUNCIÓN DE PREAJUSTE
Esta función le permite ajustar un programa de cocción para que comience a una hora determinada.
Por ejemplo: suponga que ahora son las 9:00 y quiere que el horno inicie el programa de cocción a las 11:30.
• Introduzca el programa de cocción deseado.
• Pulse una vez el botón PREAJUSTE.
• Gire el dial MENÚ/TIEMPO para fijar el dígito de la hora 11:00.
• Pulse de nuevo el botón PREAJUSTE.
• Gire el dial MENÚ/TIEMPO para ajustar que los minutos muestren 11:30
• Pulse una vez INICIO/INICIO RÁPIDO.
NOTA: Después de haber ajustado una función de preajuste, no podrá accionar otros botones
excepto comprobar la hora ajustada pulsando el botón PREAJUSTE y cancelar pulsando el botón
PAUSA/CANCELACIÓN. Cuando llegue a las 11:30, el programa de cocción deseado se iniciará
automáticamente
MENÚ AUTOMÁTICO
Para los alimentos o cocinados siguientes, no tiene que introducir la potencia y tiempo de cocinado. Simplemente indique al horno lo que desea cocinar y cuánto pesan los alimentos. El horno
comienza a trabajar después de que pulse el botón START.
Es posible que necesite dar la vuelta a los alimentos cuando estén a la mitad del tiempo de cocinado para obtener un cocinado uniforme.
Por ejemplo, para la cocción de 300 g de pizza:
• Girar el mando Time / Menu en el sentido de las agujas del reloj para indicar Pizza, que corresponde al 5 en la tabla de auto-menú.
• Pulsar el botón RELOJ para seleccionar el peso o la cantidad de alimento.
• Pulsar el botón START
CÓDIGO
ALIMENTO
1. Para leche/café y patatas, la pantalla mostrará el número de ser-
vicios en lugar del peso del alimento al pulsar el botón AJUSTAR. 2. Para los puntos 7, 8, 9 de la lista, el horno se para durante la
cocción y emite un pitido para recordarle que abra la puerta y
gire el alimento para conseguir una cocción uniforme.
01
Leche/café (200ml/taza)
02
Arroz (g)
03
Spaghetti (g)
04
Patatas (cada 230g)
05
Recalentamiento automático (g)
06
Pescado (g)
07
Pollo (g)
08
Vaca/cordero (g)
3. El resultado de la cocción automática depende de factores
tales como la fluctuación de tensión, la forma y el tamaño del
alimento, sus preferencias en cuanto al grado de cocción del
alimento e incluso de lo bien que usted coloque el alimento en
el horno. Si no encuentra satisfactorio el resultado en alguno
de los niveles, ajuste ligeramente el tiempo de cocción de
manera consecuente.
09
Carne en brochetas (g)
4. Para spaghetti, añadir agua hirviendo antes de la cocción.
Sin embargo, recuerde que el resultado del cocinado automático depende de factores como la
forma y el tamaño de los alimentos, su gusto personal, así como de la capacidad de cocción de
determinados alimentos e incluso de cómo coloca los alimentos en el horno. Si considera que el
resultado no es bastante satisfactorio, ajuste el tiempo de cocción un poco en consecuencia.
COCINADO RÁPIDO
El horno funcionará a ALTA potencia (100% salida de potencia) para el programa de cocinado RÁPIDO.
Pulse simplemente el número de veces necesario para fijar el tiempo de cocción y cocine inmediatamente a nivel de máxima potencia.
TIEMPO
PULSE EL BOTÓN START
0:30
una vez
1:00
dos veces
1:30
tres veces
…
…
12:00
15 veces
Por ejemplo, para ajustar el horno para que cocine durante 2 minutos con esta función:
• Pulse el botón STOP/CANCEL.
• Pulse START 4 veces, el horno comienza a funcionar inmediatamente a plena potencia.
CIERRE PARA NIÑOS
Utilícelo para evitar que los niños pequeños pongan en funcionamiento el horno, sin supervisión.
El indicador CHILD LOCK se mostrará en la pantalla del display y el horno no podrá ponerse en
funcionamiento mientras esté ajustado CHILD LOCK.
Para ajustar la opción CHILD LOCK: Mantenga pulsado el botón STOP/CANCEL durante 3 segundos, sonará un pitido y se encenderá el indicador LOCK.
Para cancelar la opción CHILD LOCK: Mantenga pulsado el botón STOP/CANCEL durante 3 segundos hasta que se apague el indicador de cierre en el display.
LIMPIEZA Y MANTENIMIENTO
1. Antes de limpiar apague el horno y extraiga el enchufe de alimentación de la toma de pared.
2. Mantenga limpio el interior del horno. Cuando haya salpicaduras de alimentos o líquidos vertidos adheridos a las paredes del horno, límpielos con un paño húmedo. Si el horno está muy sucio
puede usarse un detergente suave. No utilice pulverizadores ni otros limpiadores agresivos, ya
que podrían manchar, rayar o dejar sin brillo la superficie de la puerta.
3. Las superficies exteriores deben limpiarse con un paño húmedo. Para evitar daños en las piezas que
hay en el interior del horno, no debe permitirse que se filtre agua en las aberturas de ventilación.
4. Limpie la puerta y la ventana por ambos lados y las piezas adyacentes con frecuencia utilizando
un paño húmedo para eliminar cualquier vertido o salpicadura. No utilice un limpiador abrasivo.
5. No permita que se moje el panel de control. Limpie con un paño suave y húmedo. Cuando limpie el panel de
control, deje la puerta del horno abierta para evitar que se ponga en funcionamiento accidentalmente.
6. Si se acumula vapor en el interior o en torno al exterior de la puerta del horno, limpie con un
paño suave. Esto puede producirse cuando el horno microondas funciona en condiciones de humedad elevada. En dicho caso es normal.
7. Ocasionalmente es necesario retirar la bandeja de vidrio para limpiarla. Límpiela con agua
jabonosa caliente o en un lavavajillas.
8. El aro giratorio y el suelo del horno deben limpiarse regularmente para evitar el ruido excesivo.
Simplemente limpie la superficie del fondo del horno con un detergente suave. El aro giratorio
puede lavarse con agua jabonosa templada o en el lavavajillas. Al retirar el aro giratorio del suelo
de la cavidad para su limpieza, asegúrese de volver a colocarlo en la posición correcta.
9. Elimine los olores de su horno combinando una taza de agua con el zumo y la piel de un limón
en un recipiente hondo apto para microondas, colóquelo en el microondas durante 5 minutos.
Limpie a fondo y seque con un paño suave.
10. Cuando es necesario cambiar la luz del horno, póngase el contacto con su distribuidor para que se la cambien.
11. El horno debe ser limpiado regularmente y deben retirarse los restos de comida depositados.
No mantener el horno limpio puede llevar al deterioramiento de la superficie, lo cual puede afectar negativamente en la vida del aparato así como provocar alguna situación peligrosa.
12. Por favor, no arroje este electrodoméstico al cubo de basura, deberá depositarlo en el centro
de eliminación especial proporcionado por el ayuntamiento.
ANTES DE SOLICITAR ASISTENCIA TÉCNICA
SI EL HORNO NO FUNCIONA
1. Asegúrese de que el horno esté conectado firmemente. Si no es así, retire el enchufe de la
toma, espere 10 segundos y conéctelo de nuevo firmemente.
2. Compruebe que no se haya fundido un fusible o se haya disparado el disyuntor principal. Si
parece que funcionan correctamente, compruebe la toma con otro aparato.
3. Asegúrese de que el panel de control esté programado correctamente y esté ajustado el temporizador.
4. Asegúrese de que la puerta esté firmemente cerrada acoplando el sistema de cierre de seguridad de la puerta. De lo contrario, la energía de microondas no fluirá al interior del horno.
SI NADA DE LO ANTERIOR MODIFICA LA SITUACIÓN, PÓNGASE EN CONTACTO CON UN TÉCNICO
CUALIFICADO. NO INTENTE AJUSTAR NI REPARAR EL HORNO POR SÍ MISMO.
GB
PRECAUTIONS TO AVOID POSSIBLE EXPOSURE TO EXCESSIVE MICROWAVE
ENERGY
1. Do not attempt to operate this oven with the door open since open-door operation can result
in harmful exposure to microwave energy. It is important not to defeat or tamper with the safety
interlocks.
2. Do not place any object between the oven front face and the door or allow soil or cleaner residue
to accumulate on sealing surfaces.
3. Do not operate the oven if it is damaged. It is particularly important that the oven door close
properly and that there is no damage to the :
a. Door ( bent ),
b. Hinges and latches (broken or loosened).
4. Door seals and sealing surfaces.
5. The oven should not be adjusted or repaired by anyone except properly qualified service personnel.
CONTENTS
PRECAUTIONS TO AVOID POSSIBLE EXPOSURE TO EXCESSIVE MICROWAVE ENERGY
SPECIFICATION
INSTALLATION
GROUNDING INSTRUCTIONS
RADIO INTERFERENCE
IMPORTANT SAFETY INSTRUCTIONS
MICROWAVE COOKING PRINCIPLES
UTENSILS GUIDE
PART NAMES
CONTROL PANEL
HOW TO SET THE OVEN CONTROLS
SETTING THE CLOCK
MICROWAVE COOKING
GRILL
COMBINATION 1
COMBINATION 2
AUTO DEFROST
AUTO MENU
PRESET
EXPRESS COOKING
CHILD LOCK
CLEANING AND CARE
BEFORE YOU CALL FOR SERVICE
SPECIFICATION
Power Consumption:
Rated Microwave Power Output:
Operation Frequency:
Outside Dimensions:
Oven Cavity Dimensions:
Oven Capacity: Cooking Uniformity:
Net Weight: 230V~50Hz, 1200W(Microwave)
900W (Grill)
700W
2450MHz
262mm(H)×452mm(W)×333mm(D)
198mm(H)×315mm(W)×279mm(D)
17Litres
Turntable System
Approx.11,3kg
INSTALLATION
1. Make sure that all the packing materials are removed from the inside of the door.
2. WARNING: Check the oven for any damage, such as misaligned or bent door, damaged door
seals and sealing surface, broken or loose door hinges and latches and dents inside the cavity or on the
door. If there is any damage, do not operate the oven and contact qualified service personnel.
3. This microwave oven must be placed on a flat, stable surface to hold its weight and the heaviest
food likely to be cooked in the oven.
4. Do not place the oven where heat, moisture, or high humidity are generated, or near combustible materials.
5. For correct operation, the oven must have sufficient airflow. Allow 20cm of space above the
oven, 10cm at back and 5cm at both sides. Do not cover or block any openings on the appliance.
Do not remove feet.
6. Do not operate the oven without glass tray, roller support, and shaft in their proper positions.
7. Make sure that the power supply cord is undamaged and does not run under the oven or over
any hot or sharp surface.
8. The socket must be readily accessible so that it can be easily unplugged in an emergency.
9. Do not use the oven outdoors.
GROUNDING INSTRUCTIONS
This appliance must be grounded. This oven is equipped with a cord having a grounding wire with a
grounding plug. It must be plugged into a wall receptacle that is properly installed and grounded.
In the event of an electrical short circuit, grounding reduces risk of electric shock by providing an
escape wire for the electric current. It is recommended that a separate circuit serving only the
oven be provided. Using a high voltage is dangerous and may result in a fire or other accident causing oven damage. WARNING Improper use of the grounding plug can result in a risk of electric
shock.
Notes:
If you have any questions about the grounding or electrical instructions, consult a qualified electrician or service person.
Neither the manufacturer nor the dealer can accept any liability for damage to the oven or personal injury resulting from failure to observe the electrical connection procedures.
The wires in this cable main are colored in accordance with the following code:
Green and Yellow = EARTH
Blue = NEUTRAL
Brown = LIVE
RADIO INTERFERENCE
1. Operation of the microwave oven can cause interference to your radio, TV, or similar equipment.
2. When there is interference, it may be reduced or eliminated by taking the following measures:
a. Clean door and sealing surface of the oven.
b. Reorient the receiving antenna of radio or television.
c. Relocate the microwave oven with respect to the receiver.
d. Move the microwave oven away from the receiver.
e. Plug the microwave oven into a different outlet so that microwave oven and receiver are on
different branch circuits.
IMPORTANT SAFETY INSTRUCTIONS
When using electrical appliance basic safety precautions should be followed, including the following:
WARNING: To reduce the risk of burns, electric shock, fire, injury to persons or exposure to excessive microwave energy:
1. Read all instructions before using the appliance.
2. Use this appliance only for its intended use as described in this manual. Do not use corrosive
chemicals or vapors in this appliance. This type of oven is specifically designed to heat, cook or dry
food. It is not designed for industrial or laboratory use.
3. Do not operate the oven when empty.
4. Do not operate this appliance if it has a damaged cord or plug, if it is not working properly or if it
has been damaged or dropped. If the supply cord is damaged, it must be replaced by the manufacturer or its service agent or a similarly qualified person in order to avoid a hazard
5. Warning: When the appliance is operated in the combination mode, children should only use the
oven under adult supervision due to the temperatures generated
6. WARNING: Only allow children to use the oven without supervision when adequate instructions
have been given so that the child is able to use the oven in a safe way and understands the hazards
of improper use.
7. To reduce the risk of fire in the oven cavity:
a. When heating food in plastic or paper container, keep an eye on the oven due to the possibility of ignition.
b. Remove wire twist-ties from paper or plastic bags before placing bag in oven.
c. If smoke is observed, switch off or unplug the appliance and keep the door closed in order to
stifle any flames.
d. Do not use the cavity for storage purposes. Do not leave paper products, cooking utensils or
food in the cavity when not in use.
8. WARNING: Liquid or other food must not be heated in sealed containers since they are liable to explode.
9. Microwave heating of beverage can result in delayed eruptive boiling, therefore care has to be
taken when handle the container.
10. Do not fry food in the oven. Hot oil can damage oven parts and utensils and even result in skin burns.
11. Eggs in their shell and whole hard-boiled eggs should not be heated in microwave ovens since
they may explode even after microwave heating has ended.
12. Pierce foods with heavy skins such as potatoes, whole squash, apples and chestnuts before
cooking.
13. The contents of feeding bottles and baby jars should be stirred or shaken and the temperature
should be checked before serving in order to avoid burns.
14. Cooking utensils may become hot because of heat transferred from the heated food. Potholders may be needed to handle the utensil.
15. Utensils should be checked to ensure that they are suitable for use in microwave oven.
16. WARNING: It is hazardous for anyone other than a trained person to carry out any service or
repair operation which involves the removal of any cover which gives protection against exposure
to microwave energy.
17. This product is a Group 2 Class B ISM equipment. The definition of Group 2 which contains all
ISM (Industrial, Scientific and Medical) equipment in which radio-frequency energy is intentionally
generated and/or used in the form of electromagnetic radiation for the treatment of material, and
spark erosion equipment. For Class B equipment is equipment suitable for use in domestic establishments and in establishments directly connected to a low voltage power supply network which
supplies buildings used for domestic purpose.
18. This extractor is not designed to be used by people (including children) with physical, sensorial
or mental capacity, or who lack experience or knowledge about it, unless they have had supervision or instructions on how to use the hood by someone who is responsible for their safety.
19. Children must be supervised to ensure that they do not play with the extractor.
MICROWAVE COOKING PRINCIPLES
1. Arrange food carefully. Place thickest areas towards outside of dish.
2. Watch cooking time. Cook for the shortest amount of time indicated and add more as needed.
Food severely overcooked can smoke or ignite.
3. Cover foods while cooking. Covers prevent spattering and help foods to cook evenly.
4. Turn foods over once during microwaving to speed cooking of such foods as chicken and hamburgers. Large items like roasts must be turned over at least once.
5. Rearrange foods such as meatballs halfway through cooking both from top to bottom and from
the center of the dish to the outside.
UTENSILS GUIDE
1. The ideal material for a microwave utensil is transparent to microwave, it allows energy to pass
through the container and heat the food.
2. Microwave can not penetrate metal, so metal utensils or dishes with metallic trim should not be
used.
3. Do not use recycled paper products when microwave cooking, as they may contain small metal
fragments which may cause sparks and/or fires.
4. Round /oval dishes rather than square/oblong ones are recommend, as food in corners tends to
overcook.
5. Narrow strips of aluminum foil may be used to prevent overcooking of exposed areas. But be
careful don’t use too much and keep a distance of 1 inch (2.54cm) between foil and cavity.
The list below is a general guide to help you select the correct utensils.
Cookware
Heat–Resistant Glass Non Heat–Resistant Glass
Heat–Resistant Ceramics
Microwave–Safe Plastic Dish Kitchen Paper
Metal Tray
Metal Rack
Aluminum Foil & Foil Containers
PART NAMES
CONTROL PANEL
Microwave
Yes
No
Yes
Yes
Yes
No
No
No
Grill
Yes
No
Yes
No
No
Yes
Yes
Yes
Combination Cooking
Yes
No
Yes
No
No
No
No
No
1. Door Safety Lock System
2. Oven Window
3. Roller ring
4. Shaft
5. Door Release Button
6. Control Panel
7. Oven Air Vent
8. Glass Tray
9. Grill heater
10. Metal rack
• MENU ACTION SCREEN
Cooking time, power, action indicators, and clock time are displayed
• POWER
Touch this pad a number of times to set microwave cooking power level.
• GRILL
Press this pad to set a grill-cooking program up to 95 minutes.
• COMBINATION
Cooking with combined microwave and grill power.
• TIME/MENU
Turn the dial to enter time.
Turn the dial to select an auto-cooking menu.
• WEI.ADJ.
Press to specify food weights or number of servings.
• WEIGHT DEFROST
Press to set defrost program based in the weight entered.
• CLOCK
Press this button to set oven clock.
• PRESET
Press to program a cooking program which starts at an appoint time automatically.
• START / QUICK START
Touch to start a cooking program.
Press to program a cooking program which starts at an appoint time automatically.
• STOP/CANCEL
Press to cancel setting or reset the oven before setting a cooking program.
Press once to temporarily stop cooking, or twice to cancel cooking altogether.
It is also used for setting child lock.
HOW TO SET THE OVEN CONTROLS
Each time a button is pressed, a beep will sound to acknowledge the press.
After a cooking program has been finished, the oven will sound beeps with “End” showing on
screen to remind user. Press any button or open door to clear it before setting another function.
SETTING THE CLOCK
This is 24-hour clock. To check the time while the oven is operating, press the CLOCK button, then
the time will be displayed for a while on the display screen.
FOR EXAMPLE: Suppose you want to set the oven clock time to 8:30 (A.M. or P.M.).
1. Press the CLOCK button.
2. Turn Time/Menu to set 8 o’clock.
3. Press the CLOCK button.
4. Turn Time / Menu to set 30 min.
5. Press the CLOCK button to confirm the setting.
MICROWAVE COOKING
For microwave cooking, just press the POWER pad a number of times to select a cooking power
level, and then use the TIME/MENU dial to set a desired cooking time. The longest cooking time is
95 minutes.
Select power level by pressing the POWER button.
PRESS POWER BUTTON once
twice
3 times
4 times
5 times
6 times (setting timer)
DISPLAY
100
80
60
40
20
0
COOKING POWER
100%
80%
60%
40%
20%
0 For example, suppose you want to cook for 1 minute at 60% of microwave power.
• Press POWER LEVEL button a number of times to show power 60%.
• Turn MENU/TIME dial to 10:00.
• Press START/QUICK START.
GRILL
The longest cooking time is 95 minutes. The grill cooking is particularly useful for thin slices of
meat, steaks, chops, kebabs, sausages of piece of chicken. It is also suitable for hot sandwiches
and au gratin dishes.
For example, suppose you want to grill for 12 minutes.
• Press STOP/CANCEL button.
• Press GRILL button.
• Turn the TIME/MENU to 12:00.
• Press START button.
COMBINATION 1
The longest cooking time is 95 minutes.
30% time for microwave cooking, 70% for grill cooking. Use for fish, potatoes or au gratin.
FOR EXAMPLE: Suppose you want to set combination 1 cooking for 25 minutes.
• Press COMBI button once.
• Turn TIMER to 25:00.
• Press START button.
COMBINATION 2
The longest cooking time is 95 minutes. 55% time for microwave cooking, 45% for grill cooking.
Use for puddings omelettes, baked potatoes and poultry.
FOR EXAMPLE: Suppose you want to set combination 2 cooking for 12 minutes.
• Press COMBI button twice.
• Turn TIMER to 12:00.
• Press START button.
WEIGHT DEFROST
The oven allows to defrost food based on the weight entered by user. The defrosting time and
power level are automatically set once the food category and the weight are programmed. The
frozen food weight ranges from 100g to 1800g.
FOR EXAMPLE: Suppose you want to defrost 600g of shrimp.
• Press STOP/CANCEL button.
• Press WEIGHT DEFROST button.
• Press WEIGHT ADJUST to select weight of food to be defrosted.
• Press START/QUICK START button.
NOTE: the oven stops during defrosting to let the user to turn food over for uniform defrosting and
then press START/QUICK START to defrost for the remaining time.
PRESET FUNCTION
This function allow you to program a cooking program to start at an appointed time.
For example: Suppose the present time is 9:00, and you want the oven to start a cooking program
at 11:30.
• Enter a desired cooking program.
• Press PRESET button once.
• Turn MENU/TIME dial to set hour digit 11:00.
• Press PRESET button once.
• Turn MENU/TIME dial to set minute to show 11
• Press START/QUICK START once.
NOTE: After a preset function has been set, you can’t operate other buttons except check the
preset time by pressing PRESET button and cancel it by pressing PAUSE/CANCEL button. When it
time to 11:30, the desired cooking program start automatically.
AUTO MENU
For the following foods or cooking operation, you do not need to input cooking power and time. Try
to focus on telling the oven what you want to cook and how much the food weighs. The oven starts
to work after you touching the START pad.
You may need to turn food over at the middle of cooking time to obtain uniform cooking.
For example, to cook 300g of pizza.
1. Turn Time/Menu dial clockwise to indicate pizza, which is the item 5 on the auto-menu.
2. Press CLOCK button to select the weight or amount of the food.
3. Press Start/Quick Start.
CODE
FOOD
1. For milk/coffee and potato, the screen will show the
number of serving instead of food weight when pressing
WEIGHT ADJUST button.
01
Milk/Coffee (200ml/cup)
02
Rice (g)
03
Spaghetti (g)
04
Potato (each 230g)
05
Auto Reheat (g)
06
Fish (g)
07
Chicken (g)
08
Beef/Mutton (g)
3. The result of auto cooking depends on factors such
as voltage fluctuation, the shape and size of food, your
personal preference as to the doneness of certain foods
and even how well you happen to place food in the oven.
If you find the result at any rate not quite satisfactory,
please adjust the cooking time a little bit accordingly.
09
Skewered Meat (g)
4. For Spaghetti, add boiling water befote cooking.
2. For item 7, 8, 9 in the list, the oven stops during cooking, and beeps to remind you to open the door and turn
the food over for uniform cooking.
However, please remember that the result of auto cooking depends on factors such as the shape
and size of food, your personal preference as to the doneness of certain foods and even how well
you happen to place the food in the oven. If you find the result at any rate not quite satisfactory,
please adjust the cooking time a little bit accordingly.
EXPRESS COOKING
The oven will operate at HIGH power (100% power output) for EXPRESS cooking program.
Simply press it a number of times to set cooking time and cook immediately at full power level.
TIME
0:30
1:00
1:30
…
12:00
PRESS START BUTTON
once
twice
three times
…
15 times
For example, to set the oven to cook for 2 minutes using this feature:.
• Press STOP/CANCEL button.
• Press START button 4 times, the oven starts working immediately at full power.
CHILD LOCK
Use to prevent unsupervised operation of the oven by little children. The CHILD LOCK indicator will
show up on display screen, and the oven can not be operated while the CHILD LOCK is set.
To set the CHILD LOCK: Press and hold the STOP/CANCEL button for 3 seconds, a beep sounds
and LOCK indicator lights.
To cancel the CHILD LOCK: Press and hold the STOP/CANCEL button for 3 seconds until lock
indicator on display goes off.
CLEANING AND CARE
1. Turn off the oven and remove the power plug from the wall socket before cleaning.
2. Keep the inside of the oven clean. When food splatters or spilled liquids adhere to oven walls,
wipe with a damp cloth. Mild detergent may be used if the oven gets very dirty. Avoid the use of
spray and other harsh cleaners as they may stain, streak or dull the door surface.
3. The outside surfaces should be cleaned with a damp cloth. To prevent damage to the operating
parts inside the oven, water should not be allowed to seep into the ventilation openings.
4. Wipe the door and window on both sides, the door seals and adjacent parts frequently with a
damp cloth to remove any spills or spatters. Do not use abrasive cleaner.
5. Do not allow the control panel to become wet. Clean with a soft, damp cloth. When cleaning the
control panel, leave oven door open to prevent oven from accidentally turning on.
6. If steam accumulates inside or around the outside of the oven door, wipe with a soft cloth. This
may occur when the microwave oven is operated under high humidity conditions. In such case, it is
normal.
7. It is occasionally necessary to remove the glass tray for cleaning. Wash the tray in warm sudsy
water or in a dishwasher.
8. The roller ring and oven floor should be cleaned regularly to avoid excessive noise. Simply wipe
the bottom surface of the oven with mild detergent. The roller ring may be washed in mild sudsy
water or dishwasher. When removing the roller ring from cavity floor for cleaning, be sure to
replace in the proper position.
9. Remove odors from your oven by combining a cup of water with the juice and skin of one lemon
in a deep microwaveable bowl, microwave for 5 minutes. Wipe thoroughly and dry with a soft cloth.
10. When it becomes necessary to replace the oven light, please consult a dealer to have it replaced.
11. The oven should be cleaned regularly and any food deposits removed. Failure to maintain the
oven in a clean condition could lead to deterioration of the surface that could adversely affect the
life of the appliance and possibly result in a hazardous situation.
12. Please do not dispose this appliance into the domestic rubbish bin, it should be disposed to the
particular disposal center provided by the municipalities.
BEFORE YOU CALL FOR SERVICE
IF THE OVEN FAILS TO OPERATE
1. Check to ensure that the oven is plugged in securely. If it is not, remove the plug from the outlet,
wait 10 seconds, and plug it in again securely.
2. Check for a blown circuit fuse or a tripped main circuit breaker. If these seem to be operating
properly, test the outlet with another appliance.
3. Check to ensure that the control panel is programmed correctly and the timer is set.
4. Check to ensure that the door is securely closed engaging the door safety lock system.
Otherwise, the microwave energy will not flow into the oven.
IF NONE OF THE ABOVE RECTIFY THE SITUATION, THEN CONTACT A QUALIFIED TECHNICIAN.
DO NOT TRY TO ADJUST OR REPAIR THE OVEN YOURSELF.
60810565.20.02.2009
CATA ELECTRODOMÉSTICOS, S.L.
C. Àngel Guimerà, 16-17 - 08570 TORELLÓ (Barcelona) SPAIN
Tel. +34 938 594 100 - Fax +34 938 594 101
www.cnagroup.es · e-mail: [email protected]
Atención al Cliente: 902 410 450
[email protected]