1
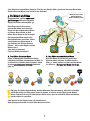
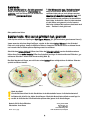
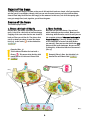
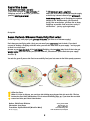
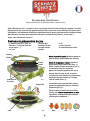
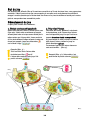
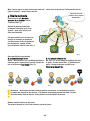
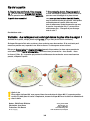
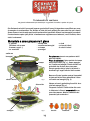
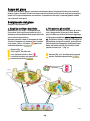
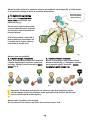
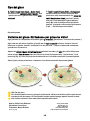
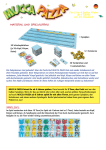
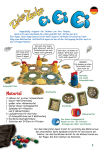
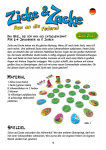
Du fütterst, was Du lieb hast
Ein kooperatives Kinderspiel für 2 bis 4 Vogeleltern ab 4 Jahren
Radau im Vogelbau! Lauthals fordern die frisch geschlüpften Vogelküken eine Fütterung nach der
anderen. Wie gut, dass Ihr schlaue Vogeleltern seid und wisst, wo der Wurm drin ist. Unermüdlich
schiebt ihr den hungrigen Vogelbabys nahrhafte Leckerbissen in die weit geöffneten Schnäbel. Und
natürlich bemerkt ihr auch, welche Küken gerade mal nicht gefüttert werden möchten, oder?
Super, dann werden bestimmt alle satt!
Material und Spielaufbau
- 4 Vogeleltern
(entscheidet selbst, ob es Mamas oder Papas sind…)
- 20 Würmer
Bilderring
Schablone
Eckaufkleber
- 1 Würfel
- 12 geschlossene Schnäbel
- 6 Eckaufkleber
- 1 Nestscheibe
- 1 Bilderring
- 1 Schablone
- 4 Steckhalter
Abb. 1
Nestscheibe
Vor der ersten Partie löst ihr alle Teile vorsichtig aus den Stanztafeln. Bevor ihr das
Spiel beginnt, legt ihr die Schablone in die
leere Schachtel ein. Darüber legt ihr den
Bilderring (Abb. 1). Ihr könnt dabei frei entscheiden, welche Seite nach oben zeigen soll.
Sucht vier der sechs beiliegenden Aufkleber
aus und klebt sie in die vier Eckflächen des
Schachtelunterteils.
Nachdem ihr die vier Steckhalter von unten
in den Löchern der Nestscheibe verankert
habt, legt ihr die Nestscheibe auf den Bilderring (Abb. 2).
Jetzt landen die Vogeleltern: Steckt sie einfach auf die herausragenden Steckhalter
(Abb. 2). Legt die Schnäbel und den Würfel
neben der Schachtel bereit. Daneben legt
ihr 20 Würmer als gemeinsamen Vorrat.
Jetzt kann die schnabelhafte Fütterung
der kleinen Schmatzspatzen beginnen!
Abb. 2
Steckhalter
Schnäbel
1
Würmer
Würfel
Spielziel
Die Vogelbabys sind hungrig. Sobald alle satt sind und ihre Schnäbel geschlossen haben, habt ihr das
Spiel gemeinsam gewonnen! Es kann aber passieren, dass euch die Würmer ausgehen, weil ihr zu
oft versucht, Küken zu füttern, die gerade nichts fressen möchten. In diesem Fall werden nicht alle
Schmatzspatzen satt und ihr habt dann das Spiel leider gemeinsam verloren.
Spielablauf
Der Kleinste von euch beginnt.
1. Du suchst einen Vogel aus und würfelst
2. Du drehst die Vögel
Wenn du am Zug bist, suchst du einen Vogel aus,
den du bewegen möchtest. Es muss ein
Vogel sein, in dessen Farbe es noch mindestens
ein hungriges Küken gibt, das den Schnabel
noch nicht geschlossen hat. Dann würfelst du.
Das gewürfelte Bild zeigt dir, an welchen Ort
du den ausgewählten Vogel bewegst (z.B. zu den
Socken ( ) an der Wäscheleine
).
Halte deinen ausgewählten Vogel fest. Sage laut,
welchen Ort du gewürfelt hast. Jetzt drehst du
den Vogel bis zu diesem Ort. Dazu drehst du
die ganze Nestscheibe so lange, bis du vor dem
ausgewählten Vogel ein Bild des gewürfelten
Ortes vollständig sehen kannst. Falls sich (vor
dem Drehen) bereits ein Bild diesen Ortes vor
dem Vogel befindet, drehst du ihn bis zum nächsten Bild dieses Ortes. Wie du siehst haben sich
alle anderen Vögel mitgedreht.
Beispiel (Abb. 3): Trixi entscheidet sich
für den blauen Vogel und würfelt eine
Blume ( ). Der blaue Vogel möchte also
zur nächsten Blumenwiese
.
Beispiel (Abb. 4): Der blaue Vogel sitzt jetzt
vor der nächsten Blumenwiese
.
Abb. 3
Abb. 4
2
Jetzt fliegt dein ausgewählter Vogel los. Zieh ihn vom Stecker (Abb. 5) und lass ihn einen Wurm holen.
Stecke ihm einen Wurm (vom Vorrat) in den Schnabel.
Welchen meiner drei
Schmatzspatzen
füttere ich denn jetzt?
3. Du fütterst ein Küken
Entscheide dich, welches seiner drei
gleichfarbigen Küken der fliegende
Vogel jetzt füttern möchte (Abb. 5)!
Dann fliegst du mit ihm zu dem
gewünschte Küken und versuchst,
dieses mit dem mitgebrachten Wurm
zu füttern: Dazu steckst du dem
Küken diesen Wurm in den Schnabel!
(Du kannst den Wurm dabei in die
Hand nehmen oder versuchen, direkt
vom Schnabel des Elternvogels in
den Schnabel des Kükens hinein zu
füttern – wie es echte Vögel in echten
Nestern tun.)
Jetzt wird es spannend:
Frisst das Küken den Wurm?
Abb. 5
A. Das Küken frisst den Wurm
Super, Schmatzspatz! Nachdem der Wurm
vollständig im Küken verschwunden ist (Abb. 6),
ist dieses satt. Schließe seinen Schnabel, indem
du einen geschlossenen Schnabel einsteckst
(Abb. 6).
B. Das Küken verschmäht den Wurm
Oje! Der Wurm lässt sich nicht ganz in den
Schnabel hinein schieben. Er bleibt stecken.
(Abb. 7). Leider verliert nun der Vogel den Wurm
vor Schreck… Du legst den Wurm vor dir ab.
Abb. 6
Abb. 7
Übrigens: Bei deiner Entscheidung, welches Küken du füttern möchtest, dürfen dir deine Mitspieler Ratschläge und Tipps geben, wenn sie glauben, zu wissen, welche Küken gerade Appetit
haben. Du kannst dir also von allen Spielern helfen lassen, bevor du schließlich selbst entscheidest,
welches Küken du auswählst.
Jetzt steckst du den Vogel wieder auf seinen Stecker.
Dein Spielzug ist beendet und dein linker Nachbar würfelt…
3
Spielende
B. Alle Würmer sind weg – Ihr habt verloren!
Wenn ihr den letzten Wurm aus dem Vorrat
verfüttert habt oder vor euch ablegen musstet,
ohne dass alle Schnäbel geschlossen sind, sind
nicht alle Küken satt geworden. Ihr beendet das
Spiel leider als Verlierer. Aber ihr habt trotzdem
so viele Küken satt gemacht, wie ihr konntet.
Und beim nächsten Mal werden es bestimmt noch
mehr… Probiert’s doch gleich aus!
A. Alle Schnäbel sind zu – Ihr habt gewonnen!
Wenn es euch gelungen ist, alle Schnäbel zu
schließen, sind alle Küken satt. Ihr beendet das
Spiel so als gemeinsame Sieger!
Oder probiert mal diese
Spielvariante: Wer zuerst gefüttert hat, gewinnt!
Jeder Spieler erhält zum Spielbeginn fünf eigene Würmer. (Es gibt also keinen gemeinsamen Vorrat.)
Immer wenn du mit einem Vogel losfliegst, steckst du ihm einen deiner Würmer in den Schnabel.
Falls es dir nicht gelingt, damit ein Küken zu füttern, nimmst du den Wurm zurück zu deinem Vorrat
und versuchst ihn bei einem späteren Spielzug erneut zu verfüttern.
Sobald du dem letzten (dritten) Küken einer Farbe den Schnabel schließt, werden die beiden anderen
Küken dieser Farbe wieder hungrig: Öffne ihre Schnäbel (und lege die dabei entfernten Plättchen „geschlossene Schnäbel“ wieder zum Vorrat zurück) (Abb. 8).
Das Spiel beendet als Sieger, wer als Erster seinen letzten Wurm erfolgreich an die kleinen Schmatzspatzen verfüttern konnte.
Abb. 8
Nach dem Spiel
Zum Aufräumen könnt ihr die Steckhalter in der Nestscheibe lassen. Im Schachtelunterteil
befinden sich nämlich vier kleine Vertiefungen. Dreht die Nestschiebe einfach um und legt sie
zurück in die Schachtel. Die Steckhalter passen dabei genau in die Vertiefungen.
Autorin: Edith Grein-Böttcher
Illustration: Lena Hesse
© 2013 Zoch GmbH
Brienner Str. 54a
80333 München
www.zoch-verlag.com
www.facebook.com / zochspiele
Art.Nr.: 60 110 5049
4
E
The beakaful feeding game
for 2 to 4 parent birds, age 4 and up
Rumble in the nest! The newly hatched baby birds loudly demand one feeding after another.
Good that you are a clever parent bird that knows how to catch the early worm. You shove
nutritious tidbits relentlessly into the hungry fledglings‘ wide-open beaks. And of course, you
can also see, can‘t you, which babies don‘t want to be fed at the moment? Great, so everyone
will certainly get enough food!
Materials and Set-up
- 4 parent birds (decide for
yourself whether they are
moms or dads…)
- 20 worms
picture ring
corner labels
Before the first game, carefully remove all
tiles from the punch-out sheet.
Before starting the game, insert the die-cut
picture ring layer into the empty box (illus 1). You are
free to decide which side you turn face up.
Choose four of the labels enclosed and stick
them in the four corner areas of the box bottom.
illus 1
After you plug the four holding pegs from
beneath into the holes of the nest disk, you
put the nest disk on the picture ring (illus 2).
Now the parent birds land: Just plug them
onto the holding pegs now showing (illus 2).
Have the beaks and the die ready, next to
the box. Alongside, you put 20 worms as a
common supply. Now the beakaful feeding
of the little spunky sparrows can begin!
nest disk
holding peg
- 1 die
- 12 closed beaks
- 6 corner labels
- 1 nest disk
- 1 picture ring
- 1 die-cut layer
- 4 holding pegs
illus 2
5
beaks
worms
die
Object of the Game
The baby birds are hungry. As soon as they are all full and their beaks are closed, all of you together
win the game! It can happen, though, that you run out of worms because you have tried too many
times to feed baby birds that are not hungry at the moment. In this case, not all of the spunky sparrows get enough food, and, together, you all lose the game.
Course of the Game
The smallest player starts.
1. Choose a bird and roll the die
2. Move the birds
On your turn, you choose a bird that you want to
move. It has to be a bird with at least one hungry
fledgling of the same color that has not closed its
beak yet.Then you roll the die. The picture that
comes up shows you where to move the chosen
bird (e.g. to the socks ( ) at the clothesline
).
Hold the bird you have chosen. Say out loud
which landscape you have rolled. Now turn the
bird along with the entire nest disk until you see
the complete picture of the same landscape in
front of the bird. If there is already a picture
of this landscape in front of the bird (before
you move it), then you turn the bird to the next
picture of that same landscape. As you can see,
in doing this, all the other birds have also moved…
(illus 4).
Example (illus 3):
Trixie chooses the blue bird and rolls a
flower ( ). This means that the blue bird
would like to visit the next flower field
.
Example (illus 4): Now, the blue bird is in
front of the next flower field
.
illus 3
illus 4
6
But now your chosen bird flies. Detach it from the holding peg (illus 5) and let it get a worm. Stick a
worm from the supply into its beak.
Which of my three
spunky sparrows do
I feed now?
3. Feed a fledgling
Decide which of the three fledglings
of the same color the flying bird now
wants to feed (illus 5)!
Then you fly the bird to the chosen
fledgling and try to feed it with the
worm you have brought: To this end,
you put the worm into the fledgling‘s
beak!
(You can take the worm into your
hand or try to feed it directly from
the parent bird‘s beak into the fledgling‘s beak – like real birds in real
nests do.)
illus 5
There are two possible outcomes:
A.The fledgling eats the worm
Great, smack snack! After the worm has completely disappeared in its beak, this fledgling is
full. Close its beak by plugging in a closed beak
(illus 6).
B.The fledgling spurns the worm
Oh no! The worm can‘t be shoved completely into
the beak; it gets stuck (illus 7). Unfortunately,
now the startled sparrow loses the worm… Now
lay down the worm in front of you.
illus 6
illus 7
By the way: The other players are allowed to give you hints and advice to help with your decision
as to which baby bird to feed, if they think they know which fledglings are hungry at the moment.
So you can get help from all players before you finally decide for yourself which fledgling to
choose.
After that, you put the bird back onto its holding peg.
Your turn is now over, and your left neighbor rolls the die…
7
End of the Game
A. All beaks are closed – you win!
If you have managed to close all beaks, all
fledglings are full. In this case, you end the
game by winning as a team!
B. All worms are gone – you lose!
When you have fed the last worm from the supply
or had to lay it down in front of you without all
beaks being closed, not all fledglings have gotten
enough to eat. Unfortunately, you all end up
losing. But nevertheless, you have fed as many
fledglings as possible. And next time, surely it
will be more… just try again right away!
Or try this
Game Variant: Whoever feeds fully first wins!
In the beginning, each player gets 5 worms of his own. (So there is no common supply.)
Each time you start flying with a bird, you put one of your own worms into its beak. If you don’t
succeed in feeding a fledgling with this worm, you take the worm back to your supply – and try again
to feed it on a later turn.
As soon as you close the beak of the last (third) fledgling, the two other baby birds of that color get
hungry again: Open their beaks (and put the removed „Closed beak“ pieces back into your supply.
See illus 8).
You win the game if you are the first to successfully feed your last worm to the little spunky sparrows.
illus 8
After the Game
When it is time to tidy up, you can leave the holding pegs plugged into the nest disk. The box
bottom has four little indentations. This is where the holding pegs go, if you turn the nest disk
around and then put it back into the box.
Author: Edith Grein-Böttcher
Illustration: Lena Hesse
Translation: Sybille Whitehill (Word for Wort)
© 2013 Zoch GmbH
Brienner Str. 54a
D-80333 München
www.zoch-verlag.com
www.facebook.com / zochspiele
No.: 60 110 5049
8
FR
Qui aime bien, nourrit bien !
Un jeu coopératif pour 2 à 4 parents oiseaux, à partir de 4 ans
Quel raffut dans le nid ! L’un après l’autre, les poussins tout frais éclos réclament à manger à tue-tête.
Heureusement que vous êtes des parents oiseaux malins et que vous savez comment leur clouer le bec.
Infatigables, vous enfournez de délicieux ingrédients dans le gosier grand ouvert de ces bébés affamés.
Bien entendu, vous êtes aussi attentifs à ceux qui ne veulent pas être nourris, n’est-ce pas ?
Super, alors chacun sera rassasié !
Contenu et préparation du jeu
- 4 parents oiseaux (à vous de
décider s’il s’agit de mamans
ou de papas…)
- 20 vers
anneau
illustré
Avant la première partie détachez soigneusement les pièces prédécoupées des planches.
plaque
trouée
autocollants
des coins
illus. 1
Avant de commencer à jouer, installez la
plaque trouée dans la boîte vide (illus. 1).
Placez l’anneau illustré par-dessus (illus. 1),
en choisissant l’une ou l’autre face.
Après avoir inséré les quatre socles par en
dessous dans les trous du nid, recouvrez
l’anneau avec le nid. Choisissez 4 autocollants
parmi ceux fournis et collez-les à chaque
coin de la boîte (illus. 2).
Les parents oiseaux peuvent alors se poser :
glissez-les simplement dans les socles qui
dépassent (illus. 2).
Posez les becs et le dé à côté de la boîte.
Formez une réserve commune de 20 vers
à proximité. La becquée de nos charmants
oisillons peut commencer !
disque Nid
socle
- 1 dé
- 12 becs fermés
- 6 autocollants des coins
- 1 disque Nid
- 1 anneau illustré
- 1 plaque trouée
- 4 socles
illus 2
9
becs
vers
dé
But du jeu
Les poussins sont affamés. Dès qu’ils sont tous rassasiés et qu’ils ont clos leurs becs, vous gagnez tous
ensemble ! Mais il peut arriver que vous manquiez de vers pour avoir voulu donner trop souvent à
manger à certains poussins qui ne réclamaient rien. Dans ce cas, tous les oisillons n’auront pas le ventre
plein et vous perdrez tous ensemble la partie.
Déroulement du jeu
Le plus jeune d’entre vous commence.
1. Choisis un oiseau et lance le dé
2. Fais voler l’oiseau
Quand vient ton tour, choisis l’oiseau que tu veux
faire voler. Il doit rester au minimum un poussin
affamé (dont le bec n’est pas encore fermé) de la
même couleur que l’oiseau choisi. Lance ensuite le
dé. Le dessin obtenu t’indique où peut s’envoler cet
oiseau (par exemple, jusqu’aux chaussettes ( )
sur la corde à linge
).
Tiens bien ton oiseau. Annonce à voix haute
le dessin obtenu au dé. Tourne alors l’oiseau
avec le disque Nid jusqu’à ce qu’il soit exactement devant un dessin correspondant.
Si (avant même de voler) ce dessin se trouve
déjà devant l’oiseau, tourne-le jusqu’au
dessin identique suivant.
Tu constates que tous les autres oiseaux se
sont aussi envolés… (illus. 4).
Exemple (illus. 3) :
Trixi veut faire voler l’oiseau bleu
et obtient une fleur ( )au dé.
L’oiseau bleu souhaite voler jusqu’à la
prairie suivante
.
Exemple (Illus. 4) : L’oiseau bleu s’est
posé devant la prairie suivante
.
illus. 3
illus. 4
10
Mais l’oiseau que tu as choisi vole ensuite tout seul : retire-le du socle pour qu’il aille chercher un ver
(dans la réserve) : coince-le dans son bec.
Lequel de mes trois
poussins vais-je nourrir
maintenant ?
3. Nourris un poussin
Choisis alors lequel des trois
poussins de sa couleur l’oiseau
va nourrir (illus. 5).
Survole le poussin et essaye de
lui donner la becquée avec le ver
apporté : pour cela, insère le ver
dans le bec du bébé.
(Tu peux prendre le ver à la main ou
essayer de le nourrir en passant le
ver directement du bec du parent au
bec du poussin, comme le font
les vrais oiseaux dans les vrais nids !)
Deux possibilités se présentent :
A.Le poussin mange le ver
Super ! Une fois que le ver a entièrement disparu
dans son gosier, le poussin est rassasié. Ferme son
bec en insérant un bec fermé (illus. 6).
illus. 6
illus. 5
B. Le poussin refuse le ver
Oh, non ! Le ver ne rentre pas entièrement dans
le gosier. Il reste coincé (illus. 7). Malheureusement, l’oiseau prend peur et perd le ver…
Place le ver devant toi.
illus. 7
Remarque : Au moment de choisir quel poussin tu veux nourrir, tes coéquipiers peuvent
te donner des conseils et des astuces, s’ils pensent savoir quels poussins ont faim. Tu peux
donc demander l’aide de tous les autres joueurs avant de choisir un poussin.
Remets ensuite l’oiseau sur son socle.
Ton tour est terminé et c’est à ton voisin de gauche de jouer…
11
Fin de la partie
B. Il ne reste plus de vers. Vous avez perdu !
Si vous avez donné le dernier ver de la réserve ou
que vous avez été obligés de le placer devant
vous sans que tous les becs aient été fermés,
tous les poussins ne sont pas rassasiés. Vous perdez
malheureusement la partie. Mais vous avez
tout de même nourri autant de poussins que vous
le pouviez. La prochaine fois, il y en aura sûrement encore plus… Pourquoi ne pas réessayer
tout de suite ?
A. Tous les becs sont fermés. Vous avez gagné ! Si vous réussissez à fermer tous les becs,
tous les poussins sont rassasiés. Vous remportez
la partie tous ensemble !
Ou choisissez cette …
Variante : Le vainqueur est celui qui donne le plus vite à manger !
Au début de la partie, chaque joueur reçoit 5 vers. (Il n’y a donc pas de réserve commune.)
À chaque fois que tu fais voler un oiseau, place un de tes vers dans son bec. Si tu ne réussis pas à
nourrir un poussin avec, reprends le ver dans ta réserve. Tu réessayeras au tour suivant.
Dès que tu fermes le bec du dernier (troisième) poussin d’une couleur, les deux autres poussins de
cette même couleur ont de nouveau faim : ouvre leurs becs (et remets les « becs fermés » dans
la réserve.) (Illus. 8). Le premier qui parvient à se débarrasser de son dernier ver en nourrissant un
poussin, remporte la partie.
illus. 8
Après le jeu
Pour ranger le disque Nid, vous pouvez laisser les socles dans le disque Nid. Il y a quatre petites
cavités à la boîte pour les socles. Simplement, tournez le disque Nid avec les socles et introduirez le
dans la boîte.
Auteur: Edith Grein-Böttcher
Illustration: Lena Hesse
Traduction: Eric Bouret
© 2013 Zoch GmbH
Brienner Str. 54a
D-80333 München
www.zoch-verlag.com
www.facebook.com / zochspiele
No.: 60 110 5049
12
IT
Tu imbocchi chi vuoi bene
Un gioco di collaborazione per bambini per 2-4 genitori di uccellini a partire dai 4 anni
Che finimondo nel nido! I passerotti appena sgusciati dall’uovo già cinguettano a perdifiato per avere
da mangiare in continuazione. Per fortuna voi siete dei bravi genitori che sanno cosa fare per calmarli.
Senza stancarvi mai riempite quei becchi spalancati dei passerotti affamati con bocconcini succulenti.
E naturalmente sapete quali pulcini al momento non vogliono essere imbeccati, vero? Perfetto, allora
tutti si sazieranno!
Materiale e come preparare il gioco
- 4 genitori
(decidete voi se sono
mamme o papà…)
- 20 vermicelli
- 1 disco-nido
- 1 anello con immagini
- 1 stampo
- 4 sostegni
anello con
immagini
stampo
adesivi inclusi
Fig. 1
disco-nido
sostegno
Fig. 2
13
- 1 dado
- 12 becchi chiusi
- 6 adesivi inclusi
Per prima cosa staccate con prudenza tutti i
pezzi dai riquadri.
Prima di cominciare il gioco mettete lo stampo
nella scatola vuota (Fig. 1) . Sopra appoggiateci l’anello con immagini. Potete decidere voi
quale delle due facciate deve stare sopra.
Cercate quattro dei sei adesivi adiacenti e
incollateli agli angoli inferiori della scatola.
Dopo aver fissato i quattro sostegni inserendoli
da sotto nei fori del disco-nido ponete il disco
sull’anello con immagini (Fig. 2)
Adesso arrivano i genitori degli uccellini: inseriteli nei sostegni (Fig. 2)
Preparate i becchi e il dado vicino alla scatola. Metteteci a fianco i 20 vermicelli come
provvista comune. Adesso l’imbeccata dei
passerotti può cominciare!
becchi
vermicelli
dado
Scopo del gioco
I pulcini sono affamati. Appena tutti sono sazi ed hanno chiuso i loro piccoli becchi avete vinto tutti
insieme il gioco. Può però accadere che non avete più vermicelli perché li avete usati per far mangiare
pulcini che in quel momento non avevano fame. In questo caso non tutti i passerotti ghiotti saranno
sazi e voi tutti avete perso.
Svolgimento del gioco
Comincia il più piccolo di voi.
1. Scegli un uccellino e tira il dado
2. Fai muovere gli uccellini
Quando tocca a te, scegli l´ uccellino che vuoi
far muovere. Deve essere un uccellino di cui c’è
almeno un pulcino affamato dello stesso colore che
non ha ancora chiuso il becco.
A questo punto tiri il dado. L’immagine sul dado
ti mostra il luogo dove ti muoverai con l’uccellino
da te scelto ( per es. sui calzini ( ) appesi alla
corda della biancheria
).
Tieni stretto l’uccellino che hai scelto. Dì ad alta
voce il luogo che hai tirato con il dado. Adesso
gira l’uccellino con il disco finché non raggiungerà l’immagine completa di questo luogo davanti a
lui. Se (prima di volare) ci fosse già l’immagine di
questo luogo davanti all’uccellino, girerai il disco
fino alla prossima immagine di quel stesso luogo.
Come vedi anche tutti gli altri uccellini si sono
spostati insieme a lui … (Fig. 4)
Esempio (Fig. 3):
Trixi sceglie l´uccellino blu
e con il dado ha tirato un fiore ( ).
L‘uccellino blu allora puó muoversi sul
prossimo prato fiorito
.
Esempio (Fig. 4): L’uccellino blu è atterrato
davanti al prossimo prato fiorito
.
Fig. 3
Fig. 4
14
Adesso l’uccellino scelto da te continua a volare da solo: toglilo dal suo sostegno (Fig. 5) e fagli prendere un vermicello: mettigli nel becco un vermicello della provvista.
Quale dei miei tre
passerotti ghiotti
imbecco adesso?
3. Tu imbocchi un pulcino
Decidi quale dei tre pulcini dello
stesso colore dell’uccellino vuoi
imboccare (Fig. 5)!
Poi vola con lui sopra il pulcino scelto
e cerca di imbeccarlo con il vermicello
che hai con te: metti il vermicello nel
becco del pulcino!
(Puoi anche prendere il vermicello in
mano o imbeccarlo direttamente con
l’uccellino che ha il verme nel becco,
come fanno gli uccellini veri.)
Fig. 5
Adesso ci sono due possibilità:
A. Il pulcino mangia il vermicello
Bravo, passerotto ghiotto! Dopo che il vermicello
è sparito completamente nel becco, questo pulcino è sazio. Chiudigli il becco inserendo un becco
chiuso (Fig. 6).
B. Il pulcino rifiuta il vermicello
Ahimè! Il vermicello non entra tutto nel becco.
Rimane incastrato (Fig. 7). Purtroppo l’uccellino,
per lo spavento, perde il vermicello… Questo
vermicello lo metti davanti a te.
Fig. 6
Fig. 7
A proposito: Per decidere quale pulcino vuoi imbeccare, puoi farti consigliare e aiutare
dai tuoi compagni di gioco che credono di sapere quale pulcino che ha fame. Alla fine sarai
però tu a decidere quale pulcino scegliere.
Adesso rimetti l’uccellino sul suo sostegno.
Ora il tuo turno è finito e tocca al tuo vicino alla tua sinistra tirare il dado…
15
Fine del gioco
B. Tutti i vermicelli sono finiti – Avete perso!
Quando avete preso l’ultimo vermicello dalla
provvista o avete dovuto metterlo via, senza che
tutti i becchi siano chiusi, non tutti i pulcini
sono sazi. Finite purtroppo il gioco come perdenti. Ma avete comunque saziato più pulcini
possibili. La prossima volta saranno sicuramente
di più…. Perché non provarci subito?
A. Tutti i becchi sono chiusi – Avete vinto!
Se siete riusciti a chiudere tutti i becchi, tutti
i pulcini sono sazi. Il gioco è finito e siete tutti
vincitori!
O provate questa
Variante del gioco: Chi imbecca per primo ha vinto!
Ogni giocatore ha a disposizione all’inizio del gioco 5 vermicelli. (Quindi non c’è una provvista comune.)
Ogni volta che voli con un uccellino, gli metti uno dei tuoi vermicelli nel becco. Se non ti riesce di
imbeccare un pulcino, rimetti il vermicello fra le tue provviste – e riprovi a imboccarlo nuovamente
quando tocca di nuovo a te .
Appena hai chiuso il becco dell’ultimo (terzo) pulcino di un colore, gli altri due pulcini dello stesso
colore avranno fame di nuovo. Apri loro il becco (e rimetti le piastrine tolte, “becchi chiusi” fra le
provviste) (Fig. 8). Vince chi per primo ha imbeccato con il suo ultimo vermicello i passerotti ghiotti.
Vince il gioco, chi per primo riesce a imboccare il suo ultimo vermicello ai passerotti ghiotti.
Fig. 8
Alla fine del gioco
Per riordinare potete lasciare i sostegni nel disco-nido. Nella parte inferiore della scatola trovate
quattro piccole incavature. All´interno della scatola vedrete sostegni appositi inseriti in modo
tale da poter mettere il disco-nido piatto capovolto nella scatola
Autrice: Edith Grein-Böttcher
Illustrazioni: Lena Hesse
Traduzione: Monja Reichert
© 2013 Zoch GmbH
Brienner Str. 54a
D-80333 München
www.zoch-verlag.com
www.facebook.com / zochspiele
No: 60 110 5049
16