1
ITALIANO
FRANÇAIS
ESPAÑOL
PORTUGUÊS
Ελληνικά
POLSKI
Nederlands
1/138
ENGLISH
Quick Reference
DVR MILANO
Recording, Live, Playback, Control, Backup and Network
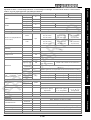
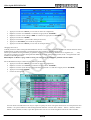
Frame rate (adjustable for
each camera)
Fps
PAL
Quality
Scheduling
Co mpression
video
audio
std
Failure event detection
1,8 (200 fps)
8,5 (200 fps)
23 (200 fps)
GB
Overwrite
days
3,5 (100 fps)
17 (100 fps)
46 (100 fps)
1,8 (200 fps)
8,5 (200 fps)
23 (200 fps)
Display
Resolution
NTSC
PAL
720×480
720×576
Real time
pixels
Speed
Zoom
Motion detection
Network
Protocols
Ports
RJ45, Ethernet 10/100 baseT Mbit
TCP/ IP, HTTP, PPPo E, DHCP, DDNS, FTP, TSP
Independent configuration for data and Control
Remote control, Live view with PTZ facility, Backup, fw upgrade
Mail notificat ion and ftp recording
Users
User interface
Max 8 users simultaneously
2/138
Nederlands
Functionalities
Event management
Full screen / Quad
/ 7 / 9 / 10 / 13 /
16 Sequential
X2 and x4 on live
Detection areas and sensitivity adjustable for each camera
Connection
Co mmunicat ions
Full screen / Quad /
7 / 9 / Sequential
POLSKI
Full screen / Quad /
Sequential
Mode
Ελληνικά
Security
160 GB
750 GB
2 TB
Capacity max
PORTUGUÊS
Partit ion
Type
Estimated Recording t ime
CIF
(352x288)
with
med iu m quality (5)
Adjustable for each camera with 9 levels
Manual / Scheduling / Motion / Alarm / Pre and Post alarm (0-60
sec)
Time and frame rate adjustable for each camera
H264
ADPCM
Date / time / motion / video loss / Camera / Smart Search
SATA, internal mount and eSATA external
2 disks with 1TB
3 disks with 2TB each one (6TB max)
each one (2TB max)
Full disk stop / Full disk overwrite / Time ad justable overwrite
(Privacy)
Double partition size ad justable for alarm and normal record ing
Search
Hard disk
240 (360×240)
120 (720×240)
60 (720×480)
200 (360×288)
100 (720×288)
50 (720×576)
ESPAÑOL
Modality
240 (360×240)
120 (720×240)
60 (720×480)
200 (360×288)
100 (720×288)
50 (720×576)
FRANÇAIS
NTSC
120 (360×240)
60 (720×240)
30 (720×480)
100 (360×288)
50 (720×288)
25 (720×576)
ENGLISH
Functions
Recordi ng
ITALIANO
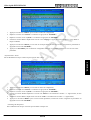
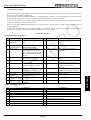
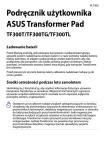
Specifiche tecniche / Technical S pecifications / Caractéristi ques téchni ques / Características técnicas / Características
técnica / Τεχνικά χαρακτηριστικά/ S pecyfikacja techniczna
DVR MILANO
4
9
16
Input
4 BNC
9 BNC
16 BNC
n°
Output
VGA / S-Video / 2 BNC (mon itor e spot)
Video
Standard
NTSC/PA L manual selection
Signal
1.0Vp-p, 75 W unbalanced tipo BCN
Input
2
4
n°
Audio
Output
2
2
Signal
100mV - 2Vrms
Multilevel Password (3) and mu lti-user (18)
Local
PC
Bro wser
CMS
Event management
Detected events
Alarms
(TTL/ CM OS
selectable polarity)
Type
Input
Output
Live (Quad/Full screen) with adjustable resolution, input alarms
status monitoring, output relay activation (home auto mation
facility)
4
n.°
Programmab le for each event
Last 1.000 events
Last 3.000 events
PTZ control
Backup
Generals
ON/ OFF
switch
Power supply ∼
Operating Hu midity
Dimensions (w×l×h)
Weight
W
°C
100–240, 50/60
(12Vdc/5A external
adapter included)
45 max
100–240, 50/60
(12Vdc/8A external adapter included))
70 max
0 – 50
Ur %
mm
kg
<80
320 x 210 x 50
About 4 (without hard disk)
Ελληνικά
1
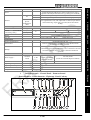
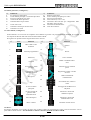
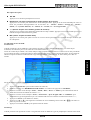
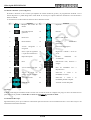
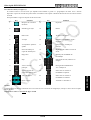
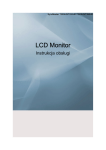
Pannello frontale – Frontal Panel - Panneau frontal
Panel delantero - Painel dianteiro – Πρόσοψη - Panel Czołowy
PORTUGUÊS
Power
Operating Temperature
V, Hz
ESPAÑOL
RS485 (D+, D-), RS-232
Pelco D, Samsung SCC-641P, Kalatel Cyber Do me, Bosch
AutoDome and other protocols…
USB 2.0 (Pendrive, external hard d isk self-powered, External
DVD burner self-powered, SD-MM C Card ) / eSATA fo r external
hard disk / Internet Exp lorer / CM S / Internal DVD burner
(optional)
FRANÇAIS
Buzzer
Log file
Connecti ons
Serial co mmun ication
Motion detection, video loss, input alarms
9
16
1 NO, 1 NC
ENGLISH
Mobile
phone/
Smartphone/
PDA
Remote
Frontal keyboard, USB mouse, remote control (up to 4 dvr),
optional control keyboard with 3-axis joystick (up to 256 DVR)
Full management (up to 4 DVR) by ActiveX control
Full management (up to 4 DVR) with interactive graphic maps
ITALIANO
Protection
POLSKI
3/138
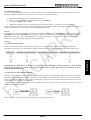
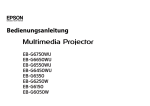
Pannello posteriore – Back Panel - Panneau arriè re
Panel trasero - Painel traseiro - Πίσω όψη - Panel Tylny
ITALIANO
2
ENGLISH
FRANÇAIS
ESPAÑOL
3
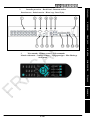
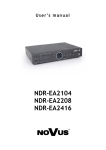
Telecomando – Remote control - Télécommande
Mando a distancia - Controlo re moto – Τηλεχειριστήριο - Pilot Zdalnego
Sterowania
PORTUGUÊS
Ελληνικά
POLSKI
4/138
Guida rapida DVR MILANO
ATTENZIONE: Questo manuale rappresenta una g ui da rapi da all a pri ma install azione del DVR, fare riferimento al
manuale utente per la descrizione completa di tutte le singole funzioni.
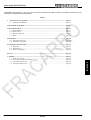
2- Descrizione del prodotto ....................................................................................................................... pag.7
3- Descrizione tasti ....................................................................................................................................... pag.7
3.1 – Pannello frontale ...............................................................................................................................pag.7
3.2 – Panello posteriore .............................................................................................................................pag.7
3.3 – Teleco mando .....................................................................................................................................pag.7
3.4 – Mouse .................................................................................................................................................pag.8
4- Installazione .............................................................................................................................................. pag.9
4.1 – Installazione disco fisso ..................................................................................................................pag.9
4.2 – Prima configurazione del DVR ......................................................................................................pag.10
5- Utilizzo basico del DVR ......................................................................................................................... pag.13
5.1 – Ricerca ...............................................................................................................................................pag.13
5.2 – Backup ...............................................................................................................................................pag.14
5.3 – Visualizzazione delle immag ini ....................................................................................................pag.15
6- Spegni mento ............................................................................................................................................ pag.15
7- Appendici ................................................................................................................................................. pag.15
7.1 – Tabella d i reg istrazione ..................................................................................................................pag.15
7.2 – Connessione di rete .........................................................................................................................pag.16
7.3 – Connessione con dispositivo mobile ............................................................................................pag.19
7.4 – connessione telecamere PTZ .........................................................................................................pag.19
5/138
ITALIANO
Indice:
1- .. Avvertenze di sicurezza ............................................................... ......................................................... pag.6
1.1 – Contenuto della confezione ................................................... ..........................................................pag.6
Guida rapida DVR MILANO
1. Avvertenze per la sicurezza:
L’installazione del prodotto deve essere eseguita da personale qualificato in conformità alle leggi e normative locali sulla
sicurezza. Il prodotto è di Classe II, secondo la norma EN 60950-1.
-
Utilizzare esclusivamente il cavo di rete in dotazione, installando il prodotto in modo che la spina di
alimentazione sia facilmente accessibile.
Il prodotto non deve essere esposto a gocciolamento o a spruzzi d’acqua e va pertanto installato in un ambiente
asciutto, all’interno di edifici.
Lasciare spazio sufficiente attorno al prodotto per garantire un’adeguata ventilazione. L’eccessiva temperatura
e/o un eccessivo riscaldamento possono compromettere il fun zionamento e la durata del prodotto.
Non installare il prodotto sopra o vicino a fonti di calore o in luoghi polverosi o dove potrebbe venire a contatto
con sostanze corrosive.
Umidità e gocce di condensa potrebbero danneggiare il prodotto. In caso di condensa, prima di utilizzare il
prodotto, attendere che sia completamente asciutto.
Controllare tutti i cavi e i fili prima d i usare il DVR. Contattare il rivenditore nel caso in cui si notino dei difetti.
Non lasciare part i non necessarie dentro al DVR perchè potrebbero provocare corto circuit i.
Non bloccare la ventola e la bocchetta del DVR.
Non esporre il DVR alla luce d iretta del sole.
Se non si è sicuri dell’installazione e dell'impostazione, consultare un tecnico.
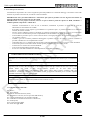
COMPATIB ILITÀ ELETTROMAGNETICA
In accordo con la direttiva europea 2004/ 108/ EC (EM C), il prodotto deve essere installato utilizzando
dispositivi, cavi e accessori che consentano di rispettare i requisit i imposti da tale direttiva per le installazioni
fisse.
RIMOZIONE E S MALTIMENTO DELL E PILE
Questo prodotto contiene 2 pile AAA alcaline di tipo mini-stilo che possono essere rimosse agendo sulla
linguetta posta nel retro del teleco mando e una batteria tampone del tipo CR2032 al lit io che si trova nella
scheda madre del DVR e può essere rimossa agendo su un lato della stessa.
Considerati i potenziali effett i sull'ambiente e sulla salute umana delle sostanze contenute nelle pile
l'utilizzatore è obbligato a smaltire le pile esauste usando gli appositi contenitori per la raccolta separata
distribuiti sul territorio o presso i punti vendita.
CONFORMITÀ ALLE DIRETTIVE EUROPEE
Questo prodotto è conforme ai requisiti essenziali delle direttive europee 2004/108/EC (Direttiva Co mpat ibilità
Elettro magnetica - EM C) e 2006/95/ EC (Direttiva bassa tensione - LVD)
1.1 Contenuto della confezione:
N°1 Mouse;
N°1 Teleco mando;
N°2 Batterie mini-stilo alcaline (AAA);
N°1 Alimentatore 12V/ 8A (12V/ 5A per DVR MILANO 4);
N°1 Cavo di alimentazione con connettore Schuko;
N°1 CD-ROM con manuale di istruzioni e software PC;
N°1 Gu ida rap ida;
N°12 Viti di fissaggio HDD;
N°4 Vit i di fissaggio HDD.
6/138
ITALIANO
IMPORTANTE: Sol o personale addestrato e autorizzato può aprire il prodotto. In caso di guasto non tentate di
ripararl o altrimenti l a garanzi a non sarà più vali da.
IMPORTANTE: Per l a propria sicurezza, staccare l a presa elettrica pri ma di s postare il DVR, installarlo o
sostituire qualche componente o l’hard dri ve.
Guida rapida DVR MILANO
2. Descrizione prodotto:
3. Descrizione tasti:
3.1 Pannello frontale (Vedi figura 1):
Nْ
1
2
3
4
Tasto
Masterizzatore
(opzionale)
Porta USB per
collegamento
Mouse
Porta USB
a
Funzione
Utilizzato per backup dei dati
Nْ
12
Tasto
STOP
Funzione
Fermare il playback
Connettere un mouse compatibile
pri ma di accendere il DVR
13
COPY
Avviare il backup
Connettere una memoria d i massa
compatibile co me: pendrive USB,
lettore di MM C/SD card o
masterizzatore DVD +RW esterno
Indicatori per alimentazione, disco
fisso e rete LA N
Passaggio da modalità live a
playback
Passaggio o ritorno alla modalità
sequenza video
Passaggio o ritorno dalla modalità
schermo intero
Visualizza il menu Ricerca
Ricevitore del segnale proveniente
dal teleco mando
14
MENU /
ESC
Visualizzare
principale
15
PA GE
Visualizzazione in modalità quad
16
LEFT /
RIGHT
UP / BS
Movimento del cursore o Pan della
telecamera PTZ verso sinistra
Movimento del cursore o Tilt della
telecamera PTZ verso l’alto / Backspace
Movimento del cursore o Tilt della
telecamera PTZ cerso il basso / Delete
Tasto di conferma
Videata successiva
5
Indicatori
LED
MODE
6
SEQ
7
CA LL
8
9
SEARCH
Sensore
remoto
10
REC
Registrazione manuale
11
Play/Pause
Play/Pausa
registrate
IR
delle
17
18
19
20
21
immagini
7/138
DOWN /
DEL
ENTER
SPLIT
Windows
+
SPLIT
Windows
-
o
Videata precedente
uscire
dal
Menu
ITALIANO
La serie DVR MILA NO 4-9-16 è stata progettata per realizzare un sistema di videosorveglianza affidabile, sicuro e
interfacciab ili con diversi tipi di monitor, PC e telefoni cellulari.
Il nuovo tipo di co mpressione dinamica utilizzata e la possibilità di impostare il livello d i qualità della reg istrazione
garantiscono un lungo tempo di registrazione nel d isco e un ottima qualità delle immag ini durante il p layback.
Il nuovo microprocessore permette al DVR di eseguire sei d iverse operazioni co me: reg istrazione, playback, v isione delle
immag ini in tempo reale, backup, controllo e accesso remoto.
Può essere gestito da pannello frontale, mouse, telecomando, tastiera esterna, tastiera virtuale e interfaccia web via PC o
smartphone.
I relè d ’uscita possono essere attivati da un ingresso allarme, rilevazione del movimento, perd ita video, eventi di sistema o
direttamente da smartphone o interfaccia web.
Guida rapida DVR MILANO
3.2 Panello posteriore (vedi figura 2):
Connettori
4-9-16 Ingressi Video BNC
Uscita monitor principale e secondario tipo BNC
4 ingressi audio RCA tipo mono
1 uscita audio RCA t ipo mono
Connettore RS-232 per tastiera
Nْ
9
10
11
12
13
6
7
8
Uscita video VGA
Connettore eSATA per dischi esterni
Connettore rete LAN
14
15
Connettori
Selettore NTSC/PA L
Uscita monitor principale tipo S-video
4/9/16 ingressi d’allarme
2 relè d’uscita (1 NA e 1 NC)
Connettore BUS RS-485 per co llegamento delle
telecamere PTZ o tastiere
Connettore di alimentazione
Tasto di accensione
3.3 Telecomando (vedi figura 3):
Il teleco mando è un accessorio che semp lifica notevolmente la gestione e la programmazione del DVR. Si consiglia d i
non superare la distanza massima di 10m da teleco mando a DVR.
Di seguito sono riportate tutte le singole funzioni dei vari tasti.
Nْ
Tasto
Funzione
1
Nْ
13
Blocco dell’evento
d’allarme
2
14
3
Destra
15
Backward
4
Tasto conferma
16
Forward
6
Avanzamento frame
per frame
Avvio backup o copia
delle informazioni
7
17
18
19
Play/pause
8
10
Abilita o d isabilita audio /
Next
Funzione zoo m / richiamo
preset
Regolazione volu me o livello
di zoom
Camb io modalità di
visualizzazione
20
Inserimento testo, numeri o
codici
Stop
9
Funzione
Sin istra
Start/Stop registrazione
5
Tasto
Accesso al menu
principale
Accesso al menu di
gestione delle
telecamere PTZ
11
21
22
23
Alto / Backspace
12
Passaggio da modalità Live a
Playback
Seleziona o ritorna alla
modalità sequenza
Seleziona o ritorna alla
modalità fu ll screen
24
Basso / Delete
Visualizza il menu ricerca
3.4 Mouse:
Il DVR può facilmente essere gestito da mouse. Per accedere al menu di configurazione portare il cursore del mouse verso la
parte inferiore dello schermo. ATTENZIONE: Connettere il mouse prima di accendere il DVR.
8/138
ITALIANO
Nْ
1
2
3
4
5
Guida rapida DVR MILANO
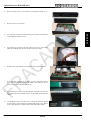
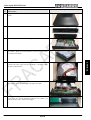
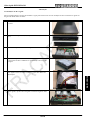
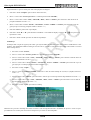
4 Installazione:
4.1 Installazione disco fisso:
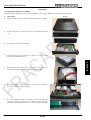
Seguire fedelmente i passi riportati di seguito per eseguire una corretta installazione di uno o più dischi fissi o del
masterizzatore DVD all’interno del DVR.
Istruzioni
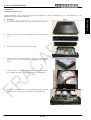
Posizionare il DVR sul banco di lavoro e d isconnettere tutti i cavi.
2
Rimuovere tutte le vit i (10) nel pannello posteriore (4) e laterale
(3+3).
3
Rimuovere il coperchio co me mostrato in figura.
4
Dagli accessori a corredo del DVR prelevare le due staffe e
fissarle ai lati del disco utilizzando le 4 vit i co me mostrato in
figura.
5
Dagli accessori a corredo del DVR prelevare 4 vit i, fissare il disco
fisso alla base del DVR e connettere i cavi dati e alimentazione.
6
Ritornare al punto numero 4 per l’installazione degli alt ri due
dischi fissi che dovranno essere collegati come in figura a lato.
9/138
Figura
ITALIANO
Nْ
1
Guida rapida DVR MILANO
Co me opzione è possibile installare un masterizzatore DVD al
posto del terzo disco fisso. Per procedure all’installazione
rimuovere le due viti e il coperchio in p lastica mostrato in figura.
8
Dagli accessori a corredo del DVR p relevare le due staffe, fissarle
ai lati dell’unità ottica e assicurare il dispositivo alla base del
DVR connettendo i cavi dati e alimentazione.
9
Utilizzando tutte le v iti prev iste chiudere il coperchio del DVR
quindi collegare il monitor e il cavo di alimentazione. Ora il DVR
è correttamente installato e pronto all’uso. Riferirsi ai capitoli
seguenti per le impostazioni di data/ora e formattazione degli
Hard disk.
Accendere il DVR agendo sull’apposito tasto posto nel pannello
posteriore. Il DVR mosterà il messaggio “Unformatted HDDs
found. Do you want to format now? [ENTER]: Yes, [ESC]:
Cancel”. Premere il tasto [ENTER] per formattare il disco fisso.
10
ITALIANO
7
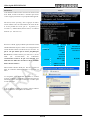
4.2 Prima configurazione del DVR:
•
Autenticazione:
Una volta acceso
il
DVR premere
il tasto “MENU” quindi
muovere
il cursore sull’icona denominata
“ACCEDI/ DISCONNETTI” e premere il tasto “ENTER”.
A questo punto inserire il no me e la password dell’utente. Da parametri di fabbrica l’ installatore dispone di un nome utente:
“aa” e di una password: “11”. Muovere il cursore sulla voce “Accedi” e confermare con il tasto “ENTER”.
Il DVR p revede 3 diverse tipologie di utente: A mministratore, Supervisore e Operatore. All’utente configurato come operatore
è consentita la sola gestione in live del DVR, al supervisore la gestione del registrato mentre all’ammin istratore è consentita
tutta la programmazione del DVR.
ATTENZIONE: Le i mpostazioni di fabbrica del DVR prevedono un sol o utente configurato come amministratore. Al
fine di aumentare il li vello di sicurezza si consiglia di utilizzare tale utente sol o per il pri mo accesso e di modi ficarne l a
password appena possibile.
ATTENZIONE: Nel caso di perdi ta dell a password di sistema contattare il distri butore di zona che si occuperà di
contattare Fracarro radioi ndustrie S.p.A.
10/138
Guida rapida DVR MILANO
•
Impostazione lingua:
Seguire fedelmente i passi riportati di seguito per configurare la lingua del DVR:
Premere il tasto “MENU” per accedere al menu di configurazione;
2.
Muovere il cursore sulla voce “IMPOSTAZIONI” e confermare con il tasto “ENTER”;
3.
Muovere il cursore sulla voce “SIS TEMA” e confermare con il tasto “ENTER” ;
4.
Utilizzando le frecce direzionali muovere il cursore sulla voce “LINGUA” e premere i tasti “+/-“ per impostare la
lingua desiderata;
5.
Premere il tasto “MENU” per tornare al menu precedente, il DVR richiederà d i salvare le impostazioni premendo il
tasto “ENTER”;
6.
Premere il tasto “ENTER” per confermare il cambio della lingua. Il sistema verrà riavviato con le nuove impostazioni.
•
Regolazione data/ora:
Seguire fedelmente i passi riportati di seguito per la regolazione data/ora:
1.
Premere il tasto “MENU” per accedere al menu di configurazione;
2.
Muovere il cursore sulla voce “IMPOSTAZIONI” e confermare con il tasto “ENTER”;
3.
Muovere il cursore sulla voce “SIS TEMA” e confermare con il tasto “ENTER” ;
4.
Utilizzando le frecce direzionali muovere il cursore sulla voce “GIORNO” e, utilizzando i tasti “+/-” impostare
l’anno, il mese e il g iorno;
5.
Utilizzando le frecce d irezionali muovere il cursore sulla voce “ORA” e, utilizzando i tasti “+/-” impostare l’ora;
6.
Premere il tasto “MENU” per tornare al menu precedente, il DVR richiederà d i salvare le impostazioni premendo il
tasto “ENTER”;
11/138
ITALIANO
1.
Guida rapida DVR MILANO
•
Formattazione disco fisso:
Seguire fedelmente i passi riportati di seguito per la formattazione del disco fisso:
Premere il tasto “MENU” per accedere al menu di configurazione;
2.
Muovere il cursore sulla voce “IMPOSTAZIONI” e confermare con il tasto “ENTER”;
3.
Muovere il cursore sulla voce “HARD DIS K” e confermare con il tasto “ENTER” ;
4.
Premere il tasto “MODE”;
5.
Premere il tasto “CALL” per formattare interamente il disco fisso;
6.
Premere il tasto “ENTER” per confermare l’operazione;
7.
Premere il tasto “MENU” per tornare al menu precedente.
•
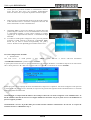
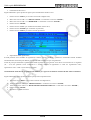
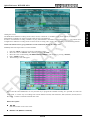
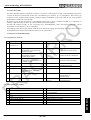
Impostazione della registrazione:
Il DVR permette varie modalità di reg istrazione: allarme, mot ion, continua o pian ificata. Utilizzando l’u ltima modalità
l’ammin istratore del sistema può defin ire, per ogni ora della settimana, il t ipo di registrazione.
Al fine di poter personalizzare la p ianificazione della reg istrazione ogni g iornata viene div isa in un massimo di 16 segmenti
(T1,…..,T16) che potranno essere configurati in 3 d iverse modalità di registrazione a scelta tra: registrazione video,
registrazione video + audio o assenza di reg istrazione.
ATTENZIONE: Il DVR viene programmato di fabbrica per registrare in maniera continua durante tutta l a setti mana.
Seguire fedelmente i passi riportati di seguito per impostare la pian ificazione:
1.
Premere il tasto “MENU” per accedere al menu di configurazione;
2.
Muovere il cursore sulla voce “IMPOSTAZIONI” e confermare con il tasto “ENTER”;
3.
Muovere il cursore sulla voce “REGIS TRAZIONE PROGRAMMATA” e confermare con il tasto “ENTER” ;
4.
Premere il tasto “MODE”;
5.
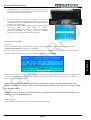
Apparirà la seguente schermata:
12/138
ITALIANO
1.
Guida rapida DVR MILANO
ITALIANO
Tale schermata permette all’ammin istratore un semplice e veloce modo per impostare la pian ificazione registrazione. Per
ogni singola ora della settimana è possibile impostare una diversa modalità di registrazione a scelta tra:
Allarme+Motion+Normale, Allarme+Motion, A llarme, Motion, Normal, e no Registrazione. In ogni caso verrà registrato
sia il video che l’audio.
Descrizione tasti:
▲▼◄►
Premere questi tasti per muovere il cursore.
Numerici 1-6 (Mouse: Click tasto sini stro)
Premere questi tasti per selezionare la modalità d i registrazione. Premere il tasto ENTER per attivare la modalità. Le
modalità di registrazione sono: “1” – Allarme+Motion+Normale, “2” – Allarme+Motion, “3” – Allarme, “4” –
Motion, “5” – Normale, “6” – No Registrazione.
+/- (Mouse: Click ta sto sini stro)
Premere questi tasti per selezionare l’intervallo di tempo desiderato. Premere il tasto ENTER per attivare la modalità
di registrazione nell’intervallo selezionato.
ESC (Mouse: Click ta sto de stro)
Premere questo tasto per uscire dalla schermata e tornare alla precedente. I segmenti di tempo verranno agiornata di
conseguenza.
5 Utilizzo basico del DVR:
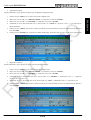
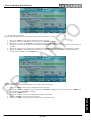
5.1 Ricerca:
Il DVR permette 4 diverse modalità di ricerca delle immag ini reg istrate: Ricerca per ora, ricerca per evento, ricerca veloce o
ricerca immagin i arch iviate.
La v ideata “RICERCA PER ORARIO”, nell’u ltima riga, mostra la data di in izio registrazione quindi è sempre possibile
conoscere il range di valori su cui effettuare la ricerca. E’ inoltre possibile limitare la ricerca alla sola registrazione su allarme,
motion, perdita video o normale.
13/138
Guida rapida DVR MILANO
ITALIANO
Seguire fedelmente i passi riportati di seguito per effettuare una ricerca delle immag ini
1.
Premere il tasto “SEARCH” per accedere al menu di ricerca;
2.
Muovere il cursore sulla voce “RICERCA PER DATA” e confermare con il tasto “ENTER”;
3.
Muovere il cursore sulle voci “ANNO”, “MES E”, “GIORNO”, “ORA” e “MINUTO” per selezionare la data di
inizio della ricerca utilizzando i tasti “+/-”;
4.
Muovere il cursore sulle voci “ALLARME”, “MOTION”, “NO S EGNALE” e “NORMALE” per selezionare il
tipo di reg istrazione su cui si desidera eseguire la ricerca utilizzando i tasti “+/-”;
5.
Premere il tasto “PLAY” per avviare il p layback;
6.
Premere i tasti “◄” e “►” per aumentare o diminuire la velocità di visualizzazione e il tasto “►/▐▐” per mettere in
pausa o in play il v ideo;
7.
Premere il tasto “STOP” per uscire dalla modalità playback.
5.2 Backup:
Il DVR permette di salvare la reg istrazione audio/video su diversi tipi d i d ispositivi esterni USB co me pendrive, dischi fissi
autoalimentati o masterizzatori DVD. Seguire fedelmente i punti riportati di seguito per eseguire la procedura di backup:
1.
Premere il tasto “SEARCH”;
2.
Muovere il cursore sulla voce “RICERCA PER DATA” e confermare con il tasto “ENTER”;
3.
Muovere il cursore sulle voci “ANNO”, “MES E”, “GIORNO”, “ORA” e “MINUTO” per selezionare la data di
inizio della ricerca utilizzando i tasti “+/-”;
4.
Muovere il cursore sulle voci “ALLARME”, “MOTION”, “NO S EGNALE” e “NORMALE” per selezionare il
tipo di reg istrazione su cui si desidera eseguire il backup utilizzando i tasti “+/-”.
5.
Premere il tasto “COPY”;
6.
Muovere il cursore sulla voce “VELOCITA” e selezionare il valore della velocità di backup da 1 (lento) a 9 (veloce)
utilizzando i tasti “+/-”.
7.
Muovere il cursore sulla voce “TEL ECAMER E” per selezionare la telecamera d i cu i si desidera fare il backup
utilizzando i tasti “+/-”;
8.
Muovere il cursore sulle voci “ANNO”, “MES E”, “GIORNO”, “ORA” e “MINUTO” per selezionare l’ora e la data
di fine del Backup utilizzando i tasti “+/-”;
14/138
Guida rapida DVR MILANO
9.
Premere il tasto “COPY” per avviare il backup.
ITALIANO
Durante tutta la procedura di backup verrà v isualizzata un icona e un messaggio indicante l’avanzamento della procedura
stessa. Una volta terminata la procedura sarà necessario disconnettere il dispositivo agendo sull’apposito menu:
1.
Premere il tasto “MENU” per accedere al menu del sistema;
2.
Muovere il cursore sulla voce “PERIFERICA DI B ACKUP” e confermare con il tasto “ENTER”;
3.
Muovere il cursore sulle voci “DRIVE USB”, “USB DVD” o “SD CARD” per selezionare il t ipo di dispositivo
collegato e premere il tasto “ENTER” per d isconnettere .
4.
A questo punto sarà possibile d isconnettere fisicamente il d ispositivo di backup dal DVR.
ATTENZIONE: Non rimuovere il DVD finchè il processo di backup non è completamente termi nato per evi tare di
danneggiare l’unità ottica.
ATTENZIONE: Non ri muovere l a peri ferica USB finchè il processo di backup non è completamente terminato.
5.3 Visualizzazione delle immagini:
Durante la fase di backup il DVR crea due cartelle sul d ispositivo, una contenente i file di backup e l’altra contenente il
visualizzatore delle immagin i (SelfPlayer). Seguire la procedura riportata di seguito per visualizzare le immagin i:
1.
Connettere il dispositivo di backup utilizzato su un PC;
2.
Avviare il software “Selfplayer” contenuto nella cartella “SelfPlayer”;
3.
Premere il tasto “FILE” quindi “OPEN”;
4.
Selezionare il file che si intende visualizzare (contenuto nella cartella “00001”) e confermare con il tasto “APRI”.
Il DVR d ivide il video di backup in più file della dimensione massima di 100Mb che possono, in seguito, essere uniti per
formare un unico file “av i” utilizzando il software “AviConverter” forn ito in dotazione.
6 Spegni mento:
15/138
Guida rapida DVR MILANO
Prima di spegnere il DVR p remere il tasto “MENU” quind i “ARRES TO” e confermare con il tasto ”ENTER”. Premere il
tasto “ENTER” nuovamente alla richiesta di conferma del comando. Solo quando il DVR mostra il messaggio “Arresto
completato. Ora è possibile spegnere il sistema”, sarà possibile spegnere il DVR utilizzando l’apposito tasto posto nel pannello
posteriore del DVR.
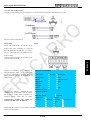
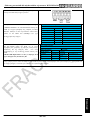
7.1 Tabella di registrazione:
Al fine di scegliere la corretta dimensione del d isco fisso da installare nel DVR si riporta una tabella con i tempi massimi d i
registrazione alla risoluzione CIF (360x288) e qualità massima (9) per ogni tipo di DVR e d imensione del disco fisso:
HDD (GB)
DVR MILANO CH4 (ore)
DVR MILANO CH9 (ore)
DVR MILANO CH16 (ore)
160
50
25
25
320
99
50
50
750
230
115
115
1000
308
154
154
ATTENZIONE: Il DVR di vi de il disco fisso in due di verse partizioni, la pri ma (70% della massima capacità del disco)
viene utilizzata per la normale registrazione mentre l a seconda (30% ) per l a registrazione in pre-allarme e pre-motion.
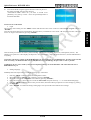
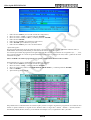
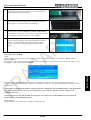
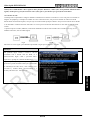
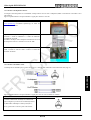
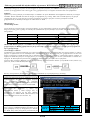
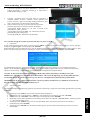
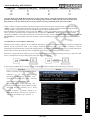
7.2 Connessione di rete:
Il DVR permette di condividere le immagin i sulla rete Ethernet oppure Internet . In ambedue i casi sarà possibile visualizzare
le immagini su un qualsiasi pc, smartphone o PDA. Nel caso si stia utilizzando un PC sarà possibile gestire fino a 4 d iversi
DVR direttamente da Internet Exp lorer senza aver b isogno di installare nessun software. Il nu mero di DVR gestibili con lo
stesso terminale cresce fino a 10 se viene installato il software fornito in dotazione. In tutti i casi è possibile gestire
direttamente i due relè d’uscita da remoto.
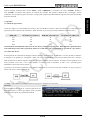
Il p rimo t ipo di connessione (Ethernet) viene effettuato utilizzando un cavo di rete incrociato tra DVR e PC (Fig.A) oppure a
mezzo d i un router, switch od hub (Fig.B).
Fig.A
Fig.B
In entramb i i casi seguire la procedura riportata di seguito per configurare la connessione
Istruzioni
Figure
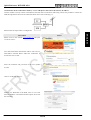
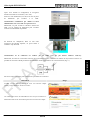
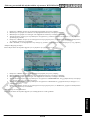
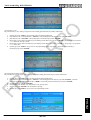
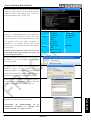
Prima d i tutto accedere ad un Pc connesso nella stessa rete
del DVR, accedere a avvio/esegui, digitare “cmd” e premere
Invio. Apparirà il pro mt dei co mandi d i MS-DOS.
16/138
ITALIANO
7 Appendice:
Guida rapida DVR MILANO
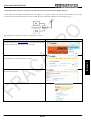
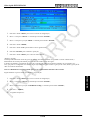
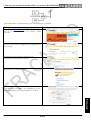
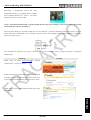
Nella videata digitare “ipconfig /all” e premere “Invio”,
apparirà la schermata riportata a lato contenente tutte le
informazioni d i rete
del
PC co me
Gateway
(Ex.
192.168.1.1), Subnet Mask (255.255.255.0) e l’indirizzo IP
ITALIANO
del PC stesso (Ex. 192.168.1.14).
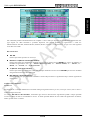
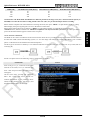
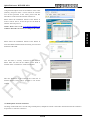
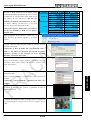
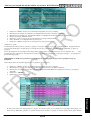
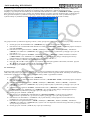
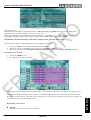
Ritornare sul DVR, premere il tasto MENU quindi
IMPOSTAZIONI e
Net type
RETE per accedere a tutta la
configurazione di rete del DVR. In questa videata inserire
Static IP
un indirizzo IP (Ex. 192.168.1.15) che non sia utilizzato da
nessun altro dis positivo di rete e gli stessi Gateway
(Ex.192.168.1.1) e Net mask (Ex. 255.255.255.0) impostati
sul PC.
PPPoE
ATTENZIONE: L’indirizzo IP che verrà assegnato al
DVR deve essere diverso da quello del PC solo
Static IP
E-mail
IP Address
Net Mask
Gateway
DNS
Username
Password
DDNS Type
URL
DDNS Username
DDNS Password
FTP
Adv.
192.168.1.15
255.255.255.0
192.168.1.1
Dynamic
nell’ulti mo numero.
Inserire l’ind irizzo IP del DVR (Ex. 192.168.1.15) nella
barra di ricerca di Internet Exp lorer e premere “Invio”.
Quando il Web browser chiederà di installare i controlli
ActiveX confermare la richiesta.
ATTENZIONE: Il flusso dati che verrà instaurato tra DVR e PC potrebbe venire bl occato dal firewall del sistema
operati vo quindi, nel caso in cui non si riesca ad accedere al DVR disabilitare la protezione del firewall.
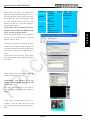
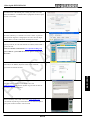
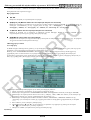
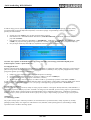
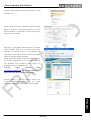
Se il browser Internet Exp lorer non dovesse riuscire a connettersi
cliccare su Strumenti / Op zioni Internet / Protezione / Siti attendibili /
Sit i, inserire l’indirizzo IP del DVR e confermare con il tasto
“Aggiungi”.
Una volta terminata la configurazione, il browser, mostrerà la finestra di
login riportata a lato.
Inserire il nome utente e la password con i quali si desidera accedere al
sistema.
ATTENZIONE: L’utente di default ha come nome utente: aa e
password:11
17/138
Guida rapida DVR MILANO
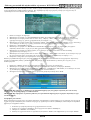
Ora sarà possibile accedere all’interfaccia web del DVR. Fare
riferimento al manuale utente per conoscere il significato di tutte le
funzioni disponibili.
da Internet Exp lorer sarà possible accedere all’interfaccia wap del DVR.
ATTENZIONE: Se la connessione viene fatta a mezzo di un cavo di rete incroci ato non inserire nessun Gateway.
Ora il DVR è correttamente connesso alla rete Ethernet ed è possible procedere al collegamento dello stesso sulla rete Internet
in modo tale da poter accedere alle stesse informazioni consultabili da rete Ethernet anche su rete Internet (Fig. C).
Seguire fedelmente i seguenti passi per configurare la connessione:
Istruzioni
Figure
Accedere al sito www.dyndns.org e creare un nuovo
account gratuito cliccando sul tasto “Create Account”.
Il sito internet invierà una mail sull’indirizzo di posta
inserito a conferma della creazione del nuovo account.
Accedere all’account appena creato inserendo username e
password scelti.
18/138
ITALIANO
Utilizzando uno smartphone, PDA o un qualsiasi browser web diverso
Guida rapida DVR MILANO
Cliccare su “Add Host Services”
auto detect IP Address” e confermare tutte le richieste
successive per attivare il nuovo Host.
Utilizzando il browser web Internet Exp lorer inserire
l’indirizzo IP del router (Gateway) e confermare con il tasto
“Invio”. Apparirà una finestra di login alle impostazion i del
router. Se non si d ispone di tali dati fare riferimento al
manuale di installazione del router .
Fare riferimento al manuale di installazione del router per
creare una regola per le porte 67, 68 e 80 relative
all’ind irizzo IP del DVR e protocollo TCP.
NOTE:
Fare
riferimento
al
sito
internet
www.portforwarding.com per conoscere la procedura
corretta alla configurazione del router.
Fare riferimento al manuale di installazione del router per
inserire le informazioni del DDNS (Dynamic DNS) co me
username, password e hostname del DVR.
19/138
ITALIANO
Scegliere un nuovo Hostname per il DVR, cliccare su “Use
Guida rapida DVR MILANO
Ora il DVR è correttamente connesso alla rete internet.
Inserire l’indirizzo web creato con il sito www.dyndns.org
(“hostname”.dyndns.org) sulla lista dei siti attendibili d i
Internet Exp lorer.
ITALIANO
Inserire l’indirizzo web creato con il sito www.dyndns.org
(“hostname”.dyndns.org) sulla barra d i ricerca di Internet
Exp lorer per poter accendere all’interfaccia web del DVR.
7.3 Connessione con dis positi vo mobile:
Le immagini del DVR possono essere visualizzate su dispositivi mob ili quali: smartphone, PDA o cellu lari connessi alla rete
internet.
Seguire fedelmente i passi riportati di seguito per instaurare la connessione:
Istruzioni
Inserire l’indirizzo web creato con il sito www.dyndns.org
(“hostname”.dyndns.org) nella barra d i ricerca del web
browser.
Figure
Apparirà una finestra di login nella quale dovranno essere
inseriti no me utente e password dell’utente configurato sul
DVR.
Scegliere la risoluzione video più adatta alle dimensioni
dello schermo del dispositivo mobile e confermare
premendo il tasto “OK”.
Ora sarà possibile accedere alle immag ini live del DVR,
gestire i relè d’uscita e conoscere lo stato degli ingressi
d’allarme.
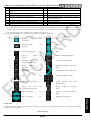
7.4 Connessione telecamera PTZ:
20/138
Guida rapida DVR MILANO
Il DVR può essere utilizzato per gestire fino a 4-9-16 telecamere PTZ utilizzando il bus RS-485 (Fig. D:).
ITALIANO
Seguire i passi riportati d i seguito per collegare correttamente le telecamere:
Instructions
Picture
Fare riferimento al manuale di installazione della
telecamera PTZ per configurare il protocollo di
comunicazione Pelco-D, Baud Rate: 4800 Bps e
indirizzo ID (da 1 a 255) che dovrà essere diverso per
ogni telecamera.
Connettere il BUS RS-485 della telecamera al pannello
posteriore del DVR co me indicato in figura.
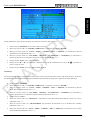
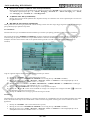
Premere “M ENU” quindi “IMPOSTAZIONI” e “RS232/422/485 Setup” sul DVR per accedere alle
impostazioni del BUS RS-485. Inserire lo stesso
protocollo di co municazione (Pelco D) e Baud rate
(4800 Bps) impostato nella telecamera.
RS-232/ 422 /485 Setup
COM Port
RS-232
Device Type
Model
Baud Rate
Data Bit
Stop Bit
Parity
Premere “M ENU” quindi “IM POSTAZIONI” e “Pre-
DVR/Camera ID
Pre-Camera Setup
Camera
REC Resoluti on
Setup”
sul
DVR
per
accedere
alle
RS-422/485
PTZ
Pelco (D-Type)
4800
8
1
None
0
720x288
impostazioni della telecamera. Inserire l’indirizzo ID
Watermar
√
Group
della telecamera PTZ collegata al rispettivo ingresso
Camera
Installed
PTZ ID
video sul DVR.
1
√
N/A
2
√
1
…
…
…
ATTENZIONE: Assicurarsi che tutte le telecamera
1234 567
PTZ abbi ano indirizzi ID di versi.
Ora la telecamera è correttamente connessa al DVR e sarà possibile gestirne le potenzialità utilizzando il teleco mando,
mouse o il software installato su PC.
21/138
Quick Reference DVR MILANO
ATTENTION: This user manual is a quick guide for the first installation of the DVR please refer to the user manual to
know the complete information of all the single functions.
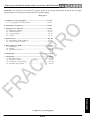
Table of contents:
1- Safety warnings ............................................................................. ........................................................ pag.23
1.1 – Content Package ...................................................................... .........................................................pag.23
2- Product Overview .................................................................................................................................. pag.23
3- Panels and remote controller .............................................................................................................. pag.24
3.1 – Front Panel ........................................................................................................................................pag.24
3.2 – Back Panel ........................................................................................................................................pag.24
3.3 – Remote controller ............................................................................................................................pag.24
3.4 – Mouse ................................................................................................................................................pag.25
5- Basic use of the DVR .............................................................................................................................. pag.29
5.1 – Search ................................................................................................................................................pag.29
5.2 – Backup ...............................................................................................................................................pag.30
5.3 – Viewing the images..........................................................................................................................pag.30
6- Shutdown .................................................................................................................................................. pag.31
7- Appendi x .................................................................................................................................................. pag.31
7.1 – Recording table ................................................................................................................................pag.31
7.2 – PC Net work connection ................................................................................................................pag.35
7.3 – Mobile phone Network connection PTZ connection ................................................................pag.35
7.4 – PTZ connection ................................................................................................................................pag.36
22/138
ENGLISH
4- Installati on ............................................................................................................................................... pag.25
4.1 – Po wer on and off .............................................................................................................................pag.25
4.2 – HDD setup ........................................................................................................................................pag.25
4.3 – First access to the DVR ..................................................................................................................pag.26
Quick Reference DVR MILANO
1. Safety warnings:
The installation of the product must be performed by qualified personnel in accordance with local laws and regulations on
safety. The product is a Class II, according to EN 60950-1.
IMPORTANT: Only trained and authorized personnel can open the product. In case of failure do not try to repair i t
otherwise the warranty will no l onger be vali d.
IMPORTANT: For your safety, disconnect the electrical outlet before movi ng the DVR, install or repl ace some
component ol'hard dri ve.
EL ECTROMAGNETIC COMPATIB ILITY
In agreement with the European Directive 2004/108/ EC (EM C), the product must be installed using equipment, cables
and accessories to meet the requirements of the Direct ive for fixed installations.
REMOVAL AND DISPOSAL OF B ATTERIES
This product contains 2 AAA alkaline batteries min i-stylus that can be removed by acting on the small tab in the back
of the remote control and a backup battery type CR2032 lithiu m battery that is in the main board of the DVR and can
be removed by acting on one side of itself.
Given the potential effects on the environment and human health effects of substances contained in batteries the user is
forced to dispose of spent batteries by using the appropriate containers for separate collection locations throughout or
at retail outlets.
EUROPEAN DIRECTIVES CONFORMIT Y
This product meets the essential requirements of European Directives 2004/ 108/ EC (Electro magnetic Co mpatibility
Directive - EM C) and 2006/95/ EC (Lo w Vo ltage Direct ive - LVD)
1.1 Content Package:
N°1 Mouse;
N°1 Remote control;
N°2 M ini stilo alkaline batteries;
N°1 Po wer supply 12V/ 8A 8A (12V/ 5A per DVR MILA NO 4);
N°1 Po wer supply cord schuko type;
N°1 CD-ROM with instruction manual and Pc software;
N°1 Quick guide;
N°12 Hard disk fixing screws
N°4 Hard disk fixing screws;
23/138
ENGLISH
- Use only the supplied network cable, installing the product so that the power plug is easily accessible.
- The product should not be exposed to dripping or splashing water and should be installed in a dry environ ment inside
buildings.
- Allow enough space around the product to ensure adequate ventilation. Excessive temperature and / or excessive heating may
affect the functioning and lifetime of the product.
- Do not install the product on or near sources of heat or in dusty or where it may co me in contact with corrosive substances.
- Hu mid ity and condensation drops can damage the product. In the case of condensation, before using the product, wait until it
is comp letely dry.
- Check all cables and wires before using a DVR. Contact your dealer if the defects are noticed.
- Do not leave unnecessary parts inside the DVR because it could cause short circuits.
- Do not block the fan and the nozzle of the DVR.
- Do not expose the DVR to direct sunlight.
- If you are unsure of the installation and setting, consult a technician.
Quick Reference DVR MILANO
2. Product Overview:
The DVR MILANO series are a family of dig ital v ideo/audio recorders designed to realize a powerfu l and secure
surveillance system that can be interfaced with d ifferent kind o f mon itors, pc and smartphones. The new type of
compression and the configurable quality guarantee a long time recording on the Hard Disk and a good quality of the
images during the playback.
The new processor allows the DVR to do six different operation like: simu ltaneous record, realtime live display, p layback,
backup, control & remote access.
It can be managed by the front panel, mouse, remote control, external keyboard, v irtual keyboard and web interface with a
Pc or a s martphone.
The two output relay can be activated by input alarm, motion, video loss, system event or directly with the mobile phone
or the web interface.
3.1 Front Panel (refer to figure 1):
Nْ
1
3
Button
DVD
Writer
(optional)
USB
Mouse
connector
USB connector
4
LEDs indicator
5
MODE
6
SEQ
7
CA LL
8
9
10
SEARCH
Remote
sensor
REC
11
Play/Pause
2
IR
Functi on
Used for backup purpose if
installed
Connect a compatible mouse
before power on the DVR
Connect a compatible storage
device such as disk drive, card
reader or DVD+RW
Indicator for Power, HDD and
NET
Toggle between live and
playback mode
Switch to or return fro m SEQ
display mode
Switch to or return fro m fu ll
screen display
Display the search menu
Receive signal fro m I/ R remote
controller
Manual recording
Nْ
12
Button
STOP
Functi on
Stop the playback
13
COPY
Start or stop backup
14
MENU / ESC
Display or ESC the menu
15
PA GE
Display in mult i-split -windows
16
LEFT / RIGHT
17
UP / BS
18
DOWN / DEL
19
20
ENTER
SPLIT Windows
+
SPLIT Windows
-
Move the cursor or Pan the
camera
Move the cursor or Tilt up the
camera or Backspace
Move the cursor or Tilt down
the camera o r Delete
Enter Key
Next split window
21
Previous split window
Play the recorded images or
pause the playback
3.2 Back Panel (refer to figure 2):
Nْ
1
2
3
4
5
Connector
4-9-16 Video BNC input
Video BNC output call and main
4 Audio input RCA
1 Audio output RCA
RS-232 connectors for Keyboard
Nْ
9
10
11
12
13
6
7
8
Video VGA output
eSATA connector for external SATA storage device
Ethernet connector for LA N connection
14
15
Connector
NTSC/PA L selector
Main S-v ideo output monitor
16 Input alarm connectors
2 Output alarm connectors
RS-485 connectors for PTZ cameras or control
keyboard
Power supply
Power switch
3.3 Remote Controller (refer to figure 3):
The remote controller is an optional accessory to ease the user’s operations. You can do all the operations by the remote
controller instead of the buttons on the front panel. The effect ive distance is about 10 meters without any obstacle.
24/138
ENGLISH
3. Panels and Remote Controller:
Quick Reference DVR MILANO
Nْ
1
Functi on
Block alarm event
Nْ
13
2
Start/Stop Recording
14
Right
3
Rewind
15
Enter
4
Forward
16
Enable or disable audio/Next
5
Play step by step
17
Level of zoo m/ Goto preset
6
Start backup or copy
informat ions
18
Adjust the volume or the zoo m
level
7
Play/pause
19
Change the division of the screen
8
Stop
20
Insert text, nu mbers or code
9
Enter menu
21
Toggle between
Playback mode
10
Esc or start PTZ mode
22
Switch or return to sequence
mode
11
Up/Backspace
23
Switch or return to full screen
mode
12
Down/Delete
24
Display the search menu
Key
Key
Functi on
Left
and
3.4 Mouse:
The DVR can be easily managed by the mouse. Please connect the mouse before connecting the power supply and then move
the cursor on the bottom of the screen to view the setup menu.
4. Installation:
4.1 HDD Setup:
Please follows the steps below for a co rrect installation of the HDD and the DVD Writer on the DVR.
Nْ
1
Instructions
Take the DVR and disconnect all the cables.
Picture
25/138
ENGLISH
Live
Quick Reference DVR MILANO
Remove all the screws (10) on the rear (4) and lateral panel (3+3).
3
Remove the cover as shown.
4
Fro m the bag of DVR accessories take the 2 brackets and fix them
on the HDD using the 4 screws.
5
Fro m the bag of DVR accessories take the 4 screws and fix the
HDD on the DVR and connect the data and power cables.
6
Return to the step number 4 to install the other 2 optional HDD.
7
It is possible to install, as optional, a DVD writer that will be
placed in the housing of the third HDD. To install this device
remove the 2 screws and the plastic cap.
8
Fro m the bag of DVR accessories take the 2 brackets, fix them on
the DVD writer and install the device on the DVR connecting the
cables.
9
Using all the screws close the cover, connect the monitor and the
power supply. Now the DVR is installed and ready to use. Please
refer to the manual to setup the time and format all the HDDs.
26/138
ENGLISH
2
Quick Reference DVR MILANO
10
Turn On the DVR using the apposite buttom on the rear panel o f
the DVR. The DVR will show the message:
“Unformatted HDDs found. Do you want to fo rmat now?
[ENTER]: Yes, [ESC]: Cancel”. Press the [ENTER] button to
format the hard disk.
4.3 First access to the DVR:
• Login
After turning on the DVR, p ress the “MENU” button and then move the cursor on the icon called " Login / Logout" and press
“ENTER”.
Now enter the name and password. Parameters fro m the factory 's installer has a user name: " aa" and password "11". Move the
cursor on "Login" and confirm by pressing “ENTER”.
ENGLISH
There are three password levels in the system, including: Administrator (h ighest), Supervisor, and Operator (lowest). The
Operator can operate live video display, the Supervisor live video display, image playback and arch ive, and the Administrator
everything.
CAUTION: The factory setti ng of the DVR takes onl y one user configured as an administrator. In order to increase the
level of security you shoul d use that user for only the first access and change the password as soon as possible.
WARNING: In case of loss of the system password please contact your local distributor who will contact Fracarro
Radi oindustrie S.p.A.
•
Setting Language
Faithfully fo llo w the steps below to configure the language of the DVR:
1.
2.
3.
4.
5.
6.
Press the “MENU” button to access the configuration menu;
Move the cursor to "SETUP” and confirm by pressing "ENTER";
Move the cursor to the "SYSTEM" and confirm by pressing "ENTER";
Using the arrow keys move the cursor to the "LANGUAGE" and press the keys "+/-" to set the desired language;
Press the “MENU” button to return to the previous menu, the DVR will be pro mpted to save the settings by pressing
the "ENTER";
Press "ENTER" to confirm the change of language. The system will restart with the new settings.
27/138
Quick Reference DVR MILANO
ENGLISH
• Adjust Date / Time:
Faithfully fo llo w the steps below to adjust the date / time:
1.
2.
3.
4.
5.
6.
Press the “MENU” button to access the configuration menu;
Move the cursor to "SETUP" and confirm by pressing "ENTER";
Move the cursor to the "SYSTEM" and confirm by pressing "ENTER";
Using the arrow keys move the cursor to the "DATE" and, using the keys "+/-" set the year, month and day;
Using the arrow keys move the cursor on "TIME" and, using the keys "+/-" set the time;
Press the “MENU” button to return to the previous menu, the DVR will be pro mpted to save the settings by pressing
the "ENTER";
• Fo rmatting the hard disk:
Faithfully fo llo w the steps below to format the hard disk:
1.
2.
3.
4.
5.
6.
Press the “MENU” button to access the configuration menu;
Move the cursor to "SETUP" and confirm by pressing "ENTER"; Move the cursor to the heading "HDD" and
confirm by pressing "ENTER";
Press the "MODE" button;
Press the "CALL" button to format the entire hard drive;
Press "ENTER" to confirm the operation;
Press the “MENU” button to return to the previous menu.
28/138
Quick Reference DVR MILANO
NOTE: The DVR is factory programmed to record continuously during the whole week.
Faithfully fo llo w the steps below to set the schedule:
1.
2.
3.
4.
5.
Press the “MENU” button to access the configuration menu;
Move the cursor to "SETUP" and confirm by pressing "ENTER";
Move the cursor to the heading "SCHEDULE RECORDING" and confirm by pressing "ENTER";
Press “MODE” button;
The following screen will appear:
This screen allow the admin istrator an easy and fast way to program the schedale recording. It is possibile, for each hour
of the week, to set the way of recording from: Alarm+Motion+Normal, A larm+Motion, Alarm, Motion, Normal, and no
Recording. I t will be recorded both audio and video.
Button description:
▲▼◄►
Press these button to move the cursor.
Numeric 1-6 (Mouse: Left click)
29/138
ENGLISH
•Setting the record:
The DVR allows different record ing modes: alarm, mot ion, continuous or scheduled. Using the last mode, the system
administrator can define, for each hour of the week, the type of registration.
In order to customize the recording schedule every day is divided into a maximu m of 16 segments (T1, ... .., T16) which can be
configured in 3 different recording modes to choose fro m: record ing video, audio+video recording or absence of registration.
Quick Reference DVR MILANO
Press these buttons to select the recording mode. Press ENTER button to activate the mode. Recording modea are:
“1” – Alarm+Motion+Normal, “2” – Alarm+Motion, “3” – Alarm, “4” – Motion, “5” – Normal, “6” – No
Recordi ng.
+/- (Mouse: Left click)
Press these buttons to select the desidered time interval. Press ENTER button to activate the recording mode on the
selected time interval.
ESC (Mouse: Right click)
Press these buttons to esc the screen and return to the previous. Time segment will be updated..
5 Basic use of the DVR:
5.1 Search:
Faithfully fo llo w the steps below to make an image search:
1.
2.
3.
4.
5.
6.
7.
Press the "SEARCH" to enter the Search menu;
Move the cursor on "SEARCH B Y TIME" and confirm by pressing "ENTER";
Move the cursor over the heading "YEAR", " MONTH", "DATE", " HOUR" and "MINUT E" to select the start date
of research using the keys "+/-";
Move the cursor over the headings "ALARM" , " MOTION", "VIDEO LOSS” and "NORMAL" to select the type of
recording you want to search using the buttons "+/-";
Press "PLAY" to start the playback;
Press the "◄" and "►" to increase or decrease the speed of display and the button "► / ▐ ▐" to pause or play the
video;
Press the "STOP" to exit the playback mode.
5.2 Backup:
The DVR permits to backup the video/audio recording on different type of external USB devices like pendrive, self-powered
HDD or DVD Writable. Please refer to the previous section to know how to install and connect all the devices:
1.
2.
3.
4.
5.
6.
Press the "SEARCH" button;
Move the cursor on "SEARCH B Y TIME" and confirm by pressing "ENTER";
Move the cursor over the heading "YEAR", " MONTH", "DATE", " HOUR" and "MINUT E" to select the start date
of research using the keys "+/-";
Move the cursor over the headings "ALARM" , " MOTION", "VIDEO LOSS” and "NORMAL" to select the type of
recording you want to search using the buttons "+/-";
Press the "COPY" button;
Move the cursor on "BACKUP SPEED" and select the value of the backup rate fro m 1 (slo w) to 9 (fast) using the
keys "+/-";
30/138
ENGLISH
The DVR allow 4 different ways to search the image like: search by time, search by event, smart search or search on archived
files.
The screen for “SEARCH B Y TIME”, on the bottom, shows the date when the recording started so it is possible to know how
long is the recording and select a specific date for search the image. It is possible to reduce the searching time by selecting the
type of recording like Alarm, Motion, Video loss or Normal.
Quick Reference DVR MILANO
7.
8.
9.
Move the cursor on "CAMERAS" to select the camera that you want to backup using the keys "+/-";
Move the cursor over the heading "YEAR", " MONTH", "DATE", " HOUR" and "MINUT E" to select the time and
date of end of backup using the keys "+/-";
Press the "COPY" to start the backup.
1.
2.
3.
4.
Press the “MENU” button to access the system menu;
Move the cursor on "BACKUP DEVICE" and confirm by pressing "ENTER";
Move the cursor over the headings "USB DRIVE" , " USB DVD" or "SD CARD" to select the type of connected
device and press "ENTER" to disconnect;
At this point you can physically d isconnect the backup device from the DVR.
CAUTION: Do not remove the DVD until the backup process is not completely finished to prevent damage to the
optical dri ve.
CAUTION: Do not remove the USB device until the backup process is not completely finished.
5.3 Viewing the i mages:
During the backup the DVR creates two folders on the device, one containing the backup files and the other containing the
display of images (SelfPlayer). Follow the steps below to view images:
1. Connect the backup device used on a PC;
2. Start the software "Selfp layer" contained in the folder "SelfPlayer";
3. Press the "FILE" then "OPEN";
4. Select the file you want to display (in the folder "00001") and confirm with the button "OPEN".
The DVR backup splits the video into mult iple files of maximu m size of 100Mb which can subsequently be joined to form a
single file "avi" using the software "AVIConverter" provided.
6 Shut down:
Before turning off the DVR, press the “MENU” button and then "SHUTDOWN" and confirm by pressing “ENTER”. Press
"ENTER" again to request for confirmation of the command. Only when the DVR displays the message "Shutdown complete.
Now you can turn off the system, you can turn off the DVR using the appropriate key on the back panel of the DVR.
7 Appendi x:
7.1 Recordi ng table:
In order to choose the correct size of hard disk to install on the DVR is a table showing the maximu m record ing time at CIF
resolution (360x288) and maximu m quality (9) for each type of DVR and hard drive size:
31/138
ENGLISH
Throughout the backup process will receive an icon and a message indicating the progress of the procedure. Once the
procedure is necessary to disconnect the device acting on the appropriate menu:
Quick Reference DVR MILANO
HDD (GB)
160
320
750
1000
DVR MILANO CH4 (hours)
50
99
230
308
DVR MILANO CH9 (hours)
25
50
115
154
DVR MILANO CH16 (hours)
25
50
115
154
ATTENTION: The DVR di vi de the HDD in two different partitions, the largest one (70% of the maxi mum capacity of
the HDD) is used for the normal recording and the other one (30% ) for pre-alarm and pre-moti on recording.
Please wait the comp lete start of the DVR befo re entering the menu, then press “MENU” in split-window d isplay to call up
Menu display, than press login/logout to access to the function of the DVR.
Please before shutting down the system press “MEN U” in split-window d isplay to call up Menu display and press
“Shutdown” then, when the DVR shows “Shutdown completed. You may turn off the system now”, it will be possible to
power off the DVR with the apposite switch on the rear panel.
The DVR can be connect to a Ethernet or Internet network. In both case it is possible to manage more DVRs fro m the same PC
and the same CMS (Central Monitorating System ) or view the image and manage the output relay directly fro m a mobile
phone or a Web browser also different fro m Internet Exp lorer.
The first type of connection is made by a cross Ethernet cable that connect the DVR (Fig.A) and the PC or by switch, hub or a
router (Fig.B):
Fig.A
Fig.B
In both case please refer to the following steps to configure the connection:
Instructions
Picture
First of all go to a pc, connected to the same
network of the DVR, access to start/run then
enter “cmd” and press Enter. The DOS p ro mpt
will appear.
On the screen enter “ipconfig /all” and press
Enter. The screen will shows all the PC
Network in formation so it is possible to know
which are the Gateway (Ex. 192.168.1.1) and
the PC IP Address (Ex. 192.168.1.14).
32/138
ENGLISH
7.2 PC Network connection:
Quick Reference DVR MILANO
Please return to the DVR , p ress MENU than
Net type
SETUP and NETWORK SETUP to access to
the “Network Setup” menu. In this screen enter
Static IP
an IP address (Ex. 192.168.1.15) that isn’t used
by other network devices and the same
Gateway (Ex.192.168.1.1) and Net mask (Ex.
255.255.255.0) o f the PC.
PPPoE
ATTENTION: The IP Address that will be
assigned to the DVR must be different from
the PC one only i n the last number.
Static IP
E-mail
IP Address
Net Mask
Gateway
DNS
Username
Password
DDNS Type
URL
DDNS Username
DDNS Password
FTP Adv.
192.168.1.15
255.255.255.0
192.168.1.1
Dynamic
ENGLISH
Please enter the IP address of the DVR (Ex.
192.168.1.15) in the search bar of Internet
Exp lorer and press Enter.
The Browser will ask to install the ActiveX
control, please confirm all the request. The
connection could be interrupt by the firewall or
the antivirus so please be sure that they aren’t
active.
If the browser won’t show the image please
insert the IP address of the DVR in the “Trusted
sites” menu.
Please insert the User ID and password of the
user that will access to the DVR.
ATTENTION: The default user is the
administrator and he has user ID: aa and
password:11
Now, using Internet Exp lorer is it possible to
view the image and manage until 4 different
DVRs.
Using Firefo x or other Web browser it is
possible to view the image, the state of the
input alarm and manage the output alarm of the
DVR.
33/138
Quick Reference DVR MILANO
ATTENTION: If the connection is made by a cross cable please don’t insert the Gateway IP address.
Now the DVR is correct ly connect to the Ethernet network, if the connection is made using a router it is possible to connect the
DVR through Internet and view the same information all over the world (Fig. C).
Please follow the steps below to configure the connection:
Picture
Please access to the website www.dyndns.org and press
“Create Account”.
An E-mail with all the informat ions will be sent to the Email address inserted. Please follo w the instructions to
activate the new account.
Insert the username and password of the new dyndns
account.
Click on “Add Host Services”
Select a new Hostname of the DVR, click on “Use auto
detect IP Address” and confirm all the requests to activate
the new Host.
34/138
ENGLISH
Instructions
Quick Reference DVR MILANO
Using Internet Explorer enter the IP Address of the router
(Gateway) and press Enter, a screen will ask to enter the
user ID and password of the router, please find this
informat ion on the instruction manual of the device.
Please follow the installation manual of the Router to
create a rule for the 67, 68 and 80 port for the DVR IP
Address and TCP p rotocol.
NOTE: Please refer to the www.portforwarding.com
website to know the correct way to configure the router
insert the DDNS informat ion like username, password and
hostname of the DVR.
Now the DVR is correctly connected to the network.
Please make sure that the IP Address of the DVR is
inserted on the “Trusted sites” of Internet Explorer
Enter the Hostname of the DVR on the search bar of
Internet Exp lorer and it will be possible to view all the
cameras.
7.3 Mobile phone network connection:
The image of the DVR can be viewed using a mobile phone, smartphone or PDA connected to the internet network. Follow the
steps below to create the connection:
35/138
ENGLISH
Please follow the installation manual of the Router to
Quick Reference DVR MILANO
Instructions
Enter the Hostname of the DVR on the search bar of the
browser of the mobile phone or PDA.
Picture
The DVR will ask the user to enter h is User ID and
Password.
Please select the best image resolution for the mobile
phone or PDA than press “OK”.
ENGLISH
Now it will be possible to view the image on the mobile
phone or PDA, manage the output relays and know the
state of the input alarm d irectly by the interface.
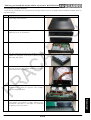
7.4 PTZ Camera connection:
The DVR can be used for manage until 4-9-16 PTZ cameras using the RS-485 cable. (Fig D:)
Please follow the steps below to connect a PTZ camera to the DVR:
Instructions
Picture
Please follow the instruction manual of the Camera to configure it with
Pelco-D Protocol, Baud Rate of 4800 bps and a ID Address (fro m 1 to
255) that will be d ifferent for each camera.
36/138
Quick Reference DVR MILANO
Connect the BUS RS-485 of the camera to the back panel of the DVR.
Press “MENU”, than “SETUP” and “RS-232/422/485
RS-232/ 422 /485 Setup
Setup” on the DVR for enter to the BUS configuration
and enter the same Protocol (Model) and Baud Rate of
the PTZ camera.
“Pre-Camera
RS-232
RS-422/485
PTZ
Pelco (D-Type)
4800
8
1
None
0
Setup” on the DVR and enter the ID Address of the
REC Resoluti on
Watermark
√
Camera
Installed
ATTENTION: Please be sure that all cameras have
1
√
di fferent ID Address.
2
√
…
…
Now the camera it is correctly connected to the DVR and is possible to manage it using
single PTZ camera.
PC software.
37/138
720x288
Group
PTZ ID
12345678
N/A
1
…
the remote controller, mouse or the
ENGLISH
Press “MENU”, than “SETUP” and
COM Port
Device Type
Model
Baud Rate
Data Bit
Stop Bit
Parity
DVR/Camera ID
Pre-Camera Setup
Guìa ràpida DVR MILANO
ATTENTION: Ce manuel est une guide rapide pour la première installat ion du DVR; se référer à le Manuel d'installation pour
les informat ions completes.
Index:
1- Avertissements de securité........................................................... ........................................................ pag.38
1.1 – Contenu de l'emballage............................................................ .........................................................pag.38
2- Descripti on du produit........................................................................................................................... pag.39
3- Descripti on des boutons ....................................................................................................................... pag.39
3.1 – Panneau frontal .................................................................................................................................pag.39
3.2 – Panneau. arrière ................................................................................................................................pag.40
3.3 – Téléco mmande .................................................................................................................................pag.40
3.4 – Souris ..................................................................................................................................................pag.41
4- Installati on ............................................................................................................................................... pag.41
4.1 – Configurat ion du disque dur ..........................................................................................................pag.42
4.2 Démmarage et arrêt .............................................................................................................................pag.43
4.3 – Premier access à le DVR ................................................................................................................pag.43
5- Utilisation de base du DVR ................................................................................................................. pag.45
5.1 – Recherche...........................................................................................................................................pag.45
5.2 – Backup ...............................................................................................................................................pag.46
5.3 – Affichage des images ......................................................................................................................pag.47
6- Arrêt .......................................................................................................................................................... pag.47
7- Annexe ....................................................................................................................................................... pag.47
7.1 – Connexion à le réseau Ethernet/Internet.......................................................................................pag.48
7.2 – Connexion au réseau de téléphone mobile ...................................................................................pag.48
7.3 – Connexion caméra PTZ ...................................................................................................................pag.52
7.4 – Connexion caméra PTZ ...................................................................................................................pag.53
ESPAÑOL
38/138
Guìa ràpida DVR MILANO
1. Avertissements de sécurité:
L'installation du produit doivent être effectués par du personnel qualifié, conformément au x lois et règlements locaux sur la
sécurité. Le produit est de classe II, selon la norme EN 60950-1.
IMPORTANT: Seulement un personnel formé et autorisé peut ouvrir le produit. En cas d'échec n'essayez pas de le
réparer sinon l a garantie ne sera plus vali de.
IMPORTANT: Pour votre sécurité, débranchez la prise électrique avant de dépl acer le DVR, installer ou rempl acer
certaines lecteur ol'hard composant.
-
Utilisez uniquement le câble fourni réseau, l'installation du produit de sorte que la fiche d'alimentation est
facilement accessible.
-
Le p roduit ne doit pas être exposé à des gouttes ou des éclaboussures d'eau et doivent être installés dans un
environnement sec à l'intérieur des bâtiments.
-
Prévoyez suffisamment d'espace autour du produit afin d'assurer une ventilation adéquate. Excessive de
température et / ou le chauffage excessif mai incidence sur le fonctionnement et la durée de vie du produit.
-
Ne pas installer le produit sur ou près de sources de chaleur ou dans un endroit poussiéreu x ou si elle mai entrer
en contact avec des substances corrosives.
-
L'humidité et les gouttes de condensation peut endommager le produit. Dans le cas de la condensation, avant
d'utiliser le p roduit, attendez qu'il soit comp lètement sec.
-
Vérifiez tous les câbles et les fils avant d'utiliser un DVR. Contactez votre revendeur si les défauts sont
remarqués.
-
Ne laissez pas de pièces inutiles à l'intérieur du DVR car elle pourrait provoquer des courts-circuits.
-
Ne bloquez pas le ventilateur et la buse de DVR.
-
Ne pas exposer le DVR d irectement au soleil.
-
Si vous n'êtes pas sûr de l'installation et de réglage, consulter un technicien.
En accord avec la directive européenne 2004/ 108/ CE (EMC), le p roduit doit être installé en utilisant des équipements,
câbles et accessoires pour répondre aux exigences de la directive pour les installations fixes.
ENLÈV EMENT ET ÉLIMINATION DES PILES
Ce produit contient 2 min i p iles alcalines AAA-stylet qui peut être enlevée en agissant sur la petite languette à l'arrière
de la téléco mmande et une batterie de secours type de pile CR2032 au lithiu m qui se trouve dans le tableau principal de
la DVR et peut être enlevée en agissant sur un côté de elle-même.
Co mpte tenu des effets potentiels sur l'environnement et la santé humaine des substances contenues dans les piles de
l'utilisateur est contraint de jeter les piles à l'aide des contenants appropriés pour les emplacements de collecte sélective
sur l'ensemble ou dans les points de vente au détail.
CONFORMITÉ AUX DIRECTIV ES EUROPÉENNES
Ce produit répond au x exigences essentielles des directives européennes 2004/108/CE (d irective sur la co mpatibilité
électro magnétique - EM C) et 2006/95/ CE (Direct ive Basse Tension - LVD)
1.1 Contenu de l'emball age
N°1 Souris;
N°1 Téléco mmande;
N°2 M ini stilo alkaline batteries;
N°1 Alimentation 12V/ 8A (5A x DVR MILANO 4);
N°1 Câble d'alimentation avec connecteur Schuko
N°1 CD-ROM avec manuel d’instruction et logiciel pour PC;
N°1 Gu ide rap ide;
N°12 vis de fixat ion HDD ;
N°4 vis de fixage du disc dur;
39/138
ESPAÑOL
COMPATIB ILITÉ ÉLECTROMAGNÉTIQUE
Guìa ràpida DVR MILANO
2. Descripti on du produit
L’enreg istreur numérique (DVR) video/audio MILANO est conçu pour des systèmes d’installations avancés et secures et
peut s’interfacer avec plusieurs types de moniteurs, PC et smartphones. Le nouveau type de compression dynamique et la
possibilité de choisir la qualité d’enregistrement assurent une longue durée de l’enregistrement sur le d isc dur et une bonne
qualité des images pendant le playback.
Le nouveau processeur permettre à le DVR d’effectuer six différents operations: enregistation simu ltanée, realt ime live
display, playback, sauvegarde, contrôle et access à distance.
On peut gérer le DVR par le panneau frontal, téléco mmande, clavier externe, clavier v irtual et interface web avec Pc ou
smartphone.
Les deux sorties à relais sont activables par les entrées d’alarme, detection de movement, perte du signal video,
événements de système ou par le téléphone portable ou l’interface web.
3. Descripti on des boutons
3.1 Panneau frontal (voir l a figure 1)
Nْ
1
2
Bouton
DVD
graveur
(optional)
Connecteur
souris USB
Connecteur USB
4
LEDs indicator
5
MODE
6
SEQ
7
CA LL
8
9
10
SEARCH
Remote
sensor
REC
11
Play/Pause
IR
Nْ
12
Bouton
STOP
Fonction
Arrête le p layback
13
COPY
Co mmence ou arrête le backup
14
MENU / ESC
Affiche ou ESC le menu
15
PA GE
16
LEFT / RIGHT
17
UP / BS
Change à ou rev ient
l’affichage à écran entiére
de
18
DOWN / DEL
Affiche le menu de récherche
Capte le
signal de la
tèlècommande I/R
Enreg istrement manual
19
20
ENTER
SPLIT Windows
+
SPLIT Windows
-
Affiche en fênetres mu lti-split
(mode QUAD)
Bouge le curseur ou tourne la
caméra
Bouge le curseur ou incline
(Pan) vers l’haut la camera/
Backspace
Bouge le curseur ou incline
(Tilt) vers le bas la camera/
Efface
Bouton de confirmation
Fênetre suivante
21
Passe les images enregistrées
ou arrête le p layback
40/138
Fênetre précédente
ESPAÑOL
3
Fonction
Utilisé pour le backup (si
installé)
Connecter
une
souris
compatible avant d’ali menter
le DVR
Connecter un dispositif de
memo ire co mpatible co mme
disk drive, lecteur de cartes ou
DVD+RW
Indicateur d’alimentation, HDD
et réseau LAN
Change entre le mode live et
playback
Change à ou rev ient de mode
d’affichage SEQ
Guìa ràpida DVR MILANO
3.2 Panneau arrière (voir la figure 2):
Nْ
1
2
3
4
5
Connecteur
4-9-16 Vidéo BNC entrées
Sortie mon iteur principal et secondaire type BNC
4 entrées audio RCA type mono
1 sortie audio RCA type mono
Connecteur RS-232 pour clav ier
Nْ
9
10
11
12
13
6
7
8
Sortie Vidéo VGA
Connecteur eSATA pour disques dur externe
Connecteur pour connexion LAN
14
15
Connecteur
Selecteur NTSC/PA L
Sortie S-vidéo pour le moniteur principal
16 Entrées d’alarme
2 sorties à relais (1 N.O. et 1 N.F.)
Connecteur BUS RS-485 pour la connexion des
PTZ caméras ou claviers de contrôle
Alimentation
Bouton d’alimentation
3.3 Télécommande (voir la figure 3):
La téléco mmande est un accessoire pour faciliter les opérations de l'utilisateur et permet de gérer jusqu’à 4 DVR. La
distance de fonctionnement est d'environ 10 mètres sans obstacle.
Nْ
1
Key
Functi on
Nْ
13
Arrête événem.d’alarme
2
14
3
Droite
15
Rewind
4
Bouton de confirmation
16
Forward
Active ou désactive audio/Next
17
Play step by step
Co mmence backup ou
copie informat ions
7
Niveau de zoom/ aller à “preset”
18
19
Play/pause
8
Change le mode de visualisation
20
Stop
10
Réglage du volu me ou du niveau
de zoo m
Accède à le menu
principal
Accède à le menu de
géstion des caméras PTZ
11
Entre text , no mbres ou côdes
21
22
23
Haut/Backspace
12
Change entre Live et Playback
mode
Passe ou retourne à le mode
sequence
Passe ou retourne à le mode à
écran entier
24
Bas/Delete
Affiche le menu de récherche
3.4 Souris:
Le DVR peut être facilement géré par la souris. Bouger le curseur en bas de l'écran pour afficher le menu de configuration.
Attenti on: Connecter l a souris avant de brancher le câble d'ali mentation
41/138
ESPAÑOL
5
9
Functi on
Gauche
Start/Stop enregistrement
6
Key
Guìa ràpida DVR MILANO
4 Installati on:
4.1 Configuration du dis que dur (HDD):
Suivre les étapes suivantes pour une correcte installation d’un ou plus d’HDD ou du graveur DVD dans le DVR.
Instructions
Placer le DVR sur le banc de travail et débrancher tous les câbles
2
Retirer toutes les vis (10) à l'arrière (4) et à le panneau latéral (3
+3).
3
Retirer le couvercle comme indiqué.
4
Prendre (entre les accessoires) les 2 appuis et les fixer sur le
disque dur en utilisant les 4 vis.
5
Prendre (entre les accessoires) les 4 vis et fixer le disc dur sur le
DVR; connecter les câbles de données et de l'alimentation
6
Retourner à l'étape 4 pour installer les 2 disques dur optionales,
qui seron connectés comme en figure.
7
Il y a la possibilité d'installer, en option, un graveur de DVD, qui
sera placé dans le logement de le troisième disque dur. Pour
installer ce d ispositif enlever les 2 v is et le couvercle en p lastique.
42/138
Picture
ESPAÑOL
Nْ
1
Guìa ràpida DVR MILANO
8
Prendre (entre les accessoires DVR) les 2 appuis, les fixer sur le
graveur de DVD et installer le dispositif sur le DVR en connectent
les cables des donnés et d’alimentation.
9
En utilisant toutes les vis fermer le couvercle, connecter le
moniteur et l'alimentation. Maintenant, le DVR est installé et prêt
à l'emp loi. Se référer au manuel d'installation pour rég ler l'heure et
formater tous les disques dur.
Tournez sur le DVR utilisant la Buttom pertinente sur le panneau
arrière
du
DVR.
Le
DVR affiche
le
message:
"Non formaté disques durs trouvés. Ne vous souhaitez formater
maintenant? [ENTRER]: Oui, [Echap]: Annuler ". ENTRER
Appuyez sur la touche [] pour fo rmater le d isque dur.
10
4.3 premier accès au DVR:
• Connexion
Après avoir allu mé le magnétoscope numérique, appuyez sur le bouton "MENU" , puis déplacez le cu rseur sur l'icône
"Connexi on / Déconnexion" et appuyez sur "ENTRER".
Entrez maintenant le nom et le mot de passe. Paramètres de l'usine de l 'installateur a un nom d'utilisateur: "AA" et mot de
passe "11". Déplacez le curseur sur "Login" et confirmez en appuyant sur "ENTRER".
ESPAÑOL
Il existe trois niveau x de mot de passe dans le système, y co mpris: Ad ministrateur (plus élevé), superviseur et l'opérateur (plus
bas). L'opérateur peut utiliser l'affichage vidéo en direct, le contrôleur d'affichage vidéo en direct, la lecture des images et
d'archivage, et le tout admin istrateur.
ATTENTION: Le réglage d'usine du DVR suffit d' un seul utilisateur configuré en tant qu' administrateur. Afin
d' accroître le ni veau de sécurité que vous devez utiliser que l'utilisateur que pour le premier accès et changer le mot de
passe dès que possible.
ATTENTION: En cas de perte du mot de passe système s'il vous plaît contacter votre distri buteur l ocal qui prendra
contact avec Fracarro Radi oindustrie SpA
• Régler la langue
Suivre fidèlement les étapes ci-dessous pour configurer la langue du DVR:
43/138
Guìa ràpida DVR MILANO
1.
Appuyez sur le bouton "MEN U" pour accéder au menu de configurat ion;
2.
Déplacez le curseur sur "SETUP" et confirmez en appuyant sur "ENTRER";
3.
Déplacez le curseur sur le «système» et confirmez en appuyant sur "ENTRER";
4.
Utiliser les touches fléchées déplacent le curseur vers le «langage» et appuyez sur les touches "+/-" pour définir la
langue souhaitée;
5.
Appuyez sur le bouton "MENU" pour revenir au menu précédent, le DVR sera invité à enregistrer les paramètres en
appuyant sur la touche "ENTRER";
6.
Appuyez sur "ENTRER" pour confirmer le changement de langue. Le système va redémarrer avec les nouveaux
paramètres.
• Ajuster la date / heure:
Suivre fidèlement les étapes ci-dessous pour régler la date / heure:
ESPAÑOL
1.
2.
3.
4.
5.
6.
Appuyez sur le bouton "MENU" pour accéder au menu de configuration;
Déplacez le curseur sur "SETUP" et confirmez en appuyant sur "ENTRER";
Déplacez le curseur sur le «système» et confirmez en appuyant sur "ENTRER";
Utiliser les touches fléchées déplacent le curseur à la "DATE" et en utilisant les touches "+/-" régler l'année, le mois
et le jour;
Utiliser les touches fléchées déplacent le curseur sur "Time" et en utilisant les touches "+/-" régler l'heure;
Appuyez sur le bouton "MENU" pour revenir au menu précédent, le DVR sera invité à enregistrer les paramètres en
appuyant sur la touche "ENTRER ";
• Formatage du disque dur:
Suivre fidèlement les étapes ci-dessous pour formater le d isque dur:
44/138
Guìa ràpida DVR MILANO
1.
2.
3.
4.
5.
6.
7.
Appuyez sur le bouton "MENU" pour accéder au menu de configuration;
Déplacez le curseur sur "SETUP" et confirmez en appuyant sur "ENTRER";
Déplacez le curseur sur la rubrique "HDD" et confirmez en appuyant sur "ENTRER";
Appuyez sur le bouton "MODE";
Appuyez sur la touche "" pour formater le d isque dur entier;
Appuyez sur "ENTRER" pour confirmer l'opération;
Appuyez sur le bouton "MENU" pour revenir au menu précédent.
• Réglage de la notice:
Le DVR permet les modes d'enregistrement différents: alarme, le mouvement, continu ou régulier. En utilisant le dernier mode,
l'ad ministrateur système peut définir, pour chaque heure de la semaine, le type d'enregistrement.
Afin de personnaliser les enregistrements programmés chaque jour est divisé en un maximu m de 16 segments (T1, ... .., T16),
qui peut être configuré en 3 modes d'enregistrement différents au choix: l'enreg istrement vidéo, audio + enregistrement vidéo
ou l'absence de l'enregistrement.
REMARQUE: Le DVR est programmé en usine pour enregistrer en permanence pendant toute la semaine.
Cet écran donne à l'ad min istrateur un moyen simple et rapide pour lancer l'enregistrement horaire. Pour chaque heure de la
semaine, vous pouvez définir un mode d'enregistrement différents à choisir entre: A larme + mot ion + Normal, Alarme +
motion, A larme, Motion, normal, et pas d'inscription. Dans tous les cas seront enregistrées à la fois la vidéo et l'audio.
45/138
ESPAÑOL
Suivre fidèlement les étapes ci-dessous pour définir la plan ification:
a. Appuyez sur le bouton "MENU" pour accéder au menu de configuration;
b. Déplacez le curseur sur "SETUP" et confirmez en appuyant sur "ENTRER";
c. Déplacez le curseur sur la rubrique "Enreg istrement programmé" et confirmez en appuyant sur "ENTRER";
d. Appuyez sur la touche “MODE”;
e. L'écran suivant apparaît:
Guìa ràpida DVR MILANO
Descripti on de la pièce:
▲▼◄►
Appuyez sur ces boutons pour déplacer le curseur.
Numériques 1-6 (souri s: Cliquez sur le bouton gauche de la souri s)
Appuyez sur ces touches pour sélectionner le mode d'enregistrement. Appuyez sur la touche ENTER pour activer le
mode. Les procédures d'enregistrement sont les suivantes: "1" - Al arme + moti on + Normal, "2" - Alarme +
moti on, "3" - Systèmes d'al arme, "4" - Motion, "5 " - Normal, "6 " - No enregistrement.
+ / - (Souris: Cliquez sur le bouton gauche de la souri s)
Appuyez sur ces touches pour sélectionner l'intervalle de temps souhaité. Appuyez sur la touche ENTER pour act iver
le mode d'enregistrement sélectionné gamme.
ESC (souri s: cliquez le bouton droit)
Appuyez sur ce bouton pour quitter cet écran et revenir à l'année précédente. Les segments de temps canalisera jour
en conséquence.
5 L'utilisation de base du DVR:
5.1 Recherche:
Le DVR permettent 4 façons différentes à la recherche de l'image co mme: recherche par le temps, une recherche par
événement, de recherche à puce ou de recherche sur les fichiers archivés.
L'écran de «recherche par TIM E», sur le fond, indique la date à laquelle l'enreg istrement a co mmencé il est donc possible de
savoir co mbien de temps est l'enregistrement et sélectionnez une date précise pour la recherche de l'image. Il est possible de
réduire le temps de recherche en sélectionnant le type d'enregistrement comme d'alarme, de mouvement, perte v idéo ou
Normal.
ESPAÑOL
Suivre fidèlement les étapes ci-dessous pour faire une recherche d'images:
1.
2.
3.
4.
5.
6.
7.
Appuyez sur "Recherche" pour accéder au menu de recherche;
Déplacez le curseur sur «RECHERCHE PAR TEMPS" et confirmez en appuyant sur "ENTRER";
Déplacez le curseur sur la rubrique "Année", "month", "Date", "heure" et "minute" pour sélectionner la date de
début de la recherche en utilisant les touches "+/-";
Déplacez le curseur sur les rubriques «alerte», «mouvement», « perte de signal vi déo" et "NORMAL" pour
sélectionner le type d'enregistrement que vous souhaitez effectuer une recherche en utilisant les boutons "+/-";
Appuyez sur "PLAY" pour démarrer la lecture;
Appuyez sur "◄" et "►" pour augmenter ou diminuer la vitesse d'affichage et le bouton "► / ▐ ▐" pour mettre en
pause ou jouer de la vidéo;
Appuyez sur la touche «STOP» pour quitter le mode de lecture.
5.2 Backup:
Le DVR permet de sauvegarder de la vidéo / enregistrement audio sur différents types de périphériques externes USB co mme
46/138
Guìa ràpida DVR MILANO
pendrive, auto-alimenté disque dur ou DVD enreg istrable. S'il vous plaît se référer à la section précédente pour savoir
comment installer et raccorder tous les appareils:
1.
2.
3.
4.
5.
6.
7.
8.
9.
Appuyez sur le bouton "Rechercher";
Déplacez le curseur sur «RECHERCHE PAR TEMPS" et confirmez en appuyant sur "ENTRER";
Déplacez le curseur sur la rubrique "Année", "month", "Date", "heure" et "minute" pour sélectionner la date de
début de la recherche en utilisant les touches "+/-";
Déplacez le curseur sur les rubriques «alerte», «mouvement», « perte de signal vi déo" et "NORMAL" pour
sélectionner le type d'enregistrement que vous souhaitez effectuer une recherche en utilisant les boutons "+/-";
Appuyez sur le bouton "Copier";
Déplacez le curseur sur «Sauvegarde à grande vitesse" et sélectionnez la valeur du tau x de sauvegarde de 1 (faible) à
9 (rapide) en utilisant les touches "+/-".
Déplacez le curseur sur «appareils photo» pour sélectionner la caméra que vous voulez sauvegarder en utilisant les
touches "+/-";
Déplacez le curseur sur la rubrique "Année", "month", "Date", "heure" et "minute" pour sélectionner l'heure et la
date de fin de sauvegarde en utilisant les touches "+/-";
Appuyez sur la "copie" pour lancer la sauvegarde.
1.
2.
3.
4.
Appuyez sur le bouton "MENU" pour accéder au menu du système;
Placez le curseur sur "périphérique de sauvegarde" et confirmez en appuyant sur "ENTRER";
Déplacez le curseur sur les rubriques "USB Dri ve, USB DVD" ou "Carte SD" pour sélectionner le type de
périphérique connecté et appuyez sur "ENTRER" pour vous déconnecter.
A ce stade, vous pouvez déconnecter physiquement le périphérique de sauvegarde de la DVR.
ATTENTION: Ne retirez pas le DVD tant que la procédure de sauvegarde n'est pas complètement termi né pour éviter
d'endommager le lecteur opti que.
ATTENTION: Ne retirez pas le péri phéri que USB avant que le processus de sauvegarde n'est pas complètement
termi né.
47/138
ESPAÑOL
Tout au long du processus de sauvegarde recevront une icône et un message indiquant l'état d'avancement de la procédure. Une
fois la procédure est nécessaire de débrancher le dispositif agissant sur le menu approprié:
Guìa ràpida DVR MILANO
5.3 Affichage des images:
Lors de la sauvegarde du DVR crée deu x dossiers sur l'appareil, l'un contenant les fichiers de sauvegarde et l'autre contenant
l'affichage d'images (SelfPlayer). Suivez les étapes ci-dessous pour visualiser les images:
1. Branchez le périphérique de sauvegarde utilisé sur un PC;
2. Lancez le logiciel "Selfpl ayer" figurant dans le dossier "SelfPlayer";
3. Appuyez sur "Fichier" puis "Ouvrir";
4. Sélectionnez le fichier que vous voulez afficher (dans le dossier "00001") et validez avec la touche "OPEN".
La sauvegarde DVR fractionne la vidéo en plusieurs fichiers d'une taille maximu m de 100 Mb qui peut ensuite être réunis pour
former un seul fich ier "avi" en utilisant le logiciel "AVIConverter" fournis.
6 Arrêt:
Avant d'éteindre le magnétoscope numérique, appuyez sur le bouton "MENU", puis "shutdown" et confirmez en appuyant sur
"ENTRER". Appuyez sur " ENTRER" de nouveau à une demande de confirmation de la co mmande. Ce n'est que lorsque le
DVR affiche le message «Arrêt complet. Maintenant, vous pouvez désactiver le système, vous pouvez désactiver le DVR
utilisant la touche correspondante sur le panneau arrière du DVR.
7 Annexe:
7.1 Tableau d'enregistrement:
Afin de choisir la taille correcte du disque dur à installer sur le DVR est un tableau indiquant la durée d'enregistrement
maximale à une résolution CIF (360x288) et la qualité maximale (9) pour chaque type de DVR et de la taille du disque dur:
HDD (GB)
DVR MILANO CH4 (heures)
DVR MILANO CH9 (heures)
DVR MILANO CH16 (heures)
160
50
25
25
320
99
50
50
750
230
115
115
1000
308
154
154
7.2 Connexion à le réseau Ethernet/Internet:
Le DVR peut être connecté au réseau Ethernet ou Internet. Dans les deux cas, il est possible visualiser les images sur tous PC,
smartphone ou PDA. Si on utilise un PC, on peut gérer jusqu'à 4 différents DVR par Internet Exp lorer sans avoir à installer de
logiciel. Le no mbre de DVR gérés avec le même terminal pousse jusqu'à 10 si on a installé le logiciel fourni. Dans tous les cas,
on peut gérer les deux relais de sortie à distance.
Le premier type de connexion est realisé par un câble Ethernet du type cross qui connecte le DVR à le PC (Fig.A ) ou par un
switch, hub ou un routeur (Fig.B):
Fig.A
Fig.B
Dans les deux cas, se référer à la p rocédure suivante pour configurer la connexion:
48/138
ESPAÑOL
ATTENTION: Le DVR di viser le dis que dur en deux partitions différentes, la plus grande (70% de l a capacité
maxi male du dis que dur) est utilisé pour l'enregistrement normal et l'autre (30% ) pour les pré-al arme et de préenregistrement du mouvement.
Guìa ràpida DVR MILANO
Instructions
Picture
Tout d'abord accéder à un PC connecté a le même réseau
de le DVR, accèder à Démarrer / Exécuter puis entrer
"cmd" et appuyer sur Enter. Le pro mpt de DOS apparaît.
Sur l'écran, entrer " ipconfig / all" et appuyer sur Enter.
L'écran affiche toutes les informations du réseau du PC
et il sera possible de savoir, par ex. le gateway (ex.
192.168.1.1), Subnet Mask (255.255.255.0) et l’adresse
IP du PC (ex. 192.168.1.14).
Revenir à le DVR, appuyer MENU puis SETUP et infin
Net type
NETWORK SETUP pour accéder à la Configuration de
réseau du DVR. Entrer une adresse IP (ex 192.168.1.15)
Static IP
qui ne soit pas utilisée par les autres péri phéri ques
du réseau et le même Gateway (Ex.192.168.1.1) et Net
mask
(Ex.
255.255.255.0)
de
l'ordinateur.
ATTENTION: l'adresse IP qui sera attri buée à le
PPPoE
DVR doi t être di fférente de l’adresse du PC seulment
Entrer l'adresse IP de le DVR (Ex. 192.168.1.15) dans la
barre de recherche d'Internet Explorer et appuyer sur
Enter.
Le navigateur vous demandera d'installer le contrôle
ActiveX, confirmer la demande. La connexion peut être
interro mpue par le firewall ou l'antiv irus. Verifier qu'ils
ne sont pas actifs.
Si le navigateur n’affiche pas l'image, insérer l'adresse
IP du DVR dans le menu "Sites de confiance".
49/138
FTP
Adv.
192.168.1.15
255.255.255.0
192.168.1.1
Dynamic
ESPAÑOL
dans le dernier numéro.
Static IP
E-mail
IP Address
Net Mask
Gateway
DNS
Username
Password
DDNS Type
URL
DDNS Username
DDNS Password
Guìa ràpida DVR MILANO
Après avoir terminé la configuration, le navigateur
affiche une fenêtre de connexion (voir à côté).
Insérer le code d'utilisateur (User ID) et le mot de passe
de
l'utilisateur
que
accèdera
à
le
DVR.
ATTENTION: L'utilisateur par défaut est aussi
Administrator et il a User ID: aa et password: 11
Maintenant, on peut accéder à l’interface Internet du
DVR. Vo ir le manuel de l'utilisateur pour connaitre
toutes les fonctionnalités disponibles.
En utilisant un smartphone, PDA ou tout autre
navigateur que Internet Exp lorer, on peut accéder à
l’interface wap du DVR.
ATTENTION: Si
la connexion
est réalisée
par
un câble
cross
ne
pas
insérer
l'adresse
Gateway.
Maintenant, le DVR est correctement connecté au réseau Ethernet; si la connexion est réalisée au moyen d'un routeur il est
possible de connecter le DVR par Internet et afficher les mêmes informations sur le réseau Internet (Fig. C:).
ESPAÑOL
Suivre les étapes ci-dessous pour configurer les paramètres de connexion:
Instructions
Image
Accèder au site www.dyndns.org et créer un nouveau compte
gratuity en appuyant sur “Create Account”.
Un E-mail avec toutes les informations sera envoyée à l'adresse email insérée. Suivre les instructions pour activer le nouveau compte.
50/138
Guìa ràpida DVR MILANO
Insérer username et password du nouveau compte dyndns.
Cliquer sur "Add Host Services"
Sélectionner un nouvel Hostname du DVR, cliquer sur “Use auto
detect IP Address” («Utiliser la détection automatique des adresses
IP") et confirmer toutes les demandes d'activer le nouvel host.
Suivre le manuel d'installation du router pour créer une règle pour les
portes 67, 68 et 80 pour l’adresse IP du DVR et le protocole TCP.
NOTE: se référer à le site www.portforwarding.com pour les
informati ons sur une propre configuration du router.
Suivre le manuel d'installation du router pour entrer les informations
DDNS: username, password et l’hostname du DVR.
51/138
ESPAÑOL
En utilisant Internet Explorer entrer l'adresse IP du router (Gateway)
et appuyer sur Enter. On demandera d'entrer l'user ID et la password
du router. Cettes informat ions se trouvent dans le manual d'emp loi
de l'appareil.
Guìa ràpida DVR MILANO
Maintenant, le DVR est correctement connecté au réseau Internet.
S'assurer que l'adresse IP du DVR soit inséré sur les "Trusted
sites”/Sites de confiance" d'Internet Explorer
Entrer l’adresse web obtenu par le site www.dyndns.org
(“hostname”.dyndns.org) sur la barre de recherche d'Internet
Exp lorer: il sera possible visualiser l’interface web du DVR.
7.3 Connexion au réseau de téléphone mobile:
Les images de le DVR peuvent être visualisées en utilisant un téléphone mobile, smartphone ou PDA connecté au réseau
Internet. Suivre les étapes ci-dessous pour créer la connexion:
Le DVR demandera à l'utilisateur d'entrer username et password configures
sur le DVR.
Choisir la meilleure résolution d'image pour l’écran du téléphone mobile ou
PDA; enfin, appuyer sur "OK".
.
Maintenant, il sera possible de visualiser l'image sur le téléphone mobile ou
PDA, gérer les sorties à relais et connaitre l'état des entrées d'alarme.
52/138
Image
ESPAÑOL
Instructions
Entrer
l’adresse
web
obtenu
par
le
site
www.dyndns.org
(“hostname”.dyndns.org) sur la barre de recherche du navigateur du téléphone
mobile ou PDA.
Guìa ràpida DVR MILANO
7.4 Connexion Caméra PTZ:
Le DVR peut être utilisé pour gérer jusqu'à 4-9-16 caméras PTZ en utilisant le BUS RS-485 (Fig. D).
Suivre les étapes ci-dessous pour connecter les caméras PTZ à le DVR:
Instructions
Image
Suivre les instructions du manuel de la
caméra PTZ pour configurer le protocole
Pelco-D, Baud rate de 4800 bps et l’adresse
ID (de 1 à 255) qui devra être différente pour
chaque caméra.
Connecter le BUS RS-485 de la caméra sur le
panneau arrière du DVR.
Appuyez sur "MENU", "SETUP" et "préCamera Setup" sur le DVR et entrer l’adresse
ID de chaque caméra PTZ connectée à la
rispettive entrée video sur le DVR.
ATTENTION: verifier que toutes
caméras ont différentes ID Adresse.
les
ESPAÑOL
Appuyez sur "MENU", puis "SETUP" et
"RS-232/ 422/485 Setup" sur le DVR pour
acceder à la configuration du BUS. Entrer le
même protocole (Model) et baudrate de la
caméra PTZ.
RS-232/ 422 /485 Setup
COM Port
Device Type
Model
Baud Rate
Data Bit
Stop Bit
Parity
DVR/Camera ID
Pre-Camera Setup
RS-232
REC Resoluti on
Watermark
√
Camera
Installed
1
√
2
√
…
…
RS-422/485
PTZ
Pelco (D-Type)
4800
8
1
None
0
720x288
Group
PTZ ID
N/A
1
…
12345678
Maintenant, la caméra est correctement connectée à le DVR et il est possible de la gérer à l'aide de la téléco mmande,
souris ou du logiciel PC.
53/138
Guìa ràpida DVR MILANO
ATENCIÓN: Este manual es una guía para la primera instalación del DVR. Consulte el manual del usuario para la
descripción completa de todas las funciones.
Índice:
1- Advertenci as de seguridad ......................................................... ........................................................pág. 53
1.1 – Contenido del embalaje .......................................................... ........................................................pág. 53
2- Descripción del producto ........................................................................................................................pág. 57
3- Descripción botones ..................................................................................................................................pág. 57
3.1 – Panel delantero ................................................................................................................................pág. 57
3.2 – Panel trasero ....................................................................................................................................pág. 57
3.3 – Mando a distancia ...........................................................................................................................pág. 57
3.4 – Ratón .................................................................................................................................................pág. 58
4- Instal ación ...................................................................................................................................................pág. 58
4.1 – Instalación disco fijo ......................................................................................................................pág. 58
4.2 – Encendido y apagado......................................................................................................................pág. 59
5- Utilización básica del DVR ......................................................................................................................pág. 62
5.1 – Búsqueda ..........................................................................................................................................pág. 63
5.2 – Reproducción ..................................................................................................................................pág. 63
5.3 – Copia de seguridad .........................................................................................................................pág. 64
6- Cierre ............................................................................................................................................................pág. 64
54/138
ESPAÑOL
7- Apéndice ......................................................................................................................................................pág. 64
7.1 – Tabla de grabación ........................................................................................................................pág. 64
7.2 – Conexión con dispositivo móvil ..................................................................................................pág. 64
7.3 – Conexión cámara PTZ ...................................................................................................................pág. 68
7.4 – Conexión cámara PTZ ...................................................................................................................pág. 68
Guìa ràpida DVR MILANO
1. Advertencias de seguridad:
La instalación del producto debe ser realizado por personal cualificado de acuerdo con las leyes y reglamentos locales en
materia de seguridad. El producto es de Clase II, según EN 60950-1.
IMPORTANTE: Sólo personal capacitado y autorizado puede abrir el producto. En caso de avería, no intente
reparar en caso contrari o la garantí a no será váli da.
IMPORTANTE: Para su seguri dad, desconecte l a toma de corriente antes de mover el DVR, instal ar o reempl azar
algunos uni dad ol'hard componente.
-
Utilice sólo el cable de red suministrado, la instalación del producto para que el cable de alimentación sea fácilmente
accesible.
El producto no debe ser expuesto a goteos o salpicaduras de agua y debe ser instalado en un ambiente seco dentro de
los edificios.
Deje espacio suficiente alrededor del producto para asegurar una ventilación adecuada. La temperatura excesiva y / o
calor excesivo puede afectar el funcionamiento y la vida útil del producto.
No instale el producto en o cerca de fuentes de calor o en polvo o donde pueda entrar en contacto con sustancias
corrosivas.
La hu medad y las gotas de condensación puede dañar el producto. En el caso de la condensación, antes de usar el
producto, espere hasta que esté completamente seco.
Co mpruebe todos los cables y los cables antes de usar un DVR. Contacte a su distribuidor si se notan los defectos.
No deje a las partes innecesarias en el interior del DVR, ya que podrían causar cortocircuitos.
No bloquee el ventilador y la boquilla de la DVR.
No exponga el DVR a la luz solar directa.
Si no está seguro de la instalación y configuración, consulte a un técnico.
COMPATIB ILIDAD EL ECTROMAGNÉTICA
De acuerdo con la Directiva Europea 2004/108/ CE (EM C), el producto debe ser instalado utilizando equipos, cables y
accesorios para satisfacer los requisitos de la Directiva para las instalaciones fijas.
EXTRACCIÓN Y ELIMINACIÓN DE LAS PILAS
Este producto cumple con los requisitos esenciales de las Directivas Europeas 2004/ 108/ CE (Direct iva de co mpatibilidad
electro magnética - EM C) y 2006/95/CE (Directiva de baja tensión - LVD)
1.1 Conteni do del embal aje:
N.°1 Ratón
N.°1 Mando a distancia
N.°2 Pilas miniestilo alcalinas (AAA)
N.°1 A limentador 12 V/ 8 A (5A x DVR MILANO 4);
N.°1 Cab le de alimentación con conector Schuko
N.°1 CD-ROM con manual de instrucciones y software PC
N.°1 Guía rápida
N°12 tornillos de fijación de disco duro
N.°4 To rnillos de fijación HDD
55/138
ESPAÑOL
Este producto contiene 2 pilas alcalinas AAA mini-láp iz óptico que puede ser removido por actuar en la pequeña pestaña de
la parte posterior del control remoto y un tipo de batería de respaldo de batería de lit io CR2032 que está en el tablero
principal
del
DVR,
y
puede
ser
remov ido
por
actuar
en
un
lado
de
sí
mis mo.
Teniendo en cuenta los posibles efectos sobre el med io ambiente y la salud humana de las sustancias contenidas en pilas
que el usuario se ve obligado a deshacerse de las pilas mediante el envase adecuado para lugares de recogida selectiva en
todo o en tiendas especializadas.
CONFORMIDAD CON LAS DIRECTIVAS EUROPEAS
Guìa ràpida DVR MILANO
2. Descripción del producto:
El nuevo DVR MILA NO se ha concebido para realizar un sistema de v ideovigilancia fiable, seguro e interconectable con
distintos tipos de monitores, ordenadores y teléfonos móviles.
El nuevo tipo de compresión dinámica utilizada y la posibilidad de ajustar el nivel de calidad de la g rabación garantizan un
largo tiempo de grabación en el disco y una óptima calidad de las imágenes durante la reproducción.
El nuevo microprocesador le permite al DVR realizar seis operaciones distintas como: grabación, reproducción,
visualización de las imágenes en tiempo real, copia de seguridad, control y acceso remoto.
Puede dirig irse desde el panel delantero, el ratón, el mando a distancia, el teclado externo, el teclado virtual y la interfaz
web vía PC o el teléfono inteligente.
Los dos relés de salida pueden activarse por una entrada de alarma, detección del movimiento, pérd ida de imagen, eventos
de sistema o directamente por un teléfono inteligente o una interfaz web.
3. Descripción botones:
3.1 Panel delantero (véase la figura 1):
Botón
Masterizador
(opcional)
Función
Utilizado
para copia
seguridad de los datos
2
Puerto USB para
conexión ratón
Puerto USB
Conectar un ratón compatible
antes de encender el DVR
Conectar una memoria de masa
compatible co mo: pendrive
USB, lector de MMC/SD card o
masterizador
DVD
+RW
externo
Indicadores para alimentación,
disco fijo y red LAN
Pasar de la modalidad live a
reproducción
3
4
de
de
N.ْ
12
Botón
STOP
Función
Interru mpir la reproducción
13
COPY
Iniciar la copia de seguridad
14
MENU/ ESC
Visualizar o salir del Menú
principal
15
PA GE
16
LEFT/RIGHT
Visualización en la modalidad
quad
Movimiento del cursor o Pan de
la cámara PTZ hacia la
izquierda
Movimiento del cursor o Tilt de
la
cámara
PTZ
hacia
arriba/Retroceder
Movimiento del cursor o Tilt de
la
cámara
PTZ
hacia
abajo/Borrar
Tecla de confirmación
Pantalla sucesiva
5
Indicador
LED
MODE
6
SEQ
Pasar o volver a la modalidad
secuencia vídeo
17
UP/ BS
7
CA LL
Pasar o volver de la modalidad
pantalla co mpleta
18
DOWN / DEL
8
9
Visualiza el menú Búsqueda
Receptor de la señal procedente
del mando
Grabación manual
19
20
10
SEARCH
Sensor
remoto
REC
ENTER
SPLIT Windows
+
SPLIT Windows
-
11
Play/Pause
IR
Reproducción/Pausa
imágenes grabadas
de
21
Pantalla anterior
las
3.2 Panel trasero (véase la figura 2):
N.ْ
1
2
3
4
5
Conectores
4-9-16 Entradas Vídeo BNC
Salida monitor principal y secundario tipo BNC
4 entradas audio RCA tipo mono
1 salida audio RCA t ipo mono
Conector RS-232 para teclado
N.ْ
9
10
11
12
13
6
7
8
Salida vídeo VGA
Conector eSATA para discos externos
Conector red LAN
14
15
56/138
Conectores
Selector NTSC/PA L
Salida monitor principal tipo S-video
16 entradas de alarma
2 relés de salida (1 NA y 1 NC)
Conector BUS RS-485 para conexión de las
cámaras PTZ o teclados
Conector de alimentación
Botón de encendido
ESPAÑOL
N.ْ
1
Guìa ràpida DVR MILANO
3.3 Mando a distancia (véase la figura 3):
El mando a distancia es un accesorio que simp lifica de manera notable la gestión y la programación del DVR. Con el
mis mo dispositivo se podrán dirigir hasta cuatro DVR. Se aconseja no superar la distancia máxima de 10 m del mando a
distancia al DVR.
A continuación se indican todas las funciones de los distintos botones.
Nْ
1
Functi on
Bloqueo del evento de
alarma
Nْ
13
2
Inicio/Interrupción
grabación
14
Derecha
3
Hacia at rás
15
Botón confirmación
4
Hacia adelante
16
Habilitar
audio/Next
5
Avance fotograma
fotograma
a
17
Función zoo m/preajuste
6
Inicio copia de seguridad
o copia de la información
18
Regulación volu men o nivel de
zoo m
7
Reproducir/pausa
19
Camb io
modalidad
visualización
8
Parar
20
Introducción texto, nú meros o
códigos
9
Acceso al menú principal
21
Paso de modalidad
Reproducción
10
22
Selecciona o vuelve
modalidad secuencia
11
Acceso al menú de
gestión de las cámaras
PTZ
Arriba/Retroceder
12
Abajo/Borrar
Key
Key
Functi on
Izquierda
o
deshabilitar
de
a
a
la
23
Selecciona o vuelve a
modalidad pantalla co mp leta
la
24
Visualiza el menú búsqueda
3.4 Ratón:
El DVR puede dirigirse fácilmente desde el ratón. Para acceder al menú de configuración ponga el cursor del ratón hacia la
parte inferior de la pantalla. A TENCIÓN: Conecte el ratón antes de encender el DVR.
4 Instalaci ón:
4.1 Instalaci ón disco fijo:
Siga fielmente los pasos que se indican a continuación para efectuar una correcta instalación de uno o varios discos fijos o del
masterizador DVD dentro del DVR.
57/138
ESPAÑOL
Live
Guìa ràpida DVR MILANO
Figuras
Instrucciones
1
Ponga el DVR en la mesa de trabajo y desconecte todos los
cables.
2
Quite todos los tornillos (10) del panel trasero (4) y lateral (3+3).
3
Quite la tapa como se muestra en la figura.
4
De entre los accesorios que se suministran con el DVR co ja las
dos bridas y fíjelas en los lados del disco con los 4 torn illos como
se muestra en la figura.
5
De entre los accesorios que se sumin istran con el DVR coja 4
tornillos, fije el d isco fijo en la base del DVR y conecte los cables
de datos y alimentación.
6
Vuelva al punto número 4 para instalar los otros dos discos fijos
que tendrán que conectarse como en la figura de al lado.
7
Co mo opción se puede instalar un masterizador DVD en vez del
tercer disco fijo. Para la instalación quite los dos tornillos y la
tapa de plástico que se muestra en la figura.
58/138
ESPAÑOL
N.º
Guìa ràpida DVR MILANO
8
De entre los accesorios que se suministran con el DVR co ja las
dos bridas, fíjelas en los lados de la unidad óptica y sujete el
dispositivo en la base del DVR conectando los cables de datos y
alimentación.
9
Utilizando todos los tornillos previstos cierre la tapa del DVR y
luego conecte el monitor y el cable de alimentación. Así el DVR
está instalado correctamente y listo para el uso. Consulte los
capítulos siguientes para los ajustes de fecha/hora y formateado
de los discos duros.
A su vez en el DVR med iante el boton oportuno en el panel
trasero del DVR. El DVR se mostrará el mensaje:
"Sin fo rmato discos duros encontrados. ¿Usted desea dar formato
ahora? [ENTRA R]: Sí, [ESC]: cancela ". Pu lse el botón
[ENTER] para formatear el disco duro.
10
4.2 Encendi do y apagado:
• Login
Después de encender el DVR, pulse el botón "MENU" y luego mueva el cursor sobre el icono llamado "Conexión /
Desconexi ón" y pulse " ENTER" .
A continuación, introduzca el no mbre y la contraseña. Parámetros de la fábrica 's instalador tiene un nombre de usuario: "aa" y
la contraseña "11". Mueve el cursor en "Login" y confirme pulsando "ENTER".
ESPAÑOL
Hay tres niveles de contraseña en el sistema, incluyendo: Administrador (más alto), Supervisor y Operador (más bajo). El
operador puede operar la pantalla de vídeo en directo, la pantalla del Supervisor de vídeo en directo, la reproducción de
imagen y archivo, y todo lo que el Administrador.
PRECAUCIÓN: La configuración de fábrica del DVR tiene sólo un usuario configurado como un admi nistrador.
Con el fi n de aumentar el ni vel de seguridad que deben utilizar ese usuario para el acceso sólo la pri mera y
cambiar la contraseña tan pronto como sea posible.
ADVERTENCIA: En caso de pérdi da de la contraseña de sistema, por favor contacte con su distribui dor local, que
se pondrá en contacto Fracarro Radi oindustrie SpA
• Ajuste del Id io ma
Seguir fielmente los pasos siguientes para configurar el id io ma del DVR:
59/138
Guìa ràpida DVR MILANO
1.
2.
3.
4.
5.
6.
Pulse el botón "MENU" para acceder al menú de configuración;
Mover el cursor a "setup" y confirme pulsando "ENTER";
Mover el cursor al "sistema" y confirmar pulsando la tecla " ENTER";
Uso de las teclas de flecha para mover el cursor de la "lengua" y presione las teclas de "+/-" para seleccionar el
idio ma deseado;
Pulse el botón "MENU" para volver al menú anterior, el DVR se le pide que guarde la configuración pulsando la tecla
"enter";
Pulse " ENTER" para confirmar el cambio de idio ma. El sistema se reiniciará con la nueva configuración.
• Ajustar fecha y hora:
Seguir fielmente los pasos siguientes para ajustar la fecha y hora:
ESPAÑOL
1.
2.
3.
4.
5.
6.
Pulse el botón "MENU" para acceder al menú de configuración;
Mover el cursor a "setup" y confirme pulsando "ENTER";
Mover el cursor al "sistema" y confirmar pulsando la tecla "ENT ER";
Uso de las teclas de flecha mueven el cursor a la "Fecha" y, utilizando las teclas de "+/-" ajustar el año, mes y día;
Uso de las teclas de flecha mueven el cursor en "tiempo" y, utilizando las teclas de "+/-" establecer el t iempo;
Pulse el botón "MENU" para volver al menú anterior, el DVR se le pide que guarde la configuración pulsando la tecla
"enter";
• El formateo del d isco duro:
Seguir fielmente los pasos siguientes para formatear el disco duro:
60/138
Guìa ràpida DVR MILANO
1.
2.
3.
4.
5.
6.
7.
Pulse el botón "MENU" para acceder al menú de configuración;
Mover el cursor a "setup" y confirme pulsando "ENTER";
Mover el cursor a la rúbrica " duro" y confirme pulsando "ENTER";
Pulse el botón "MODE";
Pulse el botón "Llamar" para formatear el disco duro;
Pulse " ENTER" para confirmar la operación;
Pulse el botón "MENU" para volver al menú anterior.
• Ajuste del reg istro:
El DVR permite diferentes modos de grabación: alarma, mov imiento continuo o regular. Utilizando el últ imo modo, el
administrador del sistema puede defin ir, por cada hora de la semana, el t ipo de registro.
Con el fin de personalizar la programación de grabación cada día se divide en un máximo de 16 segmentos (T1, ... .., T16),
que se puede configurar en 3 modos de grabación diferentes para elegir: la g rabación de vídeo, audio + grabación de vídeo
o ausencia de registro.
NOTA: El DVR es de fábrica programado para grabar continuamente durante toda la semana.
Esta pantalla ofrece al ad ministrador una manera ráp ida y fácil de configurar la grabación programada. Por cada hora de la
semana se puede establecer un registro de los distintos modos a elegir entre: Alarma + Motion + Normal, Alarma +
movimiento, alarma, Motion, normal, y no de entrada. En cualquier caso, se registrará de vídeo y de audio.
61/138
ESPAÑOL
Seguir fielmente los pasos a continuación para establecer el calendario:
1. Pulse el botón "MENU" para acceder al menú de configuración;
2. Mover el cursor a "setup" y confirme pulsando "ENTER";
3. Mover el cursor hasta el título "CALENDARIO DE GRAB ACIÓN" y confirme pulsando "ENTER";
4. Pulse el “MODE”;
5. Aparecerá la siguiente pantalla :
Guìa ràpida DVR MILANO
Descripción Key:
▲▼◄►
Pulse estos botones para mover el cursor.
Numéricos 1-6 (ratón: Haga clic en el botón izquierdo del ratón)
Pulse estos botones para seleccionar el modo de grabación. Pulse el botón ENTER para activar el modo. Los
procedimientos para el registro son: "1" - Alarma + Motion + Normal, "2" - Alarma + Moti on, "3" - de al arma,
"4" - Movi miento, "5" - Normal, "6" - n º de registro.
+/- (ratón: Haga clic en el botón izquierdo del ratón)
Pulse estos botones para seleccionar el intervalo de tiempo deseado. Pulse el botón ENTER para activar el modo de
grabación seleccionado rango.
CES (ratón: botón derecho y clic)
Pulse este botón para salir de esta pantalla y volver al año anterior. Los segmentos de tiempo de actualización del
canal en consecuencia.
5 Uso básico del DVR:
5,1 de la bús queda:
El DVR permite 4 maneras diferentes de buscar la imagen, como : búsqueda por el tiempo, la búsqueda por caso, de búsqueda
inteligente o de búsqueda en archivos comprimidos.
La pantalla de " bús queda por hora", en la parte inferio r, muestra la fecha en que comen zó la grabación de lo que es posible
saber cuánto tiempo es la grabación y seleccione una fecha concreta para la búsqueda de la imagen. Es posible reducir el
tiempo de búsqueda seleccionando el tipo de grabación como de alarma, de movimiento, pérdida de vídeo o Normal.
ESPAÑOL
Seguir fielmente los pasos de abajo para hacer una búsqueda de imágenes:
1.
2.
3.
4.
5.
6.
7.
Pulse el botón "BUSCAR" para entrar en el menú de búsqueda;
Mover el cursor en "búsqueda por hora" y confirme pulsando "ENTER";
Mueve el cursor sobre el título "Año", "mes", "Fecha", "hora" y " HORA" para seleccionar la fecha de in icio de la
investigación mediante las teclas de "+/-";
Mueve el cursor sobre los títulos de "Alarma", " movi miento", "Pérdi da de Vi deo" y "normal" para seleccionar el
tipo de grabación que desea buscar mediante los botones de "+/-";
Pulse "PLAY" para iniciar la reproducción;
Pulse el botón "◄" y "►" para aumentar o dis minuir la velocidad de la pantalla y el botón "► / ▐ ▐" para hacer una
pausa o reproducir el vídeo;
Pulse el botón "STOP" para salir del modo de reproducción.
5.2 Copi a de seguridad:
El DVR permite la copia de seguridad de vídeo / grabación de audio en diferentes tipos de dispositivos externos USB co mo
pendrive, sin corriente HDD o DVD g rabable. Po r favor refiérase a la sección anterior para saber có mo instalar y conectar
todos los dispositivos:
62/138
Guìa ràpida DVR MILANO
1.
2.
3.
4.
5.
6.
7.
8.
9.
Pulse el botón "BUSCAR";
Mover el cursor en "búsqueda por hora" y confirme pulsando "ENTER";
Mueve el cursor sobre el título "Año", " mes", "Fecha", "hora" y "HORA" para seleccionar la fecha de inicio de la
investigación mediante las teclas de "+/-";
Mueve el cursor sobre los títulos de "Alarma", " movi miento", "Pérdi da de Vi deo" y "normal" para seleccionar el
tipo de grabación que desea buscar mediante los botones de "+/-";
Pulse el botón "Copy";
Mover el cursor en "BACKUP vel oci dad" y seleccione el valor de la tasa de copia de seguridad de 1 (lento) a 9
(rápido) con las teclas de "+/-".
Mover el cursor en "cámaras" para seleccionar la cámara que desee hacer copia de seguridad utilizando las teclas de
"+/-";
Mueve el cursor sobre el título "Año", " mes", "Fecha", "hora" y "MINUTO" para seleccionar la hora y la fecha de
término de copia de seguridad utilizando las teclas de "+/-";
Pulse la "COPIA" para in iciar la copia de seguridad.
Durante todo el proceso de copia de seguridad recibirá un icono y un mensaje que indica el progreso del procedimiento.
Una vez que el procedimiento es necesario desconectar el dispositivo que actúe sobre el menú adecuado:
4.
Pulse el botón "MENU" para acceder al menú del sistema;
Mover el cursor en "Backup Device" y confirme pulsando "ENTER";
Mueve el cursor sobre los títulos "USB Dri ve", " USB DVD" o "Tarjeta SD" para seleccionar el t ipo de
dispositivo conectado y pulse "ENTER" para desconectar.
En este punto usted puede desconectar físicamente el dispositivo de copia de seguridad del DVR.
PRECAUCIÓN: No extraig a el DVD hasta que el proceso de copi a de seguridad no está completamente terminado para
evitar daños a l a uni dad óptica.
PRECAUCIÓN: No extraig a el dis positi vo USB hasta que el proceso de copi a de seguridad no está completamente
termi nado.
5.3 Visualización de l as imágenes:
Durante la copia de seguridad del DVR crea dos carpetas en el dispositivo, que contiene los archivos de copia de seguridad y el
otro con la visualización de imágenes (SelfPlayer). Siga los pasos siguientes para ver las imágenes:
1.
2.
3.
4.
Conecte el dispositivo de copia de seguridad utilizado en un PC;
Inicie el software "Selfpl ayer" que figura en la carpeta "SelfPlayer";
Pulse el botón "Archi vo" y luego "Open";
Seleccione el arch ivo que desea mostrar (en la carpeta "00001") y confirme con el botón "OPEN".
La copia de seguridad DVR d ivide el vídeo en varios archivos de tamaño máximo de 100Mb, que posteriormente pueden ser
unidos para formar un solo archivo "avi", utilizando el software "AVIConverter" siempre.
6 Cierre:
Antes de apagar el DVR, pulse el botón "MENU" y luego "Apag ar" y confirme pulsando "ENTER" . Pu lse "ENTER" otra
63/138
ESPAÑOL
1.
2.
3.
Guìa ràpida DVR MILANO
vez a la solicitud de confirmación de la orden. Sólo cuando el DVR muestra el mensaje "Apagado completado. Ahora puede
apagar el sistema, puede desactivar el DVR con la tecla adecuada en el panel trasero del DVR.
7 Apéndice:
7,1 mesa de grabaci ón:
Para elegir el tamaño correcto del disco duro para instalar en el DVR es una tabla que muestra el tiempo máximo de grabación
con una resolución CIF (360x288) y la máxima calidad (9) para cada t ipo de DVR y el tamaño del disco duro:
HDD (GB)
160
320
750
1000
DVR MILANO CH4 (horas)
50
99
230
308
DVR MILANO CH9 (horas)
25
50
115
154
DVR MILANO CH16 (horas)
25
50
115
154
ATENCIÓN: El DVR di vi dir el disco duro en dos particiones diferentes, el más grande (70% de la capaci dad máxi ma
del disco duro) se utiliza para l a grabaci ón normal y el otro (30% ) para la pre-al arma y pre-registro de movi miento.
7.2 Conexi ón de red:
El DVR permite co mpart ir las imágenes en la red Ethernet o Internet. En ambos casos se podrán visualizar las imágenes en
cualquier PC, teléfono inteligente o PDA. En caso de que se esté utilizando un PC se podrán dirig ir hasta 4 DVR d istintos
directamente desde Internet Exp lorer sin tener que instalar ningún software. El número de DVR que se pueden dirigir con el
mis mo terminal au menta hasta 10 si se instala el software suministrado. En todos los casos se pueden gestionar directamente
los dos relés de salida a distancia.
El primer t ipo de conexión (Ethernet) se efectúa utilizando un cable de red cruzado entre DVR y PC (Fig. A) o a través de un
router, switch o hub (Fig. B).
Fig. B
En ambos casos siga el procedimiento que se indica a continuación para configurar la conexión:
Instrucciones
Figuras
Antes de nada acceda a un PC conectado en la misma red
que el DVR, acceda a in iciar/ejecutar, teclee “cmd” y
pulse Enviar. Aparecerá el p ro mpt de los mandos de MSDOS.
En la pantalla teclee “ipconfig /all” y pulse “Enviar”,
aparecerá la pantalla que se muestra al lado que
comprende toda la información de red del PC co mo
Gateway (Ej. 192.168.1.1), Subnet Mask (255.255.255.0)
y la dirección IP del PC (Ej. 192.168.1.14).
64/138
ESPAÑOL
Fig. A
Guìa ràpida DVR MILANO
Vuelva al DVR, pulse el botón MENÚ, luego AJUSTES y
Net type
RED para acceder a toda la configuración de red del DVR.
En esta pantalla introduzca una dirección IP (Ej.
Static IP
192.168.1.15) que no utilice ningún otro dispositi vo de
red y los mismos Gateway (Ej. 192.168.1.1) y Net mask
(Ej. 255.255.255.0) ajustados en el PC.
PPPoE
ATENCIÓN: La direcci ón IP que se asigne al DVR
tiene que ser distinta a la del PC sól o en el últi mo
número.
Static IP
E-mail
IP Address
Net Mask
Gateway
DNS
Username
Password
DDNS Type
URL
DDNS Username
DDNS Password
FTP Adv.
192.168.1.15
255.255.255.0
192.168.1.1
Dynamic
Introduzca la d irección IP del DVR (Ej. 192.168.1.15) en
la barra de búsqueda de Internet Explorer y pulse
“Enviar”.
Cuando el navegador pida que se instalen los controles ActiveX confirme
la solicitud.
ATENCIÓN: El fl ujo de datos que se instaurará entre el DVR y el PC
podrí a ser bl oqueado por el firewall del sistema operati vo por tanto,
en caso de que no se logre acceder al DVR, deshabilite l a protección
del firewall.
Si el navegador Internet Exp lorer no consigue conectarse, haga clic en
Herramientas/Opciones Internet/Protección/Sitios web seguros/Sitios,
Una vez que haya finalizado la configuración el navegador mostrará la
ventana de login de al lado.
Introduzca el nombre del usuario y la contraseña con los que quiera
acceder al sistema.
ATENCIÓN: El usuari o por defecto tiene como nombre de usuario:
aa y como contraseña: 11.
Así se podrá acceder a la interfaz web del DVR. Consulte el manual del
usuario para saber el significado de todas las funciones disponibles.
Utilizando un teléfono inteligente, PDA o cualquier navegador web que
no sea Internet Explorer se podrá acceder a la interfaz wap del DVR.
65/138
ESPAÑOL
introduzca la dirección IP del DVR y confirme con la tecla “Añadir”.
Guìa ràpida DVR MILANO
ATENCIÓN: Si la conexi ón se efectúa con un cable de red cruzado no introduzca ningún Gateway.
Así el DVR está conectado correctamente a la red Ethernet y se puede conectar en la red Internet de forma que se pueda
acceder a la mis ma información que se puede consultar desde la red Ethernet también en la red Internet. (Fig. C):
Siga fielmente los siguientes pasos para configurar la conexión:
Instrucciones
Figuras
Acceda al sitio web www.dyndns.org y cree una nueva cuenta
gratuita haciendo clic en la tecla “Create Account”.
El sitio web enviará un mensaje a la d irección de correo indicada
para confirmar la creación de la nueva cuenta.
la contraseña elegidos.
Haga clic en “Add Host Services”
66/138
ESPAÑOL
Acceda a la cuenta que acabe de crear introduciendo el usuario y
Guìa ràpida DVR MILANO
Elija un nuevo Hostname para el DVR, haga clic en “Use auto
detect IP Address” y confirme todas las solicitudes posteriores
para activar el nuevo Host.
Utilizando el navegador web Internet Exp lorer introduzca la
dirección IP del router (Gateway) y confirmare con la tecla
“Enviar”. Aparecerá una ventana de login a los ajustes del router.
Si no dispone de esos datos consulte el manual de instalación del
router .
Consulte el manual de instalación del router para crear una regla
para los puertos 67, 68 y 80 co rrespondientes a la dirección IP del
DVR y protocolo TCP.
NOTA: Consulte el sitio web www.portforwarding.com para
saber el procedi miento correcto para configurar el router.
información
del DDNS (Dynamic
DNS) co mo
usuario,
contraseña y hostname del DVR.
Así el DVR está conectado correctamente a la red Internet.
Introduzca la dirección web que se ha creado con el sit io web
www.dyndns.org (“hostname”.dyndns.org) en la lista de los sitios
web seguros de Internet Exp lorer.
67/138
ESPAÑOL
Consulte el manual de instalación del router para introducir la
Guìa ràpida DVR MILANO
Introduzca la dirección web que se ha creado con el sit io web
www.dyndns.org (“hostname”.dyndns.org) en la barra
de
búsqueda de Internet Exp lorer para poder acceder a la interfaz
web del DVR.
7.3 Conexi ón con dis positi vo móvil:
Las imágenes del DVR pueden visualizarse en dispositivos móviles como : teléfono inteligente, PDA o teléfonos móviles
conectados a la red Internet.
Siga fielmente los pasos que se indican a continuación para instaurar la conexión:
Instrucciones
Introduzca la dirección web creada con el sitio web
www.dyndns.org (“hostname”.dyndns.org) en la barra de
búsqueda del navegador.
Figuras
ESPAÑOL
Aparecerá una ventana de login en la que tendrán que
introducirse el no mbre del usuario y la contraseña del
usuario configurado en el DVR.
Seleccione la resolución vídeo más apropiada para el
tamaño de la pantalla del dispositivo móvil y confirme
pulsando la tecla “OK”.
Así se podrá acceder a las imágenes en vivo del DVR,
gestionar los relés de salida y saber el estado de las
entradas de alarma.
7.4 Conexi ón cámara PTZ:
El DVR puede utilizarse para dirigir hasta 4-9-16 cámaras PTZ utilizando el bus RS-485 (Fig. D).
68/138
Guìa ràpida DVR MILANO
Siga los pasos que se indican a continuación para conectar correctamente las cámaras:
Instrucciones
Figuras
Consulte el manual de instalación de la cámara PTZ
para configurar el protocolo de co municación PelcoD, velocidad de transmisión de baudios: 4.800 Bps y
dirección ID (de 1 a 255) que tendrá que ser distinta
para cada cámara.
Conecte el BUS RS-485 de la cámara al panel trasero
del DVR co mo se indica en la figura.
Pulse
“MENÚ”,
luego
“AJUSTES”
y
“RS-
RS-232/ 422 /485 Setup
232/422/485 Setup” en el DVR para acceder a los
Pulse “MENÚ”, luego “AJUSTES” y “Pre-Camera
Pre-Camera Setup
protocolo de comunicación (Pelco D) y velocidad de
transmisión de baudios (4.800 Bps) ajustado en la
RS-232
RS-422/485
PTZ
Pelco (D-Type)
4800
8
1
None
0
Setup” en el DVR para acceder a los ajustes de la
REC Resoluti on
720x288
Watermark
√
Group
conectada a la respectiva entrada vídeo del DVD.
Camera
Installed
PTZ ID
12345678
ATENCIÓN: Asegúrese de que todas las cámaras
1
√
N/A
PTZ tengan direcciones ID distintas.
2
√
1
…
…
…
Así la cámara está conectada correctamente al DVR y se podrán gestionar las potencialidades utilizando el mando a distancia,
cámara. Introduzca la dirección ID de la cámara PTZ
el ratón o el software instalado en el PC.
69/138
ESPAÑOL
cámara.
COM Port
Device Type
Model
Baud Rate
Data Bit
Stop Bit
Parity
DVR/Camera ID
ajustes del BUS RS-485. Introduzca el mismo
Guia ràpido DVR MILANO
ATENÇÃO: Este manual é um guia rápido para a primeira instalação do DVR, consulte o manual do utilizador para a
descrição completa de todas as funções.
Índice:
1- Advertênci as de segurança ......................................................... ........................................................ pag.71
1.1 – Conteúdo da embalagem ........................................................ .........................................................pag.71
2- Descrição do produto ............................................................................................................................ pag.72
3- Descrição das teclas ............................................................................................................................... pag.72
3.1 – Painel dianteiro ................................................................................................................................pag.72
3.2 – Painel traseiro ...................................................................................................................................pag.72
3.3 – Controlo remoto ...............................................................................................................................pag.73
3.4 – Rato ....................................................................................................................................................pag.73
4- Instalação ................................................................................................................................................. pag.74
4.1 – Instalação do disco rígido ..............................................................................................................pag.74
4.2 – Primeiro acesso ao DVR .................................................................................................................pag.75
5- Uso básico do DVR ................................................................................................................................. pag.78
5.1 – Busca .................................................................................................................................................pag.78
5.2 – Playback ............................................................................................................................................pag.78
5.3 – Visualizando as imagens ................................................................................................................pag.79
6- Encerre ...................................................................................................................................................... pag.80
7- Apêndice ................................................................................................................................................... pag.80
7.1 – Tabela de gravação...........................................................................................................................pag.80
7.2 – Conexão de rede ...............................................................................................................................pag.80
7.3 – Conexão co m dispositivo móvel ...................................................................................................pag.84
7.4 – Conexão co m câmara PTZ .............................................................................................................pag.84
PORTUGUÊS
70/138
Guia ràpido DVR MILANO
1. Advertências de segurança:
A instalação do produto deve ser realizada por pessoal qualificado, em conformidade com as leis locais e regulamentos sobre
segurança. O produto é uma classe II, de acordo co m EN 60950-1.
IMPORTANTE: Somente pessoal treinado e autorizado pode abrir o produto. Em caso de falha não tente repará-lo
caso contrário, a garantia não será váli da.
IMPORTANTE: Para sua segurança, desligue-o da tomada elétrica antes de mover o DVR, instal ar ou substituir uma
uni dade ol'hard componente.
-
Use apenas o cabo de rede fornecido, a instalação do produto de modo que a ficha está facilmente acessível.
O produto não deve ser exposto a pingos ou salpicos de água e devem ser instalados em u m amb iente seco no interior de
edifícios.
Deixe espaço suficiente ao redor do produto para garantir a ventilação adequada. Temperatura de aquecimento excessivo e
/ ou excesso pode afetar o funcionamento ea vida útil do produto.
Não instale o produto sobre ou perto de fontes de calor ou em locais co m pó ou onde ela pode entrar em contato com
substâncias corrosivas.
Umidade e gotas de condensação pode danificar o p roduto. No caso da condensação, antes de utilizar o produto, esperar
até que esteja comp letamente seca.
Verifique todos os cabos e fios antes de usar um DVR. Contacte o seu revendedor se os defeitos são notados.
Não deixe as peças desnecessárias dentro do DVR, pois poderia causar curto-circu itos.
Não bloqueie o ventilador e do bico do DVR.
Não exponha o DVR à luz solar directa.
Se não tiver certeza da instalação e configuração, consultar u m técnico.
COMPATIB ILIDADE ELECTROMAGNÉTICA
De acordo com a Directiva Europeia 2004/ 108/ CE (EM C), o p roduto deve ser instalado usando o equipamento, cabos e
acessórios para atender as exigências da directiva para as instalações fixas .
REMOÇÃO E ELIMINAÇÃO DE PILHAS
Este produto contém 2 pilhas alcalinas AAA min i-caneta que pode ser removida sob a pequena aba na parte de trás do
controle remoto e uma bateria backup tipo de bateria de lít io CR2032 que está na placa principal do DVR e pode ser
removido, actuando ao lado de em si.
Devido aos efeitos potenciais sobre o meio amb iente e na saúde humana das substâncias contidas nas pilhas o usuário é
obrigado a dispor de pilhas, utilizando os recipientes apropriados para locais de recolha selectiva em todo ou em lo jas de
varejo.
CONFORMIDADE COM AS DIRECTIVAS EUROPEIAS
1.1 Conteúdo da embal agem:
N°1 Rato;
N°1 Controlo remoto;
N°2 Baterias alcalinas (AAA);
N°1 Alimentador 12V/ 8A (5A x DVR MILANO 4);
N°1 Cabo de alimentação com conector Schuko;
N°1 CD-ROM co m manual de instruções e software PC;
N°1 Gu ia rápido;
N ° 12 parafusos de fixação HDD;
N°4 Parafusos de fixação HDD;
71/138
PORTUGUÊS
Este produto cumpre os requisitos essenciais das Direct ivas Europeias 2004/ 108/CE (Directiva de Co mpatib ilidade
Electro magnética - CEM ) e 2006/95/ CE (Low Voltage Directive - LVD)
Guia ràpido DVR MILANO
2. Descrição do produto:
O DVR MILA NO fo i pro jectado para realizar u m sistema de vídeo-vigilância fiável, seguro e que permita a interface co m
diversos tipos de ecrãs, PCs e telemóveis.
O novo tipo de compressão dinâmica utilizada e a possibilidade de configurar o nível de qualidade da gravação garantem
um longo tempo de gravação no disco e uma óptima qualidade das imagens durante o playback.
O novo microprocessador permite que o DVR execute seis operações diversas: gravação, playback, exibição das imagens
em tempo real, backup, controlo e acesso remoto.
Pode ser controlado mediante painel d ianteiro, rato, controlo remoto, teclado externo, teclado virtual e interface web v ia
PC ou smartphone.
Os dois relés de saída podem ser activados mediante uma entrada de alarme, detecção de movimento, perda de vídeo,
ocorrências de sistema ou directamente med iante smartphone ou interface web.
3. Descrição das tecl as:
3.1 Painel di anteiro (ver figura 1):
Tecla
Gravador
(opcional)
Função
Utilizada para backup dos
dados
Nْ
12
Tecla
STOP
Função
Parar o p layback
2
COPY
Iniciar o backup
14
MENU / ESC
Visualizar ou sair do Menu
principal
4
Indicadores LED
15
PA GE
5
MODE
16
LEFT / RIGHT
6
SEQ
Conectar u m rato co mpatível
antes de ligar o DVR
Conectar u ma memó ria de
massa compatível co mo: pen
drive USB, leitor de MMC/ SD
card ou gravador DVD +RW
externo
Indicadores de alimentação,
disco rígido e rede LA N
Passagem de modalidade ao
vivo a playback
Passagem ou retorno à
modalidade sequência vídeo
13
3
Porta USB para
conexão do Rato
Porta USB
17
UP / BS
7
CA LL
18
DOWN / DEL
8
9
19
20
10
SEARCH
Sensor IV
remoto
REC
Passagem ou retorno à
modalidade ecrã inteiro
Visualiza o menu Busca
Receptor do sinal proveniente
do controlo remoto
Gravação manual
ENTER
SPLIT Windows
+
SPLIT Windows
-
Visualização em modalidade
quad
Movimento do cursor ou Pan da
câmara PTZ para a esquerda
Movimento do cursor ou Tilt da
câmara PTZ para cima /
Backspace
Movimento do cursor ou Tilt da
câmara PTZ para baixo / Delete
Tecla de confirmação
Página sucessiva
11
Play/Pause
21
Página anterior
Play/Pausa das imagens
gravadas
3.2 Painel traseiro (ver figura 2):
Nْ
1
2
3
4
5
Conectores
4-9-16 Entradas Vídeo BNC
Saída ecrã principal e secundário tipo BNC
4 entradas áudio RCA tipo mono
1 saída áudio RCA tipo mono
Conector RS-232 para teclado
Nْ
9
10
11
12
13
6
7
8
Saída vídeo VGA
Conector eSATA para discos externos
Conector rede LAN
14
15
72/138
Conectores
Selector NTSC/PA L
Saída ecrã principal t ipo S-v ideo
16 entradas de alarme
2 relés de saída (1 NA e 1 NC)
Conector BA RRAMENTO RS-485 para conexão
das câmaras PTZ ou teclados
Conector de alimentação
Tecla de activação
PORTUGUÊS
Nْ
1
Guia ràpido DVR MILANO
3.3 Controlo remoto (ver figura 3):
O controlo remoto é um acessório que simplifica notavelmente a gestão e a programação do DVR. Co m o mes mo
dispositivo é possível controlar até quatro DVR. Aconselha-se não superar a distância máxima de 10m do controlo remoto
ao DVR.
São apresentadas a seguir as funções das diversas teclas.
Nْ
1
Functi on
Bloqueio da ocorrência
de alarme
Nْ
13
2
Start/Stop gravação
14
Direita
3
Retroceder
15
Tecla de confirmação
4
Avançar
16
Habilitar ou desabilitar o áudio /
Seguinte
5
Avançamento quadro a
quadro
17
Função zoom / entrada préselecção
6
Início do backup ou
cópia das informações
18
Regulação do volume ou nível de
zoo m
7
Play/pause
19
Mudança da modalidade de
visualização
8
Stop
20
Introdução de texto, números ou
códigos
9
Acesso ao menu
principal
21
Passagem da modalidade Ao
Vivo a Playback
10
Acesso ao menu de
gestão das câmaras PTZ
22
Seleccionar ou retornar à
modalidade sequência
11
Alto / Backspace
23
Seleccionar ou retornar à
modalidade ecrã inteiro
12
Baixo / Delete
24
Visualizar o menu busca
Key
Key
Functi on
Esquerda
O DVR pode ser facilmente controlado com o rato. Para ter acesso ao menu de configuração, coloque o cursor do rato na parte
inferior do ecrã.
ATENÇÃO: Conecte o rato antes de ligar o DVR.
73/138
PORTUGUÊS
3.4 Rato:
Guia ràpido DVR MILANO
4 Instalação:
4.1 Instalação do disco rígido:
Siga escrupulosamente as etapas apresentadas a seguir para realizar u ma correcta instalação de um ou mais discos rígidos ou
do gravador DVD dentro do DVR.
Instruções
Posicione o DVR sobre a bancada de trabalho e desconecte todos
os cabos.
2
Remova todos os parafusos (10) dos painéis traseiro (4) e lateral
(3+3).
3
Remova a tampa co mo mostrado na figura.
4
Pegue as duas placas fornecidas com os acessórios do DVR e fixeas nas laterais do disco utilizando os 4 parafusos, como mostrado
na figura.
5
Pegue 4 parafusos fornecidos com os acessórios do DVR, fixe o
disco rígido na base do DVR e conecte os cabos dos dados e de
alimentação.
6
Retorne ao ponto numero 4 para a instalação dos outros dois
discos rígidos, que deverão ser ligados conforme a figura ao lado.
Figura
PORTUGUÊS
Nْ
1
74/138
Guia ràpido DVR MILANO
7
Co mo opção é possível instalar u m g ravador de DVD no lugar do
terceiro disco rígido. Para instalar, remova os dois parafusos e a
tampa de plástico mostrada na figura.
8
Pegue as duas placas fornecidas com os acessórios do DVR, fixeas nas laterais da unidade óptica e fixe o d ispositivo na base do
DVR, ligando os cabos dos dados e de alimentação.
9
Utilizando todos os parafusos previstos, feche a tampa do DVR e
conecte o ecrã e o cabo de alimentação. O DVR estará instalado
correctamente e pronto para o uso. Consulte os capítulos seguintes
para configurar data/hora e formatar os Discos Rígidos.
10
Ligue o DVR agindo sobre o botão correspondente no painel
traseiro. O Moster DVR d iz "não formatado HDDs encontrado.
Do que você deseja formatar agora? [ENTER]: Sim, [ESC]:
Cancela ". Pressione a tecla [ENTER] para formatar o d isco
ríg ido.
4.2 Primeiro acesso ao DVR:
• Login
Depois de ligar o DVR, pressione o botão "MENU" e depois mover o cursor sobre o ícone chamado " Entrar / Sair" e
pressione “Enter ".
Agora insira o nome e senha. Parâmetros de fábrica 's instalador tem u m no me de usuário: "aa" e senha "11". Mova o cursor
em "Login" e confirme pressionando "ENTER".
ATENÇÃO: A configuração do DVR leva apenas um usuário configurado como um admi nistrador. A fi m de aumentar
o ní vel de segurança que você deve usar esse usuário para acesso somente a pri meira e al terar a senha o mais
rapi damente possível.
ATENÇÃO: Em caso de perda da senha do sistema entre em contato com seu distri bui dor l ocal, que entrará em
contato com Fracarro Radi oindustrie SpA
• Definir Id io ma
Seguir fielmete os passos abaixo para configurar o id io ma do DVR:
75/138
PORTUGUÊS
Existem três níveis de senha no sistema, incluindo: Ad ministrador (mais alto), Supervisor e Operador (a mais baixa). O
operador de exibição de vídeo ao vivo, o Supervisor de exibição de vídeo ao vivo, reprodução de imagem e arquivo, e tudo o
Admin istrador.
Guia ràpido DVR MILANO
1. Pressione o botão "MENU" para acessar o menu de configuração;
2. Move o cursor para "SETUP" e confirme pressionando "ENTER";
3. Move o cursor para o "sistema" e confirmar pressionando "ENTER";
4. Usando as teclas de seta mover o cursor para o id io ma "e pressione as teclas "+/-" para definir o id io ma desejado;
5. Pressione o botão "MENU" para retornar ao menu anterior, o DVR será solicitado a salvar as configurações
pressionando "ENTER";
6. Pressione "ENTER" para confirmar a alteração da linguagem. O sistema irá rein iciar co m as novas configurações.
• Ajuste de Data / Hora:
Seguir fielmente os passos abaixo para ajustar a data / hora:
2. Move o cursor para "SETUP" e confirme pressionando "ENTER";
3. Move o cursor para o "sistema" e confirmar pressionando "ENTER";
4. Usando as teclas de seta mover o cursor para a "Data" e, utilizando as teclas "+/-" definir o ano, mês e dia;
5. Usando as setas do teclado move o cursor sobre "Time" e, utilizando as teclas "+/-" definir o tempo;
6. Pressione o botão "MENU" para retornar ao menu anterior, o DVR será solicitado a salvar as configurações
pressionando "ENTER";
• Fo rmatação do disco rígido:
Seguir fielmente os passos abaixo para formatar o disco ríg ido:
76/138
PORTUGUÊS
1. Pressione o botão "MENU" para acessar o menu de configuração;
Guia ràpido DVR MILANO
1. Pressione o botão "MENU" para acessar o menu de configuração;
2. Move o cursor para "SETUP" e confirme pressionando "ENTER";
3. Move o cursor para a posição "HDD" e confirme pressionando "ENTER";
4. Pressione o botão "MODE";
5. Pressione o botão "Call" para formatar o disco rígido inteiro;
6. Pressione "ENTER" para confirmar a operação;
7. Pressione o botão "MENU" para voltar ao menu anterio r.
• Definir o reg istro:
O DVR permite diferentes modos de gravação: alarme, mov imento contínuo ou agendado. Usando o último modo, o
administrador do sistema pode definir, para cada hora da semana, o tipo de registo.
A fim de personalizar a programação de gravação a cada dia é div idido em u m número máximo de 16 seg mentos (T1, ... ..,
T16), que pode ser configurado em 3 modos de gravação diferentes para escolher: a gravação do vídeo, áudio e gravação de
vídeo ou ausência da matrícula.
NOTA: O DVR fábrica está programado para gravar continuamente durante toda a semana.
Seguir fielmente os passos abaixo para defin ir a programação:
2. Move o cursor para "SETUP" e confirme pressionando "ENTER";
3. Move o cursor para a posição "Schedule Recording" e confirme p ressionando "ENTER";
4. Pressione o “MODE”;
5. A seguinte tela aparece :
77/138
PORTUGUÊS
1. Pressione o botão "MENU" para acessar o menu de configuração;
Guia ràpido DVR MILANO
Esta tela dá ao ad min istrador uma forma rápida e fácil de configurar a gravação da programação. Para cada hora da
semana, você pode definir u ma modos de gravação diferentes para escolher entre: Alarme + Movimento + Normal,
Alarme + Movimento, Alarme, Movimento, Normal e sem entrada. Em qualquer caso será registrado no vídeo e de áudio.
Descrição da:
▲▼◄►
Pressione estes botões para mover o cursor.
Numérica 1-6 (Mouse : Clique no botão esquerdo do mouse)
Pressione estes botões para selecionar o modo de gravação. Pressione o botão ENTER para activar o modo. Os
procedimentos para a inscrição são: "1" - Motion Alarm + + normal, "2" - Al arme + Movi mento, "3" - Alarm,
"4" - Proposta, "5" - Normal, "6" - Sem registro.
+ / - (Mouse: Clique no botão esquerdo do mouse)
Pressione estes botões para selecionar o intervalo de tempo desejado. Pressione o botão ENTER para ativar o modo de
gravação selecionado intervalo.
ESC (Mouse: Clique com o botão direito)
Pressione este botão para sair desta tela e voltar ao ano anterior. Os segmentos de canal o tempo de atualização em
conformidade.
O DVR permite 4 diferentes maneiras para procurar a imagem co mo : busca pelo tempo, busca por evento, busca
inteligente ou pesquisa em arquivos arquivados.
O ecrã de "Procura por hora", no fundo, mostra a data de quando a gravação começou por isso, é possível saber quanto
tempo é a gravação e selecionar u ma data específica para a pesquisa da imagem. É possível reduzir o tempo de busca,
selecionando o tipo de gravação, como Alarm, Motion, Vídeo perda ou Normal.
78/138
PORTUGUÊS
5 Utilização básica do DVR:
5,1 Search:
Guia ràpido DVR MILANO
Seguir fielmente os passos abaixo para fazer u ma pesquisa de imagens:
1.
Pressione o botão "Pesquisa" para aceder ao menu Procurar;
2.
Move o cursor sobre "Procura por hora" e confirme pressionando "ENTER";
3.
Mova o cursor sobre o título "ANO", " MONTH", "Data", "hora" e "minuto" para selecionar a data de início da
pesquisa utilizando as teclas "+/-";
4.
Mova o cursor sobre os títulos "alarme", " Movi mento", PERDA "VIDEO" e "normal" para selecionar o t ipo de
gravação que você deseja pesquisar usando os botões "+/-";
5.
Pressione "PLAY" para iniciar a reprodução;
6.
Pressione o botão ◄ "e" ► "para aumentar ou diminu ir a velocidade do display eo botão" ► / ▐ ▐ "para pausar ou
reproduzir o vídeo;
7.
Pressione o botão "STOP" para sair do modo de reprodução.
5.2 Backup:
O DVR permite a cópia de segurança de vídeo / gravação de áudio em diferentes tipos de dispositivos USB externos como
pendrive, auto-alimentado HDD ou DVD g ravável. Por favor, consulte a seção anterior para saber como instalar e conectar
todos os dispositivos:
Pressione o botão "Search";
2.
Move o cursor sobre "Procura por hora" e confirme pressionando "ENTER";
3.
Mova o cursor sobre o título "ANO", "MONTH", " Data", "hora" e "minuto" para selecionar a data de início da
pesquisa utilizando as teclas "+/-";
4.
Mova o cursor sobre os títulos "alarme", " Movi mento", PERDA "VIDEO" e "normal" para selecionar o t ipo de
gravação que você deseja pesquisar usando os botões "+/-";
5.
Pressione o botão "Copiar";
6.
Move o cursor em "BACKUP SPEED" e selecione o valor da taxa de backup de 1 (lento) a 9 (rápido) usando as
teclas "+/-".
7.
Move o cursor sobre "câmeras" para selecionar a câmera que você deseja fazer backup utilizando as teclas "+/-";
8.
Mova o cursor sobre o título "ANO", " MONTH", "Data", "hora" e "minuto" para selecionar a hora ea data de
fim do backup utilizando as teclas "+/-";
9.
Pressione o botão "copiar" para iniciar o backup.
Durante todo o processo de backup irá receber u m ícone e u ma mensagem indicando o andamento do processo. Uma vez que o
procedimento é necessário para desconectar o dispositivo que actua no menu adequado:
79/138
PORTUGUÊS
1.
Guia ràpido DVR MILANO
1.
Pressione o botão "MENU" para aceder ao menu do sistema;
2.
Move o cursor sobre "dispositi vo de backup" e confirme p ressionando "ENTER";
3.
Mova o cursor sobre os títulos "USB Dri ve", " USB DVD" ou "SD Card" para selecionar o tipo de dispositivo
conectado e pressione "ENTER" para desconectar.
4.
Neste ponto você pode desconectar fisicamente o dispositivo de backup do DVR.
ATENÇÃO: Não retire o DVD até o processo de backup não está completamente terminado para evitar danos na
uni dade óptica.
ATENÇÃO: Não retire o dis positi vo USB até que o processo de backup não está completamente termi nado.
5,3 Visualizando as imagens:
Durante o DVR o backup cria duas pastas no dispositivo, u ma contendo os arquivos de backup e outro com a exibição de
imagens (SelfPlayer). Siga os passos abaixo para visualizar as imagens:
1.
Ligue o dispositivo de backup usado em u m PC;
2.
Iniciar o software "Selfplayer" contido na pasta "SelfPlayer";
3.
Pressione o botão "Arqui vo" e depois "Abrir";
4.
Selecione o arquivo que deseja exibir (na pasta "00001") e confirmar co m o botão "OPEN".
O backup DVR d ivide o vídeo em vários arquivos de tamanho máximo de 100Mb que pode ser posteriormente se juntou para
formar u m único arquivo "avi" utilizando o software "AVIConverter" fornecido.
6 Encerre:
Pressione "ENTER" novamente para solicitar a confirmação do comando. So mente quando o DVR exibe a mensagem
"Shutdown completo. Agora você pode desligar o sistema, você pode desligar o DVR usando a tecla apropriada no painel
traseiro do DVR.
7 Apêndice:
7,1 mesa de gravação:
Para escolher o tamanho correto do disco rígido para instalar o DVR está uma tabela mostrando o tempo máximo de gravação
em resolução CIF (360x288) e qualidade máxima (9) para cada tipo de DVR e tamanho do disco rígido:
HDD (GB)
DVR MILANO CH4 (horas)
DVR MILANO CH9 (horas)
DVR MILANO CH16 horas)
160
50
25
25
320
99
50
50
750
230
115
115
1000
308
154
154
80/138
PORTUGUÊS
Antes de desligar o DVR, pressione o botão "MENU" e depois em "SHUTDOWN" e confirme pressionando "ENTER" .
Guia ràpido DVR MILANO
ATENÇÃO: O DVR di vi dir o disco rígido em duas partições diferentes, a mai or (70% da capaci dade máxi ma do disco
rígido) é usado para a gravação normal eo outro (30% ) para a pré-alarme e pré-gravação de movi mento.
7.2 Conexão de rede:
O DVR permite co mpartilhar as imagens mediante rede Ethernet ou Internet . Em ambos os casos será possível visualizar as
imagens em qualquer pc, smartphone ou PDA. Se estiver a utilizar u m PC, será possível controlar até 4 diversos DVRs
directamente com Internet Exp lorer, sem que seja necessário instalar qualquer software. Será possível controlar até 10 DVRs
se for instalado o software fornecido. Em ambos os casos é possível controlar d irectamente os dois relés de saída de forma
remota.
O primeiro tipo de conexão (Ethernet) é efectuado utilizando um cabo de rede cru zado entre o DVR e o PC (Fig.A) ou
med iante um router, switch ou hub (Fig.B).
Fig.A
Fig.B
Em ambos os casos seguir o procedimento apresentado a seguir para configurar a conexão:
Instruções
Figuras
Em primeiro lugar, realize o acesso a um Pc
conectado com a mesma rede do DVR, vá a
iniciar/executar, dig ite “cmd” e pressione Enter.
Aparecerá o prompt de co mandos de MS-DOS.
Dig ite na janela “ipconfig /all” e pressione “Enter”,
aparecerá a janela mostrada ao lado que contém todas
as informações de rede do PC, co mo Gateway (Ex.
192.168.1.1), Subnet Mask (255.255.255.0) e o
endereço IP do PC (Ex. 192.168.1.14).
PORTUGUÊS
81/138
Guia ràpido DVR MILANO
Retorne ao DVR, pressione a tecla MENU, então
Net type
CONFIGURA ÇÕES e REDE para ter acesso a toda a
configuração de rede do DVR. Nesta janela, insira
Static IP
um endereço IP (Ex. 192.168.1.15) que não seja
utilizado por nenhum outro dis positi vo de rede e
os mesmos Gateway (Ex.192.168.1.1) e Net mask
(Ex. 255.255.255.0) configurados no PC.
PPPoE
ATENÇÃO: Apenas o últi mo número do endereço
IP que será atri buí do ao DVR deve ser di verso
daquele do PC.
Static IP
E-mail
IP Address
Net Mask
Gateway
DNS
Username
Password
DDNS Type
URL
DDNS Username
DDNS Password
FTP
Adv.
192.168.1.15
255.255.255.0
192.168.1.1
Dynamic
Insira o endereço IP do DVR (Ex. 192.168.1.15) na
barra de busca de Internet Exp lorer e pressione
“Enter”.
Quando o browser Web pedir para instalar os controles ActiveX,
confirme a instalação.
ATENÇÃO: O fluxo de dados que será instaurado entre o
DVR e o PC poderá ser bloqueado pelo firewall do sistema
operati vo; portanto, se não conseguir ter acesso ao DVR,
desabilite a protecção do firewall.
Se o browser Internet Exp lorer não conseguir realizar a conexão,
clique em Ferramentas / Opções Internet / Segurança / Sít ios de
confiança / Sít ios, insira o endereço IP do DVR e confirme co m a
tecla “Acrescentar”.
Terminada a configuração, o bro wser exib irá a janela de login
mostrada ao lado.
sistema.
ATENÇÃO: Como predefinição, o utilizador tem nome: aa e
senha:11
Será possível, então, ter acesso à interface web do DVR. Consulte
o manual do utilizador para conhecer o significado de todas as
funções disponíveis.
Utilizando u m smartphone, PDA ou qualquer bro wser web que não
seja Internet Exp lorer será possível ter acesso à interface wap do
DVR.
82/138
PORTUGUÊS
Insira o nome do utilizador e a senha com as quais ter acesso ao
Guia ràpido DVR MILANO
ATENÇÃO: Se a conexão é feita medi ante um cabo de rede cruzado, não insira nenhum Gateway.
O DVR, então, está correctamente conectado com a rede Ethernet; é possível conectá-lo co m a rede Internet para poder ter
acesso, mediante a rede Internet, às mes mas informações que podem ser consultadas mediante rede Ethernet (Fig. C).
Siga escrupulosamente as etapas indicadas a seguir para configurar a conexão :
Instruções
Figuras
Aceda ao sítio www.dyndns.org e crie u ma nova conta gratuita
pressionando a tecla “Create Account”.
O sítio internet enviará u m Email para o endereço electrónico
inserido para confirmar a criação da nova conta.
Aceda à conta criada inserindo username e password escolhidos.
PORTUGUÊS
Pressione “Add Host Services”
83/138
Guia ràpido DVR MILANO
Escolha u m novo Hostname para o DVR, pressione “Use auto
detect IP Address” e confirme todas as perguntas sucessivas para
activar o novo Host.
Utilizando o browser web Internet Exp lorer, insira o endereço IP
do router (Gateway) e confirme co m a tecla “Enter”. Aparecerá
uma janela de login das configurações do router. Se não dispor
destes dados, consulte o manual de instalação do router .
Consulte o manual de instalação do router para criar u ma regra
para as portas 67, 68 e 80 relacionadas ao endereço IP do DVR e
protocolo TCP.
NOTA: Consulte o sítio internet www.portforwarding.com
para conhecer o procedi mento correcto para a configuração
do router.
Consulte o manual de instalação do router para inserir as
informações do DDNS (Dynamic DNS) co mo username,
password e hostname do DVR.
internet. Insira o endereço web criado co m o sítio
www.dyndns.org (“hostname”.dyndns.org) na lista de sítios de
confiança de Internet Exp lorer.
Insira o endereço web criado com o sítio www.dyndns.org
(“hostname”.dyndns.org) na barra de busca de Internet Explo rer
para poder aceder à interface web do DVR.
84/138
PORTUGUÊS
O DVR então estará correctamente conectado com a rede
Guia ràpido DVR MILANO
7.3 Conexão com dis positi vo móvel:
As imagens do DVR podem ser visualizadas em dispositivos móveis como : s martphone, PDA ou telemóveis conectados com a
rede internet.
Siga escrupulosamente as etapas indicadas a seguir para realizar a conexão:
Instruções
Insira o endereço web criado com o sítio
www.dyndns.org (“hostname”.dyndns.org) na barra de
busca do web browser.
Figuras
Aparecerá uma janela de login na qual deverão ser
inseridos o nome do utilizador e a senha do utilizador
configurado no DVR.
Escolha a resolução vídeo adequada às dimensões do ecrã
do dispositivo móvel e confirme co m a tecla “OK”.
Será então possível ter acesso às imagens ao vivo do
DVR, controlar os relés de saída e conhecer o estado das
entradas de alarme.
7.4 Conexão com câmara PTZ:
O DVR pode ser utilizado para a gestão de até 4-9-16 câmaras PTZ utilizando o barramento RS-485 (Fig. D):
PORTUGUÊS
Siga escrupulosamente as etapas indicadas a seguir para conectar correctamente as câmaras:
Instruções
Figuras
Consulte o manual de instalação da câmara PTZ
para configurar o protocolo de co municação PelcoD, Baud Rate: 4800 Bps e endereço ID (de 1 a
255), que deverá ser diverso para cada câmara.
85/138
Guia ràpido DVR MILANO
Conecte o BARRAM ENTO RS-485 da câmara ao
painel traseiro do DVR, co mo indicado na figura.
Pressione “MENU”, então “CONFIGURA ÇÕES”
RS-232/ 422 /485 Setup
e “RS-232/422/485 Setup” no DVR para ter acesso
às configurações do BARRAMENTO RS-485.
Insira o mes mo protocolo de comunicação (Pelco
D) e Baud rate (4800 Bps) configurado na câmara.
COM Port
Device Type
Model
Baud Rate
Data Bit
Stop Bit
Parity
DVR/Camera ID
Pressione “MENU”, então “CONFIGURA ÇÕES”
RS-232
RS-422/485
PTZ
Pelco (D-Type)
4800
8
1
None
0
Pre-Camera Setup
e “Pre-Camera Setup” no DVR para ter acesso às
REC Resoluti on
720x288
Watermark
√
Group
câmara PTZ conectada à respectiva entrada vídeo
Camera
Installed
PTZ ID
12345678
no DVR.
1
√
N/A
ATENÇÃO: Certi fi que-se que todas as câmaras
2
√
1
PTZ tenham endereços ID di versos.
…
…
…
A câmara, então, estará correctamente conectada ao DVR e será possível a gestão de suas funções utilizando o controlo
configurações da câmara. Insira o endereço ID da
remoto, o rato ou o software instalado no PC.
PORTUGUÊS
86/138
Skrócony prze wodnik dla uŜytkowników rejestratora DVR MILANO
ΠΡΟΣΟΧΗ : Το εγχειρίδιο αυτό αποτελεί ένα γρήγορο οδηγό για την πρώτη εγκατάσταση του DVR. Για την πλήρ η
περιγραφή όλων των επι µέρους λειτουρ γιών βλέπε το εγχειρίδιο χρήσης
Περιεχόµενα
1- Συµβουλές για ασφαλή χρήση..........................................................σε λ. 85
1.1 - Το περιεχόµενο της συσκευασίας...............................................σελ. 85
2 - Περιγραφή του προϊόντος.................................................................σελ. 86
3 - Περιγραφή των πλήκτρων................................................................σελ.86
3.1 - Εµπρόσθια επιφάνεια...................................................................σελ. 86
3.2 - Οπ ίσθια επιφάνεια.......................................................................σελ. 86
3.3 - Τηλεχειριστήριο...........................................................................σελ. 87
3.4 - Ποντίκι.........................................................................................σελ. 87
4- Εγκατάσταση........................................................................................σε λ. 88
4.1 - Εγκατάσταση σταθερού δίσκου.....................................................σελ.88
4.2 – Πρώτη επαφή µε το DVR ...........................................................σελ.89
5 - Κύρια χρήση του DVR.........................................................................σελ.92
5.1 – Αναζήτηση.....................................................................................σελ.92
5.2 – Backup ……....................................................................................σελ 92
5.3 – Προβολή των εικόνων ...................................................................σελ 93
6 – Παράρτηµα............................................................................................σε λ.93
7 – Παράρτηµα............................................................................................σε λ.93
7.1 - Record ing πίνακα…........................................................................σελ 93
7.2 - Σ ύνδεση µε το δίκτυο ………............................................................σελ.97
7.3 – Σύνδεση µε κινητή συσκευή............................................................σελ.98
7.4 – Σύνδεσης κάµερας ΡΤΖ...................................................................σελ.98
Ελληνικά
1 - Συµβουλές για ασφαλή χρήση :
87/138
Skrócony prze wodnik dla uŜytkowników rejestratora DVR MILANO
Η εγκατάσταση του προϊόντος πρέπει να εκτελούνται από ειδικευµένο προσωπικό, σύµφωνα µε τους τοπικούς νόµους και
κανονισµο ύς για την ασφάλεια. Το π ροϊόν ανήκει στην κλάση ΙΙ, σύµφωνα µε το ΕΝ 60950-1.
ΣΗΜΑΝΤΙΚΟ: Μόνο εκπαιδευµένο και εξουσιοδοτηµένο προσωπικό µπορεί να ανοίξει το προϊόν. Σε περίπτωση
αποτυχίας να µην προσπαθήσουµε να το επισκευάσουµε διαφορετικά η εγγύηση δεν θα είναι πλέ ον έγκυρη.
ΣΗΜΑΝΤΙΚΟ: Για την ασφάλειά σας, αποσυνδέστε την πρίζα πριν από τη µετακίνηση του DVR, εγκαταστήσετε ή να
αντικαταστήσετε κάποια κίνηση ol'hard συνιστώσα.
-
Χρησιµοποιείτε µόνο το παρεχόµενο καλώδιο δικτύο υ, εγκατάσταση το υ προ ϊόντος, έτσι ώστε το φις να είναι εύκολα
προσβάσιµο.
Το προϊόν δεν πρέπει να εκτίθενται στις περιπτώσεις διαρροής ή εκτοξευόµενου νερού και θα πρέπει να εγκατασταθεί σε
ένα ξηρό περιβάλλον στο εσωτερικό των κτιρίων.
Επιτρέψτε αρκετό χώρο γύρω από το προϊόν για να εξασφαλίζεται επαρκής αερισµός. Η υπ ερβολική θερµοκρασία και / ή
η υπερβολική θέρµανση µπορεί να επηρεάσει τη λειτουργία και την διάρκεια ζωής του προϊόντος.
Μην εγκαταστήσετε το προϊόν πάνω ή κοντά σε πηγές θερµό τητας ή σε χώρο υς µε σκόνη ή όπου µπορεί να έρθει σε
επαφή µε διαβ ρωτικές ουσίες.
Υγρασία και σταγόνες συµπ ύκνωση µπορεί να προκαλ έσει βλάβη στο π ροϊόν. Στην περίπτωση της συµπ ύκνωσης, πριν
χρησιµοποιήσετε το προϊόν, περιµένετε µέχρι να είναι τελείως στεγνό.
Ελέγξτε όλα τα καλώδια και σύρµατα πριν χρησιµοποιήσετε ένα DVR. Επικοινωνήστε µε τον π ροµηθευτή σας, εάν
παρατηρηθούν τα ελαττώµατα.
Μην αφήνετε τα π εριττά µέρη στο εσωτερικό το υ DVR διότι θα µπορούσε να προ καλέσει β ραχυκύκλωµα.
Μην µπλοκ του ανεµιστήρα και το ακροφύσιο του DVR.
Μην εκθέτετε το DVR σε άµεσο ηλιακό φως.
Εάν είστε σίγουροι για την εγκατάσταση και ρύθµιση, συµβουλευτείτε έναν τεχνικό.
ΗΛΕΚΤΡΟΜΑΓΝΗΤΙΚΗ Σ ΥΜΒ ΑΤΟΤΗΤΑ
Σε συµφωνία µε την Ευρωπαϊκή Οδηγία 2004/108/ΕΚ (EM C), το π ροϊόν πρέπει να εγκατασταθεί µε τον εξοπλισµό, τα
καλώδια και τα εξαρτήµατα να πληρούν τις απαιτήσεις της οδηγίας για τις σταθερές εγκαταστάσεις.
ΑΦΑΙΡΕΣ Η ΚΑΙ ΑΠΟΡΡΙΨΗ ΤΩΝ ΜΠΑΤΑΡΙΩΝ
Αυτό το προ ϊόν περιέχει 2 αλκαλ ικές µπαταρίες AAA µίνι-γραφίδα που µπορεί να αφαιρεθεί από που ενεργεί για τη µικρή
καρτέλα στο πίσω µέρος του τηλεχειριστηρίου και µια εφ εδρική µπαταρία τύπου CR2032 µπαταρία λιθίου που είναι το
κύριο διοικητικό συµβούλιο του DVR και µπορεί να αφαιρεθεί από που ενεργεί σε µια πλευρά του ίδια.
Λόγω των πιθανών επ ιπτώσεων στο περιβάλλον και την υγεία του ανθρώπου των ο υσιών που περιέχονται στις ηλεκτρικές
στήλες ο χρήστης είναι αναγκασµένος να διάθεσης των χρησιµοποιηµένων ηλ εκτρικών στηλών, χρησιµοποιώντας τα
κατάλληλα δοχεία για τη χωριστή συλλογή τοποθεσίες σε ολόκληρη ή σε καταστήµατα λιανικής πώλησης.
ΣΥΜΜΟΡΦΩΣ Η ΜΕ ΤΑ ΕΥΡΩΠΑΪΚΑ ΠΡΟΤΥΠΑ
Αυτό το προ ϊόν πληροί τις βασικές απαιτήσεις των ευρωπαϊκών οδηγιών 2004/ 108/ ΕΚ (Ηλεκτροµαγνητική Σ υµβατότητα
οδηγία - EMC) και 2006/95/ΕΚ (Οδηγία Χαµηλής Τάσης - LVD)
1.1 - Το περιεχόµενο της συσκευασίας
N °1 Ποντίκι
N °1 Τηλεχειριστήριο
N °2 Αλκαλικές µπαταρίες τύπου mini (ΑΑΑ)
N °1 Τροφοδοτικό 12 V / 8 A (5A x DVR MILANO 4)
N °1 Καλώδιο τροφοδοσίας µε φις τύπου Schuko
N °1 CD - ROM µε εγχειρίδιο χρήσης και το software PC
N °1 Πρόχειρο εγχειρίδιο χρήσης
N ° 12 β ίδες, για τον καθορισµό HDD
N °4 Βίδες στερέωσης HDD
88/138
Ελληνικά
2 - Περιγραφή του προϊόντος
Skrócony prze wodnik dla uŜytkowników rejestratora DVR MILANO
Η σειρά των DVR M ILANO σχεδιάστηκε για την δηµιουργία ενός ασφαλούς και σίγο υρο υ συστήµατος παρακολούθησης µε
κάµερες που µπορεί να συνδεθεί µε διαφορετικού τύπου οθόνες, µε PC και µε κινητά τηλέφωνα.
Ο χρησιµοποιούµενος νέος τρόπος δυναµικής εγγραφής και η δυνατότητα ρύθµισης το υ ποιοτικού επ ιπέδου της εγγραφής
επιτρέπουν µεγάλη διάρκεια εγγραφής στον δίσκο και µία θαυµάσια ποιότητα εικόνας κατά το p layback.
Το νέο µικροτσίπ δίνει την δυνατότητα στο DVR να εκτελέσει µια σειρά πράξεων όπως: εγγραφή, playback, παρουσίαση των
εικόνων σε πραγµατικό χρόνο, backup, χειρισµό εκ του µακρόθεν.
Μπορεί να λειτουργήσει µε κονσόλα, µε ποντίκι µε τηλεχειριστήριο, µε εξωτερικό πληκτρολόγιο, µε εικονικό πληκτρολόγιο
και µε interface web µέσω PC ή s martphone.
Τα δύο ρελέ εξόδου µπορούν να ενεργοποιηθούν από µία θύρα συναγερµού, αναγνώ ρισης κινήσεων, απώλεια εικόνας,
απευθείας από το σύστηµα ή µέσω PC ή s martphone ή interface web.
3. Περιγραφή πλήκτρων:
3.1 Πρόσοψη (βλ. Σχήµα 1):
Αρ.
1
2
3
Πλήκτρο
DVD-RW
(προαιρετικό)
Θύρα USB για
σύνδεση µε το
ποντίκι
Θύρα USB
µε
Λειτουργία
Για backup των δεδοµένων
Αρ.
12
Πλήκτρο
STOP
Λειτουργία
∆ιακόπτει την αναπαραγωγή
Συνδέστε
ένα
συµβατό
ποντίκι πριν ανάψετε το
DVR
Συνδέστε
µια
συµβατή
εξωτερική µνήµη όπως USB
stick, συσκευή ανάγνωσης
MMC/SD card ή εξωτερικό
αντιγραφέα DVD +RW
Ένδειξη τροφοδοσίας του
σκληρού δίσκο υ ή του
δικτύου LA N
Πέρασµα από διαµόρφωση
Live σε playback
Πέρασµα ή επιστροφή στην
διαµόρφωση της εικόνας
13
COPY
Έναρξη backup
14
MENU / ESC
Εµφάνιση ή έξοδος απο το
κυρίως Menu
15
PA GE
Εµφάνιση µε διαµό ρφωση quad
16
LEFT / RIGHT
17
UP / BS
Μετατόπιση το υ κέρσο ρα ή Pan
της κάµερας PTZ στα αριστερά
Μετατόπιση του κέρσορα ή Tilt
της κάµερας PTZ π ρος τα
επάνω / Backspace
Κίνηση του δροµέα ή Tilt PTZ
κάµερα
κάτω
/
Χωρίς
κωδικοποίηση
Πλήκτρο επ ιβεβαίωσης
4
Ενδείξεις
LED
5
MODE
6
SEQ
7
CA LL
∆ιάβαση ή την επιστροφή
από την πλήρη οθόνη
18
DOWN / DEL
8
SEARCH
19
ENTER
9
Αποµακρυσµένος
αισθητήρας IR
20
SPLIT Windows
+
Επόµενη οθόνη
10
REC
Εµφανίζει
το
µενού
αναζήτησης
Λαµβάνει το σήµα που
έρχεται
από
το
τηλεχειριστήριο
Χειρο κίνητη εγγραφή
21
SPLIT Windows
-
Προηγούµενη οθόνη
11
Play/Pause
των καταγραµµένων εικόνων
Ελληνικά
3.2 Πίσω όψη (βλ. Σχήµα 2):
Αρ. Συνδέσεις
Αρ.
89/138
Συνδέσεις
Skrócony prze wodnik dla uŜytkowników rejestratora DVR MILANO
9
10
Επιλογέας NTSC/PA L
Έξοδος κύριας οθόνης τύπου S-v ideo
3
4
5
4-9-16 είσοδοι Video BNC
Έξοδος κυρίας και δευτερεύο υσας οθόνης τύπου
BNC
4 µονοφωνικές είσοδοι audio σε RCA
1 µονοφωνική έξοδος audio σε RCA
Συνδετήρας RS-232 για πληκτρολόγιο
11
12
13
6
7
8
Έξοδος video VGA
Συνδετήρας eSATA για εξωτερικούς δίσκους
Συνδετήρας δίκτυο LA N
14
15
16 είσοδοι συναγερµού
2 έξοδοι ρελέ (1 NA και 1 NC)
Συνδετήρας BUS RS-485 για σύνδεση µε κάµερες
PTZ ή πληκτρολόγια
Συνδετήρας τροφοδοτικού
Πλήκτρο εκκίνησης
1
2
3.3 Τηλεχειριστήριο (βλ. Σχήµα 3):
Το τηλεχειριστήριο είναι ένα αξεσουάρ που απλοποιεί σηµαντικά την διαχείριση και τον προγραµµατισµό το υ DVR. Μ ε
το ίδιο εργαλείο είναι δυνατή η διαχείριση έως και τεσσάρων DVR. Συµβουλή: είναι π ροτιµότερο η απόσταση µεταξύ
του τηλεχειριστηρίου και του DVR να µην υπερβαίνει τα 10 µέτρα.
Στην συνέχεια π εριγράφονται η επί µέρους λειτουργίες των διαφόρων πλήκτρων
Nْ
1
λειτουργία
∆ιακοπή
συµβάντος
συναγερµού
Nْ
13
2
Έναρξη/∆ιακοπή
εγγραφής
14
Right
3
Γρήγορο τρέξιµο πίσω
15
Enter
4
Γρήγορο
µπροστά
τρέξιµο
16
Enable or disable audio/Next
5
Προώθηση ενα ενα τα
φωτογράµµατα (frames)
17
Level of zoo m/ Goto preset
6
18
Adjust the volume or the zoo m
level
7
Έναρξη
backup
αντίγραφο
πληροφοριών
Play/pause
19
Change the division of the screen
8
Stop
20
Insert text, nu mbers or code
9
Είσοδος στο κύριο µενού
21
Toggle between
Playback mode
10
Είσοδος
στο
µενού
διαχείρισης κάµερας PTZ
22
Switch or return to sequence
mode
11
Επάνω / Backspace
23
Switch or return to full screen
mode
12
Κάτω / ∆ιαγραφή
24
Display the search menu
κουµπί
ή
των
κουµπί
λειτουργία
Left
Live
and
Το DVR µπορεί να διαχειριστεί εύκολα µε το ποντίκι. Γ ια να εισέλθετε στην διαµόρφωση φ έρτε το κέρσορα του ποντικιο ύ
στο κάτω µέρος της οθόνης.
4 Εγκατάσταση:
90/138
Ελληνικά
3.4 Ποντίκι:
Skrócony prze wodnik dla uŜytkowników rejestratora DVR MILANO
4.1 Εγκατάσταση σταθερού δίσκου:
Για µία σωστή εγκατάσταση ενός ή περισσότερων σκληρών δίσκων ή για την εγγραφή DVD στο DVR ακολουθήστε πιστά τις
παρακάτω οδηγίες
Οδηγίε ς
Τοποθετήστε το DVR στον µπάγκο εργασίας και
αποσυνδέστε όλα τα καλώδια
2
Αφαιρέστε όλες τις βίδες (10). (4) της οπίσθιας
επιφάνειας και (3+3) των πλαϊνών
3
Αφαιρέστε το καπάκι όπως δείχνει η εικόνα
4
Από τα συνοδευτικά εξαρτήµατα του DVR πάρτε τα δύο
λαµάκια και στερεώστε τα στο πλάι του δίσκου µε τις 4
βίδες όπως στην εικόνα
5
Από τα συνοδευτικά εξαρτήµατα του DVR πάρτε τις 4
βίδες και στερεώστε τον σταθερό δίσκο στην βάση του
DVR συνδέστε και τα καλώδια.
6
Για να στερεώστε τους άλλους δυο σταθερούς δίσκους
επαναλάβατε τις κινήσεις του σηµείου 4 και συνδέστε
τους όπως δείχνει η εικόνα
7
Επιλ εκτικά είναι δυνατό να εγκατασταθεί, στην θέση του
τρίτου δίσκου, µια συσκευή εγγραφής DVD. Για την
εγκατάσταση αφαιρέστε τις δύο βίδες του πλαστικού
καλύµµατος, όπως στην εικόνα
91/138
Φωτογραφία
Ελληνικά
Αρ.
1
Skrócony prze wodnik dla uŜytkowników rejestratora DVR MILANO
8
Από τα συνοδευτικά εξαρτήµατα του DVR πάρτε τα δύο
λαµάκια και στερεώστε τα στο πλάι της µονάδας λεϊζερ.
Τοποθετήστε την µονάδα στην βάση του DVR
συνδέοντας τα καλώδια δεδοµένων και τροφοδοσίας
9
Κλείστε το κάλυµµα το υ DVR χρησιµοποιώντας όλες τις
βίδες. Στην συνέχεια συνδέστε την οθόνη και το καλώδιο
τροφοδοσίας. Τώρα το DVR είναι σωστά εγκατεστηµένο
και έτοιµο για χρήση. Βλέπε στα επόµενα κεφάλαια για
την ρύθµιση της ηµεροµηνία / ώρας και το φορµάτ του
σκληρού δίσκο υ
Ενεργοποίηση το DVR χρησιµοποιώντας τη σωστή
buttom στην πίσω πλευρά του το DVR. Το DVR θα
δείξει
το
µήνυµα:
"Unformatted
HDDs
βρέθηκαν.
Θέλετε
να
διαµορφώσετε τώ ρα; [ENTER]: Ναι, [ESC]: Ακύρωση ".
Πατήστε το [ENTER] για να διαµορφώσετε το σκληρό
δίσκο
10
4.3 Πρώτη επαφή µε το DVR:
• Σύνδεση
Μετά το άνοιγµα του DVR, πατήστε το " MENU" κουµπί και στη συνέχεια µετακινήστε το δροµέα στο εικονίδιο που
ονοµάζεται "Σύνδεση / Αποσύνδεση" και πατήστε " ENTER".
Τώρα εισάγετε το όνοµα και τον κωδικό π ρόσβασης. Παραµέτρους από το εργοστάσιο είναι εγκαταστάτη έχει ένα όνοµα
χρήστη: "α" και τον κωδικό "11". Μετακινήστε το δροµέα στο "Σύνδεση" και επιβεβαιώστε πατώντας το πλήκτρο " ENTER".
Υπάρχουν τρία επίπ εδα κωδικό π ρόσβασης στο σύστηµα, όπως: Administrator (υψηλότερη), επόπτη, και Χειριστή
(χαµηλότερη). Ο χειριστής µπορεί να λειτουργήσει ζωντανή οθόνη βίντεο, ο επόπτης ζωντανή οθόνη βίντεο, αναπαραγωγή
εικόνων και αρχείων, καθώς και τα πάντα διοικήσεως.
ΠΡΟΣΟΧΗ: Η εργοστασιακή ρύθµιση του το DVR παίρνει µόνο ένας χρήστης έχει ρυθµιστεί ως διαχειριστής. Για να
αυξηθεί το επίπεδο της ασφάλειας θα πρέπει να χρησιµοποιήσετε αυτόν το χρήστη µόνο για την πρώτη πρόσβαση και
να αλλάξετε τον κωδικό πρόσβασης, το συντοµότερο δυνατό.
ΠΡΟΕΙ∆ΟΠΟΙΗΣ Η: Σε περίπτωση απώλειας του κωδικού πρόσβασης του συστήµατος επικοινωνήστε µε τον τοπικό
διανοµέα σας, ο οποίος θα επικοινωνήσει Fracarro Radi oindustrie SpA
• Ρύθµιση γλώσσας
Ακολουθήστε πιστά τα παρακάτω βήµατα για να ρυθµίσετε τη γλώσσα της DVR:
Ελληνικά
92/138
Skrócony prze wodnik dla uŜytkowników rejestratora DVR MILANO
1.
2.
3.
4.
5.
6.
Πατήστε το "MENU" κουµπ ί για να αποκτήσετε πρόσβαση στο µενού ρύθµισης;
Μετακινήστε το δροµέα στο "SETUP" και επ ιβεβαιώστε πατώντας το πλήκτρο " ENTER";
Μετακινήστε το δροµέα στο "σύστηµα" και επιβ εβαιώστε πατώντας το πλήκτρο "ENTER";
Χρησιµοποιώντας τα β έλη για να µετακινήσετε το δροµέα στη "γλώσσα" και π ιέστε τα πλήκτρα "+/-" να ρυθµίσετε
την επ ιθυµητή γλώσσα;
Πατήστε το "MENU" κουµπ ί για να επιστρέψετε στο προηγούµενο µενού, το DVR θα σας ζητηθεί να αποθηκεύσετε
τις ρυθµίσεις, πατώντας το "ENTER";
Press "ENTER" για να επ ιβεβαιώσετε την αλλαγή της γλώσσας. Το σύστηµα θα επανεκκινήσει µε τις νέες ρυθµίσεις.
• Ρυθµίστε Ηµεροµηνία / Ώ ρα:
Ακολουθήστε πιστά τα παρακάτω βήµατα για να ρυθµίσετε την ηµεροµηνία / ώ ρα:
1.
2.
3.
4.
5.
6.
Πατήστε το "MENU" κουµπ ί για να αποκτήσετε πρόσβαση στο µενού ρύθµισης;
Μετακινήστε το δροµέα στο "SETUP" και επ ιβεβαιώστε πατώντας το πλήκτρο " ENTER";
Μετακινήστε το δροµέα στο "σύστηµα" και επιβ εβαιώστε πατώντας το πλήκτρο "ENTER";
Χρησιµοποιώντας τα β έλη για να µετακινήσετε το δροµέα στο "ΗΜ ΕΡΟΜΗΝΙΑ" και, χρησιµοποιώντας τα πλήκτρα
"+/-" σύνολο του έτους, το υ µήνα και ηµέρα;
Χρησιµοποιώντας τα β έλη για να µετακινήσετε το δροµέα στο "ΧΡΟΝΟΣ" και, χρησιµοποιώντας τα πλήκτρα "+/-"
ρυθµίσετε το χρόνο;
Πατήστε το "MENU" κουµπ ί για να επιστρέψετε στο προηγούµενο µενού, το DVR θα σας ζητηθεί να αποθηκεύσετε
τις ρυθµίσεις, πατώντας το "ENTER".
• ∆ιαµό ρφωση του σκληρού δίσκου:
Ακολουθήστε πιστά τα παρακάτω βήµατα για να διαµορφώσετε το σκληρό δίσκο:
Ελληνικά
93/138
Skrócony prze wodnik dla uŜytkowników rejestratora DVR MILANO
1.
2.
3.
4.
5.
6.
7.
Πατήστε το "MENU" κουµπ ί για να αποκτήσετε πρόσβαση στο µενού ρύθµισης;
Μετακινήστε το δροµέα στο "SETUP" και επ ιβεβαιώστε πατώντας το πλήκτρο " ENTER";
Μετακινήστε το δροµέα στην επικεφαλίδα "HDD" και επιβεβαιώστε πατώντας το πλήκτρο " ENTER";
Πιέστε το πλήκτρο "MODE" κουµπ ί;
Πατήστε το "CA LL" κουµπί για να µορφοποιήσετε ολόκληρο σκληρό δίσκο;
Press "ENTER" για να επ ιβεβαιώσετε τη λειτουργία;
Πατήστε το "MENU" κουµπ ί για να επιστρέψετε στο προηγούµενο µενού.
• Ρύθµιση της ρεκόρ:
Το DVR επ ιτρέπ ει διαφορετικούς τρόπους εγγραφής: συναγερµού, κίνηση, τη συνεχή ή προγραµµατιστεί. Χρησιµοποιώντας
την τελευταία κατάσταση, ο διαχειριστής του συστήµατος µπορεί να καθορίσει, για κάθε ώρα της εβδοµάδας, το είδος της
εγγραφής.
Για να προσαρµόσετε το π ρόγραµµα καταγραφής κάθε µέρα χωρίζεται σε κατ 'ανώτατο όριο των 16 τµηµάτων (Τ1, ... .., T16),
η οποία µπορεί να ρυθµιστεί σε 3 διαφορετικούς τρόπους εγγραφής για να διαλέξετε: εγγραφή β ίντεο, ήχου + εγγραφή βίντεο
ή απουσία καταχώ ρισης.
ΣΗΜΕΙΩΣ Η: Το DVR είναι εργοστάσιο προγραµµατίζεται να καταγράφει συνεχώς κατά τη διάρκεια όλης της
εβδοµάδας.
Ακολουθήστε πιστά τα παρακάτω βήµατα για να ρυθµίσετε το πρόγραµµα:
1.
2.
3.
4.
5.
Πατήστε το "MENU" κουµπ ί για να αποκτήσετε πρόσβαση στο µενού ρύθµισης;
Μετακινήστε το δροµέα στο "SETUP" και επ ιβεβαιώστε πατώντας το πλήκτρο " ENTER";
Μετακινήστε το δροµέα για τον τίτλο "ΠΡΟΓΡΑΜΜΑ ΚΑΤΑΓΡΑΦΗΣ" και επ ιβεβαιώστε πατώντας το πλήκτρο
"ENTER";
Πατήστε το “MODE”;
Εµφανίζεται η ακόλουθη οθόνη:
κάθε ώρα της εβδοµάδας, µπορείτε να ορίσετε διαφορετικούς τρόπους εγγραφής να επιλέξει µεταξύ: Συναγερµός Motion
94/138
Ελληνικά
Η οθόνη αυτή δίνει στον διαχειριστή ένα γρήγορο και εύκολο τρόπο για να ρυθµίσετε το π ρόγραµµα καταγραφής. Γ ια
Skrócony prze wodnik dla uŜytkowników rejestratora DVR MILANO
+ No rmal, Σ υναγερµός + Motion, Συναγερµός, Motion, Κανονική, και δεν εισόδου. Σ ε κάθε περίπ τωση θα πρέπ ει να
καταγράφονται τόσο το βίντεο και ήχου.
Περιγραφή Κλειδί :
▲▼◄►
Πατήστε τα κουµπ ιά για να µετακινήσετε το δροµέα.
Αριθµητική 1-6 (Mouse: Κάντε κλικ στο αριστερό κουµπί του ποντικιού)
Πατήστε τα κουµπ ιά για να επιλέξετε τη λειτουργία εγγραφής. Πιέστε το πλήκτρο ENTER για να ενεργοποιήσετε τη
λειτουργία. Οι διαδικασίες για την εγγραφή είναι τα εξής: "1" - Συναγερµός + + Motion Normal, "2 " Συναγερµός + Motion, "3" - Συναγερµός, "4" - Motion, "5" - Κανονική, "6" - ∆εν Εγγραφή.
+/- (Mouse: Κάντε κλικ στο αριστερό κουµπί του ποντικιού)
Πατήστε τα κουµπ ιά για να επ ιλέξετε το επιθυµητό χρονικό διάστηµα. Πιέστε το πλήκτρο ENTER για να
ενεργοποιήσετε τη λειτουργία εγγραφής επιλεγµένη π εριοχή.
ΟΚΕ (Mouse : Κάντε κλικ στο κουµπί δεξιά)
Πατήστε αυτό το κουµπί για να βγείτε από αυτή την οθόνη και να επ ιστρέψετε µε το π ροηγούµενο έτος. Τα τµήµατα
του χρόνου θα κανάλι επ ικαιροποιεί αναλόγως.
5 Βασική χρήση του DVR:
5,1 Αναζήτηση:
Το DVR επ ιτρέψει 4 διαφορετικο ύς τρόπους για την αναζήτηση της εικόνας, όπως: έρευνα από το χρόνο, από την έρευνα
περιπτώσει, έξυπνη αναζήτηση ή αναζήτηση αρχειοθετηµένα αρχεία.
Η οθόνη για το "ΑΝΑΖΗΤΗΣ Η ΑΝΑ ΩΡΑ", στο κάτω µέρος, δείχνει την ηµεροµηνία κατά την οποία άρχισε την
ηχογράφηση, ώστε να είναι δυνατόν να γνωρίζουµε πόσο χρονικό διάστηµα είναι η ηχογράφηση και επιλέξτε µια
συγκεκριµένη ηµεροµηνία για την αναζήτηση της εικόνας. Είναι δυνατό να µειωθεί ο χρόνος αναζήτησης επιλέγοντας το
είδος της εγγραφής, όπως Συναγερµός, κίνησης, βίντεο απώλεια ή Κανονική.
95/138
Ελληνικά
Ακολουθήστε πιστά τα παρακάτω βήµατα για να κάνει µια αναζήτηση εικόνων:
1. Πιέστε το πλήκτρο "Αναζήτηση" για να αρχίσει η αναζήτηση µενού;
2. Μετακινήστε το δροµέα στο "ΑΝΑΖΗΤΗΣ Η ΑΝΑ ΩΡΑ" και επιβ εβαιώστε πατώντας το πλήκτρο "ENTER";
3. Μετακινήστε τον κέρσο ρα πάνω από τον τίτλο "έτος", "Μήνας", "date", "ΩΡΑ" και "λεπτό" για να επ ιλέξετε την
ηµεροµηνία έναρξης της έρευνας χρησιµοποιώντας τα πλήκτρα "+/-";
4. Μετακινήστε τον κέρσο ρα πάνω από τα κονδύλια "Alarm", " ΠΡΟΤΑΣΗ", "ΑΠΩΛΕΙΑ VIDEO" και της
"κανονικής" για να επιλέξετε το είδος της εγγραφής που θέλετε να αναζητήσετε χρησιµοποιώντας τα κουµπ ιά
"+/-";
5. Press "PLA Y" για να ξεκινήσει η αναπαραγωγή;
6. Πιέστε το πλήκτρο "◄" και "►" για να αυξήσετε ή να µειώσετε την ταχύτητα της οθόνης και το κο υµπί
"► / ▐ ▐" για να διακό ψετε ή να παίξει το βίντεο;
7. Πατήστε το "STOP" για έξοδο από τη λειτο υργία αναπαραγωγής.
5,2 Backup:
Skrócony prze wodnik dla uŜytkowników rejestratora DVR MILANO
Το DVR επ ιτρέπ ει να κάνετε backup το video / audio εγγραφή σε διαφορετικό τύπο εξωτερικές συσκευές USB όπως pendrive,
αυτοτροφοδοτούµενος HDD ή DVD εγγράψιµο. Σας παραπέµπουµε στην προηγούµενη ενότητα για να ξέρουν πώς να
εγκαταστήσετε και να συνδέσετε όλες τις συσκευές:
Πιέστε το πλήκτρο "Αναζήτηση";
Μετακινήστε το δροµέα για "ΑΝΑΖΗΤΗΣ Η ΑΝΑ Ω ΡΑ" και επ ιβεβαιώστε πατώντας το πλήκτρο "ENTER";
Μετακινήστε τον κέρσο ρα πάνω από τον τίτλο "έτος", "Μήνας", "date", "ΩΡΑ" και "λεπτό" για να επ ιλέξετε την
ηµεροµηνία έναρξης της έρευνας χρησιµοποιώντας τα πλήκτρα "+/-";
4. Μετακινήστε τον κέρσο ρα πάνω από τα κονδύλια "Alarm", " ΠΡΟΤΑΣΗ", "ΑΠΩΛΕΙΑ VIDEO" και της "κανονικής"
για να επιλέξετε το είδος της εγγραφής που θέλετε να αναζητήσετε χρησιµοποιώντας τα κουµπιά "+/-";
5. Πατήστε το "ΑΝΤΙΓΡΑΦΟ" κουµπ ί;
6. Μετακινήστε το δροµέα στο " BACKUP ΤΑ ΧΥΤΗΤΑΣ" και επιλέξτε την αξία της δηµιουργίας αντιγράφων
ασφαλείας επιτό κιο από 1 (αργός) έως 9 (fast) χρησιµοποιώντας τα πλήκτρα "+/-".
7. Μετακινήστε το δροµέα στο "Φωτογραφία" για να επιλέξετε την κάµερα που θέλετε να κάνετε backup
χρησιµοποιώντας τα πλήκτρα "+/-";
8. Μετακινήστε τον κέρσο ρα πάνω από τον τίτλο "έτος", "Μήνας", "date", "ΩΡΑ" και "λεπτό" για να επ ιλέξετε την ώ ρα
και την ηµεροµηνία λήξης της δηµιουργίας αντιγράφων ασφαλείας χρησιµοποιώντας τα πλήκτρα "+/-";
9. Πατήστε το "αντίγραφο" για να ξεκινήσει το αντίγραφο ασφαλείας.
Καθ 'όλη τη διαδικασία δηµιο υργίας αντιγράφων ασφαλείας θα εµφανιστεί ένα εικονίδιο και ένα µήνυµα που δηλώνει την
πρόοδο της διαδικασίας. Μόλις η διαδικασία είναι απαραίτητη για να αποσυνδέσετε τη συσκευή που ενεργούν για το
κατάλληλο µενού:
1.
2.
3.
1.
2.
3.
4.
Πατήστε το "MENU" κουµπ ί για να αποκτήσετε πρόσβαση στο µενού του συστήµατος;
Μετακινήστε το δροµέα για " εφεδρική συσκευή" και επ ιβεβαιώστε πατώντας το πλήκτρο "ENTER";
Μετακινήστε τον κέρσο ρα πάνω στα κονδύλια "USB Drive", "USB DVD" ή "SD CARD" για να επιλέξετε τον τύπο
της συνδεδεµένης συσκευής και πατήστε "ENTER" για να αποσυνδεθείτε;
Στο σηµείο αυτό µπορείτε να αποσυνδέσετε την φυσική εφ εδρική συσκευή από το DVR.
ΠΡΟΣΟΧΗ: Μην αφαιρείτε το DVD µέχρι την διαδικασία δηµιουργίας αντιγράφων ασφαλείας δεν είναι τε λείως
έτοιµο για την αποτροπή βλάβης του οπτικού δίσκου.
ΠΡΟΣΟΧΗ: Μην αφαιρέσετε τη συσκευή USB έ ως ότου η διαδικασία δηµιουργίας αντιγράφων ασφαλείας δεν έχει
τελειώσει πλήρως.
1.
2.
3.
4.
Συνδέστε την εφεδρική συσκευή που χρησιµοποιείται σε ένα PC;
Έναρξη του λογισµικο ύ "Selfplayer" που π εριέχονται στο φάκελο "SelfPlayer";
Πατήστε το "ΑΡΧΕΙΟ" τότε "OPEN";
Επιλ έξτε το αρχείο που θέλετε να εµφανίσετε (στο φάκελο "00001") και επιβ εβαιώστε µε το κο υµπί " OPEN".
96/138
Ελληνικά
5,3 Προβολή των εικόνων:
Κατά τη διάρκεια της δηµιουργίας αντιγράφων ασφαλείας το DVR δηµιουργεί δύο φακέλους µε τη συσκευή, που π εριέχει τα
αρχεία αντιγράφων ασφαλείας και τα άλλα που περιέχει την εµφάνιση των εικόνων (SelfPlayer). Ακολουθήστε τα παρακάτω
βήµατα για να προβάλετε εικόνες:
Skrócony prze wodnik dla uŜytkowników rejestratora DVR MILANO
Η εφεδρική DVR χωρίζει το β ίντεο σε πολλά αρχεία του µέγιστο υ µεγέθους των 100Mb το οποίο µπορεί στη συνέχεια να
ενωθούν για να σχηµατίσουν ένα ενιαίο αρχείο "avi" χρησιµοποιώντας το λογισµικό "A VIConverter" που προβλέπεται.
6 Σβήστε:
Πριν από την απενεργοποίηση του DVR, πατήστε το "M ENU" και µετά "Shutdown" και επ ιβεβαιώστε πατώντας το πλήκτρο
"ENTER". Πιέστε "ENTER" και πάλι στο αίτηµα για επιβ εβαίωση της εντολής. Μόνο όταν το DVR εµφανίζει το µήνυµα
"Τερµατισµός πλήρης. Τώρα µπορείτε να απ ενεργοποιήσετε το σύστηµα, µπορείτε να απενεργοποιήσετε το DVR
χρησιµοποιώντας το κατάλληλο πλήκτρο στο π ίσω πάνελ το υ DVR.
Προσάρτηµα 7:
7,1 Recordi ng πίνακα:
Για να επιλέξετε το σωστό µέγεθος του σκληρού δίσκου για την εγκατάσταση σχετικά µε το DVR είναι ένας πίνακας που
δείχνει το µέγιστο χρόνο εγγραφής σε ανάλυση CIF (360x288) και µέγιστη ποιότητα (9) για κάθε τύπο DVR µέγεθος και
σκληρό δίσκο:
HDD (GB)
160
320
750
1000
DVR MILANO CH4 (ώρες)
50
99
230
308
DVR MILANO CH9 (ώρε ς)
25
50
115
154
DVR MILANO CH16 (ώρες)
25
50
115
154
ΠΡΟΣΟΧΗ: Η DVR χωρίζουν τους HDD σε δύο διαφορετικά διαµερίσµατα, το ένα µεγαλύτερο (70% της µέγιστης
χωρητικότητάς του HDD) χρησιµοποιείται για την κανονική εγγραφή και ο άλλος (30% ) για την προ-συναγερµού και
προ-εγγραφής κίνηση.
7.2 Σύνδεση µε το δίκτυο:
Το DVR δίνει την δυνατότητα διανοµής των εικόνων στο δίκτυο Ethernet ή στο Internet. Και στις δύο π εριπτώσεις οι εικόνες
µπορούν να εµφανιστούν σε ένα οποιοδήποτε PC, smarthpone ή PDA. Στην περίπτωση που χρησιµοποιείται ένα PC είναι
δυνατή η διαχείριση 4 DVR απευθείας από το Internet Exp lorer χωρίς να χρειάζεται η εγκατάσταση κάποιου software. Ο
αριθµός των DVR που µπορο ύν να διαχειριστο ύν µε το ίδιο τερµατικό αυξάνεται στο 10 εάν εγκατασταθεί το software που
παρέχεται. Σε κάθε περίπ τωση είναι δυνατή η διαχείριση απευθείας δύο ρελέ εξόδου εκ το υ µακρόθεν..
Το πρώτο είδος σύνδεσης (Ethernet) γίνεται χρησιµοποιώντας ένα διπλό καλώδιο δικτύου µεταξύ DVR και PC (εικόνα Α) ή
µέσω ενός router, switch od hud (εικόνα Β).
Εικ.A
Εικ.B
Και στις δύο περιπτώσεις ακολουθείστε την παρακάτω διαδικασία για την διαµό ρφωση της σύνδεσης:
Οδηγίε ς
Εικόνες
Πρώτα από όλα πρέπει να έχετε πρόσβαση σε ένα Pc
συνδεδεµένο στο ίδιο δίκτυο µε το DVR, κινηθείτε
στο
avvio/esegui
(εκκίνηση
/
εκτέλεση)
πληκτρολογήστε “cmd” και πιέστε Invio (αποστολή)
θα εµφανιστεί το pro mt των εντολών του MS-DOS
Πληκτρολογήστε “ipconfig / all και πιέστε Invio
(αποστολή). Θα εµφανιστεί η οθόνη που
παρουσιάζεται δίπλα η οποία περιέχει όλες τις
πληροφορίες του δικτύου του PC όπως Gateway
(Ex.192.168.1.1), Subnet Mask (255.255.255.0) και
την διεύθυνση IP του PC (Ex.192.168.1.14)
Net type
Static IP
97/138
Static IP
IP Address
Net Mask
E-mail
FTP Adv.
192.168.1.15
255.255.255.0
Ελληνικά
Επιστρέψτε στο DVR, πιέστε το πλήκτρο M ENU και
στην συνέχεια το IMPOSTAZIONE και RETE για να
έχετε πρόσβαση σε όλη την διαµόρφωση του δικτύου
του DVR. Στην οθόνη αυτή βάλτε µία διεύθυνση IP
Skrócony prze wodnik dla uŜytkowników rejestratora DVR MILANO
(Ex. 192.168.1.1) που δεν χρησιµοποιείται από
καµία άλλη συσκευή του δικτύου και από τα
Gateway
(Εx.192.168.1.1)
και
Net
mask
(Ex.255.255.255.0) που έχουν εγκατασταθεί στο PC
ΠΡΟΣΟΧΗ: Η διεύθυνση του IP που θα αποδοθεί
στο DVR πρέπει να διαφέρει από εκείνη του PC
µόνο κατά τον τελευταίο αριθµό
PPPoE
Gateway
DNS
Username
Password
DDNS Type
URL
DDNS Username
DDNS Password
192.168.1.1
Dynamic
Εισάγετε την διεύθυνση IP του DVR (Ex
192.168.1.15) στην γραµµή αναζήτησης του Internet
Exp lorer και πιέστε Inv io (Αποστολή)
Όταν το Web browser θα ζητήσει να εγκατασταθούν
οι έλεγχοι Active X επιβ εβαιώστε την αίτηση.
ΠΡΟΣΟΧΗ:
Η ροή δεδοµένων που θα
δηµιουργηθεί µεταξύ του DVR και του PC µπορεί
να διακοπεί από το firewall του λειτουργικού
συστήµατος. Στην περίπτωση που δεν είναι δυνατή
η είσοδος στο DVR απενεργοποιήστε την
προστασία του firewall
Εάν ο bro wser Internet Exp lorer δεν καταφέρει να
συνδεθεί κάντε κλ ικ στο Εργαλεία / Επιλογές Internet /
Προστασία/ Side αξιόπιστα/ Side,
πληκτρολογήστε
την διεύθυνση και επ ιβεβαιώστε µε το πλήκτρο
“Aggiungi” (προσθήκη)
Μετά το τέλος της διαµόρφωσης το browser θα
παρουσιάσει το διπλανό παράθυρο login. Εισάγετε το
όνοµα του χρήστη και το password µε τα οποία
επιθυµείτε να εισέρχεστε στο σύστηµα.
ΠΡΟΣΟΧΗ: Ο χρήστης defaul t έχει σαν όνοµα
χρήστη: aa και password:11
Τώρα µπορείτε να εισέλθετε στο Interface web του
DVR. Συµβουλ ευτείτε το εγχειρίδιο του χρήστη για
την κατανόηση όλων των διαθέσιµων λειτουργιών.
Κάνοντας χρήση ενός smartphone, PDA ή ενός
οποιαδήποτε browser web διαφορετικό το υ Internet
Exp lorer θα είναι δυνατόν να εισέλθετε στο interface
wap του DVR
Τώρα το DVR είναι σωστά συνδεδεµένο µε το δίκτυο Ethernet και µπορεί να γίνει η σύνδεση του µε το δίκτυο Internet ώστε
να είναι δυνατή η π ρόσβαση στις πληροφορίες που παρέχονται από το Ethernet και στο δίκτυο Internet (Εικ. Γ)
98/138
Ελληνικά
ΠΡΟΣΟΧΗ: Εάν η σύνδεση γίνεται µε ένα διπλό καλώδιο δικτύου µην εισάγετε κανένα Gatway
Skrócony prze wodnik dla uŜytkowników rejestratora DVR MILANO
Ακολουθήστε πιστά τις παρακάτω οδηγίες για να διαµορφώσετε την σύνδεση:
Οδηγίες
Εισέλθετε στο www.dyndns.org και δηµιο υργήστε δωρεάν
ένα νέο account κάνοντας κλικ στο πλήκτρο “Create
Account”
Εικόνες
Το side internet θα στείλει ένα mail στην καταχωρηµένη
διεύθυνση καθώς και την επιβεβαίωση της δηµιουργίας του
νέου account
Εισέλθετε στο νέο account και εγκαταστήστε το
username και το password που επιλ έξατε
Κάντε κλικ στο “Add Host Services”
Επιλ έξτε το νέο Hostname για το DVR, κάντε κλικ στο
“Use auto detect IP Address” και επ ιβεβαιώστε όλες τις
επόµενες ερωτήσεις για να ενεργοποιήσετε το νέο Host
Ελληνικά
99/138
Skrócony prze wodnik dla uŜytkowników rejestratora DVR MILANO
Με το Browser web Internet Exp lorer τοποθετήστε την διεύθυνση IP
του router (Gateway) και επ ιβεβαιώστε µε το πλήκτρο Invio
(Αποστολή). Θα εµφανιστεί ένα παράθυρο log in για την τοποθέτηση
του router. Εάν δεν διαθέτετε τα στο ιχεία αυτά απευθυνθείτε στο
εγχειρίδιο εγκατάστασης του router
Συµβουλευθείτε το εγχειρίδιο εγκατάστασης του router για να
δηµιουργήσετε ένα κανόνα για τις θύρες 67,68 και 80 που αφορούν
την διεύθυνση IP του DVR και το πρω τόκολλο TCP
ΣΗΜΕΙΩΣ Η:
Συµβουλευτείτε
το
side
internet
www.portgorwardi ng.com για να πληροφορηθείτε την σωστή
διαδικασία για την διαµόρφωση του router.
Συµβουλευτείτε το εγχειρίδιο εγκατάστασης του router για να εισάγετε
τις πληροφορίες του DDNS (Dynamic DNS) σαν username, password
και hostname το υ DVR
Τώρα το DVR είναι σωστά συνδεδεµένο µε το δίκτυο internet.
Εισάγετε την διεύθυνση web που δηµιουργήθηκε µε το side
www.dyndns.org (“hostname”.dyndns.org) στον κατάλογο µε τα
αξιόπιστα side του Internet Exp lorer
Προσθέστε την διεύθυνση web που δηµιο υργήθηκε µε το side
www.dyndns.org στην σειρά αναζήτησης του Internet Explorer για να
µπορείτε να έχετε π ρόσβαση στο interface web το υ DVR
7.3 Σύνδεση µε κινητή συσκευή:
100/138
Ελληνικά
Οι εικόνες του DVR µπορούν να εµφανιστο ύν σε κινητές συσκευές όπως: smartphone, PDA ή κινητά τηλέφωνα συνδεδεµένα
µε το δίκτυο internet
Ακολουθήστε πιστά τις παρακάτω οδηγίες για να επ ιτύχετε την σύνδεση:
Skrócony prze wodnik dla uŜytkowników rejestratora DVR MILANO
Οδηγίες
Εισάγετε την διεύθυνση web που φτάξατε µε την
ιστοσελίδα www.dyndns.org (“hostname”.dyndns.org)
στην µπάρα αναζήτησης του web browser.
Εικόνες
Θα εµφανιστεί ένα παράθυρο login στο οποίο µρέπει να
µπο΄υν όνοµα χρήστη και κωδικός του χρήστη που
διαµορφώθηκε DVR.
Επιλ έξτε την ευκρίνεια της εικόνας που αντιστο ιχεί
καλλίτερα στις διαστάσεις της οθόνης του κινητο ύ
εξαρτήµατος και επ ιβεβαιώστε πιέζοντας το πλήκτρο
“OK”
Τώρα έχετε πρόσβαση στις εικόνες live του DVR, στην
διαχείριση του ρελέ εξόδου και µπορείτε να γνωρίζετε
την κατάσταση των εισόδων συναγερµού.
7.4 Σύνδεση κάµερας ΡΤΖ:
Το DVR µπορεί να διαχειριστεί µέχρι και 4-9-16 κάµερες ΡΤΖ χρησιµοποιώντας το bus RS-485 (Εικ. ∆):.
Ακολουθήστε πιστά τις παρακάτω οδηγίες για να συνδέσετε σωστά τις κάµερες:
Οδηγίες
Συµβουλευτείτε το εγχειρίδιο εγκατάστασης της
κάµερας ΡΤΖ για να διαµο ρφώσετε το π ρωτόκολλο
επικοινωνίας Pelco–D ή, Baud Rate: 4800 Bps και την
διεύθυνση ID (από το 1 µέχρι το 255) που θα πρέπ ει
να είναι διαφορετική για κάθε κάµερα
Εικόνες
Ελληνικά
101/138
Skrócony prze wodnik dla uŜytkowników rejestratora DVR MILANO
Συνδέστε το BUS RS-485 της κάµερας στην πίσω
πλευρά του DVR όπως δείχνει η εικόνα
Πατήστε
και
«M ENU»
στην
συνέχεια
RS-232/ 422 /485 Setup
«IMPOSTAZIONE» και RS-232/ 422/485 Setup στο
DVR για να έχετε πρόσβαση στις ρυθµίσεις του BUS
RS-485. Εισάγετε το ίδιο πρωτό κολλο επικο ινωνίας
(Pelco
D
και
Baud
rate (4800Bps) που έχει
καταχωρηθεί στην κάµερα
Πιέστε “M ENU στην συνέχεια “IM POSTAZIONE”
και Pre-Camera Setup στο DVR για να έχετε
πρόσβαση στις ρυθµίσεις της κάµερας. Εισάγετε την
διεύθυνση ID της κάµερας PTZ
που είναι
συνδεδεµένη µε την αντίστοιχη είσοδο εικόνας στο
DVR
ΠΡΟΣΟΧΗ: Βεβαιωθείτε ότι όλε ς οι κάµερες ΡΤΖ
έχουν διαφορετικές διευθύνσεις ID
COM Port
Device Type
Model
Baud Rate
Data Bit
Stop Bit
Parity
DVR/Camera ID
RS-232
RS-422/485
PTZ
Pelco (D-Type)
4800
8
1
None
0
Pre-Camera Setup
REC Resoluti on
720x288
Watermark
√
Group
Camera
Installed
PTZ ID
12345678
1
√
N/A
2
√
1
…
…
…
Τώρα η κάµερα είναι σωστά συνδεδεµένη στο DVR και µπορο ύµε να επωφεληθούµε από τις δυνατότητες της χρησιµοποιώντας
το τηλεχειριστήριο, το ποντίκι ή το software που εγκατεστηµένο στον PC.
Ελληνικά
102/138
Snelle handleiding DVR MILANO
UWAGA: Niniejszy podręcznik uŜytkownika stanowi jedynie skrócony przewodnik. Przy pierwszej instalacji rejestratora
DVR naleŜy skorzystać z właściwego podręcznika uŜytkownika, który pozwoli zapoznać się z kompletnymi informacjami
dotyczącymi wszystkich dostępnych funkcji rejestratora.
Spis treści:
1- Zasady bezpieczneg o uŜytk owani a ............................................ ........................................................str.23
1.1 – Zawartość opakowania ........................................................... ..........................................................str.23
2- Informacje o produkcie .........................................................................................................................str.23
3- Panele i pil ot zdal nego sterowania .....................................................................................................str.24
3.1 – Panel czoło wy ...................................................................................................................................str.24
3.2 – Panel tylny .........................................................................................................................................str.24
3.3 – Pilot zdalnego sterowania ...............................................................................................................str.24
3.4 – Mysz ...................................................................................................................................................str.25
4- Instalacja ...................................................................................................................................................str.25
4.1 – Włączanie i wy łączan ie zasilan ia ..................................................................................................str.25
4.2 – Ustawienia dysków twardych ........................................................................................................str.25
4.3 – Uzyskanie dostępu do systemu rejestratora DVR po raz p ierwszy .........................................str.26
5- Podstawowe zastosowanie rejestratora DVR ...................................................................................str.29
5.1 – Wyszukiwania ...................................................................................................................................str.29
5.2 – Archiwizacja ......................................................................................................................................str.30
5.3 – Podgląd obrazów ...............................................................................................................................str.30
6- Wyłączanie rejestratora ........................................................................................................................str.31
7- Dodatek ......................................................................................................................................................str.31
7.1 – Tabela nagrywania ...........................................................................................................................str.31
7.2 – Po łączenie z PC za pośrednictwem Internetu .............................................................................str.35
7.3 – Po łączenie z telefonem ko mórkowy m za pośrednictwem Internetu .......................................str.35
7.4 – Po łączenie z kamerami PTZ ...........................................................................................................str.36
POLSKI
103/138
Snelle handleiding DVR MILANO
1. Zasady bezpiecznego uŜytkowania:
Instalacja produktu musi zostać przepro wadzona przez wykwalifikowanych pracowników serwisu zgodnie z lokalnym prawem
i przepisami bezp ieczeństwa. Niniejszy produkt jest produktem Klasy II, zgodnie z normą EN 60950-1.
OstrzeŜenia dotyczące montaŜu i eksploatacji
- NaleŜy uŜywać ty lko sprzętu sieci kablowej, instalując produkt w sposób umoŜliwiający łatwy dostęp do wtyczki.
- Niniejszy produkt nie powin ien być naraŜony na kontakt z wodą, w postaci kropel lub ro zbry zgów, i dlatego musi być
instalowany
w
suchych
miejscach,
wewnątrz
budynków.
- NaleŜy zostawić wystarczająco duŜo miejsca wokół produktu w celu zapewnien ia właściwej wentylacji. Zbyt wysoka
temperatura i / lub nadmierne ogrzewanie mogą stanowić zagroŜen ie dla poprawnego działan ia oraz trwałości produktu.
- Nie naleŜy instalować produktu ponad źródłami ciepła lub w ich pobliŜu, ani w miejscach gdzie występuje duŜa
koncentracja
kurzu
lub
substancje,
z
który mi
kontakt
prowadzi
do
powstawania
koro zji.
- Wilgotność oraz krople wody powstające wskutek kondensacji pary wodnej mogą doprowadzić do uszkodzen ia
produktu. JeŜeli dojdzie do skroplenia się pary wodnej, wó wczas przed ro zpoczęciem u Ŝytkowania produktu naleŜy go
całko wicie wysuszyć.
UWAGA: Produkt mo Ŝe zostać otwarty tylko przez odpowiednio wykwalifikowany i uprawn iony personel. W przypadku
awarii, nie naleŜy próbować naprawiać urządzen ia samod zielnie poniewaŜ doprowadzi to do utraty gwarancji.
Dla własnego bezpieczeństwa, naleŜy odłączyć zasilanie przed przeniesieniem Cyfrowego Rejestratora Wideo,
instalacją, lub wy mianą jakich kolwiek jego części lub dysku twardego.
Przed rozpoczęciem u Ŝytkowan ia Cyfrowego Rejestratora Wideo naleŜy upewnić się, Ŝe ws zystkie kable i przewody
zasilające są odpowiednio poprowadzone. NaleŜy niezwłocznie skontaktować się ze swoim dystrybutorem w
przypadku stwierd zenia jakiejkolwiek usterki.
Aby uniknąć spięć, nie naleŜy pozostawiać jakichko lwiek zbędnych części wewnątrz Cyfrowego Rejestratora Wideo.
Prosimy unikać radykalnych zmian warunków eksploatacyjnych, takich jak zapylenie, temperatura oraz wilgotność.
NaleŜy u Ŝywać i przechowywać Cy frowy Rejestrator Wideo w temperaturze od 5°C do ~40°C.
Cyfro wy Rejestrator Wideo naleŜy uŜy wać i przechowywać w miejscu z dobrą wentylacją z dala od wszelkich
przed miotów będących źródłem ciepła.
Nie naleŜy zasłaniać otworów wentylatora i otworów wentylacyjnych.
Nie naleŜy wystawiać urząd zenia na bezpośrednie działanie słońca.
JeŜeli masz wątpliwości dotyczące instalacji oraz konfiguracji, prosimy o skonsultowanie się z praco wnikami
technicznymi.
W przypadku stwierdzenia jakichko lwiek uszkodzeń niniejszego urząd zenia lub zasilacza, n ie naleŜy dokonywać
naprawy samodzieln ie. NaleŜy skontaktować się z dostawcą / dystrybutorem urządzen ia.
DYREKT YWA KOMPATYB ILNOŚCI EL EKTROMAGNET YCZNEJ
Zgodnie z Europejską Dyrektywą 2004/ 108/ EC (EM C), n iniejszy produkt ma być zainstalowany przy uŜyciu
urząd zeń, kabli oraz złączy, które pozwalają zapewnić zgodność z wymagam tej dyrektywy w odniesieniu do
instalacji stacjonarnych.
WYMIANA I US UWANIE B ATERII
Nin iejszy produkt zawiera baterie 2 AAA typu mini-stilo (paluszki), które moŜna wy mienić naciskając na przycisk
zwaln iający klapkę pojemn ika na baterie z tyłu pilota, oraz baterię CR2032 znajdującą się w płycie g łównej
rejestratora DVR. Mając na uwadze potencjalne szkodliwe efekty substancji uŜytych w bateriach dla środowiska
naturalnego i zdrowia człowieka, u Ŝytkown ik końcowy musi pozbyć się zuŜytych baterii wykorzystując w tym celu
specjalnie przygotowane pojemniki do zbiórki śmieci.
ZGODNOŚC Z OB OWIĄZUJ ĄCYMI DYREKT YWAMI EUROPEJS KIMI
Nin iejszy produkt jest zgodny z zasadniczy mi wy maganiami ustanowionymi w Europejskiej Dy rektywie 2004/108/ EC
(Dyrektywa Ko mpatybilności Elektro magnetycznej - Electro magnetic Co mpatib ility Directive - EM C).
1.1 Zawartość opakowania:
104/138
POLSKI
1 szt. Mysz;
1 szt. Pilot zdalnego sterowania;
2 szt. Baterie alkaliczne typu AAA (paluszki);
1 szt. Zasilacz 12V/ 8A (12V/5A DVRM ILANO CH4);
1 szt. Przewód zasilacza w wersji schuko;
1 szt. Płyta CD-ROM z instrukcją obsługi oraz oprogramowan iem do ko mputera osobistego;
1 szt. Skrócony przewodnik;
Snelle handleiding DVR MILANO
4 szt. Śruby mocujące dysku twardego;
2. Informacje o produkcie:
Cyfro we rejestratory wideo/audio DVR MILANO 4-9-16 zapro jektowano z myślą o zapewn ieniu wydajnego i zarazem
bezpiecznego systemu ochrony, który moŜe współpracować z ró Ŝnego rodzaju monitorami, ko mputerami osobistymi oraz
urząd zeniami mobilny mi typu ‘smartphone’. Nowy rodzaj ko mpresji o raz mo Ŝliwość konfigurowania jakości gwarantują
długi czas nagrań na Twardym Dysku oraz dobrą jakość obrazu podczas odtwarzania nagranego materiału.
Nowy procesor u moŜliwia rejestratorowi DVR wykonywanie sześciu ró Ŝnych operacji, takich jak: ró wnoczesne
nagrywanie, podgląd w czasie rzeczy wistym, odtwarzanie, archiwizacja, sterowanie i zdalny dostęp.
Sterowanie rejestratorem mo Ŝliwe jest poprzez panel czo łowy, mysz, p ilot zdalnego sterowania, klawiaturę zewnętrzną,
klawiaturę wirtualną oraz interfejs sieciowy za pomocą ko mputera osobistego lub urządzenia mobilnego typu
‘smartphone’.
Dwa p rzekaźniki wyjściowe mogą być aktywo wane sygnałami z wejścia alarmo wego, czujnika detekcji ruchu, zanikiem
sygnału wideo, zdarzeniem systemowym lub bezpośrednio z telefonu ko mó rko wego lub interfejsu sieciowego.
3. Panele i pilot zdalnego sterowani a :
3.1 Panel czołowy (patrz rysunek 1):
Nr
1
2
Kl awisz/złącze
Nagrywarka
DVD (opcja)
Złącze USB na
mysz
3
Złącze USB
4
Wskaźnik LED
5
MODE
6
SEQ
7
CA LL
8
9
SEARCH
Odbiornik IR
10
REC
11
Play/Pause
Funkcja
UŜywane do archiwizacji jeŜeli
jest zainstalowana nagrywarka
Podłączan ie
ko mpatybilnej
myszki (Podłącz mysz przed
włączeniem zasilan ia)
Podłączan ie
urządzeń
do
archiwzacji np. Twardy dysk,
czytnik kart, nagrywarka DVD.
Wskaźnik
LED
twardego
dysku, zasilania, sieci
Przełączanie pomięd zy trybem
odtwarzania
na
Ŝywo
a
odtwarzaniem zapisu.
Wejście/wyjście
w
tryb
sekwencyjnego
wyświetlania
obrazów.
Wejście/wyjście
w
tryb
wyświetlania pełnoekranowego.
Wyświetl menu szukania
Odbiornik IR p ilota zdalnego
sterowania
Nagrywanie manualne
Nr
12
Kl awisz/złącze
STOP
Funkcja
Zatrzy maj odtwarzanie
13
COPY
Uruchom/ zatrzy maj
archiwizację
14
MENU / ESC
Wejście/wyjście do menu
15
PA GE
16
LEFT / RIGHT
Wybór podziału wyświet lanych
obrazów
Ruszanie kursorem lub kamerą
PTZ w prawo/lewo
17
UP / BS
Ruszanie w gore ku rsorem lub
kamerą PTZ
18
DOWN / DEL
19
20
ENTER
SPLIT Windows
+
SPLIT Windows
-
Ruszanie w dół kursorem lub
kamerą PTZ
Przycisk potwierd zenia
Wybór następnego okna
21
Wybór poprzedniego okna
Uruchom/ wstrzy maj
odtwarzanie
3.2 Panel tylny (patrz rysunek 2):
Złącze
Wejście Wideo BNC 4/9/16szt.
Wyjście wideo BNC główne i podgląd
Wejście Audio RCA 4s zt.
Wyjście Audio RCA 1 s zt.
Złącze RS-232 (klawiatura)
Wyjście Video VGA
Złącze eSATA (zewn. urząd zenie do arch iwizacji)
Złącze Ethernet (Sieć Lan/Internet)
Nr
9
10
11
12
13
14
15
3.3 Panele i pil ot zdal nego sterowania (patrz rysunek 3):
105/138
Złącze
Przełączn ik trybu NTSC/PA L
Głó wne wy jście S-video
Wejścia alarmo we 4/9/ 16 szt.
Wyjścia alarmo we 2 szt.
Złącze RS-485 (kamery PTZ/ klawiatura)
Zasialanie
Włącznik zasilania
POLSKI
Nr
1
2
3
4
5
6
7
8
Snelle handleiding DVR MILANO
Pilot zdalnego sterowania stanowi opcjonalne wyposaŜenie, którego celem jest ułatwienie d ziałań uŜytko wnika
związanych z obsługą funkcji rejestratora. Wszystkie działania mo Ŝna wykonywać przy po mocy pilota zdalnego
sterowania bez konieczności korzystania z przycisków na panelu czołowy m. Efektywna odległość działania p ilota wynosi
około 10m, bez Ŝadnych przeszkód b lokujących sygnał miedzy p ilotem a portem podczerwien i na rejestratorze.
Nْ
1
Funkcja
Blokowan ie
zdarzenia
alarmo wego
Nْ
13
2
Rozpocznij / Zatrzy maj
Nagrywanie
14
W prawo
3
Do tyłu
15
Enter
4
Do przodu
16
Włącz lub
Następny
5
Odtwarzanie klatka po
klatce
17
6
18
7
Rozpoczęcie
archiwizacji nagrania lub
kopiowania info rmacji
Odtwarzanie / Pauza
Pozio m powięks zenia / Idź do
ustawienia
predefin iowanego
(presetu)
Regulacja pozio mu głośności lub
powiększen ia
19
Zmiana podziału ekranu
8
Stop
20
Wprowadź tekst, liczby lub kod
9
Wejście do menu
21
10
11
Wyjście
z
rozpoczęcie
sterowania PTZ
Do góry / Cofn ij
Przełączanie
miedzy trybem
podglądu
‘na
Ŝywo’
a
odtwarzaniem
Wejście do / opuszczenie trybu
wyświetlania sekwencyjnego
12
Do dołu / Usuń
Przycisk
lub
trybu
22
Przycisk
Funkcja
W lewo
wyłącz
audio
/
23
Wejście do / opuszczenie trybu
wyświetlania pełnoekranowego
24
Wyświetlenie menu
wyszukiwania
3.4 Mysz:
Cyfro wy m rejestratorem DVR mo Ŝna łatwo sterować przy pomocy myszy. Mysz naleŜy podłączyć przed podłączeniem
zasilan ia a następnie przesunąć kursor w dolnej części ekranu aby pokazało się menu ustawień.
4. Instal acja:
4.1 Ustawienia dysków twardych:
106/138
POLSKI
Dla poprawnego zainstalowania twardego dysku oraz nagrywarki DVD w rejestratorze DVR, naleŜy postępować zgodnie z
przedstawionymi poniŜej wskazówkami.
Snelle handleiding DVR MILANO
Nr
1
Instrukcja
Odłącz wszystkie kable.
Picture
2
Usuń wszystkie śruby (10) z tyłu (4) i po bokach (3+3).
3
Zdejmij pokrywę.
4
Z akcesorii rejestratora weź p łytki montaŜowe i przy mocuj je do
boków twardego dysku przy po mocy 4 śrub.
5
Z akcesorii rejestratora weź 4 śruby i przykręć nimi t wardy dysk
w rejestratorze a następnie podłącz kabel zasilający i sata.
6
Wróć do punktu 4 aby podłączyć kolejne 2 dyski.
7
Jest moŜliwe zainstalowanie opcjonaln ie nagrywarki DVD
zamiast dodatkowego dysku twardego. Aby zainstalować
nagrwyarkę odkręć dwie śrubki i usuń plastikową zaślepkę.
POLSKI
107/138
Snelle handleiding DVR MILANO
8
Z akcesorii rejestratora weź płytki montaŜo we i zamocuj je na
bokach nagrywarki, a następnie zamontuj ją w rejestratorze i
podłącz kabel zasilający i sata.
9
UŜywając wszystkich śrub przy mocuj pokry wę rejestratora a
następnie podłącz monitor i zasilan ie. Teraz rejestrator jest
gotowy do uŜycia. Spójrz w instrukcję obsługi jak ustawić czas i
datę w rejestratorze oraz zfo rmatować dyski t warde.
Włącz rejestrator uŜy wając p rzycisku włączania na panelu
przednim. Rejestrator wyświetli na ekranie ko munikat :
“Unformatted HDDs found. Do you want to format now?
[ENTER]: Yes, [ESC]: Cancel”.
“Niezformatowowane dyski HDD. Czy sformatować je teraz?
[ENTER] Tak [ESC] Rezygnacja
Naciśnij [ENTER] aby zformatować dyski twarde..
10
4.2 Uzyskanie dostępu do systemu rejestratora DVR po raz pierwszy DVR:
• Logowanie
Po włączeniu rejestratora DVR, naleŜy nacisnąć przycisk “MEN U” a następnie przesunąć kursor na ikonę o nazwie ‘Zaloguj /
Wyloguj’ ("Login / Logout") i nacisnąć przycisk “ENTER”.
Kolejnym krokiem jest wprowad zenie nazwy i hasła. Według parametrów ustawień fabrycznych nazwa uŜytko wnika to: " aa" a
hasło: "11". Kursor naleŜy przesunąć na ‘Zaloguj’ (" Login") i zatwierd zić poprzez naciśnięcie przycisku “ ENTER”.
W systemie funkcjonują trzy pozio my haseł, w ty m: Ad min istrator (najwy Ŝszy), Supervisor, o raz Operator (najn iŜs zy).
Operator mo Ŝe obsługiwać podgląd wideo na Ŝywo, Supervisor obsługuje podgląd wideo na Ŝy wo, odtwarzanie nagranego
obrazu oraz arch iwizację, a Ad ministrator ma uprawn ienia do obsługiwania wszystkich funkcji.
UWAGA: W fabrycznych ustawieni ach rejestratora DVR tylko jeden uŜytkownik jest skonfigurowany jako
administrator. Aby zwiększyć poziom bezpieczeństwa naleŜy wykorzystać konfigurację tego uŜytkownika tylko przy
uzyskiwaniu dostępu do sytemu rejestratora po raz pierwszy a następnie naleŜy jak najszybciej zmienić hasło.
OSTRZEś ENIE: W przypadku zagubienia hasła systemoweg o naleŜy skontaktować się z lokalnym dystrybutorem,
który skonsultuje się z Fracarro Radi oindustrie S.p.A.
•
Ustawienia języka
Aby dokonać konfiguracji wybranego języka na rejestratorze DVR, naleŜy postępować ściśle według przedstawionych poniŜej
wskazó wek:
1.
2.
3.
4.
6.
108/138
POLSKI
5.
Naciśnij przycisk “MENU” aby uzyskać dostęp do menu konfiguracji;
Przesuń kursor do ‘USTAWIENIA’ ("S ETUP”) i zatwierd ź poprzez naciśnięcie przycisku " ENTER";
Przesuń kursor do "SYSTEM" i zatwierd ź poprzez naciśnięcie przycisku " ENTER";
Korzystając z przycisków kierunkowych (strzałek) p rzesuń kursor do ‘JĘZYK’ ("LANGUAGE") i naciskaj przyciski
"+/-" aby ustawić Ŝądany języ k;
Naciśnij przycisk “MENU” aby powrócić do poprzedniego menu, rejestrator DVR zachowa ustawienia po
naciśnięciu przycisku " ENTER";
Naciśnij przycisk " ENTER" aby zatwierd zić zmianę języ ka. System zostanie uruchomiony ponownie z nowy mi
ustawieniami.
Snelle handleiding DVR MILANO
• Ustaw Datę / Czas:
Aby ustawić datę / Czas, naleŜy postępować ściśle według przedstawionych poniŜej wskazó wek:
1.
2.
3.
4.
5.
6.
Naciśnij przycisk “MENU” aby uzyskać dostęp do menu konfiguracji;
Przesuń kursor do ‘USTAWIENIA’ ("S ETUP”) i zatwierd ź poprzez naciśnięcie przycisku " ENTER";
Przesuń kursor do "SYSTEM" i zatwierd ź poprzez naciśnięcie przycisku " ENTER";
Korzystając z przycisków kierunkowych (strzałek) p rzesuń kursor do ‘DATA’ ("DATE") i, korzystając z przycisków
"+/-", ustaw rok, miesiąc i d zień;
Korzystając z przycisków kierunkowych (strzałek) p rzesuń kursor do ‘CZAS’ ("TIME") i, ko rzystając z przyciskó w
"+/-", ustaw czas;
Naciśnij przycisk “MENU” aby powrócić do poprzedniego menu, rejestrator DVR zachowa ustawienia po
naciśnięciu przycisku " ENTER";
• Fo rmatowanie t wardego dysku:
Aby sformatować twardy dysk, naleŜy postępować ściśle według przedstawionych poniŜej wskazó wek:
1.
2.
3.
4.
5.
6.
Naciśnij przycisk “ MEN U” aby uzyskać dostęp do menu konfiguracji;
Przesuń kursor do ‘USTAWIENIA’ ("S ETUP") i zatwierd ź poprzez naciśnięcie przycisku " ENTER"; Przesuń
kursor do nagłówka ‘TWARDY DYSK’ (" HDD") i zat wierdź poprzez naciśniecie przycisku " ENTER";
Naciśnij przycisk ‘TRYB’ (" MODE");
Naciśnij przycisk "CALL" aby sformatować cały twardy dysk;
Naciśnij przycisk " ENTER" aby zatwierd zić operację;
Naciśnij przycisk “MENU” aby powróci do poprzedniego menu.
POLSKI
109/138
Snelle handleiding DVR MILANO
• Ustawienia nagrania:
Rejestrator umoŜliwia realizowan ie ró Ŝnych trybów nagrywania: alarmowy, detekcja ruchu, ciągły lub kalendarz (terminarz).
Korzystając z ostatniego z wy mienionych trybów, ad min istrator moŜe defin iować, d la kaŜdej godziny tygodnia, rodzaj
nagrywania.
Aby stworzyć mo Ŝliwość personalizacji terminarza nagrywania, kaŜdy dzień jest podzielony na maksy maln ie 16 segmentów
(T1, ... .., T16), które mo Ŝna konfigurować w 3 róŜnych trybach nagrywania, do wyboru przez uŜytko wnika: nagrywanie
wideo, nagrywan ie audio+wideo lub brak nagrywan ia.
UWAGA: Rejestrator DVR jest fabrycznie zaprogramowany na nagrywanie w trybie ciągłym przez okres całego
tygodni a.
Aby ustawić terminarz nagrywania, naleŜy postępować ściśle według przedstawionych poniŜej wskazó wek:
1.
2.
3.
4.
5.
Naciśnij przycisk “MENU” aby uzyskać dostęp do menu konfiguracji;
Przesuń kursor do ‘USTAWIENIA’ ("S ETUP") i zatwierd ź poprzez naciśnięcie przycisku " ENTER";
Przesuń kursor do nagłówka ‘KA LENDA RZ - UŁATWIENIA’ ("SCHED ULE RECORDING" ) i zatwierd ź
poprzez naciśniecie przycisku " ENTER";
Naciśnij przycisk ‘TRYB’ (“MODE”);
Pojawi się następujący ekran:
Ekran ten u mo zliwia ad min istratorowi s zybkie i bezproblemo we zaprogramo wanie kalendarza nagrań. Dla kaŜdej godziny
tygodnia istnieje mozliwośc ustawienia spodobu nagrywania, do wyboru spośród nastepujących: Alarm + Detekcja ruchu
+ No rmalne, Alarm + Detekcja ruchu, Alarm, Detekcja ruchu, Normalne, oraz Brak Nagrywania. Nagrywany będzie
zaró wno sygnał audio jak i wideo.
Opis przycisków:
▲▼◄►
Korzystaj z tych przycisków aby przesuwac ku rsor.
Numeryczne 1-6 (Mysz : Kliknięcie lewym przyciskiem)
Korzystaj z tych przycisków aby dokonać wyboru trybu nagrywania. Przycisk ENTER naleŜy nacisnąć aby
aktywować wybrany tryb. Istnieją nastepujące tryby nagrywania: “1” – Alarm + Detekcja ruchu + Normalny, “2”
– Alarm + Detekcja ruchu, “3” – Al arm, “4” – Detekcja Ruchu, “5” – Normalny, “6” – Brak nagrywania.
+/- (Mysz : Klikniecie lewym przyciskiem)
Korzystaj z tych przycisków aby wybierać Ŝądany przedział czasu. Przycisk ENTER naleŜy nacisnąć aby aktywować
wybrany tryb nagrywania w wybranym przedziale czasowym.
ESC (Mysz : Kliknięcie prawym przyciskiem)
Korzystaj z tych przycisków aby opuścić dany ekran i powrócić do poprzedniego. Segment czasowy zostanie
zaktualizowany.
5 Podstawowe zastosowanie rejestratora DVR:
5.1 Wyszukiwanie:
110/138
POLSKI
Snelle handleiding DVR MILANO
Rejestrator DVR po zwala korzystać 4 ró Ŝnych sposobów wyszukiwania obrazów, takich jak: wyszukiwanie wed ług czasu,
wyszukiwanie wed ług zdarzenia, inteligentne wyszukiwan ie lub wyszukiwan ie w plikach zarchiwizo wanych.
Znajdujący się poniŜej zrzut ekranu dla trybu ‘W YSZUKIWANIE WEDŁUG CZASU’ (“S EARCH B Y TIME”), pokazuje
datę rozpoczęcia nagrywania a więc mo Ŝliwe jest określenie d ługości nagrania i wybranie konkretnej daty w odniesieniu do
której p rowadzone będzie wyszukiwan ie nagranego obrazu. Istnieje mo Ŝliwość skrócenia czasu wyszukiwania poprzez
wybranie rod zaju wyszukiwan ia, takiego jak: A larm, Detekcja Ruchu, Brak Sygnału Wideo lub No rmalny.
Aby przeprowadzić wyszukiwan ie nagranego obrazu, , naleŜy postępować ściśle według przedstawionych poniŜej wskazówek:
8.
9.
10.
11.
12.
13.
14.
Naciśnij przycisk ‘W YSZUKIWANIE’ (“S EARCH”) aby uzyskać dostęp do menu Wyszukiwania;
Przesuń kursor do ‘WYSZUKIWANIE W EDŁUG CZASU’ ("S EARCH B Y TIME") i zat wierdź poprzez naciśnięcie
przycisku " ENTER";
Przesuń kursor na nagłówek ‘ROK’ (" YEAR"), ‘MIESIĄ C’ (" MONTH"), ‘DZIEŃ’ ("DATE"), ‘GODZINA’
("HOUR") oraz ‘MINUTA’ (" MINUT E" ) aby wybrać począt kową datę wyszukiwania, posługując się w ty m celu
przyciskami "+/-";
Przesuń kursor na nagłówek "ALARM" , ‘DETEKCJA RUCHU’ (" MOTION"), ‘BRA K SYGNAŁU WIDEO’
("VIDEO LOSS”) oraz ‘NORMALNY’ ("NORMAL") aby określić według jakiego rodzaju nagrania ma być
przeprowad zone wyszukiwanie, posługując się w tym celu przyciskami "+/-";
Naciśnij ‘STA RT’ ("PLAY" ) aby ro zpocząć odtwarzanie;
Przyciski "◄" oraz "►" naleŜy naciskać aby zwiększać lub zmniejszać pręd kość odtwarzania, natomiast przycisk
"► / ▐ ▐" aby wstrzy mać odtwarzanie lub odtwarzać materiał wideo;
Naciśnij przycisk "STOP" aby opuścić tryb odtwarzania.
5.2 Archi wizacja:
Rejestrator DVR po zwala arch iwizować nagrania wideo / audio za pośrednictwem ró Ŝnego rodzaju zewnętrznych urządzeń
USB, takich jak: pamięć typu pendrive, twarde dyski z własnym zasilan iem lub nagrywarki DVD. Informacji na temat sposobu
instalowania i podłączan ia ws zelkich tego typu urządzeń naleŜy s zukać w poprzednim rozd ziale:
111/138
POLSKI
10. Naciśnij przycisk ‘W YSZUKIWANIE’ ("S EARCH");
11. Przesuń kursor na ‘W YSZUKIWANIE WEDŁUG CZASU’ ("SEARCH B Y TIME") i zatwierd ź poprzez naciśnięcie
przycisku " ENTER";
12. Przesuń kursor na nagłówek ‘ROK’ (" YEAR"), ‘MIESIĄ C’ (" MONTH"), ‘DZIEŃ’ ("DATE"), ‘GODZINA’
("HOUR") oraz ‘MINUTA’ (" MINUT E" ) aby wybrać począt kową datę wyszukiwania, posługując się w ty m celu
przyciskami "+/-";
13. Przesuń kursor na nagłówek "ALARM" , ‘DETEKCJA RUCHU’ (" MOTION"), ‘BRA K SYGNAŁU WIDEO’
("VIDEO LOSS”) oraz ‘NORMALNY’ ("NORMAL") aby określić według jakiego rodzaju nagrania ma być
przeprowad zone wyszukiwanie, posługując się w tym celu przyciskami "+/-";
14. Naciśnij przycisk ‘ZAPISZ’ ("COPY");
15. Przesuń kursor na ‘PRĘDKOŚĆ A RCHIWIZA CJI’ ("BACKUP SPEED") i wybierz wartość prędkości
archiwizowan ia w przedziale od 1 (powoli) do 9 (szybko), posługując się w ty m celu przyciskami "+/-";
16. Przesuń kursor na ‘KAM ERY’ (" CAMERAS") aby wybrać kamerę, z której nagrania chcesz archiwizo wać,
posługując się w ty m celu przyciskami "+/ -";
17. Przesuń kursor na nagłówek ‘ROK’ (" YEAR"), ‘MIESIĄ C’ (" MONTH"), ‘DZIEŃ’ ("DATE"), ‘GODZINA’
("HOUR") oraz ‘MINUTA’ (" MINUT E") aby wybrać czas oraz datę końca archiwizo wanego materiału, posługując
się w ty m celu przyciskami "+/-";
18. Naciśnij przycisk ‘USTAW’ ("COPY" ) aby rozpocząć arch iwizację.
Snelle handleiding DVR MILANO
W trakcie całego procesu archiwizacji widoczna będzie ikona oraz ko munikat wskazujący na postęp procedury. Kiedy
procedura będzie wy magała odłączenia urząd zenia, wó wczas korzystając z odpowiedniego menu postępuj zgodnie z
poniŜszy mi wskazówkami:
5.
6.
7.
8.
Naciśnij przycisk “ MEN U” aby uzyskać dostęp do menu systemu;
Przesuń kursor na ‘NOŚNIKI ZAPISU DANYCH’ ("BACKUP DEVICE") i zat wierdź poprzez naciśnięcie
przycisku " ENTER";
Przesuń kursor na nagłówek ‘USB DRIVE’ (" USB DRIVE"), ‘USB DVD’ (“USB DVD") lub ‘KARTA SD’ ("SD
CARD") aby wybrać rod zaj podłączonego urząd zenia i naciśnij przycisk " ENTER" aby to urząd zenie odłączyć;
Na ty m etapie mo Ŝna fizycznie odłączyć urząd zenie arch iwizujące od rejestratora DVR.
UWAGA: aby zapobiec uszkodzeniu napędu optyczneg o, nie naleŜy usuwać nagrywarki DVD dopóki proces
archi wizacji nie zostanie w pełni zakończony.
5.3 Podgląd obrazów:
Podczas archiwizowan ia nagrań rejestrator DVR t worzy dwa foldery w urząd zeniu, jeden folder zawierający archiwizowane
pliki oraz drugi folder zawierający aplikacje do wyświetlania obrazó w (SelfPlayer). Aby uzyskać podgląd obrazów, naleŜy
postępować zgodnie z poniŜszy mi wskazó wkami:
5. Podłącz uŜywane urząd zenie archiwizu jące do ko mputera osobistego;
6. Uruchom oprogramowanie "Selfp layer" zawarte w folderze o nazwie "SelfPlayer";
7. Naciśnij ‘PLIK’ ("FILE" ) a następnie ‘OTWÓRZ’ ("OPEN");
8. Wybierz p lik który chcesz odtworzyć (w fo lderze "00001") i potwierdź przyciskiem ‘OTW ÓRZ’ ("OPEN").
W trakcie archiwizacji rejestrator DVR d zieli materiał wideo na wiele plików o maksy malnej wielkości 100Mb, które mo Ŝna
później połączyć w jeden plik w formacie "avi", korzystając z udostępnionego oprogramowan ia "AVIConverter".
6 Wyłączanie rejestratora:
Przed wy łączen iem rejestratora DVR, naleŜy nacisnąć przycisk “M ENU” a następnie ‘W YŁĄCZA NIE’ ("SHUTDOWN") i
potwierdzić poprzez naciśnięcie p rzycisku “ENTER”. Naciśnij przycisk "ENTER" jeszcze raz aby poprosić o potwierd zenie
polecenia. Dopiero kiedy rejestrator DVR wyświetli ko munikat ‘Proces Zamykan ia Ukończony’ ("Shutdown complete”),
mo Ŝna wyłączyć system, rejestrator DVR mo Ŝna wyłączyć ko rzystając z odpowiedniego przycisku na jego tylnym panelu.
7 Dodatek:
7.1 Tabela nagrywania:
112/138
POLSKI
Aby wybrać twardy dysk o właściwej wielkości, do zainstalowania w rejestratorze DVR, naleŜy zapoznać się z tabelą
pokazującą maksy malny czas nagrania w rozd zielczości CIF (360x288) i maksymalnej jakości (9) d la kaŜdego rodzaju
rejestratora DVR i wielkości twardego dysku:
Snelle handleiding DVR MILANO
HDD (GB)
160
320
750
1000
DVR MILANO CH4 (g odz.)
50
99
230
308
DVR MILANO CH9 (g odz.)
25
50
115
154
DVR MILANO CH16 (godz.)
25
50
115
154
UWAGA: Rejestrator DVR dzieli twardy dysk na dwie róŜne partycje, z których największa (70% maksymalnej
pojemności twardego dysku) jest uŜywana do normalnego nagrywani a zaś druga partycja (30% ) uŜywana jest do
nagrywania w trybie pre-alarmowym i trybie pre-motion (rejestracji momentu przed wykryciem ruchu).
NaleŜy zaczekać do pełnej inicjalizacji rejestratora DVR przed wejściem do menu, następnie naleŜy nacisnąć przycisk
“MENU” w trybie wyświet lania z d zielony m oknem aby wywo łać okno z opcjami wyświetlan ia menu, następnie naleŜy
nacisnąć załoguj / wyloguj (login/logout) aby uzyskać dostęp do funkcji rejestratora DVR.
Przed zamknięciem systemu naleŜy nacisnąć przycisk “MENU” w trybie wyświet lania z d zielony m ekranem aby wywołać
okno z opcjami wyświet lania menu, a później nacisnąć ‘Wyłączanie’ (“Shutdown”). Kiedy rejestrator DVR wyświetli
następujący komunikat: ‘Wyłączanie Zakończone. Teraz mo Ŝna wy łączyć system’ (“Shutdown completed. You may turn off
the system now”), mo Ŝliwe będzie wyłączenie zasilania rejestratora DVR przy po mocy właściwego przełączn ika na tylnym
panelu.
7.2 Połączenie PC za pośrednictwem Internetu :
Rejestrator DVR mo Ŝna podłączyć do sieci Ethernet lub Internet. W obydwu przypadkach istnieje moŜliwość zarządzan ia
większą ilością rejestratorów DVR z tego samego ko mputera osobistego oraz z tego samego Centralnego Systemu
Monitoringu (Central Monitoring System) lub podglądu obrazu i zarząd zania przekaźnikiem wyjściowy m sygnału alarmowego
bezpośrednio z telefonu ko mó rko wego albo z przeglądarki Internetowej, ró wnieŜ innej niŜ Internet Exp lorer.
Pierwszego rod zaju połączenia dokonuje się za pomocą kabla ethernetowego (skrosowanego), który łączy rejestrator DVR
(Rys.A) z ko mputerem osobistym lub poprzez switch, hub lub router (Rys.B):
Rys.A
Rys.B
W obydwu przypadkach naleŜy odwoły wać się do następujących etapów konfiguro wania o mawianego połączen ia:
Instrukcje
Rysunek
Przede wszystkim naleŜy uruchomić ko mputer,
podłączony
do
tej samej sieci
LA N co
rejestrator, u zyskać dostęp do funkcji ‘start /
uruchom’ a następnie wpisać “cmd” i nacisnąć
Enter. Pojawi się wiersz poleceń DOS.
Na ekranie naleŜy wp isać “ipconfig /all” i
nacisnąć przycisk Enter. Ekran pokaŜe wszystkie
informacje dotyczące ustawień sieci a zatem
istnieje mo Ŝliwość uzyskania informacji na
temat adresu Bramy (Gateway) (np. 192.168.1.1)
oraz adresu IP ko mputera (np. 192.168.1.5).
POLSKI
113/138
Snelle handleiding DVR MILANO
Następnie naleŜy wrócić do rejestratora DVR,
nacisnąć
przycisk
USTAWIENIA
M ENU
(SETUP)
a
oraz
następnie
USTAWIENIA
Rodzaj
Statyczny
IP
SIECIOW E (NETWORK SETUP) aby uzyskać
dostęp do menu ‘Ustawien ia Sieciowe’. Na ty m
ekranie wprowad ź Adres IP (np. 192.168.1.15),
który nie jest uŜywany przez inne urząd zenia
PPPoE
sieciowe i tę samą Bramę (np. 192.168.1.1) oraz
Hasło
Maskę Podsieci (np.. 255.255.255.0) ko mputera
osobistego.
Statyczny
E-mail
Address IP
Maska Podsieci
Brama
DNS
Nazwa UŜytkownika
Hasło
Rodzaj DDNS
URL
Nazwa
uŜytkownika
Hasło DDNS
FTP Adv.
192.168.1.15
255.255.255.0
192.168.1.1
Dynamiczny
UWAGA: Adres IP, który zostanie przypisany
rejestratorowi DVR musi się róŜnic od adresu
komputera osobistego tylko w ostatniej liczbie.
NaleŜy wprowad zić ustawiony adres IP rejestratora
DVR (Ex. 192.168.1.15) na pasku wyszukiwania
przeglądarki Internet Exp lorer i nacisnąć przycisk
Enter.
Przeglądarka poprosi o zainstalowanie sterownika
ActiveX, naleŜy zatwierd zić wszystkie pojawiające
się zapytania. Połączenie mo Ŝe być przerwane przez
firewall albo program antywirusowy więc naleŜy się
upewnić, Ŝe nie są one aktywne.
JeŜeli p rzeglądarka n ie pokaŜe widniejącego z
prawej strony obrazu zrzutu
z ekranu (okna
logowania), wó wczas naleŜy
wpisać adres IP
rejestratora
DVR w menu ‘Zaufane Strony’
(‘Trusted Sites’).
W
oknie
logowania
naleŜy
wp rowadzić
ID
UŜytkownika o raz hasło uŜytko wnika, który będzie
miał dostęp do rejestratora DVR.
UWAGA:
Domyślnym
uŜytkownikiem
jest
administrator i dys ponuje on ID uŜytkownika: aa
oraz hasłem:11
Teraz, korzystając z przeglądarki Internet Explo rer
mo Ŝna u zyskać podgląd obrazu oraz zarządzać
POLSKI
maksymalnie 4 ró Ŝnymi rejestratorami DVR.
114/138
Snelle handleiding DVR MILANO
Korzystając
z przeg lądarki
Firefo x
lub
innej
przeglądarki mo Ŝliwy jest podgląd obrazu, podgląd
stanu sygnałów alarmowych z wejścia , oraz stanu
alarmo wych wyjść rejestratora DVR.
Uwaga : JeŜeli połączenia dokonano za pomocą kabl a ethernetowego (skrosowaneg o), wówczas nie naleŜy wprowadzać
adresu IP Bramy (Gateway IP address).
JeŜeli rejestrator DVR jest poprawnie podłączony do sieci Ethernet, i poprawn ie dokonano konfiguracji routera, wó wczas
istnieje mo Ŝliwość zalogowania się do rejestratora poprzez Internet oraz podglądu tych samych informacji z dowo lnego
miejsca na świecie (Rys. C).
Aby skonfigurować połączen ie przy łączu z dynamicznym IP (np. Neostrada), naleŜy postępować zgodnie z poniŜszy mi
wskazó wkami:
Instrukcje
Rysunek
NaleŜy wejść na stronę www.dyndns.org i nacisnąć
‘Stwórz Konto’ (“Create Account”).
E-mail zawierający wszystkie info rmacje zostanie wysłany
na podany adres poczty elektronicznej. NaleŜy zastosować
się do odnośnych wskazówek aby aktywować nowe konto.
NaleŜy wpisać nazwę uŜytkown ika oraz hasło dla nowego
konta dyndns.
POLSKI
115/138
Snelle handleiding DVR MILANO
Następnie naleŜy kliknąć na ‘Dodaj Usługi Hosta’ (“Add
Host Services”)
Wybierz nową nazwę hosta (Hostname) rejestratora DVR,
kliknij na ‘Skorzystaj z autodetekcji adresu IP’ (“Use auto
detect IP Address”) i zatwierd ź wszystkie zapytania aby
aktywować nowego Hosta.
Korzystając z p rzeg lądarki Internet Exp lorer wprowad ź
Adres IP Bramy (Gateway) i naciśnij przycisk Enter,
ko munikat na ekranie poprosi o wpro wadzenie ID
uŜytkownika oraz hasła dla routera, informacje te mo Ŝna
znaleźć w instrukcji obsługi urządzenia.
NaleŜy postępować zgodnie z instrukcją obsługi Routera
aby stworzyć regułę portu 67, 68 oraz 80 d la Adresu IP
oraz p rotokołu TCP rejestratora DVR. (Zdjęcia na
przykład zie routera D-Link DSA 3100)
UWAGA:
NaleŜy
odwiedzić
stronę
www.portforwarding.com aby uzyskać informacje o
poprawnym s posobie skonfigurowania routera
Postępuj zgodnie z instrukcją obsługi Routera aby
wprowad zić
informacje
DDNS,
takie
jak
nazwa
uŜytkownika, hasło oraz nazwa hosta rejestratora DVR.
POLSKI
116/138
Snelle handleiding DVR MILANO
Teraz rejestrator DVR jest poprawnie podłączony do sieci.
Upewnij się, Ŝe Adres IP rejestratora DVR został
wprowad zony do ‘Zaufanych stron’ (“Trusted sites”)
przeglądarki Internet Explorer
Kiedy wprowad zisz nazwę hosta (Hostname) rejestratora
DVR na pasku wyszukiwan ia przeglądarki Internet
Exp lorer, u zyskasz dostęp do podglądu ze wszystkich
kamer.
7.3 Połączenie telefonem komórkowym za pośrednictwem Internetu:
Obraz z rejestratora DVR mo Ŝna oglądać korzystając z telefonu ko mórkowego, urząd zenia mobilnego typu ‘smartphone’ lub
PDA (palmtop) podłączonego do sieci Internet. Aby stworzyć takie połączenie, naleŜy postępować zgodnie z poniŜszy mi
wskazó wkami:
Instrukcje
Wprowadź nazwę hosta (Hostname) rejestratora DVR na
pasku wyszukiwan ia przeglądarki telefonu ko mórkowego
lub urząd zenia PDA.
Rysunek
Rejestrator DVR poprosi u Ŝytkownika aby wpro wadził
swoje ID UŜytko wnika oraz hasło.
NaleŜy wybrać najlepszą ro zdzielczość obrazu dla
telefonu ko mórkowego lub urząd zenia PDA a następnie
nacisnąć przycisk “OK”.
Na tym etapie mo Ŝliwy będzie podgląd obrazu na
telefonie ko mórko wy m lub urządzeniu PDA, zarządzan ie
przekaźn ikami wyjściowy mi sygnału alarmo wego oraz
wyświetlanie aktualnego stanu alarmó w z wejść
bezpośrednio poprzez interfejs.
Rejestratora DVR mo Ŝna uŜy wać do zarządzan ia kamerami PTZ z mo Ŝliwością obserwacji rotacyjnej po 4-9-16 ekranów z
wykorzystaniem kabla PTZ RS-485. (Rys D:)
117/138
POLSKI
7.4 Połączenie z kamerami PTZ:
Snelle handleiding DVR MILANO
Aby podłączyć kamerę PTZ do rejestratora DVR, naleŜy postępować zgodnie z p rzedstawiony mi poniŜej wskazówkami:
Instrukcja
Rysunek
NaleŜy postępować zgodnie z instrukcją obsługi kamery
aby ją skonfigurować w Protokole Pelco-D, z prędkością
transmisji równą 4800 bps oraz Adresem ID (od 1 do
255), który będzie ró Ŝny dla kaŜdej kamery.
NaleŜy podłączyć konwerter trans misji BUS RS-485
kamery do tylnego panelu rejestratora DVR.
Naciśnij przycisk “MENU”, następnie “SETUP” oraz
Konfiguracja RS-232/ 422 /485
“RS-232/422/ 485 Setup” na rejestratorze DVR aby
Port COM
RS-232
Rodzaj urządzenia
ten sam Protokół (Model) i prędkość transmisji (Baud
Model
Rate) kamery PTZ.
Prędkość
Bit Danych
Bit Stopu
Parzystość
ID DVR / Kamery
Naciśnij przycisk “M ENU”, następnie ‘USTAWIENIA’ Wstępne ustawieni a kamery
wprowad zić konfigurację magistrali (BUS) i wpro wadź
RS-422/485
PTZ
Pelco (D-Type)
4800
8
1
Brak
0
(“SETUP”) oraz ‘Wstępne Ustawienia Kamery’ (“Pre-
sterowania, myszy lub oprogramowan ia ko mputera osobistego.
118/138
720x288
Grupa
ID PTZ
12345678
Nie dotyczy
1
…
korzystając z p ilota zdalnego
POLSKI
Camera Setup”) na rejestratorze DVR i wprowad ź Adres Rozdzielczość Nagrywani a
Znak wodny √
ID pojedynczej kamery PTZ.
Kamera
Zainstalowana
1
√
UWAGA: NaleŜy upewnić się, ze wszystkie kamery 2
√
mają róŜny Adres ID.
…
…
Teraz kamera jest poprawnie podłączona do rejestratora DVR i moŜna nią zarządzać
Snelle handleiding DVR MILANO
OPGELE T: Deze gebruikshandleiding is een korte samenvatting voor de eerste installatie van de DVR. A.u.b. gelieve
de volledige handleiding te gebruiken voor de uitleg van alle functies.
Inhoudstabel:
8- Veiligheids waarschuwi ngen ....................................................... ......................................................... blz. 6
1.1 – Inhoud van de verpakking ...................................................... ..........................................................blz. 6
9- Productoverzicht ..................................................................................................................................... blz. 7
10- Panelen en afstands bedieni ng ............................................................................................................... blz. 7
3.1 – Voorpaneel..........................................................................................................................................blz. 7
3.2 – Acherpaneel .......................................................................................................................................blz. 7
3.3 – Afstandsbediening ............................................................................................................................blz. 8
3.4 – Muis .....................................................................................................................................................blz. 8
11- Installatie ................................................................................................................................................... blz. 8
4.1.– Installatie van de harde schijf (HDD) ............................................................................................blz. 8
4.2. – Ingebruiksname van de DVR .......................................................................................................blz. 10
12- Basisgebruik van de DVR ..................................................................................................................... blz. 12
5.1 – Zoekfunctie........................................................................................................................................blz. 12
5.2 – Backup ...............................................................................................................................................blz. 13
5.3 – Bekijken van de beelden .................................................................................................................blz. 14
13- Ui tschakelen.............................................................................................................................................. blz. 14
14- Appendi x .................................................................................................................................................. blz. 15
7.1 – Bytes t.o.v. uren registratie ............................................................................................................blz. 15
7.2 – PC Net werk connectie ...................................................................................................................blz. 15
7.3 – Mobiele telefoon Netwerk connectie ............................................................................................blz. 19
7.4 – PTZ connectie ..................................................................................................................................blz. 20
Nederlands
119/138
Snelle handleiding DVR MILANO
1. Veiligheids waarschuwingen:
De installatie van dit produkt dient uitgevoerd te worden door gek walificeerd personeel zoals vastgelegd door de
lokale wetten en regels wat bet reft veiligheid. Dit produkt is klasse II in de Europese EN 60950-1 norm.
BELANGRIJK: Enkel specifiek opgeleid en geautoris eerd personeel mag het product openen. Probeer in het geval
van defect het product niet zelf te repareren. Inbreuk op deze regel laat de garantie op dit produkt automatisch
vervallen.
BELANGRIJK: Voor uw veiligheid dient u de voeding af te koppelen vooraleer de DVR te verplaatsen, te
installeren of eender welk onderdeel of harde schijf te vervangen.
Waarschuwing voor de installatie
Gebruik enkel bijgeleverde kabel voor de voeding van dit produkt en installeer het zodanig dat de stekker
gemakkelijk bereikbaar is.
Dit produkt dient niet blootgesteld te worden aan water-druppels of –sproeiers en dient dan ook
geinstalleerd te worden op droge plaatsen, binnenhuis.
Laat voldoende ruimte rond het produkt zodat dit correct geventileerd wordt. Hoge temperaturen en
verhitting kan het correct fonctioneren en de levensduur van het produkt in het gedrang brengen.
Installeer het product niet op stoffige plaatsen noch dichtbij hittebronnen noch dichtbij corroderende stoffen.
Vochtigheid en condensatiedruppels kunnen het produkt beschadigen. Wacht in geval van condensatie
totdat het produkt volledig opgedroogd is vooraleer het te gebruiken.
Cont rolleer of de voedingskabel en andere kabels correct zijn aangesloten vooraleer de DV R te gebruiken.
Cont acteer uw installateur of groot handelaar onmiddellijk in geval van defect.
Laat geen vreemde voorwerpen in de kast van de DV R, deze kunnen kortsluiting veroorzaken.
Gelieve sterke veranderingen in de omgeving waar het produkt gebruikt wordt te voork omen: belangrijke
factoren zijn stof, temperat uur en vochtigheid. De fuctioneringstemperatuur ligt tussen de 5 en de 40 °C.
Blokkeer de ventilator van de DV R niet.
Stel deze eenheid niet rechtstreeks bloot aan zonnestralen.
Indien u niet zeker bent van de installatie en opzet van dit systeem, gelieve techniek er te raadplegen.
EL ECTROMAGNETIS CHE COMPATIB ILIT EIT (EMC)
In overeenkomst met de Europese Richtlijn 2004/108/ EC (EM C), dient dit produkt geinstalleerd te worden met
apparatuur, kabels en accessoires die de Richtlijn voor vaste installaties respecteren.
VERWIJDEREN VAN BATTERIJ EN
Dit produkt bevat 2 AAA alkaline min i-stilo batterijen d ie kunnen verwijderd worden via het dekselt je achteraan de
afstandsbediening en 1 CR2032 lithiu m batterij d ie zich in het moederbord van de DVR bevindt en verwijderd kan
worden door zijdelings op de batterij te duwen.
Gezien de potentiele invloeden op de omgeving en op menselijke gezondheid veroorzaakt door stoffen die zich in de
batterijen bevinden is de gebruiker verplicht de batterijen in daarvoor voorziene afvalcontainers te sorteren of bij
electronische verkooppunten.
CONFORMITEIT AAN EUROPES E RICHTLIJNEN
Dit produkt respecteert de essentiele gestelde eisen van de Europese Richtlijnen 2004/108/ EC (Richtlijn wat betreft
Elekt ro magnetische Compatib iliteit - EM C) en 2006/ 95/ EC (Richtlijn wat betreft laagspanning – LVD)
1.1 Inhoud van de verpakking:
120/138
Nederlands
N°1 Muis;
N°1 Afstandsbediening;
N°2 M ini stilo AAA alkaline batterijen;
N°1 Voed ing 12V/ 3A;
N°1 Voed ingskabel type schuko;
N°1 CD-ROM met handleid ing van instructies en PC software;
N°1 Quick guide (snelle handleiding);
N°4 Schroeven o m de harde schijf vast te zetten;
Snelle handleiding DVR MILANO
2. Product Overzicht:
De DVR VENEZIA d igitale video/audio recorder is ontworpen o m krachtige en veilige camerabewakingssystemen te
creeeren die kunnen geconnecteerd worden met verschillende types monitors, pc’s en smartphones. Het nieuwe type
compressie en de configureerbare kwaliteit garanderen lange opnamet ijden op de harde schijf en een goede kwaliteit
gedurende het visualiseren van de beelden.
De nieu we processor laat de DVR toe 6 verschillende functies uit te voeren: simultaan opnemen, live visualiseren in
realtime, afspelen, backups nemen en op afstand bedienen en beelden bekijken.
De DVR kan beheerd worden via het voorpaneel, muis, afstandbediening, extern toetsenbord (optioneel), virtueel
toestenbord en web interface via PC of smartphone.
Twee uitgangs-relays kunnen geactiveerd worden door een alarm in de ingang, door beweging, door videoverlies, door een
systeemgebeurtenis of direct met de mob iele telefoon of via web interface.
3. Panelen en en afstands bedieni ng:
3.1 Voorpaneel (zie beel d 1):
Nْ
1
Toets
Alfanumeriche
toetsten (1-4)
Functie
Selectie van de camera
Nْ
10
Toets
MENU / ESC
Functie
Menu tonen of niet (ESC)
2
MODE
11
PTZ
Overstappen naar of
terugkomen van PTZ modus.
3
SEQ
12
UP / BS
Cursur bewegen of PTZ camera
opwaarts bewegen / Backspace
4
CA LL
13
DOWN / DEL
Cursur bewegen of PTZ camera
neerwaarts bewegen / Delete
5
SEARCH
Overstappen tussen live
waarnemen en geregistreerde
beelden afspelen
Overstappen naar- of
terugkomen van SEQ
waarnemingsmodus.
Overstappen naar- of
terugkomen van waarnemen op
volledig scherm
Zoekmenu oproepen
14
LEFT / RIGHT
6
7
REC
Play/pause
15
16
ENTER
Split window
8
STOP
Manueel opnemen
Afspelen van opgenomen
beelden of pause in the het
afspelen.
Afspelen stoppen
Cursur of PTZ camera
horizontaal bewegen
Enter Toets
Next or previous split window
17
LEDs
9
COPY
Backup starten of stoppen
18
Remote control
receiver
Connectoren
RS-485 connectoren voor PTZ cameras of controle
van toetsenbord
4 ingangen voor alarm connectoren
2 uitgangen voor alarm connectoren (1 NA e 1 NC)
Ethernet connector voor LA N connectie
USB connector voor mu is
Voed ing
Netschakelaar
Verklikkerlicht (LED) voor
voiding, HDD en
netwerktoegang.
Ontvanger van de
afstandsbediening
3.2 Achterpaneel (zie beel d 2):
Connectoren
4 Video BNC ingangen
Nْ
8
2
3
4
5
6
7
Video BNC uitgang naar bijmon itor
Video BNC uitgang naar hoofdmonitor
1 RCA Audio ingang
1 RCA Audio uitgang
Video VGA u itgang
USB 2.0 Poort
9
10
11
12
13
14
121/138
Nederlands
Nْ
1
Snelle handleiding DVR MILANO
3.3 Afstands bediening (zie beel d 3):
De afstandsbediening is een accessoire dat optioneel gebruikt kan worden o m de handelingen van de gebruiker te
vereenvoudigen. Men kan al de co mmandos uitvoeren via afstandsbediening i.p.v. met de toetsen op het voorpaneel.
Zonder obstakels overbrugt deze afstandsbediening ongeveer 10 meter.
Tasto
Funzione
Tasto
Funzione
Nْ
Nْ
1
Blokkeren
van
een 13
Links
alarmgebeurtenis
2
Start/Stop Opnemeng
14
Rechts
3
Terugspoelen
15
Enter
4
Vooru itspoelen
16
Audio activeren of deactiveren/
Vo lgende
5
Stap voor stap afspelen
17
Zoom-n iveau / Ga naar p reset
6
Backup
opstarten
informat ies copieren.
18
Vo lu me
of
aanpassen of
7
Play/pause
19
Indeling van het beeld veranderen
8
Stop
20
Invoeren van tekst, nummers of
codes
9
Enter menu
21
Overstappen tussen Live and
Afspelen modus
10
Esc of start PTZ mode
22
Overstappen naar of terugko men
van Sequentiele weergave modus.
11
Naar boven/Backspace
23
Overstappen naar of terugko men
van weergave op volledig scherm
12
Naar beneden/Delete
24
Zoekmenu oproepen
of
zoo m
niveau
3.4 Muis:
De DVR kan gemakkelijk beheerd worden met de mu is. Gelieve de mu is aan te sluiten vooraleer de voedingskabel aan te
sluiten en beweeg de cursor vervolgens naar de bodem van het scherm o m het setup menu op te roepen.
Nederlands
122/138
Snelle handleiding DVR MILANO
4. Installatie:
4.1 Harde schijf (HDD) Setup:
Gelieve de volgende stappen te volgen voor een correcte installatie van de HDD en de DVD Writer op de DVR.
Istruzioni
Al de (10) schroeven verwijderen.
Figura
2
Deksel verwijderen zoals getoond in afbeelding.
3
Neem de 2 montagestaafjes die bijgeleverd zijn bij de DVR en
monteer deze aan de zijkanten van de harde schijf, gebruik
makend van de 4 schroeven, zoals aangetoond op de afbeelding.
4
Connecteer de voedings- en datakabel zoals voorgedaan op de
afbeelding.
5
Indien gewenst kan er een DVD graveur geinstalleerd wo rden op
de plaats van de derde harde schijf. Om over te gaan met de
installatie d ienen de twee schroeven en het deksel die hiernaast
worden afgebeeld verwijderd worden.
6
Neem de 2 montagestaafjes die bijgeleverd zijn bij de DVR en
monteer deze aan de zijkanten van de optische unit (graveur) en
monteer deze op de bodem van de DVR en sluit de kabels voor
datadistributie en voeding aan.
7
Schroef het deksel van de DVR terug vast, opnieuw gebruik
makend van alle schroeven. Connecteer vervolgens ook de
monitor en de voeding. De DVR is nu correct geinstalleerd en
klaar voor gebruik. Gelieve de volgende hoofdstukken te
raadplegen om de t ijd in de harde schijf in te voeren en de HDD te
formatteren.
123/138
Nederlands
Nْ
1
Snelle handleiding DVR MILANO
8
Schakel de DVR aan gebruik makend van de desbetreffende toets
op het achterpaneel van de DVR. De DVR zal de volgende
boodschap aangeven:
“Unformatted HDDs found. Do you want to format now?
[ENTER]: Yes, [ESC]: Cancel”.
Gelieve op [ENTER] te drukken o m de harde schijf te
formatteren.
4.2. Eerste ingebruikname van de DVR:
• Login
Na het aanschakelen van de DVR, gelieve op de “ MENU” toets te drukken en verplaats de cursor vervolgens naar het icoon
“Login/ Logout” en druk op “ ENTER”.
Voer nu uw naam en paswoord in. De fabrieksinstelling van de DVR gebruikt “aa” als user name en “11” als paswoord. Voer
de user name en paswoord in. Beweeg de cursor naar “Login” en bevestig door op “ENTER” te drukken.
Er bestaan 3 niveaus van paswoord in het systeem. Ad ministrator (hoogste), Supervisor en Operator (laagste). De Operator kan
gebruik maken van live video waarneming, de Supervisor van life v ideo waarneming, beelden afspelen en archiveren en de
Admin istrator heeft toegang tot al de functies.
OPGEPAST: De fabrieksinstelling van de DVR aanvaardt slechts één administrator profiel. Om het veiligheidsni veau
van het systeem te verhogen kan U het fabriekspas woord best enkel gebruiken voor de ingebruiksname, en het daarna
dadelijk veranderen.
WAARSCHUWING: In het geval van het verlies van het systeempas woord, gelieve uw l ocale verdeler te contacteren
die op zijn beurt Fracarro Radioindustrie S.p.A. zal contacteren.
•
Taalkeu ze
Vo lg de volgende stappen zonder uitzondering o m de taal van de DVR te configureren.
7.
8.
9.
10.
Duw op de “ MENU” toets om het configuratie menu te activeren;
Beweeg de cursor naar “S ETUP” en bevestig door op “ENTER” te drukken;
Beweeg de cursor naar de “S YSTEM” toets en bevestig door op “ENTER” te drukken;
Beweeg de cursor door op de pijltoetsen te drukken naar “LANGUAGE” en dru k op “+/-“ o m de gewenste taal te
kiezen;
11. Druk op de “MENU” toets om terug te keren naar het voorafgaande menu, de DVR zal de veranderde instelling
activeren bij het drukken op de “ENTER” toets;
12. Druk op “ENTER” o m de taalkeuze te bevestigen. Het systeem zal zich heropstarten met de nieuwe instelling.
Nederlands
124/138
Snelle handleiding DVR MILANO
• • Datum/ t ijdstip aanpassen:
Vo lg de volgende stappen zonder uitzondering o m de datum/ het tijdstip in te stellen.
1.
2.
3.
4.
5.
6.
Duw op de “ MENU” toets om het configuratie menu te activeren;
Beweeg de cursor naar “S ETUP” en bevestig door op “ENTER” te drukken;
Beweeg de cursor naar de “DATUM” toests en bevestig door op “ENTER” te drukken;
Beweeg de cursor door op de pijltoetsen te drukken naar “DATUM” en druk op “+/ -“ o m het jaartal, maand en dag in
te stellen;
Beweeg de cursor door op de pijltoetsen te drukken naar “TIJ DSTIP” en dru k op “+/-“ o m het tijdstip in te stellen;
Druk op de “MENU” toets om terug te keren naar het voorafgaande menu, de DVR zal de veranderde instelling
activeren bij het drukken op de “ENTER” toets;
• Harde schijf formatteren:
Vo lg de volgende stappen zonder uitzondering o m de harde schijf te formatteren.
1.
2.
125/138
Nederlands
3.
4.
5.
6.
Duw op de “ MENU” toets om het configuratie menu te activeren;
Beweeg de cursor naar “S ETUP” en bevestig door op “ENTER” te drukken; Beweeg de cursor naar de “ HDD” titel
en bevestig door op “ENTER” te drukken;
Druk op de “ MODE” toets;
Druk op de “CALL” toets om de volledige harde schijf te formatteren;
Druk op “ENTER” o m de operatie te bevestigen;
Druk op de “MENU” toets om terug te keren naar het voorafgaande menu.
Snelle handleiding DVR MILANO
• Opname-Instelling:
De DVR laat toe verschillende opname-types te kiezen : alarm, beweging of gepland. Met deze laatste instelling kan de
administrator het type opname bepalen, voor elk uur van de week.
Om de opnameschema’s te personaliseren is elke dag verdeeld in 16 segmenten (T1, ... ...,T16). Bovendien kunnen er 3
verschillende opnameinstellingen kunnen gekozen worden tussen: vi deo, audio+ vi deo of geen opname.
OPMERKING: De fabrieksinstelling van de DVR is vol tijds opname gedurende de hele week.
Vo lg de volgende stappen zonder uitzondering o m het opnameplan in te stellen:
1.
2.
3.
Duw op de “ MENU” toets om het configuratie menu te activeren;
Beweeg de cursor naar “S ETUP” en bevestig door op “ENTER” te drukken;
Beweeg de cursor naar de “Programmatie Opname Instelling” titel en bevestig door op “ENTER” te drukken;
5 Basisgebruik van de DVR:
1.
Druk op de “MODE” toets;
2.
Het volgende scherm zal verschijnen:
Dit scherm laat toe aan de beheerder op een eenvoudige en snelle manier de planning in te stellen voor de opnames. Het is
mogelijk afzonderlijk voor elk uur van de week een verschillende opnamewijze in te stellen naar keuze tussen: Alarm +
Beweg ing + No rmaal, Alarm + Beweging, Alarm, Beweging, Normaal en Geen Registratie. In elk geval van opname zal
Beschrijving van de toetsen:
▲▼◄►
Druk op deze toetsen om de cursor te verplaatsen.
126/138
Nederlands
zowel de audio als de video opgenomen worden:
Snelle handleiding DVR MILANO
Numerische toetsen 1-6 (Met de muis: klik op linkertoets)
Druk op deze toetsen om de opnamewijze te selecteren. Druk op de “ ENTER” toets om de modus te activeren. De
verschillende opnamewijzen zijn :: “1” – Al arm + Beweging + Normaal, “2” – Alarm + Beweging, “3” – Alarm,
“4” – Beweging, “5” – Normaal, “6” – Geen Registratie.
+/- (Met de muis: klik op linkertoets)
Druk op deze toetsen om het tijdsinterval te bepalen. Dru k op de “ENTER” toets om de opnamewijze te activeren in
het gekozen interval.
ESC (Met de muis: klik op rechtertoets)
Druk op deze toets om uit weg te gaan uit dit scherm en terug te keren naar het vorige. Bijgevolg zal de DVR de veranderingen
qua opnamewijze per t ijdsinterval opslaan.
5.1 Zoekfunctie:
De DVR staat toe op 4 verschillende man ieren beelden op te zoeken: per tijdstip, gebeurtenis, smart search of via arch ief.
Het venster met als titel “ ZOEKEN OP TIJDS TIP” geeft aan wanneer de geregistreerde opname gestart is en laat dus toe te
weten hoe lang de opname is en laat toe een specifieke datu m te selecteren o m het beeld op te zoeken. Het is mogelijk de
zoekt ijd in te korten door te kiezen welk soort opnames dienen gezocht te worden (Alarm, Beweging, Videoverlies of
Normaal).
Vo lg de volgende stappen zonder uitzondering o m een beeld op te zoeken:
15. Druk op de “ZOEKEN” toets om het zoekmenu te openen;
16. Beweeg de cursor naar “ZOEKEN OP TIJ DSTIP” en bevestig door op “ENTER” te drukken;
17. Beweeg de cursus over “JAAR”, “MAAND”, “DATUM”, “UUR” en “MINUUT” o m het begintijdsstip van de
zoekopdracht te kiezen door middel van de “+/ -“ toetsen;
18. Beweeg de cursor over de titels “ALARM”, “B EWEGING”, “VIDEO VERLIES” en “NORMAAL” o m het type
opname te kiezen waarop U will zoeken d.m.v. de “+/-“ toetsen;
19. Druk op “PLAY/ WEERGAVE” o m de weergave van de opname te starten:
20. Druk op de "◄" en "►" toetsen om de snelheid van weergave te verhogen of te verlagen en de "► / ▐ ▐" toetsen om
het afspelen te pauseren of te reactiveren;
21. Druk op de “STOP” toets om weg te gaan uit de weergave modus.
5.2 Backup:
1.
2.
3.
Druk op de “ZOEKEN” toets om het zoekmenu te openen;
Beweeg de cursor naar “ZOEKEN OP TIJ DSTIP” en bevestig door op “ENTER” te drukken;
Beweeg de cursus over “JAAR”, “MAAND”, “DATUM”, “UUR” en “MINUUT” o m het begintijdsstip van de
zoekopdracht te kiezen door middel van de “+/ -“ toetsen;
127/138
Nederlands
De DVR laat toe de video/audio opnames over te nemen als backup op verschillende types externe USB apparatuur zoals USBsticks, autonome harde schijven of DVD Writable. Gelieve naar de voorgaande sectie te gaan voor de connectie van deze
apparatuur.
Snelle handleiding DVR MILANO
4.
5.
6.
7.
8.
9.
Beweeg de cursor over de titels “ALARM”, “B EWEGING”, “VIDEO VERLIES” en “NORMAAL” o m het type
opname te kiezen waarop U will zoeken d.m.v. de “+/-“ toetsen;
Druk op “KOPIE/ COPY” toets;
Beweeg de cursor naar “B ACKUP SPEED/ BACKUP S NELHEID” en selecteer de waarde van backup rat io die U
verkiest tussen 1 (traagst) en 9 (snelst) d.m.v. de “+/-“ toetsen;
Beweeg de cursor naar “CAMERAS” o m de camera(s) te selecteren waarvan U een backup kop ie wenst te nemen
d.m.v. de “+/ -“ toetsen;
Beweeg de cursus over “JAAR”, “MAAND”, “DATUM”, “UUR” en “MINUUT” o m het begintijdsstip van de
backup te kiezen door middel van de “+/-“ toetsen;
Druk op “KOPIE/ COPY” o m de backup te starten.
Gedurende het backup proces zal U een icoon en een boodschap krijgen die aangeven hoe ver de procedure op die mo ment
gevorderd is. Eens de backup voltooid, is het noodzakelijk het USB apparatuur correct af te koppelen via het desbetreffend
menu:
9. Druk op de “MENU” toets om toegang te krijgen tot het systeemmenu;
10. Beweeg de cursor naar “B ACK-UP-APPARATUUR” en bevestig door op “ENTER” te drukken;
11. Beweeg de cursor over de titels "USB DRIVE" , " USB DVD" of "SD CARD” o m het type aangesloten apparatuur te
selecteren en druk op “ENTER” o m deze af te koppelen;
12. Nu kan U de backup apparatuur ook fysiek verwijderen uit de DVR.
OPGEL ET: Verwi jder de DVD niet vooraleer het backup process niet volledig afgewerkt is om schade aan de optisch
lade te vermi jden.
OPGEL ET: Verwi jder de USB apparatuur niet vooraleer het backup proces niet volledig afgewerkt is.
5.3 Bekijken van de beel den:
Tijdens de backup zal de DVR t wee fo lders creeeren op de USB apparatuur, de ene bevat the backup bestanden en de andere
de software waarmee de beelden weergegeven kunnen worden (namelijk SelfPlayer). Vo lg de volgende stappen om de beelden
te bezichtigen:
6 Afsluiten:
Vooraleer de voedingsschakelaar u it te schakelen, dient U op de “MENU” toets te klikken, “Uitschakelen” te kiezen en
vervolgens op “ENTER” te drukken. De DVR zal U vragen dit co mmando te bevestigen, waarop U op “ENTER” dient te
128/138
Nederlands
1. Connecteer het gebruikte backup apparatuur op een PC;
2. Start de “Selfplayer” software die zich in de “Selfpl ayer” folder bevindt;
3. Druk op de toets “FILE” in het menu van Selfplayer en klik op “OPEN”;
4. Selecteer het bestand dat U wil weergeven (in de folder “00001”) en bevestig met de toets “OPEN”.
De DVR backup split de video in mu ltip le bestanden met een maximu m grootte van 100Mb. Deze bestanden kunnen
vervolgens aan elkaar gemonteerd worden in één enkel A VI bestand d.m.v. de software “AVIConverter” die b ijgeleverd is.
Snelle handleiding DVR MILANO
drukken o m verder te gaan met het uitschakelen. Pas wanneer de DVR de boodschap “Afsluiten OK. U mag het systeem nu
uitschakelen.” kan U de DVR uitschaklen via de desbetreffende schakelaar op het achterpaneel van de DVR.
7 Appendi x:
7.1 Bytes t.o.v. uren registratie:
Om de juiste grootte van harde schijf te kiezen d ie geinstalleerd d ient te worden in de DVR, b ij deze een tabel d ie de maximu m
opnametijd aangeeft aan CIF resolutie (360x288) aan maximu m kwaliteit (9) voor het desbetreffende type DVR:
HDD (GB)
DVR MILANO CH4 (ore)
DVR MILANO CH9 (ore)
DVR MILANO CH16 (ore)
160
50
25
25
320
99
50
50
750
230
115
115
1000
308
154
154
AANDACHT: De DVR verdeelt de Harde Schijf (HDD) in twee verschillende parti tions (partities), de grootste
(equi valent aan 70% van de maxi mum capaciteit van de HDD) wordt gebruikt voor gewone opnames en de rest
(equi valent aan 30% ) voor pre-al arm en pre-beweging opnames.
Gelieve te wachten totdat de DVR volled ig is opgestart vooraleer in het menu te gaan en druk vervolgens op “MENU” o m de
weergave van het menu op te roepen en druk vervolgens op “login/logout” o m toegang te verschaffen tot de functies van de
DVR.
7.2 PC Network connectie:
De DVR kan aangesloten worden aan een Ethernet of Internet netwerk. In beide gevallen is het mogelijk verschillende DVR’s
te beheren vanaf dezelfde PC en met dezelfde CMS (Central Monitoring System ), of rechtstreeks met een mobiele telefoon of
met Web browser (niet alleen Internet Exp lorer) beelden te visualiseren en relays te activeren.
De Ethernet connectie wordt gemaakt met een Ethernet cross cable die de DVR (Fig A) connecteert met de PC of v ia switch,
hub of router (Fig B.).
Fig.A
Fig.B
Gelieve in beide gevallen de connectie te configureren volgense de volgende stappen:
Instructies
Afbeel di ng
Ga naar een PC die op hetzelfde netwerk geconnecteerd
is als de DVR, klik op start/run en type “cmd” in en dru k
vervolgens op “Enter”. Het DOS p ro mpt venster zal zich
openen.
Nederlands
129/138
Snelle handleiding DVR MILANO
Type in dit venster “ipconfig /all” in en druk vervolgens
o Enter. Dit scherm zal nu al de PC Netwerk gegevens
visualiseren en dus ook de Gateway (Bijv. 192.168.1.1)
en het PC IP Address (Bijv. 192.168.1.14).
Ga terug naar de DVR, activeer het “MENU”, ga naar
Net type
“SETUP” en “NETW ERK SETUP” o m het menu voor
de instelling van het netwerk te act iveren. Voer in dit
Static IP
scherm een IP adres in (bijvoorbeeld 192.168.1.15) dat
niet
gebruikt
wordt
door andere
apparatuur en
aangesloten is op dezelfde Gateway (b ijvoorbeeld
Ex.192.168.1.1) en Net mask als de PC (bijvoorbeeld:
PPPoE
255.255.255.0).
OPGEL ET: Het IP adres dat zal toegewezen worden
aan de DVR zal dus enkel verschillen van degene van
Static IP
E-mail
IP Address
Net Mask
Gateway
DNS
Username
Password
DDNS Type
URL
DDNS Username
DDNS Password
FTP Adv.
192.168.1.15
255.255.255.0
192.168.1.1
Dynamic
de PC in de laatste nummer.
Gelieve het IP adres van de DVR (b ijv. 192.168.1.15) in
de zoekbar in te voeren van Internet Explorer en dru k
vervolgens op Enter.
De browser zal U vragen o m ActiveX control te
installeren,
gelieve
al
de
verzoeken
van
het
installeerprogramma te bevredigen. De connectie kan
onderbroken worden door eventuele firewall of antiv irus
systemen, dus zorg ervoor dat deze zijn uitgeschakeld.
Indien de browser de beelden n iet visualiseert, gelieve
dan het IP adres van de DVR b ij te voegen in het menu
van de “Trusted sites” (betrouwbare IP adressen).
Nederlands
Gelieve de User ID en het paswoord in te voeren van de
gebruiker d ie toegang zal hebben tot de DVR.
AANDACHT:
Administrator
De
fabrieksinstelling
beschouwen
als
zal
de
gebruiker,
met
standaard User ID: “aa” en pas woord “11”,
130/138
Snelle handleiding DVR MILANO
Nu is het mogelijk met Internet Exp lorer beelden van de
DVR te visualiseren en tot 4 verschillende DVR’s te
beheren.
Met Firefo x of andere Web browsers is het mogelijk
beelden te visualiseren, de staat van de alarm-ingang na
te gaan en de alarm-u itgang van de DVR te beheren.
AANDACHT: Wanneer de connectie wordt gemaakt met een cross cable, gelieve dan NIET het Gateway IP adres in te
voeren.
De DVR is nu correct aangesloten op het Ethernet netwerk, indien de connectie gemaakt werd met een router is het mogelijk U
te connecteren met de DVR v ia Internet en kan U dezelfde informat ie vanover heel de wereld v isualiseren (FIG C.)
Gelieve de volgende stappen te volgen om de connectie te configureren:
Instructies
Afbeel di ng
Gelieve naar de website www.dyndns.org te gaan en klik
op “Create Account”.
Een E-mail met al de nodige informat ie zal naar het
ingevoerde E-mail adres verstuurd worden. Gelieve de
instructies te volgen om een nieu w account te activeren.
account.
131/138
Nederlands
Vu l de username en het paswoord in van de nieuwe dynds
Snelle handleiding DVR MILANO
Klik op “Add Host Services”
Selecteer een nieu we Hostname voor de DVR, klik op
“Use auto detect IP Address” en bevestig al de verzoeken
om de n ieuwe Host te activeren.
Met Internet Explo rer, gelieve het IP Adres van de router
(Gateway) in de zoekbar in te voeren, een scherm zal U
vragen het User ID en paswoord in te voeren van de router,
gelieve
deze
informat ie
op
te
zoeken
op
de
gebruikshandleiding van de apparatuur.
Gelieve de gebru ikshandleiding van de Router te volgen
om een regel te creeeren voor poort 67, 68 en 80 voor het
IP adres van de DVR en voor het TCP protocol.
NOTA:
Gelieve
te
refereren
naar
de
website
www.portforwarding.com om te weten te komen hoe de
router correct geconfigureerd dient te worden.
Gelieve de gebru ikshandleiding van de Router te volgen
om de DDNS informat ie zoals username, paswoord en
hostname van de DVR in te voeren.
Nederlands
132/138
Snelle handleiding DVR MILANO
Nu is de DVR correct aangesloten op het netwerk.
NEDERLANDS
Gelieve nog eens na te kijken indien het IP adres van de
DVR ingevoerd is in de “Trusted sites” van Internet
Exp lorer.
Voer de Hostname van de DVR in in de zoekbar van
Internet Explo rer en U zal al de aangesloten cameras
kunnen visualiseren.
7.3 Connectie op een Mobiel telefoonnetwerk:
De beelden van de DVR kunnen via een mobiele telefoon gevisualiseerd worden, via s martphone of PDA geconnecteerd op het
internet. Gelieve de volgende stappen te volgen om de connectie te creeeren:
Instructies
Voer de Hostname van de DVR in op de zoekbar van de
browser van de mobiele telefoon of PDA.
Afbeel di ngen
De DVR zal de gebruiker vragen om zijn Used ID en
Paswoord in te voeren.
Gelieve de beste beeld resolutie voor uw mobiele telefoon
of PDA u it te kiezen en druk op “OK”.
Het is nu mogelijk o m beelden te bekijjken op uw
mobiele telefoon of PDA, o m de u itgangsrelays te
beheren en de staat van het ingangsalarm te kennen direct
via de interface.
Nederlands
133/138
Snelle handleiding DVR MILANO
7.4 PTZ Camera connectie:
De DVR kan gebruikt wo rden om tot 4 PTZ cameras te beheren gebruik makend van de RS-485 kabel (Fig. D).
Gelieve de volgende stappen te volgen om een PTZ camera op de DVR aan te sluiten:
Instructies
Afbeel di ng
Gelieve de gebru ikershandleiding van de Camera te volgen o m hem te
configureren in Pelco-D Protocol, Baud Rate op 4800 bps en een ID adres
(van 1 tot 255) dat zal verschillen camera per camera.
Connecteer de BUS RS-485 van de camera met het achterpaneel van de
DVR.
Op de DVR, gelieve op “M ENU” te klikken dan op
RS-232/ 422 /485 Setup
“SETUP” en vervolgens op “RS-232/422/485 Setup”
om uiteindelijk dezelfde BUS configuratie, hetzelfde
Protocol (Model) en Baud Rate in te voeren als voor
de PTZ camera.
Op de DVR, gelieve op “MENU” te klikken, dan op
COM Port
Device Type
Model
Baud Rate
Data Bit
Stop Bit
Parity
DVR/Camera ID
Pre-Camera Setup
RS-232
RS-422/485
PTZ
Pelco (D-Type)
4800
8
1
None
0
“SETUP” en voer vervolgens het ID adres in van de
REC Resoluti on
720x288
Watermark
√
Group
Camera
Installed
PTZ ID
12345678
AANDACHT: Zorg ervoor dat alle cameras een
1
√
N/A
verschillend ID adres hebben.
2
√
1
…
…
…
Nu is de camera verbonden met de DVR en is het mogelijk hem te beheren via afstandsbediening, muis of met de software op
individuele PTZ camera.
134/138
Nederlands
de PC.
Notes:
………………………………………………………………………………………………
………………………………………………………………………………………………
………………………………………………………………………………………………
………………………………………………………………………………………………
………………………………………………………………………………………………
………………………………………………………………………………………………
………………………………………………………………………………………………
………………………………………………………………………………………………
………………………………………………………………………………………………
………………………………………………………………………………………………
………………………………………………………………………………………………
………………………………………………………………………………………………
………………………………………………………………………………………………
………………………………………………………………………………………………
………………………………………………………………………………………………
………………………………………………………………………………………………
………………………………………………………………………………………………
………………………………………………………………………………………………
………………………………………………………………………………………………
………………………………………………………………………………………………
………………………………………………………………………………………………
………………………………………………………………………………………………
………………………………………………………………………………………………
………………………………………………………………………………………………
………………………………………………………………………………………………
………………………………………………………………………………………………
………………………………………………………………………………………………
………………………………………………………………………………………………
………………………………………………………………………………………………
135/138
Notes:
………………………………………………………………………………………………
………………………………………………………………………………………………
………………………………………………………………………………………………
………………………………………………………………………………………………
………………………………………………………………………………………………
………………………………………………………………………………………………
………………………………………………………………………………………………
………………………………………………………………………………………………
………………………………………………………………………………………………
………………………………………………………………………………………………
………………………………………………………………………………………………
………………………………………………………………………………………………
………………………………………………………………………………………………
………………………………………………………………………………………………
………………………………………………………………………………………………
………………………………………………………………………………………………
………………………………………………………………………………………………
………………………………………………………………………………………………
………………………………………………………………………………………………
………………………………………………………………………………………………
………………………………………………………………………………………………
………………………………………………………………………………………………
………………………………………………………………………………………………
………………………………………………………………………………………………
………………………………………………………………………………………………
………………………………………………………………………………………………
………………………………………………………………………………………………
………………………………………………………………………………………………
………………………………………………………………………………………………
136/138
Notes:
………………………………………………………………………………………………
………………………………………………………………………………………………
………………………………………………………………………………………………
………………………………………………………………………………………………
………………………………………………………………………………………………
………………………………………………………………………………………………
………………………………………………………………………………………………
………………………………………………………………………………………………
………………………………………………………………………………………………
………………………………………………………………………………………………
………………………………………………………………………………………………
………………………………………………………………………………………………
………………………………………………………………………………………………
………………………………………………………………………………………………
………………………………………………………………………………………………
………………………………………………………………………………………………
………………………………………………………………………………………………
………………………………………………………………………………………………
………………………………………………………………………………………………
………………………………………………………………………………………………
………………………………………………………………………………………………
………………………………………………………………………………………………
………………………………………………………………………………………………
………………………………………………………………………………………………
………………………………………………………………………………………………
………………………………………………………………………………………………
………………………………………………………………………………………………
………………………………………………………………………………………………
137/138
Quick Reference DVR MILANO
ITA - Garantito da Fracarro Radioindustrie S.p.A., Vi a Cazzaro n.3, 31033 Castelfranco Veneto (TV) Italia.
ENG – Guarantee by Fracarro Radi oindustrie S.p.A., Vi a Cazzaro n.3, 31033 Castelfranco Veneto (TV) Italia.
FRA – Garantie par Fracarro Radi oindustrie S.p.A., Via Cazzaro n.3, 31033 Castelfranco Veneto (TV) Italia.
SPA - Garantia par Fracarro Radi oindustrie S.p.A., Vi a Cazzaro n.3, 31033 Castelfranco Veneto (TV) Italia.
PORT – Garantia por da Fracarro Radi oindustrie S.p.A., Via Cazzaro n.3, 31033 Castelfranco Veneto (TV) Itali a.
GRE - εγγύηση Fracarro Radi oindustrie S.p.A., Vi a Cazzaro n.3, 31033 Castelfranco Veneto (TV) Italia.
POLS KI – Gwarancji Fracarro Radi oindustrie S.p.A., Vi a Cazzaro n.3, 31033 Castelfranco Veneto (TV) Italia.
NEDERLANDS - Guarantee by Fracarro Radi oindustrie S.p.A., Vi a Cazzaro n.3, 31033 Castelfranco Veneto (TV) Italia.
138/138