1
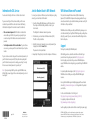
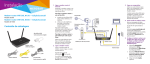
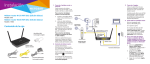
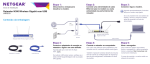
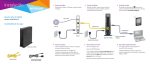
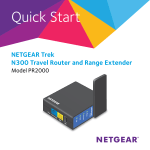
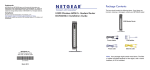
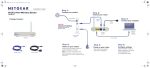
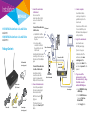
Installation
N300 WiFi DSL Modem Router—Essential Edition
Model D1500
Package Contents
ADSL microfilter
(varies by region)
a. Install an ADSL microfilter
between the phone line and
the phone.
b. Use a phone cable to
connect the microfilter to
the gray ADSL port on the
modem router.
For additional information about
connecting to a DSL service, see
the other side of this installation
guide.
2. Power on the modem router.
Connect the power adapter to
the modem router and plug it
into an electrical outlet.
(N300 shown)
Wait for the Power LED
light green.
Ethernet cable
Power adapter
(varies by region)
Cable or fiber Internet
to
If the Power LED does not
light, press the Power On/Off
button.
4. Log in to the modem router.
Launch a web browser.
NETGEAR genie displays.
Line
ADSL microfilter
If you do not see genie:
In the address field of the
web browser, enter www.
routerlogin.net. When
prompted, enter admin for the
user name and password for the
password.
Phone cable to ADSL
Ethernet cable
To connect the modem router
to a cable or fiber modem:
Use an Ethernet cable to
connect the cable or fiber
modem to the yellow LAN2/
WAN port on the modem router.
Modem router
You can also use WiFi to connect.
To connect with WiFi, use the
WiFi network name and password
on the product label.
DSL Internet
Phone
Model D500
To connect the modem router
to a DSL service:
ADS L
N150 WiFi DSL Modem Router—Essential Edition
Phone cable
3. Connect a computer.
Use an Ethernet cable to
connect your computer to a
yellow Ethernet port on the
modem router.
1. Connect the modem router
to the Internet.
You can connect the
modem router either to a DSL
service or to a cable or fiber
modem.
to LAN2/WAN
Cable or fiber modem
Modem router
Power adapter
5. If you connected the
modem router to a cable or
fiber modem in Step 1, change
the default connection
method in NETGEAR genie.
a. Select ADVANCED > Setup
> WAN Setup.
b. From the WAN Preference
menu, select Must use
Ethernet WAN.
c. Click the Apply button.
Information for DSL Service
Join the Modem Router’s WiFi Network
WiFi Network Name and Password
You can connect directly to a DSL line or to a fiber or cable modem.
To connect your computer or WiFi device (such as a smartphone or gaming
device) to your modem router’s WiFi network:
This product has a unique WiFi network name (SSID) and network key
(password). The default SSID and password are uniquely generated for every
device, like a serial number, to protect and maximize your wireless security. This
information is on the product label.
If you are connecting to a DSL line, make sure that your DSL service
is active before you install the modem router. You need the following
information to install your DSL modem and connect to the Internet:
• DSL user name and password. This information is included in the
welcome letter your DSL ISP sent you when you signed up for your
service. Record your DSL Internet service account user name and
password.
• Your telephone number or DSL account number. If you do not have
voice service, you can use your DSL account number in place of a phone
number.
If you do not know or cannot locate your DSL user name and password, call
your DSL Internet service provider (ISP). Be specific when speaking with
your DSL Internet service provider. For example, you could say, “I need my
DSL service user name and password. Can you help me?”
Note:  If your provider says that they do not support NETGEAR services,
tell them that you need only your DSL user name and password; you do not
need support.
1. Open the software utility that manages your WiFi connections on
the computer or WiFi device that you want to connect to your
modem router.
This utility scans for all wireless networks in your area.
2. Find and select your modem router’s WiFi network name (SSID).
The SSID is on the product label.
NETGEAR recommends that you use the preset WiFi settings because you can
check the router label if you forget them. NETGEAR genie lets you change these
settings if you want. If you do so, write down the new WiFi settings and store
them in a safe place.
3. Enter the modem router’s password (or your custom password if you
changed it) and click the Connect button.
The password is on the product label.
Support
4. Repeat Step 1 through Step 3 to add other computers or WiFi devices.
After installing your device, locate the serial number on the label of your
product and use it to register your product at https://my.netgear.com.
You must register your product before you can use NETGEAR telephone
support. NETGEAR recommends registering your product through the NETGEAR
website.
WiFi network name (SSID)
Network key (password)
Thank you for purchasing this NETGEAR product.
For product updates and web support, visit http://support.netgear.com.
NETGEAR recommends that you use only the official NETGEAR support
resources.
You can get this installation guide in multiple languages and the user manual
online at http://downloadcenter.netgear.com or through a link in the product’s
user interface.
For the current EU Declaration of Conformity, visit
http://support.netgear.com/app/answers/detail/a_id/11621/.
For regulatory compliance information, visit
http://www.netgear.com/about/regulatory/.
See the regulatory compliance document before connecting the power supply.
August 2014
NETGEAR, Inc.
350 East Plumeria Drive
San Jose, CA 95134, USA
NETGEAR, the NETGEAR logo, and Connect with Innovation are trademarks and/or registered
trademarks of NETGEAR, Inc. and/or its subsidiaries in the United States and/or other countries.
Information is subject to change without notice. © NETGEAR, Inc. All rights reserved.