1
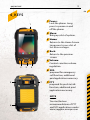
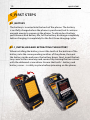
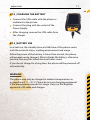
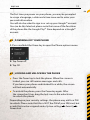
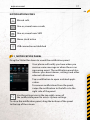
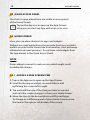
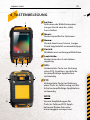
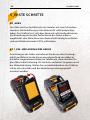
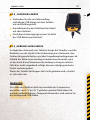
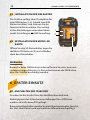
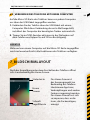
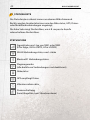
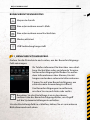
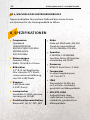
Quick Start Manual_ EN
SCHNELLSTARTANLEITUNG_ DE
2
TITEL DES KAPITELs
Content
Safety Instructions
1_Introduction
2_Faults and damages
3_Further safety advises
5
6
7
Quick Start
4_Keys
5_First steps
5.1_Battery
5.1.1_Installing and extracting the battery
5.1.2_Charging the battery
5.1.3_Battery use
5.2_Installation of the SIM cards
5.3_Installation of the microSD card
9
10
10
10
11
11
12
12
First Use
6_First use
6.1_Powering on your phone
6.2_Powering off your phone
6.3_Locking and unlocking the phone
6.4_Using the touchscreen
6.5_Connecting the phone with a computer
12
12
13
13
14
15
TITEL DES KAPITELs
3
EN
Display layout
7_Display layout
7.1_Status bar
7.1.1_Notification panel
7.2_Quick access panel
7.3_Home screen
7.3.1_Adding a new screen item
7.3.2_Moving a screen item
7.3.3_Removing a screen item
7.3.4_Creating a folder
7.3.5_Renaming a folder
7.3.6_Changing the wallpaper
15
16
17
18
18
18
19
19
19
19
20
Information
8_Specifications
9_Troubleshooting
10_Maintenance
11_SAR
Service center
20
21
23
24
26
Reservation
Technical Data is subject to change without notice.
Changes, errors and misprints may not be used as a
basis for any claim for damages.
All rights reserved.
RugGear Europe GmbH cannot be held responsible
for any data or other loss and direct or indirect
damages caused by any improper use of this phone.
This document contains a quick start guide and the
safety instructions necessary for the safe use of the
smartphone RG500.
More detailed instructions on the use of the phone
can be found at www.ruggear-europe.com or directly
at our Service Centre.
(c) 2014 RugGear Europe GmbH
Safety Instructions
5
1_Introduction
This document contains information and safety regulations
which are to be observed without fail for safe operation of the
smartphone RG500 under the described conditions.
The current EC declaration of conformity, EC certificate of
conformity, safety instructions and manual can be found
at www.ruggear-europe.com, or requested from
RugGear Europe GmbH.
Note
This document contains only the instructions necessary for setting
up and safe use of your phone. A complete Quick Start Manual can
be found at www.ruggear-europe.com.
To ensure the IP protection of the phone please make sure that the
seals of the battery, the USB port cover and all the screw covers are
in their correct place.
Please consult page 15 to learn how to access the phone from any
computer.
EN
6
Safety Instructions
2_Faults and Damages
If there is any reason to suspect that the safety of the phone has
been compromised, it must be withdrawn from use immediately.
Measures must be taken to prevent any accidental restarting
of the phone.
The safety of the phone may be compromised if, for example:
malfunctions occur.
the housing of the phone or the battery shows damage.
the phone has been subjected to excessive loads.
the phone has been stored improperly.
Safety Instructions
7
3_Further Safety Advises
Do not touch the screen of the phone with sharp objects.
Dust particles and dirt may scratch the screen. Please maintain
the screen clean. Remove dust on the screen with a soft cloth
gently and do not scratch the screen.
Charge the phone under indoor conditions only.
Please do not put the phone in environments with excessive
temperatures as this could lead to heating of the battery,
resulting in fire or explosion.
Do not charge the phone near any flammable or explosive
substances.
Do not charge the phone in environments with much
dust, humidity, or excessively high or low temperatures
(the permitted charging temperature range is 0 °C – 45 °C).
Do not use the phone in areas where regulations or legislatives
prohibit the use of a mobile phone.
Do not expose the phone, the battery or the charger to strong
magnetic fields, such as are emitted from induction ovens or
micro-waves.
Do not attempt to open or repair the phone. Improper repair
or opening can lead to the destruction of the phone, fire or
explosion. Only authorized personnel are allowed to repair
the phone.
Only use accessories approved by RugGear Europe GmbH.
Please do not connect the poles of the battery directly, to avoid
short-circuiting the battery.
Power off the phone in hospitals or other places where the use
of mobile phones is prohibited. This phone may affect proper
work of medical equipment, like pacemakers, so always keep a
distance of at least 15 cm between the phone and these devices.
EN
8
Safety Instructions
Observe all corresponding laws that are in force in the
respective countries regarding the use of mobile phones
while operating a vehicle.
Please power off the phone and disconnect the charging cable
before cleaning the phone.
Do not use any chemical cleaning agents to clean the phone or
the charger. Use a damp and anti-static soft cloth for cleaning.
Do not discard old and abandoned lithium batteries into
the trash, send them to designated waste disposal locations
or return them to RugGear Europe GmbH.
The user alone is responsible for any and all damages and
liabilities caused by malware downloaded when using the
network or other data-exchange functions of the phone.
RugGear Europe GmbH cannot be held responsible for any
of these claims.
Warning
RugGear Europe GmbH will not assume any liability for damages
caused by disregarding any of these advices or by any inappropriate use of the phone.
9
Quick Start
EN
4_Keys
1_Power:
Lock the phone. Long
press to power on and
off the phone.
1
2_Menu:
Bring up a list of options.
3_Home:
Returns to the Home Screen.
Long press to see a list of
last accessed apps.
4_Back:
Return to the previous
screen.
2
5
3
5_Volume:
Context-sensitive volume
regulation.
4
6_ SOS:
prepared for emergency
call function, additional
paid application necessary.
7
7_PTT:
prepared for push to talk
function, additional paid
application necessary.
Note
6
You can find our
recommendations of PTT
and SOS applications under:
www.ruggear-europe.com
10
Quick Start
5_First Steps
5.1_Battery
The battery is inserted into the back of the phone. The battery
is not fully charged when the phone is purchased, but it contains
enough energy to power on the phone. To obtain best battery
performance and battery life, let the battery discharge completely
before charging it completely for the first three charging cycles.
5.1.1_Installing and Extracting the Battery
When installing the battery, insert the teeth at the bottom of the
battery into the corresponding notches of the phone, then put
the battery inside and press the battery down. Next, insert the battery cover in the same way and secure it by turning the two screws
with the delivered screw driver. Ensure that both – battery and
battery cover – is safely in place before powering on the phone.
Quick Start
11
EN
5.1.2_Charging the Battery
Connect the USB-cable with the phone as
indicated in the picture.
Connect the plug with the socket of the
Power Supply.
After charging, remove the USB-cable from
the charger.
5.1.3_Battery Use
In actual use, the standby time and talk time of the phone varies
with the network status, working environment and usage.
When the power of the battery is lower than normal, the phone
will prompt you to charge it. Please charge the battery; otherwise
you may lose any files which have not been saved.
If you do not charge for a long time, the phone will be powered off
automatically.
Warning
The phone may only be charged at ambient temperatures in
a range from 0 °C – 45 °C. Please do not use charging equipment
if the temperature exceeds this range. Only use the RugGear
approved USB-cable and charger.
12
Quickstart / First Use
5.2_ I nstallation of
the SIM Cards
The phone features two SIM
card slots (1, 2). If you have
installed two SIM cards, you
can choose your primary card in
SIM management.
Settings
1
5.3_ I nstallation of
the Micro-SD Card
2
Open the microSD card holder,
and insert the microSD card
into the slot (3), then close the
microSD card holder.
Warning
Do not try to insert or remove any of the SIM cards when any
external power supply is connected, otherwise the SIM cards or
the phone may be damaged.
6_First Use
6.1_Powering On Your Phone
Press the Power key until the screen lights up.
Depending on the security settings of your SIM card, the phone
may ask you for your personal identification number (PIN) before
starting up.
3
First Use
13
EN
The first time you power on your phone, you may be prompted
to assign a language, a date and a time zone and to enter your
personal information.
You will also be asked to sign in or set up your Google™ account.
You can do this later but please note that some of the functions
of the phone like the Google Play™ Store depend on a Google™
account.
6.2_Powering Off Your Phone
1. Press and hold the Power key to open the Phone options menu.
2. Tap Power off.
3. Tap OK.
6.3_Locking and Unlocking the phone
Press the Power key to lock the phone. When the screen is
locked, you can still receive messages and calls.
If you leave your phone undisturbed for a while, the screen
will lock automatically.
To unlock the phone, press the Power key again. After
the screen has lit up, drag the lock icon to the unlock icon
to unlock the phone.
Depending on your security settings, the phone may ask for a PIN
to unlock. Please note that this is NOT the PIN of your SIM card, but
Security
a code that can be assigned under System settings
Screen lock.
14
First Use
6.4_Using the Touchscreen
This phone features a capacitive touchscreen. It is not necessary
to press the screen for it to work, a simple touch is enough.
The following gestures can be used with this phone:
Tap
To open an application (app), or to enter a character using
the on-screen keyboard, tap it with a finger.
Tap and hold
Tap and hold your finger to the screen for more than two
seconds to access further options where available.
Drag
Tap an icon and hold your finger to the screen. Then drag it
to where you would like to place it.
Double tap
Perform two taps onto a webpage or image to zoom in.
Double tap again to zoom out.
Flick
Touch the screen and flick your finger left, right, up or down
to scroll through available panels or lists.
Pinch
Touch the screen with two fingers near together. While touching the screen, put your fingers farther apart to zoom into
a webpage or picture. Do the reverse to zoom out again.
15
First Use / Display Layout
EN
6.5_Connecting the phone with a computer
You can access the microSD card of the phone by any compatible
computer via the USB cable. The card will be accessed as a mass
storage device.
1. Connect your phone to the computer with the USB cable.
When connecting the phone to a computer for the first time,
the computer will install the necessary drivers automatically.
2. Tap turn on USB storage in the dialogue box that opens on the
phone and tap OK to confirm your choice. Your computer
will detect the microSD card as a removable disc. You can
now transfer files from and to the microSD card.
Note
While USB mass storage function is enabled, some functions
of the phone may not be available.
7_Display Layout
After you sign in or when you power on the phone, by default the
Home Screen opens:
Status Bar
Home
Screen
Quick
Access Bar
The Home Screen is your
starting point to access
all the features on your
phone. It displays application icons, shortcuts
and other features. You
can customize the Home
Screen and display the
items you need.
16
Display Layout
7.1_Status bar
The status bar appears at the top of every screen.
On the right side, it displays phone status icons, such as the status
of the battery, GPS, data or mobile connections and the time.
On the left side, it displays notification icons, such as missed calls
or received messages.
Status Icons
SIM1 or SIM2 current signal status, type (E for Edge,
3G for UMTS, H for HSDPA) and strength
Wi-Fi connection status and signal strength
Bluetooth® connection status
Airplane mode (all wireless interfaces are off)
Battery power level indicator
GPS is receiving location data
Vibration alert only
Silent mode (no ringtone, no vibration alert)
17
Display Layout
EN
Notification Icons
Missed calls
One or several new e-mails
One or several new SMS
Alarm clock active
USB connection established
7.1.1_Notification Panel
Drag the Status Bar down to reveal the notification panel:
Your phone will notify you here when you
receive a new message or when there is an
upcoming event. The notification panel also
informs you about alarms, settings and other
relevant information.
Tap a notification to open a related application.
To remove notifications from the panel,
swipe the notification to the left or to the
right side of the panel.
Use the settings icon in the top right corner of
the notification panel to access system settings.
To close the notification panel, drag the bottom of the panel
to the top of the screen.
18
Display Layout
7.2_Quick Access Panel
Shortcuts to apps placed here are visible on every panel
of the Home Screen.
Tap on the App icon to open up the App Drawer.
Here you can start any App with a tap on its icon.
7.3_Home Screen
Here, you can place shortcuts to apps and widgets.
Widgets are small applications that provide functions and information on your Home Screen, like local weather, stock exchange
information or email previews. To use them, add widgets from
the App drawer in the Quick Access Panel.
Note
Some widgets connect to web services which might result
in additional charges.
7.3.1_Adding a New Screen Item
1. T ap on the App icon to open up the App Drawer.
2. S croll for the app or widget you would like to add
by flicking the screen left or right.
3. Tap and hold the icon of the item you want to use and
wait until the screen changes to show your Home Screen.
4. Move the item to the desired place and lift your finger.
To change to a different panel of yours Home Screen, move
the item to the right or left border of the screen.
Display Layout
19
EN
7.3.2_Moving a Screen Item
1. Touch and hold an icon on the Home Screen until
the icon enlarges.
2. Without lifting your finger, drag the icon to the desired
position on the screen and release it.
Note
There must be enough space for the icon to fit on the current
Home Screen.
7.3.3_Removing a Screen Item
1. Tap and hold an application icon on the Home Screen until
the icon enlarges.
2. Drag the item to the top of the screen towards Remove.
7.3.4_Creating a Folder
Drag the application icon or shortcut and drop it on top of
another app icon. A folder containing both icons will be created.
You can then add other icons into the folder.
7.3.5_Renaming a Folder
1. Tap a folder to open it.
2. Tap the title bar of the folder.
3. Enter the new folder name.
4. Tap Done or press the Back key.
20
Display Layout / information
7.3.6_Changing the Wallpaper
On the Home Screen, tap and hold the screen to show options
for the Wallpaper.
8_Specifications
Frequencies
Quad band
GSM/GPRS/EDGE
850/900/1800/1900 MHz
WCDMA/HSPA
900/2100 Mhz
Dimension
weight: 206 g,
size: 124 x 68.5 x 24 mm
Screen
3.2" (8.13 cm) RugDisplayGlass, rugged TFT-touchscreen with a resolution of
320 x 480 pixel
Cameras
5 MP rear camera
0.3 MP front camera
Loudspeaker
amplified 1.5 watt, with 100 dB
Wireless technologies
Bluetooth®, Wi-Fi®, GPS, NFC
Battery
2060 mAh, standby 300 hrs.,
talktime 2G/3G:
468 min./210 min.
Memory
internal memory 4 GB ROM,
512 MB RAM, external
memory microSD up to 32 GB
Processor
MT6572 (Dual Core 1.2 GHz)
Temperature
operation range from
-20 °C to 60 °C
IP68
waterproof: 30 min. up
to 2 m, impervious to dust
and microparticles
MIL-STD-810G
2 m drop-protection,
impervious to dust and
microparticles
Information
9_Troubleshooting
If problems occur when using the mobile, please try the
following tips. If the problem is not solved, please contact
your vendor or RugGear Europe GmbH directly.
The phone cannot be powered on
The battery voltage is too low.
Please recharge the battery.
The power on key is not pressed long enough.
Please press power on key for more than three seconds.
The connection to the battery is bad.
Please assemble the battery again or clean the contact
points of the battery carefully.
The SIM card has a failure.
Please check or replace the SIM card.
The phone has insufficient standby time
The battery performance is reduced because of the age
of the battery.
Please contact your vendor or RugGear Europe GmbH
for a replacement battery.
Too many programs running.
Please reduce the number of running programme.
21
EN
22
Information
The phone is not charging
Poor electrical contact.
Please check and replace any dirty or broken plugs.
Input voltage is too low.
Please charge for about one hour first, remove the plug, wait
a minute and then continue charging. During this time it is
possible that the phone cannot be powered on, as the voltage
is too low.
A battery fault has occurred.
Please replace the battery.
Failures during calls occur
SIM Card failures occur.
Please check the contacts of the SIM card or replace the card.
Network error.
Please change to a network provider with a stronger signal.
Other people are answering my calls
The phone has been set into divert your calls
to another phone number.
Please check and cancel call divert.
The phone powers off automatically
The charge of the battery is too low.
Please recharge the battery.
There was an error during operation.
Please restart the phone. If the problem reoccurs, please
contact your vendor or RugGear Europe GmbH directly.
Information
23
10_Maintenance
Thank you for using the RG500. If there is a problem with the
phone, please contact your vendor or consult the service center.
If your phone is in need of repair, you can either contact the
service center or your vendor.
Trademarks
RugGear (Europe) and the RugGear (Europe) logo
are registered trademarks of RugGear Europe GmbH.
The Android logo, Google™ and Google Play™ Store
are registered trademarks of Google, Inc.
The Android robot is reproduced or modified from work
created and shared by Google™ and used according to terms
described in the Creative Commons 3.0 Attribution License.
Bluetooth® is a registered trademark of Bluetooth SIG,
Inc. worldwide.
Wi-Fi® is a registered trademark of the Wi-Fi Alliance.
All other trademarks and copyrights are the properties
of their respective owners.
Recycling
The crossed-out wheeled-bin symbol on your product, battery,
literature, or packaging reminds you that all electrical and electronic products, batteries, and accumulators must be taken to separate collection at the end of their working life. This requirement
applies in the European Union. Do not dispose of these products
as unsorted municipal waste.
EN
24
Information
Always return your used electronic products, batteries, and
packaging materials to dedicated collection points. This way
you help to prevent uncontrolled waste disposal and to promote
the recycling of materials.
More detailed information is available from the product retailer,
local waste authorities, national producer responsibility organizations, or your local RugGear Europe GmbH representative.
The content of this document is presented as it currently exists.
RugGear Europe GmbH does not provide any explicit or tacit
guarantee for the accuracy or completeness of the content of this
document, including, but not restricted to, the tacit guarantee
of market suitability or fitness for a specific purpose unless applicable laws or court decisions make liability mandatory. RugGear
Europe GmbH reserves the right to make changes to this document
or to withdraw it any time without prior notice.
11_S pecific Absorption Rate (SAR)
certification information
This device meets international guidelines
for exposure to radio waves
Your mobile device is a radio transmitter and receiver. It is
designed not to exceed the limits for exposure to radio waves
(radio frequency electromagnetic fields) recommended by
international guidelines. The guidelines were developed by an
independent scientific organization (ICNIRP) and include
a substantial safety margin designed to assure the safety of all
persons, regardless of age and health.
25
Information
EN
The radio wave exposure guidelines use a unit of measurement
known as the Specific Absorption, or SAR. The SAR limit for mobile
devices is 2.0 W/kg.
Tests for SAR are conducted using standard operating positions
with the deice transmitting at its highest certified power level in all
tested frequency bands. The highest SAR values under the ICNIRP
guidelines for this device model are:
Maximum SAR for this model and conditions
under which it was recorded
SAR (head)
0.650 W/kg (GSM1800)
SAR (body - worn)
0.807 W/kg (GSM900)
During use, the actual SAR values for this device are usually well
below the values stated above. This is because, for purposes of
system efficiency and to minimize interference on the network,
the operating power of your mobile device is automatically
decreased when full power is not needed for the call. The lower
the power output of the device, the lower its SAR value.
A body-worn SAR test has been performed on this device at
a separation distance of 1.5 cm. To meet RF exposure guidelines
during body-worn operation, the device must be positioned
at least 1.5 cm away from the body.
Organizations such as the World Health Organization and the US
Food and Drug Administration have suggested that if people are
concerned and want to reduce their exposure, they could use
a hands-free accessory to keep the wireless device away from the
head and body during use, or they could reduce the amount of
time spent using the device.
27
Informations
Contact / Service Center
RugGear Europe GmbH
Service Center
c/o AdivoTEC GmbH
Averdiekstraße 28
49078 Osnabrück
Germany
[email protected]
Fon +49 (0)541 150464-15
Fax +49 (0)541 150464-14
Available: Monday – Friday, 08:00 am – 05:00 pm
(not during public holidays)
R ead the User
Manual Online
www.ruggear-europe.com/en/support
RugGear Europe GmbH | [email protected]
i_Park Tauberfranken 14 | 97922 Lauda-Koenigshofen | Germany
EN
28
TITEL DES KAPITELs
Inhalt
Sicherheitshinweise
1_Einführung
2_Fehler und unzulässige Belastungen
3_Weitere Sicherheitshinweise
31
32
33
Schnellstart
4_Tastenbelegung
5_Erste Schritte
5.1_Akku
5.1.1_Ein- und Ausbau des Akkus
5.1.2_Laden des Akkus
5.1.3_Gebrauch des Akkus
5.2_Installation der SIM Karten
5.3_Installation der Micro-SD Karte
35
36
36
36
37
37
38
38
Erster Einsatz
6_Erster Einsatz
6.1_Anschalten des Telefons
6.2_Ausschalten des Telefons
6.3_Sperren und Entsperren des Telefons
6.4_Benutzung des Touchscreen
6.5_Verbinden des Telefons
mit einem Computer
40
40
41
41
42
43
TITEL DES KAPITELs
29
EN
DE
Bildschirmlayout
7_Bildschirmlayout
7.1_Statusleiste
7.1.1_Benachrichtigungsfeld
7.2_Schnellzugriffsleiste
7.3_Home Screen
7.3.1_Hinzufügen neuer Elemente
zum Home Screen
7.3.2_Verschieben eines Elementes
7.3.3_Entfernen eines Elementes
7.3.4_Erstellen eines Ordners
7.3.5_Umbenennen eines Ordners
7.3.6_Wechseln des Hintergrundbildes
43
44
45
46
46
46
47
47
47
47
48
Informationen
8_Spezifikationen
9_Fehlerbehebung
10_Wartungshinweis
11_SAR
11_Richtlinien R&TTE
Service Center
48
49
51
51
53
54
Vorbehalt
Technische Änderungen behalten wir uns vor.
Änderungen, Irrtümer und Druckfehler begründen
keinen Anspruch auf Schadensersatz.
Alle Rechte vorbehalten.
Für Datenverluste oder andere Schäden gleich
welcher Art, die durch den unsachgemäßen
Gebrauch des Telefons entstanden sind, übernimmt
die RugGear Europe GmbH keine Haftung.
Dieses Dokument enthält die notwendigen
Sicherheitshinweise für die sichere Verwendung
des Smartphones RG500.
Detailliertere Informationen erhalten Sie unter
www.ruggear-europe.com oder direkt direkt bei
unserem Service Center.
(c) 2014 RugGear Europe GmbH
Sicherheitshinweise
31
1_Einführung
Dieses Dokument enthält Informationen und Sicherheitsvorschriften, die für einen sicheren Betrieb des Smartphones
RG500 unter den beschriebenen Bedingungen unbedingt zu
berücksichtigen sind.
Die gültige EG-Konformitätserklärung, Sicherheitshinweise und
Bedienungsanleitung können unter www.ruggear-europe.com
heruntergeladen oder bei der RugGear Europe GmbH angefordert
werden.
Hinweis
Dieses Dokument enthält nur die für die Inbetriebnahme und die
sichere Verwendung des Telefons nötigen Schritte. Eine komplette
Schnellstartanleitung finden Sie auf www.ruggear-europe.com.
Um den IP-Schutz des Telefons sicherzustellen, achten Sie bitte
darauf, dass die Akkuabdeckung, die Verschlüsse für den
Headset- und USB-Anschluss und die Abdeckung der Gehäuseschrauben sicher und fest installiert sind.
Bitte beachten Sie Seite 41, um zu erfahren wie sich das Telefon mit
einem Computer verbinden lässt.
DE
32
Sicherheitshinweise
2_Fehler und unzulässige
Belastungen
Sobald zu befürchten ist, dass die Sicherheit des Gerätes beeinträchtigt wurde, muss das Gerät außer Betrieb genommen werden.
Die unbeabsichtigte Wiederinbetriebnahme muss verhindert
werden.
Die Gerätesicherheit kann gefährdet sein, wenn z.B.:
Fehlfunktionen auftreten.
am Gehäuse des Telefons oder des Akkus
Beschädigungen erkennbar sind.
das Telefon übermäßigen Belastungen ausgesetzt wurde.
das Telefon unsachgemäß gelagert wurde.
Sicherheitshinweise
33
3_Weitere Sicherheitshinweise
Berühren Sie das Display nicht mit scharfkantigen
Gegenständen. Staub und Schmutz können ebenso die
Displayscheibe zerkratzen. Bitte halten Sie die Displayscheibe sauber, indem Sie diese regelmäßig mit einem
weichen Stofftuch reinigen.
Laden Sie das Telefon nur in trockenen Innenräumen.
Setzen Sie das Telefon keinen hohen Temperaturen aus,
da dadurch der Akku überhitzen kann, was zu Feuer
oder im schlimmsten Fall zu einer Explosion führen kann.
Laden Sie das Telefon nicht in der Nähe von brennbaren
oder explosiven Substanzen.
Laden Sie das Telefon nicht in feuchter, staubiger oder zu
warmer bzw. zu kalter Umgebung. (Der zulässige Temperaturbereich für das Laden des Telefons beträgt 0 °C – 45 °C).
Benutzen Sie das Telefon nicht an Orten, an denen das
Benutzen von Mobiltelefonen verboten ist.
Setzen Sie das Gerät, den Akku oder das Ladegerät keinen
starken elektrischen Magnetfeldern aus, wie sie z.B. von
Induktionsherden oder Mikrowellenöfen ausgehen.
Öffnen Sie das Telefon nicht selbst und führen Sie auch
keine Reparaturen selbst durch. Unsachgemäße Reparaturen
können zur Zerstörung des Gerätes, zu Feuer oder zu einer
Explosion führen. Das Gerät darf nur von autorisierten
Fachleuten repariert werden.
Verwenden Sie nur von RugGear Europe GmbH
zugelassenes Zubehör.
Achten Sie unbedingt darauf, dass Sie die Pole des Akkus
nicht direkt mit einem leitfähigen Material verbinden. Damit
verhindern Sie einen Kurzschluss des Akkus.
DE
34
Sicherheitshinweise
Schalten Sie das Telefon in Kliniken oder anderen medizinischen Einrichtungen aus. Dieses Telefon kann die Funktion
von medizinischen Geräten wie Herzschrittmachern oder
Hörhilfen beeinflussen. Halten Sie daher immer einen Sicherheitsabstand von mindestens 15 cm zwischen Telefon und
dem Herzschrittmacher.
Achten Sie bei der Verwendung des Telefons während der
Steuerung eines Kraftfahrzeuges auf die entsprechenden
Landesgesetze.
Schalten Sie das Telefon aus und entfernen Sie das Ladegerät,
bevor Sie das Telefon reinigen.
Benutzen Sie keine chemischen Mittel zum Reinigen des
Telefons oder des Ladegerätes. Reinigen Sie die Geräte mit
einem weichen, angefeuchteten antistatischen Stofftuch.
Akkus gehören NICHT in den Hausmüll. Als Verbraucher sind
Sie dazu verpflichtet alte Akkus zur fachgerechten Entsorgung
zurückzugeben.
Für Schäden durch Computerviren, die beim Gebrauch der
Internetfunktionen heruntergeladen werden, ist der Benutzer
selbst verantwortlich. Ein Regressanspruch gegenüber der
RugGear Europe GmbH besteht nicht.
Warnung
Die RugGear Europe GmbH übernimmt keine Haftung für
Schäden, die durch Nichtbeachtung dieser Hinweise oder
unsachgemäßen Gebrauch des Telefons entstehen.
35
Schnellstart
4_Tastenbelegung
1_An/Aus:
Aktivieren der Bildschirmsperre.
Langer Druck zum An-, bzw.
Ausschalten.
1
2_Menü:
Kontextspezifische Optionen.
3_Home:
Zurück zum Home Screen. Langer
Druck zeigt zuletzt verwendete Apps.
4_Zurück:
Rückkehr zum vorherigen Bildschirm.
5_Lautstärke:
Kontextsensitive Lautstärkenregelung.
2
5
3
4
7
6_ SOS:
Vorbereitete Taste zur Nutzung
einer SOS-Funktion, zusätzliche
kostenpflichtige Applikation
notwendig.
7_PTT:
Vorbereitete Taste zur Nutzung
einer Push-to-Talk Lösung, zusätzliche kostenpflichtige Applikation
notwendig.
Note
6
Unsere Empfehlungen für
Push-to-Talk und SOS Applikationen finden Sie unter:
www.ruggear-europe.com
DE
36
Schnellstart
5_Erste Schritte
5.1_Akku
Der Akku wird an der Rückseite des Gerätes mit zwei Schrauben
montiert. Bei Anlieferung ist der Akku nicht vollständig aufgeladen. Das Telefon lässt sich aber dennoch vollständig aktivieren.
Zur Erreichung der besten Performance des Akkus wäre es
angebracht, den Akku die ersten dreimal vollständig zu entladen
und anschließend wieder 100 % aufzuladen.
5.1.1_Ein- und Ausbau des Akkus
Zum Einlegen des Akkus entnehmen Sie diesen dem Packungsinhalt und führen Sie die Nasen am unteren Ende des Akkus in
die dafür vorgesehenen Nuten im Telefon ein, dann drücken Sie
den Akku in die Halterung. Als nächstes verfahren Sie genauso mit
der Akkuabdeckung. Stellen Sie vor Inbetriebnahme des Telefons
sicher, dass der Akku und die Abdeckung ordnungsgemäß
montiert wurden.
Schnellstart
37
5.1.2_Laden des Akkus
Verbinden Sie das im Lieferumfang
enthaltene USB-Kabel mit dem Telefon
wie im Bild dargestellt.
Kontaktieren Sie anschließend das Kabel
mit dem Netzteil.
Nach dem Ladevorgang trennen Sie bitte
das USB Kabel vom Netzteil.
5.1.3_Gebrauch des Akkus
Im täglichen Gebrauch des Telefons hängt die Standby- und die
Redezeit von der Qualität der Verbindung zum Netzwerk, den
Gebrauchsgewohnheiten und den Umgebungsbedingungen ab.
Sobald der Akku einen niedrigen Ladezustand erreicht, wird
er das Gerät darauf hinweisen die Ladung in Gang zu setzten.
Falls dies nicht umgehend erfolgt, können nichtgespeicherte
Daten verloren gehen.
Wenn das Telefon für längere Zeit nicht geladen wird, schaltet
es sich selbst ab.
Warnung
Der Akku des Telefons darf nur innerhalb des Temperaturbereiches von 0 °C bis 45 °C geladen werden! Bitte laden Sie
niemals außerhalb dieses Temperaturbereiches und nutzen Sie
das beiliegende USB-Kabel.
DE
38
Schnellstart / Erster Einsatz
5.2_I nstallation der SIM Karten
Das Telefon verfügt über Steckplätze für
zwei SIM Karten (1, 2). Sobald zwei SIM
Karten installiert sind, können Sie die
favorisierte Karte wählen. Dies erfolgt
in den Einstellungen unter dem MenüSIM Verwaltung.
punkt Einstellungen
1
2
5.3_I nstallation der Micro-SD
Karte
Öffnen Sie den SD Kartenhalter, legen Sie
die Micro-SD Karte ein (3) und schließen
dann den Kartenhalter.
3
Warnung
Bauen Sie keine SIM Karte ein oder entfernen Sie eine, wenn ein
Ladegerät angeschlossen ist. Ansonsten können die SIM Karten,
bzw. das Telefon beschädigt werden.
6_Erster Einsatz
6.1_Anschalten des Telefons
Drücken Sie die An/Aus Taste bis der Bildschirm hell wird.
Abhängig von den Sicherheitseinstellungen Ihrer SIM Karte
werden sie nach deren PIN gefragt.
Beim ersten Einschalten werden Sie nach Ihrer bevorzugten Sprache,
der Zeit, dem Datum und persönlichen Informationen gefragt.
Erster Einsatz
39
Sie werden ebenfalls aufgefordert, sich in Ihrem Google™-Konto
einzuloggen oder ein neues Konto anzulegen. Sie können
dies auch später tun, aber beachten Sie bitte, dass Funktionen
des Telefons wie der Google Play™ Store von einem aktivierten
Google™-Konto abhängen.
6.2_Ausschalten des Telefons
1. Halten Sie die An/Aus Taste gedrückt
bis das Ausschaltmenü erscheint.
2. Tippen Sie auf Ausschalten.
3. Tippen Sie auf OK.
6.3_Sperren und Entsperren des Telefons
Drücken Sie die An/Aus Taste, um das Telefon zu sperren.
Bei gesperrtem Bildschirm können Sie weiterhin Nachrichten
und Anrufe empfangen.
Bei längerer Nichtbenutzung wird das Telefon automatisch
gesperrt.
Um das Telefon zu entsperren, drücken Sie die An/Aus Taste.
Nachdem sich der Bildschirm eingeschaltet hat, ziehen Sie
das Schloss-Icon nach rechts, um das Telefon zu entsperren.
Abhängig von den Sicherheitseinstellungen wird das Telefon nach
einer PIN zum Entsperren fragen. Dies ist NICHT die PIN Ihrer SIM
Karte sondern ein separater Code, den Sie unter
Sicherheit
Bildschirmsperre
Systemeinstellungen
einstellen können.
DE
40
Erster Einsatz
6.4_Benutzung des Touchscreen
Dieses Telefon beinhaltet einen kapazitiven Touchscreen.
Zur Bedienung reicht eine leichte Berührung, starker Druck
ist nicht nötig.
Die folgenden Aktionen können verwendet werden:
Tippen
Um eine Anwendung (App) zu öffnen oder um die Bildschirmtastatur zu nutzen, tippen Sie mit einem Finger auf
den Bildschirm.
Tippen und halten
Tippen Sie länger als zwei Sekunden auf ein Element,
um eine Pop-up-Liste mit Optionen zu öffnen.
Ziehen
Tippen Sie auf ein Element und ziehen Sie es mit dem Finger
zum gewünschten Platz.
Zweimal Tippen
Tippen Sie zweimal schnell mit Ihrem Finger, um angezeigte
Fotos oder Webseiten zu vergrößern oder zu verkleinern.
Wischen
Berühren Sie den Bildschirm und wischen Sie rechts
oder links, um weitere Seiten anzuzeigen. Wischen Sie
nach oben oder unten, um in Listen zu scrollen.
Finger auseinander- und zusammenbewegen
Berühren Sie den Bildschirm mit zwei Fingern dicht zusammen.
Ziehen Sie die Finger auseinander, um den Bereich auf einer
Webseiten, einer Karte oder einem Bild zu vergrößern. Führen
Sie die Finger zusammen, um einen Bereich zu verkleinern.
41
Erster Einsatz / Bildschirmlayout
6.5_Verbinden des Telefons mit einem Computer
Auf die Micro-SD Karte des Telefons kann von jedem Computer
aus über das USB Kabel zugegriffen werden.
1. V
erbinden Sie das Telefon über das USB Kabel mit einem
Computer. Wird diese Verbindung das erste Mal hergestellt,
installiert der Computer die benötigten Treiber automatisch.
2. Tippen Sie auf USB-Speicher aktivieren in der Dialogbox auf
dem Telefon und tippen Sie auf OK zur Bestätigung.
Hinweis
Während von einem Computer auf die Micro-SD Karte zugegriffen
wird sind eventuell nicht alle Funktionen des Telefons verfügbar.
7_Bildschirmlayout
Nach der Anmeldung oder dem Anschalten des Telefons öffnet
sich standardmäßig der Home Screen:
Statusleiste
Home
Screen
Schnellzugriffsleiste
Der Home Screen ist
der Ausgangspunkt zur
Bedienung des Telefons.
Hier können App Icons,
Verknüpfungen und andere
Features angezeigt werden.
Der Home Screen lässt sich
so anpassen, dass er die
Icons, die Sie benötigen,
anzeigt.
DE
42
Bildschirmlayout
7.1_Statusleiste
Die Statusleiste erscheint immer am oberen Bildschirmrand.
Rechts werden Gerätestatusicons wie der Akkustatus, GPS, Datenoder Mobilfunkverbindungen angezeigt.
Die linke Seite zeigt Nachrichten, wie z.B. verpasste Anrufe
oder erhaltene Nachrichten.
Statusicons
Signalstärke und -typ von SIM1 oder SIM2
(E für Edge, 3G für UMTS, H für HSDPA)
WLAN Verbindungsstatus und -stärke
Bluetooth® Verbindungsstatus
Flugzeugmodus
(alle drahtlosen Verbindungen sind deaktiviert)
Akkustatus
GPS empfängt Daten
Vibrationsalarm aktiv
Stummschaltung
(kein Klingelton, kein Vibrationsalarm)
43
Bildschirmlayout
Benachrichtigungsicons
Verpasste Anrufe
Eine oder mehrere neue E-Mails
Eine oder mehrere neue Nachrichten
Wecker aktiviert
USB Verbindung hergestellt
7.1.1_Benachrichtigungsfeld
Ziehen Sie die Statusleiste nach unten, um das Benachrichtigungsfeld anzuzeigen:
Ihr Telefon informiert Sie hier über neu erhaltene Nachrichten oder anstehende Termine.
Im Benachrichtigungsfeld finden Sie außerdem Informationen über Alarme, Einstellungen und andere relevante Informationen.
Tippen Sie auf eine Benachrichtigung, um
eine relevante Anwendung zu öffnen.
Um Benachrichtigungen zu entfernen,
wischen Sie sie nach links oder rechts.
Benutzen Sie das Einstellungs-Icon in der oberen
rechten Ecke des Benachrichtigungsfeldes, um Zugriff
auf die Systemeinstellungen zu erhalten.
Um das Einstellungsfeld zu schließen, ziehen Sie es vom unteren
Bildschirmrand nach oben.
DE
44
Bildschirmlayout
7.2_Schnellzugriffsleiste
Verknüpfungen, die hier platziert sind, sind auf jeder Seite
des Home Screens sichtbar.
Tippen Sie auf das App Icon, um den Anwendungsordner
mit Ihren installierten Anwendungen zu öffnen. Von hier
aus können sie jede App mit einem Tip auf ihr Icon starten.
7.3_Home Screen
Hier können Verknüpfungen zu Apps und Widgets platziert werden.
Widgets sind kleine Anwendungen, die Funktionen und Informationen auf dem Home Screen darstellen, wie z.B. das lokale Wetter,
Börseninformationen oder eine Vorschau Ihrer Emails. Widgets
finden Sie im Anwendungsordner.
Hinweis
Einige Widgets nehmen Verbindung zu Internet-Diensten auf.
Diese Dienste können kostenpflichtig sein.
7.3.1_Hinzufügen neuer Elemente zum Home Screen
1. Tippen Sie auf das App Icon, um den Anwendungsordner zu öffnen.
2. S uchen Sie nach der gewünschten App oder dem Widget.
Wischen Sie mit dem Finger nach rechts oder links, um eine
Seite vor- oder zurückzublättern.
3. Tippen und halten Sie das Icon des gewünschten Elementes
und warten Sie, bis der Bildschirm zum Home Screen wechselt.
4. Ziehen Sie das Element zum gewünschten Platz und heben Sie
Ihren Finger. Um zu einer andern Seite des Home Screens zu
wechseln, bewegen Sie das Element zum linken oder rechten
Bildschirmrand.
Bildschirmlayout
45
7.3.2_Verschieben eines Elementes
1. Tippen und halten Sie ein Element auf dem Home Screen
bis sich das Icon vergrößert.
2. Ziehen sie das Element zur gewünschten Position auf
dem Bildschirm, ohne den Finger zu heben.
Hinweis
Auf dem Home Screen muss genügend Platz vorhanden sein,
um das Element zu platzieren.
7.3.3_Entfernen eines Elementes
1. Tippen und halten Sie ein Element auf dem Home Screen
bis sich das Icon vergrößert.
2. Ziehen Sie das Element zum oberen Bildschirmrand
zum Entfernen.
7.3.4_Erstellen eines Ordners
Ziehen Sie ein App Icon auf ein anderes App Icon und lassen Sie es
los. Es wird ein Ordner generiert, der beide Icons enthält. Weitere
Icons können hinzugefügt werden.
7.3.5_Umbenennen eines Ordners
1. T ippen Sie auf einen Ordner, um ihn zu öffnen.
2. Tippen Sie auf den Namen des Ordners.
3. Geben Sie den neuen Namen ein.
4. Tippen Sie Fertig oder drücken Sie die Zurück Taste.
DE
46
Bildschirmlayout / Informationen
7.3.6_Wechseln des Hintergrundbildes
Tippen und halten Sie eine freie Stelle auf dem Home Screen,
um Optionen für das Hintergrundbild zu öffnen.
8_Spezifikationen
Frequenzen
Quadband
GSM/GPRS/EDGE
850/900/1800/1900 MHz
WCDMA/HSPA
900/2100 Mhz
Abmessungen
Gewicht: 206 g,
Maße: 124 x 68,5 x 24 mm
Bildschirm
3,2" (8,13 cm) RugDisplayGlas, robustes TFT-Touchscreen mit einer Auflösung
von 320 x 480 Pixeln
Kameras
5 MP (Rückseite)
0,3 MP (Front)
Lautsprecher
Verstärkte 1,5 Watt, mit einer
Leistung von 100 dB
Drahtlose Kommunikation
Bluetooth®, Wi-Fi®, GPS, NFC
Akku
Akku mit 2060 mAh, 300 Std.
Stand-by, Gesprächszeit
2G/3G: 468 Min./210 Min.
Speicher
4 GB ROM, 512 MB RAM
Speicher, Micro-SD Speicher
erweiterbar auf 32 GB
Prozessor
MT6572 (Dual Core 1.2 GHz)
Temperatur
In einer Umgebung von
-20 °C bis 60 °C
IP68
Wasserdicht: 30 Min. bis
zu 2 m Tiefe, staubdicht,
geschützt vor Mikropartikeln
MIL-STD-810G
Aufprallschutz: übersteht Fall aus 2 m Höhe,
staubdicht, geschützt vor
Mikropartikeln
Informationen
47
9_Fehlerbehebung
Wenn Sie Probleme mit Ihrem Telefon haben, probieren Sie die
nachfolgenden Anweisungen zur Problembehebung. Können
Sie damit das Problem nicht beheben, wenden Sie sich an Ihren
Fachhändler oder das RugGear Europe Service Center.
Das Telefon lässt sich nicht einschalten
Die Akkuladung ist zu niedrig.
Bitte laden Sie den Akku.
Die Einschalttaste wurde nicht lang genug gedrückt.
Drücken Sie die Einschalttaste länger als 3 Sekunden.
Der Akku hat eine schlechte Verbindung zum Gerät.
Entfernen Sie den Akku und reinigen Sie vorsichtig
die Kontakte.
Es liegt ein Fehler mit einer SIM Karte vor.
Prüfen und ersetzen Sie die SIM Karte.
Unzureichende Stand-by Zeit
Die Leistung des Akkus wird altersbedingt schwach.
Bitte wenden Sie sich an Ihren Fachhändler oder das
RugGear Europe Service Center direkt und ersetzen Sie
den Akku.
Zu viele Programme und Funktionen laufen gleichzeitig.
Beenden Sie Programme und Funktionen, wenn Sie diese
nicht mehr brauchen.
DE
48
Informationen
Keine Ladung möglich
Schlechte Kontakte.
Prüfen Sie alle Kontakte und Stecker.
Die Eingangsspannung ist zu schwach.
Laden Sie das Telefon für eine Stunde, nehmen Sie das Ladegerät
vom Netz, warten Sie eine Minute und setzen Sie dann die Ladung
fort. In dieser Zeit kann es vorkommen, dass sich das Telefon
aufgrund der niedrigen Spannungslage nicht einschalten lässt.
Der Akku hat einen Fehler.
Ersetzen Sie den Akku.
Gesprächsabbrüche treten auf
Es liegt ein Fehler mit einer SIM Karte vor.
Prüfen und ersetzen Sie die SIM Karte.
Es treten Netzwerkfehler auf.
Bitte wechseln Sie zu einem Netzwerk mit einem stärkeren Signal.
andere Personen erhalten meine Anrufe
Das Telefon ist auf eine andere Telefonnummer umgestellt.
Bitte prüfen und ändern Sie die Einstellung der Rufumleitung.
Das Telefon schaltet sich automatisch ab
Die Akkuladung ist zu niedrig.
Bitte laden Sie den Akku.
Es ist eine Störung aufgetreten.
Starten Sie das Telefon erneut. Ist das Problem damit nicht
behoben, wenden Sie sich an Ihren Fachhändler oder die
RugGear Europe GmbH.
Informationen
49
10_Wartungshinweis
Bedarf Ihr Telefon einer Reparatur oder sollten Sie ein Problem mit
Ihrem Telefon haben, wenden Sie sich bitte an das Service Center
oder Ihren Verkäufer.
Marken
RugGear (Europe) und das RugGear (Europe) Logo sind
eingetragene Marken der RugGear Europe GmbH.
Das Android-Logo, Google™ und Google Play™ Store
sind Marken von Google, Inc.
Der Android Roboter wird anhand von Werken reproduziert
bzw. verändert, die von Google™ erstellt oder geteilt wurden.
Seine Verwendung erfolgt gemäß den Bestimmungen der
Creative Commons 3.0 Lizenz (Namensnennung).
Bluetooth® ist eine weltweit eingetragene Marke
der Bluetooth SIG, Inc.
Wi-Fi® ist eine eingetragene Marke der Wi-Fi Alliance.
Alle weiteren Marken und Copyrights sind Eigentum
ihrer jeweiligen Besitzer.
Wiederverwertung
Das Symbol der durchgestrichenen Abfalltonne auf Rädern, das
auf dem Produkt, auf dem Akku, in der Dokumentation oder auf
dem Verpackungsmaterial zu finden ist, bedeutet, dass elektrische
und elektronische Produkte und Akkus am Ende ihrer Lebensdauer
einer getrennten Müllsammlung zugeführt werden müssen. Diese
Vorschriften gelten in der Europäischen Union.
DE
50
Informationen
Entsorgen Sie diese Produkte nicht über den unsortierten
Hausmüll. Entsorgen Sie gebrauchte elektronische Produkte,
Akkus und Verpackungsmaterial stets bei den entsprechenden
Sammelstellen. Sie beugen so der unkontrollierten Müllbeseitigung vor und fördern die Wiederverwertung von stofflichen
Ressourcen.
Weitere Informationen erhalten Sie über den Händler, bei
dem Sie das Produkt erworben haben, von regionalen Abfallunternehmen, staatlichen Behörden für die Einhaltung der
erweiterten Herstellerhaftung oder dem für Ihr Land oder Ihre
Region zuständigen RugGear Europe GmbH Vertreter.
Der Inhalt dieses Dokuments wird so präsentiert, wie er aktuell
vorliegt. Die RugGear Europe GmbH übernimmt weder ausdrücklich noch stillschweigend irgendeine Gewährleistung für die
Richtigkeit oder Vollständigkeit des Inhalts dieses Dokuments,
einschließlich, aber nicht beschränkt, auf die stillschweigende
Garantie der Markttauglichkeit und der Eignung für einen
bestimmten Zweck, es sei denn, anwendbare Gesetze oder
Rechtsprechungen schreiben zwingend eine Haftung vor. Die
RugGear Europe GmbH behält sich das Recht vor, jederzeit ohne
vorherige Ankündigung Änderungen an diesem Dokument vorzunehmen oder das Dokument zurückzuziehen.
51
Informationen
11_Informationen zur SAR
Zertifizierung (spezifische
Absorbationsrate)
Dieses Gerät erfüllt internationale Richtlinien für die
Belastung durch Radiowellen.
Dieses Gerät ist ein Funksender und -empfänger. Die Konstruktion
des Gerätes gewährleistet, dass die durch internationale Richtlinien empfohlenen Grenzwerte für die Belastung durch Radiowellen
(elektromagnetische Funkfrequenzfelder) nicht überschritten
werden. Diese Richtlinien wurden von der unabhängigen wissenschaftlichen Organisation ICNIRP erarbeitet und enthalten eine
beträchtliche Sicherheitsspanne, um die Sicherheit aller Personen,
ungeachtet ihres Alters und Gesundheitszustandes, zu garantieren.
In den Richtlinien für die Belastung durch Radiowellen wird die
Maßeinheit SAR (Specific Absorption Rate – spezifische Absorptionsrate) verwendet. Für mobile Geräte gilt ein SAR-Grenzwert
von 2,0W/kg. SAR-Tests werden mit üblichen Nutzungspositionen
durchgeführt, wobei das Gerät in allen getesteten Frequenzbändern mit dem höchsten zugelassenen Leistungspegel sendet.
Für dieses Gerätemodel wurden gemäß ICNIRP-Richtlinien die
folgenden SAR-Höchstwerte ermittelt:
SAR – Höchstwerte für dieses Model und die Bedingungen,
unter denen diese Werte ermittelt wurden
SAR (Kopf)
0,650 W/kg (GSM1800)
SAR (am Körper getragen) 0,807 W/kg (GSM900)
DE
52
Informationen
Während der Nutzung des Gerätes liegen die tatsächlichen SARWerte in der Regel weit unter den oben aufgeführten Werten. Dies
ist dadurch bedingt, dass Ihr Mobilgerät aus Gründen der Systemeffizienz und zur Verminderung von Störungen im Mobilfunknetz
automatisch die Betriebsleistung reduziert, wenn für einen Anruf
nicht die vollständige Leistung erforderlich ist. Je geringer die
Leistungsabgabe des Gerätes ist, desto niedriger ist der SAR-Wert.
Mit diesem Gerät wurde ein SAR-Test durchgeführt, bei dem ein
Abstand von 1,5 cm eingehalten wurde. Damit die Anforderungen
hinsichtlich der HF-Belastung bei der Verwendung in Körpernähe
eingehalte werden, muss sich das Gerät mindestens 1,5 cm vom
Körper entfernt befinden.
Organisationen wie die Weltgesundheitsorganisation und die
amerikanische Food and Drug Administration schlagen vor, zum
Verringern der Strahlenbelastung Freisprecheinrichtungen zu
verwenden, wodurch sich das Drahtlosgerät bei der Nutzung
in Entfernung zu Kopf und Körper befindet, oder schränken Sie
die Verwendung des Gerätes ein.
DE
55
TITEL DES KAPITELs
KONTAKT / Service Center
RugGear Europe GmbH
Service Center
c/o AdivoTEC GmbH
Averdiekstraße 28
49078 Osnabrück
[email protected]
Fon +49 (0)541 150464-15
Fax +49 (0)541 150464-14
Erreichbar: Montag – Freitag , 08:00 – 17:00 Uhr
(nicht an gesetzlichen Feiertagen)
Hier geht‘s
zum Online Handbuch!
www.ruggear-europe.com/service
RugGear Europe GmbH | [email protected]
i_Park Tauberfranken 14 | 97922 Lauda-Koenigshofen | Germany
DE
www.ruggear-europe.de