1
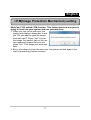
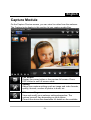
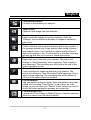
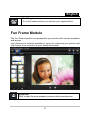
English
Table of Contents
WideCam F100 Features
1
Set up the device
2
I.P.M setting
3
Arcsoft Webcam Companion 4
4
How to use Webcam Companion4
5-12
Trouble shooting for WideCam F100
12-13
i
English
Symbol for Separate Collection in European Countries
This symbol indicates that this product is to be collected separately.
The following apply only to users in European countries:
This product is designated for separate collection at an appropriate
collection point. Do not dispose of as household waste.
For more information, contact the retailer or the local authorities in charge
of waste management.
WideCam F100 Features
Experience true plug and play with WideCam F100! Hook it up to a USB
port and start video chatting right away! No drivers are needed for this
USB Video Class web camera.
1. Ultra wide angle lens
120 degree lens
provides wider view
2. Microphone built in
Sensitive microphone
3. Base rotation
Base rotates 360
degrees for any angle
view
4. Clipping Base
Adjustable clipping
base fits easily to
desktop, NB or TV
-1-
English
Set up the Device
WideCam F100 supports UVC (USB Video Class) which can plug and
play in Windows 7/Vista/XP SP2 or Mac 10.4.9 and above without using
a device driver.
1. Make sure your PC OS system is Windows 7/Vista/XP SP2 or Mac 10.4.9
and above.
2. Plug in the WideCam F100 to a USB port.
3. WideCam F100 is now ready for use with any application. It can work
properly with any video chat software that supports a video feature. If you
use Mac OS, you can use iChat for online chatting.
Image Capture under Windows XP SP2 and Vista:
1. Double-click on the My Computer icon. Or click Start
My Computer
2. Now look for and double-click on “USB Video Device”, then you can start
to capture still images.
NOTE
To check if Windows XP system is SP2 (Service Pack 2).
− Click on the My Computer icon on your desktop or in the Windows
Start menu.
− When the menu appears, click Properties.
If your Windows XP system isn’t SP2 (Service Pack 2), go to the website
http://www.microsoft.com to upgrade your version.
-2-
English
I.P.M(Image Protection Mechanism) setting
WideCam F100 embed I.P.M function. This feature prevents any person
trying to hack into your system and use your web cam.
1. When you turn on the web cam, the
system will display a dialog box to ask
you “Do you want to open the image
from web cam?” Press “Yes” to open
the image. Any hacker can not turn on
your webcam because they can not
press “Yes”. This keeps your web cam
safe.
2. Every time when you turn the web cam, the system will ask again if you
want to prevent any hacker invasion.
-3-
English
Webcam Companion 4 (For HD recording)
This simple application makes it easy for you to capture still images and
videos directly from your webcam. You even have the option to shoot a
picture of you in which your face is morphed by the one in the template you
have selected. The program also provides templates and layouts for you to
customize your photos and print them out or send them by email to share
with your family and friends! WCC4 can record the HD video from webcam
which up to 720p HD 30fps.
System Requirements
Make sure that your PC meets the following minimum system requirements
before running Webcam Companion 4
Minimum
Recommended
Hardware
CPU
Intel® Core™2 Duo
Intel® Core™2
RAM
Disk Space
DirectX
Software
Operating System
DirectX
2.2 GHz
Quad2.83 GHz
256 MB
500 MB
DirectX 9
1G DDR2
1GB
DirectX 10
Windows XP/Vista/7
DirectX 9 or above
-4-
English
How to use Webcam Companion 4
Capture
The module allows you to capture a still image and video from
your webcam.
Fun Frame
The function can personalize your photos with various
templates and layouts.
Edit Module
Provides functions for you to enhance your captured photos
and videos, and save the modified files to your local disk.
-5-
English
Capture Module
On the Capture Preview screen, you can view live video from the webcam.
The Capture tools display in this section let you capture media files.
Full Screen
Display the current video or live preview full screen. Press
ESC button to exit full screen mode.
Setting
Adjust your capture settings such as image and video formats,
quality, devices, number of photos in burst, etc.
Webcam setting
View and modify your webcam settings/properties. The
options here will vary depending on your device.
Consult the device documentation for details on the available
-6-
English
options.
Connect/Disconnect
Connect or disconnect your camera.
Take Picture
Capture a still image from the webcam.
Burst
Capture multiple images in quick succession. Click the
"Settings" icon to define the number of images to capture in
each burst.
Snapshot
Click to start the auto-snapshot process with V-sign gesture. If
the program detects the V-sign gesture after taking a picture
with people's face, it will continue to detect whether there is
blink in the picture or not. If a blink exists, a mention message
will pop up and ask you to save or cancel the picture.
Record Video
Begin capturing video from your camera. The button will
change to "Stop Recording" while capturing. Click it again to
stop capturing. The recording time will show at the top of the
capture preview section.
Record Audio
Click this button to capture audio from your camera. The
button will change to "Stop Recording" while capturing. Click it
again to stop capturing. The recording time will be shown at
the top of the capture preview window.
Live Annotation
Add annotations to the live video. After annotations have been
added, you can click "Take Picture" to save them as a still
image; or you can also click "Record Video" before you start to
record the entire annotation process as a video clip.
Preview Media Files
Launch the Photo Viewer or Media Player to view the selected
photos or videos from the current album.
-7-
English
Find Target
Go to the location where you archive your captured files.
Fun Frame Module
The Fun Frame function can personalize your photos with various templates
and layouts.
Just choose your favorite template or layout to customize your photos and
click to print it out or send it to your family and friends.
Snap shot
Click to start the auto-snapshot process with pose detection.
-8-
English
Take Picture
Capture a still image from the webcam.
Preview Media Files
Launch the Photo Viewer or Media Player to view the selected
photos or videos from the current album.
E-mail
E-mail the captured images or videos as attachments from your
e-mail program.
Print
Print your captures to share with your friends and family.
Pose Detection Sensitivity
Drag and drop the slider to adjust the sensitivity for Pose
Detection function.
Edit Module
The Edit Module provides functions for you to enhance your captured photos
and videos, and save the modified files to your local disk.
-9-
English
Find Target
Go to the location where you archive your captured files.
E-mail
E-mail the captured images or videos as attachments from
your e-mail program.
Print
Print your captures to share with your friends and family.
Delete
Remove the selected files from the current album. When you
delete a thumbnail from the albums, the corresponding file will
also be removed from your local disc.
Upload to Twitter
Upload the edited file to Twitter to post for others to view
-10-
English
Upload to Flickr
Upload the edited file to Flickr to post for others to view.
Upload to YouTube
Upload the edited video file to YouTube to share with your
friends.
Auto Enhance
Click the Auto Enhance button to improve the overall quality of
your pictures with a single click.
Adjust Brightness
Drag and drop the slider to lighten or darken your image.
Adjust Contrast
Drag and drop the slider to adjust the contrast of a photo
manually.
Adjust Blur
Drag and drop the slider to smooth rough edges or sharpen
fuzzy areas.
Zoom In
Enlarge the active photo within the preview area.
Zoom Out
Reduce the size of the active photo within the preview area.
Rotate Left 90
Rotate the active photo 90-degrees counter-clockwise.
-11-
English
Rotate Right 90
Rotate the active photo 90-degrees clockwise.
Flip
Create a mirror image of the photo.
Undo
Undo the last action. You can use this command to correct a
mistake.
Redo
This command reverses the last Undo command.
Resize
Resize the active photo. A window will appear where you can
type in the values for photo width and height, or choose to
Keep Aspect Ratio.
Crop
Remove unwanted area from the image. Use the Crop Tool to
define a rectangular or square area. Once the area is defined,
the area outside the selection will turn dark. Click the Crop
button located under the Preview area to apply the crop
operation.
.
Trouble shooting
Q1: My computer cannot detect the web camera when
connected with an extended USB cable.
Solution:
•
Connect the web camera directly to a USB port on your computer.
Make sure the web camera is connected to the USB port at the
-12-
English
back of your computer. Some USB ports at the front of computers
may not supply sufficient power for your web camera.
Q2: Insufficient system resources reserved for the USB port,
causing the system to be unable to function.
There are too many devices in the system, causing IRQ problems with the
system's USB controller.
Do the following:
Remove some USB devices from the system.
Restart the system.
The computer reallocates resources.
Q3: The web camera does not light up or the computer restarts
for no apparent reason.
You may have a USB device drawing too much power from your computer.
This can happen especially when connecting USB devices to a passive or
self-powered USB hub. A USB Hub Power Exceeded dialog box appears.
Try the following:
Connect the web camera directly to your computer's USB port.
Use a USB hub with an external power supply.
-13-