1
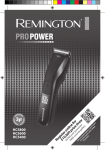
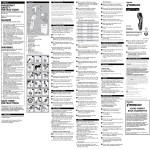
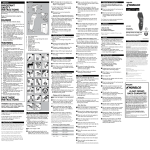
HC5200
m r
le
of us odu
ry
pu t re ctr
rch gi egi
as ster ster
e. w .co
ith .uk
in /re
28 m
da ing
ys ton
.
Re
g
£1 iste
0 r
EX ,0 o
TR 0 nl
FR A y 0 p ine
EE ea r
re r g ize fo
r
w ua
ar ra d
Vis
ds n ra
it w
t
ga ee w
Yo ww
u .p
l
3
Thank you for choosing Remington®. Our products are designed to meet the highest
standard of quality, functionality and design.
We hope you enjoy using your new Remington® product. Please read the instructions for
use carefully and keep in a safe place for future reference.
Claim your extra 1 year warranty by registering your product online.
Simply go to: www.productregister.co.uk/remington
2
A IMPORTANT Safeguards
1 WARNING – TO REDUCE THE RISK OF BURNS, ELECTROCUTION, FIRE, OR INJURY TO PERSONS:
2 Use this appliance only for its intended use as described in this manual. Do not use attachments not recommended by Remington®.
3 Do not use this product if it is not working correctly, if it has been dropped or damaged, or dropped in water.
4 An appliance should never be left unattended when plugged in to a power outlet, except when charging.
5 Keep the power plug and cord away from heated surfaces.
6 Make sure the power plug and cord do not get wet.
7 Do not plug or unplug the appliance with wet hands.
8 Do not use the product with a damaged cord. A replacement can be obtained via our International Service Centres.
9 Do not twist or kink the cable, and don’t wrap it around the appliance.
10Store the product at a temperature between 15°C and 35°C.
11Only use the parts supplied with the appliance.
12The appliance, including its cord, must not be used, played with, cleaned or maintained by persons under eight years old and should at all times be kept out of their reach.
13Use, cleaning or maintenance of the appliance by children over eight or by anyone with a lack of knowledge, experience or with reduced physical, sensory or mental capabilities
should only be undertaken after receiving appropriate instruction and under the adequate supervision of a responsible adult to ensure that they do so safely and that the hazards involved are understood and avoided.
FWARNING: Keep the appliance dry.
3
6
1
4
5
C Key Features
1 On / Off Switch
2 Blade set
3 2 attachment guide combs: 3 -21mm and 24-42mm, 3mm adjustment
4 Charging indicator light
5 Power Port
6Adaptor
2
3
C GETTING STARTED
,CHARGING YOUR HAIRCLIPPER
• Ensure the product is switched off
• Connect the charging adaptor to the product and then to the mains.
• If the product is not going to be used for an extended period time (2 – 3 months), unplug it from the mains and store.
• Fully recharge your product when you would like to use it again.
• Allow 16 – 20 hours for a full charge.
• This appliance should be charged by approved safety isolating adaptors PA-3215E (for EU version) or PA-3215U (for UK version) with the output capacity of 3.2V dc; 1500mA .
,CORDED USE
• Connect the charging adaptor to the product then to the mains.
FCAUTION: Extended mains only use will result in the reduction of the battery life.
Keep the appliance dry.
4
,TO ATTACH A COMB
• Hold the comb with its teeth upward.
• Slide it onto and along the clipper blade until the front of the comb firmly sits against the clipper blade.
,TO REMOVE THE COMB
• Holding the clipper with the blades facing away from you, firmly push the comb upward and away from the blades.
,INSTRUCTIONS FOR HAIR CUTTING
Note: For even cutting, allow the comb attachment/blade to cut its way through the hair. Do not force it through quickly. If you are cutting for the first time, start with the maximum comb attachment.
,CORDLESS USE
When the unit is switched on and fully charged, the product can be used in cordless mode
for up to 40 minutes.
,STEP 1 – Nape of the neck
• Set the comb to 3mm or 6mm.
• Hold the clipper with the blade teeth pointing upwards. Begin starting at the centre of the head at the base of the neck.
• Slowly lift the clipper, working upwards and outwards through the hair, trimming just a little at a time.
C HOW TO USE
,STEP 2 – Back of the head
• With the comb set at 12mm or 18mm, cut the hair at the back of the head.
,BEFORE STARTING THE CUT
• Inspect the clipper making sure that it is free from hair and dirt.
• Seat the person so that their head is approximately at your eye level.
• Before cutting, always comb the hair so it is tangle free and dry.
,STEP 3 – Side of the head
• Set the comb to 3mm or 6mm, trim sideburns. Then change the setting to 9mm and continue to cut the top of the head.
Comb position
Short comb
Long comb
1
3 mm
24 mm
2
6 mm
27 mm
3
9 mm
30 mm
4
12 mm
33 mm
5
15 mm
36 mm
6
18 mm
39 mm
7
21 mm
42 mm
,STEP 4 – Top of the head
• Use the longer length comb attachment and set it to 24mm or 27mm then cut hair on top of the head against the direction in which the hair normally grows.
• For longer hair on top, use the longer length comb attachment (24 – 42mm) to achieve the desired style.
• Always work from the back of the head.
,STEP 5 – The finishing touches
• Use the clipper without an attachment comb for close trimming around the base and sides of the neck.
• To produce a clean straight line at the sideburns, reverse the hair clipper. Place the reversed clipper at right angles to the head, tips of the blades lightly touching the skin and then work downwards.
5
,SHORT TAPERED STYLES – “FLAT TOPS” & SHORT CUTS
• Starting with the longest guide comb attached (24 - 42mm), cut from the back of the neck to the crown. Hold the guide comb flat against the head and slowly move the clipper through the hair.
• Use the same procedure from the lower side to the upper side of the head. Then cut the hair against the direction in which it grows and level with the sides.
• To give a “flat top” look, the hair on top of the head must be cut over the top of a
flat comb.
• Use a closer guide comb to taper the hair down to the neckline as desired.
•
•
•
•
H Environmental Protection
To avoid environmental and health problems due to hazardous substances in electrical
and electronic goods, appliances marked with this symbol must not be disposed of
with unsorted municipal waste, but recovered, reused or recycled.
C CARE FOR YOUR HAIRCLIPPER
Your clipper is fitted with high quality blades. To ensure long lasting performance of your
clipper, clean the blades and unit regularly. Always keep the attachment guide comb on the
trimmer blade.
,AFTER EACH USE
• Ensure the clipper is switched off and disconnected from the mains before cleaning.
• Brush the accumulated hair from the blades. Do not submerge the clipper in water.
• To clean unit, wipe with damp cloth and dry immediately.
,EVERY SIX MONTHS
• At regular intervals the blade set should be removed and cleaned.
• Remove the 2 screws retaining the fixed blade with a screwdriver. Do not remove
blade set.
• Brush out hairs from between the blades with soft cleaning brush. Do not remove the lubricating grease from the blades. It is not necessary to remove the small moving blade from the unit.
• If the moving blade has been removed this can be re-fitted by slotting the coated blade holder over the pin in the centre of the interior product head. The groove on the coated blade, just below the teeth, rests on a metal plate at the opposite side to the screw holes. The fixed blade is fitted with the raised profile pointing outwards and fixed with the
2 screws.
• Note that if the blades are not correctly aligned then cutting efficiency will be impaired.
• Place a few drops of cutter or sewing machine oil onto the blades. Wipe off excess oil.
Cleaning should be done with a soft brush, such as the brush supplied with the product.
Do not rinse under water.
Do not use harsh or corrosive cleaners on the units or their blades.
Ensure the appliance is switched off and unplug from the main outlet before cleaning
BATTERY REMOVAL
•
•
•
•
•
•
•
•
•
The battery must be removed from the appliance before it is scrapped.
The appliance must be disconnected from the supply mains when removing the battery.
Ensure that the clipper is discharged of all power and disconnected from the mains.
Remove the screw cover from back housing.
Using a small screwdriver, remove (1) screw from the bottom of the clipper.
Pry the front panel from the front housing and expose the PCB and batteries.
Pry the PCB assembly from the housing.
Cut or break the wire stamps on the both end of the batteries and remove the batteries.
The battery is to be disposed of safely.
E Service and Guarantee
Defects affecting product functionality appearing within the guarantee period will
be corrected by replacement or repair at our option provided the product is used and
maintained in accordance with the instructions.
Defects from repair by an unauthorized dealer are not covered.
Consumables are excluded.
Your statutory rights are not affected.
If you call the Service Centre, please have the Model No. to hand, as we won’t be able to help
you without it. The Model No. can be found on the rating plate of the appliance.
Replacement parts and accessories are available to buy at
www.remington.co.uk/parts-accessories
,CLEANING CAUTIONS
• Only the attachment guide combs and trimmer blade may be removed from the product for cleaning.
6
7
E SERVICE CENTRE
United Kingdom
G Tel 0800 212 438 (free call mainland UK)
G +44 161 947 3111 (call outside the UK)
Spectrum Brands (UK) Ltd
Fir Street, Failsworth, Manchester
M35 0HS, UK
www.remington.co.uk
Ireland
G Tel 142 951 40
Remington Consumer Products,
Unit B12, Ballymount Corporate Park,
Ballymount, Dublin 12.
www.remington.co.uk
I Register Online For
£10,000 prize draw, EXTRA year guarantee, FREE rewards gallery.
Visit www.productregister.co.uk/remington. You must register within 28 days
of purchase.
Model No. HC5200
13/UK/HC5200 T22-0001001 Version 01 /13
Remington® is a Registered Trade Mark of Spectrum Brands, Inc., or one of its subsidiaries.
Spectrum Brands (UK) Ltd
Fir Street,
Failsworth,
Manchester
M35 0HS
www.remington.co.uk
© 2013 SBI
8