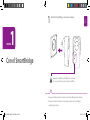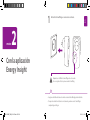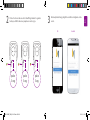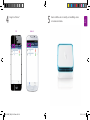
1
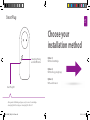
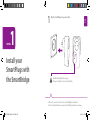
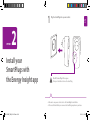
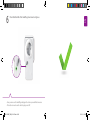
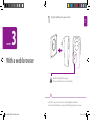
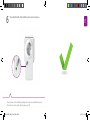
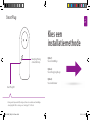
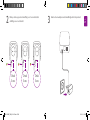
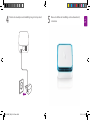
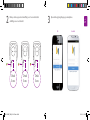
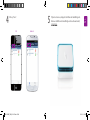
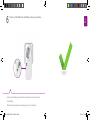
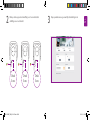
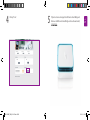
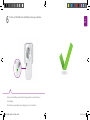
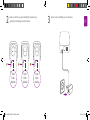
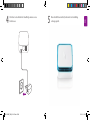
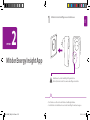
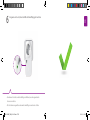
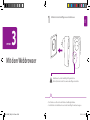
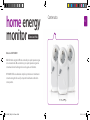
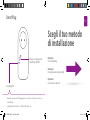
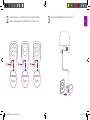
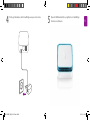
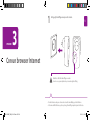
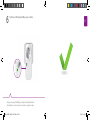
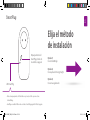
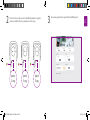
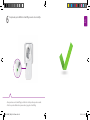
Installation guide
WLE-1100INT_QIG_20131127.indd 1-2
09-01-14 16:09
EN
home energy
monitor
Package content
Extension Pack
Sitecom and NET2GRID
Many energy suppliers offer a way to gain insights into your energy use.
We believe that you don’t have to be tied to a supplier to gain insights
into your energy use.
NET2GRID provides an easy solution to measure and monitor your home’s
energy consumption. That’s why we have partnered up with them.
3x SmartPlugs
WLE-1100INT_QIG_20131127.indd 3-4
09-01-14 16:09
EN
SmartPlug
Choose your
installation method
Smartplug Pairing
and On/Off button
Option 1)
With the SmartBridge
Option 2)
With the Energy Insight app
Option 3)
With a web browser
SmartPlug LED
• Pairing mode: LED blinking red/green, ready to connect to smartbridge.
• Smartplug ON: LED is solid green / Smartplug OFF: LED is off.
WLE-1100INT_QIG_20131127.indd 5-6
09-01-14 16:09
1
EN
1
Plug the SmartPlugs into a power socket.
OPTION
Install your
SmartPlugs with
the SmartBridge
!
Check if the SmartPlug LEDs are green.
If not press the button to turn on the SmartPlug.
• Make sure to use power sockets close to the SmartBridge for installation.
• After successful installation you can move the SmartPlugs anywhere in your house.
WLE-1100INT_QIG_20131127.indd 7-8
09-01-14 16:09
press
5 sec.
WLE-1100INT_QIG_20131127.indd 9-10
press
5 sec.
3
Disconnect your SmartBridge from the wall socket.
EN
2
Push the button on each of the three SmartPlugs for 5 seconds
until the LED starts to blink green and red.
press
5 sec.
09-01-14 16:09
WLE-1100INT_QIG_20131127.indd 11-12
5
When the LED’s turn solid blue your SmartBridge is ready.
EN
4
Plug the power adapter of your SmartBridge back into a wall socket.
09-01-14 16:09
EN
6
Check that the LEDs of the SmartPlugs have turned solid green.
• Now you can move the SmartPlugs and plug in the devices you would like to measure.
• The button can now be used to turn the plugs on and off.
WLE-1100INT_QIG_20131127.indd 13-14
09-01-14 16:09
OPTION
2
Install your
SmartPlugs with
the Energy Insight app
!
EN
1
Plug the SmartPlugs into a power socket.
Check if the SmartPlug LEDs are green.
If not press the button to turn on the SmartPlug.
• Make sure to use power sockets close to the SmartBridge for installation.
• After successful installation you can move the SmartPlugs anywhere in your house.
WLE-1100INT_QIG_20131127.indd 15-16
09-01-14 16:09
3
Open the Energy Insight app on your smartphone.
iOS
press
5 sec.
WLE-1100INT_QIG_20131127.indd 17-18
press
5 sec.
EN
2
Push the button on each of the SmartPlugs for 5 seconds until the
LED starts to blink green and red.
Android
press
5 sec.
09-01-14 16:09
5
iOS
WLE-1100INT_QIG_20131127.indd 19-20
While scanning, the SmartBridge will blink white. When the
LED’s turn solid blue your SmartBridge is ready.
EN
4
Click “Scan”.
Android
09-01-14 16:09
EN
6
Check that the LEDs of the SmartPlugs have turned solid green.
• Now you can move the SmartPlugs and plug in the devices you would like to measure.
• The button can now be used to turn the plugs on and off.
WLE-1100INT_QIG_20131127.indd 21-22
09-01-14 16:09
OPTION
3
1
EN
Plug the SmartPlugs into a power socket.
With a web browser
!
Check if the SmartPlug LEDs are green.
If not press the button to turn on the SmartPlug.
• Make sure to use power sockets close to the SmartBridge for installation.
• After successful installation you can move the SmartPlugs anywhere in your house.
WLE-1100INT_QIG_20131127.indd 23-24
09-01-14 16:09
press
5 sec.
WLE-1100INT_QIG_20131127.indd 25-26
press
5 sec.
3
Open your web browser and go to http://smartbridge.local
EN
2
Push the button on each of the SmartPlugs for 5 seconds until
the LED starts to blink green and red.
press
5 sec.
09-01-14 16:09
WLE-1100INT_QIG_20131127.indd 27-28
5
While scanning, the SmartBridge will blink white. When the
LED’s turn solid blue your SmartBridge is ready.
EN
4
Click “scan”.
09-01-14 16:09
EN
6
Check that the LEDs of the SmartPlugs have turned solid green.
• Now you can move the SmartPlugs and plug in the devices you would like to measure.
• The button can now be used to turn the plugs on and off.
WLE-1100INT_QIG_20131127.indd 29-30
09-01-14 16:09
NL
home energy
monitor
Verpakkingsinhoud
Extension Pack
Sitecom en NET2GRID
Veel energieleveranciers bieden je een manier om inzicht te krijgen in
je energieverbruik. Wij vinden echter dat je hiervoor niet gebonden
hoeft te zijn aan een leverancier.
NET2GRID biedt je een eenvoudige oplossing waarmee je het
energieverbruik van je woning kunt meten ongeacht je energie leverancier. Daarom zijn wij een samenwerking met hen aangegaan.
3x SmartPlugs
WLE-1100INT_QIG_20131127.indd 31-32
09-01-14 16:09
NL
SmartPlug
Kies een
installatiemethode
Smartplug Pairing
en Aan/Uit knop
Optie 1)
Via de SmartBridge
Optie 2)
Via de Energy Insight app
Optie 3)
Via de webbrowser
SmartPlug LED
• Pairing mode: Kniperende LED (rood/groen). Klaar om te verbinden met SmartBridge.
• Smartplug AAN: LED is continu groen / Smartplug UIT: LED is uit.
WLE-1100INT_QIG_20131127.indd 33-34
09-01-14 16:09
1
NL
1
Plaats de SmartPlugs in een stopcontact.
OPTIE
Installeer de
SmartPlugs met
de SmartBridge
!
Controleer of de led op de SmartPlug groen brandt.
Als dit niet het geval is, druk op de knop om de SmartPlug aan te schakelen.
• T ijdens de installatie is het handig om de SmartPlugs in een stopcontact
te plaatsen dicht bij de SmartBridge.
• Na een succesvolle installatie kan je de SmartPlugs verplaatsen.
WLE-1100INT_QIG_20131127.indd 35-36
09-01-14 16:09
Druk
5 sec.
WLE-1100INT_QIG_20131127.indd 37-38
Druk
5 sec.
3
Haal de stroomadapter van de SmartBridge uit het stopcontact.
NL
2
Druk op de knop op iedere SmartPlug voor 5 seconden totdat
de LED groen en rood brandt.
Druk
5 sec.
09-01-14 16:09
WLE-1100INT_QIG_20131127.indd 39-40
5
Wanneer de LED van de SmartBridge continue blauw brandt,
is deze klaar.
NL
4
Plaats de stroomadapter van de SmartBridge terug in het stopcontact.
09-01-14 16:09
NL
6
Controleer of the LED’s van de SmartPlugs continue groen branden.
• Nu kan je de SmartPlugs verplaatsen. Plaats de apparaten die je wilt controleren in
de SmartPlugs.
• De button kan nu gebruikt worden om de plugs aan en uit te schakelen.
WLE-1100INT_QIG_20131127.indd 41-42
09-01-14 16:09
OPTIE
2
Installeer de
SmartPlugs via
de Energy Insight app
!
NL
1
Plaats de SmartPlugs in een stopcontact.
Controleer of de led op de SmartPlug groen brandt.
Als dit niet het geval is, druk op de knop om de SmartPlug aan te schakelen.
• T ijdens de installatie is het handig om de SmartPlugs in een stopcontact
te plaatsen dicht bij de SmartBridge.
• Na een succesvolle installatie kan je de SmartPlugs verplaatsen.
WLE-1100INT_QIG_20131127.indd 43-44
09-01-14 16:09
3
Open de Energy Insight app op je smartphone
iOS
Druk
5 sec.
WLE-1100INT_QIG_20131127.indd 45-46
Druk
5 sec.
NL
2
Druk op de knop op iedere SmartPlug voor 5 seconden totdat
de LED groen en rood brandt.
Android
Druk
5 sec.
09-01-14 16:09
5
iOS
WLE-1100INT_QIG_20131127.indd 47-48
Tijdens het scannen, knippert de LED van de SmartBirdge wit.
Wanneer de LED van de SmartBridge continue blauw brandt,
is deze klaar.
NL
4
Klik op “Scan”.
Android
09-01-14 16:09
NL
6
Controleer of the LED’s van de SmartPlugs continue groen branden.
• Nu kan je de SmartPlugs verplaatsen. Plaats de apparaten die je wilt controleren in
de SmartPlugs.
• De button kan nu gebruikt worden om de plugs aan en uit te schakelen.
WLE-1100INT_QIG_20131127.indd 49-50
09-01-14 16:09
OPTIE
3
NL
1
Plaats de SmartPlugs in een stopcontact.
Via de webbrowser
!
Controleer of de led op de SmartPlug groen brandt.
Als dit niet het geval is, druk op de knop om de SmartPlug aan te schakelen.
• T ijdens de installatie is het handig om de SmartPlugs in een stopcontact
te plaatsen dicht bij de SmartBridge.
• Na een succesvolle installatie kan je de SmartPlugs verplaatsen.
WLE-1100INT_QIG_20131127.indd 51-52
09-01-14 16:09
Druk
5 sec.
WLE-1100INT_QIG_20131127.indd 53-54
Druk
5 sec.
3
Open je webbrowser en ga naar http://smartbridge.local
NL
2
Druk op de knop op iedere SmartPlug voor 5 seconden totdat
de LED groen en rood brandt.
Druk
5 sec.
09-01-14 16:09
WLE-1100INT_QIG_20131127.indd 55-56
5
Tijdens het scannen knippert de LED van de SmartBirdge wit.
Wanneer de LED van de SmartBridge continue blauw brandt,
is deze klaar.
NL
4
Klik op “Scan”.
09-01-14 16:10
NL
6
Controleer of the LED’s van de SmartPlugs continue groen branden.
• Nu kan je de SmartPlugs verplaatsen. Plaats de apparaten die je wilt controleren in
de SmartPlugs.
• De button kan nu gebruikt worden om de plugs aan en uit te schakelen.
WLE-1100INT_QIG_20131127.indd 57-58
09-01-14 16:10
DE
home energy
monitor
Verpackungsinhalt
Extension Pack
Sitecom und NET2GRID
Viele Energieversorger bieten ihren Kunden eine Möglichkeit, einen
Einblick in ihren Energieverbrauch zu erhalten. Wir sind jedoch der
Ansicht, dass Sie sich für diese Informationen nicht an einen
Energieanbieter binden müssen.
Mit NET2GRID können Sie Ihren Stromverbrauch zu Hause ganz einfach
selbst messen und überwachen. Aus diesem Grund haben wir uns für
eine Partnerschaft mit Net2Grid entschieden.
3x SmartPlugs
WLE-1100INT_QIG_20131127.indd 59-60
09-01-14 16:10
SmartPlug Pairing
und An/Aus Taste
Wählen Sie eine
Methode um Ihre
SmartPlugs zu
installieren
DE
SmartPlug
Option 1)
Mit der SmartBride
SmartPlug LED
Option 2)
Mit der Energy Insight App
Option 3)
Mit dem Webbrowser
• Pairing mode: LED blinkt rot/grün, zum Verbindungsaufbau bereit.
• SmartPlug an: LED ist konstant grün / SmartPlug aus: LED ist aus.
WLE-1100INT_QIG_20131127.indd 61-62
09-01-14 16:10
1
DE
1
Schließen Sie die SmartPlugs an eine Steckdose an.
OPTION
Mit der SmartBride
!
Kontrollieren Sie, ob die SmartPlug LEDS grün leuchten.
Falls nicht, drücken Sie die Taste um den SmartPlug anzuschalten.
• Die Steckdosen sollten sich in der Nähe der SmartBridge befinden.
• Nach Abschluss der Installation können Sie die SmartPlugs frei im Haus bewegen.
WLE-1100INT_QIG_20131127.indd 63-64
09-01-14 16:10
Taste
5 Sek.
drücken
WLE-1100INT_QIG_20131127.indd 65-66
Taste
5 Sek.
drücken
3
Ziehen Sie die SmartBridge aus der Steckdose.
DE
2
Halten Sie die Taste an jedem SmartPlug 5 Sekunden lang
gedrückt, bis die LEDs grün und rot blinken.
Taste
5 Sek.
drücken
09-01-14 16:10
WLE-1100INT_QIG_20131127.indd 67-68
5
Wenn die LED blau leuchtet, funktioniert die SmartBridge
ordnungsgemäß.
DE
4
Schließen Sie das Netzteil der SmartBridge wieder an eine
Steckdose an.
09-01-14 16:10
DE
6
Vergewissern Sie sich, dass die LEDs der SmartPlugs grün leuchten.
• Nun können Sie Geräte an die SmartPlugs anschließen, deren Energieverbrauch
Sie messen möchten.
• Die Taste kann nun genutzt werden um die SmartPlugs an und aus zu schalten.
WLE-1100INT_QIG_20131127.indd 69-70
09-01-14 16:10
OPTION
2
DE
1
Schließen Sie die SmartPlugs an eine Steckdose an.
Mit der Energy Insight App
!
Kontrollieren Sie, ob die SmartPlug LEDS grün leuchten.
Falls nicht, drücken Sie die Taste um den SmartPlug anzuschalten.
• Die Steckdosen sollten sich in der Nähe der SmartBridge befinden.
• Nach Abschluss der Installation können Sie die SmartPlugs frei im Haus bewegen.
WLE-1100INT_QIG_20131127.indd 71-72
09-01-14 16:10
3
Öffnen Sie die Energy Insight App auf Ihrem Smartphone.
iOS
Taste
5 Sek.
drücken
WLE-1100INT_QIG_20131127.indd 73-74
Taste
5 Sek.
drücken
DE
2
Halten Sie die Taste an jedem SmartPlug 5 Sekunden lang
gedrückt, bis die LEDs grün und rot blinken.
Android
Taste
5 Sek.
drücken
09-01-14 16:10
5
iOS
WLE-1100INT_QIG_20131127.indd 75-76
Wenn die LED blau leuchtet, funktioniert die SmartBridge
ordnungsgemäß.
DE
4
Klicken Sie in der App auf “Scan“.
Android
09-01-14 16:10
DE
6
Vergewissern Sie sich, dass die LEDs der SmartPlugs grün leuchten.
• Nun können Sie Geräte an die SmartPlugs anschließen, deren Energieverbrauch
Sie messen möchten.
• Die Taste kann nun genutzt werden um die SmartPlugs an und aus zu schalten.
WLE-1100INT_QIG_20131127.indd 77-78
09-01-14 16:10
OPTION
3
DE
1
Schließen Sie die SmartPlugs an eine Steckdose an.
Mit dem Webbrowser
!
Kontrollieren Sie, ob die SmartPlug LEDS grün leuchten.
Falls nicht, drücken Sie die Taste um den SmartPlug anzuschalten.
• Die Steckdosen sollten sich in der Nähe der SmartBridge befinden.
• Nach Abschluss der Installation können Sie die SmartPlugs frei im Haus bewegen.
WLE-1100INT_QIG_20131127.indd 79-80
09-01-14 16:10
Taste
5 Sek.
drücken
WLE-1100INT_QIG_20131127.indd 81-82
Taste
5 Sek.
drücken
3
Öffnen Sie Ihren Browser, und rufen Sie die Seite http://
smartplug.local auf.
DE
2
Halten Sie die Taste an jedem SmartPlug 5 Sekunden lang
gedrückt, bis die LEDs grün und rot blinken.
Taste
5 Sek.
drücken
09-01-14 16:10
WLE-1100INT_QIG_20131127.indd 83-84
5
Wenn die LED blau leuchtet, funktioniert die SmartBridge
ordnungsgemäß.
DE
4
Klicken Sie im Browser auf “Scan“.
09-01-14 16:10
DE
6
Vergewissern Sie sich, dass die LEDs der SmartPlugs grün leuchten.
• Nun können Sie Geräte an die SmartPlugs anschließen, deren Energieverbrauch
Sie messen möchten.
• Die Taste kann nun genutzt werden um die SmartPlugs an und aus zu schalten.
WLE-1100INT_QIG_20131127.indd 85-86
09-01-14 16:10
IT
home energy
monitor
Contenuto
Extension Pack
Sitecom e NET2GRID
Molti fornitori energetici offrono un modo per capire quanta energia
si sta consumando. Ma secondo noi, per capire quanta energia stai
consumando non hai bisogno di essere legato a un fornitore.
NET2GRID offre una soluzione semplice per misurare e monitorare i
consumi energetici di casa. È per questo che abbiamo scelto loro
come partner.
3x SmartPlugs
WLE-1100INT_QIG_20131127.indd 87-88
09-01-14 16:10
IT
SmartPlug
Scegli il tuo metodo
di installazione
Pulsante accoppiamento
SmartPlug e On/Off
Opzione 1)
Con il SmartBridge
Opzione 2)
Con l’applicazione Energy Insight
SmartPlug LED
Opzione 3)
Con un browser Internet
• Modalità accoppiamento: LED lampeggiante rosso/verde, pronto alla connessione con
lo SmartBridge.
• SmartPlug ON: LED verde fisso / SmartPlug OFF: LED spento.
WLE-1100INT_QIG_20131127.indd 89-90
09-01-14 16:10
1
IT
1
Collega gli SmartPlug a una presa di corrente.
Opzione
Con il SmartBridge
!
Controlli se i LED dello SmartPlug sono verdi.
Se non lo sono, prema il pulsante per accendere gli SmartPlug.
• Ricordati di usare due prese di corrente vicine allo SmartBridge per l’installazione.
• Al termine dell’installazione, potrai spostare gli SmartPlug in qualsiasi punto della casa.
WLE-1100INT_QIG_20131127.indd 91-92
09-01-14 16:10
premere
5 sec.
WLE-1100INT_QIG_20131127.indd 93-94
premere
5 sec.
3
Scollega lo SmartBridge dalla presa di corrente.
IT
2
Tieni premuto per 5 secondi il tasto di ciascuno degli SmartPlug
finché non lampeggiano prima il LED verde e poi quello rosso.
premere
5 sec.
09-01-14 16:10
WLE-1100INT_QIG_20131127.indd 95-96
5
Quando il LED diventa blu fisso, significa che lo SmartBridge
funziona correttamente.
IT
4
Ricollega l’alimentatore dello SmartBridge a una presa di corrente.
09-01-14 16:10
IT
6
Verifica che i LED degli SmartPlug siano verdi fissi.
• Ora puoi spostare gli SmartPlug e collegare i dispositivi da misurare.
• Il pulsante può ora essere usato per accendere o spegnere le spine.
WLE-1100INT_QIG_20131127.indd 97-98
09-01-14 16:10
Opzione
2
IT
1
Collega gli SmartPlug a una presa di corrente.
Con l’applicazione
Energy Insight
!
Controlli se i LED dello SmartPlug sono verdi.
Se non lo sono, prema il pulsante per accendere gli SmartPlug.
• Ricordati di usare due prese di corrente vicine allo SmartBridge per l’installazione.
• Al termine dell’installazione, potrai spostare gli SmartPlug in qualsiasi punto della casa.
WLE-1100INT_QIG_20131127.indd 99-100
09-01-14 16:10
3
Apri l’applicazione NET2GRID Energy Insight sullo smartphone.
IT
2
Tieni premuto per 5 secondi il tasto di ciascuno degli SmartPlug
finché non lampeggiano prima il LED verde e poi quello rosso.
iOS
premere
5 sec.
WLE-1100INT_QIG_20131127.indd 101-102
premere
5 sec.
Android
premere
5 sec.
09-01-14 16:10
5
iOS
WLE-1100INT_QIG_20131127.indd 103-104
Quando il LED diventa blu fisso, significa che lo SmartBridge
funziona correttamente.
IT
4
Passa all’applicazione e fai clic su “Cerca”.
Android
09-01-14 16:10
IT
6
Verifica che i LED degli SmartPlug siano verdi fissi.
• Ora puoi spostare gli SmartPlug e collegare i dispositivi da misurare.
• Il pulsante può ora essere usato per accendere o spegnere le spine.
WLE-1100INT_QIG_20131127.indd 105-106
09-01-14 16:10
Opzione
3
IT
1
Collega gli SmartPlug a una presa di corrente.
Con un browser Internet
!
Controlli se i LED dello SmartPlug sono verdi.
Se non lo sono, prema il pulsante per accendere gli SmartPlug.
• Ricordati di usare due prese di corrente vicine allo SmartBridge per l’installazione.
• Al termine dell’installazione, potrai spostare gli SmartPlug in qualsiasi punto della casa.
WLE-1100INT_QIG_20131127.indd 107-108
09-01-14 16:10
premere
5 sec.
WLE-1100INT_QIG_20131127.indd 109-110
premere
5 sec.
3
Apri il browser Web e vai al sito http://smartbridge.local
IT
2
Tieni premuto per 5 secondi il tasto di ciascuno degli SmartPlug
finché non lampeggiano prima il LED verde e poi quello rosso.
premere
5 sec.
09-01-14 16:10
WLE-1100INT_QIG_20131127.indd 111-112
5
Quando il LED diventa blu fisso, significa che lo SmartBridge
funziona correttamente.
IT
4
Fai clic su “Scan”.
09-01-14 16:11
IT
6
Verifica che i LED degli SmartPlug siano verdi fissi.
• Ora puoi spostare gli SmartPlug e collegare i dispositivi da misurare.
• Il pulsante può ora essere usato per accendere o spegnere le spine.
WLE-1100INT_QIG_20131127.indd 113-114
09-01-14 16:11
ES
home energy
monitor
Contenido
Extension Pack
Sitecom y NET2GRID
Muchos proveedores de energía ofrecen un modo de llevar el control de
su gasto energético. Creemos que no debe estar atado a un proveedor
para llevar el control de su gasto energético.
NET2GRID ofrece una solución sencilla para medir y controlar el consumo
energético de su hogar. Por ello, nos hemos asociado con ellos.
3x SmartPlugs
WLE-1100INT_QIG_20131127.indd 115-116
09-01-14 16:11
ES
SmartPlug
Elija el método
de instalación
Emparejamiento del
SmartPlug y botón de
encendido / apagado
Opción 1)
Con el SmartBridge
Opción 2)
Con la aplicación Energy Insight
LED SmartPlug
Opción 3)
Con un navegador web
• Modo de emparejamiento: LED destella en rojo/verde, está listo para conectarse
al SmartBridge.
• SmartPlug encendido: El LED es verde constante / SmartPlug apagado: El LED está apagado.
WLE-1100INT_QIG_20131127.indd 117-118
09-01-14 16:11
1
ES
1
Enchufe los SmartPlugs en una toma de corriente.
OPCIÓN
Con el SmartBridge
!
Compruebe si el LED de los SmartPlugs es de color verde.
Si no es así, pulse el botón para encender el SmartPlug.
• Asegúrese de utilizar dos tomas de corriente cercanas al SmartBridge para la instalación.
• D
espués de realizar la instalación correctamente, puede mover los SmartPlugs a
cualquier lugar del hogar.
WLE-1100INT_QIG_20131127.indd 119-120
09-01-14 16:11
pulse
5 seg.
WLE-1100INT_QIG_20131127.indd 121-122
pulse
5 seg.
3
Desconecte su SmartBridge de la toma de corriente.
ES
2
Pulse el botón en cada uno de los SmartPlugs durante 5 segundos
hasta que el LED comience a parpadear en verde y rojo.
pulse
5 seg.
09-01-14 16:11
WLE-1100INT_QIG_20131127.indd 123-124
5
Cuando el LED sea de color azul fijo, su SmartBridge estará
correctamente instalado.
ES
4
Enchufe el adaptador de potencia de su SmartBridge de nuevo en
una toma de corriente.
09-01-14 16:11
ES
6
Compruebe que los LED de los SmartPlugs sean de color verde fijo.
• Ahora puede mover los SmartPlugs y enchufarlos a los dispositivos que desee medir.
• El botón se puede utilizar ahora para encender y apagar los SmartPlugs.
WLE-1100INT_QIG_20131127.indd 125-126
09-01-14 16:11
OPCIÓN
2
ES
1
Enchufe los SmartPlugs en una toma de corriente.
Con la aplicación
Energy Insight
!
Compruebe si el LED de los SmartPlugs es de color verde.
Si no es así, pulse el botón para encender el SmartPlug.
• Asegúrese de utilizar dos tomas de corriente cercanas al SmartBridge para la instalación.
• D
espués de realizar la instalación correctamente, puede mover los SmartPlugs a
cualquier lugar del hogar.
WLE-1100INT_QIG_20131127.indd 127-128
09-01-14 16:11
3
Abra la aplicación Energy Insight de su teléfono inteligente e inicie
sesión.
iOS
pulse
5 seg.
WLE-1100INT_QIG_20131127.indd 129-130
pulse
5 seg.
ES
2
Pulse el botón en cada uno de los SmartPlugs durante 5 segundos
hasta que el LED comience a parpadear en verde y rojo.
Android
pulse
5 seg.
09-01-14 16:11
5
iOS
WLE-1100INT_QIG_20131127.indd 131-132
Cuando el LED sea de color azul fijo, su SmartBridge estará
correctamente instalado.
ES
4
Haga clic en “Buscar”.
Android
09-01-14 16:11
ES
6
Compruebe que los LED de los SmartPlugs sean de color verde fijo.
• Ahora puede mover los SmartPlugs y enchufarlos a los dispositivos que desee medir.
• El botón se puede utilizar ahora para encender y apagar los SmartPlugs.
WLE-1100INT_QIG_20131127.indd 133-134
09-01-14 16:11
OPCIÓN
3
ES
1
Enchufe los SmartPlugs en una toma de corriente.
Con un navegador web
!
Compruebe si el LED de los SmartPlugs es de color verde.
Si no es así, pulse el botón para encender el SmartPlug.
• Asegúrese de utilizar dos tomas de corriente cercanas al SmartBridge para la instalación.
• D
espués de realizar la instalación correctamente, puede mover los SmartPlugs a
cualquier lugar del hogar.
WLE-1100INT_QIG_20131127.indd 135-136
09-01-14 16:11
pulse
5 seg.
WLE-1100INT_QIG_20131127.indd 137-138
pulse
5 seg.
3
Abra su navegador web y vaya a http://smartbridge.local
ES
2
Pulse el botón en cada uno de los SmartPlugs durante 5 segundos
hasta que el LED comience a parpadear en verde y rojo.
pulse
5 seg.
09-01-14 16:11
WLE-1100INT_QIG_20131127.indd 139-140
5
Cuando el LED sea de color azul fijo, su SmartBridge estará
correctamente instalado.
ES
4
Haga clic en “Scan”
09-01-14 16:11
ES
6
Compruebe que los LED de los SmartPlugs sean de color verde fijo.
• Ahora puede mover los SmartPlugs y enchufarlos a los dispositivos que desee medir.
• El botón se puede utilizar ahora para encender y apagar los SmartPlugs.
WLE-1100INT_QIG_20131127.indd 141-142
09-01-14 16:11
www.sitecom.com/helpdesk
WLE-1100INT_QIG_20131127.indd 143-144
09-01-14 16:11