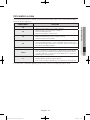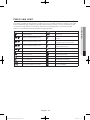
1
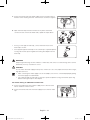
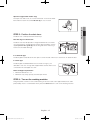
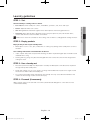
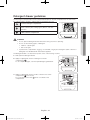
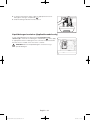
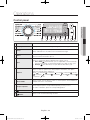
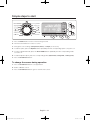
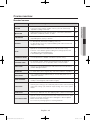
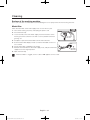
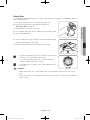
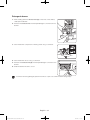
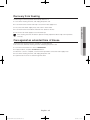
WW90H7410E*
Washing Machine
user manual
This manual is made with 100% recycled paper.
Imagine the possibilities
Thank you for purchasing this Samsung product.
To receive a more complete service, please
register your product at
www.samsung.com/register
WW90H7410EW-03403A_EN(XSP).indd 1
2014/4/10 16:07:04
Contents
3
Safety information
What you need to know about safety instructions����������������������������������������������������������������������� 3
Important safety symbols������������������������������������������������������������������������������������������������������������� 3
Important safety precautions������������������������������������������������������������������������������������������������������� 4
Instruction about the WEEE������������������������������������������������������������������������������������������������������� 10
11
Installation
What’s included������������������������������������������������������������������������������������������������������������������������� 11
Installation requirements������������������������������������������������������������������������������������������������������������ 12
Step-by-step installation������������������������������������������������������������������������������������������������������������ 14
18
Before you start
lnitial settings����������������������������������������������������������������������������������������������������������������������������� 18
Laundry guidelines��������������������������������������������������������������������������������������������������������������������� 19
Detergent drawer guidelines������������������������������������������������������������������������������������������������������ 21
23
Operations
Control panel����������������������������������������������������������������������������������������������������������������������������� 23
Simple steps to start������������������������������������������������������������������������������������������������������������������ 24
Course overview������������������������������������������������������������������������������������������������������������������������ 25
Settings�������������������������������������������������������������������������������������������������������������������������������������� 28
29
Maintenance
Eco Drum Clean������������������������������������������������������������������������������������������������������������������������� 29
Smart Care��������������������������������������������������������������������������������������������������������������������������������� 30
Emergency drain������������������������������������������������������������������������������������������������������������������������ 31
Cleaning������������������������������������������������������������������������������������������������������������������������������������� 32
Recovery from freezing�������������������������������������������������������������������������������������������������������������� 35
Care against an extended time of disuse����������������������������������������������������������������������������������� 35
36
Troubleshooting
Checkpoints������������������������������������������������������������������������������������������������������������������������������� 36
Information codes���������������������������������������������������������������������������������������������������������������������� 37
38
Specifications
Protecting the environment�������������������������������������������������������������������������������������������������������� 38
Declaration of conformity����������������������������������������������������������������������������������������������������������� 38
Fabric care chart������������������������������������������������������������������������������������������������������������������������ 39
Sheet of household washing machines�������������������������������������������������������������������������������������� 40
Information of main washing programmes��������������������������������������������������������������������������������� 42
English - 2
WW90H7410EW-03403A_EN(XSP).indd 2
2014/4/10 16:07:04
Safety information
Congratulations on your new Samsung washing machine. This manual contains
important information on the installation, use and care of your appliance. Please
take some time to read this manual to take full advantage of your washing
machine’s many benefits and features.
Please read this manual thoroughly to ensure that you know how to safely and efficiently operate the
extensive features and functions of your new appliance. Please store the manual in a safe location close
to the appliance for future reference. Use this appliance only for its intended purpose as described in this
instruction manual.
Warnings and Important Safety Instructions in this manual do not cover all possible conditions and
situations that may occur. It is your responsibility to use common sense, caution and care when installing,
maintaining and operating your washing machine.
Because the following operating instructions cover various models, the characteristics of your washing
machine may differ slightly from those described in this manual and not all warning signs may be applicable.
If you have any questions or concerns, contact your nearest service centre or find help and information
online at www.samsung.com.
01 SAFETY INFORMATION
What you need to know about safety instructions
Important safety symbols
What the icons and signs in this user manual mean:
WARNING: Hazards or unsafe practices that may result in severe personal injury, death
and/or property damage.
CAUTION: Hazards or unsafe practices that may result in personal injury and/or
property damage.
NOTE
These warning signs are here to prevent injury to yourself and others.
Please follow them explicitly.
After reading this manual, store it in a safe place for future reference.
Read all instructions before using the appliance.
As with any equipment that uses electricity and moving parts, potential hazards exist. To safely operate this
appliance, familiarize yourself with its operation and exercise care when using it.
English - 3
WW90H7410EW-03403A_EN(XSP).indd 3
2014/4/10 16:07:05
Important safety precautions
WARNING: To reduce the risk of fire, electric shock, or injury to persons when using
your appliance, follow basic precautions, including the following:
Do not let children (or pets) play in or on your washing machine. The
washing machine door does not open easily from the inside and
children may be seriously injured if trapped inside.
This appliance is not to be used by persons (including children)
with reduced physical, sensory or mental capabilities, or lack of
experience and knowledge, unless they have been given supervision
or instruction concerning use of the appliance by a person
responsible for their safety.
Children should be supervised to ensure that they do not play with
the appliance.
For use in Europe: This appliance can be used by children aged
from 8 years and above and persons with reduced physical, sensory
or mental capabilities or lack of experience and knowledge if they
have been given supervision or instruction concerning use of the
appliance in a safe way and understand the hazards involved.
Children shall not play with the appliance. Cleaning and user
maintenance shall not be made by children without supervision.
If the supply cord is damaged, it must be replaced by the
manufacturer, its service agent or similarly qualified persons in order
to avoid a hazard.
This appliance should be positioned so that the power plug, the
water supply taps, and the drain pipes are accessible.
For appliances with ventilation openings in the base, that a carpet
must not obstruct the openings.
The new hose-sets supplied with the appliance are to be used and
that old hose-sets should not be reused.
English - 4
WW90H7410EW-03403A_EN(XSP).indd 4
2014/4/10 16:07:05
CAUTION: In order to avoid a hazard due to inadvertent resetting of
the thermal cut-out, this appliance must not be supplied through an
external switching device, such as a timer, or connected to a circuit
that is regularly switched on and off by the utility.
The installation of this appliance must be performed by a qualified technician or service company.
• Failure to do so may result in electric shock, fire, an explosion, problems with the product, or injury.
The appliance is heavy, therefore take care when lifting it.
Plug the power cord into an AC 220 - 240 V / 50 Hz wall socket or higher and use the socket for this
appliance only. Never use an extension cord.
• Sharing a wall socket with other appliances using a power strip or extending the power cord may result
in electric shock or fire.
• Ensure that the power voltage, frequency, and current are the same as those of the product
specifications. Failure to do so may result in electric shock or fire. Plug the power plug into the wall
socket firmly.
01 SAFETY INFORMATION
WARNING: Critical installation WARNINGS
Remove all foreign substances such as dust or water from the power plug terminals and contact points
using a dry cloth on a regular basis.
• Unplug the power plug and clean it with a dry cloth.
• Failure to do so may result in electric shock or fire.
Plug the power plug into the wall socket so that the cord is running towards the floor.
• If you plug the power plug into the socket in the opposite direction, the electric wires within the cable
may be damaged and this may result in electric shock or fire.
Keep all packaging materials out of the reach of children as these may be dangerous.
• If a child places a bag over its head, it may suffocate.
When the appliance, power plug or power cord is damaged, contact your nearest service centre.
This appliance must be properly grounded.
Do not ground the appliance to a gas pipe, plastic water pipe, or telephone line.
• This may result in electric shock, fire, an explosion, or problems with the product.
• Never plug the power cord into a socket that is not grounded correctly and make sure that it is in
accordance with local and national regulations.
Do not install this appliance near a heater or any inflammable material.
Do not install this appliance in a humid, oily or dusty location, or in a location exposed to direct sunlight or
water (rain drops).
Do not install this appliance in a location exposed to low temperatures.
• Frost may cause the tubes to burst.
English - 5
WW90H7410EW-03403A_EN(XSP).indd 5
2014/4/10 16:07:05
Do not install this appliance in a location where gas may leak.
• This may result in electric shock or fire.
Do not use an electric transformer.
• This may result in electric shock or fire.
Do not use a damaged power plug, damaged power cord, or loose wall socket.
• This may result in electric shock or fire.
Do not pull or excessively bend the power cord.
Do not twist or tie the power cord.
Do not hook the power cord over a metal object, place a heavy object on the power cord, insert the power
cord between objects, or push the power cord into the space behind the appliance.
• This may result in electric shock or fire.
Do not pull the power cord when unplugging the power plug.
• Unplug the power plug by holding the plug.
• Failure to do so may result in electric shock or fire.
CAUTION: Installation CAUTIONS
This appliance should be positioned in such a way that the power plug is easily accessible.
• Failure to do so may result in electric shock or fire due to electric leakage.
Install your appliance on a solid, level floor that can support its weight.
• Failure to do so may result in abnormal vibrations, movement, noise, or problems with the product.
Do not install this appliance in a location exposed to low temperatures.
• Frost may cause the tubes to burst.
WARNING: Critical usage WARNINGS
If the appliance is flooded, turn off the water & power supplies immediately and contact your nearest service
centre.
• Do not touch the power plug with wet hands.
• Failure to do so may result in electric shock.
If the appliance generates a strange noise, a burning smell, or smoke, unplug the power plug immediately
and contact your nearest service centre.
• Failure to do so may result in electric shock or fire.
In the event of a gas leak (such as propane gas, LP gas, etc.), ventilate immediately without touching the
power plug. Do not touch the appliance or power cord.
• Do not use a ventilating fan.
• A spark may result in an explosion or fire.
Do not let children play in or on the washing machine. In addition, when disposing of the appliance, remove
the washing machine door lever.
• If trapped inside the product, children may suffocate to death.
English - 6
WW90H7410EW-03403A_EN(XSP).indd 6
2014/4/10 16:07:05
Make sure to remove the packaging (sponge, styrofoam) attached to the bottom of the washing machine
before using it.
Do not wash items contaminated with gasoline, kerosene, benzene, paint thinner, alcohol or other
inflammable or explosive substances.
• This may result in electric shock, fire, or an explosion.
01 SAFETY INFORMATION
Do not open the washing machine door by force while it is operating (high-temperature washing/drying/
spinning).
• Water flowing out of the washing machine may result in burns or cause the floor to be slippery.
This may result in injury.
• Opening the door by force may result in damage to the product or injury.
Do not insert your hand under the washing machine while an operation is in progress.
• This may result in injury.
Do not touch the power plug with wet hands.
• This may result in electric shock.
Do not turn the appliance off by unplugging the power plug while an operation is in progress.
• Plugging the power plug into the wall socket again may cause a spark and result in electric shock or fire.
Do not let children or the infirm use this washing machine without proper supervision. Do not let children
climb in or onto the appliance.
• This may result in electric shock, burns or injury.
Do not insert your hand or a metal object under the washing machine while it is operating.
• This may result in injury.
Do not unplug the appliance by pulling the power cord. Always grip the plug firmly and pull it straight out of
the outlet.
• Damage to the power cord may cause a short-circuit, fire and/or electric shock.
Do not attempt to repair, disassemble, or modify the appliance yourself.
• Do not use a fuse (such as copper, steel wire, etc.) other than a standard fuse.
• When the appliance needs to be repaired or reinstalled, contact your nearest service centre.
• Failure to do so may result in electric shock, fire, problems with the product, or injury.
If the water supply hose comes loose from the water tap and floods the appliance, unplug the power plug.
• Failure to do so may result in electric shock or fire.
Unplug the power plug when the appliance is not being used for long periods of time or during a thunder or
lightning storm.
• Failure to do so may result in electric shock or fire.
If any foreign substance enters into the appliance, unplug the power plug and contact you nearest
Samsung Customer Service.
• This may result in electric shock or fire.
English - 7
WW90H7410EW-03403A_EN(XSP).indd 7
2014/4/10 16:07:05
CAUTION: Usage CAUTIONS
When the washing machine is contaminated by a foreign substance such as detergent, dirt, food waste,
etc., unplug the power plug and clean the washing machine using a damp, soft cloth.
• Failure to do so may result in discolouration, deformation, damage, or rust.
The front glass may be broken by a strong impact. Take care when using the washing machine.
• If the glass is broken, it may result in injury.
After a water supply failure or when reconnecting the water supply hose, open the water tap slowly.
Open the water tap slowly after a long period of non-use.
• The air pressure in the water supply hose or the water pipe may damage a product part or result in a
water leak.
If a draining error occurs during an operation, check if there is a draining problem.
• If the washing machine is used when it is flooded because of a draining problem, it may result in electric
shock or fire.
Insert the laundry into the washing machine completely so that the laundry does not get caught in the door.
• If laundry gets caught in the door, it may result in damage to the laundry or the washing machine, or
result in a water leak.
Turn the water supply off when the washing machine is not being used.
Ensure that the screws on the water supply hose connector are properly tightened.
• Failure to do so may result in property damage or injury.
Ensure that the rubber seal and front door glass are not contaminated by a foreign substance (e.g. waste,
thread, hair, etc.).
• If a foreign substance is caught in the door or the door is not completely closed, it may cause a water
leak.
Open the water tap and check if the water supply hose connector is firmly tightened and that there is no
water leak before using the product.
• If the screws on the water supply hose connector are loose, it may result in a water leak.
The product you have purchased is designed for domestic use only.
Using the product for business purposes qualifies as a product misuse. In this case, the product will not
be covered by the standard warranty provided by Samsung and no responsibility can be attributed to
Samsung for malfunctions or damages resulting from such misuse.
Do not stand on the appliance or place objects (such as laundry, lighted candles, lighted cigarettes, dishes,
chemicals, metal objects, etc.) on the appliance.
• This may result in electric shock, fire, problems with the product, or injury.
Do not spray volatile material such as insecticide onto the surface of the appliance.
• As well as being harmful to humans, this may result in electric shock, fire or problems with the product.
English - 8
WW90H7410EW-03403A_EN(XSP).indd 8
2014/4/10 16:07:05
Do not place objects that generate electromagnetic fields near the washing machine.
• This may result in injury due to a malfunction.
Water drained during a high-temperature wash or drying cycle is hot. Do not touch the water.
• This may result in burns or injury.
Do not operate the washing machine when the detergent drawer is removed.
• This may result in electric shock or injury due to a water leak.
01 SAFETY INFORMATION
Do not wash, spin, or dry water-proof seats, mats, or clothing (*) unless your appliance has a special cycle
for washing these items.
(*): Woollen bedding, rain covers, fishing vests, ski pants, sleeping bags, diaper covers, sweat suits, and
bicycle, motor cycle and car covers, etc.
• Do not wash thick or hard mats even if the washing machine mark is on the care label. This may result in
injury or damage to the washing machine, walls, floor, or clothing due to abnormal vibrations.
• Do not wash throw rugs or doormats with rubber backing. The rubber backing may come off and stick
to inside the drum, and this may result in malfunction such as a drainage error.
Do not touch the insides of the drum during or just after drying as it is hot.
• This may result in burns.
Do not insert your hand into the detergent drawer.
• This may result in injury as your hand may be caught by the detergent input device.
Do not place any objects (such as shoes, food waste, animals) other than laundry into the washing
machine.
• This may result in damage to the washing machine, or injury and death in the case of pets due to the
abnormal vibrations.
Do not press the buttons using sharp objects such as pins, knifes, fingernails, etc.
• This may result in electric shock or injury.
Do not wash laundry contaminated by oils, creams or lotions usually found in skincare shops or massage
clinics.
• This may cause the rubber seal to become deformed and result in a water leak.
Do not leave metal objects such as safety pins, hair pins or bleach in the drum for long periods of time.
• This may cause the drum to rust.
• If rust starts appearing on the surface of the drum, apply a (neutral) cleansing agent to the surface and
use a sponge to clean it. Never use a metal brush.
Do not use dry cleaning detergent directly and do not wash, rinse, or spin laundry contaminated by dry
cleaning detergent.
• This may result in spontaneous combustion or ignition due to the heat from the oxidation of the oil.
Do not use water from water cooling/heating devices.
• This may result in problems with the washing machine.
English - 9
WW90H7410EW-03403A_EN(XSP).indd 9
2014/4/10 16:07:05
Do not use natural hand-washing soap for the washing machine.
• If it hardens and accumulates inside the washing machine, it may result in problems with the product,
discolouration, rust, or bad odours.
Place socks and brassieres in a washing net and wash them with the other laundry.
Do not wash large laundry items such as bedding in the washing net.
• Failure to do so may result in injury due to abnormal vibrations.
Do not use hardened detergent.
• If it accumulates inside the washing machine, it may result in a water leak.
Make sure that the pockets of all the clothing items to be washed are empty.
• Hard, sharp objects such as coins, safety pins, nails, screws, or stones can cause extensive damage to
the appliance.
Do not wash clothing with large buckles, buttons or other heavy metal objects.
Sort the laundry by color on the basis of its colorfastness and select the recommended cycle, water
temperature and additional functions.
• This may result in discoloration or fabric damage.
Take care that children’s fingers are not caught in the door when you close it.
• Failure to do so may result in injury.
WARNING: Critical cleaning WARNINGS
Do not clean the appliance by spraying water directly onto it.
Do not use the a strong acidic cleaning agent.
Do not use benzene, thinner or alcohol to clean the appliance.
• This may result in discolouration, deformation, damage, electric shock or fire.
Before cleaning or performing maintenance, unplug the appliance from the wall socket.
• Failure to do so may result in electric shock or fire.
English - 10
WW90H7410EW-03403A_EN(XSP).indd 10
2014/4/10 16:07:05
Installation
Follow these instructions carefully to ensure a proper installation of the washing
machine, and to prevent accidents when doing the laundry.
What’s included
1
3
1
Detergent drawer
4
2
Door
3
Work top
4
Control panel
5
Power plug
6
Drain hose
7
Drum
8
Levelling feet
9
Debris filter
5
2
6
7
9
8
10
02 INSTALLLATION
Make sure all the parts are included in the product package. If you have a problem with the washing
machine or the parts, contact a local Samsung customer center or the retailer.
10 Emergency drain tube
11 Filter cover
11
Spanner
Cold water supply hose
Bolt caps
Hose guide
Hot water supply hose
Cap fixer
Liquid detergent container
• Bolt hole covers : The number of bolt hole covers depends on the model (3~6 covers).
• Hot water supply hose : Applicable models only.
• Liquid detergent container : Applicable models only.
English - 11
WW90H7410EW-03403A_EN(XSP).indd 11
2014/4/10 16:07:06
Installation requirements
Electrical supply and grounding
• AC 220-240 V / 50 Hz fuse or circuit breaker equipped
• Individual branch circuit specific to the washing machine
To ensure a proper grounding, the washing machine comes with a power cord featuring a threeprong
grounding plug for use in a properly installed and grounded outlet.
Check with a qualified electrician or serviceperson if you are not sure about the grounding.
Do not modify the provided plug. If it does not fit the outlet, call a qualified electrician and install a proper
outlet.
WARNING
• Do NOT use an extension cord.
• Use only the power cord that comes with the washing machine.
• Do NOT connect the ground wire to plastic plumbing, gas lines, or hot water pipes.
• Improperly connected grounding conductors may cause electric shock.
Water supply
A proper water pressure for this washing machine is between 50 kPa and 800 kPa. Water pressures less
than 50 kPa may cause the water valve not to close completely. Or, it may take a longer time to fill the drum,
turning off the washing machine resultantly. Water taps must be within 120 cm from the rear of the washing
machine so that the provided inlet hoses reach the washing machine.
To reduce a risk of leak
• Make water taps easily accessible.
• Turn off taps when the washing machine is not in use.
• Check for any leak at water inlet hose fittings on a regular basis.
CAUTION: Before using the washing machine for the first time, check all connections at the water
valve and taps for any leak.
English - 12
WW90H7410EW-03403A_EN(XSP).indd 12
2014/4/10 16:07:06
Drain
Samsung recommends a standpipe in height of 65cm. The drain hose must be connected through the hose
clip to the standpipe, and the standpipe must fully cover the drain hose.
Flooring
CAUTION: Do NOT install the washing machine on a platform or a poorly supported structure.
Water temperature
02 INSTALLLATION
For best performance, the washing machine must be installed on a solid floor. Wood floors may need to be
reinforced to minimize vibration and/or unbalanced loads. Carpeting and soft tile surfaces are not a good
resistance to vibrations and may cause the washing machine to move slightly during the spin cycle.
Do not install the washing machine in areas where water may freeze as the washing machine always retains
some water in its water valves, pumps, and/or hoses. Frozen water left in the connection parts may cause
damage to belts, the pump, and other components of the washing machine.
Alcove or closet installation
Minimum clearance for a stable operation:
Sides
25 mm
Rear
50 mm
Top
25 mm
Front
500 mm
If both the washing machine and a dryer are installed in one location, the front of the alcove or closet must
have at least 500 mm unobstructed air opening. Your washing machine alone does not require a specific air
opening.
English - 13
WW90H7410EW-03403A_EN(XSP).indd 13
2014/4/10 16:07:06
Step-by-step installation
STEP 1 - Select a location
Location requirements:
• Solid, level surface without carpeting or flooring that may obstruct ventilation
• Away from direct sunlight
• Adequate room for ventilation and wiring
• The ambient temperature is always higher than the freezing point (0 ˚C)
• Away from a heat source
STEP 2 - Remove the shipping bolts
Unpack the product package and remove all shipping bolts.
1. Loosen all shipping bolts on the rear of the machine using the supplied
spanner.
2. Fill the holes with the supplied plastic bolt caps.
Keep the shipping bolts for future use.
WARNING
Packaging materials can be dangerous to children. Dispose all packaging material (plastic bags,
polystyrene, etc.) out of children’s reach.
STEP 3 - Adjust the levelling feet
1. Gently slide the washing machine into position. Excessive force may
damage the levelling feet.
2. Level the washing machine by manually adjusting the levelling feet.
3. When levelling is complete, tighten the nuts using the spanner.
English - 14
WW90H7410EW-03403A_EN(XSP).indd 14
2014/4/10 16:07:06
STEP 4 - Connect the water hose
Connect the water supply hose to the water tap.
1. Remove the adaptor (A) from the water supply hose (B).
A
02 INSTALLLATION
B
2. Use a Philips screwdriver to loosen four screws on the adaptor.
3. Hold the adaptor and turn part (C) in the arrow direction to loosen it
by 5 mm (*).
C
4. Insert the adaptor into the water tap, and tighten the screws while
lifting up the adaptor.
5. Turn part (C) in the arrow direction to tighten it.
C
6. While holding down part (E), connect the water supply hose to the
adaptor. Then, release part (E). The hose fits into the adaptor with a
clicking sound.
E
English - 15
WW90H7410EW-03403A_EN(XSP).indd 15
2014/4/10 16:07:07
7. Connect the other end of the water supply hose to the inlet valve on
the back of the washing machine. Turn the hose clockwise to tighten.
8. Open the water tap and check if there are any leaks around the
connection areas. If there are water leaks, repeat the steps above.
• If using a screw type of water tap, connect the water hose to the
water tap as shown.
• Use a popular type of water taps. If the current tap is squareshaped or
too big, remove the spacer ring before inserting the adaptor into the
water tap.
WARNING
Stop using the washing machine if there is a water leak, and contact a local Samsung service centre.
Otherwise, this may cause electric shock.
CAUTION
Do not stretch the water supply hose by force. If the hose is too short, replace the hose with a longer,
high-pressure hose.
• After connecting the water supply hose to the adaptor, check if it is connected properly by pulling
the water supply hose downwards.
• Use a popular type of water taps. If the tap is square-shaped or too big, remove the spacer ring
before inserting the tap into the adaptor.
For models having an additional hot water inlet:
1. Connect the red end of the hot water supply hose to the hot water
inlet on the back of the machine.
2. Connect the other end of the hot water supply hose to the hot water
tap.
English - 16
WW90H7410EW-03403A_EN(XSP).indd 16
2014/4/10 16:07:07
Aqua hose (applicable models only)
The aqua hose alerts users of a risk of water leaks. It senses the water
flow and turns red on the centre indicator (A) in case of a leak.
A
02 INSTALLLATION
STEP 5 - Position the drain hose
The drain hose can be positioned in three ways:
Over the edge of a wash basin
The drain hose must be placed at a height of between 60 cm and 90
cm (*) from the floor. To keep the spout of the drain hose bent, use the
supplied plastic hose guide (A). Secure the guide to the wall using a
hook to ensure stable drainage.
A
ln a sink drain pipe
The drain pipe must be above the sink siphon so that the end of the hose is at least 60 cm above the floor.
ln a drain pipe
The drain pipe should be between 60 cm and 90 cm high (*). It is
advisable to use a 65 cm high vertical pipe. Make sure the drain hose is
connected to the stand pipe at a slant.
Drain standpipe requirements:
• Minimum diameter of 5 cm
• Minimum carry-away capacity of 60 litres per minute
STEP 6 - Turn on the washing machine
TPlug the power cord into a wall socket featuring an AC 220-240V / 50Hz approved electrical outlet
protected by a fuse or circuit breaker. Then, press the Power button to turn on the washing machine.
English - 17
WW90H7410EW-03403A_EN(XSP).indd 17
2014/4/10 16:07:08
Before you start
lnitial settings
Run Calibration mode (recommended)
Samsung washing machine detects the laundry weight automatically. For more accurate weight detection,
please run Calibration Mode after the installation. Calibration mode is done by following the steps below.
1. Remove laundry or any contents in the machine and turn off the machine.
2. Press the Power button and release it, and then press the Temp button and Delay End button
simultaneously. Then the machine turns on.
3. Press the Start/Pause button to activate “Calibration Mode”.
4. The drum rotates clockwise and counterclockwise approximately for 3 minutes.
5. When “Calibration Mode” is finished, “END(En)” appears on the display, and the machine automatically
turns off. The washing machine is now ready for use.
English - 18
WW90H7410EW-03403A_EN(XSP).indd 18
2014/4/10 16:07:08
Laundry guidelines
STEP 1 - Sort
Sort the laundry according to these criteria:
• Care Label: Sort the laundry into cottons, mixed fibres, synthetics, silks, wools and rayon.
• Size: Mixing different-sized items together in the drum improves the washing performance.
• Sensitivity: Wash delicate items separately using an EasyIron option for pure, new woollen items,
curtains and silk items. Check the labels on the items.
Make sure to check the care label on the clothing, and sort them accordingly before starting the wash.
STEP 2 - Empty pockets
03 BEFORE YOU START
• Colour: Separate whites from colours.
Empty all the pockets of your laundry items.
• Metal objects such as coins, pins, and buckles on clothing may damage other laundry items as well as
the drum.
Turn clothing with buttons and embroiders inside out.
• If zips of pants and jackets are open while washing, the drum may be damaged. Zips should be closed
and fixed with a string.
• Clothing with long strings may become entangled with other clothes. Be sure to fix the strings before
starting the wash.
STEP 3 - Use a laundry net
• Brassieres (water washable) must be placed in a laundry net. Metal parts of the brassieres may break
through and rip other laundry items.
• Small, light clothing such as socks, gloves, stockings and handkerchiefs may become caught around
the door. Place them inside a fine laundry net.
• Do not wash the laundry net by itself without other laundry. This may cause abnormal vibrations that
could move the washing machine and result in injury.
STEP 4 - Prewash (if necessary)
Add a Prewash option to the selected course with a protein-based detergent for cotton items that are
contaminated severely.
English - 19
WW90H7410EW-03403A_EN(XSP).indd 19
2014/4/10 16:07:08
STEP 5 - Determine the load capacity
Do not overload the washing machine or the laundry may not wash properly. For the load capacity for the
type of cothing, see page 25.
When washing bedding or bedding covers, the wash time may be lengthened or the spin efficiency
may be reduced. For bedding or bedding covers, the recommended maximum spin cycle speed is
800 rpm and the load capacity is 2.0 kg or less.
CAUTION: If the laundry is unbalanced and the “UE” error code is displayed, redistribute the load.
Unbalanced laundry may reduce the spinning performance.
STEP 6 - Apply a proper detergent
The type of detergent depends on the type of fabric (cotton, synthetic, delicate items, wool), colour,
wash temperature, and degree of soiling. Always use “low suds” laundry detergent, which is designed for
automatic washing machines.
• Follow the detergent manufacturer’s recommendations based on the weight of the laundry, the
degree of soiling, and the hardness of the water in a local area. If you are not sure about the
water hardness, contact a local water authority.
• Do not use detergent that tends to be hardened or solidified. This detergent may remain after the
rinse cycle, blocking the drain outlet.
CAUTION: Use only a neutral liquid detergent for wool in the Wool course. A powder detergent with
the Wool course may remain on the laundry and discolour the laundry.
English - 20
WW90H7410EW-03403A_EN(XSP).indd 20
2014/4/10 16:07:08
Detergent drawer guidelines
The washing machine provides a three-compartment dispenser: the left compartment for the main wash,
the centre for fabric softeners, and the right for the preliminary wash.
Prewash detergent compartment
03 BEFORE YOU START
Main wash detergent compartment: powder detergents,
water softeners, pre-soaking agents, bleach, and stain
removers
Fabric softener compartment
CAUTION
• Do not open the detergent drawer while the washing machine is operating.
• Do not use the following types of detergent:
• Tablet or capsule types
• Ball or net types
• To prevent the compartment clogging, concentrated or highly-enriched agents (fabric softener or
detergent) must be diluted with water before applied.
The detergent drawer is located at the top-left corner of the washing machine.
1. Slide open the detergent drawer.
2. Apply an appropriate amount of detergent to the left
compartment ( ).
To use a liquid detergent, see the Liquid detergent guide below.
3. Apply an appropriate amount of fabric softener to the centre
compartment ( ) if necessary.
Do not exceed the max line ( ) which is marked on the
compartment.
English - 21
WW90H7410EW-03403A_EN(XSP).indd 21
2014/4/10 16:07:08
4. If selecting the Prewash option, apply an appropriate amount of
detergent to the right compartment (
).
5. Slide the detergent drawer inward to close it.
Liquid detergent container (Applicable models only)
To use a liquid detergent, first put the provided liquid detergent
container (A) in the main wash detergent compartment ( ). Then, apply
an appropriate amount of detergent to the container. Do not exceed the
max line which is marked on the inner of the container.
CAUTION: Remove the liquid detergent container if using a
powder detergent.
English - 22
WW90H7410EW-03403A_EN(XSP).indd 22
2014/4/10 16:07:09
Operations
Control panel
04 OPERATIONS
1
2
3
4
5
6
7
8
9
10
1
Course Selector
Turn the dial to select a course.
2
Display area
Displays information of remaining washing time, and settings.
3
Temp.
Press to change the water temperature for the current course.
Press and hold for 3 seconds to turn on/off the Drum Light.
4
Rinse
Press to change the rinse times for the current course.
You can set the rinse times up to 5.
Spin
Press to change the spinning speed for the current course.
• Rinse Hold
: The final rinse cycle is suspended so that the laundry
remains in the water. To unload the laundry, run a drain or spin cycle.
• No Spin
: The drum does not spin after the final drain cycle.
6
Options
Press to select an option. Each time you press this button, the option
selection changes in this sequence:
Soak
> Intensive
> Prewash
> Soak
+ Intensive
> Soak
+ Prewash
> Intensive
+ Prewash
> Soak
+ Intensive
+ Prewash
> off
7
Prefer Mode
Press to enter custom options screen. 3 custom options are available but
multiple selection is not allowed.
8
Frequent options
Three frequent options are provided separately for easy access.
To select or deselect, press the corresponding button.
5
9
Start/Pause
Press to start or stop an operation.
10
Power
Press to turn on/off the washing machine.
English - 23
WW90H7410EW-03403A_EN(XSP).indd 23
2014/4/10 16:07:10
Simple steps to start
2
1
6
7
3
4
5
1. Press the Power button to turn on the washing machine.
2. Turn the Course Selector to select a course.
3. Change the course settings (Temperature, Rinse, and Spin) as necessary.
4. To add an option, press the Options button repeatedly until the corresponding option icon(s) turns on.
5. To select a preferred mode, press the Prefer Mode button repeatedly until the corresponding mode
icon turns on.
6. To add a frequent option, press the corresponding button (Quick wash, Delay End, and Easy Iron).
7. Press the Start/Pause button.
To change the course during operation
1. Press the Start/Pause button to stop operation.
2. Select a different course.
3. Press the Start/Pause button again to start the new course.
English - 24
WW90H7410EW-03403A_EN(XSP).indd 24
2014/4/10 16:07:11
Course overview
Standard courses
Description & Max load (kg)
COTTON
• For cottons, bed linens, table linens, underwear, towels, or shirts.
• The washing time and the number of rinse cycles are automatically
adjusted according to the load.
Max
• Optimal performance with lower energy for cotton fabrics, bed linens,
table linens, underwear, towels, or shirts.
Max
SYNTHETICS
• For blouses or shirts that are made of polyester (diolen, trevira),
polyamide (perlon, nylon), or the like.
3.5
BEDDING
• For bed spreads, bed sheets, bedding covers, etc.
• For best results, wash only 1 type of bedding and make sure the load
weighs less than 2 kg.
2
WOOL
• Specific for machine-washable wool for loads less than 2.0 kg.
• The wool course features gentle cradling and soaking to protect the
wool fibres from shrinkage/distortion.
• A neutral detergent is recommended.
2
SUPER ECO WASH
• Low-temperature Eco Bubble contributes to power saving.
4
OUTDOOR CARE
• For mountain clothes, skiwear, and sportswear that are made of
functional materials such as spandex, stretch, and micro-fiber
2
BABY CARE
• Featuring a high-temperature wash and extra rinses to ensure that no
powder detergent remains.
4
DELICATES
• For sheer fabrics, bras, lingerie (silk), and other handwash-only fabrics.
2
DAILY WASH
• Fast completion within approximately an hour for daily items such as
underwear and shirts.
4
DARK GARMENT
• Featuring additional rinses and reduced spinning to ensure that the
laundry is washed gently and rinsed thoroughly.
4
STAIN AWAY
• Featuring the soaking cycle to effectively remove stains from the laundry.
During the soaking cycle, the drum stops rotating. This is not a system
failure.
4
RINSE+SPIN
• Featuring an additional rinse after applying fabric softener to the laundry.
-
ECO DRUM CLEAN
• • • • -
COTTON
Specific to drum cleaning and removes dirt and bacteria from the drum.
Perform once every 40 washes with no detergent or bleach applied.
Make sure the drum is empty.
Do not use any cleaning agents for cleaning the drum.
04 OPERATIONS
Course
English - 25
WW90H7410EW-03403A_EN(XSP).indd 25
2014/4/10 16:07:11
Options
Option
-
Description
Prewash
• This will add a priliminary washing cycle before the main wash cycle.
Intensive
• For badly soiled laundry. The operation time for each cycle is longer than
normal.
Soak
• This option effectively removes stains by soaking the laundry.
• Each soak cycle spins the drum for 1 minute and stands still for 4 minutes,
totaling 6 times for 30 minutes.
Quick Wash
• Specific to less soiled garments with less than a 2kg load.
• It takes about 15 minutes, depending on the conditions such as the water
pressure, water hardness, and/or extra options selected.
• The Quick Wash time increases in this sequence: Off > 15 min > 20 min > 30
min > 40 min > 50 min > 60 min.
• A recommended amount of detergent is less than 20g (for a 2kg load).
Delay End
• The displayed time refers to the end time of a selected course.
• You can set the time of Delay End in hourly units more than estimated time of
current cycle.
• Set the Delay End time between 1 hour and 19 hours.
Easy Iron
• The spinning speed increases to reduce wrinkles of the laundry.
• Set the spinning speed up to 800 rpm.
Prefer Mode
Mode
Description
• This changes the course settings to reduce the overall washing time.
Speed Wash • The recommended laundry load is less than 4.0 kg for the COTTON course
with Speed Wash enabled.
Eco Wash
• FThis changes the course settings to save the overall power consumption.
Silent Wash
• This changes the course settings to reduce operating noise and vibration.
English - 26
WW90H7410EW-03403A_EN(XSP).indd 26
2014/4/10 16:07:11
Delay End
You can set the washing machine to finish the current course at specific hours later.
This is useful if you want to finish the wash by the time you come home from business.
Case study
You want to finish a two-hour course after 3 hours from now. For this, you add the Delay End option to
the current course with the 3-hour setting, and press the Start/Pause button at 2:00 p.m. Then, what
happens? The washing machine starts operating at 3:00 p.m., and ends at 5:00 p.m. Provided below is the
time line for this case.
2:00 pm
Set the Delay End to 3 hours.
3:00 pm
Start
04 OPERATIONS
1. Select a course. Then change the course settings if necessary.
2. Press the Delay End button repeatedly to set the Delay End time.
3. Press the Start/Pause button.
5:00 pm
End
English - 27
WW90H7410EW-03403A_EN(XSP).indd 27
2014/4/10 16:07:12
Settings
Child Lock
To prevent accidents by children or infants, Child Lock locks all buttons.
• To set or release the Child Lock, press and hold the Options and Prefer Mode buttons simultaneously
for 3 seconds.
To add detergent or more laundry in the drum, or to change the course settings in the Child Lock
state, you must first release the Child Lock.
Sound
Mute or unmute the sound.
• To mute or unmute the sound, press and hold the Rinse and Spin buttons simultaneously for 3
seconds.
Drum Light
• To turn the Drum Light on or off, press and hold the Temp. button for 3 seconds.
• The drum light turns off automatically after 5 minutes.
English - 28
WW90H7410EW-03403A_EN(XSP).indd 28
2014/4/10 16:07:12
Maintenance
Keep the washing machine clean to prevent deteriorated performance, and to preserve the life cycle.
Eco Drum Clean
Perform this course regularly to clean the drum, and to remove bacteria from it.
2. Turn the Course Selector to select a Eco Drum Clean.
3. Press the Start/Pause button.
The water temperature for Eco Drum Clean is set to 70 °C, which cannot be changed.
CAUTION: Do not use any cleaning agents for cleaning the drum. Chemical residues in the drum
deteriorates the washing performance.
05 MAINTENANCE
1. Press the Power button to turn on wasing machine.
Eco Drum Clean reminder
The Eco Drum Clean reminder
appears on the main screen once every 40 washes.
Run the Eco Drum Clean cycle. It is advisable to perform the Eco Drum Clean regularly.
When you first see this reminder, you can ignore the reminder for 6 consecutive times. From the 7th wash,
the reminder does not appear. However, it appears again on the second 40th wash.
English - 29
WW90H7410EW-03403A_EN(XSP).indd 29
2014/4/10 16:07:12
Smart check
To enable this function, you must first download the “Samsung Smart Washer” app from Google Play or
App Store, and install it on a mobile device featuring the camera operation.
The Smart Check function has been optimized for:
Galaxy & iPhone series (cannot be supported for some models)
1. Press and hold the Spin and Options buttons simultaneously for 3 seconds to enter the Smart Check
mode.
2. The washing machine starts the self-diagnosis procedure, and display an error code if an error is found.
3. Run the Samsung Smart Washer app on your mobile device, and tap Smart Check.
4. Present the mobile device to the washing machine’s display panel so that the mobile device and the
washing machine face each other. Then, the error code will be recognized automatically by the app.
5. When the error code is recognized correctly, the app provides detailed information for the error with
further actions.
• The function name, Smart Check, may differ depending on the language.
• If the washing machine reflects light on the display, the app may fail to recognize the error code.
• If the app fails to recognize the Smart Check code consecutively, enter the error code manually
onto the app screen.
English - 30
WW90H7410EW-03403A_EN(XSP).indd 30
2014/4/10 16:07:12
Emergency drain
In case of a power failure, drain the water inside the drum before taking out the laundry.
1. Unplug the power cord of the washing machine from the main socket.
2. Gently press the top area of the filter cover to open.
05 MAINTENANCE
3. Gently pull out the emergency drain tube.
4. While holding the end of the drain tube, open the tube cap.
5. Let the water run into a container.
6. Close the tube cap, and reinsert the drain tube.
7. Close the filter cover.
English - 31
WW90H7410EW-03403A_EN(XSP).indd 31
2014/4/10 16:07:12
Cleaning
Surface of the washing machine
Use a soft cloth with a nonabrasive household detergent. Do not spray water onto the washing machine.
Mesh filter
Clean the mesh filter of the water supply hose once or twice a year.
1. Turn off the washing machine, and unplug the power cord.
2. Close the water tap.
3. Loosen and disconnect the water supply hose from the back of the
washing machine. Cover the hose with a cloth to prevent water from
gushing out.
4. Use pliers to pull out the mesh filter from the inlet valve hole.
5. Soak the mesh filter deeply in water so that the threaded connector is
also soaked.
6. Dry the mesh filter completely in the shade.
7. Reinsert the mesh filter into the water supply hose, and place the water
supply hose in the original position.
8. Open the water tap.
If the mesh filter is clogged, an error code of “4E” appears on the screen.
English - 32
WW90H7410EW-03403A_EN(XSP).indd 32
2014/4/10 16:07:12
Debris filter
It is advisable to clean the debris filter 5 or 6 times a year to prevent its clogging. A clogged debris filter may
reduce the bubble effect.
1. Turn off the washing machine, and unplug the power cord.
2. Drain the remaining water inside the drum by referring to
05 MAINTENANCE
“Emergency drain” on page 31.
3. Open the filter cover using a coin or key.
4. Turn the debris filter cap to the left, and drain off the remaining water.
5. Remove the debris filter.
6. Clean the debris filter using soft brushes. Make sure the drain pump
propeller inside the filter is unclogged.
7. Reinsert the debris filter, and turn the filter cap to the right.
• To open the safety filter cap, push in and turn it anticlockwise.
The spring of the cap helps to open the cap.
• To close the safety filter cap, turn it clockwise. The spring
makes a rattling sound, which is normal.
• If the debris filter is clogged, an error code of “5E” appears on
the screen.l
CAUTION
• Make sure the filter cap is closed properly after cleaning the filter. Otherwise, this may cause a
leak.
• Make sure the filter is inserted properly after cleaning it. Otherwise, this may cause an operational
failure or a leak.
English - 33
WW90H7410EW-03403A_EN(XSP).indd 33
2014/4/10 16:07:12
Detergent drawer
1. While holding down the release lever (A) on the inner of the drawer,
slide open the drawer.
2. Remove the release lever and the liquid detergent container from the
drawer.
A
3. Clean the drawer components in flowing water using a soft brush.
4. Clean the drawer recess using a soft brush.
5. Reinsert the release lever (A) and the liquid detergent container to the
drawer.
6. Slide the drawer inward to close it.
To remove remaining detergent, perform the Rinse + Spin course with the drum being empty.
English - 34
WW90H7410EW-03403A_EN(XSP).indd 34
2014/4/10 16:07:13
Recovery from freezing
The washing machine may freeze when it drops below 0 °C.
1. Turn off the washing machine, and unplug the power cord.
2. Pour warm water over the water tap to loosen the water supply hose.
4. Pour warm water into the drum and leave it for about 10 minutes.
5. Reconnect the water supply hose to the water tap.
If the washing machine still doesn’t operate normally, repeat the above steps until it operates
normally.
Care against an extended time of disuse
05 MAINTENANCE
3. Disconnect the water supply hose, and soak it in warm water.
Avoid leaving the washing machine unused for an extended time.
If this is the case, drain the washing machine and unplug the power cord.
1. Turn the Course Selector to select a RINSE+SPIN.
2. Empty the drum, and press Start/Pause button.
3. When the course is complete, close the water tap and disconnect the water supply hose.
4. Turn off the washing machine, and unplug the power cord.
5. Open the door to let air circulate through the drum.
English - 35
WW90H7410EW-03403A_EN(XSP).indd 35
2014/4/10 16:07:13
Troubleshooting
Checkpoints
If you encounter a problem with the washing machine, first check the table below and try the suggestions.
PROBLEM
Will not start
Has no water or not enough
water
Has detergent remaining in
the detergent drawer after
the wash cycle is complete
Vibrates or is too noisy
The washing machine does
not drain and/or spin
Door is locked shut or will
not open.
SOLUTION
•
•
•
•
•
•
•
•
•
•
•
•
•
•
•
•
•
Make sure your washing machine is plugged in.
Make sure the door is firmly closed.
Make sure the water source tap(s) are turned on.
Make sure to press the Start/Pause button.
Turn the water tap on fully.
Make sure the water source hose is not frozen.
Straighten the water intake hoses.
Clean the filter on the water intake hose.
Make sure your washing machine is running with sufficient water
pressure.
Make sure the detergent is added to the center of the detergent
drawer.
Make sure your washing machine is on a level surface. If the surface is
not level, adjust the washing machine feet to level the appliance.
Make sure that the shipping bolts are removed.
Make sure your washing machine is not touching any other object.
Make sure the laundry load is balanced.
Straighten the drain hose. Eliminate kinked hoses.
Make sure the debris filter is not clogged.
The door will not open until 3 minutes after the machine stops or the
power turns off.
If a problem persists, contact a local Samsung service center.
English - 36
WW90H7410EW-03403A_EN(XSP).indd 36
2014/4/10 16:07:13
Information codes
If the washing machine fails to operate, you may see an information code on the screen. Check the table
below and try the suggestions.
CODE SYMBOL
4E
5E
UE
cE/3E
Sd/Sud
Uc
•
•
•
•
•
•
•
•
•
Make sure the door is firmly closed.
Make sure that laundry is not caught in the door.
Make sure the source water tap is turned on.
Check the water pressure.
Clean the mesh filters of water hose.
Clean the debris filter.
Make sure the drainage hose is installed correctly.
Clean the water hose mesh filter.
The laundry load is unbalanced. Redistribute the load. If only one item
of clothing needs washing, such as a bathrobe or pair of jeans, the
final spin result might be unsatisfactory and an “UE” error message will
be shown in the display window.
06 TROUBLESHOOTING
dE
SOLUTION
• Call the after-sales service.
• This occurs when too much foaming is detected. It is also displayed
while foaming is removed. When the removal is finished, the normal
cycle proceeds.(This is one of the normal operations. It is an error for
preventing non-sensing faults.)
• If the voltage of the supplied power is instable, the washing machine
will be paused to protect its electric devices.
• If the correct voltage is supplied, the cycle will resume automatically.
If any information code keeps appearing on the screen, contact a local Samsung service center.
English - 37
WW90H7410EW-03403A_EN(XSP).indd 37
2014/4/10 16:07:13
Specifications
Protecting the environment
• This appliance is manufactured from recyclable materials. If you decide to dispose of this appliance,
please observe local waste disposal regulations. Cut off the power cord so that the appliance cannot be
connected to a power source. Remove the door so that animals and small children cannot get trapped
inside the appliance.
• Do not exceed the detergent quantities recommended in the detergent manufactures’ instructions.
• Use stain removal products and bleaches before the wash cycle only when strictly necessary.
• Save water and electricity by only washing full loads (the exact amount depends upon the program
used).
Declaration of conformity
This appliance complies with European safety standards, EC directive 93/68 and EN Standard 60335.
English - 38
WW90H7410EW-03403A_EN(XSP).indd 38
2014/4/10 16:07:13
Fabric care chart
Resistant material
Can be ironed at 100 ˚C max
Delicate fabric
Do not iron
Item may be washed at 95 ˚C
Can be dry cleaned using any
solvent
Item may be washed at 60 ˚C
Dry clean with perchloride, lighter
fuel, pure alcohol or R113 only
Item may be washed at 40 ˚C
Dry clean with aviation fuel, pure
alcohol or R113 only
Item may be washed at 30 ˚C
Do not dry clean
Item may be hand washed
Dry flat
Dry clean only
Can be hung to dry
Can be bleached in cold water
Dry on clothes hanger
Do not bleach
Tumble dry, normal heat
Can be ironed at 200 ˚C max
Tumble dry, reduced heat
Can be ironed at 150 ˚C max
Do not tumble dry
07 SPECIFICATIONS
The following symbols provide garment care directions. The care labels include four symbols in this order:
washing, bleaching, drying and ironing (and dry cleaning when necessary). The use of symbols ensures
consistency among garment manufacturers of domestic and imported items. Follow the care label
directions to maximize garment life and reduce laundery problems.
English - 39
WW90H7410EW-03403A_EN(XSP).indd 39
2014/4/10 16:07:16
Specifications
TYPE
FRONT LOADING WASHER
WW90H7410E*
DIMENSION
W600mm X D600mm X H850mm
WATER PRESSURE
50 kPa ~ 800 kPa
WATER VOLUME
54.9ℓ
WW90H7410E*
NET WEIGHT
73 kg
WASH AND SPIN CAPACITY
9.0 kg
MODEL
WASHING
POWER
CONSUMPTION
WASH AND
HEATING
SPIN
SPIN
REVOLUTIONS
WW90H7410E*
220 V
60 W
240 V
60 W
220 V
2000 W
240 V
2400 W
MODEL
WW90H7410E*
230V
600 W
PUMPING
34 W
MODEL
WW90H7410E*
rpm
1400
• T
he appearance and specifications of the product are subject to change without prior notice for
purposes of product enhancement.
• Cotton 60 ºC is recommended for a normally soiled load.
English - 40
WW90H7410EW-03403A_EN(XSP).indd 40
2014/4/10 16:07:16
Memo
07 SPECIFICATIONS
English - 41
WW90H7410EW-03403A_EN(XSP).indd 41
2014/4/10 16:07:16
WW90H7410EW-03403A_EN(XSP).indd 42
2014/4/10 16:07:16
WW90H7410EW-03403A_EN(XSP).indd 43
2014/4/10 16:07:16
QUESTIONS OR COMMENTS?
Country
CALL
OR VISIT US ONLINE AT
MALAYSIA
1800-88-9999
www.samsung.com/my/support
SINGAPORE
1800-SAMSUNG(726-7864)
www.samsung.com/sg/support
Code No. DC68-03403A-01_EN
WW90H7410EW-03403A_EN(XSP).indd 44
2014/4/10 16:07:16