1
User’s Guide
BASIC
BASIC
This guide provides information concerning installation, basic operation and
troubleshooting on Windows.
ADVANCED
This guide provides information about installation, advanced configuration, operation and
troubleshooting on various OS environments.
Some features may not be available depending on models or countries.
BASIC
Using USB memory device
67
1. Introduction
Key benefits
5
Features by model
8
Useful to know
13
About the user’s guide
14
Safety information
15
Machine overview
21
Control panel overview
24
Turning on the machine
26
Installing the driver locally
27
Reinstalling the driver
29
2. Menu Overview and Basic Setup
Menu overview
31
Machine’s basic settings
37
Media and tray
38
Basic printing
52
Basic copying
59
Basic scanning
62
Basic faxing
63
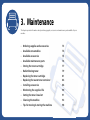
3. Maintenance
Ordering supplies and accessories
73
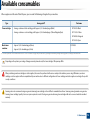
Available consumables
74
Available accessories
75
Available maintenance parts
76
Storing the toner cartridge
77
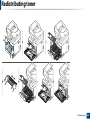
Redistributing toner
79
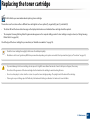
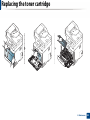
Replacing the toner cartridge
81
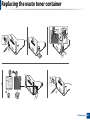
Replacing the waste toner container
84
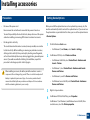
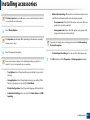
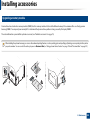
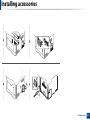
Installing accessories
86
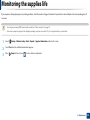
Monitoring the supplies life
90
Setting the toner low alert
91
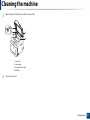
Cleaning the machine
92
Tips for moving & storing the machine
98
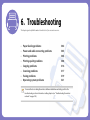
4. Troubleshooting
Tips for avoiding paper jams
100
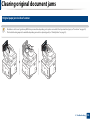
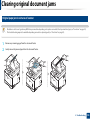
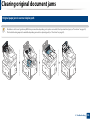
Clearing original document jams
101
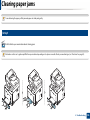
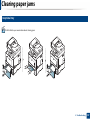
Clearing paper jams
106
2
BASIC
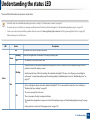
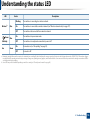
Understanding the status LED
115
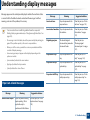
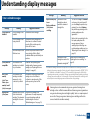
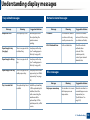
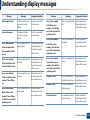
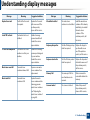
Understanding display messages
117
5. Appendix
Specifications
123
Regulatory information
133
Copyright
146
3
1. Introduction
This chapter provides information you need to know before using the machine.
• Key benefits
5
• Features by model
8
• Useful to know
13
• About the user’s guide
14
• Safety information
15
• Machine overview
21
• Control panel overview
24
• Turning on the machine
26
• Installing the driver locally
27
• Reinstalling the driver
29
Key benefits
Environmentally friendly
• Fast, on-demand printing.
-
For single-side printing, up to 26 ppm (A4) or up to 27 ppm (Letter).
Convenience
• To save toner and paper, this machine supports Eco feature (see "Eco
printing" on page 56).
• To save paper, you can print multiple pages on one single sheet of paper
(see "Using advanced print features" on page 244).
• To save paper, you can print on both sides of the paper (double-sided
printing) (see "Using advanced print features" on page 244).
• To save electricity, this machine automatically conserves electricity by
substantially reducing power consumption when not in use.
• We recommend using recycled paper for saving energy.
Fast high resolution printing
• You can print in a full range of colors using cyan, magenta, yellow, and black.
• You can print with a resolution of up to 9,600 x 600 dpi effective output (600
x 600 x 4 bit).
• Simply touch your mobile device on the NFC tag on your printer and get the
print job done (see "Using the NFC feature" on page 190).
• You can print on the go from your smartphone or computer using Google
Cloud Print™ enabled apps (see "Google Cloud Print™" on page 198).
• Easy Capture Manager allows you to easily edit and print whatever you
captured using the Print Screen key on the keyboard (see "Easy Capture
Manager" on page 281).
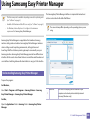
• Samsung Easy Printer Manager and Printing Status is a program that
monitors and informs you of the machine’s status and allows you to
customize the machine’s settings (see "Using Samsung Printer Status" on
page 293 or "Using Samsung Easy Printer Manager" on page 290).
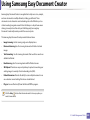
• Samsung Easy Document Creator is an application to help users scan,
compile, and save documents in multiple formats, including .epub format.
These documents can be shared via social networking sites or fax (see
"Using Samsung Easy Document Creator" on page 289).
• Samsung AnyWeb Print helps you screen-capture, preview, scrap, and print
the screen of Windows Internet Explorer more easily than when you use the
ordinary program (see "Samsung AnyWeb Print" on page 283).
Key benefits
• Smart Update allows you to check for the latest software and install the
latest version during the printer driver installation process. This is available
only for Windows.
Supports various wireless network setting method
• If you have Internet access, you can get help, support application, machine
drivers, manuals, and order information from the Samsung website,
www.samsung.com > find your product > Support or Downloads.
Wide range of functionality and application support
• Using WPS (Wi-Fi Protected Setup™)
- You can easily connect to a wireless network using the WPS feature on
the machine and an access point (wireless router).
• Using a USB cable or a network cable
- You can connect to a network and set various wireless network settings
using a USB cable or a network cable.
• Supports various paper sizes (see "Print media specifications" on page 125).
• Print watermark: You can customize your documents with words, such as
“Confidential” (see "Using advanced print features" on page 244).
• Using Wi-Fi Direct
- You can conveniently print from your mobile device using the Wi-Fi
Direct feature.
• You can print in various operating systems (see "System requirements" on
page 129).
• Your machine is equipped with a USB interface and/or a network interface.
See "Introducing wireless set up methods" on page 172.
Key benefits
Support XOA applications
The machine supports XOA custom applications.
• Regarding the XOA custom applications, please contact your XOA custom
application provider.
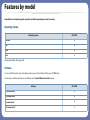
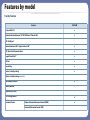
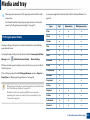
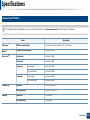
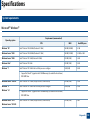
Features by model
Some features and optional goods may not be available depending on model or country.
Operating System
Operating System
C267xFW
Windows
●
Mac
●
Linux
●
Unix
●
(●: Supported, Blank: Not supported)
Software
You can install the printer driver and software when you insert the software CD into your CD-ROM drive.
For windows, select the printer driver and software in the Select Software to Install window.
Software
C267xFW
SPL printer driver
●
PCL printer driver
●
PS printer drivera
●
XPS printer drivera
●
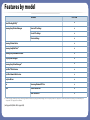
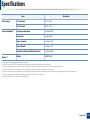
Features by model
Software
●
Direct Printing Utilitya
Samsung Easy Printer Manager
C267xFW
Scan to PC settings
●
Fax to PC settings
●
Device Settings
●
Samsung Printer Status
●
Samsung AnyWeb Printa
●
Samsung Easy Document Creator
●
Easy Capture Manager
●
Samsung Easy Color Managera
●
SyncThru™ Web Service
●
SyncThru Admin Web Service
●
Easy Eco Driver
●
Fax
Samsung Network PC Fax
●
Scan
Twain scan driver
●
WIA scan driver
●
a. Download the software from the Samsung website and install it: (http://www.samsung.com > find your product > Support or Downloads). Before installing, check whether your
computer’s OS support the software.
(●: Supported, Blank: Not supported)
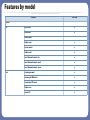
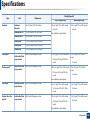
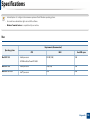
Features by model
Variety feature
Features
C267xFW
Hi-Speed USB 2.0
●
Network Interface Ethernet 10/100/1000 Base TX wired LAN
●
IEEE 1284B porta
○
Network Interface 802.11b/g/n wireless LANb
●
NFC (Near Field Communication)
●
Google Cloud Print™
●
AirPrint
●
Eco printing
●
Duplex (2-sided) printing
●
Duplex (2-sided) printing (manual)c d
USB memory interface
●
Memory module
○
Optional tray (Tray2)
○
Mass Storage Device
●e
Document Feeder
Duplex Automatic Document Feeder (DADF)
Automatic Document Feeder (ADF)
●
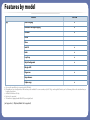
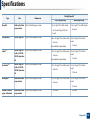
Features by model
Features
C267xFW
Handset
Fax
Multi-send
●
Delay send
●
Priority send
Scan
Duplex send
●
Secure receive
●
Duplex print
●
Send/ Receive forward - fax
●
Send/ Receive forward - email
●
Send/ Receive forward - server
●
Scanning to email
●
Scanning to SMB server
●
Scanning to FTP server
●
Duplex scan
●
Scan to PC
●
Features by model
Features
Copy
C267xFW
ID card copying
●
Reduced or enlarged copying
●
Collation
●
Poster
Clone
Auto Fit
●
Book
●
2-up/4-up
●
Adjust background
●
Margin shift
Edge erase
●
Gray enhance
Duplex copy
●
a. If you use the parallel port, you cannot use the USB cable.
b. Depending on your country, wireless LAN card may not be available. For some countries, only 802.11 b/g can be applied. Contact your local Samsung dealer or the retailer where you
bought your machine.
c. Available for Windows OS only.
d. Only tray1 is supported.
e. The machine is equipped with 4GB of SD (secure digital) card.
(●: Supported, ○: Optional, Blank: Not supported)
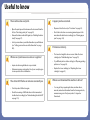
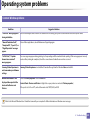
Useful to know
The machine does not print.
A paper jam has occurred.
• Open the print queue list and remove the document from the
list (see "Canceling a print job" on page 53).
• Open and close the door (see "Front view" on page 22).
• Remove the driver and install it again (see "Installing the driver
locally" on page 27).
• Check the instructions on removing jammed paper in this
manual and troubleshoot accordingly (see "Clearing paper
jams" on page 106).
• Select your machine as your default machine in your Windows
(see "Setting your machine as a default machine" on page
243).
Printouts are blurry.
Where can I purchase accessories or supplies?
• The toner level might be low or uneven. Shake the toner
cartridge (see "Redistributing toner" on page 79).
• Inquire at a Samsung distributor or your retailer.
• Try a different print resolution setting (see "Opening printing
preferences" on page 54).
• Visit www.samsung.com/supplies. Select your country/region
to view product service information.
• Replace the toner cartridge (see "Replacing the toner
cartridge" on page 81).
The status LED flashes or remains constantly on.
Where can I download the machine’s driver?
• Turn the product off and on again.
• You can get help, support application, machine drivers,
manuals, and order information from the Samsung website,
www.samsung.com > find your product > Support or
Downloads.
• Check the meanings of LED indications in this manual and
troubleshoot accordingly (see "Understanding the status LED"
on page 115).
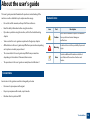
About the user’s guide
This user's guide provides information for your basic understanding of the
machine as well as detailed steps to explain machine usage.
•
Do not discard this manual, and keep it for future reference.
•
Read the safety information before using the machine.
•
If you have a problem using the machine, refer to the troubleshooting
chapter.
•
Terms used in this user’s guide are explained in the glossary chapter.
•
All illustrations in this user’s guide may differ from your machine depending
on its options or model you purchased.
•
The screenshots in this user’s guide may differ from your machine
depending on the machine’s firmware/driver version.
•
The procedures in this user’s guide are mainly based on Windows 7.
2
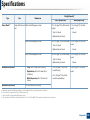
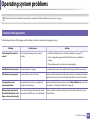
General icons
Icon
Text
Description
Caution
Gives users information to protect the machine
from possible mechanical damage or
malfunction.
Warning
Used to alert users to the possibility of personal
injury.
Note
Provides additional information or detailed
specification of the machine function and
feature.
1
Conventions
Some terms in this guide are used interchangeably, as below:
•
Document is synonymous with original.
•
Paper is synonymous with media, or print media.
•
Machine refers to printer or MFP.
1. Introduction
14
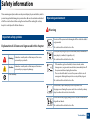
Safety information
These warnings and precautions are to prevent injury to you and others, and to
prevent any potential damage to your machine. Be sure to read and understand
all of these instructions before using the machine. After reading this section,
keep it in a safe place for future reference.
4
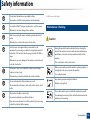
Operating environment
Warning
3
Important safety symbols
Do not use if the power cord is damaged or if the electrical outlet is
not grounded.
Explanation of all icons and signs used in this chapter
Warning
Hazards or unsafe practices that may result in severe
personal injury or death.
Caution
Hazards or unsafe practices that may result in minor
personal injury or property damage.
Do not attempt.
This could result in electric shock or fire.
Do not place anything on top of the machine (water, small metal or
heavy objects, candles, lit cigarettes, etc.).
This could result in electric shock or fire.
• If the machine gets overheated, it releases smoke, makes
strange noises, or generates an odd odor, immediately turn off
the power switch and unplug the machine.
• The user should be able to access the power outlet in case of
emergencies that might require the user to pull the plug out.
This could result in electric shock or fire.
Do not bend, or place heavy objects on the power cord.
Stepping on or allowing the power cord to be crushed by a heavy
object could result in electric shock or fire.
Do not remove the plug by pulling on the cord; do not handle the
plug with wet hands.
This could result in electric shock or fire.
1. Introduction
15
Safety information
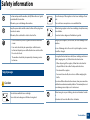
5
Caution
During an electrical storm or for a period of non-operation,
remove the power plug from the electrical outlet.
Operating method
Caution
This could result in electric shock or fire.
Be careful, the paper output area is hot.
Do not forcefully pull the paper out during printing.
Burns could occur.
It can cause damage to the machine.
If the machine has been dropped, or if the cabinet appears
damaged, unplug the machine from all interface connections and
request assistance from qualified service personnel.
Be careful not to put your hand between the machine and paper
tray.
Otherwise, this could result in electric shock or fire.
You may get injured.
If the machine does not operate properly after these instructions
have been followed, unplug the machine from all interface
connections and request assistance from qualified service
personnel.
Be careful when replacing paper or removing jammed paper.
Otherwise, this could result in electric shock or fire.
If the plug does not easily enter the electrical outlet, do not
attempt to force it in.
Call an electrician to change the electrical outlet, or this could
result in electric shock.
Do not allow pets to chew on the AC power, telephone or PC
interface cords.
New paper has sharp edges and can cause painful cuts.
When printing large quantities, the bottom part of the paper
output area may get hot. Do not allow children to touch.
Burns can occur.
When removing jammed paper, do not use tweezers or sharp metal
objects.
It can damage the machine.
Do not allow too many papers to stack up in the paper output tray.
It can damage the machine.
This could result in electric shock or fire and/or injury to your pet.
1. Introduction
16
Safety information
Do not block or push objects into the ventilation opening.
Caution
This could result in elevated component temperatures which can
cause damage or fire.
Use of controls or adjustments or performance of procedures other
than those specified herein may result in hazardous radiation
exposure.
This machine's power reception device is the power cord.
To switch off the power supply, remove the power cord from the
electrical outlet.
Before moving the machine, turn the power off and disconnect all
cords. The information below are only suggestions based on the
units weight.
If you have a medical condition that prevents you from lifting, do
not lift the machine. Ask for help, and always use the appropriate
amount of people to lift the device safely.
The machine could fall, causing injury or machine damage.
Then lift the machine:
6
Installation / Moving
Warning
Do not place the machine in an area with dust, humidity, or water
leaks.
•
If the machine weighs under 20 kg (44.09 lbs), lift with 1 person.
•
If the machine weighs 20 kg (44.09 lbs) - 40kg (88.18 lbs), lift
with 2 people.
•
If the machine weighs more than 40 kg (88.18 lbs), lift with 4 or
more people.
Choose a flat surface with enough space for ventilation to place
the machine. Also consider the space required to open the cover
and trays.
This could result in electric shock or fire.
The place should be well-ventilated and be far from direct light,
heat, and humidity.
Place the machine in the environment where it meets the
operating temperature and humidity specification. Otherwise,
quality problems can occur and cause damage to the machine (see
"General specifications" on page 123).
When using the machine for a long period of time or printing a
large number of pages in a non-ventilated space, it could pollute
the air and be harmful to your health. Place the machine in a wellventilated space or open a window to circulate the air periodically.
1. Introduction
17
Safety information
Do not place the machine on an unstable surface.
a. AWG: American Wire Gauge
The machine could fall, causing injury or machine damage.
7
a
Use only No.26 AWG or larger, telephone line cord, if necessary.
Maintenance / Checking
Otherwise, it can cause damage to the machine.
Make sure you plug the power cord into a grounded electrical
outlet.
Caution
Otherwise, this could result in electric shock or fire.
Use the power cord supplied with your machine for safe
operation. If you are using a cord which is longer than 2 meters (6
feet) with a 110V machine, then the gauge should be 16 AWG or
larger.
Otherwise, it can cause damage to the machine, and could result
in electric shock or fire.
Do not put a cover over the machine or place it in an airtight
location, such as a closet.
If the machine is not well-ventilated, this could result in fire.
Do not overload wall outlets and extension cords.
This can diminish performance, and could result in electric shock
or fire.
The machine should be connected to
the power level which is specified on the label.
Unplug this product from the wall outlet before cleaning the
inside of the machine. Do not clean the machine with benzene,
paint thinner or alcohol; do not spray water directly into the
machine.
This could result in electric shock or fire.
When you are working inside the machine replacing supplies or
cleaning the inside, do not operate the machine.
You could get injured.
Keep cleaning supplies away from children.
Children could get hurt.
Do not disassemble, repair or rebuild the machine by yourself.
It can damage the machine. Call a certified technician when the
machine needs repairing.
If you are unsure and want to check the power level you are using,
contact the electrical utility company.
1. Introduction
18
Safety information
To clean and operate the machine, strictly follow the user's guide
provided with the machine.
Do not burn any of the supplies such as toner cartridge or fuser
unit.
Otherwise, you could damage the machine.
This could cause an explosion or uncontrollable fire.
Keep the power cable and the contact surface of the plug clean
from dust or water.
When storing supplies such as toner cartridges, keep them away
from children.
Otherwise, this could result in electric shock or fire.
Toner dust can be dangerous if inhaled or ingested.
• Do not remove any covers or guards that are fastened with
screws.
Using recycled supplies, such as toner, can cause damage to the
machine.
• Fuser units should only be repaired by a certified service
technician. Repair by non-certified technicians could result in
fire or electric shock.
In case of damage due to the use of recycled supplies, a service
fee will be charged.
• The machine should only be repaired by a Samsung service
technician.
For supplies that contain toner dust (toner cartridge, waste toner
bottle, imaging unit, etc.) follow the instructions below.
• When disposing of the supplies, follow the instructions for
disposal. Refer to the reseller for disposal instructions.
8
Supply usage
Caution
Do not disassemble the toner cartridge.
Toner dust can be dangerous if inhaled or ingested.
• Do not wash the supplies.
• For a waste toner bottle, do not reuse it after emptying the
bottle.
If you do not follow the instructions above, it may cause machine
malfunction and environmental pollution. The warranty does not
cover damages caused by a user’s carelessness.
When toner gets on your clothing, do not use hot water to wash
it.
Hot water sets toner into fabric. Use cold water.
1. Introduction
19
Safety information
When changing the toner cartridge or removing jammed paper,
be careful not to let toner dust touch your body or clothes.
Toner dust can be dangerous if inhaled or ingested.
1. Introduction
20
Machine overview
9
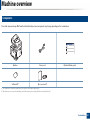
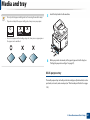
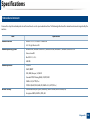
Components
The actual component may differ from the illustration below. Some components may change depending on the circumstances.
Machine
Power cord
Software CDa
Misc. accessoriesb
Quick installation guide
a. The software CD contains the print drivers, user’s guide, and software applications.
b. Miscellaneous accessories included with your machine may vary by country of purchase and specific model.
1. Introduction
21
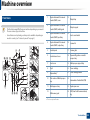
Machine overview
10
Front view
• This illustration may differ from your machine depending on your model.
There are various types of machine.
• Some features and optional goods may not be available depending on
model or country (see "Features by model" on page 8).
1
16
17
2
Duplex Automatic Document
Feeder (DADF) cover
13
2
Duplex Automatic Document
Feeder (DADF) width guide
14
3
Duplex Automatic Document
Feeder (DADF) input tray
15
4
Duplex Automatic Document
Feeder (DADF) output tray
16
5
Control panel
17
Scanner glass
18
Paper width guides on a multipurpose tray
6
3
14 13
1
Control board cover
15
4
5
18
Output tray
Output support
Front cover handle
Scanner lid
7
Front cover
19
Multi-purpose support tray
8
Tray 1
20
Toner cartridge
9
Optional traya
21
Toner cartridge handle
10
Push-release of Multi-purpose
tray
22
11
Multi-purpose tray
23
Duplex jam cover
24
NFC (Near Field Communication)
tag
19
6
7
8
20
21
22
12
23
11 10
9
24
Intermediate Transfer Belt (ITB)
12
USB memory port
a. This is an optional feature.
1. Introduction
22
Machine overview
11
Rear view
• This illustration may differ from your machine depending on your model.
There are various types of machine.
• Some features and optional goods may not be available depending on
model or country (see "Features by model" on page 8).
9
10
8
7
6
5
1
Waster toner container
2
Rear cover
3
Rear cover handle
4
Power receptacle
5
Power-switch
6
5V output port for IEEE 1284B Porta
7
USB port
8
Network port
9
Telephone line socket (LINE)
10
Extension telephone socket (EXT.)
a. The optional IEEE 1284B parallel connector can be used by plugging in both the USB port and
the 5V output port.
4
1
1
3
2
1. Introduction
23
Control panel overview
• This control panel may differ from your machine depending on its model. There are various types of control panels.
• Some features and optional goods may not be available depending on model or country (see "Features by model" on page 8).
• When using the touch screen, only use your finger. Sharp objects can damage the screen.
1
11 10
3
2
9
8
7
4
5
6
1
Touch screen
Displays the current status and allows you to access available menus.
2
Numeric keypad
Dials a number or enters alphanumeric characters (see "Understanding keypad" on page 237).
3
Clear
Deletes characters in the edit area.
4
Stop
Stops an operation at any time.
1. Introduction
24
Control panel overview
Turns the power on or off, or wakes up the machine from the power save mode. If you need to turn the machine off, press this
button for more than three seconds.
5
Power/Wake
Up
6
Start
7
On Hook Dial
When you press this button, you can hear a dial tone. Then enter a fax number. It is similar to making a call using speaker phone
(see "Receiving manually in Tel mode" on page 273).
8
Help
Gives detailed information about this machine’s menus or status.
9
Reset
Resets the current machine’s setup.
Starts a job in black or color mode.
10 Wireless LED
Shows the current status of the wireless network connection (see "Understanding the status LED" on page 115).
11 Status LED
Indicates the status of your machine (see "Understanding the status LED" on page 115).
1. Introduction
25
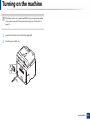
Turning on the machine
Illustrations on this user’s guide may differ from your machine depending
on its options or models. Check your machine type (see "Front view" on
page 22).
1
2
Connect the machine to the electricity supply first.
Turn the power switch on.
2
1
1. Introduction
26
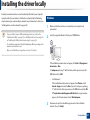
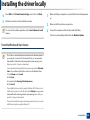
Installing the driver locally
A locally connected machine is a machine directly attached to your computer
using the cable. If your machine is attached to a network, skip the following
steps below and go on to installing a network connected machine’s driver (see
"Installing driver over the network" on page 160).
• If you are a Mac, Linux or UNIX operating systems user, refer to the
"Installation for Mac" on page 151 or "Installation for Linux" on page 153
or "Installing the UNIX printer driver package" on page 166.
12
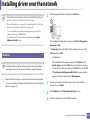
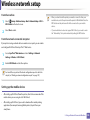
Windows
1
Make sure that the machine is connected to your computer and
powered on.
2
Insert the supplied software CD into your CD-ROM drive.
• The installation window in this User’s Guide may differ depending on the
machine and interface in use.
• Only use a USB cable no longer than 3 meters (118 inches).
If the installation window does not appear, click Start > All programs >
Accessories > Run.
X:\Setup.exe replacing “X” with the letter, which represents your CDROM drive and click OK.
•
For Windows 8,
If the installation window does not appear, from Charms, select
Search > Apps and search for Run. Type in X:\Setup.exe, replacing
“X” with the letter that represents your CD-ROM drive and click OK.
If “Tap to choose what happens with this disc.” pop-up window
appears, click the window and select Run Setup.exe.
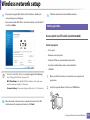
3
Review and accept the installation agreements in the installation
window. Then, click Next.
1. Introduction
27
Installing the driver locally
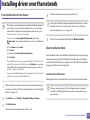
4
5
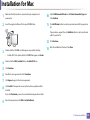
Select USB on the Printer Connection Type screen. Then, click Next.
1
Make sure that your computer is connected to the Internet and powered
on.
2
3
Make sure that the machine is powered on.
Follow the instructions in the installation window.
You can select the software applications in the Select Software to Install
window.
Connect the computer and the machine with a USB cable.
The driver is automatically installed from the Windows Update.
From the Windows 8 Start Screen
• The V4 driver is automatically downloaded from the Windows Update if
your computer is connected to the Internet. If not, you can manually
download the V4 driver from Samsung website, www.samsung.com >
find your product > Support or downloads.
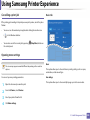
• You can download Samsung Printer Experience app from the Windows
Store. You need have a Microsoft account to use the Windows Store.
1 From Charms, select Search.
2 Click Store.
3 Search and click Samsung Printer Experience.
4 Click Install.
• If you install the driver using the supplied software CD, V4 driver is not
installed. If you want to use the V4 driver in the Desktop screen, you can
download from the Samsung website, www.samsung.com > find your
product > Support or downloads.
• If you want to install Samsung’s printer management tools, you need to
install them using the supplied software CD.
1. Introduction
28
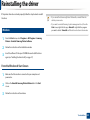
Reinstalling the driver
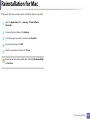
If the printer driver does not work properly, follow the steps below to reinstall
the driver.
13
Windows
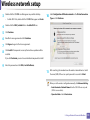
1
From the Start menu, select Programs or All Programs > Samsung
Printers > Uninstall Samsung Printer Software.
2
3
Follow the instructions in the installation window.
• If you cannot find a Samsung Printer Software tile, uninstall from the
desktop screen mode.
• If you want to uninstall Samsung’s printer management tools, from the
Start screen, right-click the app > Uninstall > right-click the program
you want to delete > Uninstall and follow the instruction in the window.
Insert the software CD into your CD-ROM drive and install the driver
again (see "Installing the driver locally" on page 27).
From the Windows 8 Start Screen
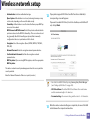
1
Make sure that the machine is connected to your computer and
powered on.
2
Click on the Uninstall Samsung Printer Software tile in the Start
screen.
3
Follow the instructions in the window.
1. Introduction
29
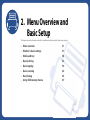
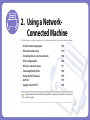
2. Menu Overview and
Basic Setup
This chapter provides information about the overall menu structure and the basic setup options.
• Menu overview
31
• Machine’s basic settings
37
• Media and tray
38
• Basic printing
52
• Basic copying
59
• Basic scanning
62
• Basic faxing
63
• Using USB memory device
67
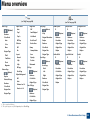
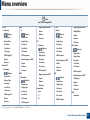
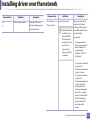
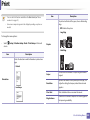
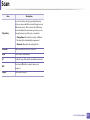
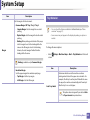
Menu overview
The control panel provides access to various menus to set up the machine or use
the machine’s functions.
Icon
Name
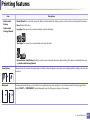
Copy
When you touch Copy from the display screen, the
Copy screen appears which has several tabs and
lots of copying options.
Scan
When you touch Scan from the display screen, the
Scan screen appears which has several tabs and lots
of Scanning options.
Fax
When you touch Fax from the display screen, the
Fax screen appears which has several tabs and lots
of Faxing options.
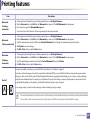
Setup
You can browse current machine settings or
change machine values.
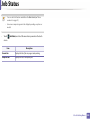
Job Status
Job status shows the jobs currently running,
completed job or in queue.
Eco
You can view the eco settings.
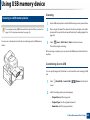
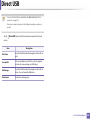
Direct USB
Enters the USB menu when USB memory is inserted
into the USB memory port on your machine.
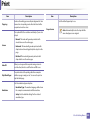
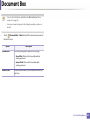
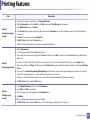
Document Box
You can store the printing data, print the secure
page or shared folder.
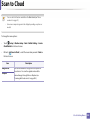
Scan to Cloud
You can scan an image and the scanned data will
be stored in the cloud service.
Toner status
Shows the toner status.
Menu
Selects the LCD brightness and language.
You can set menus easily using the touch screen.
• Some menus are grayed out depending on your options or models.
• Some menu names may differ from your machine depending on its
options or the models.
• The menus are described in the Advanced Guide (see "Useful Setting
Menus" on page 201).
1
Introducing the Home Screen
Description
2. Menu Overview and Basic Setup
31
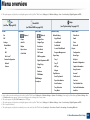
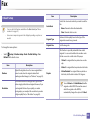
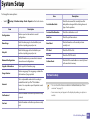
Menu overview
Copy
Fax
(see "Copy" on page 204)
Basic Copy
Paper Source
(Options)
Darkness
Color Mode
Edge Erase
Auto
a
Original Orientation
Darkness
Darkness
Darkness
Duplex
Resolution
Resolution
Resolution
Darkness
Original Type
Original Type
Original Type
Color Mode
Original Size
Original Size
Original Size
Stamp Activate
Original Size
Duplex
Duplex
Duplex
Item
Original Type
Collation
Border Erase
Stamp
Layout
Text
Text/Photo
Photo
Magazine
Custom Copy
(Options)
Duplex
Reduce/Enlarge
Darkness
Color Mode
Original Size
Normal
Opacity
2-Up
Position
4-Up
Watermark
ID Copy
ID Copy
Book Copy
(Options)
Adjust Background
Darkness
(Options)
Book Copy
On Hook Dial
To
(Options)
(Options)
(Options)
(Options)
Both
Resolution
Resolution
Resolution
Left
Color Mode
Original Type
Original Type
Right
Original Type
Original Size
Original Size
Duplex
Duplex
Auto
Original Type
Color Mode
Duplex
Original Type
To
Darkness
Original Size
(Options)
Redial
Darkness
Darkness
Auto Fit Copy
Speed Dial Send
(Options)
Darkness
Book Copy
Color Mode
Erase Lev.1~4
(Options)
To
Off
Enhance Lev.1~2
To
Hole Punch
Color
On
To
Group Dial Send
N-Up
MP Tray
Original Type
To
Delayed Send
Small Original
Auto
Off
Memory Send
(Options)
Book Centerb
Mono
N-Up Copy
Off
Tray 1
Tray 2
(see "Fax" on page 212)
Original Size
Original Type
Darkness
Color Mode
Original Type
a. This is an optional feature.
b. This option appears only if the Layout option is Book Copy.
2. Menu Overview and Basic Setup
32
Menu overview
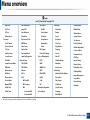
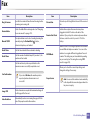
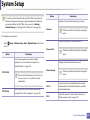
Scan
(see "Scan" on page 208)
Local PC
Email
Destination
To
(Options)
(Options)
Digital Signature in PDFb
BCC
Duplex
Subject
Digital Signature in PDFb
Filing Policy
(Options)
Darkness
Duplex
Original Size
Original Size
Original Type
Original Type
Resolution
Resolution
Color Mode
Color Mode
File Format
File Format
Original Size
File Format
PDF Encryptiona
Original Type
PDF Encryptiona
Original Type
Resolution
Digital Signature in PDFb
Resolution
PDF Encryption
a
File Name
FTP
Original Size
Darkness
Original Type
File Name
Resolution
Destination
Shared Folder
Color Mode
(Options)
(Options)
Original Size
Duplex
Digital Signature in PDF
Darkness
Duplex
Color Mode
Duplex
Color Mode
Darkness
File Format
Darkness
File Format
File Name
PDF Encryptiona
File Name
PDF Encryptiona
Network PC
Destination
(Options)
Original Size
Original Type
SMB
b
Digital Signature in PDFb
Destination
(Options)
Duplex
USB
Digital Signature in PDFb
(Options)
Filing Policy
Darkness
Original Size
Duplex
File Name
Original Type
Darkness
Resolution
File Name
Resolution
Original Size
Color Mode
Original Type
File Format
Resolution
From
Color Mode
PDF Encryptiona
Color Mode
To
File Format
Duplex
File Format
CC
PDF Encryptiona
Darkness
PDF Encryptiona
Custom Email
WSD
Destination
a. This option appears only if the File Format option is PDF type.
2. Menu Overview and Basic Setup
33
Menu overview
b. This option appears only if you have set a digital signature on the SyncThru™ Web Service (Settings tab > Machine Settings > Scan > Scan Security > Digital Signature in PDF).
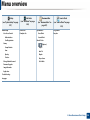
Eco
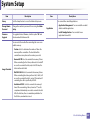
(see "Eco" on page 229)
Eco-On
On
Setup
Direct USB
(see "System Setup" on page 217)
(see "Direct USB" on page 230)
Print From
Scan to USB
(Options)
(Options)
Machine Setup
Default Setting
Address Book
Phone Book
Off
Copies
Original Size
Copy Default
Email
Settings
Auto Fit
Original Type
Scan Default
Print
Duplex
Resolution
Fax Default
Delete All
On
Paper Source
Color Mode
Scan to Cloud Default
Off
Color Mode
File Format
Program Management
Default Mode
On-Forceda
Feature Configuration
Default
Custom
PDF Encryptionb
Digital Signature in PDFc
Filing Policy
Duplex
Darkness
File Name
File Manage
Show Space
Paper Setup
Report
Configuration
Demo Page
Tray 1
Help List
Tray 2d
Network Configuration
MP Tray
Supplies Information
Margin
Usage Counter
Tray Behavior
Accounte
Auto Tray Switch
Fax Received
Paper Substitution
Fax Sent
Auto Continue
Fax Scheduled Jobs
Tray Protection
Fax Send Confirmation
Tray Mode
Junk Fax
a. If you set the eco mode on with a passcode on the SyncThru™ Web Service (Settings tab > Machine Settings > System > Eco Settings) or Samsung Easy Printer Manager (Device Settings > Eco),
the On-forced message appears. You have to enter the passcode to change the eco mode status.
b. This option appears only if the File Format option is PDF type.
c. This option appears only if you have set a digital signature on the SyncThru™ Web Service (Settings tab > Machine Settings > Scan > Scan Security > Digital Signature in PDF).
d. This is an optional feature.
e. This option appears only if you have activated your account on the SyncThru™ Web Service (Security tab > User Access Control > Accounting > Accounting Methods).
2. Menu Overview and Basic Setup
34
Menu overview
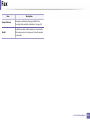
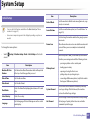
Setup
(see "System Setup" on page 217)
Email Sent
Fax Confirmation
PCL Font
Image TCR
On/Off
Orientation
Power Save
PS Font
Auto Reduction
Device Name
Duplex
Wakeup Event
Address Book
Discard Size
IP Address
Copies
System Timeout
Receive Start Code
Group Owner
Resolution
Job Timeout
Send Forward
DRPD Mode
Network Key
Clear Text
Held Job Timeout
Receive Forward
Paper Source
Status
Edge Enhance
Altitude Adjustment
Toll Save
Duplex Print
Wi-Fi Signal
Trapping
Toner Low Alert
Junk Fax Setup
Fax Setup Wizard
Clear Wi-Fi Settings
Screen
Firmware Version
Secure Receive
Smart Fax Diagnostics
Auto CR
PDF Type
HTTP
Skip Blank Pages
Import Setting
Fax Setup
Prefix Dial
Network Setup
Wi-Fi Direct
Protocol Management
Print Setup
Sound/Volume
Stamp Received Name
TCP/IP (IPv4)
WINS
Emulation
Export Setting
ECM Mode
TCP/IP (IPv6)
SNMPv1/v2
Paper Source
Default Paper Size
Modem Speed
Ethernet
SNTP
Dial Mode
802.1x
UPnP(SSDP)
Machine ID & Fax Number
Ring to Answer
Wi-Fi
mDNS
Date & Time
Initial Setup
Receive Mode
Wi-Fi On/Off
SetIP
Date Format
Manual TX/RX
Wi-Fi Settings
SLP
Clock Mode
Redial Term
WPS
Redial Times
Connect via PBC
Connect via PIN
Network Configuration
Select Country
Clear Settings
Language
CLR Empty Msg.a
Image Management
Vapor Mode
Paper Stacking
Humidity
Default Mode
a. This option only appears when small amount of toner is left in the cartridge.
2. Menu Overview and Basic Setup
35
Menu overview
Job Status
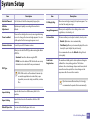
Setup
(see "System Setup" on page
217)
Admin Setup
User Access Control
Authentication
Card Registration
Stamp
(see "Job Status" on page
228)
Current Job
Complete Job
Document Box
(see "Document Box" on
page 231)
System Boxes
Stored Print
(see "Scan to Cloud" on page
232)
Google Drive
Dropbox
Secured Print
Shared Folder
(Options)
Stamp Activate
Copies
Item
Auto Fit
Opacity
Duplex
Position
Paper Source
Change Admin Password
Scan to Cloud
Color Mode
Firmware Upgrade
Image Overwrite
Application
Troubleshooting
Language
2. Menu Overview and Basic Setup
36
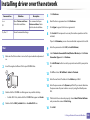
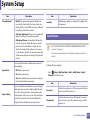
Machine’s basic settings
You can set the machine’s settings by using the Device Settings in
Samsung Easy Printer Manager program.
•
Clock Mode: You can set your machine to display the current time
using either a 12-hour or 24-hour format.
•
Power Save: When you are not using the machine for a while, use this
feature to save power.
For Windows and Mac users, you set from Samsung Easy Printer Manager
>
(Switch to advanced mode) > Device Settings, see "Device
Settings" on page 292.
When you press the
received, the product will wake up from the power saving mode.
After installation is complete, you may want to set the machine's default settings.
To change the machine’s default settings, follow these steps:
1
Select
screen.
2
Select the option you want.
•
(Setup) > Machine Setup > Next > Initial Setup on the touch
•
Language: change the language that is displayed on the control panel.
•
Date & Time: When you set the time and date, they are used in delay
fax and delay print. They are printed on reports. If, however, they are not
correct, you need to change it for the correct time being.
Enter the correct time and date using arrows or numeric keypad (see
"Understanding keypad" on page 237).
• Month = 01 to 12
• Day = 01 to 31
• Year = requires four digits
• Hour = 01 to 12
• Minute = 00 to 59
(Power/Wake Up) button, start printing, or a fax is
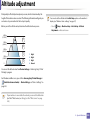
3
Altitude Adjustment: Print quality is affected by atmospheric
pressure, which atmospheric pressure is determined by the height of
the machine above sea level. Before you set the altitude value,
determine the altitude where you are (see "Altitude adjustment" on
page 234).
Press
(Stop) button or home (
) icon to return to ready mode.
Refer to below links to set other settings useful for using the machine.
• See "Entering various characters" on page 237.
• See "Understanding keypad" on page 237.
• See "Setting the paper size and type" on page 47.
• See "Setting up the fax address book" on page 239.
2. Menu Overview and Basic Setup
37
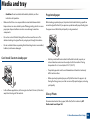
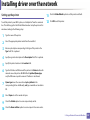
Media and tray
This chapter provides information on how to load print media into your
machine.
• Using print media that does not meet these specifications may cause
problems or require repairs. Such repairs are not covered by Samsung’s
warranty or service agreements.
2
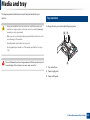
Tray overview
To change the size, you need to adjust the paper guides.
2
1
• Make sure not to use the inkjet photo paper with this machine. It could
cause damage to the machine.
• Using flammable print media can cause a fire.
• Use designated print media (see "Print media specifications" on page
125).
The use of flammable media or foreign materials left in the printer may lead
to overheating of the unit and, in rare cases may cause a fire.
3
1 Tray extend lever
2 Paper length guide
3 Paper width guide
2. Menu Overview and Basic Setup
38
Media and tray
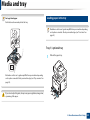
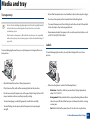
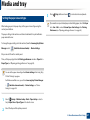
3
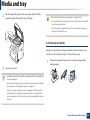
For Legal-sized paper
Loading paper in the tray
Push button as shown and pull out the tray.
Illustrations on this user’s guide may differ from your machine depending
on its options or models. Check your machine type (see "Front view" on
page 22).
1
Tray 1 / optional tray
2
1
Pull out the paper tray.
LGL
Illustrations on this user’s guide may differ from your machine depending
on its options or models. Check your machine type (see "Tray overview" on
page 38).
If you do not adjust the guide, it may cause paper registration, image skew,
or jamming of the paper.
2. Menu Overview and Basic Setup
39
Media and tray
2
Squeeze and the paper width guide and paper length lever to locate
them in the correct paper size slot marked at the bottom of the tray to
adjust to the size (see "Tray overview" on page 38).
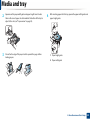
4
After inserting paper into the tray, squeeze the paper width guides and
paper length guide.
2
1
3
Flex or fan the edge of the paper stack to separate the pages before
loading papers.
1 Paper length guide
2 Paper width guide
2. Menu Overview and Basic Setup
40
Media and tray
• Do not push the paper width guide too far causing the media to warp.
5
Insert the tray back into the machine.
6
When you print a document, set the paper type and size for tray (see
"Setting the paper size and type" on page 47).
• If you do not adjust the paper width guide, it may cause paper jams.
• Do not use a paper with a leading-edge curl, it may cause a paper jam or
the paper can be wrinkled.
Multi-purpose tray
The multi-purpose tray can hold special sizes and types of print material, such as
postcards, note cards, and envelopes (see "Print media specifications" on page
125).
2. Menu Overview and Basic Setup
41
Media and tray
Tips on using the multi-purpose tray
•
Load only one type, size and weight of print media at a time in the multipurpose tray.
•
To prevent paper jams, do not add paper while printing when there is still
paper in the multi-purpose tray. This also applies to other types of print
media.
•
Always load the specified print media only to avoid paper jams and print
quality problems (see "Print media specifications" on page 125).
•
Flatten any curl on postcards, envelopes, and labels before loading them
into the multi-purpose tray.
1
Press the push-release of multi-purpose tray and it down to open.
2
Load the paper.
3
Squeeze the multi-purpose tray paper width guides and adjust them to
the width of the paper. Do not force them too much, or the paper will
bent resulting in a paper jam or skew.
• When printing the special media, you must follow the loading guideline
(See "Printing on special media" on page 43).
• When papers overlap when printing using Multi-purpose tray, open tray
1 and remove overlapping papers then try printing again.
2. Menu Overview and Basic Setup
42
Media and tray
4
When you print a document, set the paper type and size for the multipurpose tray.
To see paper weights for each sheet, refer to "Print media specifications" on
page 125.
For information about setting the paper type and size on the control
panel (see "Setting the paper size and type" on page 47).
Types
Tray 1
Optional tray
Multi-purpose tray
Plain
●
●
●
Thick
●
●
●
Thicker
●
Thin
●
●
●
Bond
●
●
●
Color
●
CardStock
●
Labels
●
●
Transparency
●
●
Envelope
●
●
Preprinted
●
●
Cotton
●
●
Recycled
●
●
●
Archive
●
●
●
Letterhead
●
●
●
Punched
●
●
●
4
Printing on special media
The paper setting in the machine and driver should match to print without a
paper mismatch error.
To change the paper setting set in the machine, from the Samsung Easy Printer
Manager select
(Switch to advanced mode) > Device Settings.
Or if your machine supports a display screen or touch screen, you can set it from
the control panel.
Then, set the paper type from the Printing preferences window > Paper tab >
Paper Type (see "Opening printing preferences" on page 54).
• When using special media, we recommend you feed one sheet at a time
(see "Print media specifications" on page 125).
• Illustrations on this user’s guide may differ from your machine
depending on its options or models. Check your machine type (see
"Front view" on page 22).
●
●
●
●
2. Menu Overview and Basic Setup
43
Media and tray
Types
Glossy Photo
Tray 1
Optional tray
Multi-purpose tray
●
●
●
(●: Supported, Blank: Not supported)
•
Do not use stamped envelopes.
•
Do not use envelopes with clasps, snaps, windows, coated lining, selfadhesive seals, or other synthetic materials.
•
Do not use damaged or poorly made envelopes.
•
Be sure the seam at both ends of the envelope extends all the way to the
corner of the envelope.
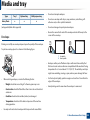
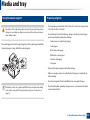
Envelope
Printing successfully on envelopes depends upon the quality of the envelopes.
To print an envelope, place it as shown in the following figure.
1
2
•
•
When selecting envelopes, consider the following factors:
-
Weight: should not exceed 90 g/m2 otherwise, jams may occur.
-
Construction: should lie flat with less than 6 mm curl and should not
contain air.
-
Condition: should not be wrinkled, nicked, nor damaged.
-
Temperature: should resist the heat and pressure of the machine
during operation.
Acceptable
Unacceptable
•
Envelopes with a peel-off adhesive strip or with more than one flap that
folds over to seal must use adhesives compatible with the machine’s fusing
temperature for 0.1 second about 170 °C (338 °F). The extra flaps and strips
might cause wrinkling, creasing, or jams, and may even damage the fuser.
•
For the best print quality, position margins no closer than 15 mm from the
edges of the envelope.
•
Avoid printing over the area where the envelope’s seams meet.
Use only well-constructed envelopes with sharp and well-creased folds.
2. Menu Overview and Basic Setup
44
Media and tray
Transparency
• In case of color printing using transparencies, the picture quality would
be lower than mono printing when the printouts are used on the
overhead projector.
•
Ensure that transparencies are not wrinkled, curled, or have any torn edges.
•
Do not use transparencies that separate from the backing sheet.
•
To prevent transparencies from sticking to each other, do not let the printed
sheets stack up as they are being printed out.
•
Recommended media: Transparency for a color laser printer by Xerox, such
as 3R 91331(A4), 3R 2780 (Letter).
• Prints made on transparency film with this machine are not compatible
with overhead projectors and may appear as a black and white image if
projected.
Labels
To avoid damaging the machine, use only transparencies designed for use in
laser printers.
•
Must withstand the machine’s fusing temperature.
•
Place them on a flat surface after removing them from the machine.
•
Do not leave unused transparencies in the paper tray for long. Dust and dirt
may accumulate on them, resulting in spotty printing.
•
To avoid smudging caused by fingerprints, handle them carefully.
•
To avoid fading, do not expose printed transparencies to prolonged
sunlight.
To avoid damaging the machine, use only labels designed for use in laser
printers.
•
When selecting labels, consider the following factors:
-
Adhesives: Should be stable at your machine’s fusing temperature
about 170 °C (338 °F).
-
Arrangement: Only use labels with no exposed backing between them.
Labels can peel off sheets that have spaces between the labels, causing
serious jams.
-
Curl: Must lie flat with no more than 13 mm of curl in any direction.
2. Menu Overview and Basic Setup
45
Media and tray
-
Condition: Do not use labels with wrinkles, bubbles, or other
indications of separation.
•
Make sure that there is no exposed adhesive material between labels.
Exposed areas can cause labels to peel off during printing, which can cause
paper jams. Exposed adhesive can also cause damage to machine
components.
•
Do not run a sheet of labels through the machine more than once. The
adhesive backing is designed for only a single pass through the machine.
•
Do not use labels that are separating from the backing sheet or are wrinkled,
bubbled, or otherwise damaged.
Card stock/ Custom-sized paper
•
In the software application, set the margins to at least 6.4 mm (0.25 inches)
away from the edges of the material.
Preprinted paper
When loading preprinted paper, the printed side should be facing up with an
uncurled edge at the front. If you experience problems with paper feeding, turn
the paper around. Note that print quality is not guaranteed.
•
Must be printed with heat-resistant ink that will not melt, vaporize, or
release hazardous emissions when subjected to the machine’s fusing
temperature for 0.1 second (about 170 °C (338 °F)).
•
Preprinted paper ink must be non-flammable and should not adversely
affect machine rollers.
•
Before you load preprinted paper, verify that the ink on the paper is dry.
During the fusing process, wet ink can come off preprinted paper, reducing
print quality.
Glossy Photo
Recommended media: Glossy paper (A4/Letter) for this machine by HP
Professional Laser Paper 150.
2. Menu Overview and Basic Setup
46
Media and tray
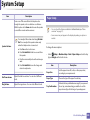
5
Setting the paper size and type
After loading paper in the paper tray, set the paper size and type using the
control panel buttons.
3
Press
(Stop) button or home (
) icon to return to ready mode.
If you want to use special-sized paper such as billing paper, select the Paper
tab > Size > Edit... and set Custom Paper Size Settings in the Printing
Preferences (see "Opening printing preferences" on page 54).
The paper setting in the machine and driver should match to print without a
paper mismatch error.
To change the paper setting set in the machine, from the Samsung Easy Printer
Manager select
(Switch to advanced mode) > Device Settings.
Or you can set it from the control panel.
Then, set the paper type from the Printing preferences window > Paper tab >
Paper Type (see "Opening printing preferences" on page 54).
You can set the paper size and type from Device Settings in Samsung Easy
Printer Manager program.
For Windows and Mac users, you set from Samsung Easy Printer Manager
>
(Switch to advanced mode) > Device Settings, see "Device
Settings" on page 292.
1
Select
(Setup) > Machine Setup > Next > Paper Setup > select a
tray > Paper Size or Paper Type on the touch screen.
2
Select the tray and the option you want.
2. Menu Overview and Basic Setup
47
Media and tray
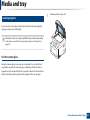
6
7
Using the output support
The surface of the output tray may become hot if you print a large number
of pages at once. Make sure that you do not touch the surface, and do not
allow children near it.
Preparing originals
•
Do not load paper smaller than 142 x 148 mm (5.6 x 5.8 inches) or larger than
216 x 356 mm (8.5 x 14 inches).
•
Do not attempt to load the following s of paper, in order to prevent paper
jam, low print quality and machine damage.
The printed pages stack on the output support, and the output support will help
the printed pages to align. Unfold the output support.
Illustrations on this user’s guide may differ from your machine depending
on its options or models. Check your machine type (see "Front view" on
page 22).
-
Carbon-paper or carbon-backed paper
-
Coated paper
-
Onion skin or thin paper
-
Wrinkled or creased paper
-
Curled or rolled paper
-
Torn paper
•
Remove all staples and paper clips before loading.
•
Make sure any glue, ink, or correction fluid on the paper is completely dry
before loading.
•
Do not load originals that include different sizes or weights of paper.
•
Do not load booklets, pamphlets, transparencies, or documents with other
unusual characteristics.
2. Menu Overview and Basic Setup
48
Media and tray
8
Loading originals
1
Lift and open the scanner lid.
You can use the scanner glass or the document feeder to load an original for
copying, scanning, and sending a fax.
Illustrations on this user’s guide may differ from your machine depending
on its options or models. Check your machine type (see "Front view" on
page 22).
On the scanner glass
Using the scanner glass, you can copy or scan originals. You can get the best
scan quality, especially for colored or gray-scaled images. Make sure that no
originals are in the document feeder. If an original is detected in the document
feeder, the machine gives it priority over the original on the scanner glass.
2. Menu Overview and Basic Setup
49
Media and tray
2
Place the original face down on the scanner glass. Align it with the
registration guide at the top left corner of the glass.
• Be careful not to break the scanner glass. You may get hurt.
• Do not put hands while closing the scanner lid. The scanner lid may fall
on your hands and get hurt.
• Do not look into the light from inside of the scanner while copying or
scanning. It is harmful to eyes.
In the document feeder
Using the document feeder (or duplex automatic document feeder), you can
load up to 50 sheets of paper (80 g/m2, 21 lbs bond) for one job.
1
3
Flex or fan the edge of the paper stack to separate the pages before
loading originals.
Close the scanner lid.
• Leaving the scanner lid open while copying may affect copy quality and
toner consumption.
• Dust on the scanner glass may cause black spots on the printout. Always
keep it clean (see "Cleaning the machine" on page 92).
• If you are copying a page from a book or magazine, lift the scanner lid
until its hinges are caught by the stopper and then close the lid. If the
book or magazine is thicker than 30 mm, start copying with the scanner
lid open.
2. Menu Overview and Basic Setup
50
Media and tray
2
Load the original face up into the document feeder input tray. Make sure
that the bottom of the original stack matches the paper size marked on
the document input tray.
3
Adjust the document feeder width guides to the paper size.
Dust on the document feeder glass may cause black lines on the printout.
Always keep the glass clean (see "Cleaning the machine" on page 92).
2. Menu Overview and Basic Setup
51
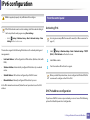
Basic printing
For special printing features, refer to the Advanced Guide (see "Using
advanced print features" on page 244).
3
Select your machine from the Select Printer list.
4
The basic print settings including the number of copies and print range
are selected within the Print window.
9
Printing
If you are a Mac, Linux or UNIX operating systems user, refer to the
Advanced Guide (see "Mac printing" on page 253, "Linux printing" on page
255 or "Unix printing" on page 256).
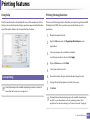
The following Printing Preferences window is for Notepad in Windows 7.
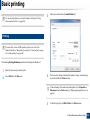
1
2
Open the document you want to print.
Select Print from the File menu.
To take advantage of the advanced printing features, click Properties or
Preferences from the Print window (see "Opening printing preferences" on
page 54).
5
To start the print job, click OK or Print in the Print window.
2. Menu Overview and Basic Setup
52
Basic printing
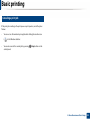
10
Canceling a print job
If the print job is waiting in the print queue or print spooler, cancel the job as
follows:
•
You can access this window by simply double-clicking the machine icon
(
•
) in the Windows task bar.
You can also cancel the current job by pressing
control panel.
(Stop) button on the
2. Menu Overview and Basic Setup
53
Basic printing
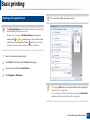
11
Opening printing preferences
The screenshot may differ depending on model.
• The Printing Preferences window that appears in this user’s guide may
differ depending on the machine in use.
• When you select an option in Printing Preferences, you may see a
warning mark
or . An
mark means you can select that certain
option but it is not recommended, and an
mark means you cannot
select that option due to the machine’s setting or environment.
1
2
3
4
Open the document you want to print.
Select Print from the file menu. The Print window appears.
Select your machine from the Select Printer.
Click Properties or Preferences.
• You can apply Eco features to save paper and toner before printing (see
"Easy Eco Driver" on page 284).
• You can check the machine’s current status pressing the Printer Status
button (see "Using Samsung Printer Status" on page 293).
2. Menu Overview and Basic Setup
54
Basic printing
Using a favorite setting
To use a saved setting, select it in the Favorites tab. The machine is now set
to print according to the settings you have selected.
The Favorites option, which is visible on each preferences tab except for the
Favorites and Samsung tab, allows you to save the current preferences for
future use.
To delete saved settings, select it in the Favorites tab and click Delete.
To save a Favorites item, follow these steps:
12
1
2
Change the settings as needed on each tab.
3
4
5
Click Save.
Enter a name for the item in the Favorites input box.
Using help
Click the option you want to know on the Printing Preferences window and
press F1 on your keyboard.
Enter name and description, and then select the desired icon.
Click OK. When you save Favorites, all current driver settings are saved.
2. Menu Overview and Basic Setup
55
Basic printing
13
Eco printing
1
2
Select
Select the option you want.
•
The Eco function cuts toner consumption and paper usage. The Eco function
allows you to save print resources and lead you to eco-friendly printing.
(Eco) > Settings > Next on the touch screen.
If you press the Eco button from the control panel, eco mode is enabled. The
default setting of Eco mode is duplex, Multiple Pages per Side (2-up), Skip Blank
Pages.
Default Mode: Select this to turn on or off the eco mode.
-
Off: Set the eco mode off.
-
On: Set the eco mode on.
If you set the eco mode on with a passcode from the SyncThru™ Web Service
(Settings tab > Machine Settings > System > Eco Settings) or Samsung
Easy Printer Manager (Device Settings > Eco), the On-forced message
appears. You have to enter the passcode to change the eco mode status.
You can set the altitude value from Device Settings in Samsung Easy
Printer Manager program.
• For Windows and Mac users, you set from Samsung Easy Printer
•
Manager >
(Switch to advanced mode) > Device Settings, see
"Device Settings" on page 292.
Setting Eco mode on the control panel
3
Feature Configuration: Set features to use in the Eco mode.
-
Default: The machine is set to Default mode.
-
Custom: Change any necessary values.
Press
(Stop) button or home (
) icon to return to ready mode.
Setting eco mode on the driver
Accessing menus may differ from model to model (see "Menu overview" on
page 31 or "Control panel overview" on page 24).
To take advantage of the advanced printing features, click Properties or
Preferences from the Print window (see "Opening printing preferences" on
page 54).
2. Menu Overview and Basic Setup
56
Basic printing
Open the Eco tab to set Eco mode. When you see the eco image (
means the eco mode is currently enabled.
), that
Result simulator
Eco options
Result Simulator shows the results of reduced emission of carbon dioxide, used
electricity, and the amount of saved paper in accordance with the settings you
selected.
•
Printer Default: Follows the settings from the machine's control panel.
•
•
None: Disables Eco mode.
The results are calculated on the basis that the total number of printed
paper is one hundred without a blank page when the Eco mode is disabled.
•
Eco Printing: Enables eco mode. Activate the various Eco items you want to
use.
•
Refers to the calculation coefficient about CO2, energy, and paper from IEA,
the index of Ministry of Internal Affairs and Communication of Japan and
www.remanufacturing.org.uk. Each model has a different index.
•
Passcode: If the administrator fixed to enable the Eco mode, you have to
enter the passcode to change the status.
•
The power consumption in printing mode refers to the average printing
power consumption of this machine.
•
The actual amount displayed is only an estimate as the actual amount may
differ depending on the operating system used, computing performance,
application software, connection method, media type [thickness], media
size, job complexity, etc.
Passcode button: You can set from SyncThru™ Web Service (Settings tab >
Machine Settings > System > Eco Settings) or Samsung Easy Printer
Manager (Device Settings > Eco), the passcode button is activated. To
change the print settings, click on this button, enter the passcode or need
to contact the administrator.
14
Secure printing
• Some menus may not appear on the display depending on options or
models. If so, it is not applicable to your machine.
• You might not be able to print a complex document using the RAM Disk.
Install an optional memory to print a complex document.
2. Menu Overview and Basic Setup
57
Basic printing
When you use a printing device in an office, school or other public place, you can
protect your personal documents or confidential information by using the
secure printing feature.
Printing secure documents from the control panel
Accessing menus may differ from model to model (see "Menu overview" on
page 31 or "Control panel overview" on page 24).
Starting secure printing from the SyncThru™ Web
Service
1
1
Select
(Document Box) > System Boxes > Next > Secured Print on
the touch screen.
2
3
4
Select the document to print.
Access a web browser, such as Internet Explorer, from Windows.
Enter the machine IP address of your printer (http://xxx.xxx.xxx.xxx) in
the address field and press the Enter key or click Go.
2
Click Login on the upper right of SyncThru™ Web Service website (see
"Logging into SyncThru™ Web Service" on page 285).
3
4
Settings > Machine Settings > System > RAM Disk.
Enter the password that you set from the printer driver.
Print or delete the document.
Enable RAM Disk.
This feature may not appear on the display depending on options or
models. If so, it is not applicable to your machine.
2. Menu Overview and Basic Setup
58
Basic copying
16
• For special printing features, refer to the Advanced Guide (see "Copy" on
page 204).
• Accessing menus may differ from model to model (see "Menu overview"
on page 31 or "Control panel overview" on page 24).
Changing the settings for each copy
Your machine provides default settings for copying so that you can quickly and
easily make a copy.
15
Basic copy
• If you press the
(Stop) button twice while setting the copy options,
all of the options you have set for the current copy job will be canceled
and returned to their default status. Or, they will automatically return to
their default status after the machine completes the copy in progress.
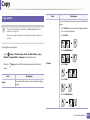
1
2
Select
3
If you want to customize the copy settings including Reduce/Enlarge,
Darkness, Original Type and more by using the control panel buttons (see
"Changing the settings for each copy" on page 59).
Darkness
4
5
Enter the number of copies using the arrow or number keypad, if necessary.
If you have an original containing faint marking and dark images, you can adjust
the brightness to make a copy that is easier to read.
(Copy) > Basic Copy >
(Options) on the touch screen.
• Accessing menus may differ from model to model (see "Menu overview"
on page 31).
Place a single document face down on the document glass, or load the
documents face up into the document feeder (see "Loading originals" on
page 49).
Touch Start on the touch screen or press
(Start) on the control panel.
If you need to cancel the copying job during the operation, press
button and the copying will stop.
1
Select
(Copy) > Basic Copy >
touch screen.
2
Select the option you want.
(Options) > Darkness on the
(Stop)
For example, the Light+5 being the lightest, and the Dark+5 being the
darkest.
3
Press
(Stop) button or home (
) icon to return to ready mode.
2. Menu Overview and Basic Setup
59
Basic copying
Original Type
• This feature may not be available depending on model or optional goods
(see "Variety feature" on page 10).
The original setting is used to improve the copy quality by selecting the
document for the current copy job.
1
Select
(Copy) > Basic Copy >
the touch screen.
• If the machine set to Eco mode, reduce and enlarge features are not
available.
(Options) > Original Type on
To select from the predefined copy sizes
2
Select the option you want.
•
Text: Use for originals containing mostly text.
•
Text/Photo: Use for originals with mixed text and photographs.
If texts in the printout is blurry, select Text to get the clear texts.
3
•
Photo: Use when the originals are photographs.
•
Magazine: Use when the originals are magazines.
Press
(Stop) button or home (
1
Select
(Copy) > Custom Copy >
Enlarge on the touch screen.
2
3
Select the option you want.
You can reduce or enlarge the size of a copied image from 25% to 400% from the
document feeder or scanner glass.
(Stop) button or home (
) icon to return to ready mode.
To scale the copy by directly entering the scale rate
1
Select
(Copy) > Custom Copy >
Enlarge > Custom on the touch screen.
2
3
Enter the copy size you want using the numeric keypad.
) icon to return to ready mode.
Reduced or enlarged copy
Press
(Options) > Reduce/
Press
(Stop) button or home (
(Options) > Reduce/
) icon to return to ready mode.
When you make a reduced copy, black lines may appear at the bottom of
your copy.
2. Menu Overview and Basic Setup
60
Basic copying
17
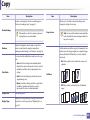
ID card copying
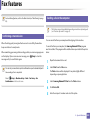
4
Touch Start on the touch screen or press
panel.
(Start) on the control
Your machine begins scanning the front side.
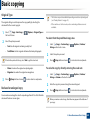
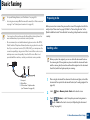
Your machine can print 2-sided originals on one sheet.
The machine prints one side of the original on the upper half of the paper and
the other side on the lower half without reducing the size of the original. This
feature is helpful for copying a small-sized item such as business card.
5
Turn the original over and place it on the scanner glass where arrows
indicate as shown. Then, close the scanner lid.
6
Touch Start on the touch screen or press
panel.
• The original must be placed on the scanner glass to use this feature.
• If the machine set to Eco mode, this feature is not available.
1
2
Select
(Copy) > ID Copy on the touch screen.
3
Touch Next on the touch screen.
Place the front side of an original facing down on the scanner glass
where arrows indicate as shown. Then, close the scanner lid.
(Start) on the control
Your machine begins scanning the back side.
If the original is larger than the printable area, some portions may not be
printed.
2. Menu Overview and Basic Setup
61
Basic scanning
For special scanning features, refer to the Advanced Guide (see "Scan
features" on page 259).
3
4
Touch
(Options) and select the option you want.
Touch
(back) and select the scan destination you want.
• You can create and save the frequently used settings as a profile list. Also
you can add and delete the profile and save each profile to a different
path.
18
Basic Scanning
• To change the Samsung Easy Printer Manager >
Switch to
advanced mode > Scan to PC Settings.
This is the normal and usual procedure for scanning originals.
This is a basic scanning method for USB-connected machine.
5
• Accessing menus may differ from model to model.
• If you want to scan using the network, refer to the Advanced Guide (see
"Scanning from network connected machine" on page 260).
1
Place a single document face down on the document glass, or load the
documents face up into the document feeder (see "Loading originals" on
page 49).
2
Select
Touch Start on the touch screen or press
(Start) on the control
panel. The machine starts to scan and send the scanned image to the
destinations
Scanned image is saved in computer’s C:\Users\users name\My
Documents. The saved folder may differ, depending on your operating
system or the application you are using.
(Scan) > Local PC and touch Next on the touch screen.
If you see Not Available message, check the port connection, or select
Enable Scan from Device Panel in Samsung Easy Printer Manager >
Switch to advanced mode > Scan to PC Settings.
2. Menu Overview and Basic Setup
62
Basic faxing
19
• For special faxing features, see "Fax features" on page 269.
• Accessing menus may differ from model to model (see "Menu overview"
on page 31 or "Control panel overview" on page 24).
• You cannot use this machine as a fax through the internet phone. For
more information, ask your internet service provider.
• We recommend you use traditional analog phone services like PSTN(
Public Switched Telephone Network) when using a phone line as a fax
line. If you use internet services (DSL, ISDN, VolP), you can improve the
connection quality by using a micro-filter. A micro-filter reduces noise
and improves connection quality. Since the DSL micro-filter is not
provided with the machine, contact your Internet service provider.
1 Line port
2 Micro filter
3 DSL modem / Telephone line
(see "Rear view" on page 23).
Preparing to fax
Before you send or receive a fax, you need to connect the supplied cord to the
wall jack (see "Rear view" on page 23). Refer to “Connecting Fax Line” in the
Quick Installation Guide. The method of connecting a telephone line varies by
country.
20
Sending a fax
When you place the originals, you can use either the document feeder or
the scanner glass. If the originals are placed on both the document feeder
and the scanner glass, the machine will read the originals on the document
feeder first, which has higher priority in scanning.
1
Place a single document face down on the document glass, or load the
documents face up into the document feeder (see "Loading originals" on
page 49).
2
3
Select
Touch
(Fax) > Memory Send > Next on the touch screen.
(Options) > select the option you want using arrows >
(back) > Next on the touch screen (see "Adjusting the document
settings" on page 65).
2. Menu Overview and Basic Setup
63
Basic faxing
4
5
Select Direct Input or Fax List and enter the destination fax number
using number keypad on the touch screen (see "Understanding keypad"
on page 237).
3
Touch
(Options) > select the option you want using arrows >
(back) > Next on the touch screen (see "Adjusting the document
settings" on page 65).
Touch Send on the touch screen.
The machine starts to scan and send the fax to the destinations.
• If you want to send a fax directly from your computer, use Samsung
Network PC Fax (see "Sending a fax in the computer" on page 269).
• When you want to cancel a fax job, press
machine starts transmission.
Touch On Hook on the touch screen.
Enter a fax number using the number keypad on the control panel.
Touch Start on the touch screen or press
(Start) on the control panel
when you hear a high-pitched fax signal from the remote fax machine.
(Stop) button before the
• If you used the scanner glass, the machine shows the message asking to
place another page.
Sending a fax to multiple destinations
You can use the multiple send feature, which allows you to send a fax to multiple
locations. Originals are automatically stored in memory and sent to a remote
station. After transmission, the originals are automatically erased from memory.
Sending a fax manually
Perform the following to send a fax using
4
5
6
You cannot send faxes with this feature if you have chosen super fine as an
option or if the fax is in color.
(On Hook Dial) on the control
panel.
1
Place a single document face down on the document glass, or load the
documents face up into the document feeder (see "Loading originals" on
page 49).
1
Place a single document face down on the document glass, or load the
documents face up into the document feeder (see "Loading originals" on
page 49).
2
Select
2
Select
screen.
(Fax) > On Hook Dial on the touch screen.
(Fax) > Speed Dial Send or Group Dial Send on the touch
2. Menu Overview and Basic Setup
64
Basic faxing
3
Touch
(Options) > select the option you want using arrows >
Resolution
(back) > Next on the touch screen (see "Adjusting the document
settings" on page 65).
4
5
Select a speed dial number or select a group dial number.
The default document settings produce good results when using typical textbased originals. However, if you send originals that are of poor quality, or
contain photographs, you can adjust the resolution to produce a higher quality
fax.
Touch Send on the touch screen.
The machine begins sending the fax to the numbers you entered in the
order in which you entered them.
The resolution setting is applied to the current fax job. To change the
default setting, see "Fax" on page 212.
21
Receiving a fax
Your machine is preset Fax mode at the factory. When you receive a fax, the
machine answers the call on a specified number of rings and automatically
receives the fax.
1
Select
(Fax) > select an item such as Memory Send, On Hook Dial,
Delayed Send, or etc. >
(Options) > Resolution on the touch
screen.
2
Select the resolution you want using arrows. Touch
to the previous screen.
(back) to go back
•
Standard: Originals with normal sized characters.
•
Fine: Originals containing small characters or thin lines or originals
printed using a dot-matrix printer.
•
Super Fine: Originals containing extremely fine detail. Super Fine
mode is enabled only if the machine with which you are
communicating also supports the Super Fine resolution.
22
Adjusting the document settings
Before starting a fax, change the following settings according to your original’s
status to get the best quality.
Accessing menus may differ from model to model (see "Menu overview" on
page 31 or "Control panel overview" on page 24).
2. Menu Overview and Basic Setup
65
Basic faxing
• For memory transmission, Super Fine mode is not available. The
resolution setting is automatically changed to Fine.
• When your machine is set to Super Fine resolution and the fax machine
with which you are communicating does not support Super Fine
resolution, the machine transmits using the highest resolution mode
supported by the other fax machine.
3
Press
(Stop) button or home (
) icon to return to ready mode.
Darkness
You can select the degree of darkness of the original document.
The darkness setting is applied to the current fax job. To change the default
setting, see "Fax" on page 212.
1
Select
(Fax) > select an item such as Memory Send, On Hook Dial,
Delayed Send, or etc. >
(Options) > Darkness on the touch
screen.
2
Select a darkness level you want using arrows. Touch
back to the previous screen.
3
Press
(Stop) button or home (
(back) to go
) icon to return to ready mode.
2. Menu Overview and Basic Setup
66
Using USB memory device
This chapter explains how to use a USB memory device with your machine.
You must use only an authorized USB memory device with an A plug connector.
A
23
B
About USB memory
USB memory devices are available with a variety of memory capacities to give
you more room for storing documents, presentations, downloaded music and
videos, high resolution photographs or whatever other files you want to store or
move.
Use only a metal-shielded USB memory device.
You can do the following tasks on your machine by using a USB memory device.
•
Scan documents and save them on a USB memory device
•
Print data stored on a USB memory device
•
Restore backup files to the machine’s memory
•
Format the USB memory device
•
Check the available memory space
24
Plugging in a USB memory device
Only use a USB memory device that has obtained compatibility certification;
otherwise, the machine might not recognize it.
• Do not remove the USB memory device while the machine is in operation
or writing to or reading from USB memory. The machine warranty does
not cover damage caused by user’s misuse.
• If your USB memory device has certain features such as security settings
and password settings, your machine may not automatically detect it.
For details about these features, see the user’s guide of the USB memory
device.
The USB memory port on the front of your machine is designed for USB V1.1 and
USB V2.0 memory devices. Your machine supports USB memory devices with
FAT16/FAT32 and a sector size of 512 bytes.
Check your USB memory device’s file system from your dealer.
2. Menu Overview and Basic Setup
67
Using USB memory device
Scanning
25
Scanning to a USB memory device
Accessing menus may differ from model to model (see "Menu overview" on
page 31 or "Control panel overview" on page 24).
You can scan a document and save the scanned image onto a USB memory
device.
1
2
Insert a USB memory device into the USB memory port on your machine.
3
Select
Place a single document face down on the document glass, or load the
documents face up into the document feeder (see "Loading originals" on
page 49).
(Scan) > USB > Next > Start on the touch screen.
The machine begins scanning.
After scanning is complete, you can remove the USB memory device from the
machine.
Customizing Scan to USB
You can specify image size, file format, or color mode for each scanning to USB
job.
1
Select
(Direct USB) > Scan to USB >
(Options) on the touch
screen.
2
Select the setting option you want appears.
•
Original Size: Sets the image size.
•
Original Type: Sets the original document’s.
•
Resolution: Sets the image resolution.
2. Menu Overview and Basic Setup
68
Using USB memory device
•
•
Color Mode: Sets the color mode. If you select Mono in this option,
you cannot select JPEG in File Format.
File is supported by Direct Print option.
•
File Format: Sets the file format in which the image is to be saved.
When you select TIFF or PDF, you can select to scan multiple pages.
If you select JPEG in this option, you cannot select Mono in Color
Mode.
•
PDF Encryption: Sets the encrypts PDF files.
•
Filing Policy: Sets the policy to save files between overwriting or
renaming
•
Duplex: Sets the duplex mode.
•
Darkness: Sets the brightness level to scan an original.
•
File Name: Sets the file name.
If you print PRN files created from other machine, the printout would be
different.
•
TIFF: TIFF 6.0 Baseline
•
JPEG: JPEG Baseline
•
PDF: PDF 1.7 or lower version.
To print a document from a USB memory device
3
Select the desired status you want. Touch
previous screen.
4
Press
(Stop) button or home (
PRN: Only files created by provided driver with your machine are
compatible.
(back) to go back to the
1
and then select
) icon to return to ready mode.
You can change the default scan settings (see "Scan" on page 208).
26
Printing from a USB memory device
You can directly print files stored on a USB memory device.
Insert a USB memory device into the USB memory port on your machine,
(Direct USB) > Print From > Next on the touch
screen.
2
3
4
5
Select the folder or file you want.
Select the number of copies to be printed or enter the number.
Touch Print on the touch screen.
Press
(Stop) button or home (
) icon to return to ready mode.
2. Menu Overview and Basic Setup
69
Using USB memory device
Restoring data
27
Backing up data
Data in the machine’s memory can be accidentally erased due to power failure
or storage failure. Backup helps you protect the system settings by storing them
as backup files on a USB memory device.
Backing up data
1
Insert the USB memory device into the USB memory port on your
machine.
2
Select
(Setup) > Machine Setup > Next > Initial Setup > Export
Setting on the touch screen.
3
4
5
Select Setup Data or Address Book.
1
Insert the USB memory device on which the backup data is stored in to
the USB memory port.
2
Select
(Setup) > Machine Setup > Next > Initial Setup > Import
Setting on the touch screen.
3
4
5
6
Select Setup Data or Address Book.
Select the file you want to restore.
Touch Yes appears to restore the backup file to the machine.
Press
(Stop) button or home (
) icon to return to ready mode.
28
Managing USB memory
Touch Yes when the confirmation window appears.
Press
(Stop) button or home (
) icon to return to ready mode.
You can delete image files stored on a USB memory device one by one or all at
once by reformatting the device.
After deleting files or reformatting a USB memory device, files cannot be
restored. Therefore, confirm that you no longer need the data before
deleting it.
2. Menu Overview and Basic Setup
70
Using USB memory device
Deleting an image file
1
2
3
4
Insert a USB memory device into the USB memory port on your machine.
Select
(Direct USB) > File Manage > Next > select the folder or file
you want >
(Options) > Delete on the touch screen.
1
2
3
4
Insert a USB memory device into the USB memory port on your machine.
Select
(Direct USB) > Show Space > Next on the touch screen.
The available memory space appears on the display.
Press
(Stop) button or home (
) icon to return to ready mode.
Touch Yes when the confirmation window appears.
Press
(Stop) button or home (
) icon to return to ready mode.
Formatting a USB memory device
1
2
Insert a USB memory device into the USB memory port on your machine.
3
4
Touch Yes when the confirmation window appears.
select
(Direct USB) > File Manage > Next > select the folder or file
you want >
(Options) > Format on the touch screen.
Press
(Stop) button or home (
) icon to return to ready mode.
Viewing the USB memory status
You can check the amount of memory space available for scanning and saving
documents.
2. Menu Overview and Basic Setup
71
3. Maintenance
This chapter provides information about purchasing supplies, accessories and maintenance parts available for your
machine.
• Ordering supplies and accessories
73
• Available consumables
74
• Available accessories
75
• Available maintenance parts
76
• Storing the toner cartridge
77
• Redistributing toner
79
• Replacing the toner cartridge
81
• Replacing the waste toner container
84
• Installing accessories
86
• Monitoring the supplies life
90
• Setting the toner low alert
91
• Cleaning the machine
92
• Tips for moving & storing the machine
98
Ordering supplies and accessories
Available accessories may differ from country to country. Contact your sales representatives to obtain the list of available supplies, and maintenance parts.
To order Samsung-authorized supplies, accessories, and maintenance parts, contact your local Samsung dealer or the retailer where you purchased your machine.
You can also visit www.samsung.com/supplies, and then select your country/region to obtain the contact information for service.
3. Maintenance
73
Available consumables
When supplies reach the end of their life spans, you can order the followings of supplies for your machine:
Average yielda
Type
Toner cartridge
Part name
• Average continuous black cartridge yield: Approx. 6,000 standard pages (Black)
• CLT-K505L: Black
• Average continuous color cartridge yield: Approx. 3,500 standard pages (Yellow/Magenta/Cyan)
• CLT-Y505L: Yellow
• CLT-M505L: Magenta
• CLT-C505L: Cyan
Waste toner
container
• Approx. 14,000 standard pages (Mono)
CLT-W506
• Approx. 3,500 standard pages (Color)
a. Declared yield value in accordance with ISO/IEC 19798. The number of pages may be affected by operating environment, printing interval, graphics, media type and media size.
Depending on the options, percentage of image area and job mode used, the toner cartridge’s lifespan may differ.
When purchasing new toner cartridges or other supplies, these must be purchased in the same country as the machine you are using. Otherwise, new toner
cartridges or other supplies will be incompatible with your machine due to different configurations of toner cartridges and other supplies according to the specific
country conditions.
Samsung does not recommend using non-genuine Samsung toner cartridge such as refilled or remanufactured toner. Samsung cannot guarantee non-genuine
Samsung toner cartridge's quality. Service or repair required as a result of using non-genuine Samsung toner cartridges will not be covered under the machine’s
warranty.
3. Maintenance
74
Available accessories
You can purchase and install accessories to enhance your machine’s performance and capacity.
• Some features and optional goods may not be available depending on model or country (see "Features by model" on page 8).
Accessory
Memory module
Optional tray
Function
Part name
Extends your machine’s memory capacity.
ML-MEM380 (1,024 MB)
If you are experiencing frequent paper supply problems, you can attach an additional
CLP-S680A
520a sheet tray.
IEEE 1284 Portb
Allows you to use various interface.
ML-PAR100
• When installing the printer driver with an IEEE1284B parallel connector, the
machine might not be found and after installing the printer driver, only basic
printing features are available.
• If you want to check the machine's status or set the settings, connect the
machine to a computer with a USB cable or a network.
• If you use the IEEE 1284B parallel connector, you can not use the USB cable.
a. Plain paper 80 g/m2 (20 lb bond).
b. The optional IEEE 1284 port can be used by plugging in both the USB port and the 5V output port.
3. Maintenance
75
Available maintenance parts
You need to replace the maintenance parts at specific intervals to keep the machine in the best condition and avoid print quality and paper feeding problems
resulting from the worn-out parts. Maintenance parts are mostly rollers, belts and pads. However, the replacement period and parts may differ depending on the
model. Replacing maintenance parts can be performed only by an authorized service provider, dealer, or the retailer where you bought the machine. To purchase
maintenance parts, contact the retailer where you bought the machine. The replacement period for the maintenance parts is informed by the Samsung Printer Status
program. Or if your machine supports display screen, a message is displayed in the display screen. The replacement period varies based on the operating system
used, computing performance, application software, connecting method, paper type, paper size, and job complexity.
3. Maintenance
76
Storing the toner cartridge
Toner cartridges contain components that are sensitive to light, temperature
and humidity. Samsung suggests users follow these recommendations to
ensure optimal performance, highest quality, and longest life from your new
Samsung toner cartridge.
Store the cartridge in the same environment in which the printer will be used.
This should be in controlled temperature and humidity conditions. The toner
cartridge should remain in its original and unopened package until installation
– if original packaging is not available, cover the top opening of the cartridge
with paper and store in a dark cabinet.
Opening the cartridge package prior to use dramatically shortens its useful shelf
and operating life. Do not store on the floor. If the toner cartridge is removed
from the printer, follow the instructions below to store the toner cartridge
properly.
•
Store the cartridge inside the protective bag from the original package.
•
Store lying flat (not standing on end) with the same side facing up as if it
were installed in the machine.
•
Do not store consumables in any of the following conditions:
-
Temperature greater than 40 °C (104 °F).
-
Humidity range less than 20% or greater than 80%.
-
An environment with extreme changes in humidity or temperature.
-
Direct sunlight or room light.
-
Dusty places.
-
A car for a long period of time.
-
An environment where corrosive gases are present.
-
An environment with salty air.
1
Handling instructions
•
Do not touch the surface of the photoconductive drum in the cartridge.
•
Do not expose the cartridge to unnecessary vibrations or shock.
•
Never manually rotate the drum, especially in the reverse direction; this can
cause internal damage and toner spillage.
2
Toner cartridge usage
Samsung Electronics does not recommend or approve the use of non-Samsung
brand toner cartridges in your printer including generic, store brand, refilled, or
remanufactured toner cartridges.
Samsung’s printer warranty does not cover damage to the machine caused
by the use of refilled, remanufactured, or non-Samsung brand toner
cartridges.
3. Maintenance
77
Storing the toner cartridge
3
Estimated cartridge life
Estimated cartridge life (the life of the toner cartridge yield) depends on the
amount of toner that print jobs require. The actual print yield may vary
depending on the print density of the pages you print on, operating
environment, percentage of image area, printing interval, media type and/or
media size. For example, if you print a lot of graphics, the consumption of the
toner is higher and you may need to change the cartridge more often.
3. Maintenance
78
Redistributing toner
When the toner cartridge is near the end of its life:
•
White streaks or light printing occurs and/or density varies from side to side.
•
The Status LED blinks red. The toner-related message saying that the toner is low may appear on the display.
•
The computer’s Samsung Printing Status program window appears on the computer telling you which color cartridge is low on toner (see "Using Samsung Printer
Status" on page 293).
If this happens, you can temporarily improve print quality by redistributing the remaining toner in the cartridge. In some cases, white streaks or light printing will still
occur even after you have redistributed the toner.
Illustrations on this user’s guide may differ from your machine depending on its options or models. Check your machine type (see "Front view" on page 22).
• To prevent damage to the toner cartridge, do not expose it to light for more than a few minutes. Cover it with a piece of paper, if necessary.
• Do not touch the green area of the toner cartridge. Use the handle on the cartridge to avoid touching this area.
• Do not use sharp objects such as a knife or scissors to open the toner cartridge package. They might scratch the drum of the cartridge.
• If toner gets on your clothing, wipe it off with a dry cloth and wash clothing in cold water. Hot water sets toner into fabric.
3. Maintenance
79
Redistributing toner
3. Maintenance
80
Replacing the toner cartridge
Click this link to open an animation about replacing a toner cartridge.
The machine uses four colors and has a different toner cartridge for each one: yellow (Y), magenta (M), cyan (C), and black (K).
•
The status LED and the toner-related message on the display indicate when each individual toner cartridge should be replaced.
•
The computer’s Samsung Printing Status Program window appears on the computer telling you which color cartridge is empty on toner (see "Using Samsung
Printer Status" on page 293).
Check the type of the toner cartridge for your machine (see "Available consumables" on page 74).
• Shake the toner cartridge thoroughly, it will increase the initial print quality.
• Illustrations on this user’s guide may differ from your machine depending on its options or models. Check your machine type (see "Front view" on page 22).
• To prevent damage to the toner cartridge, do not expose it to light for more than a few minutes. Cover it with a piece of paper, if necessary.
• Do not touch the green area of the toner cartridge. Use the handle on the cartridge to avoid touching this area.
• Do not use sharp objects such as a knife or scissors to open the toner cartridge package. They might scratch the drum of the cartridge.
• If toner gets on your clothing, wipe it off with a dry cloth and wash clothing in cold water. Hot water sets toner into fabric.
3. Maintenance
81
Replacing the toner cartridge
3. Maintenance
82
Replacing the toner cartridge
3. Maintenance
83
Replacing the waste toner container
When the life span of the waste toner container has expired, waste toner container-related message appears on the screen display of the control panel, indicating
the waste toner container needs to be replaced. Check the waste toner container for your machine (see "Available consumables" on page 74).
• Toner particles can be released inside the machine but it does not mean the machine is damaged. Contact a service representative when print quality problems
occur.
• When you pull out the waste toner container out of the machine, move the container carefully not to drop it from your hands.
• Make sure that you lay the waste toner container on a flat surface so that the toner does not spill.
Do not tilt or turn over the container.
3. Maintenance
84
Replacing the waste toner container
1
2
1
2
2
1
3. Maintenance
85
Installing accessories
4
5
Precautions
•
Disconnect the power cord
Never remove the control board cover while the power is turned on.
To avoid the possibility of an electrical shock, always disconnect the power
cord when installing or removing ANY internal or external accessories.
•
Discharge static electricity
The control board and internal accessories (memory module) are sensitive
to static electricity. Before installing or removing any internal accessories,
discharge static electricity from your body by touching something metal,
such as the metal back plate on any device plugged into a grounded power
source. If you walk around before finishing the installation, repeat this
procedure to discharge any static electricity again.
Setting Device Options
When you install the optional devices such as optional tray, memory, etc, this
machine automatically detects and sets the optional devices. If you cannot use
the optional devices you installed in this driver, you can set the optional devices
in Device Options.
1
Click the Windows Start menu.
•
2
When installing accessories, the battery inside the machine is a service
component. Do not change it by yourself. There is a risk of an explosion if
battery is replaced by an incorrect type. Your service provider should
remove the old battery from your device and dispose of it in accordance
with the relevant regulations in your country.
3
4
For Windows 8, from Charms, select Search > Settings.
For Windows XP/2003, select Printers and Faxes.
•
For Windows 2008/Vista, select Control Panel > Hardware and
Sound > Printers.
•
For Windows 7, select Control Panel > Hardware and Sound >
Devices and Printers.
•
For Windows 8, search for Devices and Printers.
•
For Windows Server 2008 R2, select Control Panel > Hardware >
Devices and Printers.
Right-click your machine.
For Windows XP/2003/2008/Vista, press Properties.
For Windows 7, For Windows 8, and Windows Server 2008 R2, from
context menus, select the Printer properties.
3. Maintenance
86
Installing accessories
•
If Printer properties item has ▶ mark, you can select other printer drivers
connected with selected printer.
5
Select Device Options.
The Properties window may differ depending on the driver or operating
system you are using.
6
•
Tray Options: Select the optional tray you installed. You can select
the tray.
•
Storage Options: Select the optional memory you installed. If this
feature is checked, you can select the Print Mode.
•
Printer Configuration: Select the printer language for the print job.
•
Administrator Settings: You can select the Printer Status and EMF
Spooling.
-
User permission: If you check this option, only users with user
permission can start a print job.
-
Group permission: If you check this option, only groups with
group permission can start a print job.
If you want to encrypt job accounting password, check Job Accounting
Password Encryption.
Select the appropriate option.
Some menus may not appear in the display depending on options or
models. if so, it is not applicable to your machine.
Admin Job Accounting: Allows you to associate user and account
identification information with each document you print.
•
7
Custom Paper Size Settings: You can specify custom paper size.
Click OK until you exit the Properties or Printer properties window.
3. Maintenance
87
Installing accessories
6
Upgrading a memory module
Your machine has a dual in-line memory module (DIMM). Use this memory module slot to install additional memory. We recommend the use of only genuine
Samsung DIMM's. You may void your warranty if it is determined that your machine problem is being caused by third party DIMM's.
The order information is provided for optional accessories (see "Available accessories" on page 75).
After installing the optional memory, you can use the advanced printing features, such as proofing a job and specifying of printing a secure print job in the printer
properties window. You can control the active job queue in Document Box (see "Using optional device features" on page 278 and "Document Box" on page 231).
1
2
2
1
3. Maintenance
88
Installing accessories
2
2
1
1
3. Maintenance
89
Monitoring the supplies life
If you experience frequent paper jams or printing problems, check the number of pages the machine has printed or scanned. Replace the corresponding parts, if
necessary.
• Accessing menus may differ from model to model (see "Menu overview" on page 31).
• Some menus may not appear in the display depending on options or models. If so, it is not applicable to your machine.
1
2
3
Select
(Setup) > Machine Setup > Next > Report > Supplies Information on the touch screen.
Touch Yes when the confirmation windows appears.
Press
(Stop) button or home (
) icon to return to ready mode.
3. Maintenance
90
Setting the toner low alert
If the amount of toner in the cartridge is low, a message or LED informing the user to change the toner cartridge appears. You can set the option for whether or not
this message or LED appears.
• Accessing menus may differ from model to model (see "Menu overview" on page 31).
• You can set the machine’s settings by using the Device Settings in Samsung Easy Printer Manager program.
- For Windows and Mac users, you set from Samsung Easy Printer Manager >
page 292.
1
Select
(Switch to advanced mode) > Device Settings, see "Device Settings" on
(Setup) > Machine Setup > Next > Initial Setup > Toner Low Alert on the touch screen.
You can set the toner's Warning Level for the toner low error in the Toner Low Alert option. Warning Level means the remaining amount of toner (%) in the toner
cartridge. Default value of Warnig Level is 10 %. You can set the value between 1 and 30 %.
2
3
Select the option you want.
Press
(Stop) button or home (
) icon to return to ready mode.
3. Maintenance
91
Cleaning the machine
If printing quality problems occur or if you use your machine in a dusty environment, you need to clean your machine regularly to keep it in the best printing
condition and prolong the life of your machine.
• Cleaning the cabinet of the machine with cleaning materials containing large amounts of alcohol, solvents, or other strong substances can discolor or distort the
cabinet.
• If your machine or the surrounding area is contaminated with toner, we recommend you use a cloth or tissue dampened with water to clean it. If you use a vacuum
cleaner, toner blows in the air and might be harmful to you.
7
Cleaning the outside
Clean the machine cabinet with a soft, lint-free cloth. Dampen the cloth slightly with water, but be careful not to let any water drip onto or into the machine.
3. Maintenance
92
Cleaning the machine
8
Cleaning the inside
During the printing process, paper, toner, and dust particles can accumulate inside the machine. This buildup can cause print quality problems, such as toner specks
or smearing. Cleaning the inside of the machine clears and reduces these problems.
• To prevent damage to the toner cartridge, do not expose it to light for more than a few minutes. Cover it with a piece of paper, if necessary.
• Do not touch the green area of the toner cartridge. Use the handle on the cartridge to avoid touching this area.
• Use a dry lint free cloth when cleaning the inside of the machine, be careful not to damage the transfer roller or any other inside parts. Do not use solvents such
as benzene or thinner. Printing quality problems can occur and cause damage to the machine.
• Use a dry lint-free cloth to clean the machine.
• Turn the machine off and unplug the power cord. Wait for the machine to cool down. If your machine has a power switch, turn the power switch off before
cleaning the machine.
• Illustrations on this user’s guide may differ from your machine depending on its options or models. Check your machine type (see "Front view" on page 22).
3. Maintenance
93
Cleaning the machine
3. Maintenance
94
Cleaning the machine
9
Cleaning the pickup roller
• Turn the machine off and unplug the power cord. Wait for the machine to cool down. If your machine has a power switch, turn the power switch off before
cleaning the machine.
• Illustrations on this user’s guide may differ from your machine depending on its options or models. Check your machine type (see "Front view" on page 22).
3. Maintenance
95
Cleaning the machine
10
Cleaning the scan unit
Keeping the scan unit clean helps ensure the best possible copies. We suggest that you clean the scan unit at the start of each day and during the day as needed.
• Turn the machine off and unplug the power cord. Wait for the machine to cool down. If your machine has a power switch, turn the power switch off before
cleaning the machine.
• Illustrations on this user’s guide may differ from your machine depending on its options or models. Check your machine type (see "Front view" on page 22).
1
2
Slightly dampen a soft, lint-free cloth or paper towel with water.
Lift and open the scanner lid.
3. Maintenance
96
Cleaning the machine
3
Wipe the surface of the scanner until it is clean and dry.
4
3
1
2
1
2
3
4
4
Scanner lid
Scanner glass
Document feeder glass
White bar
Close the scanner lid.
3. Maintenance
97
Tips for moving & storing the machine
•
When moving the machine, do not tilt or turn it upside down. Otherwise, the inside of the machine may be contaminated by toner, which can cause damage to
the machine or reduce print quality.
•
When moving the machine, make sure at least two people are holding the machine securely.
3. Maintenance
98
4. Troubleshooting
This chapter gives helpful information for what to do if you encounter an error.
• Tips for avoiding paper jams
100
• Clearing original document jams
101
• Clearing paper jams
106
• Understanding the status LED
115
• Understanding display messages
117
This chapter gives helpful information for what to do if you encounter an error. If your machine
has a display screen, check the message on the display screen first to solve the error.
If you cannot find a solution to your problem in this chapter, refer to the Troubleshooting
chapter in the Advanced Guide (see "Troubleshooting" on page 301).
If you cannot find a solution in the User's Guide or the problem persists, call for service.
Tips for avoiding paper jams
By selecting the correct medias, most paper jams can be avoided. To avoid paper jams, refer to the following guidelines:
•
Ensure that the adjustable guides are positioned correctly (see "Tray overview" on page 38).
•
Do not remove paper from the tray while your machine is printing.
•
Flex, fan, and straighten paper before loading.
•
Do not use creased, damp, or highly curled paper.
•
Do not mix paper type and size in a tray.
•
Use only recommended print media (see "Print media specifications" on page 125).
4. Troubleshooting
100
Clearing original document jams
When an original document jams in the document feeder, a warning message appears on the display.
To avoid tearing the document, remove the jammed document slowly and carefully.
To prevent document jams, use the scanner glass for thick, thin or mixed paper- originals.
4. Troubleshooting
101
Clearing original document jams
1
Original paper jam in front of scanner
• Illustrations on this user’s guide may differ from your machine depending on its options or models. Check your machine type (see "Front view" on page 22).
• This troubleshooting may not be available depending on model or optional goods (see "Variety feature" on page 10).
4. Troubleshooting
102
Clearing original document jams
2
Original paper jam inside of scanner
• Illustrations on this user’s guide may differ from your machine depending on its options or models. Check your machine type (see "Front view" on page 22).
• This troubleshooting may not be available depending on model or optional goods (see "Variety feature" on page 10).
4. Troubleshooting
103
Clearing original document jams
3
Original paper jam in exit area of scanner
• Illustrations on this user’s guide may differ from your machine depending on its options or models. Check your machine type (see "Front view" on page 22).
• This troubleshooting may not be available depending on model or optional goods (see "Front view" on page 22).
1
2
Remove any remaining pages from the document feeder.
Gently remove the jammed paper from the document feeder.
4. Troubleshooting
104
Clearing original document jams
4
Original paper jam in scanner duplex path
• Illustrations on this user’s guide may differ from your machine depending on its options or models. Check your machine type (see "Front view" on page 22).
• This troubleshooting may not be available depending on model or optional goods (see "Front view" on page 22).
2
1
4. Troubleshooting
105
Clearing paper jams
To avoid tearing the paper, pull the jammed paper out slowly and gently.
5
In tray1
Click this link to open an animation about clearing a jam.
Illustrations on this user’s guide may differ from your machine depending on its options or models. Check your machine type (see "Front view" on page 22).
4. Troubleshooting
106
Clearing paper jams
6
In optional tray
Click this link to open an animation about clearing a jam.
4. Troubleshooting
107
Clearing paper jams
If you do not see the paper in this area, stop and go to next step:
4. Troubleshooting
108
Clearing paper jams
7
In the multi-purpose tray
Click this link to open an animation about clearing a jam.
4. Troubleshooting
109
Clearing paper jams
If you do not see the paper in this area, stop and go to next step:
1
2
3
4. Troubleshooting
110
Clearing paper jams
8
Inside the machine
Click this link to open an animation about clearing a jam.
The fuser area is hot. Turn the machine off and let the machine cool before removing paper from the Fuser Unit area. Failure to take care when removing paper from
this area may cause injury.
Illustrations on this user’s guide may differ from your machine depending on its options or models. Check your machine type (see "Front view" on page 22).
4. Troubleshooting
111
Clearing paper jams
9
In the exit area
Click this link to open an animation about clearing a jam.
The fuser area is hot. Take care when removing paper from the machine.
4. Troubleshooting
112
Clearing paper jams
If you do not see the paper in this area, stop and go to next step:
4. Troubleshooting
113
Clearing paper jams
10
In the duplex unit area
Click this link to open an animation about clearing a jam.
4. Troubleshooting
114
Understanding the status LED
The color of the LED indicates the machine's current status.
• Some LEDs may not be available depending on model or country (see "Control panel overview" on page 24).
• To resolve the error, look at the error message and its instructions from the troubleshooting part (see "Understanding display messages" on page 117).
• You also can resolve the error with the guideline from the computer’s Samsung Printing Status window (see "Using Samsung Printer Status" on page 293).
• If the problem persists, call for service.
LED
Status
Off
Description
The machine is off-line or in power save mode.
Blinking
When the backlight blinks, the machine is receiving or printing data.
On
• The machine is on-line and can be used.
Green
• A minor error has occurred and the machine is waiting for the error to be cleared. Check the display message. When the
problem is cleared, the machine resumes.
Blinking
Status
• Small amount of toner is left in the cartridge. The estimated cartridge lifea of toner is close. Prepare a new cartridge for
replacement. You may temporarily increase the printing quality by redistributing the toner (see "Redistributing toner" on
page 79).b
Red
• A toner cartridge has almost reached its estimated cartridge lifea. It is recommended to replace the toner cartridge (see
"Replacing the toner cartridge" on page 81).
• The cover is opened. Close the cover.
On
• There is no paper in the tray. Load paper in the tray.
• The machine has stopped due to a major error. Check the display message (see "Understanding display messages" on page
117).
• A paper jam has occurred (see "Clearing paper jams" on page 106).
4. Troubleshooting
115
Understanding the status LED
LED
Wirelessb
Status
Blue
(
)Power Blue
/Wake Up
Eco
Description
Blinking
The machine is connecting to a wireless network.
On
The machine is connected to a wireless network (see "Wireless network setup" on page 171).
Off
The machine is disconnected from a wireless network.
On
The machine is in power save mode.
Off
The machine is in ready mode or machine’s power is off.
On
Eco mode is on (see "Eco printing" on page 56).
Off
Eco mode is off.
Green
a. Estimated cartridge life means the expected or estimated toner cartridge life, which indicates the average capacity of print-outs and is designed pursuant to ISO/IEC 19798. The number of pages
may be affected by operating environment, percentage of image area, printing interval, graphics, media and media size. Some amount of toner may remain in the cartridge even when red LED is
on and the printer stops printing.
b. Some LEDs may not be available depending on model or country (see "Control panel overview" on page 24).
4. Troubleshooting
116
Understanding display messages
Messages appear on the control panel display to indicate the machine’s status
or errors. Refer to the tables below to understand the messages’ and their
meaning, and correct the problem, if necessary.
Message
Jam in exit area
Meaning
Suggested solutions
Paper has jammed in the
paper exit area.
Clear the jam (see "In the
exit area" on page 112).
• You can resolve the error with the guideline from the computer’s
Printing Status program window (see "Using Samsung Printer Status" on
page 293).
Jam inside of machine Paper has jammed inside
the machine.
Clear the jam (see "Inside
the machine" on page
111).
• If a message is not in the table, reboot the power and try the printing job
again. If the problem persists, call a service representative.
Original paper jam
The loaded original
document has jammed in
document feeder.
Clear the jam (see
"Clearing original
document jams" on page
101).
Paper Jam in tray 1
Paper has jammed in the
tray.
Clear the jam (see "In
tray1" on page 106).
Paper Jam in tray 2
Paper has jammed in the
optional tray.
Clear the jam (see "In
optional tray" on page
107).
Paper Jam in MP tray
Paper has jammed in the
multi-purpose tray.
Clear the jam (see "In the
multi-purpose tray" on
page 109).
• When you call for service, provide the service representative with the
contents of display message.
• Some messages may not appear on the display depending on the
options or models.
• [error number] indicates the error number.
• [tray type] indicates the tray number.
• [color] indicates the color of toner.
11
Paper Jam-related messages
Message
Jam inside of duplex
Meaning
Suggested solutions
Paper has jammed during Clear the jam (see "In the
duplex printing. This is
duplex unit area" on page
applicable only to
114).
machines with this feature.
4. Troubleshooting
117
Understanding display messages
12
Message
Toner-related messages
Message
[color] toner not
installed
[color] toner not
compatible
Error: [error
number]
[color] Toner
Failure: [error
number]. Install
[color] toner again
Prepare new
[color] toner
Meaning
Suggested solutions
A toner cartridge is not
installed.
Reinstall the toner cartridge.
A toner cartridge is not
being detected
Reinstall the toner cartridge two or
three times to confirm it is seated
properly. If the problem persists,
please call for service.
Not removed protective
film from toner.
Remove the protective film from the
toner cartridge. Refer to Quick
Installation Guide provided with your
machine.
The indicated toner
cartridge is not suitable
for your machine.
Install the corresponding toner
cartridge with a Samsung-genuine
cartridge (see "Replacing the toner
cartridge" on page 81).
The indicated toner
cartridge is installed
improperly, or the
connector is polluted.
Reinstall the Samsung-genuine toner
cartridge two or three times to
confirm it is seated properly. If the
problem persists, please call for
service.
Small amount of toner is
left in the indicated
cartridge. The estimated
cartridge life of toner is
close.
Prepare a new cartridge for a
replacement. You may temporarily
increase the printing quality by
redistributing the toner (see
"Redistributing toner" on page 79).
Replace new [color]
toner
Replace with new
[color] toner
cartridge
Meaning
The indicated toner
cartridge has almost
reached its estimated
cartridge lifea.
Suggested solutions
•
•
The indicated toner
cartridge has reached its
estimated cartridge lifea.
You can choose Stop or Continue
as shown on the control panel. If
you select Stop, the printer stops
printing. If you select Continue,
the printer keeps printing but the
printing quality cannot be
guaranteed.
Replace the toner cartridge for the
best print quality when this
message appears. Using a
cartridge beyond this stage can
result in printing quality issues (see
"Replacing the toner cartridge" on
page 81).
Replace the toner cartridge (see
"Replacing the toner cartridge" on
page 81).
a. Estimated cartridge life means the expected or estimated toner cartridge life, which
indicates the average capacity of print-outs and is designed pursuant to ISO/IEC 19798
(see "Available consumables" on page 74). The number of pages may be affected by
operating environment, percentage of image area, printing interval, media, percentage
of image area, and media size. Some amount of toner may remain in the cartridge even
when replace new cartridge appears and the machine stops printing.
Samsung does not recommend using a non-genuine Samsung toner
cartridge such as refilled or remanufactured. Samsung cannot guarantee a
non-genuine Samsung toner cartridge's quality. Service or repair required
as a result of using non-genuine Samsung toner cartridges will not be
covered under the machine warranty.
4. Troubleshooting
118
Understanding display messages
13
14
Tray-related messages
Message
Output bin is full
Network-related messages
Meaning
The output tray is full.
Suggested solutions
Message
Remove papers from
the output tray, the
printer resumes
printing.
Paper Empty in tray
[tray type]
There is no paper in the
indicated tray.
Load paper in the tray
(see "Loading paper in
the tray" on page 39).
Paper Empty in all tray
There is no paper in all
tray.
Load paper in the tray
(see "Loading paper in
the tray" on page 39).
Paper Empty in MP tray
There is no paper in the
multi-purpose tray.
Load paper in the multipurpose tray (see "Multipurpose tray" on page
41).
Tray 2 cassette Out
The optional tray2 is not
installed.
Install the optional tray
2. If the optional tray 2 is
installed, check the
cable connecting the
machine and the
optional tray 2. If the
problem persists, call for
service.
Meaning
Suggested solutions
IP Conflict
The network IP address
you have set is being
used by someone else.
Check the IP address
and reset it if necessary
(see Advanced Guide).
802.1x Network Error
Fail to authenticate.
Check the network
authentication
protocol. If the
problem persists,
contact your network
administrator.
15
Misc. messages
Message
Not proper room temp
Meaning
Suggested solutions
The machine is in a room
with improper room
temperature.
Move the machine to a
room with proper room
temperature (see
"Specifications" on
page 123).
4. Troubleshooting
119
Understanding display messages
Message
Door is open. Close it
Scanner door open.
Error: [error number]
Engine System Failure:
[error number]. Call for
service
Error: [error number]
UI System Failure: [error
number]. Call for service
Error: [error number]
Fuser Unit Failure: [error
number]. Turn off then
on
Error: [error number]
Motor Failure: [error
number]. Turn off then
on. Call for service if the
problem persists
Meaning
Suggested solutions
Message
The front cover or rear
cover is not securely
latched.
Close the cover until it
locks into place.
The document feeder
cover is not securely
latched.
Close the cover until it
locks into place.
There is a problem in the
engine system.
Unplug the power cord
and plug it back in. If
the problem persists,
call for service.
Fan Failure: [error
number]. Turn off then
on. Call for service if the
problem persists
There is a problem in the
UI system.
Unplug the power cord
and plug it back in. If
the problem persists,
call for service.
Error: [error number]
There is a problem in the
fuser unit.
Reboot the power. If
the problem persists,
please call for service.
There is a problem in the
motor system.
Suggested solutions
There is a problem in the
LSU.
Reboot the power. If
the problem persists,
please call for service.
There is a problem in the
fan system.
Reboot the power. If
the problem persists,
please call for service.
There is a problem in the
sensor.
Reboot the power. If
the problem persists,
please call for service.
Prepare TR. belt
The life of the transfer
belt will be expired soon.
Replace TR. belt
The life of the transfer
belt has expired.
Replace the transfer
belt with a new one. If
the problem persists,
please call for service.
Prepare fuser unit
The estimated life of the
fuser unit is close.
Error: [error number]
LSU Failure: [error
number]. Turn off then
on. Call for service if the
problem persists
Error: [error number]
Reboot the power. If
the problem persists,
please call for service.
Meaning
Sensor Failure: [error
number]. Turn off then
on. Call for service if the
problem persists
Prepare a new fuser
unit for replacement,
please call for service.
4. Troubleshooting
120
Understanding display messages
Message
Meaning
Suggested solutions
Replace fuser unit
The life of the fuser unit
has expired.
Replace the fuser unit
with a new one. If the
problem persists,
please call for service.
Install TR. belt unit
The transfer belt is not
installed.
Install a Samsunggenuine transfer belt.
Contact the service
representatives.
TR. belt Not compatible
Waste toner near full
Waste tank full
The transfer belt of the
machine is not for your
machine.
The waste toner
container is almost full.
The waste toner
container is full.
Install the a Samsunggenuine part designed
for your machine.
Contact the service
representatives.
Prepare a new waste
toner container for a
replacement.
Replace the waste
toner container with a
Samsung-genuine
waste toner container
(see "Replacing the
waste toner container"
on page 84).
Message
Meaning
Suggested solutions
Waste Not Installed
The waste toner
container is not installed.
Install the waste toner
container. If it is already
installed, try to reinstall
the waste toner
container. If the
problem persists, call
for service.
Replace pickup roller
The life of the tray pick-up
roller has expired.
Replace the tray pickup roller with a new
one. If the problem
persists, call for service.
Replace retard roller
The life of the tray retard
roller has expired.
Replace the tray retard
roller with a new one. If
the problem persists,
call for service.
Memory Full
The memory is full. No
more fax data can be
received.
Print or remove the
received fax data in the
memory.
Scanner Locked
The scanner is locked.
Reboot the power. If
the problem persists,
please call for service.
4. Troubleshooting
121
5. Appendix
This chapter provides product specifications and information concerning applicable regulations.
• Specifications
123
• Regulatory information
133
• Copyright
146
Specifications
1
General specifications
The specification values listed below are subject to change without notice. See www.samsung.com for possible changes in information.
Items
Description
Dimensiona
Width x Length x Height
469 x 452.5 x 504.3 mm (18.46 x 17.81 x 19.85 inches)
Weighta
Machine with consumables
26.62 Kg (58.69 Ibs)
Noise Levelb c
Ready mode
Less than 37 dB (A)
Print mode
Less than 55 dB (A)
Copy mode
Scan mode
Temperature
Humidity
Scanner glass
Less than 56 dB (A)
Document feeder
Less than 56 dB (A)
Scanner glass
Less than 56 dB (A)
Document feeder
Less than 56 dB (A)
Operation
10 to 30 °C (50 to 86 °F)
Storage (packed)
-20 to 40 °C (-4 to 104 °F)
Operation
20 to 80% RH
Storage (packed)
10 to 90% RH
5. Appendix
123
Specifications
Items
Power ratingd
Power consumptione
Wirelessg
a.
b.
c.
d.
e.
f.
g.
Description
110 volt models
AC 110 - 127 V
220 volt models
AC 220 - 240 V
Average operating mode
Less than 450 W
Ready mode
Less than 18 W
Power save mode
Less than 2.5 W
Power off modef
Less than 0.1 W
Network Standby Mode (All Port Activation)
Less than 2.48 W
Module
SPW-B43143U
Dimensions and weight are measured without a handset.
Sound Pressure Level, ISO 7779. Configuration tested: basic machine installation, A4 paper, simplex printing.
China only: If the equipment's noise is louder than 63 db (A) ,the equipment should be placed in region of relatively independent advice.
See the rating label on the machine for the correct voltage (V), frequency (hertz) and of current (A) for your machine.
The power consumption may be affected by the machine’s status, setting conditions, operating environment, and measuring equipment and method the country uses.
Power consumption can be completely avoided only when the power cable is not connected.
Wireless models only (see "Features by model" on page 8).
5. Appendix
124
Specifications
2
Print media specifications
Type
Size
Weight/Capacitya
Dimensions
Tray1/ Optional tray
Plain paper b c
Multi-purpose tray
Letter
216 x 279 mm (8.5 x 11 inches)
70 to 90 g/m2 (19 to 24 lbs bond)
70 to 90 g/m2 (19 to 24 lbs bond)
Legal
216 x 356 mm (8.5 x 14 inches)
• 50 sheets
US Folio
216 x 330 mm (8.5 x 13 inches)
• Tray1: 250 sheets of 80 g/m2
(21 lbs bond)
A4
210 x 297 mm (8.27 x 11.69 inches)
• Optional tray: 520 sheets of 80 g/
Oficio
216 x 343 mm (8.5 x 13.5 inches)
JIS B5
182 x 257 mm (7.17 x 10.12 inches)
ISO B5
176 x 250 mm (6.93 x 9.84 inches)
Executive
184 x 267 mm (7.25 x 10.5 inches)
Statement
140 x 216 mm (5.5 x 8.5 inches)
A5
148 x 210 mm (5.83 x 8.27 inches)
105 x 148 mm (4.13 x 5.83 inches)
A6
m2 (20 lbs bond)
70 to 90 g/m2 (19 to 24 lbs bond)
• 150 sheets of 80 g/m2 (21 lbs
bond)
Not available in optional tray.
5. Appendix
125
Specifications
Type
Size
Weight/Capacitya
Dimensions
Tray1/ Optional tray
Envelope
Thick paperb c
Thicker paperb c
Envelope
Monarch
98 x 191 mm (3.87 x 7.5 inches)
Envelope No. 10
105 x 241 mm (4.12 x 9.5 inches)
Envelope No. 9
98 x 225 mm (3.87 x 8.87 inches)
Envelope DL
110 x 220 mm (4.33 x 8.66 inches)
Envelope C5
162 x 229 mm (6.38 x 9.02 inches)
Envelope C6
114 x 162 mm (4.49 x 6.38 inches)
Refer to the Plain paper section
Refer to the Plain
paper section
Refer to the Plain
paper section
75 to 90 g/m2 (20 to 24 lbs bond)
75 to 90 g/m2 (20 to 24 lbs bond)
• 20 sheets
• 5 sheets
Not available in optional tray.
91 to 105 g/m2 (24 to 28 lbs bond)
• 50 sheets of 105 g/m2 (28 lbs
bond)
Refer to the Plain paper section
Multi-purpose tray
91 to 105 g/m2 (24 to 28 lbs
bond)
• 10 sheets
164 to 220 g/m2 (43 to 59 lbs bond) 164 to 220 g/m2 (43 to 59 lbs
bond)
• 50 sheets of 220 g/m2 (59 lbs
• 10 sheets)
bond)
Not available in optional tray.
Thin paper
Cotton, Color, Preprinted
Refer to the Plain
paper section
Refer to the Plain paper section
Refer to the Plain
paper section
Refer to the Plain paper section
60 to 70 g/m2 (16 to 19 lbs bond)
60 to 70 g/m2 (16 to 19 lbs bond)
• 250 sheets of 70 g/m2 (19 lbs
bond)
• 50 sheets
75 to 90 g/m2 (20 to 24 lbs bond)
75 to 90 g/m2 (20 to 24 lbs bond)
• 250 sheets of 80 g/m2 (21 lbs
bond)
• 50 sheets
Not available in optional tray.
5. Appendix
126
Specifications
Type
Size
Weight/Capacitya
Dimensions
Tray1/ Optional tray
Recycled
Transparency
Refer to the Plain
paper section
Refer to the Plain paper section
Letter, Legal, A4
Refer to the Plain paper section
70 to 90 g/m2 (19 to 24 lbs bond)
70 to 90 g/m2 (19 to 24 lbs bond)
• 250 sheets of 80 g/m2 (21 lbs
bond)
• 50 sheets
138 to 146 g/m2 (35 to 39 lbs bond) 138 to 146 g/m2 (35 to 39 lbs
bond)
• 50 sheets
Not available in optional tray.
Labels d
Card stock b c
Bond paper
Letter, Legal, US
Folio, A4, JIS B5,
ISO B5, Executive,
A5
Refer to the Plain paper section
Letter, Legal, US
Folio, A4, JIS B5,
ISO B5, Executive,
A5
Refer to the Plain paper section
Refer to the Plain
paper section
Refer to the Plain paper section
Multi-purpose tray
• 10 sheets
120 to 150 g/m2 (32 to 40 lbs bond) 120 to 150 g/m2 (32 to 40 lbs
bond)
• 50 sheets
Not available in optional tray.
• 10 sheets
121 to 163 g/m2 (32 to 43 lbs bond) 121 to 163 g/m2 (32 to 43 lbs
bond)
• 50 sheets
• 10 sheets
105 to 120 g/m2 (28 to 32 lbs bond) 105 to 120 g/m2 (28 to 32 lbs
bond)
• 50 sheets
• 10 sheets
Archive, Punched
paper, Letterhead
Refer to the Plain
paper section
Refer to the Plain paper section
• 250 sheets
• 50 sheets
5. Appendix
127
Specifications
Type
Size
Weight/Capacitya
Dimensions
Tray1/ Optional tray
Glossy Photo b
Letter, A4, Postcard
4x6
Refer to the Plain paper section
Multi-purpose tray
111 to 130 g/m2 (30 to 35 lbs bond)
for tray1
111 to 130 g/m2 (30 to 35 lbs
bond)
• Tray1: 30 sheets
• 5 sheets
• Optional tray: 50 sheets
Refer to the Plain paper section
131 to 175 g/m2 (35 to 47 lbs bond) 131 to 175 g/m2 (35 to 47 lbs
bond)
• Tray1: 30 sheets
• Optional tray: 50 sheets
Refer to the Plain paper section
Minimum size (custom)
• Tray1: 98 x 127 mm (3.86 x 5 inches)
• Optional tray: 148.5 x 210 mm (5.85 x
8.27inches)
• Multi-Purpose tray: 76 x 127 mm (3 x 5
inches)
Maximum size (custom)
a.
b.
c.
d.
• 5 sheets
176 to 220 g/m2 (47 to 59 lbs bond) 176 to 220 g/m2 (47 to 59 lbs
bond)
• Tray1: 30 sheets
• Optional tray: 50 sheets
• 5 sheets
• 60 to 220 g/m2 ( 16 to 59 lbs
bond) for tray1
60 to 220 g/m2 ( 16 to 59 lbs
bond)
• 60 to 163 g/m2 ( 16 to 43 lbs
bond) for optional tray.
216 x 356 mm (8.5 x 14 inches)
Maximum capacity may differ depending on media weight, thickness, and environmental conditions.
Post card 4 x 6 is supported for Tray1, Multi-purpose tray.
Index card (3x5) is supported for Multi-purpose tray.
The smoothness of the labels used in this machine is 100 to 250 (sheffield). This means the numeric level of smoothness.
5. Appendix
128
Specifications
3
System requirements
Microsoft® Windows®
Requirement (recommended)
Operating system
CPU
RAM
free HDD space
Windows® XP
Intel® Pentium® III 933 MHz (Pentium IV 1 GHz)
128 MB (256 MB)
1.5 GB
Windows Server® 2003
Intel® Pentium® III 933 MHz (Pentium IV 1 GHz)
128 MB (512 MB)
1.25 GB to 2 GB
Windows Server® 2008
Intel® Pentium® IV 1 GHz (Pentium IV 2 GHz)
512 MB (2 GB)
10 GB
Windows Vista®
Intel® Pentium® IV 3 GHz
512 MB (1 GB)
15 GB
Windows® 7
Intel® Pentium® IV 1 GHz 32-bit or 64-bit processor or higher
1 GB (2 GB)
16 GB
• Support for DirectX® 9 graphics with 128 MB memory (to enable the Aero theme).
• DVD-R/W Drive
Windows Server® 2008 R2
Intel® Pentium® IV 1.4 GHz (x64) processors (2 GHz or faster)
512 MB (2 GB)
10 GB
Windows® 8
Intel® Pentium® IV 1 GHz 32-bit or 64-bit processor or higher
2 GB (2 GB)
20 GB
Windows® 8.1
• Support for DirectX® 9 graphics with 128 MB memory (to enable the Aero theme).
512 MB (2 GB)
32GB
• DVD-R/W Drive
Windows Server® 2012
Intel® Pentium® IV 1.4 GHz (x64) processors (2 GHz or faster)
Windows Server® 2012 R2
5. Appendix
129
Specifications
• Internet Explorer 6.0 or higher is the minimum requirement for all Windows operating systems.
• Users who have administrator rights can install the software.
• Windows Terminal Services is compatible with your machine.
Mac
Requirements (Recommended)
Operating system
CPU
Mac OS X 10.5
• Intel® processors
RAM
Free HDD space
512 MB (1 GB)
1 GB
• 867 MHz or faster Power PC G4/G5
Mac OS X 10.6
• Intel® processors
1 GB (2 GB)
1 GB
Mac OS X 10.7-10.9
• Intel® processors
2 GB
4 GB
5. Appendix
130
Specifications
Linux
Items
Requirements
Red Hat Enterprise Linux 5, 6
Fedora 11, 12, 13, 14, 15, 16, 17, 18, 19
OpenSUSE 11.0, 11.1, 11.2, 11.3, 11.4, 12.1, 12.2, 12.3
Operating system
Ubuntu 10.04, 10.10, 11.04, 11.10, 12.04, 12.10, 13.04
SUSE Linux Enterprise Desktop 10, 11
Debian 5.0, 6.0, 7.0, 7.1
Mint 13, 14, 15
CPU
Pentium IV 2.4 GHz (Intel Core™ 2)
RAM
512 MB (1 GB)
Free HDD space
1 GB (2 GB)
Unix
Items
Requirements
Sun Solaris 9, 10, 11 (x86, SPARC)
Operating system
HP-UX 11.0, 11i v1, 11i v2, 11i v3 (PA-RISC, Itanium)
IBM AIX 5.1, 5.2, 5.3, 5.4, 6.1, 7.1 (PowerPC)
Free HDD space
Up to 100 MB
5. Appendix
131
Specifications
4
Network environment
You need to set up the network protocols on the machine to use it as your network machine. The following table shows the network environments supported by the
machine.
Items
Network interface
Specifications
• Ethernet 10/100/1000 Base-TX Wired Lan
• 802.11b/g/n Wireless LAN
Network operating system
• Windows® XP, Windows Server® 2003, Windows Vista®, Windows® 7, Windows Server® 2008 R2
• Various Linux OS
• Mac OS X 10.5 -10.9
• UNIX OS
Network protocols
• TCP/IPv4
• DHCP, BOOTP
• DNS, WINS, Bonjour, SLP, UPnP
• Standard TCP/IP Printing (RAW), LPR, IPP, WSD
• SNMPv 1/2/3, HTTP, IPSec
• TCP/IPv6 (DHCP, DNS, RAW, LPR, SNMPv 1/2/3, HTTP, IPSec)
Wireless security
• Authentication: Open System, Shared Key, WPA Personal, WPA2 Personal (PSK)
• Encryption: WEP64, WEP128, TKIP, AES
5. Appendix
132
Regulatory information
This machine is designed for a normal work environment and certified with
several regulatory statements.
When using this product, these basic safety precautions should always be
followed to reduce risk of fire, electric shock, and injury to persons:
5
Laser safety statement
The printer is certified in the U.S. to conform to the requirements of DHHS 21
CFR, chapter 1 Subchapter J for Class I (1) laser products, and elsewhere is
certified as a Class I laser product conforming to the requirements of IEC 608251 : 2007.
Class I laser products are not considered to be hazardous. The laser system and
printer are designed so there is never any human access to laser radiation above
a Class I level during normal operation, user maintenance or prescribed service
condition.
Warning
Never operate or service the printer with the protective cover removed from
laser/scanner assembly. The reflected beam, although invisible, can damage
your eyes.
6
Ozone safety
This product’s ozone emission rate is under 0.1 ppm. Because
ozone is heavier than air, keep the product in a place with good
ventilation.
5. Appendix
133
Regulatory information
7
9
Mercury Safety
Recycling
Contains Mercury, Dispose According to Local, State or Federal
Laws.(U.S.A. only)
Recycle or dispose of the packaging material for this product in an
environmentally responsible manner.
8
Power saver
10
China only
This printer contains advanced energy conservation technology that
reduces power consumption when it is not in active use.
When the printer does not receive data for an extended period of
time, power consumption is automatically lowered.
ENERGY STAR and the ENERGY STAR mark are registered U.S. marks.
For more information on the ENERGY STAR program see http://
www.energystar.gov
Website: http://www.samsung.com/cn/support/location/
supportServiceLocation.do?page=SERVICE.LOCATION
For ENERGY STAR certified models, the ENERGY STAR label will be on
your machine. Check if your machine is ENERGY STAR certified.
5. Appendix
134
Regulatory information
11
Correct disposal of this product (Waste electrical &
electronic equipment)
(Applicable in countries with separate collection
systems)
(The United States of America only)
Dispose unwanted electronics through an approved recycler. To find the nearest
recycling location, go to our website: www.samsung.com/recyclingdirect Or
call, (877) 278 - 0799
12
State of California Proposition 65 Warning (US Only)
This marking on the product, accessories or literature indicates that the
product and its electronic accessories (e.g. charger, headset, USB cable)
should not be disposed of with other household waste at the end of
their working life. To prevent possible harm to the environment or
human health from uncontrolled waste disposal, please separate these
items from other s of waste and recycle them responsibly to promote the
sustainable reuse of material resources.
Household users should contact either the retailer where they
purchased this product, or their local government office, for details of
where and how they can take these items for environmentally safe
recycling.
13
Taiwan only
Business users should contact their supplier and check the terms and
conditions of the purchase contract. This product and its electronic
accessories should not be mixed with other commercial wastes for
disposal.
5. Appendix
135
Regulatory information
•
14
Consult the dealer or experienced radio TV technician for help.
Radio frequency emissions
FCC information to the user
Change or modifications not expressly approved by the manufacturer
responsible for compliance could void the user's authority to operate the
equipment.
This device complies with Part 15 of the FCC Rules. Operation is subject to the
following two conditions:
•
This device may not cause harmful interference, and
•
This device must accept any interference received, including interference
that may cause undesired operation.
This equipment has been tested and found to comply with the limits for a Class
B digital device, pursuant to Part 15 of the FCC Rules. These limits are designed
to provide reasonable protection against harmful interference in a residential
installation. This equipment generates, uses and can radiate radio frequency
energy and, if not installed and used in accordance with the instructions, may
cause harmful interference to radio communications. However, there is no
guarantee that interference will not occur in a particular installation. If this
equipment does cause harmful interference to radio or television reception,
which can be determined by turning the equipment off and on, the user is
encouraged to try to correct the interference by one or more of the following
measures:
•
Reorient or relocate the receiving antenna.
•
Increase the separation between the equipment and receiver.
•
Connect the equipment into an outlet on a circuit different from that to
which the receiver is connected.
Canadian radio interference regulations
This digital apparatus does not exceed the Class B limits for radio noise
emissions from digital apparatus as set out in the interference-causing
equipment standard entitled “Digital Apparatus”, ICES-003 of the Industry and
Science Canada.
Cet appareil numérique respecte les limites de bruits radioélectriques
applicables aux appareils numériques de Classe B prescrites dans la norme sur le
matériel brouilleur: “Appareils Numériques”, ICES-003 édictée par l’Industrie et
Sciences Canada.
5. Appendix
136
Regulatory information
15
United States of America
Wireless devices are not user serviceable. Do not modify them in any way.
Modification to a wireless device will void the authorization to use it.
Contact manufacturer for service.
Federal Communications Commission (FCC)
Intentional emitter per FCC Part 15
Low power, Radio LAN devices (radio frequency (RF) wireless communication
devices), operating in the 2.4 GHz/5 GHz Band, may be present (embedded) in
your printer system. This section is only applicable if these devices are present.
Refer to the system label to verify the presence of wireless devices.
Wireless devices that may be in your system are only qualified for use in the
United States of America if an FCC ID number is on the system label.
FCC Statement for Wireless LAN use:
While installing and operating this transmitter and antenna combination
the radio frequency exposure limit of 1 mW/cm2 may be exceeded at
distances close to the antenna installed. Therefore, the user must maintain
a minimum distance of 20 cm from the antenna at all times. This device
cannot be collocated with another transmitter and transmitting antenna.
The FCC has set a general guideline of 20 cm (8 inches) separation between the
device and the body, for use of a wireless device near the body (this does not
include extremities). This device should be used more than 20 cm (8 inches)
from the body when wireless devices are on. The power output of the wireless
device (or devices), which may be embedded in your printer, is well below the
RF exposure limits as set by the FCC.
This transmitter must not be collocated or operation in conjunction with any
other antenna or transmitter.
Operation of this device is subject to the following two conditions: (1) This
device may not cause harmful interference, and (2) this device must accept any
interference received, including interference that may cause undesired
operation of the device.
5. Appendix
137
Regulatory information
16
19
Russia / Kazakhstan / Belarus only
Thailand only
This telecommunication equipment conforms to NTC technical requirement.
20
Canada only
This product meets the applicable Industry Canada technical specifications. / Le
present materiel est conforme aux specifications techniques applicables
d’Industrie Canada.
17
Germany only
18
Turkey only
The Ringer Equivalence Number (REN) is an indication of the maximum number
of devices allowed to be connected to a telephone interface. The termination of
an interface may consist of any combination of devices subject only to the
requirement that the sum of the RENs of all the devices not exceed five. / L’indice
d’equivalence de la sonnerie (IES) sert a indiquer le nombre maximal de
terminaux qui peuvent etre raccordes a une interface telephonique. La
terminaison d’une interface peut consister en une combinaison quelconque de
dispositifs, a la seule condition que la somme d’indices d’equivalence de la
sonnerie de tous les dispositifs n’excede pas cinq.
5. Appendix
138
Regulatory information
21
22
Fax Branding
The Telephone Consumer Protection Act of 1991 makes it unlawful for any
person to use a computer or other electronic device to send any message via a
telephone facsimile machine unless such message clearly contains in a margin
at the top or bottom of each transmitted page or on the first page of the
transmission the following information:
1 the date and time of transmission
2 identification of either business, business entity or individual sending the
message; and
3 telephone number of either the sending machine, business, business entity
or individual.
The Telephone Company may make changes in its communications facilities,
equipment operations or procedures where such action is reasonably required
in the operation of its business and is not inconsistent with the rules and
regulations in FCC Part 68. If such changes can be reasonably expected to render
any customer terminal equipment incompatible with telephone company
communications facilities, or require modification or alteration of such terminal
equipment, or otherwise materially affect its use or performance, the customer
shall be given adequate notice in writing, to allow the customer an opportunity
to maintain uninterrupted service
Ringer Equivalence Number
The Ringer Equivalence Number and FCC Registration Number for this machine
may be found on the label located on the bottom or rear of the machine. In some
instances you may need to provide these numbers to the telephone company.
The Ringer Equivalence Number (REN) is a measure of the electrical load placed
on the telephone line, and is useful for determining whether you have
“overloaded” the line. Installing several s of equipment on the same telephone
line may result in problems making and receiving telephone calls, especially
ringing when your line is called. The sum of all Ringer Equivalence Numbers of
the equipment on your telephone line should be less than five in order to assure
proper service from the telephone company. In some cases, a sum of five may
not be usable on your line. If any of your telephone equipment is not operating
properly, you should immediately remove it from your telephone line, as it may
cause harm to the telephone network.
The equipment complies with Part 68 of the FCC rules and the requirements
adopted by the ACTA. On the rear of this equipment is a label that contains,
among other information, a product identifier in the format US:AAAEQ##TXXXX.
If requested, this number must be provided to the telephone company.
5. Appendix
139
Regulatory information
FCC Regulations state that changes or modifications to this equipment not
expressly approved by the manufacturer could void the user’s authority to
operate this equipment. In the event that terminal equipment causes harm
to the telephone network, the telephone company should notify the
customer that service may be stopped. However, where prior notice is
impractical, the company may temporarily cease service, providing that
they:
a promptly notify the customer.
b give the customer an opportunity to correct the equipment problem.
c inform the customer of the right to bring a complaint to the Federal
Communication Commission pursuant to procedures set out in FCC
Rules and Regulations Subpart E of Part 68.
•
When programming emergency numbers and/or making test calls to
emergency numbers, use a non-emergency number to advise the
emergency service dispatcher of your intentions. The dispatcher will give
you further instructions on how to actually test the emergency number.
•
This machine may not be used on coin service or party lines.
•
This machine provides magnetic coupling to hearing aids.
You may safely connect this equipment to the telephone network by means of
a standard modular jack, USOC RJ-11C.
23
Replacing the Fitted Plug (for UK Only)
You should also know that:
Important
•
Your machine is not designed to be connected to a digital PBX system.
•
If you intend to use a computer modem or fax modem on the same phone
line as your machine, you may experience transmission and reception
problems with all the equipment. It is recommended that no other
equipment, except for a regular telephone, share the line with your
machine.
The mains lead for this machine is fitted with a standard (BS 1363) 13 amp plug
and has a 13 amp fuse. When you change or examine the fuse, you must re-fit
the correct 13 amp fuse. You then need to replace the fuse cover. If you have lost
the fuse cover, do not use the plug until you have another fuse cover.
•
If your area experiences a high incidence of lightning or power surges, we
recommend that you install surge protectors for both the power and the
telephone lines. Surge protectors can be purchased from your dealer or
telephone and electronic specialty stores.
Contact the people from you purchased the machine.
The 13 amp plug is the most widely used in the UK and should be suitable.
However, some buildings (mainly old ones) do not have normal 13 amp plug
sockets. You need to buy a suitable plug adaptor. Do not remove the moulded
plug.
5. Appendix
140
Regulatory information
24
If you cut off the moulded plug, get rid of it straight away.
You cannot rewire the plug and you may receive an electric shock if you
plug it into a socket.
Important warning:
You must earth this machine.
The wires in the mains lead have the following color code:
• Green and Yellow: Earth
• Blue: Neutral
• Brown: Live
If the wires in the mains lead do not match the colors marked in your plug, do
the following:
You must connect the green and yellow wire to the pin marked by the letter “E”
or by the safety ‘Earth symbol’ or colored green and yellow or green.
You must connect the blue wire to the pin which is marked with the letter “N” or
colored black.
You must connect the brown wire to the pin which is marked with the letter “L”
or colored red.
You must have a 13 amp fuse in the plug, adaptor, or at the distribution board.
Declaration of conformity (European countries)
Approvals and Certifications
Hereby, Samsung Electronics, declares that this [C267xFW] is in
compliance with the essential requirements and other relevant
provisions of Low Voltage Directive (2006/95/EC), EMC Directive
(2004/108/EC).
Hereby, Samsung Electronics, declares that this [C267xFW] is in
compliance with the essential requirements and other relevant
provisions of R&TTE Directive 1999/5/EC.
The declaration of conformity may be consulted at
www.samsung.com, go to Support > Download center and enter
your printer (MFP) name to browse the EuDoC.
January 1, 1995: Council Directive 2006/95/EC Approximation of the laws of
the member states related to low voltage equipment.
January 1, 1996: Council Directive 2004/108/EC, approximation of the laws of
the Member States related to electromagnetic compatibility.
March 9, 1999: Council Directive 1999/5/EC on radio equipment and
telecommunications terminal equipment and the mutual recognition of their
conformity. A full declaration, defining the relevant Directives and referenced
standards can be obtained from your Samsung Electronics Co., Ltd.
representative.
5. Appendix
141
Regulatory information
EC Certification
Certification to 1999/5/EC Radio Equipment & Telecommunications Terminal
Equipment Directive (FAX)
This Samsung product has been self-certified by Samsung for pan-European
single terminal connection to the analogue public switched telephone network
(PSTN) in accordance with Directive 1999/5/EC. The product has been designed
to work with the national PSTNs and compatible PBXs of the European
countries:
European radio approval information (for products
fitted with EU-approved radio devices)
Low power, Radio LAN type devices (radio frequency (RF) wireless
communication devices), operating in the 2.4 GHz/5 GHz band, may be present
(embedded) in your printer system which is intended for home or office use. This
section is only applicable if these devices are present. Refer to the system label
to verify the presence of wireless devices.
Wireless devices that may be in your system are only qualified for
use in the European Union or associated areas if a CE mark with a
Notified Body Registration Number and the Alert Symbol is on the
system label.
In the event of problems, you should contact the Euro QA Lab of Samsung
Electronics Co., Ltd. in the first instance.
The product has been tested against TBR21. To assist in the use and application
of terminal equipment which complies with this standard, the European
Telecommunication Standards Institute (ETSI) has issued an advisory document
(EG 201 121) which contains notes and additional requirements to ensure
network compatibility of TBR21 terminals. The product has been designed
against, and is fully compliant with, all of the relevant advisory notes contained
in this document.
The power output of the wireless device or devices that may be embedded in
you printer is well below the RF exposure limits as set by the European
Commission through the R&TTE directive.
European states qualified under wireless approvals:
EU countries
European states with restrictions on use:
EU
In France, this equipment may only be used indoors.
EEA/EFTA countries
5. Appendix
142
Regulatory information
No limitations at this time
25
Regulatory compliance statements
As a general guideline, a separation of 20 cm (8 inches) between the wireless
device and the body, for use of a wireless device near the body (this does not
include extremities) is typical. This device should be used more than 20 cm (8
inches) from the body when wireless devices are on and transmitting.
This transmitter must not be collocated or operation in conjunction with any
other antenna or transmitter.
Wireless guidance
Low power, Radio LAN devices (radio frequency (RF) wireless communication
devices), operating in the 2.4 GHz/5 GHz Band, may be present (embedded) in
your printer system. The following section is a general overview of
considerations while operating a wireless device.
Additional limitations, cautions, and concerns for specific countries are listed in
the specific country sections (or country group sections). The wireless devices in
your system are only qualified for use in the countries identified by the Radio
Approval Marks on the system rating label. If the country you will be using the
wireless device in, is not listed, contact your local Radio Approval agency for
requirements. Wireless devices are closely regulated and use may not be
allowed.
The power output of the wireless device or devices that may be embedded in
your printer is well below the RF exposure limits as known at this time. Because
the wireless devices (which may be embedded into your printer) emit less
energy than is allowed in radio frequency safety standards and
recommendations, manufacturer believes these devices are safe for use.
Regardless of the power levels, care should be taken to minimize human contact
during normal operation.
Some circumstances require restrictions on wireless devices. Examples of
common restrictions are listed below:
Radio frequency wireless communication can interfere with
equipment on commercial aircraft. Current aviation regulations
require wireless devices to be turned off while traveling in an airplane.
IEEE 802.11 (also known as wireless Ethernet) and Bluetooth
communication devices are examples of devices that provide wireless
communication.
In environments where the risk of interference to other devices or
services is harmful or perceived as harmful, the option to use a wireless
device may be restricted or eliminated. Airports, Hospitals, and
Oxygen or flammable gas laden atmospheres are limited examples
where use of wireless devices may be restricted or eliminated. When in
environments where you are uncertain of the sanction to use wireless
devices, ask the applicable authority for authorization prior to use or
turning on the wireless device.
5. Appendix
143
Regulatory information
Every country has different restrictions on the use of wireless devices.
Since your system is equipped with a wireless device, when traveling
between countries with your system, check with the local Radio
Approval authorities prior to any move or trip for any restrictions on
the use of a wireless device in the destination country.
If your system came equipped with an internal embedded wireless
device, do not operate the wireless device unless all covers and shields
are in place and the system is fully assembled.
Wireless devices are not user serviceable. Do not modify them in any
way. Modification to a wireless device will void the authorization to
use it. Contact manufacturer for service.
Only use drivers approved for the country in which the device will be
used. See the manufacturer System Restoration Kit, or contact
manufacturer Technical Support for additional information.
5. Appendix
144
Regulatory information
26
China only
5. Appendix
145
Copyright
© 2014 Samsung Electronics Co., Ltd. All rights reserved.
This user’s guide is provided for information purposes only. All information included herein is subject to change without notice.
Samsung Electronics is not responsible for any direct or indirect damages, arising from or related to use of this user’s guide.
•
Samsung and the Samsung logo are trademarks of Samsung Electronics Co., Ltd.
•
Microsoft, Windows, Windows Vista, Windows 7, Windows 8, and Windows Server 2008 R2 are either registered trademarks or trademarks of Microsoft
Corporation.
•
Microsoft, Internet Explorer, Excel, Word, PowerPoint, and Outlook are either registered trademarks or trademarks of Microsoft Corporation in the United States
and other countries.
•
Google, Picasa, Google Cloud Print, Google Docs, Android and Gmail are either registered trademarks or trademarks of Google Inc.
•
iPad, iPhone, iPod touch, Mac and Mac OS are trademarks of Apple Inc., registered in the U.S and other countries.
•
AirPrint and the AirPrint logo are trademarks of Apple Inc.
•
All other brand or product names are trademarks of their respective companies or organizations.
Refer to the 'LICENSE.txt' file in the provided CD-ROM for the open source license information.
REV. 1.00
5. Appendix
146
User’s Guide
ADVANCED
ADVANCED
This guide provides information about installation, advanced configuration,
operation and troubleshooting on various OS environments.
Some features may not be available depending on models or countries.
BASIC
This guide provides information concerning installation, basic operation and troubleshooting
on Windows.
ADVANCED
1. Software Installation
3. Useful Setting Menus
Installation for Mac
151
Print
202
Reinstallation for Mac
152
Copy
204
Installation for Linux
153
Scan
208
Reinstallation for Linux
154
Fax
212
System Setup
217
Job Status
228
Eco
229
Direct USB
230
2. Using a Network-Connected
Machine
Useful network programs
156
Document Box
231
Wired network setup
157
Scan to Cloud
232
Installing driver over the network
160
IPv6 configuration
168
Wireless network setup
171
Samsung Mobile Print
189
Altitude adjustment
234
Using the NFC feature
190
Storing email address
235
AirPrint
197
Entering various characters
237
Google Cloud Print™
198
Setting up the fax address book
239
Registering authorized users
242
Printing features
243
Scan features
259
4. Special Features
148
ADVANCED
Fax features
269
Copying problems
316
Using shared folder features
277
Scanning problems
317
Using optional device features
278
Faxing problems
319
Operating system problems
321
5. Useful Management Tools
Accessing management tools
280
Easy Capture Manager
281
Samsung Easy Color Manager
282
Samsung AnyWeb Print
283
Easy Eco Driver
284
Using SyncThru™ Web Service
285
Using Samsung Easy Document Creator
289
Using Samsung Easy Printer Manager
290
Using Samsung Printer Status
293
Using Samsung Printer Experience
295
6. Troubleshooting
Paper feeding problems
302
Power and cable connecting problems
303
Printing problems
304
Printing quality problems
308
149
1. Software Installation
This chapter provides instructions for installing essential and helpful software for use in an environment where the
machine is connected via a cable. A locally connected machine is a machine directly attached to your computer using
the cable. If your machine is attached to a network, skip the following steps below and go on to installing a network
connected machine’s driver (see "Installing driver over the network" on page 160).
• Installation for Mac
151
• Reinstallation for Mac
152
• Installation for Linux
153
• Reinstallation for Linux
154
• If you are a Windows OS user, refer to the Basic Guide for installing the machine’s driver (see
"Installing the driver locally" on page 27).
• Only use a USB cable no longer than 3 meter (118 inches).
Installation for Mac
1
Make sure that the machine is connected to your computer and
powered on.
10
Select USB Connected Printer on the Printer Connection Type and
click Continue.
2
Insert the supplied software CD into your CD-ROM drive.
11
Click Add Printer button to select your printer and add it to your printer
list.
If your machine supports fax, click Add Fax button to select your fax and
add it to your fax list
3
Double-click the CD-ROM icon that appears on your Mac desktop.
•
4
5
6
7
8
12
13
Click Continue.
After the installation is finished, click Close.
For Mac OS X 10.8, double-click the CD-ROM that appears on Finder.
Double-click the MAC_Installer folder > Installer OS X icon.
Click Continue.
Read the license agreement and click Continue.
Click Agree to agree to the license agreement.
Click Install. All components necessary for machine operations will be
installed.
If you click Customize, you can choose individual components to install.
9
Enter the password and click OK (or Install Software).
1. Software Installation
151
Reinstallation for Mac
If the printer driver does not work properly, uninstall the driver and reinstall it.
1
Open the Applications folder > Samsung > Printer Software
Uninstaller.
2
3
4
5
To uninstall printer software, click Continue.
Check the program you want to delete and click Uninstall.
Enter the password and click OK.
After the uninstallation is finished, click Close.
If a machine has already been added, delete it from the Print Setup Utility
or Print & Fax.
1. Software Installation
152
Installation for Linux
You need to download the Linux software packages from the Samsung website
to install the printer software (http://www.samsung.com > find your product >
Support or Downloads).
1
Installing the Unified Linux Driver
8
9
10
11
When the installation is finished, launch printing utility(Go to System >
Administration > Printing or execute "system-config-printer"
command in Terminal program).
Click Add button.
Select your printer.
Click the Forward button and add it to your system.
You must log in as a super user (root) to install the machine software. If you
are not a super user, ask your system administrator.
1
Make sure that the machine is connected to your computer and
powered on.
2
3
Copy the Unified Linux Driver package to your system.
4
5
6
Extract the package.
7
Proceed with the installation.
Open Terminal program and go to the folder that you copied the
package to.
Move to uld folder.
Execute "./install.sh" command (If you're not logged in as a root, execute
the command with "sudo" as "sudo ./install.sh")
1. Software Installation
153
Reinstallation for Linux
If the printer driver does not work properly, uninstall the driver and reinstall it.
Open Terminal program.
1
2
3
Move to uld folder extracted from Unified Linux Driver package.
4
Proceed with the uninstallation.
Execute "./uninstall.sh" command (If you're not logged in as root,
execute the command with "sudo" as "sudo ./uninstall.sh")
1. Software Installation
154
2. Using a NetworkConnected Machine
This chapter gives you step-by-step instructions for setting up a network connected machine and software.
• Useful network programs
156
• Wired network setup
157
• Installing driver over the network
160
• IPv6 configuration
168
• Wireless network setup
171
• Samsung Mobile Print
189
• Using the NFC feature
190
• AirPrint
197
• Google Cloud Print™
198
Supported optional devices and features may differ according to your model (see "Features by
model" on page 8).
Useful network programs
There are several programs available to setup the network settings easily in a
network environment. For the network administrator especially, managing
several machines on the network is possible.
• Before using the programs below, set the IP address first.
• Some features and optional goods may not be available depending on
model or country (see "Features by model" on page 8).
2
SyncThru™ Web Admin Service
Web-based machine management solution for network administrators.
SyncThru™ Web Admin Service provides you with an efficient way of managing
network devices and lets you remotely monitor and troubleshoot network
machines from any site with corporate internet access.
•
Download this program from Samsung website (http://www.samsung.com
> find your product > Support or Downloads).
1
SyncThru™ Web Service
3
SetIP wired network setup
The web server embedded on your network machine allows you to do the
following tasks (see "Using SyncThru™ Web Service" on page 285).
•
Check the supplies information and status.
This utility program allows you to select a network interface and manually
configure the IP addresses for use with the TCP/IP protocol.
•
Customize machine settings.
•
See "IPv4 configuration using SetIP (Windows)" on page 157.
•
Set the email notification option. When you set this option, the machine
status (toner cartridge shortage or machine error) will be sent to a certain
person's email automatically.
•
See "IPv4 configuration using SetIP (Mac)" on page 158.
•
See "IPv4 configuration using SetIP (Linux)" on page 159.
•
Configure the network parameters necessary for the machine to connect to
various network environments.
• The machine that does not support the network port, it will not be able
to use this feature (see "Rear view" on page 23).
• TCP/IPv6 is not supported by this program.
2. Using a Network-Connected Machine
156
Wired network setup
4
Printing a network configuration report
You can print Network Configuration Report from the machine’s control panel
that will show the current machine’s network settings. This will help you to set
up a network.
•
Select
(Setup) > Machine Setup > Next > Report > Network
Configuration on the touch screen.
First, you have to set up an IP address for network printing and management. In
most cases a new IP address will be automatically assigned by a DHCP (Dynamic
Host Configuration Protocol) server located on the network.
IPv4 configuration using SetIP (Windows)
Before using the SetIP program, disable the computer firewall from Control
Panel > Security Center > Windows Firewall.
Using this Network Configuration Report, you can find your machine’s MAC
address and IP address.
The following instructions may differ for your model.
For example:
•
MAC Address: 00:15:99:41:A2:78
•
IP Address: 169.254.192.192
5
Setting IP address
• The machine that does not support the network interface, it will not be
able to use this feature (see "Rear view" on page 23).
1
Download the software from the Samsung website then unpack and
install it: (http://www.samsung.com > find your product > Support or
Downloads).
2
3
4
5
Follow the instructions in the installation window.
6
Click the
icon (third from left) in the SetIP window to open the TCP/
IP configuration window.
• TCP/IPv6 is not supported by this program.
Connect your machine to the network with a network cable.
Turn on the machine.
From the Windows Start menu, select All Programs > Samsung
Printers > SetIP > SetIP.
2. Using a Network-Connected Machine
157
Wired network setup
7
Enter the machine’s new information into the configuration window. In
a corporate intranet, you may need to have this information assigned by
a network manager before proceeding.
1
2
Connect your machine to the network with a network cable.
3
Double-click the CD-ROM icon that appears on your Mac desktop.
Insert the supplied software CD into your CD-ROM drive.
Find the machine’s MAC address from the Network Configuration Report
(see "Printing a network configuration report" on page 157) and enter it
without the colons. For example, 00:15:99:29:51:A8 becomes
0015992951A8.
8
Click Apply, and then click OK. The machine will automatically print the
Network Configuration Report. Confirm that all the settings are
correct.
IPv4 configuration using SetIP (Mac)
Before using the SetIP program, disable the computer firewall from System
Preferences > Security (or Security & Privacy) > Firewall.
The following instructions may vary from your model.
•
4
5
6
7
8
For Mac OS X 10.8, Double-click the CD-ROM that appears on Finder.
Double-click the MAC_Installer folder > Installer OS X icon.
Click Continue.
Read the license agreement and click Continue.
Click Agree to agree to the license agreement.
Click Install. All components necessary for machine operations will be
installed.
If you click Customize, you can choose individual components to install.
9
10
Enter the password and click OK (or Install Software).
When the message that warns that all applications will close on your
computer appears, click Continue.
2. Using a Network-Connected Machine
158
Wired network setup
11
12
13
Select Network Connected Printer (Wired or Wireless) on the Printer
Connection Type and click Set IP Address button.
Click the
icon (third from left) in the SetIP window to open the TCP/
IP configuration window.
Enter the machine’s new information into the configuration window. In
a corporate intranet, you may need to have this information assigned by
a network manager before proceeding.
1
2
Download the SetIP program from the Samsung web site and extract it.
3
4
Click to open the TCP/IP configuration window.
Find the machine’s MAC address from the Network Configuration Report
(see "Printing a network configuration report" on page 157) and enter it
without the colons. For example, 00:15:99:29:51:A8 becomes
0015992951A8.
14
Click Apply, and then click OK. The machine will automatically print the
Network Configuration Report. Confirm that all the settings are
correct.
Double-click the SetIPApplet.html file in cdroot/Linux/noarch/
at_opt/share/utils folder.
Enter the machine’s new information into the configuration window. In
a corporate intranet, you may need to have this information assigned by
a network manager before proceeding.
Find the machine’s MAC address from the Network Configuration Report
(see "Printing a network configuration report" on page 157) and enter it
without the colons. For example, 00:15:99:29:51:A8 becomes
0015992951A8.
5
The machine will automatically print the Network Configuration
Report.
IPv4 configuration using SetIP (Linux)
Before using the SetIP program, disable the computer firewall from System
Preferences or Administrator.
The following instructions may vary from your model or operating systems.
2. Using a Network-Connected Machine
159
Installing driver over the network
• Some features and optional goods may not be available depending on
model or country (see "Features by model" on page 8).
2
Insert the supplied software CD into your CD-ROM drive.
• The machine that does not support the network interface, it will not be
able to use this feature (see "Rear view" on page 23).
•
You can install the printer driver and software when you insert the
software CD into your CD-ROM drive.
For windows, select the printer driver and software in the Select
Software to Install window.
If the installation window does not appear, click Start > All programs >
Accessories > Run.
X:\Setup.exe replacing “X” with the letter, which represents your CDROM drive and click OK.
6
Windows
•
For Windows 8,
If the installation window does not appear, from Charms, select
Search > Apps and search for Run. Type in X:\Setup.exe, replacing
“X” with the letter that represents your CD-ROM drive and click OK.
The firewall software might be blocking network communication. Before
connecting the device to the network, disable the computer’s firewall.
If “Tap to choose what happens with this disc.” pop-up window
appears, click the window and select Run Setup.exe.
1
Make sure that the machine is connected to the network and powered
on. Also, your machine’s IP address should have been set (see "Setting IP
address" on page 157).
3
Review and accept the installation agreements in the installation
window. Then, click Next.
4
5
Select Network on the Printer Connection Type screen.
Follow the instructions in the installation window.
2. Using a Network-Connected Machine
160
Installing driver over the network
From the Windows 8 Start Screen
4
You can print a Network Configuration Report from the machine’s control
panel that will show the current machine’s host name (see "Printing a
network configuration report" on page 181).
• The V4 driver is automatically downloaded from the Windows Update if
your computer is connected to the Internet. If not, you can manually
download the V4 driver from Samsung website, www.samsung.com >
find your product > Support or downloads.
• You can download Samsung Printer Experience app from the
Windows Store. You need have a Microsoft account to use the Windows
Store.
a From Charms, select Search.
b Click Store.
c Search and click Samsung Printer Experience.
d Click Install.
• If you install the driver using the supplied software CD, V4 driver is not
installed. If you want to use the V4 driver in the Desktop screen, you can
download from the Samsung website, www.samsung.com > find your
product > Support or downloads.
• If you want to install Samsung’s printer management tools, you need to
install them using the supplied software CD.
1
Make sure that the machine is connected to the network and powered
on. Also, your machine’s IP address should have been set (see "Setting IP
address" on page 157).
2
3
From Charms, select Settings > Change PC settings > Devices.
Click the model name or host name you wish to use.
5
The driver is automatically installed from the Windows Update.
Silent installation Mode
Silent installation mode is an installation method that does not require any user
intervention. Once you start the installation, the machine driver and software
are automatically installed on you computer. You can start the silent installation
by typing /s or /S in the command window.
Command-line Parameters
Following table shows commands that can be used in the command window.
Following command-line are effective and operated when command is
used with /s or /S. But /h, /H or /? are exceptional commands that can be
operated solely.
Click Add a device.
Discovered machines will be shown on the screen.
2. Using a Network-Connected Machine
161
Installing driver over the network
Command- line
/s or
/S
Definition
Starts silent installation.
Description
Installs machine drivers
without prompting any UIs
or user intervention.
Command- line
/p”<port name>” or
Definition
Specifies printer port.
/P”<port name>”
Network Port will be
created by use of
Standard TCP/IP
Port monitor. For
local port, this port
must exist on
system before
being specified by
command.
Description
Printer port name can be
specified as IP address,
hostname, USB local port
name, IEEE1284 port name
or network path.
For example:
•
/p”xxx.xxx.xxx.xxx” in
where, “xxx.xxx.xxx.xxx”
means IP address for
network printer. /
p”USB001”, /P”LPT1:”, /
p”hostname”
• /
p"\\computer_name\sha
red_printer" or
"\\xxx.xxx.xxx.xxx\shared
_printer" in where,
"\\computer_name\shar
ed_printer" or
"\\xxx.xxx.xxx.xxx\shared
_printer" means the
network path to the
printer by entering two
slashes, the computer
name or local IP address
of the PC sharing the
printer, and then the
share name of the
printer.
2. Using a Network-Connected Machine
162
Installing driver over the network
Command- line
/a”<dest_path>” or
/A”<dest_path>”
Definition
Specifies destination path
for installation.
The destination
path should be a
fully qualified path.
Description
Since machine drivers
should be installed on the
OS specific location, this
command applies to only
application software.
Command- line
Definition
Description
Uses existing machine
driver files to create printer
instance if it is already
installed.
This command provides a
way to install a printer
instance that uses installed
printer driver files without
installing an additional
driver.
Removes only specified
printer instance and not the
driver files.
This command provides a
way to remove only
specified printer instance
from your system without
effecting other printer
drivers. It will not remove
printer driver files from your
system.
Uninstalls all device drivers
and applications from your
system.
This command will remove
all installed device drivers
and application software
from your system.
/v”<share name>” or Shares installed machine
and add other available
/V”<share name>”
platform drivers for Point &
Print.
It will install all supported
Windows OS platform’s
machine drivers to system
and share it with specified
<share name> for point and
print.
/x or
/X
/up”<printer
name>” or
/n”<Printer name>”
or
/N”<Printer name>”
/nd or
/ND
Specifies printer name.
Printer instance shall be
created as specified printer
name.
With this parameter, you
can add printer instances as
your wishes.
Commands not to set the
installed driver as a default
machine driver.
It indicates installed
machine driver will not be
the default machine driver
on your system if there are
one or more printer drivers
installed. If there is no
installed machine driver on
your system, then this
option won’t be applied
because Windows OS will
set installed printer driver as
a default machine driver.
/UP”<printer
name>”
/d or
/D
2. Using a Network-Connected Machine
163
Installing driver over the network
Command- line
Definition
Description
/O
Opens Printers and Faxes
folder after installation.
This command will open
Printers and Faxes folder
after the silent installation.
/h, /H or /?
Shows Command-line Usage.
/o or
5
6
7
8
Click Continue.
Read the license agreement and click Continue.
Click Agree to agree to the license agreement.
Click Install. All components necessary for machine operations will be
installed.
If you click Customize, you can choose individual components to install.
7
Mac
1
2
3
Make sure that the machine is connected to your network and powered
on.
Insert the supplied software CD into your CD-ROM drive.
Enter the password and click OK (or Install Software).
11
Click Add Printer button to select your printer and add it to your printer
list.
12
13
14
Click IP and select HP JetDirect - Socket in Protocol.
15
If Auto Select does not work properly, choose Select Printer Software
and your machine name in Print Using.
16
Click Add.
Double-click the CD-ROM icon that appears on your Mac desktop.
•
4
9
10
For Mac OS X 10.8, double-click the CD-ROM that appears on Finder.
Double-click the MAC_Installer folder > Installer OS X icon.
Select Network Connected Printer(Wired or Wireless) on the Printer
Connection Type and click Continue.
Enter the machine’s IP address in the Address input field.
Enter the queue name in the Queue input field. If you cannot determine
the queue name for your machine server, try using the default queue
first.
2. Using a Network-Connected Machine
164
Installing driver over the network
17
18
Click Continue.
8
After the installation is finished, click Close.
9
10
11
8
Linux
You need to download Linux software packages from the Samsung website to
install the printer software (http://www.samsung.com > find your product >
Support or Downloads).
When the installation is finished, launch Printing utility(Go to System >
Administration > Printing menu or execute “system-config-printer”
command in Terminal program).
Click the Add button.
Select AppSocket/HP JetDirect and enter your machine's IP address.
Click the Forward button and add it to your system.
9
UNIX
1
Make sure that the machine is connected to your network and powered
on. Also, your machine’s IP address should have been set.
2
3
Copy the Unified Linux Driver package to your system.
Open Terminal program and go to the folder that you copied the
package to.
Extract the package.
4
5
6
Move to uld folder.
7
Proceed with the installation.
Execute “./install.sh” command (If you're not logged in as root, execute
the command with “sudo” as “sudo ./install.sh”)
• Make sure your machine supports the UNIX operating system before
installing the UNIX printer driver (see "Operating System" on page 8).
• The commands are marked with “”, when typing the commands, do not
type “”.
• Some features and optional goods may not be available depending on
model or country (see "Operating System" on page 8).
To use the UNIX printer driver, you have to install the UNIX printer driver
package first, then setup the printer. You can download the UNIX printer driver
package from the Samsung website (http://www.samsung.com > find your
product > Support or Downloads).
2. Using a Network-Connected Machine
165
Installing driver over the network
Installing the UNIX printer driver package
The installation procedure is common for all variants of UNIX OS mentioned.
1
From the Samsung website, download and unpack the UNIX Printer
Driver package to your computer.
2
Acquire root privileges.
“su -”
3
Copy the appropriate driver archive to the target UNIX computer.
7
8
Execute the “./install –c” command to verify installation results.
Run “installprinter” from the command line. This will bring up the Add
Printer Wizard window. Setup the printer in this window referring to
the following procedures.
On some UNIX OS, for example on Solaris 10, just added printers may not be
enabled and/or may not accept jobs. In this case run the following two
commands on the root terminal:
“accept <printer_name>”
“enable <printer_name>”
See administration guide of your UNIX OS for details.
Uninstalling the printer driver package
4
Unpack the UNIX printer driver package.
For example, on IBM AIX, use the following commands.
“gzip -d < enter the package name | tar xf -”
5
6
Go to the unpacked directory.
Run the install script.
“./install –i”
install is the installer script file which is used to install or uninstall the
UNIX Printer Driver package.
Use “chmod 755 install” command to give the permission to the
installer script.
The utility should be used to delete the printer installed in the system.
a Run “uninstallprinter” command from the terminal.
It will open the Uninstall Printer Wizard.
The installed printers are listed in the drop-down list.
b Select the printer to be deleted.
c Click Delete to delete the printer from the system.
d Execute the “./install –d” command to uninstall the whole package.
e To verify removal results, execute the “./install –c” command.
To re-install it, use the command “./install –i” to reinstall the binaries.
2. Using a Network-Connected Machine
166
Installing driver over the network
Setting up the printer
To add the printer to your UNIX system, run ‘installprinter’ from the command
line. This will bring up the Add Printer Wizard window. Setup the printer in this
window according to the following steps:
1
2
3
Type the name of the printer.
4
5
6
Specify any printer description in the Description field. This is optional.
7
8
9
10
11
12
Check the Make Default option to set this printer as default.
Click OK to add the printer.
Select the appropriate printer model from the model list.
Enter any description corresponding to the type of the printer in the
Type field. This is optional.
Specify the printer location in the Location field.
Type the IP address or DNS name of the printer in the Device textbox for
network-connected printers. On IBM AIX with jetdirect Queue type,
only the DNS name is possible-numeric IP address is not allowed.
Queue type shows the connection as lpd or jetdirect in the
corresponding list box. Additionally, usb type is available on Sun Solaris
OS.
Select Copies to set the number of copies.
Check the Collate option to receive copies already sorted.
Check the Reverse Order option to receive copies in the reverse order.
2. Using a Network-Connected Machine
167
IPv6 configuration
10
IPv6 is supported properly only in Windows Vista or higher.
If the IPv6 network seems to not be working, set all the network setting to
the factory defaults and try again using Clear Settings:
From the control panel
Activating IPv6
Accessing menus may differ from model to model (see "Menu overview" on
page 31).
• Select
(Setup) > Machine Setup > Next > Network Setup > Clear
Settings on the touch screen.
The machine supports the following IPv6 addresses for network printing and
managements.
1
Select
(Setup) > Machine Setup > Next > Network Setup > TCP/IP
(IPv6) > IPv6 Activate on the touch screen.
•
Link-local Address: Self-configured local IPv6 address (Address starts with
FE80).
Select On to enable.
•
Stateless Address: Automatically configured IPv6 address by a network
router.
2
3
•
Stateful Address: IPv6 address configured by a DHCPv6 server.
•
Manual Address: Manually configured IPv6 address by a user.
In the IPv6 network environment, follow the next procedure to use the IPv6
address.
Turn the machine off and turn it on again.
When you install the printer driver, do not configure both IPv4 and IPv6. We
recommend to configure either IPv4 or IPv6.
DHCPv6 address configuration
If you have a DHCPv6 server on your network, you can set one of the following
options for default dynamic host configuration.
2. Using a Network-Connected Machine
168
IPv6 configuration
1
Select
(Setup) > Machine Setup > Next > Network Setup > TCP/IP
(IPv6) > DHCPv6 Config on the touch screen.
2
Select the required value you want.
•
DHCPv6 address: Always use DHCPv6 regardless of router request.
•
DHCPv6 Off: Never use DHCPv6 regardless of router request.
•
Router: Use DHCPv6 only when requested by a router.
11
From the SyncThru™ Web Service
3
When the SyncThru™ Web Service window opens, move the mouse
cursor over the Settings of the top menu bar and then click Network
Settings.
4
5
6
7
Click TCP/IPv6 on the left pane of the website.
Check the IPv6 Protocol check box to activate IPv6.
Click the Apply button.
Turn the machine off and turn it on again.
• You can also set the DHCPv6.
Activating IPv6
1
Access a web browser, such as Internet Explorer, from Windows. Enter
the machine IP address (http://xxx.xxx.xxx.xxx) in the address field and
press the Enter key or click Go.
2
If it’s your first time logging into SyncThru™ Web Service you need to
log-in as an administrator. Type in the below default ID and password.
We recommend you to change the default password for security
reasons.
•
ID: admin
•
Password: sec00000
• To manually set the IPv6 address:
Check the Manual Address check box. Then, the Address/Prefix text
box is activated. Enter the rest of the address
(e.g.,:3FFE:10:88:194::AAAA. “A” is the hexadecimal 0 through 9, A
through F).
2. Using a Network-Connected Machine
169
IPv6 configuration
IPv6 address configuration
1
Start a web browser, such as Internet Explorer, that supports IPv6
addressing as a URL.
2
Select one of the IPv6 addresses (Link-local Address, Stateless
Address, Stateful Address, Manual Address) from Network
Configuration Report (see "Printing a network configuration report" on
page 157).
3
•
Link-local Address: Self-configured local IPv6 address (Address
starts with FE80).
•
Stateless Address: Automatically configured IPv6 address by a
network router.
•
Stateful Address: IPv6 address configured by a DHCPv6 server.
•
Manual Address: Manually configured IPv6 address by a user.
Enter the IPv6 addresses (e.g.,: http://[FE80::215:99FF:FE66:7701]).
Address must be enclosed in '[ ]' brackets.
2. Using a Network-Connected Machine
170
Wireless network setup
12
Getting started
Understanding your network type
Typically, you can only have one connection between your computer and the
machine at a time.
Infrastructure mode
This is an environment generally used for homes and SOHOs
(Small Office/ Home Office). This mode uses an access point to
communicate with the wireless machine.
Ad hoc modea
This mode does not use an access point. The wireless
computer and wireless machine communicate directly.
a. C2670 model does not support Ad hoc mode.
Wireless network name and network password
Wireless networks require higher security, so when an access point is first set up,
a network name (SSID), the type of security used, and a Network Password are
created for the network. Ask your network administrator about this information
before proceeding with the machine installation.
2. Using a Network-Connected Machine
171
Wireless network setup
13
Introducing wireless set up methods
You can set wireless settings either from the machine or the computer. Choose the setting method from the below table.
• Some wireless network installation types may not be available depending on the model or country.
• If problems occur during wireless set up or driver installation, refer to the troubleshooting chapter (see "Troubleshooting for wireless network" on page 186).
• It is strongly recommended that you set the password on Access Points. If you do not set the password on Access Points, they might be exposed to illegal access
from unknown machine including PCs, smart phones and printers. Refer to the Access Point user guide for password settings.
Connecting Type
With Access Point
Description & Reference
• See "Setting up on the touch screen" on page 173.
• For Windows user, see "Access point via USB cable (recommended)" on page 176.
• For Mac user, see "Access point via USB cable (recommended)" on page 178.
• See "Using a network cable" on page 181.
Without Access Point
Using Ad hoc modea
Not Available
Using Wi-Fi Direct
See "Setting the Wi-Fi Direct for mobile printing" on page 184.
a. C2670 model does not support Ad hoc mode.
2. Using a Network-Connected Machine
172
Wireless network setup
Re-connecting to the network
14
Setting up on the touch screen
Before starting, you will need to know the network name (SSID) of your wireless
network and the network key if it is encrypted. This information was set when
the access point (or wireless router) was installed. If you do not know about your
wireless environment, please ask the person who set up your network.
Connecting to a wireless network
When the wireless connection is lost, the machine automatically tries to reconnect to the access point (or wireless router) with the previously used wireless
connection settings and address.
In the following cases, the machine automatically re-connects to the
wireless network:
• The machine is turned off and on again.
• The access point (or wireless router) is turned off and on again.
After completing the wireless network connection, you need to install a
machine driver to print from an application (see "Installing driver over the
network" on page 160).
Canceling the connection process
To cancel the wireless network connection when the machine is connecting to
1
Select
(Setup) > Machine Setup > Next > Network Setup > Wi-Fi >
Wi-Fi Settings on the touch screen.
2
Select the setup method you want.
•
Search List (recommended): The machine will display a list of
available networks from which to choose. After a network is chosen
then printer will prompt for the corresponding security key.
•
Custom: In this mode, users can give or edit manually their own SSID
, or choose the security option in detail.
the wireless network, press and release
(Stop) on the control panel. You
need to wait 2 minutes to re-connect to the wireless network.
2. Using a Network-Connected Machine
173
Wireless network setup
Choosing your type
15
Using Wi-Fi Protected Setup™ (WPS)
If your machine and an access point (or wireless router) support Wi-Fi Protected
Setup™ (WPS), you can easily set up the secured wireless connection.
• If you want to use the wireless network using the infrastructure mode,
make sure that the network cable is disconnected from the machine.
Using the WPS (PBC) button or entering the PIN from the computer to
connect to the access point (or wireless router) varies depending on the
access point (or wireless router) you are using. Refer to the user's guide
of the access point (or wireless router) you are using.
• When using the WPS button to set the wireless network, security settings
may change. To prevent this, lock the WPS option for the current wireless
security settings. The option name may differ depending on the access
point (or wireless router) you are using.
Items to prepare
•
Check if the access point (or wireless router) supports Wi-Fi Protected
Setup™ (WPS).
•
Check if your machine supports Wi-Fi Protected Setup™ (WPS).
•
Networked computer (PIN mode only)
There are two methods available to connect your machine to a wireless network
using WPS.
•
The Push Button Configuration (PBC) method allows you to connect your
machine to a wireless network by enabling WPS in your machine and
pressing the WPS (PBC) button on a WPS-supported access point (or wireless
router).
•
The Personal Identification Number (PIN) method helps you connect your
machine to a wireless network by entering the supplied PIN information on
a WPS-supported access point (or wireless router).
Factory default in your machine is PBC mode, which is recommended for a
typical wireless network environment.
Connecting in PBC mode
1
Select
WPS.
(Setup) > Machine Setup > Next > Network Setup > Wi-Fi >
2
3
Select Connect via PBC.
Touch OK when the confirmation window appears.
Information window appears showing 2 minutes connection processing
time.
2. Using a Network-Connected Machine
174
Wireless network setup
4
Press the WPS (PBC) button on the access point (or wireless router).
4
The messages are displayed on the display screen in the order below:
You need to enter the eight-digit PIN within two minutes on the
computer that is connected to the access point (or wireless router).
a Connecting: The machine is connecting to the access point (or
wireless router).
The messages are displayed on the display screen in the order below:
b Connected: When the machine is successfully connected to the
wireless network, the WPS LED light stays on.
a Connecting: The machine is connecting to the wireless network.
b Connected: When the machine is successfully connected to the
wireless network, the WPS LED light stays on.
c AP SSID: After completing the wireless network connection process,
the AP’s SSID information appears on the display.
5
Insert the supplied software CD into your CD-ROM drive, and follow the
instructions in the window to set up the wireless network.
The eight-digit PIN appears on the display.
c AP SSID: After completing the wireless network connection process,
the AP’s SSID information appears on the display.
5
Insert the supplied software CD into your CD-ROM drive, and follow the
instructions in the window to set up the wireless network.
Connecting in PIN mode
1
Select
WPS.
(Setup) > Machine Setup > Next > Network Setup > Wi-Fi >
2
3
Select Connect via PIN.
Touch OK when the confirmation window appears.
2. Using a Network-Connected Machine
175
Wireless network setup
16
Setting up in Windows
3
Insert the supplied software CD into your CD-ROM drive.
Shortcut to the Samsung Easy Wireless Setup program without the CD: If
you have installed the printer driver once, you can access the Samsung
Easy Wireless Setup program without the CD (see "Accessing
management tools" on page 280).
If the installation window does not appear, click Start > All programs >
Accessories > Run.
X:\Setup.exe replacing “X” with the letter, which represents your CDROM drive and click OK.
Access point via USB cable (recommended)
•
Items to prepare
•
Access point
•
Network-connected computer
•
Software CD that was provided with your machine
•
A machine installed with a wireless network interface
•
USB cable
Creating the infrastructure network
1
2
For Windows 8,
If the installation window does not appear, from Charms, select
Search > Apps and search for Run. Type in X:\Setup.exe, replacing
“X” with the letter that represents your CD-ROM drive and click OK.
If “Tap to choose what happens with this disc.” pop-up window
appears, click the window and select Run Setup.exe.
4
Review and accept the installation agreements in the installation
window. Then, click Next.
5
Select Wireless on the Printer Connection Type screen. Then, click
Next.
Check whether the USB cable is connected to the machine.
Turn on your computer, access point, and machine.
2. Using a Network-Connected Machine
176
Wireless network setup
6
7
On the Are you setting up your printer for the first time? screen, select
Yes, I will set up my printer's wireless network. Then, click Next.
• Confirm Network Password: Confirm the encryption network
password value.
If your printer is already connected on the network, select No, my
printer is already connected to my network.
• WEP Key Index: If you are using WEP Encryption, select the appropriate
WEP Key Index.
After searching, the window shows the wireless network devices. Select
the name (SSID) of the access point you want to use and click Next.
The wireless network security window appears when the access point has
security settings.
Enter the Network Password of the access point (or router).
If you cannot find the network name you want to choose, or if you want to
set the wireless configuration manually, click Advanced Setting.
• Enter the wireless Network Name: Enter the SSID of the access point
(SSID is case-sensitive).
• Operation Mode: Select Infrastructure.
8
When the network connection window appears, disconnect the network
cable. Then, click Next. The network cable connection can interfere with
searching for wireless devices.
• Authentication: Select an authentication type.
Open System: Authentication is not used, and encryption may or may
not be used, depending on the need for data security.
Shared Key: Authentication is used. A device that has a proper WEP key
can access the network.
WPA Personal or WPA2 Personal: Select this option to authenticate the
print server based on a WPA Pre-Shared Key. This uses a shared secret key
(generally called Pre Shared Key pass phrase), which is manually
configured on the access point and each of its clients.
• Encryption: Select the encryption (None, WEP64, WEP128, TKIP, AES,
TKIP AES).
• Network Password: Enter the encryption network password value.
2. Using a Network-Connected Machine
177
Wireless network setup
9
If your printer supports Wi-Fi Direct and this function is disabled, its
corresponding screen will appear.
If you want to enable Wi-Fi Direct, check the checkbox, and click Next. If
not, click just Next.
11
Follow the instructions in the installation window.
17
Setting up in Mac
Access point via USB cable (recommended)
Items to prepare
• Can start to build Wi-Fi Direct by using Samsung Easy Printer Manager
(see "Setting up Wi-Fi Direct" on page 184).
•
Access point
•
Network-connected printer
•
Software CD that was provided with your machine
•
A machine installed with a wireless network interface
•
USB cable
1
powered on.
• Wi-Fi Direct Name: The default Wi-Fi Direct Name is the model name
and the maximum length is 22 characters.
• Password setting is the numeric string, and the size is 8 ~ 64 characters.
10
Make sure that the machine is connected to your computer and
2
Insert the supplied software CD into your CD-ROM drive.
When the wireless network set up is completed, disconnect the USB
cable between the computer and machine. Click Next.
2. Using a Network-Connected Machine
178
Wireless network setup
3
Double-click the CD-ROM icon that appears on your Mac desktop.
•
4
5
6
7
8
10
Select Configuration of Wireless network on the Printer Connection
Type and click Continue.
11
After searching, the window shows the wireless network devices. Select
the name (SSID) of the access point you want to use and click Next.
For Mac OS X 10.8, double-click the CD-ROM that appears on Finder.
Double-click the MAC_Installer folder > Installer OS X icon.
Click Continue.
Read the license agreement and click Continue.
Click Agree to agree to the license agreement.
Click Install. All components necessary for machine operations will be
installed.
If you click Customize, you can choose individual components to install.
9
Enter the password and click OK (or Install Software).
When you set the wireless configuration manually, click Advanced Setting.
• Enter the wireless Network Name: Enter the SSID of the access point
(SSID is case-sensitive).
• Operation Mode: Select Infrastructure.
2. Using a Network-Connected Machine
179
Wireless network setup
• Authentication: Select an authentication type.
Open System: Authentication is not used, and encryption may or may
not be used, depending on the need for data security.
Shared Key: Authentication is used. A device that has a proper WEP key
can access the network.
WPA Personal or WPA2 Personal: Select this option to authenticate the
print server based on the WPA Pre-Shared Key. This uses a shared secret
key (generally called Pre Shared Key pass phrase) that is manually
configured on the access point and each of its clients.
12
If your printer supports Wi-Fi Direct and this function is disabled, its
corresponding screen will appears.
If you want to enable Wi-Fi Direct, check the checkbox, and click Next. If
not, click just Next.
• Encryption: Select the encryption. (None, WEP64, WEP128, TKIP, AES,
TKIP, AES)
• Network Password: Enter the encryption network password value.
• Confirm Network Password: Confirm the encryption network
password value.
• WEP Key Index: If you are using WEP Encryption, select the appropriate
WEP Key Index.
The wireless network security window appears when the access point has
security enabled.
Enter the Network Password of the access point (or router).
• Can start to build Wi-Fi Direct by using Samsung Easy Printer Manager
(see "Setting up Wi-Fi Direct" on page 184).
• Wi-Fi Direct Name: The default Wi-Fi Direct Name is the model name
and the maximum length is 22 characters.
• Password setting is the numeric string, and the size is 8 ~ 64 characters.
13
When the wireless network settings are completed, disconnect the USB
cable between the computer and machine.
2. Using a Network-Connected Machine
180
Wireless network setup
14
Wireless network set up is completed. After the installation is finished,
click Quit.
After completing the wireless network connection, you need to install a
machine driver to print from an application (see "Installation for Mac" on
page 151).
Items to prepare
•
Access point
•
Network-connected computer
•
Software CD that was provided with your machine
•
A machine installed with a wireless network interface
•
Network cable
18
Using a network cable
Machines that do not support the network port will not be able to use this
feature (see "Rear view" on page 23).
Printing a network configuration report
You can identify the network settings of your machine by printing a network
configuration report.
See "Printing a network configuration report" on page 157.
Your machine is a network compatible machine. To enable your machine to
work with your network, you will need to perform some configuration
procedures.
• After completing the wireless network connection, you need to install a
machine driver to print from an application (see "Installing driver over
the network" on page 160).
• See your network administrator, or the person that set up your wireless
network, for information about your network configuration.
IP setting using SetIP Program (Windows)
This program is used to manually set the network IP address of your machine
using its MAC address to communicate with the machine. The MAC address is
the hardware serial number of the network interface and can be found in the
Network Configuration Report.
See "Setting IP address" on page 157.
2. Using a Network-Connected Machine
181
Wireless network setup
Configuring the machine’s wireless network
Before starting you will need to know the network name (SSID) of your wireless
network and the network key if it is encrypted. This information was set when
the access point (or wireless router) was installed. If you do not know about your
wireless environment, please ask the person who set up your network.
To configure wireless parameters, you can use SyncThru™ Web Service.
Using SyncThru™ Web Service
4
2
Check whether or not the network cable is connected to the machine. If
not, connect the machine with a standard network cable.
•
ID: admin
•
Password: sec00000
5
When the SyncThru™ Web Service window opens, click Network
Settings.
6
Click Wireless > Wizard.
Wizard will help you setup the wireless network configuration. However, if
you want to set the wireless network directly, select Custom.
Before starting wireless parameter configuration, check the cable connection
status.
1
Type in the ID and Password then click Login. We recommend you to
change the default password for security reasons.
7
Select the one Network Name(SSID) in the list.
•
SSID: SSID (Service Set Identifier) is a name that identifies a wireless
network, access points, and wireless devices attempting to connect
to a specific wireless network must use the same SSID. The SSID is
case sensitive.
•
Operation Mode: Operation Mode refers to the type of wireless
connections (see "Wireless network name and network password"
on page 171).
Start a web browser such as Internet Explorer, Safari, or Firefox and enter
your machine’s new IP address in the browser window.
For example,
3
Click Login on the upper right of the SyncThru™ Web Service website.
-
Ad-hoc: Allows wireless devices to communicate directly with
each other in a peer-to-peer environment.
-
Infrastructure: Allows wireless devices to communicate with
each other through an access point.
2. Using a Network-Connected Machine
182
Wireless network setup
If your network’s Operation Mode is Infrastructure, select the SSID of the
access point. If the Operation Mode is Ad-hoc, select the machine’s SSID.
8
1
Check whether the network cable is connected to the machine. If not,
connect the machine with a standard network cable.
2
Start a web browser such as Internet Explorer, Safari, or Firefox and enter
your machine’s new IP address in the browser window.
Click Next.
For example,
If the wireless security setting window appears, enter the registered
password (network password) and click Next.
9
The confirmation window appears, please check your wireless setup. If
the setup is right, click Apply.
3
4
Disconnect the network cable (standard or network). Your machine should
then start communicating wirelessly with the network. In case of Ad-hoc
mode, you can use a wireless LAN and wired LAN simultaneously.
10
Insert the supplied software CD into your CD-ROM drive, and follow the
instructions in the window to set up the wireless network.
19
Click Login on the upper right of the SyncThru™ Web Service website.
Type in the ID and Password, then click Login. We recommend you to
change the default password for security reasons.
•
ID: admin
•
Password: sec00000
5
When the SyncThru™ Web Service window opens, click Network
Settings.
6
Click Wireless > Custom.
You can also turn the Wi-Fi network on/off.
Turning the Wi-Fi network on/off
If your machine has a display, you can also turn on/off the Wi-Fi from the
machine’s control panel using the Network menu.
2. Using a Network-Connected Machine
183
Wireless network setup
From the USB cable-connected computer(recommended)
20
Setting the Wi-Fi Direct for mobile printing
After the driver installation is complete, Samsung Easy Printer Manager can be
set and changes in the Wi-Fi Direct can be made.
Wi-Fi Direct is an easy-to-setup peer-to-peer connection method between the
Wi-Fi Direct certified printer and a mobile device that provides a secure
connection and better throughput than ad hoc mode.
With Wi-Fi Direct, you can connect your printer to a Wi-Fi Direct network while
concurrently connecting to an access point. You can also use a wired network
and a Wi-Fi Direct network simultaneously so multiple users can access and print
documents both from Wi-Fi Direct and from a wired network.
• You cannot connect your mobile device to the internet through the
printer’s Wi-Fi Direct.
• The supported protocol list may differ from your model, Wi-Fi Direct
networks do NOT support IPv6, network filtering, IPSec, WINS, and SLP
services.
Samsung Easy Printer Manager is Available for Windows
and Mac OS users only.
From the Start menu, select Programs or All Programs > Samsung Printers >
Samsung Easy Printer Manager > Device Settings > Network.
•
Wi-Fi Direct On/Off: Select On to enable.
•
Device Name: Enter the printer’s name for searching for your printer on a
wireless network. By default, the device name is the model name.
•
IP Address: Enter the IP address of the printer. This IP address is used only
for the local network and not for the infrastructure wired or wireless
network. We recommend using the default local IP address (the default local
IP address of the printer for Wi-Fi Direct is 192.168.3.1 )
•
Group Owner: Activate this option to assign the printer the Wi-Fi Direct
group’s owner. The Group Owner acts similar to a wireless access point. We
recommend activating this option.
•
Network Password: If your printer is a Group Owner, a Network Password
is required for other mobile devices to connect to your printer. You can
configure a network password yourself, or can remember the given Network
Password that is randomly generated by default.
• The maximum number of devices that can be connected via Wi-Fi Direct
is 3.
Setting up Wi-Fi Direct
You can enable Wi-Fi Direct feature by one of the following methods.
2. Using a Network-Connected Machine
184
Wireless network setup
From the machine
1
Select
(Setup) > Machine Setup > Next > Network Setup > Wi-Fi >
Wi-Fi Direct on the touch screen.
• When you have found the printer you want to connect to from your
mobile device, select the printer and the printer's LED will blink. Press the
WPS button on the printer and it will be connected to your mobile
device.
2
Select On to enable.
•
If your mobile device does not support Wi-Fi Direct, you need to enter
the "Network Key" of a printer instead of pushing the WPS button.
From the network-connected computer
If your printer is using a network cable or a wireless access point, you can enable
and configure Wi-Fi Direct from SyncThru™ Web Service.
1
Access SyncThru™ Web Service and select Settings > Network
Settings > Wireless > Wi-Fi Direct.
2
Enable Wi-Fi Direct and set other options.
For Linux OS users, print an IP network configuration report to check the
output (see "Printing a network configuration report" on page 157).
Setting up the mobile device
•
After setting up Wi-Fi Direct from the printer, refer to the user manual of the
mobile device you are using to set its Wi-Fi Direct.
•
After setting up Wi-Fi Direct, you need to download the mobile printing
application (For example: Samsung Mobile printer) to print from your
smartphone.
2. Using a Network-Connected Machine
185
Wireless network setup
Connecting Failure - General Connection Error
21
Troubleshooting for wireless network
•
Your computer is not receiving a signal from your machine. Check the USB
cable and your machine’s power.
Problems during setup or driver installation
Connecting Failure - Connected Wired Network
Printers Not Found
•
Your machine may not be turned on. Turn on your computer and the
machine.
•
USB cable is not connected between your computer and machine. Connect
the machine to your computer using the USB cable.
•
The machine does not support wireless networking. Check the machine's
user's guide included on the software CD supplied with your machine and
prepare a wireless network machine.
Connecting Failure - SSID Not Found
•
Your machine is connected with a wired network cable. Remove the wired
network cable from your machine.
Connecting Failure - Assigning the IP address
•
Cycle the power for the access point (or wireless router) and machine.
PC Connection Error
•
The configured network address is unable to connect between your
computer and machine.
-
For a DHCP network environment
•
The machine is unable to find the network name (SSID) you have selected or
entered. Check the network name (SSID) on your access point and try
connecting again.
The machine receives the IP address automatically (DHCP) when
computer is configured to DHCP.
•
Your access point is not turned on. Turn on your access point.
If the printing job is not working in DHCP mode, the problem may be caused
by the automatically changed IP address. Compare the IP address between
the product's IP address and the printer port's IP address.
Connecting Failure - Invalid Security
•
Security is not configured correctly. Check the configured security on your
access point and machine.
How to compare:
1 Print the network information report of your printer, and then check the
IP address (see "Printing a network configuration report" on page 157).
2. Using a Network-Connected Machine
186
Wireless network setup
If the computer’s network information is as shown below:
2 Check the printer port's IP address from your computer.
a Click the Windows Start menu.
• For Windows 8, from Charms, select Search > Settings.
b For Windows XP/Server 2003, select Printer and Faxes.
• For Windows 7/8, select Control Panel > Devices and Printers.
-
For example,
▪
Subnet Mask: 255.255.0.0
▪
IP address: 169.254.133.43
▪
Subnet Mask: 255.255.0.0 (Use the computer’s subnet mask.)
▪
Gateway: 169.254.133.1
Other problems
If problems occur while using the machine on a network, check the following:
For information on the access point (or wireless router), refer to its own
user's guide.
•
You cannot enable wired and wireless networks at the same time.
•
Your computer, access point (or wireless router), or machine may not be
turned on.
•
Check the wireless reception around the machine. If the router is far from
the machine or there is an obstacle, you might have difficulty receiving the
signal.
•
Cycle the power for the access point (or wireless router), machine, and
computer. Sometimes cycling the power can recover network
communication.
For a Static network environment
The machine uses the static address when the computer is configured
to static address.
IP address: 169.254.133.42
Then the machine’s network information should be as below:
• For Windows Server 2008/Vista, select Control Panel > Hardware
and Sound > Printers.
• For Windows Server 2008 R2, select Control Panel > Hardware >
Devices and Printers.
c Right-click your machine.
d For Windows XP/2003/2008/Vista, press Properties.
For Windows 7/8 and Windows Server 2008 R2, from context menus,
select the Printer properties.
If Printer properties item has ► mark, you can select other printer
drivers connected with selected printer.
e Click Port tab.
f Click Configure Port... button.
g Check if Printer Name or IP Address: is the IP address on the network
configuration Sheet.
3 Change the printer port's IP address if it is different from the network
information report's.
If you want to use the software installation CD to change the port IP,
Connect to a network printer. Then reconnect the IP address.
▪
2. Using a Network-Connected Machine
187
Wireless network setup
•
Check whether firewall software (V3 or Norton) is blocking the
communication.
•
If the computer and the machine are connected on the same network and it
cannot be found when searching, firewall software might be blocking the
communication. Refer to the user's guide for the software to turn it off and
try searching for the machine again.
•
Check whether the machine's IP address is allocated correctly. You can
check the IP address by printing the network configuration report.
•
Check whether the access point (or wireless router) has a configured
security (password). If it has a password, refer to the access point (or wireless
router) administrator.
•
Check the machine's IP address. Reinstall the machine driver and change the
settings to connect to the machine on the network. Due to the
characteristics of DHCP, the allocated IP address could change if the
machine is not used for a long time or if the access point has been reset.
The machine is located away from obstacles that could block the wireless
signal.
Remove any large metal objects between the access point (or wireless
router) and the machine.
Make sure the machine and wireless access point (or wireless router) are not
separated by poles, walls, or support columns containing metal or concrete.
•
The machine is located away from other electronic devices that may
interfere with the wireless signal.
Many devices can interfere with the wireless signal, including a microwave
oven and some Bluetooth devices.
•
Whenever the configuration of your access point (or wireless router)
changes, you must do the product's wireless network setup again.
•
The maximum number of devices that can be connected via Wi-Fi Direct is 4.
Register the product's MAC address when you configure the DHCP server on
the access point (or wireless router). Then you can always use the IP address
that is set with the MAC address. You can identify the MAC address of your
machine by printing a network configuration report (see "Printing a network
configuration report" on page 157).
•
Check the wireless environment. You might not be able to connect to the
network in the infrastructure environment where you need to type in a
user's information before connecting to the access point (or wireless router).
•
This machine only supports IEEE 802.11 b/g/n and Wi-Fi. Other wireless
communication types (e.g., Bluetooth) are not supported.
•
The machine is within the range of the wireless network.
2. Using a Network-Connected Machine
188
Samsung Mobile Print
22
24
What is Samsung Mobile Print?
Samsung Mobile Print is a free application that enables users to print photos,
documents, and web pages directly from your smartphone or tablet. Samsung
Supported Mobile OS
•
Android OS 2.3 or higher
•
iOS 4.0 or higher
Mobile Print is not only compatible with your Android and iOS smart phones
but also with your iPod Touch and tablet PC. It connects your mobile device to a
network connected Samsung printer or to a wireless printer through a Wi-Fi
access point. Installing a new driver or configuring network settings isn’t
necessary – just simply install the Samsung Mobile Print application, and it will
automatically detect compatible Samsung printers. Besides printing photos,
web pages, and PDFs, scanning is also supported. If you have a Samsung
multifunction printer, scan any document into a JPG, PDF, or PNG format for
quick and easy viewing on your mobile device.
23
Downloading Samsung Mobile Print
To download Samsung Mobile Print, go to the application store (Samsung
Apps, Play Store, App Store) on your mobile device, and just search for
“Samsung Mobile Print.” You can also visit iTunes for Apple devices on your
computer.
2. Using a Network-Connected Machine
189
Using the NFC feature
The NFC (Near Field Communication) printer allows you to directly print/scan/
fax from your mobile device just by holding your mobile device over the NFC tag
on your printer. It does not require installing print driver or connecting to an
access point. You just need NFC supported mobile device. In order to use this
feature, Samsung Mobile Print app needs to be installed on your mobile device.
25
Requirements
•
• Depending on the material of the mobile device cover, NFC recognition
may not work properly.
Only Android OS 4.1 or higher will automatically enable the Wi-Fi Direct
feature on your mobile device when you enable the NFC feature. We
recommend you to upgrade your mobile device to Android OS 4.1 or higher
to use the NFC feature.
• Depending on the mobile device you are using, the transmission speed
may differ.
• This feature is available only for the model with a NFC tag (see "Machine
overview" on page 21).
• Using a cover or a battery other than the ones that came with the mobile
device, or a metal cover/sticker can block NFC.
NFC and Wi-Fi Direct enabled, Samsung Mobile Print app installed mobile
device with Android OS 4.0 or higher.
•
Wi-Fi Direct feature enabled printer (see "Setting up Wi-Fi Direct" on page
184).
• If NFC devices keep failing to communicate,
- Remove the case or cover from the mobile device, then try again.
- Reinstall the battery from the mobile device, then try again.
2. Using a Network-Connected Machine
190
Using the NFC feature
26
• For some mobile devices, NFC tag might not be located at the back of the
mobile device. Check the location of the NFC antenna on your mobile
device before tagging.
Printing
1
Check that NFC and Wi-Fi Direct features are enabled on your mobile
device and Wi-Fi Direct feature is enabled on your printer (see "Setting
the Wi-Fi Direct for mobile printing" on page 184).
• If error message about changed PIN number appears, enter a changed
PIN number and press OK. Follow the instruction on the app screen to
update the PIN number.
2
Tag the NFC tag on your mobile device (usually located on the back of
the mobile device) over the NFC tag (
) on your printer.
• If your do not have Samsung Mobile Print app installed on your mobile
devices, it automatically connects to Samsung Mobile Print app
download page. Download the app and try again.
Wait a few seconds for the Samsung Mobile Print app to start.
3
4
Select print mode.
Select the content you want to print.
If necessary, change the print option by pressing the
icon.
2. Using a Network-Connected Machine
191
Using the NFC feature
5
Tag the NFC tag on your mobile device (usually located on the back of
the mobile device) over the NFC tag (
) on your printer.
27
Scanning
Wait a few seconds for the mobile device to connect to the printer.
1
Check that NFC and Wi-Fi Direct features are enabled on your mobile
device and Wi-Fi Direct feature is enabled on your printer (see "Setting
the Wi-Fi Direct for mobile printing" on page 184).
2
Tag the NFC tag on your mobile device (usually located on the back of
the mobile device) over the NFC tag (
) on your printer.
Wait a few seconds for the Samsung Mobile Print app to start.
• For some mobile devices, NFC tag might not be located at the back of the
mobile device. Check the location of the NFC antenna on your mobile
device before tagging.
• If error message about changed PIN number appears, enter a changed
PIN number and press OK. Follow the instruction on the app screen to
update the PIN number.
6
The printer starts printing.
2. Using a Network-Connected Machine
192
Using the NFC feature
• For some mobile devices, NFC tag might not be located at the back of the
mobile device. Check the location of the NFC antenna on your mobile
device before tagging.
5
Tag the NFC tag on your mobile device (usually located on the back of
the mobile device) over the NFC tag (
) on your printer.
• If error message about changed PIN number appears, enter a changed
PIN number and press OK. Follow the instruction on the app screen to
update the PIN number.
• If your do not have Samsung Mobile Print app installed on your mobile
devices, it automatically connects to Samsung Mobile Print app
download page. Download the app and try again.
3
4
Select scan mode.
Place a single document face down on the document glass, or load the
documents face up into the document feeder (see "Loading originals" on
page 49).
If necessary, change the scan option by pressing the
• For some mobile devices, NFC tag might not be located at the back of the
mobile device. Check the location of the NFC antenna on your mobile
device before tagging.
icon.
• If error message about changed PIN number appears, enter a changed
PIN number and press OK. Follow the instruction on the app screen to
update the PIN number.
6
The printer starts scanning the content.
The scanned data is saved on your mobile device.
2. Using a Network-Connected Machine
193
Using the NFC feature
• For some mobile devices, NFC tag might not be located at the back of the
mobile device. Check the location of the NFC antenna on your mobile
device before tagging.
If you want to continue scanning, follow the instruction on the app screen.
• If error message about changed PIN number appears, enter a changed
PIN number and press OK. Follow the instruction on the app screen to
update the PIN number.
28
Sending Fax
1
Check that NFC and Wi-Fi Direct features are enabled on your mobile
device and Wi-Fi Direct feature is enabled on your printer (see "Setting
the Wi-Fi Direct for mobile printing" on page 184).
2
Tag the NFC tag on your mobile device (usually located on the back of
the mobile device) over the NFC tag (
) on your printer.
Wait a few seconds for the Samsung Mobile Print app to start.
• If your do not have Samsung Mobile Print app installed on your mobile
devices, it automatically connects to Samsung Mobile Print app
download page. Download the app and try again.
3
4
Select fax mode.
Select the content you want to send fax.
If necessary, enter the fax number and change the fax option by pressing
the
icon.
2. Using a Network-Connected Machine
194
Using the NFC feature
5
Tag the NFC tag on your mobile device (usually located on the back of
the mobile device) over the NFC tag (
) on your printer.
29
Registering Google Cloud Printer
Wait a few seconds for the mobile device to connect to the printer.
1
Check that NFC and Wi-Fi Direct features are enabled on your mobile
device and Wi-Fi Direct feature is enabled on your printer (see "Setting
the Wi-Fi Direct for mobile printing" on page 184).
2
Tag the NFC tag on your mobile device (usually located on the back of
the mobile device) over the NFC tag (
) on your printer.
Wait a few seconds for the Samsung Mobile Print app to start.
• For some mobile devices, NFC tag might not be located at the back of the
mobile device. Check the location of the NFC antenna on your mobile
device before tagging.
• If error message about changed PIN number appears, enter a changed
PIN number and press OK. Follow the instruction on the app screen to
update the PIN number.
6
The printer starts faxing the content.
2. Using a Network-Connected Machine
195
Using the NFC feature
• For some mobile devices, NFC tag might not be located at the back of the
mobile device. Check the location of the NFC antenna on your mobile
device before tagging.
5
Tag the NFC tag on your mobile device (usually located on the back of
the mobile device) over the NFC tag (
) on your printer.
Wait a few seconds for the mobile device to connect to the printer.
• If error message about changed PIN number appears, enter a changed
PIN number and press OK. Follow the instruction on the app screen to
update the PIN number.
• If your do not have Samsung Mobile Print app installed on your mobile
devices, it automatically connects to Samsung Mobile Print app
download page. Download the app and try again.
3
4
Select device status icon.
Select Google Cloud Print > Register Google Cloud Printer.
• For some mobile devices, NFC tag might not be located at the back of the
mobile device. Check the location of the NFC antenna on your mobile
device before tagging.
• If error message about changed PIN number appears, enter a changed
PIN number and press OK. Follow the instruction on the app screen to
update the PIN number.
6
Confirm your printer in pop-up window.
Now your printer is registered with Google Cloud Print™ service.
2. Using a Network-Connected Machine
196
AirPrint
4
Only AirPrint certified machines can use the AirPrint feature. Check the box
your machine came in for the AirPrint certified mark.
AirPrint allows you to wirelessly print directly from an iPhone, iPad,
and iPod touch running the latest version of iOS.
30
Setting up AirPrint
Type in the ID and Password, then click Login. If it’s your first time logging into
SyncThru™ Web Service, type in the below default ID and password. We
recommend you to change the default password for security reasons.
•
ID: admin
•
Password: sec00000
5
When the SyncThru™ Web Service window opens, click Settings > Network
Settings.
6
Click Raw TCP/IP, LPR, IPP or mDNS.
You can enable the IPP protocol or mDNS protocol.
31
Bonjour(mDNS) and IPP protocols are required on your machine to use the AirPrint
feature. You can enable the AirPrint feature by one of the following methods.
1
2
Check whether the machine is connected to the network.
Start a web browser such as Internet Explorer, Safari, or Firefox and enter your
machine’s new IP address in the browser window.
For example,
3
Click Login in the upper right of the SyncThru™ Web Service website.
Printing via AirPrint
For example, the iPad manual provides these instructions:
1
2
3
4
Open your email, photo, web page, or document you want to print.
5
Cancelling print job: To cancel the printing job or view the print summary,
click the print center (
) icon in multitasking area. You can click cancel in
the print center.
Touch the action (
)icon.
Select your printer driver name and option menu to set up.
Touch Print button. Print it out.
2. Using a Network-Connected Machine
197
Google Cloud Print™
Google Cloud Print™ is a service that allows you to print to a printer using your
If the network environment is using a proxy server, you need to configure
smart phone, tablet, or any other web-connected devices. Just register your
Google account with the printer, and you are ready to use the Google Cloud
Print™ service. You can print your document or email with Chrome OS, Chrome
browser, or a Gmail™/ Google Docs™ application on your mobile device, so you
don’t need to install the printer driver on the mobile device. Refer to the Google
website (http://www.google.com/cloudprint/learn/ or http://
support.google.com/cloudprint) for more information about Google Cloud
Print™.
the proxy’s IP and port number from Proxy Setting. Contact your network
service provider or network administrator for more information.
5
Confirm your printer in the pop-up window..
6
32
Click Register .
Click Finish.
Now your printer is registered with Google Cloud Print™ service.
Registering your Google account to the printer
Registering from Samsung Mobile Print app
Registering from the Chrome Browser
• Make sure the printer machine is turned on and connected to a wired or
wireless network that has access to the Internet.
In order to use this feature, Samsung Mobile Print app needs to be installed
on your cell phone.
1
2
3
4
Open Samsung Mobile Print app from your mobile device.
Select device setting.
Select Google Cloud Print.
• You should create your Google account in the advance.
1
2
3
Open the Chrome browser.
Visit www.google.com.
Sign in to the Google website with your Gmail™ address.
Enter your printer’s name and description.
2. Using a Network-Connected Machine
198
Google Cloud Print™
4
Enter your printer’s IP address in the address field and press the Enter key
or click Go.
5
Click Login in the upper right corner of the SyncThru™ Web Service
website.
6
If you set the browser to block pop-ups, the confirmation window will not
appear. Allow the site to show pop-ups.
10
11
If it’s your first time logging into SyncThru™ Web Service you need to
log-in as an administrator. Type in the below default ID and Password.
We recommend you to change the default password for security
reasons.
•
ID: admin
•
Password: sec00000
Click Finish printer registration.
Click Manage your printers.
Now your printer is registered with Google Cloud Print™ service.
Google Cloud Print™-ready devices will appear in the list.
33
Printing with Google Cloud Print™
If the network environment is using a proxy server, you need to configure
the proxy’s IP and port number from Settings > Network Settings >
Google Cloud Print > Proxy Setting. Contact your network service
provider or network administrator for more information.
7
When the SyncThru™ Web Service window opens, click Settings >
Network Settings > Google Cloud Print.
8
9
Enter your printer’s name and description.
Click Register.
The printing procedure varies depending on the application or the device you
are using. You can see the application list that supports Google Cloud Print™
service.
Make sure the printer is turned on and connected to a wired or wireless
network that has access to the Internet.
Printing from an application on mobile device
The confirmation pop-up window appears.
The following steps are an example of using the Google Docs™ app from
Android mobile phone.
2. Using a Network-Connected Machine
199
Google Cloud Print™
1
Install the Cloud Print application on your mobile device.
If you do not have the application, download it from the application store
such as Android Market or App Store.
2
3
4
5
6
7
5
6
Select Print with Google Cloud Print.
Click the Print button.
Access the Google Docs™ application from your mobile device.
Tap the option (
Tap the send (
) button of the document that you want to print.
) button.
Tap the Cloud Print (
) button.
Set the printing options if you want.
Tap Click here to Print.
Printing from the Chrome browser
The following steps are an example of using the Chrome browser.
1
2
3
4
Run Chrome.
Open the document or email that you want to print.
Click the wrench (
) icon in the browser’s top right corner.
Click Print. A new tab for printing appears.
2. Using a Network-Connected Machine
200
3. Useful Setting Menus
This chapter explains how to browse the current status of your machine, and the method of setting for advanced
machine setup.
• Print
202
• Copy
204
• Scan
208
• Fax
212
• System Setup
217
• Job Status
228
• Eco
229
• Direct USB
230
• Document Box
231
• Scan to Cloud
232
Print
Item
• You can check the features available in the Basic Guide (see "Menu
overview" on page 31).
Description
To print on both sides of the paper, choose the binding
edge.
• Some menus may not appear in the display depending on options or
models.
• Off: Disables this option.
• Long Edge
To change the menu options:
•
Select
screen.
(Setup) > Machine Setup > Next > Print Setup on the touch
Duplex
• Short Edge
Item
Description
Selects the direction in which information is printed on a
page.
• Portrait
Copies
You can enter the number of copies using the number
keypad.
Resolution
Specifies the number of dots printed per inch (dpi). The
higher the setting, the sharper printed characters and
graphics.
Clear Text
Prints text darker than on a normal document.
Edge Enhance
It allows user to enhance sharpness of text and graphics
for improving readability.
Orientation
• Landscape
3. Useful Setting Menus
202
Print
Item
Trapping
Description
It reduces the white gap caused by misalignment of color
channels in color printing mode. Also black text will be
overprinted on other colors.
This option affect the resolution and clarity of your color
output.
Item
Description
Sets the default paper tray to use.
Paper Source
Auto: Automatically locates the tray with the
same sized paper as an original.
• Normal: This mode will generate printouts with
smooth tone over the entire page.
Screen
• Enhanced: This mode will generate printouts with
sharp texts and smooth graphic/photo objects in the
page.
• Detailed: This mode will generate printouts with
sharp details over the entire page.
Auto CR
Allows you to append the required carriage return to
each line feed, which is useful for Unix or DOS users.
Skip Blank Pages
The printer detects the printing data from computer
whether a page is empty or not. You can set to print or
skip the blank page.
Sets the emulation type and option.
Emulation
• Emulation Type: The machine language defines how
the computer communicates with the machine.
• Setup: Sets the detailed settings for the selected
emulation type.
3. Useful Setting Menus
203
Copy
1
Item
Copy options
Description
You can set the machine to print copies on both sides of
paper.
• You can check the features available in the Basic Guide (see "Menu
overview" on page 31).
• 1 -> 1 Sided: Scans one side of an original and prints
it on one side of the paper.
• Some menus may not appear in the display depending on options or
models.
• 1 -> 2 Sided
To change the menu options:
• 1 -> 2 Sided Rotated
•
Select
(Setup) > Machine Setup > Next > Default Setting > Copy
Default ( or Copy Default > Common ) on the touch screen.
•
Or touch
screen.
Item
Copies
(Copy) and select the menu item you want on the touch
Duplex
• 2 -> 1 Sided
Description
You can enter the number of copies using the number
keypad.
• 2 -> 2 Sided
• 2 -> 1 Sided Rotated
3. Useful Setting Menus
204
Copy
Item
Description
Item
Allows you to check the current tray settings and
change the settings if necessary.
Reduces or enlarges the size of a copied image (see
"Reduced or enlarged copy" on page 60).
Reduce/Enlarge
If the machine is set to Eco mode, reduce and
enlarge features are not available.
Darkness
Paper Source
Adjusts the brightness level to make a copy that is
easier to read, when the original contains faint
markings and dark images (see "Darkness" on page 59)
• On: Prints output in sets to match the sequence of
originals.
• Auto: Select this setting to automatically detect
whether the scanned document is in color or black
and white, and then select an appropriate color
setting.
• Color: Select this setting to print the same as the
original image color.
• Mono: Select this setting to print the copy in black
and white, regardless whether the scanned
document is in color or in black and white.
Original Size
Sets the image size.
Original Type
Improves the copy quality by selecting the document
type for the current copy job (see "Original Type" on
page 60)
Auto: You can set the machine to automatically
to the tray with the same sized paper when the
tray in use is empty.
Set the machine to sort the copy job. For example, if you
make 2 copies of a 3 page original, one complete 3 page
document will print followed by a second complete
document.
You can select the default color mode to use for copy
jobs.
Color Mode
Description
Collation
• Off: Prints output sorted into stacks of individual
pages.
3. Useful Setting Menus
205
Copy
Item
Description
Reduces the size of the original images and prints 2 or 4
pages onto one sheet of paper.
1
2
3
4
Copies can be started quickly.
Custom Copy
Copies can be customized through detailed options.
ID Copy
This feature is helpful for copying a small-sized item
such as business card (see "ID card copying" on page
61).
Auto Fit Copy
Copies image to fit automatically to the paper size.
Layout
Adjusts the layout format such as ID copy, 2/4-up, etc.
1
The Book Copy feature allows you to copy an entire
book. If the book is too thick, lift the cover until its
hinges are caught by the stopper and then close the
cover. If the book or magazine is thicker than 30 mm,
start copying with the cover open.
Prints an image without its background. This copy
feature removes the background color and can be
helpful when copying an original containing color in
the background, such as a newspaper or a catalog.
Adjust Background
Book Copy
• Off: Does not use this feature.
• Left Page: Use this option to print left page of the
book.
• Right Page: Use this option to print right page of the
book.
Description
Basic Copy
2
N-Up Copy
Item
• Off: Does not use this feature.
• Auto: Optimizes the background.
• Enhance Lev.1~2: The higher the number is, the
more vivid the background is.
• Erase Lev.1~4: The higher the number is, the lighter
the background is.
• Both Pages: Use this option to print both pages of
the book.
This copy feature is available only when you
place originals on the scanner glass.
3. Useful Setting Menus
206
Copy
Item
Description
Item
Allows you to erase spots, drill holes, fold creases and
staple marks along any of the four edges of a document.
Watermark
Description
The watermark option allows you to print text over an
existing document. For example, you use it when you
want to have large gray letters reading “DRAFT” or
“CONFIDENTIAL” printed diagonally across the first
page or all pages of a document.
• Off: Does not use this feature.
Edge Erase
• Small Original: Erases the edge of the original if it is
small. This feature is available only when you place
originals on the scanner glass.
• Hole Punch: Erases the marks of bookbinding holes.
• Book Center: Erases the middle part of the paper
which is black and horizontal, when you copy a
book. This feature is available only when you place
originals on the scanner glass.
• Border Erase: Enter the left, right, top, bottom
margin using Number keypad.
You can apply the stamp feature.
Stamp
• Item: Prints the time and date, IP address, page
number, device information, comment, or user ID, to
the copy output.
• Opacity: You can select the transparency.
• Position: Sets the position.
3. Useful Setting Menus
207
Scan
2
Item
Default Setup
You can check the features available in the Basic Guide (see "Menu
overview" on page 31).
To change the menu options:
•
Select
(Setup) > Machine Setup > Next > Default Setting > Scan
Default on the touch screen.
Item
Description
Scan to Email
Sets scan destination to an email. You scan the originals
and email the scanned image to destinations (see
"Scanning to email" on page 261).
Scan to SMB/FTP
Sets scan destination to an SMB/FTP server. You scan
the originals and send the scanned image to an SMB/
FTP server (see "Scanning to FTP/SMB server" on page
262).
Scan to USB
Sets scan destination to a USB. You scan the originals
and save the scanned image to a USB device.
File Format
Description
Sets the file format in which the image is to be saved. If you
select JPEG, TIFF, XPS or PDF, you can select to scan
multiple pages. Depending on the selected scan type, this
option may not appear.
• Multi-Page PDF: Scans originals in PDF, but several
originals are scanned as one file.
• Single-Page PDF: Scans the originals in PDF, and
several originals are scanned as an each individual TIFF
file.
• Multi-Page TIFF: Scans originals in TIFF (Tagged Image
File Format), but several originals are scanned as one
file.
• Single-Page TIFF: Scans the originals in TIFF (Tagged
Image File Format), and several originals are scanned as
an each individual TIFF file.
• JPEG: Scans original in JPEG format.
• Multi-Page XPS: Scans originals in XPS, but several
originals are scanned as one file.
• Single-Page XPS: Scans the originals in XPS, and several
originals are scanned as an each individual TIFF file.
• XPS: This feature is only supported for the
devices that have mass storage.
• The file format JPEG cannot be selected in
the File Format option, if Mono has been
selected for Color Mode.
Sets scan destination to a shared folder. You can create
Scan to Shared Folder and use the shared folder (see "Using shared folder
features" on page 277).
3. Useful Setting Menus
208
Scan
3
Item
Description
Scan Options
You can set the machine to print server confirmation
result report.
Server Confirmation
If you select On-Error, the machine prints a
report only when a transmission is not
successful.
You can set the machine to print email confirmation
result report.
Email Confirmation
• You can check the features available in the Basic Guide (see "Menu
overview" on page 31).
• If you select On-Error, the machine prints a
report only when a transmission is not
successful.
• Some menus may not appear in the display depending on options or
models.
To change the menu options:
•
Touch
•
Or select
(Scan) > select a menu item > Next >
touch screen.
• If a report contains characters or fonts that
the machine does not support, Unknown
could be printed instead of the characters/
fonts in the report.
Item
(Scan) and select the menu item you want on the touch screen.
(Options) on the
Description
Local PC
Sets scan destination to a usb-connected computer.
You scan the originals and save the scanned image to a
directory such as My Documents (see "Basic Scanning"
on page 62).
Network PC
Sets scan destination to a network-connected
computer. You scan the originals and save the scanned
image to a directory such as My Documents (see
"Scanning from network connected machine" on page
260).
3. Useful Setting Menus
209
Scan
Item
Description
WSD
Scans the originals and saves the scanned data on the
connected computer if it supports the WSD (Web
Service for Device) feature.
Destination or To
Enter the destination’s information.
Original Size
Sets the image size.
Original Type
Sets the original document’s type.
Resolution
Sets the image resolution.
Item
Digital Signature in
PDF
Description
Adds to a digital signature to PDF files when you scan
the originals to PDF files. Select On to add a digital
signature to PDF files.
Selects if the machine scans one side of the paper (1
Sided), both sides of the paper (2 Sided), or both sides
of the paper (2 Sided Rotated).
• 1 Sided: For originals that are printed on one side
only.
• 2 Sided: For originals that are printed on both sides.
You can select the color options of scan outputs.
• Color: Uses color to display an image. 24 bits per
pixel, 8 bits for each RGB, is used for 1 pixel.
Duplex
• Gray: Uses the black gradation to display an image.
8 bits per pixel.
If an original is placed on the scanner glass, the
machine shows the window asking to place
another page. Load another original and press
Yes. When you finish, select No for this option.
Color Mode
• Mono: Displays an image in black and white. 1 bit
per pixel.
PDF Encryption
• 2 Sided Rotated: For originals that are printed on
both sides, but the back is rotated 180 degrees.
Darkness
Adjusts the brightness level to scan.
Encrypts PDF files when you scan the originals to PDF
files. Select On to encrypt the PDF file, and set up a
password. To open the file, users need to enter the
password
3. Useful Setting Menus
210
Scan
Item
Filing Policy
Description
You can choose the policy for generating file name
before you proceed with the scan job through server or
USB memory device. If the server or the USB memory
device already has the same name you enter, you can
change the name, cancel the job, or overwrite it.
• Change Name: The sent file is saved as a different
file name that is automatically programmed.
• Overwrite: Overwrites the existing the file.
File Name
Makes a file name to store the scan data.
From
Sets a sender’s email address.
CC
Sends the copy of the email to an additional recipient.
BCC
The same as CC but the recipient's name is not
displayed.
Subject
Sets an email’s subject.
3. Useful Setting Menus
211
Fax
4
Item
Default Setup
Description
Selects the color mode in which you want to send the
fax.
• You can check the features available in the Basic Guide (see "Menu
overview" on page 31).
• Some menus may not appear in the display depending on options or
models.
Color Mode
• Mono: Transmits a fax in black and white.
• Color: Transmits a fax in color.
Original Type
Enhances the fax quality based on the type of the
original document being scanned.
Original Size
Sets the image size.
To change the menu options:
•
This function is especially intended for two-sided
originals. You can select whether the machine sends
the fax on one side or both sides of the paper.
Select
(Setup) > Machine Setup > Next > Default Setting > Fax
Default on the touch screen.
Item
• 1 Sided: For originals that are printed on one side
only.
Description
Darkness
Adjusts the brightness level to scan an original that is
easier to read, when the original contains faint
markings and dark images (see "Darkness" on page 66).
Resolution
The default document settings produce good results
when using typical text-based originals. However, if you
send originals that are of poor quality, or contain
photographs, you can adjust the resolution to produce
a higher quality fax (see "Resolution" on page 65).
• 2 Sided: For originals that are printed on both sides.
Duplex
• 2 Sided Rotated: For originals that are printed on
both sides, but the back is rotated 180 degrees.
To use 2 Sided and 2 Sided Rotated, load the
originals on the DADF. If the machine cannot
detect the original on the DADF, it
automatically changes the option to 1 Sided.
3. Useful Setting Menus
212
Fax
5
Item
General Setup
Junk Fax Setup
• You can check the features available in the Basic Guide (see "Menu
overview" on page 31).
• Some menus may not appear in the display depending on options or
models.
Select
screen.
Secure Receive
Prefix Dial
Sets a prefix of up to five digits. This number dials
before any automatic dial number is started. It is useful
for accessing a PABX exchange.
Stamp Received
Name
Automatically prints the page number, and the date
and time of reception at the bottom of each page of a
received fax.
ECM Mode
Sends faxes using error correction mode (ECM) to
makes sure the faxes are sent smoothly without any
error. It may take more time.
Modem speed
Select the maximum modem speed you want if the
phone line fails to sustain a higher modem speed. You
can select 33.6, 28.8, 14.4, 12.0, 9.6 or 4.8 kbps.
Dial Mode
Sets the dialing mode to either tone or pulse. This
setting may not be available depending on your
country.
(Setup) > Machine Setup > Next > Fax Setup on the touch
Item
Send Forward
Receive Forward
Description
Forwards the received or sent fax to other destination
by a fax or PC. If you are out of office but have to receive
the fax, this feature may be useful.
• See "Forwarding a sent fax to another destination"
on page 271.
• See "Forwarding a received fax" on page 271.
Toll Save
This setting may not be available depending on your
country. Using this feature, the system will not accept
faxes sent from remote stations whose numbers are
stored in the memory as junk fax numbers. This feature
is useful for blocking any unwanted faxes.
Stores the received fax in memory without printing out.
To print received documents, you need to enter the
password. You can prevent your received faxes from
being accessed by unauthorized people (see "Receiving
in secure receiving mode" on page 275).
To change the menu options:
•
Description
Sends faxes at a preset toll-saving time to save on call
costs. This setting may not be available depending on
your country.
3. Useful Setting Menus
213
Fax
Item
Description
Item
Ring To Answer
Specifies the number of times the machine rings before
answering an incoming call.
Receive Mode
Selects the default fax receiving mode (see "Changing
the receive modes" on page 273).
Discard Size
Discards a specific length from the end of the received
fax.
Receive Start Code
Initiates fax reception from an extension phone
plugged into the EXT socket on the back of the
machine. If you pick up the extension phone and hear
fax tones, enter the code. It is preset to *9* at the
factory.
DRPD Mode
Enables a user to use a single telephone line to answer
several different telephone numbers. You can set the
machine to recognize different ring patterns for each
number. This setting may not be available depending
on your country (see "Receiving faxes using DRPD
mode" on page 274).
This option allows users to select sending/receiving fax
Manual TX/RX
manually using the On Hook Dial (
) button,
extension telephone, or a handset.
Redial Term
Sets the time interval before automatic redialing.
Redial Times
Sets the number of redial attempts. If you enter 0, the
machine will not redial.
Sets the machine to print a report whether a fax
transmission was successfully completed or not.
Fax Confirmation
If you select On-Error, the machine prints a
report only when a transmission is not
successful.
Image TCR
Prints a transmission report with a minimized image of
the first page of the fax sent.
Auto Reduction
Automatically reduces an incoming fax page to fit the
size of the paper loaded in the machine.
Description
Allows you to check the current tray settings and
change the settings if necessary.
Paper Source
Auto: You can set the machine to automatically
to the tray with the same sized paper when the
tray in use is empty.
3. Useful Setting Menus
214
Fax
6
Item
Description
Sending Fax
Prints the received fax data on both sides of the paper.
You can save the paper usage.
• Off: Prints only one side of the paper.
Duplex Print
• You can check the features available in the Basic Guide (see "Menu
overview" on page 31).
• Long Edge: Prints both sides of the paper; however,
the binding will be the long edge.
• Some menus may not appear in the display depending on options or
models.
• Short Edge: Prints both sides of the paper; however,
the binding will be the short edge.
Fax Setup Wizard
Makes it easy to configure the necessary fax options
such as machine ID, fax number, etc.
Smart Fax Diagnostics Optimizes the settings for your fax line.
• Auto Configuration: When sending and receiving
faxes, the machine regularly checks for errors and
automatically configures the fax settings to ensure a
stable connection.
• Start Now: Allows you to automatically detect or
manually specify the environment when sending or
receiving faxes. Select Auto Detection to
automatically detect the environment, or manually
specify the faxing environment as Normal,
VoIP(Office), Noise(Home), or Big Noise.
To change the menu options:
•
Touch
(Fax) and select the menu item you want on the touch screen.
Item
Description
Memory Send
Fax can be customized through detailed options.
On Hook Dial
Access a dial tone to send fax.
Sets your machine to send a fax at a later time when you
will not be present (see "Delaying a fax transmission" on
page 270).
Delayed Send
• Initialization: Resets all the settings.
You cannot send a color fax using this feature.
Speed Dial Send
Fax image to destination from speed dial list.
3. Useful Setting Menus
215
Fax
Item
Description
Group Dial Send
Fax image to destination from group dial list (see
"Sending a fax to multiple destinations" on page 64).
Redial
Redials the recently sent fax number or received caller
ID in ready mode, or inserts a pause(-) into a fax number
in edit mode.
3. Useful Setting Menus
216
System Setup
7
Item
Initial Setup
• You can check the features available in the Basic Guide (see "Menu
overview" on page 31).
Default Mode
Sets the machine’s default mode among fax mode, copy
mode, or scan mode.
Sound/Volume
Sets the sound/volume option (see "Sound/Volume" on
page 219).
• Some menus may not appear in the display depending on options or
models.
Sets how long the machine waits before going to power
save mode.
Power Save
To change the menu options:
•
Select
screen.
Description
(Setup) > Machine Setup > Next > Initial Setup on the touch
When the machine does not receive data for an extended
period of time, power consumption is automatically
lowered.
When this option is "On", you can wake up the machine
from the power saving mode with the following actions:
• pressing any button on the control panel
Item
Description
Machine ID & Fax
Number
Sets the machine ID and fax number which will be printed
at the top of each fax page that you send.
Date & Time
Sets the date and time.
Date Format
Sets the date format.
Clock Mode
Selects the format for displaying time between 12 hr. and
24 hr.
Select Country
Selects the country.
Language
Sets the language of the text that appears on the control
panel display.
Wakeup Event
• loading paper in a tray
• opening or closing the front cover
• pulling a tray out or pushing a tray in
• connecting a USB memory device (only for the models
that support USB memory devices)
System Timeout
Sets the time that the machine remembers previously
used copy settings. After the timeout, the machine
restores the default copy settings.
Job Timeout
Sets the length of time the printer waits before printing
the last page of a print job that does not end with a
command to print the page.
3. Useful Setting Menus
217
System Setup
Item
Description
Held Job Timeout
Sets the time to hold the temporarily stopped job.
Altitude
Adjustment
Optimize print quality according to the machine’s
altitude.
Toner Low Alert
If toner in the cartridge has run out, a message informing
the user to change the toner cartridge appears. You can
set the option for this message to appear or not.
Firmware Version
Item
Description
CLR Empty Msg.
When toner cartridge is empty, this option appears. You
can clear the empty message.
Image Management
Allows you to adjust the color setting such as color
registration, color density, etc.
Custom Color
This menu allows you to adjust contrast, color by color.
• Default: Optimizes colors automatically.
Shows the product’s firmware version.
• Print Density: Allows you to manually adjust the color
density for print. Adjust the print density.
Allows you to select the PDF type when saving the data as
a PDF file.
It is recommended to use the Default setting for best
color quality.
• Standard: Saves the data as a regular PDF.
• PDF/A: Saves the data as a PDF that has the necessary
information to render itself in any environment.
PDF Type
PDF/A file must be self-contained: it cannot rely
on another application to render fonts, open
hyperlinks, or execute scripts, audio files, or video
files.
Import Setting
Imports data stored on a USB memory stick to the
machine.
Export Setting
Exports data stored on the machine stick to a USB
memory.
Default Paper Size
You can set the default paper size to use.
Auto Color
Registration
The machine virtually prints certain patterned image to
calibrate the color printing position. This feature
enhances the colored image sharper and clearer, which
means the machine prints the colored image on the
paper more like the one in the monitor.
If you have moved the machine, it is strongly
recommended to operate this menu manually.
3. Useful Setting Menus
218
System Setup
Item
Tone Adjustment
Description
Item
• Default: The machine automatically calibrates the
toner density of machine for the best possible color
print quality. If you select Off, the machine is calibrated
by the factory default toner density.
Humidity
Description
Optimizes print quality according to the humidity in the
environment.
8
• Auto Tone Adjustment: Allows you to automatically
adjust tone for the best possible print quality.
Sound/Volume
• Calibrating ID Sensor: Automatically calculates the
reduced or worn out supplies like toner or machine
parts and uses this information to adjust the color
density. For example, if the yellow toner is running
out, the machine calculates the amount of remaining
yellow toner and adjusts color density so the printouts
are fine.
You can reduce the amount of water vapor produced
during printing.
Vapor Mode
• Off: Disables vapor mode.
• On: Enables vapor mode.
• Auto: Automatically enters vapor mode according to
time in high humidity environments.
Paper Stacking
If you use a machine in a humid area, or you are using the
damp print media caused by a high humidity, the printouts on the output tray may be curled and may not be
stacked properly. In this case, you can set the machine to
use this function to let print-outs stacked firmly. But,
using this function will make the print speed slow.
• You can check the features available in the Basic Guide (see "Menu
overview" on page 31).
• Some menus may not appear in the display depending on options or
models.
To change the menu options:
•
Select
(Setup) > Machine Setup > Next > Initial Setup > Sound/
Volume on the touch screen.
Item
Description
Key Sound
Turns the key sound on or off. A tone sounds each time a
key is pressed if this option is on.
Alarm Sound
Turns the alarm sound on or off. An alarm tone sounds
when an error occurs or fax communication ends if this
option is on.
3. Useful Setting Menus
219
System Setup
9
Item
Description
Paper Setup
Turns on or off the sounds from the telephone line
through the speaker, such as a dial tone or a fax tone.
With this option set to Comm. which means the speaker
is on until the remote machine answers.
Speaker Volume
You can adjust the volume level using On Hook
Dial. You can adjust the speaker volume only
when the telephone line is connected.
a Press Fax on the touch screen.
b Press On Hook Dial. A dial tone sounds from
the speaker.
c Press the arrows until you hear the volume you
want.
d Press On Hook Dial to save the change and
return to ready mode.
Dial Tone volume
Adjusts the dial tone volume. You can select different
levels.
Ring Volume
Adjusts the ring volume. You can select different levels.
• You can check the features available in the Basic Guide (see "Menu
overview" on page 31).
• Some menus may not appear in the display depending on options or
models.
To change the menu options:
•
Select
(Setup) > Machine Setup > Next > Paper Setup and select a tray
type or Margin on the touch screen.
Item
Description
Paper Size
Sets the paper size as A4, Letter, or other paper sizes,
according to your requirements.
Paper Type
Chooses the type of the paper for each tray.
Tray Confirmation
Activates the tray confirmation message. If you open and
close a tray, a window asking you whether to set the
paper size and type for the tray just opened appears.
3. Useful Setting Menus
220
System Setup
10
Item
Description
Tray Behavior
Sets the margins for the document.
• Common Margin / MP Tray / Tray 1 / Tray 2
Margin
- Simplex Margin: Sets the margin for one-sided
printing.
• You can check the features available in the Basic Guide (see "Menu
overview" on page 31).
- Duplex Margin: Sets the margin for double-sided
printing.
• Some menus may not appear in the display depending on options or
models.
- Binding: When printing on both sides of the paper,
side A's margin closest to the binding will be the
same as side B's margin closest to the binding.
Likewise, the sides' margins farthest from the
binding will be the same.
To change the menu options:
•
Select
screen.
(Setup) > Machine Setup > Next > Tray Behavior on the touch
Binding is available only in Common Margin.
• Emulation Margin
Sets the paper margins for emulation print page.
Item
- Top Margin: Sets the top margin.
- Left Margin: Sets the left margin.
Auto Tray Switch
Description
Determine whether or not the machine continues
printing when it detects the paper does not match. For
example, if both tray 1 and tray 2 are filled with the same
size paper, the machine automatically prints from tray 2
after the tray 1 runs out of paper.
This option does not appear if you selected Auto
for Paper Source from printer driver.
3. Useful Setting Menus
221
System Setup
Item
Paper Substitution
Description
Item
Automatically substitutes the printer driver’s paper size
to prevent the paper mismatch between Letter and A4.
For example, if you have A4 paper in the tray but you set
the paper size to Letter in the printer driver, the machine
prints on A4 paper and vice versa.
Tray Mode
Determine whether or not the machine continues
printing when it detects the paper does not match the
paper settings.
Auto Continue
• After 30 sec: If a paper mismatch occurs, an error
message will display. The machine waits for about 30
second, then automatically clear the message and
continue printing.
• After 0 sec: This option allows you to continue
printing when the paper size you have set is
mismatched with the paper in the tray.
• Off: If a paper mismatch occurs, the machine waits
until you insert the correct paper.
Decides to use or not use the Auto tray switch feature.
Description
• Dynamic: If you open and close the tray when a paper
mismatch occurs, the paper settings (size and type) for
that tray automatically change to the settings
required for the job. (When you open and close the
tray in the Dynamic mode, the machine presumes
that the paper in the tray was replaced with the size
and type required for the job.)
• Static: The tray settings do not change when you
open and close the tray.
11
Report
• You can check the features available in the Basic Guide (see "Menu
overview" on page 31).
• Some menus may not appear in the display depending on options or
models.
If you set tray 1 to On, for example, then tray 1 is
excluded during tray switching.
Tray Protection
This setting works for copy or print jobs: It
doesn't affect fax jobs.
3. Useful Setting Menus
222
System Setup
To change the menu options:
•
Select
Item
(Setup) > Machine Setup > Next > Report on the touch screen.
Item
Fax Scheduled Jobs
Prints the document list currently stored for
delayed faxes along with the starting time and
type of each operation.
Fax Send Confirmation
Prints fax confirmation result.
Junk Fax
Prints the junk fax numbers.
Email Sent
Prints information on the emails you have
recently sent.
PCL Font
Prints the PCL font list.
PS Font
Prints the PS/PS3 font list.
Address Book
Prints all of the email addresses currently stored
in the machine’s memory.
Description
Configuration
Prints a report on the machine's overall
configuration.
Demo Page
Prints the demo page to check whether your
machine is printing properly or not.
Help List
Prints the help page to check whether your
machine is printing properly or not.
Network Configuration
Prints information on your machine’s network
connection and configuration.
Supplies Information
Prints supplies’ information page.
Usage Counter
Prints a usage page. The usage page contains the
total number of pages printed.
Account
This is only available when Job Accounting is
enabled from the SyncThru™ Web Admin
Service. You can print a report of printout counts
for each user.
Fax Received
Prints information on the faxes you have recently
received.
Fax Sent
Prints information on the faxes you have recently
sent.
Description
12
Network setup
• You can check the features available in the Basic Guide (see "Menu
overview" on page 31).
• Some menus may not appear in the display depending on options or
models.
3. Useful Setting Menus
223
System Setup
You can also use this feature from the SyncThru™ Web Service. Open the
Web browser from your networked computer and type the IP address of
your machine. When SyncThru™ Web Service opens, click Settings >
Network Settings (see "Using SyncThru™ Web Service" on page 285).
Option
Description
Configure the network transmission speed or port.
Ethernet
Turn the power off and on after you change this
option.
To change the menu options:
•
Select
screen.
You can set whether to use Ethernet on or off.
(Setup) > Machine Setup > Next > Network Setup on the touch
Ethernet Port
Option
Description
Selects the appropriate protocol and configure
parameters to use the network environment (see
"Setting IP address" on page 157).
Configure the network transmission speed.
Ethernet Speed
TCP/IP (IPv4)
There are lots of parameters to be set. If you are
not sure, leave as is, or consult the network
administrator.
TCP/IP (IPv6)
Turn the power off and on after you change this
option.
Turn the power off and on after you change this
option.
802.1x
You can selects the user authentication for network
communication. For detailed information consult the
network administrator.
Wi-Fi
Selects this option to use the wireless network ( see
"Wireless network setup" on page 171).
Selects this option to use the network environment
through IPv6 (see "IPv6 configuration" on page 168).
3. Useful Setting Menus
224
System Setup
Option
Description
• HTTP: You can set whether to use SyncThru™ Web
Service or not.
Option
Network
Configuration
• WINS: You can configure the WINS server. WINS
(Windows Internet Name Service) is used in the
Windows operating system.
• SNMPv1/v2: You can set SNMP (Simple Network
Management Protocol). Administrator’s can use SNMP
to monitor and manage machines on the network.
Description
This list shows information on your machine’s network
connection and configuration.
Reverts the network settings to the default values.
Clear Settings
Turn the power off and on after you change this
option.
• SNTP: You can set SNTP (Simple Network Time
Protocol) settings. SNTP synchronizes the clocks of the
computer systems through the Internet (NTP) so there
would not be a time difference when exchanging
data.
Protocol
Management
• UPnP(SSDP): You can set UPnP protocol.
• mDNS: You can set mDNS (Multicast Domain Name
System) settings.
• SetIP: You can set whether to use SyncThru™ Web
Service or not.
• SLP: You can configure SLP (Service Location
Protocol) settings. This protocol allows host
applications to find services in a local area network
without prior configuration.
Turn the power off and on after you change this
option.
3. Useful Setting Menus
225
System Setup
13
14
Address book setup
Admin setup
• You can check the features available in the Basic Guide (see "Menu
overview" on page 31).
• You can check the features available in the Basic Guide (see "Menu
overview" on page 31).
• Some menus may not appear in the display depending on options or
models.
• Some menus may not appear in the display depending on options or
models.
• You need to enter a password to enter this menu. The default password
is sec00000.
To change the menu options:
•
Select
screen.
(Setup) > Machine Setup > Next > Address Book on the touch
To change the menu options:
•
Option
(Setup) > Admin Setup > Next on the touch screen.
Description
Phone Book
Adds, views, prints or deletes the phone book list. You
also can create a group.
Email
Adds, views, prints or deletes the email list. You also can
create a group.
Print
Prints the address book.
Delete All
Select
Deletes all the current address book.
Item
Description
You can control user access to a machine. You can assign
different levels of permissions to use the machine to each
user.
User Access
Control
You can also use this feature from the SyncThru™
Web Service. Open the Web browser from your
networked computer and type the IP address of your
machine. When SyncThru™ Web Service opens, click
the Security tab > User Access Control (see
"Registering authorized users" on page 242).
3. Useful Setting Menus
226
System Setup
Item
Description
Item
Description
Stamp
Sets the stamp feature to access the Admin Setup menu.
You can install or uninstall applications.
Change Admin.
Password
Changes the machine’s password for accessing the Admin
Setup.
• Application Management: You can uninstall or enable/
disable installed applications.
Firmware
Upgrade
To upgrade the latest firmware, turn this option "On" and
then download the firmware file.
Application
• Install New Application: You can install a new
application from a USB.
You can select the method for overwriting the secure nonvolatile memory.
• Custom: Select to determine the number of times the
memory will be overwritten. The hard disk will be
overwritten as many times as the number you select.
Image Overwrite
• German VSITR: Select to overwrite the memory 7 times.
When overwriting for the 6 times, alternate 0x00 and 0xff
are used to overwrite the disk, and, in the 7th time, the
disk is written with 0xAA.
• DoD5220.28-M: Select to overwrite the memory 3 times.
When overwriting three times, patterns 0x35, 0xCA, 0x97
are used to overwrite the disk’s content. This method of
overwriting the disk is specified by US DoD.
• Australian ACSI33: Select to overwrite the memory 5
times. When overwriting 5 times, character “C” and its
complement alternatively are used to overwrite the disk.
After the 2nd time, there is a mandatory validation. For
the 5th time, random data is used.
3. Useful Setting Menus
227
Job Status
• You can check the features available in the Basic Guide (see "Menu
overview" on page 31).
• Some menus may not appear in the display depending on options or
models.
•
Touch
screen.
(Job Status) and select the menu item you want on the touch
Item
Description
Current Job
Displays the list of jobs in progress and pending.
Complete Job
Displays the list of completed jobs.
3. Useful Setting Menus
228
Eco
• You can check the features available in the Basic Guide (see "Menu
overview" on page 31).
• Some menus may not appear in the display depending on options or
models.
To change the menu options:
•
Touch
(Eco) and select the menu item you want on the touch screen.
Item
Eco-On or Eco-Off
Description
Select eco mode and change on/off or on-forced
option.
Sets eco-related settings and change default settings.
Settings
• Default Mode: Select this to turn on or off the
default mode.
• Feature Configuration: Select the Default mode or
Custom mode.
3. Useful Setting Menus
229
Direct USB
• You can check the features available in the Basic Guide (see "Menu
overview" on page 31).
• Some menus may not appear in the display depending on options or
models.
•
Touch
(Direct USB) and select the menu item you want on the touch
screen.
Item
Description
Print From
Views the file list from the file navigation. Select a file to
print.
Scan to USB
Sets scan destination to a USB. You scan the originals
and save the scanned image to a USB device.
File Manage
Views the file list from the file navigation. Select a file to
delete. You can format the USB device.
Show Space
Shows the remaining space.
3. Useful Setting Menus
230
Document Box
• You can check the features available in the Basic Guide (see "Menu
overview" on page 31).
• Some menus may not appear in the display depending on options or
models.
•
Touch
(Document Box) > Next and select the menu item you want on
the touch screen.
Option
System Boxes
Description
Stores the printing data or prints the secure page.
• Stored Print: Prints out the stored data without
entering password.
• Secured Print: Prints out the stored data with
entering password.
Shared Folder
Show the shared folders on your network and save your
jobs there.
3. Useful Setting Menus
231
Scan to Cloud
• You can check the features available in the Basic Guide (see "Menu
overview" on page 31).
• Some menus may not appear in the display depending on options or
models.
To change the menu options:
•
Touch
(Setup) > Machine Setup > Next > Default Setting > Scan to
Cloud Default on the touch screen.
•
Or touch
(Scan to Cloud) > select the menu item you want > Next on
the touch screen.
Item
Google Drive
Dropbox
Description
Sets scan destination to Google Drive or Dropbox for
cloud service. You scan the originals and send the
scanned image to Google Drive or Dropbox (see
"Scanning with cloud service" on page 264).
3. Useful Setting Menus
232
4. Special Features
This chapter explains special copying, scanning, faxing, and printing features.
• Altitude adjustment
234
• Storing email address
235
• Entering various characters
237
• Setting up the fax address book
239
• Registering authorized users
242
• Printing features
243
• Scan features
259
• Fax features
269
• Using shared folder features
277
• Using optional device features
278
The procedures in this chapter are mainly based on Windows 7.
Altitude adjustment
Print quality is affected by atmospheric pressure, which is determined by the
height of the machine above sea level. The following information will guide you
on how to set your machine for the best print quality.
Before you set the altitude value, determine the altitude where you are.
You can also set the altitude in the Initial Setup option on the machine’s
display (see "Machine’s basic settings" on page 37).
• Select
(Setup) > Machine Setup > Initial Setup > Altitude
Adjustment on the touch screen
4,000 m
(13,123 ft)
1
3,000 m
(9,842 ft)
2
2,000 m
(6,561 ft)
3
1,000 m
(3,280 ft)
4
0
1
2
3
4
High 3
High 2
High 1
Normal
You can set the altitude value from Device Settings in Samsung Easy Printer
Manager program.
For Windows and Mac users, you set from Samsung Easy Printer Manager >
(Switch to advanced mode) > Device Settings, see "Device Settings" on
page 292.
• If your machine is connected to the network, you can set the altitude via
SyncThru™ Web Service (see "Using SyncThru™ Web Service" on page
285).
4. Special Features
234
Storing email address
This feature may not be available depending on model or optional goods
(see "Features by model" on page 8).
You can set up address book with the email addresses you use frequently via
SyncThru™ Web Service and then easily and quickly enter email addresses by
entering the location numbers assigned to them in address book.
1
Storing on your machine
To scan and send an image as an email attachment, you need to set up email
address using SyncThru™ Web Service.
1
Access the SyncThru™ Web Service (see "Using SyncThru™ Web Service"
on page 285).
2
3
Click Login on the upper right of the SyncThru™ Web Service website.
4
5
If you need to set SMB or FTP sever information, check SMB or FTP and set
the information.
6
Click Apply.
If you make a group,
1 Click Address Book > Group > Add Group.
2 Select the Speed No. and enter Group Name.
You can easily add individual address if you check Yes for Add
individual(s) after this group is created.
3 Click Apply.
Type in the ID and Password then click Login. We recommend you to
change the default password for security reasons.
•
ID: admin
•
Password: sec00000
Click Address Book > Individual > Add.
Select the Speed No. and enter e-mail address and fax number.
4. Special Features
235
Storing email address
2
Searching for an email address
Searching sequentially through memory
1
Select
(Setup) > Machine Setup > Next > Address Book > Email >
View List > Individual or Group on the touch screen.
2
Search through the entire memory in index (numerical) order, and select
the name and address you want.
Searching with a particular first letter
1
Select
(Setup) > Machine Setup > Next > Address Book > Email >
View Lists > Individual or Group on the touch screen.
2
Select
(Options) > Search and enter the first few letters of the
name you want.
3
Touch the arrows until the name and number you want appears.
4. Special Features
236
Entering various characters
As you perform various tasks, you may need to enter names and numbers. For
example, when you set up your machine, you enter your name or your
company’s name, and the fax number. When you store fax numbers or email
addresses in memory, you may also enter the corresponding names.
3
Understanding keypad
Press the button until the correct letter appears on the display. For example, to
enter the letter O, press 6, labeled with MNO. Each time you press 6, the display
shows a different letter, M, N, O, m, n, o and finally 6.
• You can enter a space by pressing 1 twice.
• To delete the last digit or character, press the arrows button.
• Special character sets may differ from your machine depending on its
options or the models.
Key
Assigned Numbers, Letters, or Symbols
1
@/.’1
2
ABCabc2
3
DEFdef3
4
GHIghi4
5
JKLjkl5
6
MNOmno6
7
PQRSpqrs7
8
TUVtuv8
9
WXYZwxyz9
0
&+-,0
*
*%^_~!#$()[]
• Some of the follow key values may not appear depending on the job you
are doing.
(These symbols are available when you type for network authentication.)
#
#=|?":{}<>;
(These symbols are available when you type for network authentication.)
4. Special Features
237
Entering various characters
4
Understanding the pop-up keyboard
No.
1
Some of the following keys may not appear depending on the job you are
doing.
You can enter letters, numbers, or special symbols using the pop-up keyboard
on the display screen. This keyboard uses the standard QWERTY layout for ease
of use.
When you touch an input area, the keyboard pops up on the screen. The
keyboard initially shows lowercase letters.
4
2
3
4
5
6
7
3
5
2
8
6
9
1
Key
Description
Moves the cursor between characters in the input area.
Toggles between lowercase keys and uppercase keys.
Returns to the upper menu.
Deletes character in the input area.
Deletes all characters in the input area.
Switches from the alphanumeric keyboard to the numbers or
special symbols keyboard.
Saves and closes input result.
Switches diacritical characters.
Enters a blank between characters. Also, you can insert a pause.
7
9
8
4. Special Features
238
Setting up the fax address book
You can set up speed number with the fax numbers you use frequently via
SyncThru™ Web Service and then easily and quickly enter fax numbers by
entering the location numbers assigned to them in address book.
• For a one-digit (0-9) speed dial number, press and hold the
corresponding digit button on the number keypad for more than 2
seconds.
• For a two- or three-digit speed dial number, press the first digit button(s)
and then hold down the last digit button for more than 2 seconds.
5
Registering a speed dial number
1
Select
(Setup) > Machine Setup > Next > Address Book > Phone
Book > View List > Individual >
(Menu) > Add on the touch
screen.
2
Enter the name, fax number, email address, and speed dial number.
Touch
(back) to go back to the previous screen.
3
Press
(Stop) button or home (
) icon to return to ready mode.
1
Select
(Fax) > Speed Dial Send or Group Dial Send > Next on the
touch screen.
2
3
Select the number you want.
Touch Send.
7
Editing speed dial numbers
6
Using speed dial numbers
When you are prompted to enter a destination number while sending a fax,
enter the speed dial number at which you stored the number you want.
1
Select
(Setup) > Machine Setup > Next > Address Book > Phone
Book > View List > Individual on the touch screen.
2
3
Select the speed dial number you want to edit.
4
Press
Change the name, fax number, email address, and speed dial number.
Touch
(back) to go back to the previous screen.
(Stop) button or home (
) icon to return to ready mode.
4. Special Features
239
Setting up the fax address book
8
10
Registering a group dial number
Printing address book
1
Select
(Setup) > Machine Setup > Next > Address Book > Phone
Book > View List > Group >
(Menu) > Add on the touch screen.
2
3
4
Select the Group Members > Phone Book.
Select an individual address and touch
Press
(Stop) button or home (
(back).
) icon to return to ready mode.
You can check your Address Book settings by printing a list.
1
Select
(Setup) > Machine Setup > Next > Report > Address Book
on the touch screen.
2
Touch Yes when the confirmation windows appears.
The machine begins printing.
9
Editing group dial numbers
1
Select
(Setup) > Machine Setup > Next > Address Book > Phone
Book > View List > Group on the touch screen.
2
3
4
Select the group dial number you want to edit.
5
Press
Select Name and edit the group name using the keyboard.
Select Group Members and add or delete the group number using the
Phone Book.
(Stop) button or home (
) icon to return to ready mode.
4. Special Features
240
Setting up the fax address book
11
Searching address book for an entry
There are two ways to search for a number in memory. You can either scan from
A to Z sequentially, or you can search by entering the first letters of the name
associated with the number.
1
Select
(Setup) > Machine Setup > Next > Address Book > Phone
Book > View Lists > Group >
(Menu) > Search on the touch
screen.
2
Enter the name, number, or letter you want to search and press OK from
the keyboard on the touch screen.
OR
Press the name and number or the keypad button labeled with the letter
you want to search.
For example, if you want to find the name “MOBILE,” press the 6 button,
which is labeled with “MNO.”
3
Press
(Stop) button or home (
) icon to return to ready mode.
4. Special Features
241
Registering authorized users
To send a scanned image, copy image, or fax data through email or via network
server safely, you must register account information of authorized users to your
local machine using SyncThru™ Web Service.
1
Access the SyncThru™ Web Service (see "Using SyncThru™ Web Service"
on page 285).
2
3
Click Login on the upper right of the SyncThru™ Web Service website.
You can easily add individual address if you check Yes for Add individual(s)
after this group is created.
10
Click Apply.
Type in the ID and Password then click Login. We recommend you to
change the default password for security reasons.
•
ID: admin
•
Password: sec00000
4
5
Click Security > User Access Control > Authentication.
6
7
8
9
Click Apply.
Select Basic Authentication in the Authentication Mode, and select
Local Authentication in the AA Method, and click.
Click OK in the confirmation pop-up window.
Click User Profile > Add.
Enter User Name, Login ID, Password, Confirm Password, E-mail
Address, and Fax Number.
4. Special Features
242
Printing features
If Printing preferences has a ►, you can select other printer drivers
connected to the selected printer.
For basic printing features, refer to the Basic Guide (see "Basic printing" on
page 52).
5
6
12
Changing the default print settings
1
Click the Windows Start menu.
•
2
Click OK.
If you want to change the settings for each print job, change it in Printing
Preferences.
For Windows 8, from the Charms, select Search > Settings.
For Windows XP/Server 2003, select Printer and Faxes.
•
•
•
3
4
Change the settings on each tab.
For Windows Server 2008/Vista, select Control Panel > Hardware
and Sound > Printers.
For Windows Server 2008 R2, select Control Panel > Hardware >
Devices and Printers.
13
Setting your machine as a default machine
1
For Windows 7/8, select Control Panel > Devices and Printers.
Right-click on your machine.
Click the Windows Start menu.
•
2
For Windows 8, from the Charms, select Search > Settings.
For Windows XP/Server 2003, select Printer and Faxes.
For Windows XP/Server 2003/Server 2008/Vista, select Printing
Preferences.
•
For Windows Server 2008/Vista, select Control Panel > Hardware
and Sound > Printers.
For Windows 7/8 or Windows Server 2008 R2, from context menus, select
Printing preferences.
•
For Windows Server 2008 R2, select Control Panel > Hardware >
Devices and Printers.
•
For Windows 7/8, select Control Panel > Devices and Printers.
4. Special Features
243
Printing features
3
4
Select your machine.
1
Check the Print to file box in the Print window.
2
3
Click Print.
Right-click your machine and select Set as Default Printer.
For Windows 7 or Windows Server 2008 R2, if Set as default printer has a
►, you can select other printer drivers connected to the selected printer.
14
Using advanced print features
XPS printer driver: used to print XPS file format.
• See "Features by model" on page 8.
• The XPS printer driver can be installed only on Windows Vista OS or
higher.
• Install optional memory when an XPS job does not print because the
printer is out of memory.
• You can install the printer driver and software when you insert the
software CD into your CD-ROM drive.
For Windows, select the printer XPS driver in the Select Software to
Install window.
Type in the destination path and the file name, and then click OK.
For example, c:\Temp\file name.
If you type in only the file name, the file is automatically saved in My
Documents, Documents and Settings, or Users. The saved folder may
differ, depending on your operating system or the application you are
using.
Printing to a file (PRN)
You will sometimes need to save the print data as a file.
4. Special Features
244
Printing features
Understanding special printer features
You can use advanced printing features when using your machine.
To take advantage of the printer features provided by your printer driver, click Properties or Preferences in the application’s Print window to change the print
settings. The machine name that appears in the printer properties window may differ depending on the machine in use.
• Some menus may not appear on the display depending on options or models. If so, it is not applicable to your machine.
• Select the Help menu or click the
on page 55).
Item
Multiple Pages per
Side
button from the window or press F1 on your keyboard and click on any option you want to know about (see "Using help"
Description
Selects the number of pages to print on a single sheet of paper. To print more than one page per sheet, the pages will be reduced in size and
arranged in the order you specify. You can print up to 16 pages on one sheet.
4. Special Features
245
Printing features
Item
Poster Printing
Description
Prints a single-page document onto 4 (Poster 2x2), 9 (Poster 3x3), or 16 (Poster 4x4) sheets of paper, for the purpose of pasting the sheets
together to form one poster-size document.
Select the Poster Overlap value. Specify Poster Overlap in millimeters or inches by selecting the radio button on the upper right of Basic tab
to make it easier to paste the sheets together.
Prints your document on both sides of a sheet of paper and arranges the pages so that the paper can be folded in half after printing to produce
a booklet.
Booklet Printinga
• If you want to make a booklet, you need to print on Letter, Legal, A4, US Folio, or Oficio sized print media.
8
9
• The Booklet Printing option is not available for all paper sizes. Select the available paper Size option under the Paper tab to see what
paper sizes are available.
• If you select an unavailable paper size, this option can be automatically canceled. Select only available paper (paper without
mark).
• Double-sided
Printing
• Double-sided
Printing (Manual)a
or
Print on both sides of a sheet of paper (duplex). Before printing, decide how you want your document oriented.
• You can use this feature with Letter, Legal, A4, US Folio or Oficio sized paper
• If your machine does not have a duplex unit, you should complete the printing job manually. The machine prints every other page of
the document first. After that, a message appears on your computer.
• Skip Blank Pages feature does not work when you select the Double-sided Printing (Manual) option.
4. Special Features
246
Printing features
Item
Description
• Double-sided
Printing
• None: Disables this feature.
• Double-sided
• Long Edge: This option is the conventional layout used in bookbinding.
Printing (Manual)a
• Printer Default: If you select this option, this feature is determined by the settings you have selected on the control panel of the machine.
• Short Edge: This option is the conventional layout used in calendars.
• Reverse Double-Sided Printing: Check this option to reverse the print order when duplex printing. This option is not available when you
use Double-sided Printing (Manual).
Paper Options
Changes the size of a document to appear larger or smaller on the printed page by entering in a percentage by which to enlarge or decrease the
document.
Watermark
The watermark option allows you to print text over an existing document. For example, you use it when you want to have large gray letters
reading “DRAFT” or “CONFIDENTIAL” printed diagonally across the first page or all pages of a document.
4. Special Features
247
Printing features
Item
Watermark
(Creating a
watermark)
Watermark
(Editing a watermark)
Watermark
(Deleting a
watermark)
Description
a To change the print settings from your software application, access Printing Preferences.
b Click the Advanced tab, select Edit from the Watermark drop-down list. The Edit Watermarks window appears.
c Enter a text message in the Watermark Message box.
You can enter up to 256 characters. The message displays in the preview window.
a
b
c
d
e
To change the print settings from your software application, access Printing Preferences.
Click the Advanced tab, select Edit from the Watermark drop-down list. The Edit Watermarks window appears.
Select the watermark you want to edit from the Current Watermarks list and change the watermark message and options.
Click Update to save the changes.
Click OK or Print until you exit the Print window.
a
b
c
d
To change the print settings from your software application, access Printing Preferences.
Click the Advanced tab, select Edit from the Watermark drop-down list. The Edit Watermarks window appears.
Select the watermark you want to delete from the Current Watermarks list and click Delete.
Click OK or Print until you exit the Print window.
This option is available only when you use the PCL/SPL printer driver (see "Software" on page 8).
Overlaya
An overlay is text and/or images stored in the computer hard disk drive (HDD) as a special file format that can be printed on any document.
Overlays are often used to take the place of letterhead paper. Rather than using preprinted letterhead, you can create an overlay containing
exactly the same information that is currently on your letterhead. To print a letter with your company’s letterhead, you do not need to load
preprinted letterhead paper in the machine: just print the letterhead overlay on your document.
To use a page overlay, you must create a new page overlay containing your logo or image.
• The overlay document size must be the same as the document you print with the overlay. Do not create an overlay with a watermark.
• The resolution of the overlay document must be the same as that of the document you will print with the overlay.
4. Special Features
248
Printing features
Item
Overlaya
(Creating a new page
overlay)
Description
a
b
c
d
To save the document as an overlay, access Printing Preferences.
Click the Advanced tab, and select Edit from the Text drop-down list. Edit Overlay window appears.
In the Edit Overlay window, click Create.
In the Save As window, type a name up to eight characters in the File name box. Select the destination path, if necessary (The default is
C:\Formover).
e Click Save. The name appears on the Overlay List.
f Click OK or Print until you exit the Print window.
The file is not printed. Instead, it is stored on your computer hard disk drive.
a Click the Advanced tab.
b Select the desired overlay from the Text drop-down list.
c If the overlay file you want does not appear in the Text drop-down list, select Edit... from the list and click Load. Select the overlay file you
want to use.
If you have stored the overlay file you want to use in an external source, you can also load the file when you access the Open window.
Overlaya
After you select the file, click Open. The file appears in the Overlay List box and is available for printing. Select the overlay from the Overlay
(Using a page overlay)
List box.
d If necessary, check Confirm Page Overlay When Printing box. If this box is checked, a message window appears each time you submit a
document for printing, asking you to confirm printing an overlay on your document.
If this box is not checked and an overlay has been selected, the overlay automatically prints with your document.
e Click OK or Print until you exit the Print window.
Overlaya
(Deleting a page
overlay)
a
b
c
d
e
f
In the Printing Preferences window, click the Advanced tab.
Select Edit in the Text drop down list.
Select the overlay you want to delete from the Overlay List box.
Click Delete.
When a confirming message window appears, click Yes.
Click OK or Print until you exit the Print window. You can delete page overlays that you no longer use.
4. Special Features
249
Printing features
Item
Description
•
This feature is available only if you have installed the mass device or optional memory (see "Variety feature" on page 10).
• Some menus may not appear on the display depending on options or models. If so, it is not applicable to your machine.
• You need to check Storage Options to use this feature (see "Setting Device Options" on page 86).
• Without installing the mass storage device in the machine, the Ram Disk feature provides only 3 options: Normal, Proof, and
Confidential.
• Print Mode: The default Print Mode is Normal, which is for printing without saving the printing file in the memory.
- Normal: This mode prints without storing your document in the optional memory.
- Proof: This mode is useful when you print more than one copy. You can print one copy first to check, then print the rest of the copies later.
- Confidential: This mode is used for printing confidential documents. You need to enter a password to print.
Print Mode
- Store: Select this setting to save a document in the mass storage device without printing.
- Store and Print: This mode is used when printing and storing document at the same time.
- Spool: This option can be useful when handling large amounts of data. If you select this setting, the printer spools the document into the
mass storage device and then prints it from the mass storage device queue, decreasing the computer’s work load.
- Print Schedule: Select this setting to print the document at a specified time.
• Job Name: This option is used when you need to find a stored file using the control panel.
• User ID: This option is used when you need to find a stored file using the control panel. The user name automatically appears as the
user name that you use to log on Windows.
• Enter Password: If the Property of the document box you selected is Secured, you have to enter the password for the document
box. This option is used for loading a stored file using the control panel.
• Confirm Password: Re-enter the password to confirm it.
4. Special Features
250
Printing features
Item
Job Accounting
Description
This option allows you to print with the given permission.
• User permission: If you check this option, only users with user permission can start a print job.
• Group permission: If you check this option, only groups with group permission can start a print job.
• Click the question mark(
) from the upper-right corner of the window and click on any option you want to know about.
• Administrators can enable job accounting and configure permissions in the control panel or SyncThru™ Web Service.
Encrypts printing data first, and transmits it to the machine. This feature protects the printing information even though the data is snatched on
a network.
Job Encryption
Job Encryption feature is enabled only when the mass storage device is installed. The mass storage device is used to decrypt the printing
data (see "Variety feature" on page 10).
a. This option is not available when you use XPS driver.
4. Special Features
251
Printing features
• Whether or not a PDF file can be printed using the Direct Printing Utility
program depends on how the PDF file was created.
15
Using Direct Printing Utility
• The Direct Printing Utility program supports PDF version 1.7 and below.
For higher versions, you must open the file to print it.
• Available for Windows OS users only.
•
Direct Printing Utility may not be available depending on model or
optional goods (see "Software" on page 8).
Printing
There are several ways you can print using the Direct Printing Utility.
What is Direct Printing Utility?
1
Direct Printing Utility is a program that sends the PDF files directly to your
machine to print without having to open the file.
To install this program:
Download the software from the Samsung website then unpack and install it:
(http://www.samsung.com > find your product > Support or Downloads).
• Optional memory or mass storage device should be installed on your
machine, to print files using this program. (see "Variety feature" on page
10).
• You cannot print PDF files that are restricted. Deactivate the printing
restriction feature and retry printing.
From the Start menu select Programs or All Programs > Samsung
Printers > Direct Printing Utility .
The Direct Printing Utility window appears.
2
Select your machine from the Select Printer drop-down list and click
Browse.
3
Select the file you wish to print and click Open.
The file is added in the Select Files section.
4
5
Customize the machine settings for your needs.
Click Print. The selected PDF file is sent to the machine.
• You cannot print PDF files that are restricted by a password. Deactivate
the password feature, and retry printing.
4. Special Features
252
Printing features
Using the right-click menu
1
Right-click on the PDF file to print and select Direct Printing.
1
2
Open the document to print.
3
Choose your paper size, orientation, scaling, other options, and make
sure that your machine is selected. Click OK.
4
5
6
Open the File menu and click Print.
Open the File menu and click Page Setup (Document Setup in some
applications).
The Direct Printing Utility window appears with the PDF file is added.
2
3
4
Select the machine to use.
Customize the machine settings.
Click Print. The selected PDF file is sent to the machine.
16
Choose the number of copies and indicate which pages to print.
Click Print.
Mac printing
Changing printer settings
Some features may not be available depending on models or options. It
means that the features are not supported.
You can use advanced printing features when using your machine.
Printing a document
Open an application and select Print from the File menu. The machine name,
which appears in the printer properties window, may differ depending on the
machine in use. Except for the name, the composition of the printer properties
window is similar to the following.
When you print with a Mac, you need to check the printer driver settings in each
application you use. Follow the steps below to print from a Mac:
Printing multiple pages on one sheet
You can print more than one page on a single sheet of paper. This feature
provides a cost-effective way to print draft copies.
4. Special Features
253
Printing features
1
2
3
4
Open an application, and select Print from the File menu.
Select Layout from the drop-down list under Orientation. In the Pages
per Sheet drop-down list, select the number of pages you want to print
on one sheet of paper.
Select the other options to use.
Click Print.
The machine prints the selected number of pages to print on one sheet
of paper.
Printing on both sides of the paper
1
2
3
4
5
From your Mac application, select Print from the File menu.
Select Layout from the drop-down list under Orientation.
Select a binding orientation from the Two-Sided option.
Select the other options to use.
Click Print and the machine prints on both sides of the paper.
If you print more than 2 copies, the first copy and the second copy might
print on the same sheet of paper. Avoid printing on both sides of paper
when you are printing more than 1 copy.
Some features may not be available depending on models or options. It
means that the features are not supported (see "Variety feature" on page
10).
Before printing in the duplex mode, decide on which edge you will be binding
your finished document. The binding options are, as follows:
•
Long-Edge Binding: This option is the conventional layout used in book
binding.
•
Short-Edge Binding: This option is the type often used with calendars.
4. Special Features
254
Printing features
Using help
Printing from applications
Click the question mark on the bottom-left corner of the window and click on
the topic you want to know about. A pop-up window appears with information
about that option's feature, which is provided from the driver.
There are a lot of Linux applications that allow you to print using Common UNIX
Printing System (CUPS). You can print on your machine from any such
application.
1
2
Open the document to print.
Open the File menu and click Page Setup (Print Setup for some
applications).
3
Choose your paper size, orientation, and make
sure that your machine is selected. Click Apply.
17
Linux printing
Some features may not be available depending on models or options. It
means that the features are not supported.
4
5
6
7
8
Open the File menu and click Print.
Select your machine to print.
Choose the number of copies and indicate which pages to print.
Change other printing options in each tab, if necessary.
Click Print.
Automatic/manual duplex printing may not be available depending on
models. You can alternatively use the lpr printing system or other
applications for odd-even printing (see "Features by model" on page 8).
4. Special Features
255
Printing features
Printing files
18
Unix printing
You can print text, image, pdf files on your machine using the standard
CUPS directly from the command line interface. The CUPS lp or lpr utility allows
you to do that. You can print these files by using below command format.
Some features may not be available depending on models or options. It
means that the features are not supported (see "Features by model" on
page 8).
"lp -d <printer name> -o <option> <file name>"
Please refer to lp or lpr man page on your system for more details.
Configuring Printer Properties
Proceeding the print job
After installing the printer, choose any of the image, text, or PS files to print.
You can change the default printing options or connection type with Printing
utility supplied by the OS.
1
2
3
4
1
For example, if you are printing “document1”
Launch Printing utility (Go to System > Administration > Printing
menu or execute "system-config-printer" command in Terminal
program).
printui document1
This will open the UNIX Printer Driver Print Job Manager in which the
user can select various print options.
Select your printer and double-click it.
Change default printing options or connection type.
Click Apply button.
Execute “printui <file_name_to_print>” command.
2
3
4
Select a printer that has been already added.
Select the printing options from the window such as Page Selection.
Select how many copies are needed in Number of Copies.
4. Special Features
256
Printing features
To take advantage of the printer features provided by your printer driver,
press Properties.
5
Press OK to start the print job.
Automatic/manual duplex printing may not be available depending on
models. You can alternatively use the lpr printing system or other
applications for odd-even printing.
•
Multiple pages: Print several pages on one side of the paper.
•
Page Border: Choose any of the border styles (e.g., Single-line hairline,
Double-line hairline)
Changing the machine settings
The UNIX printer driver Print Job Manager in which the user can select various
print options in printer Properties.
The following hot keys may also be used: “H” for Help, “O” for OK, “A” for Apply,
and “C” for Cancel.
General tab
•
Paper Size: Set the paper size as A4, Letter, or other paper sizes, according
to your requirements.
•
Paper Type: Choose the type of the paper. Options available in the list box
are Printer Default, Plain, and Thick.
•
Paper Source: Select from which tray the paper is used. By default, it is Auto
Selection.
•
Orientation: Select the direction in which information is printed on a page.
•
Duplex: Print on both sides of paper to save paper.
Image tab
In this tab, you can change the brightness, resolution, or image position of your
document.
Text tab
Set the character margin, line space, or the columns of the actual print output.
Margins tab
•
Use Margins: Set the margins for the document. By default, margins are not
enabled. The user can change the margin settings by changing the values in
the respective fields. Set by default, these values depend on the page size
selected.
•
Unit: Change the units to points, inches, or centimeters.
4. Special Features
257
Printing features
Printer-Specific Settings tab
Select various options in the JCL and General frames to customize various
settings. These options are specific to the printer and depend on the PPD file.
4. Special Features
258
Scan features
• For basic scanning features, refer to the Basic Guide (see "Basic scanning"
on page 62).
• This feature may not be available depending on model or optional goods
(see "Features by model" on page 8).
• The maximum resolution that can be achieved depends upon various
factors, including computer speed, available disk space, memory, the
size of the image being scanned, and bit depth settings. Thus, depending
on your system and what you are scanning, you may not be able to scan
at certain resolutions, especially using enhanced dpi.
19
You can scan the originals with your machine via an USB cable or the network.
The following methodologies can be used for scanning your documents:
•
Scan to PC: Scan the originals from the control panel. Then, the scanned
data will be stored in the connected computers My Documents folder (see
"Basic Scanning" on page 62).
•
TWAIN: TWAIN is one of the preset imaging applications. Scanning an
image launches the selected application, enabling you to control the
scanning process. This feature can be used via the local connection or the
network connection (see "Scanning from image editing program" on page
265).
•
Samsung Easy Document Creator: You can use this program to scan
images or documents. We recommend using scan features with the
Samsung Easy Document Creator program provided in the supplied
software CD.
Basic scanning method
This feature may not be available depending on model or optional goods
(see "Variety feature" on page 10).
See "Using Samsung Easy Document Creator" on page 289.
•
WIA: WIA stands for Windows Images Acquisition. To use this feature, your
computer must be connected directly with the machine via an USB cable
(see "Scanning using the WIA driver" on page 265).
•
USB Memory: You can scan a document and save the scanned image onto
an USB memory device.
•
Email: You can send the scanned image as an email attachment (See
"Scanning to email" on page 261).
•
FTP/SMB: You can scan an image and upload it to an FTP/SMB server (see
"Scanning to FTP/SMB server" on page 262).
4. Special Features
259
Scan features
20
21
Setting the scan settings in the computer
Scanning from network connected machine
This feature may not be available depending on model or optional goods
(see "Features by model" on page 8).
1
Open Samsung Easy Printer Manager (see "Using Samsung Easy
Printer Manager" on page 290).
2
3
4
Select the appropriate machine from the Printer List.
Select Scan to PC Settings menu.
Make sure the printer driver is installed on your computer using the software CD,
since the printer driver includes the scan program (see "Installing the driver
locally" on page 27).
1
Place a single document face down on the document glass, or load the
documents face up into the document feeder (see "Loading originals" on
page 49).
2
Select
(Scan) > Network PC > Next and select the scan destination
you want on the touch screen.
Select the option you want.
•
Scan Activation: Determines whether or not scanning is enabled on
the device.
•
Basic tab: Contains settings related to general scan and device
settings.
•
5
This feature is not available for the machine that does not support the
network interface (see "Features by model" on page 8).
If you see Not Available message, check the port connection.
Image tab: Contains settings related to image altering.
Select Save > OK.
3
Select your registered computer ID, and enter the Password if
necessary.
4. Special Features
260
Scan features
• ID is the same ID as the registered scan ID for Samsung Easy Printer
Manager >
Switch to advanced mode > Scan to PC Settings.
Setting up an email account
1
Access the SyncThru™ Web Service (see "Using SyncThru™ Web Service"
on page 285).
2
3
4
5
Select Settings > Network Settings and Outgoing Mail Server(SMTP).
6
7
Enter the SMTP server login name and password.
• Password is the 4 digit number registered password for Samsung Easy
Printer Manager >
Switch to advanced mode > Scan to PC
Settings.
4
5
Touch
(Options) > select the option you want using arrows >
Start button on the touch screen.
Scanning begins.
Scanned image is saved in computer’s C:\Users\users name\My
Documents. The saved folder may differ, depending on your operating
system or the application you are using.
Enter the IP address in dotted decimal notation or as a host name.
Enter the server port number, from 1 to 65535.
Check the box next to SMTP Requires Authentication to require
authentication.
Press Apply.
• If the authentication method of SMTP server is POP3 before SMTP, put a
check mark of SMTP Requires POP Before SMTP Authentication.
22
• Enter the IP address and port number.
Scanning to email
This feature may not be available depending on model or optional goods
(see "Features by model" on page 8).
4. Special Features
261
Scan features
Scanning and sending an email
23
Scanning to FTP/SMB server
1
Place a single document face down on the document glass, or load the
documents face up into the document feeder (see "Loading originals" on
page 49).
2
3
Select
4
Enter the sender’s and recipient’s email address.
(Scan) > Email > Next on the touch screen.
Enter the login name and password if you configured on SyncThru™ Web
Service (see "Using SyncThru™ Web Service" on page 285).
You can send an email to yourself by activating the Auto Send To Self
option in the Settings > Scan > Scan To E-mail on SyncThru™ Web Service.
5
Select Direct Input or Address Book and enter the email address using
number keypad on the touch screen.
6
Touch
(Options) > select the option you want using arrows >
Start button on the touch screen.
7
This feature may not be available depending on model or optional goods
(see "Features by model" on page 8).
Setting up an FTP/SMB server
1
Access the SyncThru™ Web Service (see "Using SyncThru™ Web Service"
on page 285).
2
3
4
5
6
Select Address Book > Individual > Add.
7
8
Enter the login name and password.
The machine begins scanning and then sends the email.
Check the box next to Add FTP or Add SMB.
Enter the IP address in dotted decimal notation or as a host name.
Enter the server port number, from 1 to 65535.
Check the box next to Anonymous, then the server permits the access
of unauthorized people.
Enter the domain name if your server is joined to the certain domain,
otherwise just enter your computer name which is registered to the SMB
server.
4. Special Features
262
Scan features
9
Enter the path for saving the scanned image.
24
Scanning to WSD
• The folder to save the scanned image must be on the root.
• The folder properties need to be setup as a share.
• Your user name should have the rights to read and write the folder.
10
Press Apply.
Scans the originals and saves the scanned data on a connected computer if the
computer supports the WSD (Web Service for Device) feature. To use the WSD
feature, you need to install the WSD printer driver on your computer. For
Windows 7, you can install the WSD driver by Control Panel > Devices and
Printers > Add a printer. Click Add a network, wireless or Bluetooth printer
from the wizard.
Scanning and sending to FTP/SMB server
1
2
Make sure that your machine is connected to a network.
Place a single document face down on the document glass, or load the
documents face up into the document feeder (see "Loading originals" on
page 49).
3
Select
(Scan) > SMB or FTP > Next and select the scan destination
you want on the touch screen.
4
Touch
(Options) > select the option you want using arrows >
Start button on the touch screen.
5
• The WSD feature works only with Windows Vista® or later version that are
the WSD-compliant computer.
The machine begins scanning and then sends the scanned image to the
specified server.
• The following installation steps are based on Windows 7 computer.
Installing a WSD Printer Driver
1
2
3
Select Start > Control Panel > Devices and Printers > Add a printer.
Click Add a network, wireless or Bluetooth printer from the wizard.
In the printers list, select the one you want to use, and then click Next.
4. Special Features
263
Scan features
25
• The IP address for WSD printer is http://IP address/ws/ (example: http://
111.111.111.111/ws/).
• If no WSD printer is displayed in the list, click The printer that I want
isn't listed > Add a printer using a TCP/IP address or hostname and
select Web Services Device from Device type. Then enter the printer's
IP address.
Scanning with cloud service
You should be registered to a Google Drive or Dropbox account to use this
function.
Logging into Google Drive or Dropbox
4
Follow the instructions in the installation window.
Google Drive or Dropbox follow each cloud’s log in policy.
Scanning using the WSD feature
1
2
3
Make sure that the machine is connected to your computer and
powered on.
Place a single document face down on the document glass, or load the
documents face up into the document feeder (see "Loading originals" on
page 49).
Touch
(Scan to Cloud) on the touch screen.
Select the cloud service where you want to send the scanned data.
Enter the cloud service account and password to access the cloud service
you selected.
To log in automatically, check Enable Auto Login and press OK.
To log in using a different account, press Logout on the touch screen and
log in as a different account.
Select
(Scan) > WSD > Next and select the scan destination you
want on the touch screen.
If you see Not Available message, check the port connection. Or check the
printer driver for WSD is correctly installed.
4
1
2
3
4
Press OK.
Touch Start on the touch screen.
4. Special Features
264
Scan features
Scanning to Google Drive or Dropbox
1
Make sure that the machine is connected to your computer and
powered on.
2
Place a single document face down on the document glass, or load the
documents face up into the document feeder (see "Loading originals" on
page 49).
3
4
5
6
7
Touch
(Scan to Cloud) on the touch screen.
Select your cloud service where you want to send the scanned data.
Select the folder you want to scan to.
If necessary, touch
want.
(Options) and select the scan settings you
Touch Start on the touch screen.
Scanning begins.
26
Scanning from image editing program
You can scan and import documents in the image editing software such as
Adobe Photoshop, if the software is TWAIN-compliant. Follow the steps below
to scan with TWAIN-compliant software:
1
Make sure that the machine is connected to your computer and
powered on.
2
Place a single document face down on the document glass, or load the
documents face up into the document feeder (see "Loading originals" on
page 49).
3
4
5
6
Open an application, such as Adobe Photoshop.
Click File > Import, and select the scanner device.
Set the scan options.
Scan and save your scanned image.
27
Scanning using the WIA driver
Your machine supports the Windows Image Acquisition (WIA) driver for
scanning images. WIA is one of the standard components provided by Microsoft
Windows 7 and works with digital cameras and scanners. Unlike the TWAIN
driver, the WIA driver allows you to scan and easily adjust images without using
additional software:
The WIA driver works only on Windows OS with a USB port.
4. Special Features
265
Scan features
1
Make sure that the machine is connected to your computer and
powered on.
2
Place a single document face down on the document glass, or load the
documents face up into the document feeder (see "Loading originals" on
page 49).
3
Click Start > Control Panel > Hardware and Sound > Devices and
Printers.
4
5
6
Right-click on device driver icon in Printers and Faxes > Start Scan.
7
• Available for Windows OS users only.
• Windows XP or higher and Internet Explorer 6.0 or higher is the minimum
requirement for Samsung Easy Document Creator.
• Samsung Easy Document Creator is installed automatically when you
install the machine software (see "Using Samsung Easy Document
Creator" on page 289).
1
Place a single document face down on the document glass, or load the
documents face up into the document feeder (see "Loading originals" on
page 49).
2
3
From the Start menu select Programs or All Programs.
New Scan application appears.
Choose your scanning preferences and click Preview to see how your
preferences affect the picture.
Scan and save your scanned image.
28
Scanning with Samsung Easy Document Creator
Samsung Easy Document Creator is an application to help users scan, compile,
and save documents in multiple formats, including .epub format.
Click Samsung Printers, and start Samsung Easy Document Creator.
Click Scan (
) from the home screen.
4
5
6
Select the type of scanning or a favorites then click Start.
7
8
Select to Save to Location, Send to E-mail, or Send to SNS.
Make adjustments to the image (Scan Settings and More Options).
Click Scan to scan a final image or Prescan to get another preview
image.
Click on Save (Saving a Scan), Send ( E-mailing a Scan), or Share
(Uploading).
4. Special Features
266
Scan features
If there is room on the document glass, more than one item can be scanned
at the same time. Use the
If scanning does not operate in Image Capture, update Mac OS to the latest
version.
tool to make multiple selection areas.
Scanning from network connected machine
29
Mac scanning
Network or wireless model only (see "Features by model" on page 8).
Scanning from USB connected machine
1
2
3
Make sure that the machine is connected to your computer and
powered on.
Place a single document face down on the document glass, or load the
documents face up into the document feeder (see "Loading originals" on
page 49).
Start Applications and click Image Capture.
1
2
Make sure that your machine is connected to a network.
3
4
Start Applications and click Image Capture.
Place a single document face down on the document glass, or load the
documents face up into the document feeder (see "Loading originals" on
page 49).
According to OS, follow steps below.
•
If No Image Capture device connected message appears, disconnect the
USB cable and reconnect it. If the problem continues, refer to the Image
Capture’s help.
4
5
•
Select the option you want.
Scan and save your scanned image.
5
For 10.5
-
Click Devices > Browse Devices on Menu bar.
-
Make sure that Connected checkbox is checked beside your
machine in Bonjour Devices.
For 10.6 -10.9, select your device below SHARED.
Set the scan options on this program.
4. Special Features
267
Scan features
6
Scan and save your scanned image.
• If scanning does not operate in Image Capture, update Mac OS to the
latest version.
• For more information, refer to the Image Capture’s help.
• You can also scan using TWAIN-compliant software, such as Adobe
Photoshop.
• You can scan using Samsung Scan Assistant software. Open the
Applications folder > Samsung folder > Samsung Scan Assistant.
30
Linux scanning
1
Make sure that the machine is connected to your computer and
powered on.
2
Launch a scan application such as xsane or simple-scan (If it's not
installed, please install it manually to use scan features. For example, you
may use "yum install xsane" for rpm package systems and "apt-get install
xsane" for deb package systems to install xsane).
3
4
Select your device from the list and set the scan options to apply.
Click the Scan button.
4. Special Features
268
Fax features
32
For basic faxing features, refer to the Basic Guide (see "Basic faxing" on page
63).
Sending a fax in the computer
• This feature may not be available depending on model or optional goods
(see "Features by model" on page 8).
31
Confirming a transmission
You can send a fax from your computer without going to the machine.
When the last page of your original has been sent successfully, the machine
beeps and returns to ready mode.
When something goes wrong while sending your fax, an error message appears
on the display. If you receive an error message, press
message and try to send the fax again.
To send a fax from your computer, the Samsung Network PC Fax program
must be installed. This program will be installed when you installed the printer
driver.
(Stop) to clear the
You can set your machine to print a confirmation report automatically each
time sending a fax is completed.
Select
(Setup) > Machine Setup > Next > Fax Setup > Fax
Confirmation on the touch screen.
1
2
Open the document to be sent.
Select Print from the File menu.
The Print window will be displayed. It may look slightly different
depending on your application.
3
4
5
Select Samsung Network PC Fax from the Print window
Click Print or OK.
Enter the recipients’ numbers and select the option
4. Special Features
269
Fax features
If you set a time earlier than the current time, the fax will be sent at that time
on the following day.
Select the Help menu or click the
button from the window and click on
any option you want to know about.
6
6
Click Send.
The original is scanned into memory before transmission.
The machine returns to ready mode. The display reminds you that you
are in ready mode and that a delayed fax is set.
33
Delaying a fax transmission
You can check the list of delayed fax jobs.
You can set your machine to send a fax at a later time when you will not be
present. You cannot send a color fax using this feature.
1
Place a single document face down on the document glass, or load the
documents face up into the document feeder.
2
3
Select
(Fax) > Delayed Send on the touch screen.
Touch
(Options) to adjust the resolution and the darkness for
your fax needs.
4
Touch
(back) to go back to the previous screen and then touch Next
to go to the Delayed Time Set screen.
5
Enter the time > Next > select Direct Input or Fax List and enter the fax
number using number keypad on the touch screen.
Select
(Setup) > Machine Setup > Next > Reports > Fax Schedule
Jobs on the touch screen.
Canceling a reserved fax job
1
2
3
4
Select
(Job Status) > Current Job > Next on the touch screen.
Touch
(Cancel) from fax job you want on the touch screen.
Touch Yes when the confirmation windows appears.
Press
(Stop) button or home (
) icon to return to ready mode.
4. Special Features
270
Fax features
4
34
Forwarding a sent fax to another destination
You can set the machine to forward the received or sent fax to other destination
by a fax, an email or a server. If you are out of office but have to receive the fax,
this feature may be useful.
• When you forward a fax by an email, you must first set the mail server and
IP address in SyncThru™ Web Service (see "Using SyncThru™ Web
Service" on page 285).
Place a single document face down on the document glass, or load the
documents face up into the document feeder.
2
Select
(Setup) > Machine Setup > Next > Fax Setup > Send
Forward > Forward to Fax, Forward to Email or Forward to Server on
the touch screen.
Forward options may not be available depending on model or optional
goods (see "Variety feature" on page 10).
3
Turn this option "On" and then enter the forward number.
(Stop) button or home (
) icon to return to ready mode.
Subsequent sent faxes will be forwarded to the specified fax machine.
35
Forwarding a received fax
You can set the machine to forward the received or sent fax to other destination
by a fax, an email or a server. If you are out of office but have to receive the fax,
this feature may be useful.
• Though you sent or received a color fax, the data is forwarded in
grayscale.
1
Press
Though you sent or received a color fax, the data is forwarded in grayscale.
1
Select
(Setup) > Machine Setup > Next > Fax Setup > Receive
Forward > Forward to Fax, Forward to PC, Forward to Email or
Forward to Server on the touch screen.
To set the machine to print out a fax when fax forwarding has been
completed, select Forward&Print.
2
3
Turn this option "On" and then enter the forward number.
Press
(Stop) button or home (
) icon to return to ready mode.
Subsequent sent faxes will be forwarded to the specified fax machine.
4. Special Features
271
Fax features
36
37
Sending faxes on both sides of paper
Receiving a fax in the computer
• This is available only when you load originals into the document feeder.
• This feature may not be available depending on model or optional goods
(see "Features by model" on page 8).
• This feature may not be available depending on model or optional goods
(see "Features by model" on page 8).
• To use this feature, set the option on the control panel:
Select
(Setup) > Machine Setup > Next > Fax Setup > Receive
Forward > Forward to PC > Forward on the touch screen.
1
Place a single document face down on the document glass, or load the
documents face up into the document feeder.
2
Select
(Fax) > select the menu you want >
Duplex on the touch screen.
(Options) >
•
1 Sided: For originals that are printed on one side only.
•
2 Sided: For originals that are printed on both sides.
•
2 Sided Rotated: For originals that are printed on both sides, but the
back is rotated 180°.
To use 2 Sided and 2 Sided Rotated, load the originals on the DADF. If the
machine cannot detect the original on the DADF, it automatically changes
the option to 1 Sided.
3
Touch
(back) to go back to the previous screen.
1
2
3
4
Open the Samsung Easy Printer Manager.
Select the appropriate machine from the Printer List.
Select Fax to PC Settings menu.
Use Enable Fax Receiving from Device to change the fax settings.
•
Image Type: Convert the received faxes to PDF or TIFF.
•
Save Location: Select location to save the converted faxes.
•
Prefix: Select prefix.
•
Print received fax: Set to print information for the received fax after
receiving the fax.
•
Notify me when complete: Set to show the popup window to
notify receiving a fax.
4. Special Features
272
Fax features
•
•
Open with default application: After receiving the fax, open it with
default application.
To use the Ans/Fax mode, attach an answering machine to the EXT socket
on the back of your machine.
None: After receiving a fax, the machine does not notify the user or
opens the application.
•
5
Select Save > OK.
38
Changing the receive modes
1
Select
(Setup) > Machine Setup > Next > Fax Setup > Receive
Mode on the touch screen.
2
Select the option you want.
•
Fax: Answers an incoming fax call and immediately goes into the fax
reception mode.
•
Tel: Receives a fax by pressing
DRPD: You can receive a call using the Distinctive Ring Pattern
Detection (DRPD) feature. Distinctive Ring is a telephone company
service which enables an user to use a single telephone line to
answer several different telephone numbers. For further details, see
"Receiving faxes using DRPD mode" on page 274.
This setting may not be available depending on your country.
3
4
Touch
Press
(back) to go back to the previous screen.
(Stop) button or home (
) icon to return to ready mode.
39
(On Hook Dial) and then
(Start) button.
•
Ans/Fax: Is for when an answering machine is attached to your
machine. Your machine answers an incoming call, and the caller can
leave a message on the answering machine. If the fax machine
senses a fax tone on the line, the machine automatically switches to
Fax mode to receive the fax.
Receiving manually in Tel mode
You can receive a fax call by pressing
pressing
(On Hook Dial) button and then
(Start) when you hear a fax tone. If your machine has a handset,
you can answer calls using the handset (see "Features by model" on page 8).
4. Special Features
273
Fax features
40
Receiving in Answering Machine/Fax mode
*9* is the remote receive code preset at the factory. The first and the last
asterisks are fixed, but you can change the middle number to whatever you
want.
To use this mode, you must attach an answering machine to the EXT socket on
the back of your machine. If the caller leaves a message, the answering machine
stores the message. If your machine detects a fax tone on the line, it
automatically starts to receive the fax.
• If you have set your machine to this mode and your answering machine
is switched off, or no answering machine is connected to EXT socket,
your machine automatically goes into Fax mode after a predefined
number of rings.
• If the answering machine has a user-selectable ring counter, set the
machine to answer incoming calls within 1 ring.
• If the machine is in Tel mode, disconnect or switch off the answering
machine with the fax machine. Otherwise, the outgoing message from
the answering machine will interrupt your phone conversation.
While you are talking over the telephone connected to the EXT socket, copy
and scan features are not available.
42
Receiving faxes using DRPD mode
This setting may not be available depending on your country. Distinctive Ring is
a telephone company service which enables an user to use a single telephone
line to answer several different telephone numbers. This feature is often used by
answering services who answer telephones for many different clients and need
to know which number someone is calling in on to properly answer the phone.
This setting may not be available depending on your country.
41
Receiving faxes with an extension telephone
When you are using an extension telephone connected to the EXT socket, you
can receive a fax from someone you are talking to on the extension telephone,
without going to the fax machine.
1
Select
(Setup) > Machine Setup > Next > Fax Setup > Receive
Mode > DRPD on the touch screen.
2
Call your fax number from another telephone.
When you receive a call on the extension phone and hear fax tones, press the
keys *9* on the extension phone. The machine receives the fax.
4. Special Features
274
Fax features
3
When your machine begins to ring, do not answer the call. The machine
requires several rings to learn the pattern.
To use the secure receiving mode, activate the menu from
(Setup) >
Machine Setup > Next > Fax Setup > Secure Receive on the touch screen.
The machine displays Waiting Ring while recording the ring pattern.
When completed learning, it shows Successful End DRPD Setup on the
screen.
If the DRPD setup fails, DRPD Ring Error appears.
• DRPD must be set up again if you re-assign your fax number, or connect
the machine to another telephone line.
• After DRPD has been set up, call your fax number again to verify that the
machine answers with a fax tone. Then have a call placed to a different
number assigned to that same line to be sure the call is forwarded to the
extension telephone or answering machine plugged into the EXT socket.
43
Printing received faxes
1
Select
(Setup) > Machine Setup > Next > Fax Setup > Secure
Receive on the touch screen.
2
3
4
Select Configuration > Print using arrows.
Enter a four-digit passcode and touch Print.
The machine prints all of the faxes stored in memory.
Receiving in secure receiving mode
This feature may not be available depending on model or optional goods
(see "Features by model" on page 8).
You may need to prevent your received faxes from being accessed by
unauthorized people. Turn on secure receiving mode, then all incoming faxes
go into memory. You can print the incoming faxes by entering the password.
4. Special Features
275
Fax features
44
45
Printing faxes on both sides of the paper
1
Place a single document face down on the document glass, or load the
documents face up into the document feeder.
2
Select
(Setup) > Machine Setup > Next > Fax Setup > Duplex Print
on the touch screen.
•
Off: Prints in Normal mode.
•
Long Edge: Prints pages to be read like a book.
•
Short Edge: Prints pages to be read by flipping like a note pad.
Receiving faxes in memory
Since your machine is a multi-tasking device, it can receive faxes while you are
making copies or printing. If you receive a fax while you are copying or printing,
your machine stores incoming faxes in its memory. Then, as soon as you finish
copying or printing, the machine automatically prints the fax.
If fax is received and being printed, other copy and print jobs cannot be
processed at the same time.
2
3
5
3
Touch
(back) to go back to the previous screen.
4. Special Features
276
Using shared folder features
This feature allows you to use the machine’s memory as a shared folder. The
advantage of this feature is that you can conveniently use the shared folder
through your computer’s window.
• This feature may not be available depending on model or optional goods
(see "Features by model" on page 8).
• You can use this feature in the models that have a mass storage device
(see "Variety feature" on page 10).
47
Using the shared folder
You can use the shared folder exactly like the normal computer. Create, edit and
delete the folder or file as a normal Windows folder. You also store the scanned
data in the shared folder. You can directly print files stored on a the shared
folder. You can print TIFF, JPEG and PRN files.
• The administrator can set the ID and password to restrict the user’ s
access and also set the maximum number of simultaneous users.
46
Creating a shared folder
1
2
Open the Windows Explore window from the computer.
3
Create a new folder under nfsroot directory.
Enter the printer’s \\[ip address] (example: \\169.254.133.42) in
the address field, and press the Enter key or click Go.
4. Special Features
277
Using optional device features
Some features may not be available depending on models or options. It
means that the features are not supported (see "Variety feature" on page
10).
3
Select your printer driver from the Select Printer list.
4
5
6
Click Properties or Preferences .
7
Select OK.
48
From the printer driver
If you install the optional device, you can use advanced printing features, such
as proofing a job and printing a private job in the Print window. Check the mass
storage or RAM disk option in Device Options, then you can select the various
features from Print Mode (see "Setting Device Options" on page 86).
1
2
Open the document you want to print.
Select Print from the File menu. The Print window appears.
Click the each tab then select Print Mode.
Select the option you want (see "Understanding special printer features"
on page 245).
4. Special Features
278
5. Useful Management
Tools
This chapter introduces management tools provided to help you make full use of your machine.
• Accessing management tools
280
• Easy Capture Manager
281
• Samsung Easy Color Manager
282
• Samsung AnyWeb Print
283
• Easy Eco Driver
284
• Using SyncThru™ Web Service
285
• Using Samsung Easy Document Creator
289
• Using Samsung Easy Printer Manager
290
• Using Samsung Printer Status
293
• Using Samsung Printer Experience
295
Accessing management tools
Samsung provides a variety of management tools for Samsung printers.
1
2
Make sure that the machine is connected to your computer and powered on.
From the Start menu, select Programs or All Programs.
•
3
4
5
For Windows 8, from the Charms, select Search > Apps.
Find Samsung Printers.
Under Samsung Printers, you can see installed management tools.
Click the management tool you want to use.
• After installing the driver, for some management tools, you can access them directly from the Start menu > Programs or All Programs.
• For Windows 8, after installing the driver, for some management tools, you can access them directly from the Start screen by clicking on the corresponding tile.
5. Useful Management Tools
280
Easy Capture Manager
• Available for Windows OS users only.
• This feature may not be available depending on model or optional goods (see "Software" on page 8).
Capture your screen and launch Easy Capture Manager by simply pressing the Print Screen key. Now you can easily print your captured screen as captured or edited.
5. Useful Management Tools
281
Samsung Easy Color Manager
Samsung Easy Color Manager allows you to adjust the color balance, brightness, contrast, and saturation of any image viewed on your PC monitor. It also provides
various special effects that allow the image to be enhanced prior to printing without requiring editing expertise.
You can also use the Samsung Easy Color Manager to create a personalized color profile. This color profile can be added to the printer driver as a color option, or you
can replace the default color profile by transmitting the new color profile to the machine.
• Available for Windows and Mac OS users only.
• This feature may not be available depending on model or optional goods (see "Software" on page 8).
Download the software from the Samsung website then unpack and install it: (http://www.samsung.com > find your product > Support or Downloads).
5. Useful Management Tools
282
Samsung AnyWeb Print
• Available for Windows OS users only.
• This feature may not be available depending on model or optional goods (see "Software" on page 8).
This tool helps you screen-capture, preview, scrap, and print Windows Internet Explorer pages more easily than when you use an ordinary program.
Download the software from the Samsung website then unpack and install it: (http://www.samsung.com > find your product > Support or Downloads).
5. Useful Management Tools
283
Easy Eco Driver
Available for Windows OS users only (see "Software" on page 8).
With the Easy Eco Driver, you can apply Eco features to save paper and toner before printing.
Easy Eco Driver also allows you simple editing such as removing images and texts, and more. You can save frequently used settings as a preset.
How to use:
1 Open a document to print.
2 Open printing preference window (see "Opening printing preferences" on page 54).
3 From the Favorites tab, select Eco Printing Preview.
4 Click OK > Print in the window. A preview window appears.
5 Select the options you want to apply to the document.
You can see the preview of the applied features.
6 Click Print.
If you want to run Easy Eco Driver every time you print, check Start Easy Eco Driver before printing job checkbox in the Basic tab of the printing preference
window.
5. Useful Management Tools
284
Using SyncThru™ Web Service
1
2
• Internet Explorer 6.0 or higher is the minimum requirement for
SyncThru™ Web Service.
• SyncThru™ Web Service explanation in this user’s guide may differ from
your machine depending on its options or models.
Click Login on the upper right of the SyncThru™ Web Service website.
Type in the ID and Password then click Login. We recommend you to
change the default password for security reasons.
•
ID: admin
•
Password: sec00000
• Network model only (see "Software" on page 8).
2
1
SyncThru™ Web Service overview
Accessing SyncThru™ Web Service
1
Access a web browser, such as Internet Explorer, from Windows.
Enter the machine IP address of your printer (http://xxx.xxx.xxx.xxx) in
the address field and press the Enter key or click Go.
Some tabs may not appear depending on your model.
2
Your machine’s embedded website opens.
Logging into SyncThru™ Web Service
Information tab
Before configuring options in SyncThru™ Web Service, you need to log-in as an
administrator. You can still use SyncThru™ Web Service without logging in but
you won’t have access to Settings tab and Security tab.
This tab gives you general information about your machine. You can check
things, such as remaining amount of toner. You can also print reports, such as an
error report.
•
Active Alerts: Shows the alerts that have occurred in the machine and their
severity.
•
Supplies: Shows how many pages are printed and amount of toner left in
the cartridge.
5. Useful Management Tools
285
Using SyncThru™ Web Service
•
Usage Counters: Shows the usage count by print types: simplex and
duplex.
•
Current Settings: Shows the machine’s and network’s information.
•
Security Information: Shows the machine’s security information.
•
Print information: Prints reports such as system related reports, e-mail
address, and font reports.
•
User Access Control: Classifies users into several groups according to each
user’s role. Each user’s authorization, authentication and accounting will be
controlled by the group’s role definition.
•
System Log: The System Log contains settings related to logs of device
events.
Settings tab
This tab allows you to set configurations provided by your machine and
network. You need to log-in as an administrator to view this tab.
•
Machine Settings tab: Sets options provided by your machine.
•
Network Settings tab: Shows options for the network environment. Sets
options such as TCP/IP and network protocols.
Security tab
System Security: Sets the system administrator’s information and also
enables or disables machine features.
•
Network Security: Sets settings for HTTPs, IPSec, IPv4/IPv6 filtering, 802.1x,
and Authentication servers.
Log Configuration: The Log Configuration section contains settings
related to saving logs.
-
Log Viewer: The Log Viewer section contains options to view logs
stored locally on the device.
Maintenance tab
This tab allows you to maintain your machine by upgrading firmware and
setting contact information for sending emails. You can also connect to
Samsung website or download drivers by selecting the Link menu.
•
Firmware Upgrade: Upgrade your machine’s firmware.
•
Contact Information: Shows the contact information.
•
Link: Shows links to useful sites where you can download or check
information.
•
License Management: License Management provides settings for installed
applications and application licenses.
•
Cloning: You can import or export (transfer) various settings (machine
setting, network information, address book, etc.) between devices that have
the Cloning feature in SyncThru™ Web Service.
This tab allows you to set system and network security information. You need to
log-in as an administrator to view this tab.
•
-
5. Useful Management Tools
286
Using SyncThru™ Web Service
3
E-mail notification setup
You can receive emails about your machine’s status by setting this option. By
setting information such as IP address, host name, e-mail address and SMTP
server information, the machine status (toner cartridge shortage or machine
error) will be sent to a certain person's e-mail automatically. This option may be
used more frequently by a machine administrator.
5
Click Add button to add e-mail notification user.
Set the recipient name and e-mail address(es) with notification items
you want to receive an alert for.
6
Click Apply.
If the firewall is activated, the e-mail may not be sent successfully. In that
case, contact a network administrator.
Some menus may not appear in the display depending on options or
models. If so, it is not applicable to your machine.
1
Start a web browser, such as Internet Explorer, from Windows.
Enter the machine IP address (http://xxx.xxx.xxx.xxx) in the address field
and press the Enter key or click Go.
2
3
Your machine’s embedded website opens.
From the Settings tab, select Machine Settings > E-mail Notification.
If you have not configured outgoing server environment, go to Settings >
Network Settings > Outgoing Mail Server(SMTP) to configure network
environment before setting e-mail notification.
4
Select Enable check box to use the E-mail Notification.
5. Useful Management Tools
287
Using SyncThru™ Web Service
4
Setting the system administrator’s information
This setting is necessary for using the e-mail notification option.
Some menus may not appear in the display depending on options or
models. If so, it is not applicable to your machine.
1
Start a web browser, such as Internet Explorer, from Windows.
Enter the machine IP address (http://xxx.xxx.xxx.xxx) in the address field
and press the Enter key or click Go.
2
3
4
Your machine’s embedded website opens.
5
Click Apply.
From the Security tab, select System Security > System Administrator
Enter the name of the administrator, phone number, location, and email
address.
5. Useful Management Tools
288
Using Samsung Easy Document Creator
Samsung Easy Document Creator is an application to help users scan, compile,
and save documents in multiple formats, including .epub format. These
documents can be shared via social networking sites or fax. Whether you’re a
student needing to organize research from the library or a stay-at-home mom
sharing scanned pictures from last year’s birthday party, Samsung Easy
Document Creator will provide you with the necessary tools.
The Samsung Easy Document Creator provides features below:
•
Image Scanning: Use for scanning single or multiple pictures.
•
Document Scanning: Use for scanning documents with text or text and
images.
•
Text Converting: Use for scanning documents that need to be saved in an
editable text format.
•
Book Scanning: Use for scanning books with the flatbed scanner.
•
SNS Upload: Provides an easy and quick way to upload scanned image or
existing images to a variety of social networking sites (SNS).
•
E-Book Conversion: Provides the ability to scan multiple documents in as
one e-book or convert existing files into an e-book format.
•
Plug-in: Scan and fax directly from the Microsoft Office program.
Click the Help (
) button from the window and click on any option you
want to know about.
5. Useful Management Tools
289
Using Samsung Easy Printer Manager
• This feature may not be available depending on model or optional goods
(see "Software" on page 8).
The Samsung Easy Printer Manager interface is comprised of various basic
sections as described in the table that follows:
• Available for Windows and Mac OS users only (see "Software" on page 8).
The screenshot may differ depending on the operating system you are
using.
• For Windows, Internet Explorer 6.0 or higher is the minimum
requirement for Samsung Easy Printer Manager.
Samsung Easy Printer Manager is an application that combines Samsung
machine settings into one location. Samsung Easy Printer Manager combines
device settings as well as printing environments, settings/actions and
launching. All of these features provide a gateway to conveniently use your
Samsung machine. Samsung Easy Printer Manager provides two different user
interfaces for the user to choose from: the basic user interface and the advanced
user interface. Switching between the two interfaces is easy: just click a button.
5
Understanding Samsung Easy Printer Manager
To open the program:
For Windows,
Select Start > Programs or All Programs > Samsung Printers > Samsung
Easy Printer Manager > Samsung Easy Printer Manager.
Printer list
1
The Printer List displays printers installed on your
computer and network printers added by network
discovery (Windows only).
For Mac,
Open the Applications folder > Samsung folder > Samsung Easy Printer
Manager.
5. Useful Management Tools
290
Using Samsung Easy Printer Manager
Printer
information
2
Quick links
This area gives you general information about your
machine. You can check information, such as the machine’s
model name, IP address (or Port name), and machine
status.
4
If you connect your machine to a network, the
SyncThru™ Web Service icon is enabled.
You can view the online User’s Guide.
Troubleshooting button: This button opens the
Troubleshooting Guide when an error occurs.
You can directly open the necessary section in the
user’s guide.
Application
information
3
Displays Quick links to machine specific functions. This
section also includes links to applications in the advanced
settings.
Contents area
Displays information about the selected machine,
remaining toner level, and paper. The information will vary
based on the machine selected. Some machines do not
have this feature.
Order supplies
Click on the Order button from the supply ordering
window. You can order replacement toner cartridge(s)
from online.
5
Includes links for changing to the advanced settings
(switching UI), refresh, preference setting, summary, help,
and about.
6
The
button is used to change the user
interface to the advanced settings user interface
(see "Advanced settings user interface overview"
on page 291).
Select the Help menu or click the
button from the window and click on
any option you want to know about.
6
Advanced settings user interface overview
The advanced user interface is intended to be used by the person responsible
for managing the network and machines.
5. Useful Management Tools
291
Using Samsung Easy Printer Manager
Fax to PC Settings
Some menus may not appear in the display depending on options or
models. If so, it is not applicable to your machine.
Device Settings
This menu includes settings related to the basic fax functionality of the selected
device.
•
Disable: If Disable is On, incoming faxes will not be received on this device.
•
Enable Fax Receiving from Device: Enables faxing on the device and
allows more options to be set.
You can configure various machine settings such as machine setup, paper,
layout, emulation, network, and print information.
Alert Settings (Windows only)
Scan to PC Settings
This menu includes settings related to error alerting.
This menu includes settings to create or delete scan to PC profiles.
•
Printer Alert: Provides settings related to when alerts will be received.
•
•
Email Alert: Provides options relating to receiving alerts via email.
•
Alert History: Provides a history of device and toner related alerts.
Scan Activation: Determines whether or not scanning is enabled on the
device.
•
Basic tab: Contains general scan and device settings.
•
Image tab: Contains settings related to image altering.
Job Accounting
Provides querying of quota information of the specified job accounting user.
This quota information can be created and applied to devices by job accounting
software such as SyncThru™ or CounThru™ admin software.
5. Useful Management Tools
292
Using Samsung Printer Status
The Samsung Printer Status is a program that monitors and informs you of the
machine status.
Icon
• The Samsung Printer Status window and its contents shown in this user’s
guide may differ depending on the machine or operating system in use.
Mean
Normal
The machine is in ready mode and experiencing no
errors or warnings.
Warning
The machine is in a state where an error might occur in
the future. For example, it might be in toner low status,
which may lead to toner empty status.
Error
The machine has at least one error.
• Check the operating system(s) that are compatible with your machine
(see "Specifications" on page 123).
• Available for Windows OS users only (see "Software" on page 8).
Description
7
Samsung Printer Status overview
If an error occurs while operating, you can check the error from the Samsung
Printer Status. Samsung Printer Status is installed automatically when you install
the machine software.
You can also launch Samsung Printer Status manually. Go to the Printing
Preferences, click the Basic tab > Printer Status button.
These icons appear on the Windows task bar:
Toner Level
You can view the level of toner remaining in each
toner cartridge. The machine and the number of
toner cartridge(s) shown in the above window may
differ depending on the machine in use. Some
machines do not have this feature.
Option
You can set printing job alert related settings.
1
2
5. Useful Management Tools
293
Using Samsung Printer Status
3
Order Supplies
You can order replacement toner cartridge(s) from
online.
User’s Guide
You can view the online User’s Guide.
This button opens the Troubleshooting
Guide when an error occurs. You can directly
open the troubleshooting section in the
user’s guide.
4
5
Close
Close the window.
5. Useful Management Tools
294
Using Samsung Printer Experience
Samsung Printer Experience is a Samsung application that combines
Samsung machine settings and machine management into one location. You
can set device settings, order supplies, open troubleshooting guides, visit
Samsung’s web site, and check connected machine information. This
application will be automatically downloaded from the Windows Store if the
machine is connected to a computer with an Internet connection.
The screenshot may differ depending on the model you are using.
1
8
2
6
Understanding the Samsung Printer Experience
3
To open the application,
From the Start screen, select the Samsung Printer Experience (
4
) tile.
5
The Samsung Printer Experience interface comprises various useful features as
described in the following table:
1
Printer
Information
This area gives you general information about your
machine. You can check information, such as the
machine’s status, location, IP address, and remaining
toner level.
5. Useful Management Tools
295
Using Samsung Printer Experience
9
2
User Guide
You can view the online User’s Guide. You need to be
connected to the Internet to use this feature.
This button opens the Troubleshooting Guide
when an error occurs. You can directly open the
troubleshooting section in the user’s guide.
Adding/Deleting Printers
If you do not have any printer added to the Samsung Printer Experience, or if
you want to add/delete a printer, follow the instructions below.
You can only add/delete network connected printers.
3
4
Order
Supplies
Visit Samsung
Printer Settings
5
6
Device List &
Latest Scanned
Image
Click on this button to order replacement toner
cartridges online. You need to be connected to the
Internet to use this feature.
Links to Samsung printer website. You need to be
connected to the Internet to use this feature.
You can configure various machine settings such as
machine setup, paper, layout, emulation, networking,
and print information through SyncThru™ Web Service.
Your machine needs to be connected to a network. This
button will be disabled if your machine is connected via
USB cable.
The scan list displays devices that supports Samsung
Printer Experience. Under the device, you can see the
latest scanned images. Your machine needs to be
connected to a network to scan from here.
This section is for the users with multi-functional printers.
Adding a printer
1
From the Charms, select Settings.
Or, right-click the Samsung Printer Experience page and select
Settings.
2
3
Select Add Printer
Select the printer you want to add.
You can see the added printer.
If you see
mark, you can also click
mark to add printers.
5. Useful Management Tools
296
Using Samsung Printer Experience
Deleting a printer
1
From the Charms, select Settings.
4
5
Select the printer settings, such as the number of copies and orientation.
Click the Print button to start the print job.
Or, right-click the Samsung Printer Experience page and select
Settings.
2
3
4
Select Remove Printer
Select the printer you want to delete.
Click Yes.
You can see that the deleted printer is removed from the screen.
10
Printing from Windows 8
This section explains common printing tasks from the Start screen.
Basic printing
1
2
3
Open the document to print.
From the Charms, select Devices.
Select your printer from the list
5. Useful Management Tools
297
Using Samsung Printer Experience
Cancelling a print job
Basic tab
If the printing job is waiting in the print queue or print spooler, cancel the job as
follows:
•
You can access this window by simply double-clicking the machine icon
(
•
) in the Windows task bar.
You can also cancel the current job by pressing
the control panel.
(Stop/Clear) button on
Opening more settings
The screen may appear somewhat different depending on the model or
options.
You can set up more printing parameters.
1
2
3
4
Open the document you want to print.
Basic
This option allows you to choose the basic printing settings such as copies,
orientation, and document type.
Eco settings
This option allows you to choose multiple pages per side to save media.
From the Charms, select Devices.
Select your printer from the list
Click More settings.
5. Useful Management Tools
298
Using Samsung Printer Experience
Advanced tab
Security tab
Some features may not be available depending on the model or options. If
this tab is not shown or disabled, it means that these features are not
supported.
Paper settings
This option allows you to set the basic paper handling specifications.
Layout settings
This option allows you to set the various ways to layout your documents.
Job Accounting
This option allows you to print with the given permission.
Confidential Printing
This option is used for printing confidential documents. You need to enter a
password to print using it.
5. Useful Management Tools
299
Using Samsung Printer Experience
11
Scanning from Windows 8
This section is for the users with multi-functional printers.
7
Click Scan (
)and save the image.
• When you place the originals in the ADF (or DADF), Prescan (
available.
) is not
• You can skip step 5, if the Prescan option is selected.
Scanning with your machine lets you turn pictures and text into digital files that
can be stored on your computer.
Scanning from Samsung Printer Experience
The most frequently used printing menus are displayed for quick scanning.
1
Place a single document face down on the document glass, or load the
documents face up into the document feeder.
2
3
4
Click the Samsung Printer Experience tile on the Start screen.
5
6
Click Prescan (
Click Scan (
).
Set up the scanning parameters such as image type, document size, and
resolution.
)to check the image.
Adjust the prescanned image with scanning operation functions such as
rotate and mirror.
5. Useful Management Tools
300
6. Troubleshooting
This chapter gives helpful information for what to do if you encounter an error.
• Paper feeding problems
302
• Power and cable connecting problems
303
• Printing problems
304
• Printing quality problems
308
• Copying problems
316
• Scanning problems
317
• Faxing problems
319
• Operating system problems
321
For errors that occur during the wireless software installation and settings, refer to the
troubleshooting section in the wireless setting chapter (see "Troubleshooting for wireless
network" on page 186).
Paper feeding problems
Condition
Suggested solutions
Paper jams during printing.
Clear the paper jam.
Paper sticks together.
• Check the maximum paper capacity of the tray.
• Make sure that you are using the correct type of paper.
• Remove paper from the tray and flex or fan the paper.
• Humid conditions may cause some paper to stick together.
Multiple sheets of paper do not feed.
Different types of paper may be stacked in the tray. Load paper of only one type, size, and weight.
Paper does not feed into the machine.
• Remove any obstructions from inside the machine.
• Paper has not been loaded correctly. Remove paper from the tray and reload it correctly.
• There is too much paper in the tray. Remove excess paper from the tray.
• The paper is too thick. Use only paper that meets the specifications required by the machine.
The paper keeps jamming.
• There is too much paper in the tray. Remove excess paper from the tray. If you are printing on special materials, use the
manual feeding in tray.
• An incorrect type of paper is being used. Use only paper that meets the specifications required by the machine.
• There may be debris inside the machine. Open the front cover and remove any debris.
Envelopes skew or fail to feed correctly.
Ensure that the paper guides are against both sides of the envelopes.
6. Troubleshooting
302
Power and cable connecting problems
Click this link to open an animation about solving power problems.
Condition
The machine is not receiving power,
or the connection cable between the
computer and the machine is not
connected properly.
Suggested solutions
• Connect the machine to the electricity supply first. If the machine has a
(Power/Wake Up) button on the control,
press it.
• Disconnect the machine’s cable and reconnect it.
6. Troubleshooting
303
Printing problems
Condition
The machine does not
print.
Possible cause
The machine is not receiving power.
Suggested solutions
Connect the machine to the electricity supply first. If the machine has a
(Power/
Wake Up) button on the control, press it.
The machine is not selected as the default
machine.
Select your machine as your default machine in Windows.
Check the machine for the following:
• The cover is not closed. Close the cover.
• Paper is jammed. Clear the paper jam (see "Clearing paper jams" on page 106).
• No paper is loaded. Load paper (see "Loading paper in the tray" on page 39).
• The toner cartridge is not installed. Install the toner cartridge (see "Replacing the toner cartridge" on page 81).
• Make sure the protect cover and sheets are removed from the toner cartridge (see "Replacing the toner cartridge" on page 81).
If a system error occurs, contact your service representative.
The connection cable between the computer and
the machine is not connected properly.
Disconnect the machine cable and reconnect it (see "Rear view" on page 23).
The connection cable between the computer and
the machine is defective.
If possible, attach the cable to another computer that is working properly and print a job.
You can also try using a different machine cable.
The port setting is incorrect.
Check the Windows printer settings to make sure that the print job is sent to the correct
port. If the computer has more than one port, make sure that the machine is attached to
the correct one.
6. Troubleshooting
304
Printing problems
Condition
The machine does not
print.
Possible cause
Suggested solutions
The machine may be configured incorrectly.
Check the Printing Preferences to ensure that all of the print settings are correct.
The printer driver may be incorrectly installed.
Uninstall and reinstall the machine’s driver.
The machine is malfunctioning.
Check the display message on the control panel to see if the machine is indicating a
system error. Contact a service representative.
The document size is so big that the hard disk
space of the computer is insufficient to access the
print job.
Get more hard disk space and print the document again.
The output tray is full.
Once the paper is removed from the output tray, the machine resumes printing.
The machine selects print
materials from the wrong
paper source.
The paper option that was selected in the
Printing Preferences may be incorrect.
For many software applications, the paper source selection is found under the Paper tab
within the Printing Preferences (see "Opening printing preferences" on page 54).
Select the correct paper source. See the printer driver help screen (see "Using help" on
page 55).
A print job is extremely
slow.
The job may be very complex.
Reduce the complexity of the page or try adjusting the print quality settings.
Half the page is blank.
The page orientation setting may be incorrect.
Change the page orientation in your application (see "Opening printing preferences" on
page 54). See the printer driver help screen (see "Using help" on page 55).
The paper size and the paper size settings do not
match.
Ensure that the paper size in the printer driver settings matches the paper in the tray.
The machine cable is loose or defective.
Disconnect the machine cable and reconnect. Try a print job that you have already
printed successfully. If possible, attach the cable and the machine to another computer
that you know works and try a print job. Finally, try a new machine cable.
The machine prints, but
the text is wrong,
garbled, or incomplete.
Or, ensure that the paper size in the printer driver settings matches the paper selection
in the software application settings you use (see "Opening printing preferences" on
page 54).
6. Troubleshooting
305
Printing problems
Condition
Pages print, but they are
blank.
Possible cause
Suggested solutions
The wrong printer driver was selected.
Check the application’s printer selection menu to ensure that your machine is selected.
The software application is malfunctioning.
Try printing a job from another application.
The operating system is malfunctioning.
Exit Windows and reboot the computer. Turn the machine off and back on again.
The toner cartridge is defective or out of toner.
Redistribute the toner, if necessary.
If necessary, replace the toner cartridge.
• See "Redistributing toner" on page 79.
• See "Replacing the toner cartridge" on page 81.
The file may have blank pages.
Check the file to ensure that it does not contain blank pages.
Some parts, such as the controller or the board,
may be defective.
Contact a service representative.
The machine does not
print PDF files correctly.
Some parts of graphics,
text, or illustrations are
missing.
Incompatibility between the PDF file and the
Acrobat products.
Printing the PDF file as an image may enable the file to print. Turn on Print As Image
from the Acrobat printing options.
The print quality of
photos is not good.
Images are not clear.
The resolution of the photo is very low.
Reduce the photo size. If you increase the photo size in the software application, the
resolution will be reduced.
Before printing, the
machine emits vapor near
the output tray.
Using damp/wet paper can cause vapor [white
smoke] during printing.
This is not a problem, just keep printing. If you are bothered by the smoke [vapor], then
replace the paper with fresh paper from an unopened ream.
It will take longer to print when you print a PDF file as an image.
6. Troubleshooting
306
Printing problems
Condition
Possible cause
Suggested solutions
The machine does not
print special-sized paper,
such as billing paper.
Paper size and paper size setting do not match.
Set the correct paper size in the Custom in Paper tab in Printing Preferences (see
"Opening printing preferences" on page 54).
The printed billing paper
is curled.
The paper type setting does not match.
Change the printer option and try again. Go to Printing Preferences, click Paper tab,
and set type to Thin (see "Opening printing preferences" on page 54).
6. Troubleshooting
307
Printing quality problems
If the inside of the machine is dirty or paper has been loaded improperly, there
might be a reduction in print quality. See the table below to clear the problem.
Condition
Light or faded print
Suggested solutions
• If a vertical white streak or faded area appears on the page, the toner supply is low. Install a new toner cartridge (see "Replacing the
toner cartridge" on page 81).
• The paper may not meet paper specifications; for example, the paper may be too moist or rough.
• If the entire page is light, the print resolution setting is too low or the toner save mode is on. Adjust the print resolution and turn
the toner save mode off. See the help screen of the printer driver.
• A combination of faded or smeared defects may indicate that the toner cartridge needs cleaning. Clean the inside of your machine
(see "Cleaning the machine" on page 92).
• The surface of the LSU part inside the machine may be dirty. Clean the inside of your machine (see "Cleaning the machine" on page
92). If these steps do not correct the problem, contact a service representative.
The top half of the paper is
printed lighter than the rest of
the paper
The toner might not adhere properly to this type of paper.
• Change the printer option and try again. Go to Printing Preferences, click the Paper tab, and set the paper type to Recycled (see
"Opening printing preferences" on page 54).
6. Troubleshooting
308
Printing quality problems
Condition
Toner specks
Suggested solutions
• The paper may not meet specifications; for example, the paper may be too moist or rough.
• The transfer roller may be dirty. Clean the inside of your machine (see "Cleaning the machine" on page 92).
A aB bC c
A aB bC c
A aB bC c
A aB bC c
A aB bC c
Dropouts
• The paper path may need cleaning. Contact a service representative (see "Cleaning the machine" on page 92).
If faded areas, generally rounded, occur randomly on the page:
• A single sheet of paper may be defective. Try reprinting the job.
A aBb C
A aBb C
A aBb C
A aBb C
A aBb C
• The moisture content of the paper is uneven or the paper has moist spots on its surface. Try a different brand of paper.
• The paper lot is bad. The manufacturing processes can cause some areas to reject toner. Try a different kind or brand of paper.
• Change the printer option and try again. Go to Printing Preferences, click the Paper tab, and set type to Thick (see "Opening
printing preferences" on page 54).
If these steps do not correct the problem, contact a service representative.
White Spots
If white spots appear on the page:
• The paper is too rough and a lot of dirt from paper falls to the inner components within the machine, so the transfer roller may be
dirty. Clean the inside of your machine (see "Cleaning the machine" on page 92).
• The paper path may need cleaning. Clean the inside of your machine (see "Cleaning the machine" on page 92).
If these steps do not correct the problem, contact a service representative.
6. Troubleshooting
309
Printing quality problems
Condition
Vertical lines
Suggested solutions
If black vertical streaks appear on the page:
• The surface (drum part) of the toner cartridge inside the machine has probably been scratched. Remove the toner cartridge and
install a new one (see "Replacing the toner cartridge" on page 81).
If white vertical streaks appear on the page:
• The surface of the LSU part inside the machine may be dirty. Clean the inside of your machine (see "Cleaning the machine" on page
92). If these steps do not correct the problem, contact a service representative.
Black or color background
If the amount of background shading becomes unacceptable:
• Change to a lighter weight paper.
• Check the environmental conditions: very dry conditions or a high level of humidity (higher than 80% RH) can increase the amount
of background shading.
• Remove the old toner cartridge and install a new one (see "Replacing the toner cartridge" on page 81).
• Thoroughly redistribute the toner (see "Redistributing toner" on page 79).
Toner smear
• Clean the inside of the machine (see "Cleaning the machine" on page 92).
• Check the paper type and quality.
• Remove the toner cartridge and install a new one (see "Replacing the toner cartridge" on page 81).
6. Troubleshooting
310
Printing quality problems
Condition
Vertical repetitive defects
Suggested solutions
If marks repeatedly appear on the printed side of the page at even intervals:
• The toner cartridge may be damaged. If you still have the same problem, remove the toner cartridge and, install a new one (see
"Replacing the toner cartridge" on page 81).
• Parts of the machine may have toner on them. If the defects occur on the back of the page, the problem will likely correct itself after
a few more pages.
• The fusing assembly may be damaged. Contact a service representative.
Background scatter
A
Background scatter results from bits of toner randomly distributed on the printed page.
• The paper may be too damp. Try printing with a different batch of paper. Do not open packages of paper until necessary so that
the paper does not absorb too much moisture.
• If background scatter occurs on an envelope, change the printing layout to avoid printing over areas that have overlapping seams
on the reverse side. Printing on seams can cause problems.
Or select Thick from the Printing Preferences window (see "Opening printing preferences" on page 54).
• If background scatter covers the entire surface area of a printed page, adjust the print resolution through your software application
or in Printing Preferences (see "Opening printing preferences" on page 54). Ensure the correct paper type is selected. For example:
If Thicker Paper is selected, but Plain Paper actually used, an overcharging can occur causing this copy quality problem.
• If you are using a new toner cartridge, redistribute the toner first (see "Redistributing toner" on page 79).
Toner particles are around bold
characters or pictures
The toner might not adhere properly to this type of paper.
• Change the printer option and try again. Go to Printing Preferences, click the Paper tab, and set the paper type to Recycled (see
"Opening printing preferences" on page 54).
• Ensure the correct paper type is selected. For example: If Thicker Paper is selected, but Plain Paper actually used, an overcharging
can occur causing this copy quality problem.
6. Troubleshooting
311
Printing quality problems
Condition
Suggested solutions
Misformed characters
• If characters are improperly formed and producing hollow images, the paper stock may be too slick. Try different paper.
Page skew
• Ensure that the paper is loaded properly.
A aBb
A aBb C
A aBb C
A aBb C
A aBb C
Cc
Curl or wave
• Check the paper type and quality.
• Ensure that the guides are not too tight or too loose against the paper stack.
• Ensure that the paper is loaded properly.
• Check the paper type and quality. Both high temperature and humidity can cause paper curl.
• Turn the stack of paper over in the tray. Also try rotating the paper 180° in the tray.
6. Troubleshooting
312
Printing quality problems
Condition
Wrinkles or creases
Suggested solutions
• Ensure that the paper is loaded properly.
• Check the paper type and quality.
• Turn the stack of paper over in the tray. Also try rotating the paper 180° in the tray.
Back of printouts are dirty
• Check for leaking toner. Clean the inside of the machine (see "Cleaning the machine" on page 92).
Solid color or black pages
• The toner cartridge may not be installed properly. Remove the cartridge and reinsert it.
A
• The toner cartridge may be defective. Remove the toner cartridge and install a new one (see "Replacing the toner cartridge" on
page 81).
• The machine may require repairing. Contact a service representative.
6. Troubleshooting
313
Printing quality problems
Condition
Loose toner
Suggested solutions
• Clean the inside of the machine (see "Cleaning the machine" on page 92).
• Check the paper type, thickness, and quality.
• Remove the toner cartridge and then, install a new one (see "Replacing the toner cartridge" on page 81).
If the problem persists, the machine may require repair. Contact a service representative.
Character voids
Character voids are white areas within parts of characters that should be solid black:
• You may be printing on the wrong surface of the paper. Remove the paper and turn it around.
A
Horizontal stripes
• The paper may not meet paper specifications.
If horizontally aligned black streaks or smears appear:
• The toner cartridge may be installed improperly. Remove the cartridge and reinsert it.
• The toner cartridge may be defective. Remove the toner cartridge and install a new one (see "Replacing the toner cartridge" on
page 81).
If the problem persists, the machine may require repairing. Contact a service representative.
6. Troubleshooting
314
Printing quality problems
Condition
Curl
Suggested solutions
If the printed paper is curled or paper does not feed into the machine:
• Turn the stack of paper over in the tray. Also try rotating the paper 180° in the tray.
• Change the printer’s paper option and try again. Go to Printing Preferences, click the Paper tab, and set type to Thin (see
"Opening printing preferences" on page 54).
• An unknown image
repetitively appears on a few
sheets
Your machine is probably being used at an altitude of 1,000 m (3,281 ft) or above.
The high altitude may affect the print quality, such as loose toner or light imaging. Change the altitude setting for your machine (see
"Altitude adjustment" on page 234).
• Loose toner
• Light print or contamination
occurs
6. Troubleshooting
315
Copying problems
Condition
Suggested solutions
Copies are too light or too dark. Adjust the darkness in copy feature to lighten or darken the backgrounds of copies (see "Changing the settings for each copy" on page
59).
Smears, lines, marks, or spots
appear on copies.
• If the defects are on the original, adjust darkness in copy feature to lighten the background of your copies.
Copy image is skewed.
• Ensure that the original is aligned with the registration guide.
• If there are no defects on the original, clean the scan unit (see "Cleaning the scan unit" on page 96).
• The transfer roller may be dirty. Clean the inside of your machine (see "Cleaning the machine" on page 92).
Blank copies print out.
Ensure that the original is face down on the scanner glass or face up in the document feeder.
If these steps do not correct the problem, contact a service representative.
Image rubs off the copy easily.
• Replace the paper in the tray with paper from a new package.
• In high humidity areas, do not leave paper in the machine for extended periods of time.
Frequent copy paper jams
occur.
• Fan the paper, then turn it over in the tray. Replace the paper in the tray with a fresh supply. Check/adjust the paper guides, if
necessary.
• Ensure that the paper is the proper type and weight (see "Print media specifications" on page 125).
• Check for copy paper or pieces of copy paper remaining in the machine after a paper jam has been cleared.
Toner cartridge produces fewer
copies than expected before
running out of toner.
• Your originals may contain pictures, solids, or heavy lines. For example, your originals may be forms, newsletters, books, or other
documents that use more toner.
• The scanner lid may be left open while copies are being made.
• Turn the machine off and back on.
6. Troubleshooting
316
Scanning problems
Condition
The scanner does not work.
Suggested solutions
• Make sure that you place the original to be scanned face down on the scanner glass, or face up in the document feeder (see
"Loading originals" on page 49).
• There may not be enough available memory to hold the document you want to scan. Try the Prescan function to see if that works.
Try lowering the scan resolution rate.
• Check that the machine printer cable is connected properly.
• Make sure that the machine printer cable is not defective. Switch the printer cable with a known good cable. If necessary, replace
the printer cable.
• Check that the scanner is configured correctly. Check scan setting in the application you want to use to make certain that the
scanner job is being sent to the correct port (for example, USB001).
The unit scans very slowly.
• Check if the machine is printing received data. If so, scan the document after the received data has been printed.
• Graphics are scanned more slowly than text.
• Communication speed slows in scan mode because of the large amount of memory required to analyze and reproduce the scanned
image. Set your computer to the ECP printer mode through BIOS setting. It will help to increase the speed. For details about how
to set BIOS, refer to your computer user’s guide.
6. Troubleshooting
317
Scanning problems
Condition
Message appears on your
computer screen:
Suggested solutions
• There may be a copying or printing job in progress. Try your job again when that job is finished.
• The selected port is currently being used. Restart your computer and try again.
• Device can’t be set to the H/W
mode you want.
• The machine printer cable may be improperly connected or the power may be off.
• Port is being used by another
program.
• Ensure that the machine is properly connected and the power is on, then restart your computer.
• Port is disabled.
• The scanner driver is not installed or the operating environment is not set up properly.
• The USB cable may be improperly connected or the power may be off.
• Scanner is busy receiving or
printing data. When the
current job is completed, try
again.
• Invalid handle.
• Scanning has failed.
6. Troubleshooting
318
Faxing problems
Condition
Suggested solutions
The machine is not working,
there is no display, or the
buttons are not working.
• Unplug the power cord and plug it in again.
No dial tone.
• Check that the phone line is properly connected (see "Rear view" on page 23).
• Ensure that there is power being supplied to the electrical outlet.
• Ensure that the power is turned on.
• Check that the phone socket on the wall is working by plugging in another phone.
The numbers stored in memory
do not dial correctly.
Make sure that the numbers are stored in memory correctly. To check that, print an address book list.
The original does not feed into
the machine.
• Make sure that the paper is not wrinkled and you are inserting it in correctly. Check that the original is the right size, not too thick
or thin.
• Make sure that the document feeder is firmly closed.
• The document feeder rubber pad may need to be replaced. Contact a service representative (see "Available maintenance parts" on
page 76).
Faxes are not received
automatically.
• The receiving mode should be set to fax (see "Changing the receive modes" on page 273).
• Make sure that there is paper in the tray (see "Print media specifications" on page 125).
• Check to see if the display shows any error message. If it does, clear the problem.
The machine does not send.
• Make sure that the original is loaded in the document feeder or on the scanner glass.
• Check the fax machine you are sending to, to see if it can receive your fax.
The incoming fax has blank
spaces or is of poor-quality.
• The fax machine sending you the fax may be faulty.
• A noisy phone line can cause line errors.
• Check your machine by making a copy.
• A toner cartridge has almost reached its estimated cartridge life. Replace the toner cartridge (see "Replacing the toner cartridge"
on page 81).
6. Troubleshooting
319
Faxing problems
Condition
Suggested solutions
Some of the words on an
incoming fax are stretched.
The fax machine sending the fax had a temporary document jam.
There are lines on the originals
you sent.
Check your scan unit for marks and clean it (see "Cleaning the scan unit" on page 96).
The machine dials a number,
but the connection with the
other fax machine fails.
The other fax machine may be turned off, out of paper, or cannot answer incoming calls. Speak with the other machine operator and
ask them to solve the problem on their side.
Faxes do not store in memory.
There may not be enough memory space to store the fax. If the display indicating the memory status shows, delete any faxes you no
longer need from the memory, and then try to store the fax again. Call for service.
Blank areas appear at the
bottom of each page or on
other pages, with a small strip
of text at the top.
You may have chosen the wrong paper settings in the user option setting. Check the paper size and type again.
6. Troubleshooting
320
Operating system problems
1
Common Windows problems
Condition
Suggested solutions
“File in Use” message appears
during installation.
Exit all software applications. Remove all software from the startup group, then restart Windows. Reinstall the printer driver.
“General Protection Fault”,
“Exception OE”, “Spool 32”, or
“Illegal Operation” messages
appear.
Close all other applications, reboot Windows and try printing again.
“Fail To Print”, “A printer
timeout error occurred”
message appear.
These messages may appear during printing. Just keep waiting until the machine finishes printing. If the message appears in ready
mode or after printing has completed, check the connection and/or whether an error has occurred.
Samsung Printer Experience is
not shown when you click more
settings.
Samsung Printer Experience is not installed. Download the app from the Windows Store and install it.
Machine information is not
displayed when you click the
device in the Devices and
Printers.
Check the Printer properties. Click the Ports tab.
(Control Panel > Devices and Printers > Right-click on your printer icon and select Printer properties)
If the port is set to File or LPT, uncheck them and select TCP/IP, USB, or WSD.
Refer to the Microsoft Windows User’s Guide that came with your computer for further information on Windows error messages.
6. Troubleshooting
321
Operating system problems
2
Common Mac problems
Condition
The machine does not print PDF files
correctly. Some parts of graphics, text, or
illustrations are missing.
Suggested solutions
Printing the PDF file as an image may enable the file to print. Turn on Print As Image from the Acrobat printing options.
It will take longer to print when you print a PDF file as an image.
Some letters are not displayed normally
during cover page printing.
Mac OS cannot create the font while printing the cover page. The English alphabet and numbers are displayed normally on
the cover page.
When printing a document in Mac with
Acrobat Reader 6.0 or higher, colors
print incorrectly.
Make sure that the resolution setting in your machine driver matches the one in Acrobat Reader.
Refer to the Mac User’s Guide that came with your computer for further information on Mac error messages.
6. Troubleshooting
322
Operating system problems
3
Common Linux problems
Condition
Suggested solutions
There is no xsane nor simplescan application on my Linux
machine.
For some Linux distributions, there might be no default scan application. To use scan features, install one of scan applications using
download center supplied by the OS(ex. Ubuntu Software Center for Ubuntu, Install/Remove Software for openSUSE, Software for
Fedora).
Scanner can not be found via
network.
For some Linux distributions, strong firewall is enabled and it may block our installer from opening the necessary port for searching
network devices. In such a case, open the snmp port - 22161 manually or disable the firewall temporarily while using the device.
When printing more than one
copy, the second copy does not
print.
The problem occurs on Ubuntu 12.04 due to the problem in standard CUPS filter 'pdftops'. Update 'cups-filters' package to version
1.0.18 to fix the problem ('pdftops' is a part of 'cups-filters' package).
Unchecking the collate option
in the Print Dialog does not
work.
For some distributions, GNOME Print Dialog has an issue handling the collate option. As workaround, set the default value of collate
option to False using the system's printing utility(execute "system-config-printer" in the Terminal program).
Printing always works with
duplex.
This duplex issue was in Ubuntu 9.10 CUPS package. Update CUPS version to 1.4.1-5ubuntu2.2.
Printer is not added through
system's printing utility.
The problem occurs on Debian 7 due to the defect in 'system-config-printer' package of the Debian 7 (http://bugs.debian.org/cgibin/bugreport.cgi?bug=662813 in Debian bug tracking system). Please use another way to add printer (CUPS WebUI for example)
Paper size and orientation are
disabled in the Print Dialog
when opening text files.
The problem occurs on Fedora 19 and it's related to 'leafpad' text editor on Fedora 19. Please use other text editors like 'gedit'.
6. Troubleshooting
323
Operating system problems
Refer to the Linux User’s Guide that came with your computer for further information on Linux error messages.
4
Common PostScript problems
The following situations are PS language specific and may occur when several printer languages are used.
Problem
The PostScript file cannot be
printed
Possible cause
The PostScript driver may not be installed
correctly.
Solution
• Install the PostScript driver (see "Software Installation" on page 150).
• Print a configuration page and verify that the PS version is available for
printing.
• If the problem persists, contact a service representative.
Limit Check Error report prints
The print job was too complex.
You might need to reduce the complexity of the page or install more memory.
A PostScript error page prints
The print job may not be PostScript.
Make sure that the print job is a PostScript job. Check to see whether the software
application expected a setup or PostScript header file to be sent to the machine.
The optional tray is not
selected in the driver
The printer driver has not been configured to
recognize the optional tray.
Open the PostScript driver properties, select the Device Options tab, and set the
tray option (see "Setting Device Options" on page 86).
When printing a document in
Mac with Acrobat Reader 6.0 or
higher, colors print incorrectly
The resolution setting in the printer driver may
not be matched with the one in Acrobat Reader.
Make sure that the resolution setting in your printer driver matches the one in
Acrobat Reader.
6. Troubleshooting
324
Contact SAMSUNG worldwide
If you have any comments or questions regarding Samsung products, contact
the Samsung customer care center.
Country/Region
BANGLADESH
Country/Region
ALGERIA
ANGOLA
ARGENTINE
ARMENIA
AUSTRALIA
AUSTRIA
AZERBAIJAN
Customer Care Center
021 36 11 00
0800-333-3733
www.samsung.com/
ar/support
BOLIVIA
0-800-05-555
www.samsung.com/
support
BOSNIA
1300 362 603
www.samsung.com/
au/support
BOTSWANA
0800 - SAMSUNG (0800 7267864)
www.samsung.com/
at/support
088-55-55-555
www.samsung.com/
support
810-800-500-55-500
www.samsung.com/
in/support
02-201-24-18
www.samsung.com/
be/support (Dutch)
BELGIUM
www.samsung.com/
support
BAHRAIN
BELARUS
www.samsung.com/
n_africa/support
www.samsung.com/
ae/support (English)
BRAZIL
BULGARIA
www.samsung.com/
ae_ar/support (Arabic)
BURUNDI
www.samsung.com/
support
CAMEROON
WebSite
09612300300 – non toll free
WebSite
91-726-7864
8000-4726
Customer Care Center
www.samsung.com/
be_fr/support (French)
800-10-7260
www.samsung.com/
cl/support
051 133 1999
www.samsung.com/
support
8007260000
www.samsung.com/
support
0800-124-421 (Demais cidades e
regiões)
www.samsung.com/
br/support
4004-0000 (Capitais e grandes
centros)
07001 33 11 ,sharing cost
www.samsung.com/
bg/support
200
www.samsung.com/
support
7095- 0077
www.samsung.com/
africa_fr/support
Contact SAMSUNG worldwide
325
Contact SAMSUNG worldwide
Country/Region
Customer Care Center
1-800-SAMSUNG (726-7864)
CANADA
CHILE
CHINA
COLOMBIA
800-SAMSUNG (726-7864)
[HHP] 02-24828200
www.samsung.com/
ca/support(English)
CYPRUS
www.samsung.com/
ca_fr/support (French)
CZECH
www.samsung.com/
cl/support
DENMARK
www.samsung.com/
cn/support
Bogotá 600 12 72
www.samsung.com/
co/support
DOMINICA
www.samsung.com/
latin/support
(Spanish)
DRC
Gratis desde cualquier parte del
país 01 8000 112 112 ó desde su
celular #SAM(726)
00-800-1-SAMSUNG (726-7864)
COSTA RICA
Cote D’ Ivoire
Country/Region
400-810-5858
0-800-507-7267
CROATIA
WebSite
www.samsung.com/
latin_en/support
(English)
062 726 786
www.samsung.com/
hr/support
8000 0077
www.samsung.com/
africa_fr/support
Customer Care Center
8009 4000 only from landline,toll
free
www.samsung.com/
gr/support
800-SAMSUNG (800-726786)
www.samsung.com/
cz/support
70 70 19 70
www.samsung.com/
dk/support
1-800-751-2676
www.samsung.com/
latin/support
(Spanish)
www.samsung.com/
latin_en/support
(English)
499999
www.samsung.com/
support
1-800-10-72670
www.samsung.com/
latin/support
(Spanish)
1-800-SAMSUNG (72-6786)
ECUADOR
EGYPT
WebSite
www.samsung.com/
latin_en/
support(English)
08000-726786
16580
www.samsung.com/
eg/support
Contact SAMSUNG worldwide
326
Contact SAMSUNG worldwide
Country/Region
EIRE
Customer Care Center
0818 717100
800-6225
EL SALVADOR
ESTONIA
FINLAND
FRANCE
www.samsung.com/
ie/support
www.samsung.com/
latin/support
(Spanish)
800-7267
www.samsung.com/
ee/support
030-6227 515
www.samsung.com/fi/
support
01 48 63 00 00
www.samsung.com/
fr/support
0180 6 7267864*
www.samsung.com/
de/support
GHANA
GREECE
Customer Care Center
0800-10077
0302-200077
80111-SAMSUNG (80111 726
7864) only from land line
www.samsung.com/
gr/support
(+30) 210 6897691 from mobile
and land line
1-800-299-0013
1-800-299-0033
GUATEMALA
8-800-555-555
800-2791-9111
HONDURAS
www.samsung.com/
latin/support
(Spanish)
www.samsung.com/
latin_en/support
(English)
(852) 3698-4698
www.samsung.com/
support
www.samsung.com/
latin/support
(Spanish)
www.samsung.com/
latin_en/support
(English)
800-2791-9267
HONG KONG
WebSite
www.samsung.com/
africa_en/support
[HHP] 0180 6 M SAMSUNG bzw.
0180 6 67267864* (*0,20 €/Anruf
aus dem dt. Festnetz, aus dem
Mobilfunk max. 0,60 €/Anruf)
GEORGIA
Country/Region
www.samsung.com/
latin_en/support
(English)
0180 6 SAMSUNG bzw.
GERMANY
WebSite
www.samsung.com/
hk/support (Chinese)
www.samsung.com/
hk_en/support
(English)
Contact SAMSUNG worldwide
327
Contact SAMSUNG worldwide
Country/Region
HUNGARY
INDIA
INDONESIA
Customer Care Center
0680SAMSUNG (0680-726-786)
0680PREMIUM (0680-773-648)
1800 3000 8282 - Toll Free
1800 266 8282 - Toll Free
0800112888
021-56997777
WebSite
www.samsung.com/
hu/support
Country/Region
183-2255 (183-CALL)
021-8255
www.samsung.com/
id/support
www.samsung.com/
iran/support
LITHUANIA
800-SAMSUNG (800.7267864)
ITALIA
JAMAICA
[HHP] 800.Msamsung
(800.67267864)
1-800-234-7267
1-800-SAMSUNG (726-7864)
www.samsung.com/
it/support
LUXEMBURG
www.samsung.com/
latin/support
MACEDONIA
MALAYSIA
JAPAN
0120-327-527
www.samsung.com/
jp/support
MEXICO
800-22273
JORDAN
KAZAKHSTAN
KENYA
www.samsung.com/
ae_ar/support (Arabic)
www.samsung.com/
in/support
KYRGYZSTAN
06 5777444
www.samsung.com/
levant/support
(English)
MOLDOVA
8-10-800-500-55-500
(GSM:7799,VIP care 7700))
www.samsung.com/
support
MONGOLIA
0800 545 545
www.samsung.com/
support
WebSite
www.samsung.com/
ae/support (English)
KUWAIT
LATVIA
IRAN
Customer Care Center
00-800-500-55-500
www.samsung.com/
kz_ru/support
8000-7267
www.samsung.com/
lv/support
8-800-77777
www.samsung.com/
lt/support
261 03 710
www.samsung.com/
support
023 207 777
1800-88-9999
www.samsung.com/
my/support
01-800-SAMSUNG (726-7864)
www.samsung.com/
mx/support
0-800-614-40
www.samsung.com/
support
7-800-555-55-55
www.samsung.com/
support
Contact SAMSUNG worldwide
328
Contact SAMSUNG worldwide
Country/Region
MONTENEGRO
MOROCCO
MOZAMBIQUE
NAMIBIA
NIGERIA
NETHERLANDS
NEW ZEALAND
Customer Care Center
020 405 888
www.samsung.com/
support
080 100 2255
www.samsung.com/
n_africa/support
847267864 / 827267864
www.samsung.com/
support
08 197 267 864
www.samsung.com/
support
0800-726-7864
www.samsung.com/
africa_en/support
0900-SAMSUNG (0900-7267864)
(€ 0,10/min)
www.samsung.com/
nl/support
0800 SAMSUNG (0800 726 786)
www.samsung.com/
nz/support
00-1800-5077267
NICARAGUA
NORWAY
WebSite
Customer Care Center
800-SAMSUNG (726-7864)
OMAN
PAKISTAN
www.samsung.com/
no/support
www.samsung.com/
ae/support (English)
0800-Samsung (72678)
www.samsung.com/
pk/support
800-7267
www.samsung.com/
latin/support
(Spanish)
800-0101
PANAMA
www.samsung.com/
latin_en/support
(English)
009-800-542-0001
www.samsung.com/
latin/support
(Spanish)
PARAGUAY
www.samsung.com/
latin_en/support
(English)
0-800-777-08
PERU
WebSite
www.samsung.com/
ae_ar/support (Arabic)
www.samsung.com/
latin/support(Spanish)
www.samsung.com/
latin_en/support
(English)
815-56 480
Country/Region
Desde celulares por favor llamar
al número 336 8686
www.samsung.com/
pe/support
Contact SAMSUNG worldwide
329
Contact SAMSUNG worldwide
Country/Region
Customer Care Center
1-800-10-7267864 [PLDT]
PHILIPPINES
1-800-8-7267864 [Globe landline
and Mobile]
WebSite
www.samsung.com/
ph/support
Country/Region
Customer Care Center
800-2255 (800-CALL)
www.samsung.com/
ae/support (English)
QATAR
www.samsung.com/
ae_ar/support (Arabic)
02-4222111 [Other landline]
0 801-172-678* lub +48 22 60793-33 **
www.samsung.com/
pl/support
[HHP] 0 801-672-678* lub +48 22
607-93-33**
POLAND
RWANDA
ROMANIA
PUERTO RICO
9999
www.samsung.com/
support
08008 SAMSUNG (08008 726
7864)
www.samsung.com/
ro/support
TOLL FREE No.
*(całkowity koszt połączenia jak
za 1 impuls według taryfy
operatora)
RUSSIA
** (koszt połączenia według
taryfy operatora)
PORTUGAL
WebSite
808 20 7267
www.samsung.com/
pt/support
1-800-682-3180
www.samsung.com/
latin/support
(Spanish)
www.samsung.com/
latin_en/support
(English)
8-800-555-55-55
www.samsung.com/
ru/support
920021230
www.samsung.com/
sa/support
SAUDI ARABIA
SENEGAL
SERBIA
SINGAPORE
www.samsung.com/
sa_en/support
(English)/
800-00-0077
www.samsung.com/
africa_fr/support
011 321 6899
www.samsung.com/
rs/support
1800-SAMSUNG (726-7864)
www.samsung.com/
sg/support
Contact SAMSUNG worldwide
330
Contact SAMSUNG worldwide
Country/Region
SLOVENIA
SLOVAKIA
SOUTH AFRICA
SPAIN
SUDAN
SWEDEN
SWITZERLAND
Customer Care Center
080 697 267
Country/Region
www.samsung.com/
rs/si
TAIWAN
0800 - SAMSUNG(0800-726 786)
www.samsung.com/
sk/support
TANZANIA
0860 SAMSUNG (726-7864)
www.samsung.com/
support
THAILAND
090 726 786
0034902172678
[HHP] 0034902167267
www.samsung.com/
es/support
1969
www.samsung.com/
support
0771 726 7864 (SAMSUNG)
www.samsung.com/
es/support
0848 726 78 64 (0848-SAMSUNG) www.samsung.com/
ch/support (German)
www.samsung.com/
ch_fr/support (French)
18252273
SYRIA
TADJIKISTAN
WebSite
8-10-800-500-55-500
www.samsung.com/
levant/support
(English)
www.samsung.com/
support
Customer Care Center
0800-32-9999
www.samsung.com/
tw/support
0685 88 99 00
www.samsung.com/
support
0-2689-3232,
www.samsung.com/
th/support
1800-29-3232
1-800-SAMSUNG (726-7864)
TRINIDAD &
TOBAGO
TURKEY
TUNISIA
www.samsung.com/
latin/support
(Spanish)
www.samsung.com/
latin_en/support
(English)
444 77 11
www.samsung.com/
tr/support
80-1000-12 www.samsung.com/
n_africa/support
800-SAMSUNG (726-7864)
www.samsung.com/
ae/support (English)
U.A.E
U.K
WebSite
www.samsung.com/
ae_ar/support (Arabic)
0330 SAMSUNG (7267864)
www.samsung.com/
uk/support
Contact SAMSUNG worldwide
331
Contact SAMSUNG worldwide
Country/Region
U.S.A
Customer Care Center
WebSite
1-800-SAMSUNG (726-7864)
www.samsung.com/
us/support
1-800-SAMSUNG (72-6786)
www.samsung.com/
us/support
-Consummer
Country/Region
ZAMBIA
Customer Care Center
0211 350370
WebSite
www.samsung.com/
support
Electonics
U.S.A
(Mobile Phones)
UGANDA
[HHP] 1-888-987-HELP(4357)
0800 300 300
www.samsung.com/
support
0-800-502-000
www.samsung.com/
ua/support (Ukrainian)
UKRAINE
www.samsung.com/
ua_ru/support
(Russian)
000- 405-437-33
URUGUAY
UZBEKISTAN
VENEZUELA
VIETNAM
www.samsung.com/
latin/support(Spanish)
www.samsung.com/
latin_en/
support(English)
8-10-800-500-55-500
www.samsung.com/
support
0-800-SAMSUNG (726-7864)
www.samsung.com/
ve/support
1800 588 889
www.samsung.com/
vn/support
Contact SAMSUNG worldwide
332
Glossary
ADF
The following glossary helps you get familiar with the product by
understanding the terminologies commonly used with printing as well as
mentioned in this user’s guide.
802.11
802.11 is a set of standards for wireless local area network (WLAN)
communication, developed by the IEEE LAN/MAN Standards Committee (IEEE
802).
802.11b/g/n
802.11b/g/n can share same hardware and use the 2.4 GHz band. 802.11b
supports bandwidth up to 11 Mbps, 802.11n supports bandwidth up to 150
Mbps. 802.11b/g/n devices may occasionally suffer interference from
microwave ovens, cordless telephones, and Bluetooth devices.
An Automatic Document Feeder (ADF) is a scanning unit that will automatically
feed an original sheet of paper so that the machine can scan some amount of the
paper at once.
AppleTalk
AppleTalk is a proprietary suite of protocols developed by Apple, Inc for
computer networking. It was included in the original Mac (1984) and is now
deprecated by Apple in favor of TCP/IP networking.
BIT Depth
A computer graphics term describing the number of bits used to represent the
color of a single pixel in a bitmapped image. Higher color depth gives a broader
range of distinct colors. As the number of bits increases, the number of possible
colors becomes impractically large for a color map. 1-bit color is commonly
called as monochrome or black and white.
Access point
Access Point or Wireless Access Point (AP or WAP) is a device that connects
wireless communication devices together on wireless local area networks
(WLAN), and acts as a central transmitter and receiver of WLAN radio signals.
BMP
A bitmapped graphics format used internally by the Microsoft Windows
graphics subsystem (GDI), and used commonly as a simple graphics file format
on that platform.
Glossary
333
Glossary
BOOTP
Coverage
Bootstrap Protocol. A network protocol used by a network client to obtain its IP
address automatically. This is usually done in the bootstrap process of
computers or operating systems running on them. The BOOTP servers assign
the IP address from a pool of addresses to each client. BOOTP enables 'diskless
workstation' computers to obtain an IP address prior to loading any advanced
operating system.
It is the printing term used for a toner usage measurement on printing. For
example, 5% coverage means that an A4 sided paper has about 5% image or text
on it. So, if the paper or original has complicated images or lots of text on it, the
coverage will be higher and at the same time, a toner usage will be as much as
the coverage.
CSV
CCD
Charge Coupled Device (CCD) is a hardware which enables the scan job. CCD
Locking mechanism is also used to hold the CCD module to prevent any damage
when you move the machine.
Comma Separated Values (CSV). A type of file format, CSV is used to exchange
data between disparate applications. The file format, as it is used in Microsoft
Excel, has become a de facto standard throughout the industry, even among
non-Microsoft platforms.
Collation
DADF
Collation is a process of printing a multiple-copy job in sets. When collation is
selected, the device prints an entire set before printing additional copies.
A Duplex Automatic Document Feeder (DADF) is a scanning unit that will
automatically feed and turn over an original sheet of paper so that the machine
can scan on both sides of the paper.
Control Panel
Default
A control panel is a flat, typically vertical, area where control or monitoring
instruments are displayed. They are typically found in front of the machine.
The value or setting that is in effect when taking a printer out of its box state,
reset, or initialized.
Glossary
334
Glossary
DHCP
DPI
A Dynamic Host Configuration Protocol (DHCP) is a client-server networking
protocol. A DHCP server provides configuration parameters specific to the DHCP
client host requesting, generally, information required by the client host to
participate on an IP network. DHCP also provides a mechanism for allocation of
IP addresses to client hosts.
Dots Per Inch (DPI) is a measurement of resolution that is used for scanning and
printing. Generally, higher DPI results in a higher resolution, more visible detail
in the image, and a larger file size.
DIMM
Distinctive Ring Pattern Detection. Distinctive Ring is a telephone company
service which enables a user to use a single telephone line to answer several
different telephone numbers.
Dual Inline Memory Module (DIMM), a small circuit board that holds memory.
DIMM stores all the data within the machine like printing data, received fax data.
DRPD
Duplex
DLNA
The Digital Living Network Alliance (DLNA) is a standard that allows devices on
a home network to share information with each other across the network.
A mechanism that will automatically turn over a sheet of paper so that the
machine can print (or scan) on both sides of the paper. A printer equipped with
a Duplex Unit can print on both sides of paper during one print cycle.
DNS
Duty Cycle
The Domain Name Server (DNS) is a system that stores information associated
with domain names in a distributed database on networks, such as the Internet.
Duty cycle is the page quantity which does not affect printer performance for a
month. Generally the printer has the lifespan limitation such as pages per year.
The lifespan means the average capacity of print-outs, usually within the
warranty period. For example, if the duty cycle is 48,000 pages per month
assuming 20 working days, a printer limits 2,400 pages a day.
Dot Matrix Printer
A dot matrix printer refers to a type of computer printer with a print head that
runs back and forth on the page and prints by impact, striking an ink-soaked
cloth ribbon against the paper, much like a typewriter.
Glossary
335
Glossary
ECM
EtherTalk
Error Correction Mode (ECM) is an optional transmission mode built into Class 1
fax machines or fax modems. It automatically detects and corrects errors in the
fax transmission process that are sometimes caused by telephone line noise.
A suite of protocols developed by Apple Computer for computer networking. It
was included in the original Mac (1984) and is now deprecated by Apple in favor
of TCP/IP networking.
Emulation
FDI
Emulation is a technique of one machine obtaining the same results as another.
Foreign Device Interface (FDI) is a card installed inside the machine to allow a
third party device such as a coin operated device or a card reader. Those devices
allow the pay-for-print service on your machine.
An emulator duplicates the functions of one system with a different system, so
that the second system behaves like the first system. Emulation focuses on exact
reproduction of external behavior, which is in contrast to simulation, which
concerns an abstract model of the system being simulated, often considering its
internal state.
Ethernet
Ethernet is a frame-based computer networking technology for local area
networks (LANs). It defines wiring and signaling for the physical layer, and frame
formats and protocols for the media access control (MAC)/data link layer of the
OSI model. Ethernet is mostly standardized as IEEE 802.3. It has become the most
widespread LAN technology in use during the 1990s to the present.
FTP
A File Transfer Protocol (FTP) is a commonly used protocol for exchanging files
over any network that supports the TCP/IP protocol (such as the Internet or an
intranet).
Fuser Unit
The part of a laser printer that fuses the toner onto the print media. It consists of
a heat roller and a pressure roller. After toner is transferred onto the paper, the
fuser unit applies heat and pressure to ensure that the toner stays on the paper
permanently, which is why paper is warm when it comes out of a laser printer.
Glossary
336
Glossary
Gateway
IEEE
A connection between computer networks, or between a computer network
and a telephone line. It is very popular, as it is a computer or a network that
allows access to another computer or network.
The Institute of Electrical and Electronics Engineers (IEEE) is an international
non-profit, professional organization for the advancement of technology
related to electricity.
Grayscale
IEEE 1284
A shades of gray that represents light and dark portions of an image when color
images are converted to grayscale; colors are represented by various shades of
gray.
The 1284 parallel port standard was developed by the Institute of Electrical and
Electronics Engineers (IEEE). The term "1284-B" refers to a specific connector
type on the end of the parallel cable that attaches to the peripheral (for example,
a printer).
Halftone
Intranet
An image type that simulates grayscale by varying the number of dots. Highly
colored areas consist of a large number of dots, while lighter areas consist of a
smaller number of dots.
Mass storage device
Mass storage device, commonly referred to as a hard drive or hard disk, is a nonvolatile storage device which stores digitally-encoded data on rapidly rotating
platters with magnetic surfaces.
A private network that uses Internet Protocols, network connectivity, and
possibly the public telecommunication system to securely share part of an
organization's information or operations with its employees. Sometimes the
term refers only to the most visible service, the internal website.
IP address
An Internet Protocol (IP) address is a unique number that devices use in order to
identify and communicate with each other on a network utilizing the Internet
Protocol standard.
Glossary
337
Glossary
IPM
ITU-T
The Images Per Minute (IPM) is a way of measuring the speed of a printer. An IPM
rate indicates the number of single-sided sheets a printer can complete within
one minute.
The International Telecommunication Union is an international organization
established to standardize and regulate international radio and
telecommunications. Its main tasks include standardization, allocation of the
radio spectrum, and organizing interconnection arrangements between
different countries to allow international phone calls. A -T out of ITU-T indicates
telecommunication.
IPP
The Internet Printing Protocol (IPP) defines a standard protocol for printing as
well as managing print jobs, media size, resolution, and so forth. IPP can be used
locally or over the Internet to hundreds of printers, and also supports access
control, authentication, and encryption, making it a much more capable and
secure printing solution than older ones.
ITU-T No. 1 chart
Standardized test chart published by ITU-T for document facsimile
transmissions.
IPX/SPX
JBIG
IPX/SPX stands for Internet Packet Exchange/Sequenced Packet Exchange. It is a
networking protocol used by the Novell NetWare operating systems. IPX and
SPX both provide connection services similar to TCP/IP, with the IPX protocol
having similarities to IP, and SPX having similarities to TCP. IPX/SPX was
primarily designed for local area networks (LANs), and is a very efficient protocol
for this purpose (typically its performance exceeds that of TCP/IP on a LAN).
Joint Bi-level Image Experts Group (JBIG) is an image compression standard with
no loss of accuracy or quality, which was designed for compression of binary
images, particularly for faxes, but can also be used on other images.
ISO
JPEG
Joint Photographic Experts Group (JPEG) is a most commonly used standard
method of lossy compression for photographic images. It is the format used for
storing and transmitting photographs on the World Wide Web.
The International Organization for Standardization (ISO) is an international
standard-setting body composed of representatives from national standards
bodies. It produces world-wide industrial and commercial standards.
Glossary
338
Glossary
LDAP
MH
The Lightweight Directory Access Protocol (LDAP) is a networking protocol for
querying and modifying directory services running over TCP/IP.
Modified Huffman (MH) is a compression method for decreasing the amount of
data that needs to be transmitted between the fax machines to transfer the
image recommended by ITU-T T.4. MH is a codebook-based run-length
encoding scheme optimized to efficiently compress white space. As most faxes
consist mostly of white space, this minimizes the transmission time of most
faxes.
LED
A Light-Emitting Diode (LED) is a semiconductor device that indicates the status
of a machine.
MMR
MAC address
Media Access Control (MAC) address is a unique identifier associated with a
network adapter. MAC address is a unique 48-bit identifier usually written as 12
hexadecimal characters grouped in pairs (e. g., 00-00-0c-34-11-4e). This address
is usually hard-coded into a Network Interface Card (NIC) by its manufacturer,
and used as an aid for routers trying to locate machines on large networks.
Modified Modified READ (MMR) is a compression method recommended by ITUT T.6.
Modem
A device that modulates a carrier signal to encode digital information, and also
demodulates such a carrier signal to decode transmitted information.
MFP
MR
Multi Function Peripheral (MFP) is an office machine that includes the following
functionality in one physical body, so as to have a printer, a copier, a fax, a
scanner and etc.
Modified Read (MR) is a compression method recommended by ITU-T T.4. MR
encodes the first scanned line using MH. The next line is compared to the first,
the differences determined, and then the differences are encoded and
transmitted.
Glossary
339
Glossary
NetWare
OSI
A network operating system developed by Novell, Inc. It initially used
cooperative multitasking to run various services on a PC, and the network
protocols were based on the archetypal Xerox XNS stack. Today NetWare
supports TCP/IP as well as IPX/SPX.
Open Systems Interconnection (OSI) is a model developed by the International
Organization for Standardization (ISO) for communications. OSI offers a
standard, modular approach to network design that divides the required set of
complex functions into manageable, self-contained, functional layers. The layers
are, from top to bottom, Application, Presentation, Session, Transport, Network,
Data Link and Physical.
OPC
Organic Photo Conductor (OPC) is a mechanism that makes a virtual image for
print using a laser beam emitted from a laser printer, and it is usually green or
rust colored and has a cylinder shape.
An imaging unit containing a drum slowly wears the drum surface by its usage
in the printer, and it should be replaced appropriately since it gets worn from
contact with the cartridge development brush, cleaning mechanism, and paper.
Originals
The first example of something, such as a document, photograph or text, etc,
which is copied, reproduced or translated to produce others, but which is not
itself copied or derived from something else.
PABX
A private automatic branch exchange (PABX) is an automatic telephone
switching system within a private enterprise.
PCL
Printer Command Language (PCL) is a Page Description Language (PDL)
developed by HP as a printer protocol and has become an industry standard.
Originally developed for early inkjet printers, PCL has been released in varying
levels for thermal, dot matrix printer, and laser printers.
PDF
Portable Document Format (PDF) is a proprietary file format developed by
Adobe Systems for representing two dimensional documents in a device
independent and resolution independent format.
Glossary
340
Glossary
PostScript
Protocol
PostScript (PS) is a page description language and programming language used
primarily in the electronic and desktop publishing areas. - that is run in an
interpreter to generate an image.
A convention or standard that controls or enables the connection,
communication, and data transfer between two computing endpoints.
PS
Printer Driver
See PostScript.
A program used to send commands and transfer data from the computer to the
printer.
Print Media
The media like paper, envelopes, labels, and transparencies which can be used
in a printer, a scanner, a fax or, a copier.
PSTN
The Public-Switched Telephone Network (PSTN) is the network of the world's
public circuit-switched telephone networks which, on industrial premises, is
usually routed through the switchboard.
RADIUS
PPM
Pages Per Minute (PPM) is a method of measurement for determining how fast
a printer works, meaning the number of pages a printer can produce in one
minute.
Remote Authentication Dial In User Service (RADIUS) is a protocol for remote
user authentication and accounting. RADIUS enables centralized management
of authentication data such as usernames and passwords using an AAA
(authentication, authorization, and accounting) concept to manage network
access.
PRN file
Resolution
An interface for a device driver, this allows software to interact with the device
driver using standard input/output system calls, which simplifies many tasks.
The sharpness of an image, measured in Dots Per Inch (DPI). The higher the dpi,
the greater the resolution.
Glossary
341
Glossary
SMB
TCP/IP
Server Message Block (SMB) is a network protocol mainly applied to share files,
printers, serial ports, and miscellaneous communications between nodes on a
network. It also provides an authenticated Inter-process communication
mechanism.
The Transmission Control Protocol (TCP) and the Internet Protocol (IP); the set of
communications protocols that implement the protocol stack on which the
Internet and most commercial networks run.
TCR
SMTP
Simple Mail Transfer Protocol (SMTP) is the standard for e-mail transmissions
across the Internet. SMTP is a relatively simple, text-based protocol, where one
or more recipients of a message are specified, and then the message text is
transferred. It is a client-server protocol, where the client transmits an email
message to the server.
SSID
Service Set Identifier (SSID) is a name of a wireless local area network (WLAN). All
wireless devices in a WLAN use the same SSID in order to communicate with
each other. The SSIDs are case-sensitive and have a maximum length of 32
characters.
Transmission Confirmation Report (TCR) provides details of each transmission
such as job status, transmission result and number of pages sent. This report can
be set to print after each job or only after failed transmissions.
TIFF
Tagged Image File Format (TIFF) is a variable-resolution bitmapped image
format. TIFF describes image data that typically come from scanners. TIFF
images make use of tags, keywords defining the characteristics of the image that
is included in the file. This flexible and platform-independent format can be
used for pictures that have been made by various image processing
applications.
Toner Cartridge
Subnet Mask
The subnet mask is used in conjunction with the network address to determine
which part of the address is the network address and which part is the host
address.
A kind of bottle or container used in a machine like a printer which contains
toner. Toner is a powder used in laser printers and photocopiers, which forms
the text and images on the printed paper. Toner can be fused by a combination
of heat/pressure from the fuser, causing it to bind to the fibers in the paper.
Glossary
342
Glossary
TWAIN
Watermark
An industry standard for scanners and software. By using a TWAIN-compliant
scanner with a TWAIN-compliant program, a scan can be initiated from within
the program. It is an image capture API for Microsoft Windows and Apple Mac
operating systems.
A watermark is a recognizable image or pattern in paper that appears lighter
when viewed by transmitted light. Watermarks were first introduced in Bologna,
Italy in 1282; they have been used by papermakers to identify their product, and
also on postage stamps, currency, and other government documents to
discourage counterfeiting.
UNC Path
WEP
Uniform Naming Convention (UNC) is a standard way to access network shares
in Window NT and other Microsoft products. The format of a UNC path is:
\\<servername>\<sharename>\<Additional directory>
URL
Uniform Resource Locator (URL) is the global address of documents and
resources on the Internet. The first part of the address indicates what protocol to
use, the second part specifies the IP address or the domain name where the
resource is located.
Wired Equivalent Privacy (WEP) is a security protocol specified in IEEE 802.11 to
provide the same level of security as that of a wired LAN. WEP provides security
by encrypting data over radio so that it is protected as it is transmitted from one
end point to another.
WIA
Windows Imaging Architecture (WIA) is an imaging architecture that is originally
introduced in Windows Me and Windows XP. A scan can be initiated from within
these operating systems by using a WIA-compliant scanner.
USB
WPA
Universal Serial Bus (USB) is a standard that was developed by the USB
Implementers Forum, Inc., to connect computers and peripherals. Unlike the
parallel port, USB is designed to concurrently connect a single computer USB
port to multiple peripherals.
Wi-Fi Protected Access (WPA) is a class of systems to secure wireless (Wi-Fi)
computer networks, which was created to improve upon the security features of
WEP.
Glossary
343
Glossary
WPA-PSK
WPA-PSK (WPA Pre-Shared Key) is special mode of WPA for small business or
home users. A shared key, or password, is configured in the wireless access point
(WAP) and any wireless laptop or desktop devices. WPA-PSK generates a unique
key for each session between a wireless client and the associated WAP for more
advanced security.
WPS
The Wi-Fi Protected Setup (WPS) is a standard for establishing a wireless home
network. If your wireless access point supports WPS, you can configure the
wireless network connection easily without a computer.
XPS
XML Paper Specification (XPS) is a specification for a Page Description Language
(PDL) and a new document format, which has benefits for portable document
and electronic document, developed by Microsoft. It is an XML-based
specification, based on a new print path and a vector-based deviceindependent document format.
Glossary
344
Index
A
accessories
installing
86
ordering
75
address book
editing
general setup
registering
using
239
95
scan unit
96
cleaning a machine
92
clear button
24
control panel
24
touch screen
239
226, 240
pickup roller
convention
31
14
copy
general setup
239
204
copying
address book setup
239
administrator’s setup
226
basic copying
59
AirPrint
197
reducing or enlarging copies
60
AnyWeb Print
283
authorized users
registering
242
E
easy document creator
289
e-book conversion
289
Eco
229
eco printing
56
email address
searching
235
236, 235
entering character
237
error message
117
F
favorites settings, for printing
55
fax
D
default settings
tray setting
47
canceling a reserved fax job
270, 273
delaying a fax transmission
270
forwarding a received fax to another
destination
271
212
B
device options
buttons
direct printing utility
252
general setup
document box
231
printing faxes on both sides of the paper
276
numeric keypad
24
general setup
C
86
231
driver installation
Unix
cleaning
inside
93
outside
92
165
receiving a fax in the computer 272, 276,
274,
275, 273, 274
sending a fax in the computer
fax feature
269, 272
269
Index 345
Index
fax sending
multi sending
clearing original document
faxing
adjusting darkness
66, 65
preparing to fax
63
receiving in Fax mode
65
features
machine features
print media feature
front view
tips for avoiding paper jams
64
LCD display
Linux
125
driver installation for network connected
165,
153, 154
22
G
general icons
14
glossary
333
google cloud printing
198
I
id copy
158
mac scanning
267
204, 209, 212, 222
machine setup
machine status
217
204, 209, 212, 222
maintenance parts
memory upgrading
scanning
268, 131
menu overview
linux scanning
159
loading
special media
loading originals
88
277, 278
31
multi-purpose tray
268
41, 39
76
memory
memory/hard drive feature
loading
41
using special media
43
N
43
49
M
61
using SetIP
256, 255
paper in multi-purpose tray
25
267, 130
printer properties
using SetIP
H
help button
323
253
scanning
machine information
browsing the machine status 204, 209, 212,
222
common Linux problems
printing
100
L
5
201
101, 106
Mac
J
common Mac problems
322
jam
driver installation for network connected
164,
151, 152
network
driver installation
Linux
Mac
UNIX
Windows
165
164
165
160
general setup
223
Index 346
Index
installing environment
IPv6 configuration
SetIP program
wired network setup
132, 156
168
157, 158, 159, 181
157, 171
n-up printing
Mac
print
general setup
202
mobile OS
189
253
244
setting as a default machine
UNIX
labels
45
Linux
255
125
Mac
253
46
UNIX
256
photo paper
ordering
75
setting the paper size
48
transparency
print menu
delete
249
print
249
47, 43
45
Linux
printing a document
printing feature
operating system problems
ordering
75
placing a machine
adjusting the altitude
234
postScript driver
troubleshooting
324
256
printer status
copying problems
316
faxing problems
319
paper feeding problems 302, 303, 304, 308
293
scanning problems
changing the default print settings
243
Linux
255
Mac
253
multiple pages on one sheet of paper
253
Mac
printing a document
321
problems
printing
Parallel
243
problem
202
printer preferences
general information
P
252
44
39
249
256, 69
envelope
loading paper
create
using direct printing utility
243, 245
46
output support
overlay printing
52
254
card stock
75
output support
Windows
Mac
48
print media
O
optional tray
preparing originals type
317
R
rear view
regulatiory information
23
133
reports
machine information 205, 210, 212, 214,
Index 347
Index
217,
reset button
223
25
resolution
faxing
USB flash memory
secu printing
service contact numbers
65
S
SetIP program
325
touch screen
125
changing the tray size
38
loading paper in multi-purpose tray
41
ordering an optional tray
75
setting the paper size and type
47
25
235
supplies
available supplies
74
estimated toner cartridge life
78
208
monitoring the supplies life
90
Scan Assitant
266
ordering
74
scan feature
259
replacing toner cartridge
81
scan to cloud
232
scan
SyncThru Web Service
Scanning
U
understanding the status LED
285
SyncThru™ Web Service
285
driver installation for network connected
165
Linux scanning
268
toner cartridge
Mac
267
estimated life
78
handling instructions
77
non-Samsung and refilled
77
256
Unix
system requirements
USB
T
259
115
UNIX
printing
general information
basic information
Scanning from image editing program 265,
260,
263, 264, 261, 262, 265
tray
print media
Storing
scanning
238
38
15
Scanning with Samsung Scan Assitant 266
keyboard
157, 181
adjusting the width and length
symbols
general setup
77
123
status
293
storing
specifications
15
Samsung Printer Status
57
79, 81
233
information
295
redistributing toner
Special features
safety
samsung printer experience
68
131
230
USB cable
driver installation 27, 29, 151, 153, 152, 154
USB flash memory
data backup
70
Index 348
Index
managing
70
wireless LED
printing
69
wireless network
scanning
68
network cable
25
181
using
keyboard
using help
238
55, 255
W
watermark
create
248
delete
248
edit
248
Windows
common Windows problems
321
driver installation for network connected
160,
27, 29
system requirements
using SetIP
129
157, 181
wireless
Infrastructure mode
171
USB cable
176
WPS
disconnecting
PBC mode
175
174
Index 349