1
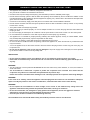
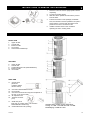
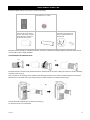
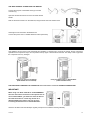
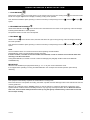
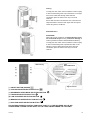
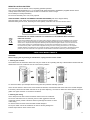
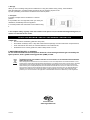
EN
LOCAL AIR CONDITIONER
OPERATING INSTRUCTIONS
Read the instructions carefully before operating the appliance or carrying out maintenance work.
Observe all the safety instructions; failure to observe the instructions may lead to accidents and/or
damage. Keep these instructions in a safe place for future reference.
V 03/14
10
GENERAL OPERATING AND SAFETY INSTRUCTIONS
•
•
•
•
•
•
•
•
•
•
•
•
•
•
•
This appliance is a portable air-conditioner, designed for domestic use.
Only use this air-conditioner as described in this manual.
Ensure that the required voltage and frequency (220-240V/50Hz) match the available power supply.
Ensure that the electricity system is able to deliver the operating current needed by the air-conditioner in addition to that
normally absorbed by other appliances (electrical appliances, lighting, etc.). Please refer to the maximum absorption data
given on the air-conditioner data plate.
Connection to the electricity supply must take place in accordance with current installation standards.
Ensure that the automatic switches and system protection valves are able to withstand a start-up current of 7A (normally
for less than 1 second).
The system socket must always be grounded.
Make sure the plug is inserted properly. Do not use multiple sockets. Do not touch the plug with wet hands. Make sure
the plug is clean.
Do not use the plug to start/stop the air-conditioner: use the power button on the remote control or on the control panel.
Do not install the air-conditioner in rooms that may be subject to water sprays (e.g. laundries).
This appliance is not suitable for people (including children) with reduced physical, sensory or mental abilities, unless
they are adequately supervised by a person responsible for their safety.
Before moving or cleaning, ensure that the device is unplugged from the socket.
Do not move the air-conditioner while it is operating; first turn the appliance off, check and remove any condensation that
may have formed.
To turn the appliance off, set the remote control to OFF and remove the plug from the socket. Only pull on the plug. Do
not pull the cord.
Do not use the appliance if the cord or plug are damaged. If the power supply cord is damaged, it must be replaced
by the service centre in order to avoid any safety risks.
PRECAUTION!
• Do not insert any objects into the air-conditioner: this is very dangerous as the fan turns very quickly.
• Ensure that air circulates freely around the unit. Do not cover the air intake and delivery grilles with drapes or in
any way.
WARNING!
• The air-conditioner must be positioned at least 50 cm from the wall and any other obstacles, on a firm, flat surface to
avoid water leaks.
• The air-conditioner is fitted with a system to protect the compressor from overload. This means that the
compressor only starts once 3.5 minutes have passed from its previous stop.
Please wait at least 3.5 minutes before starting the unit. This helps prevent the compressor from being damaged.
WARNING!
In the event of an anomaly, switch the appliance off and unplug from the socket. Do not dismantle or attempt to
repair or modify the product. In the event of a malfunction, contact the after-sales service centre directly.
WARNING!
• Do not expose the air-conditioner to direct sunlight, as the colour of the materials may change and if the
appliance overheats this may activate the protection mechanism, causing it to switch off.
• Do not use insecticides, oils, detergents or spray paints near the appliance; do not use aggressive chemical
detergents to clean the casing: this may damage the finish and colour.
• Close all open windows to maximise air-conditioning efficiency.
The manufacturer will not be held liable if safety and accident prevention rules are not observed.
V 03/14
11
INSTRUCTIONS TO REMOVE THE PACKAGING
1.
2.
3.
4.
5.
Place the unit in the correct upright position before
unpacking.
Cut the two packing straps.
Slide the carton upwards and remove the product
from the base.
Pull from the bottom of the package, the flexible
hose, the terminal connector (divided in two parts a
and b) and the connector with the magnet to be
placed on the unit to connect the hose.
Install the exhaust hose on the unit before
operating the unit in Cooling mode.
DESCRIPTION OF THE APPLIANCE
FRONT VIEW
1.
2.
3.
4.
5.
Upper air filter
Cold air inlet
Bottom air filter
Hot air inlet
Horizontal motorized flaps
SIDE VIEW
6.
7.
8.
9.
10.
Upper air filter
Cold air inlet
Condensate drain hole (Dehumidification)
Bottom air filter
Hot air inlet
REAR VIEW
11. Control panel
(button for
operation without
remote control)
12. Cool and/or dehumidified air outlet
13. Hot air outlet
14. Connector with hooks and magnet to be placed on
the unit, on the hot air outlet.
15. Air expulsion hose
16. Terminal connector
(a+b)
17. Small door (to be
kept open in Cooling mode, to be closed in
Dehumidification mode only).
18. Condensate drain hole (Cooling)
V 03/14
Operation limits: min/max. (indoor temperature):
Cooling: 17°C D.B. - 13°C W.B./ 32°C D.B. – 23° W.B.
Dehumidifying: 5°C D.B./32°C D.B
12
APPLIANCE START-UP
Elements supplied with the unit (shown in the box here below).
Slim Remote control
Connector with magnet to be
placed on the hot air outlet on
the unit, after having connected
the flexible hose, complete of
the terminal flat connector.
Battery for remote control
Type CR2025- 3V - Lithium.
Flexible hose for hot air expulsion
Terminal flat connector to be
connected to the flexible hose
and to be placed between the
window leafs.
Place the product vertically on a stable, flat surface, as close to a window as possible, keeping a minimum distance of 50
cm from walls or other nearby obstacles.
FITTING HOSE FOR AIR EXPULSION
(1)
(2)
Insert the terminal connector to be placed between the window leafs on the hose, rotating the connector counter-clockwise,
according to the arrow (1).
Then, connect the air discharge hose complete of the terminal connector, to the connector with the magnet, that must be
placed to the hot air outlet on the unit, always turning it counter-clockwise, according to the arrow (2).
(3)
Connect the hose complete with connectors to the unit (3)
To remove the hose, turn it clockwise.
V 03/14
13
USE WITH TERMINAL CONNECTION FOR WINDOW
Connect the end part of the flexible hose (5) to the flat
connector (4).
Open the windows and block one of the two leafs with the
handle.
Rest the terminal connection on the fixed leaf, bring the other leaf of the window close.
Avoid tight curves and folds in the flexible hose.
Connect the power cord to a suitable electrical socket (220-240V).
HOW TO USE THE APPLIANCE
This appliance can be used to Cool, Dehumidify and Ventilate. In changing from one mode to another, the fan continues to
operate but the compressor stops; the compressor starts up again 3 and a half minutes later. This delay in start-up protects
the compressor from any damages.
Using it as room air conditioner
(with flexible hose connected)
Using it as Spot Cooler or Dehumidifier
(without flexible hose)
THE DISCHARGE TUBE MUST BE CONNECTED to the unit when it is used as ROOM AIR CONDITIONER.
IMPORTANT!
When using it as SPOT COOLER or as DEHUMIDIFIER
the hose must not be connected: in the specific case of
use as a dehumidifier, you must also close the door at
the outlet of the hot air: in this way, the hot air is
ducted upwards and "mixes" with cool air, thus
increasing the effectiveness of dehumidification.
Clean the air filters under the side flaps regularly to keep the air conditioner working efficiently.
V 03/14
14
OPERATING MODES & MODE SELECTION
1. COOLING MODE
Press the key Power
on the control panel or on the remote control to enter into Cooling mode
far left on the upper ring of the unit will light, indicating Cooling mode operation.
Then select the ventilation speed, pressing on remote control keys corresponding to the low
speed.
; the white LED at the
, medium
or high
2. DEHUMIDIFICATION MODE
Select Dehumidification mode
on the remote control: the white LED in the centre on the upper ring of the unit will light,
indicating Dehumidification mode operation.
Fan speed is fixed to low and cannot be adjusted.
3. FAN MODE
Select Fan mode
on the remote control; the white LED at the far right on the upper ring of the unit will light, indicating
Fan mode operation.
Then select the ventilation speed, pressing on remote control keys corresponding to the low
speed.
, medium
or high
NOTE
The air conditioner does not cool the environment when operating as a dehumidifier.
Dehumidification mode is recommended in autumn and winter.
If used in summer, it is better to leave the flexible hose attached, in order to send the hot air outside rather than
releasing it into the environment.
During dehumidification, it is better to ensure continuous drainage (see paragraph entitled "HOW TO ELIMINATE
CONDENSATE").
IMPORTANT!
When the LED Ventilation (far right) flashes slowly (1 "on / 1" off), the unit is in DEFROST mode.
It can happen when operating in cooling and dehumidification: the unit stops and resumes operation just ended up
defrosting.
HOW TO ELIMINATE CONDENSATE
This equipment automatically vaporises the condensation in Cooling mode.
Ensure that when the unit operates as Cooling, the rubber caps that close the discharge holes on the sides and the rear are
correctly positioned.
When the air conditioner works in Cooling, there is no need to arrange for continuous drainage of condensate; only in
specific weather conditions where air humidity levels are very high may water deposit within the unit. When the internal
tank is full, the three white LEDs positioned on the top ring will light up simultaneously, to warn that it is full and
the unit stops working.
V 03/14
15
Cooling
To empty the tank, switch the air conditioner off and unplug
it. Remove the drainage hole cap at the bottom on the right
and connect a little tube through which drain the
condensate; place the other end on top of a normal
reservoir.
Ensure that the tube is not twisted or bent. The tube must
slope downwards. Close the drain again with the cap and
restart using the air conditioner.
Dehumidification
ATTENTION!
When using the air conditioner in Dehumidification mode,
we recommend always ensuring continuous drainage, in
order to guarantee maximum dehumidification efficiency.
To empty the tank, switch the air conditioner off and unplug
it. Remove the drainage hole cap below the filter on the
side and connect a little tube through which drain the
condensate; place the other end on top of a normal
reservoir.
REMOTE CONTROL & LEDS
LED Cooling
(2)
(7)
(3)
(6)
(4)
(5)
(1)
(1) ON/OFF BUTTON (POWER)
LED
Dehumidification
LED Ventilation
Signal receiver
(2) COOLING MODE SELECTION BUTTON
(3) DEHUMIDIFICATION MODE SELECTION BUTTON
(4) FAN MODE SELECTION BUTTON
(5) LOW FAN SPEED SELECTION BUTTON
(6) MEDIUM FAN SPEED SELECTION BUTTON
(7) HIGH FAN SPEED SELECTION BUTTON
FOR OPTIMAL REMOTE CONTROL FUNCTION, POINT IT TO THE RECEIVER ON THE AIR
CONDITIONER, PLACED ON THE RIGHT OF THE LEDS, HIDDEN UNDER THE TOP RING.
V 03/14
16
REMOTE CONTROL BATTERY
Insert the battery into the remote control, respecting polarities specified.
Only use type CR2025 batteries 3 V Li, in accordance with European Directive 2006/66/EC (supplied with the remote
control). Remove the battery if the remote control is not used for a month or longer.
Do not attempt to recharge the battery.
Do not throw the battery onto a fire, it may explode.
HOW TO INSERT / REMOVE THE REMOTE CONTROL BATTERIES (refer to the diagram below)
Open the battery cover at the rear of the remote control (press and pull the cover).
Place the battery into the cover, observing the correct polarity. Insert the cover on to the remote control.
INFORMATION FOR CORRECT DISPOSAL OF THE PRODUCT IN ACCORDANCE WITH EUROPEAN
DIRECTIVE 2006/66/EC
Please replace batteries when flat: at the end of their useful life, batteries must not be disposed of with unsorted
waste. It must be must be delivered to appropriate separated waste disposal plants or to dealers that provide a
similar service. Separate waste disposal of batteries prevents potential negative effects on the environment and
human health resulting from inadequate disposal, and also allows the materials from which it is made to be
recovered and recycled in order to achieve significant savings in terms of energy and resources. The separate
disposal obligation is underlined by the crossed-out dustbin symbol appearing on the battery. Illegal disposal of the
product by the user shall result in the application of administrative sanctions as defined by current regulations.
CARE AND MAINTENANCE
WARNING!
Before carrying out any cleaning or maintenance, unplug from the electric socket.
1. Cleaning the air filters
The air filters must be checked at least once every two weeks of use. Operating with dirty or blocked filters will decrease the
effectiveness of the air-conditioner and can cause serious problems.
To remove the filters, open the flaps without forcing them and pull them delicately upwards.
Use a vacuum cleaner to remove dust. If this should not sufficient, wash the filters with warm water and a neutral detergent
if necessary. Rinse with cold water and leave to air dry before replacing. Once the two filters have been replaced, close the
grilles once again and return to use the air-conditioner.
2. Cleaning the casing.
Use a damp and soft cloth to clean the exterior surface of the air-conditioner.
Do not use water that is too hot, solvents, petrol or other aggressive chemical
compounds, talcum powder or brushes: these may damage the surface or colour
of the casing.
To remove stains use warm water with a little neutral detergent.
Do not pour water onto the air-conditioner to clean it: this may damage the
internal components or cause a short circuit.
V 03/14
17
3. Storage.
When you do not envisage using the air-conditioner for a long time, before storing it away, clean the filters.
Keep the appliance in a vertical position at all times. Do not rest heavy objects on the
top and, if possible, protect the air-conditioner with a sheet of plastic.
4. Transport.
If possible, transport the air-conditioner in a vertical
position.
If not possible, lie it on its right side; when you reach your
destination, immediately return the appliance
to a vertical position and wait at least 4 hours before using
it.
5. For complete safety, regularly check the condition of the power cord; if it should be damaged through use, to
replace it contact the Service Centre.
ADVICE FOR MAXIMUM COMFORT AND MINIMUM CONSUMPTION
CHECK that:
•
the unit suction and delivery grilles are always free;
•
the air filters are always clean; a dirty filter will decrease the passage of air and reduce the unit performance;
•
doors and windows are closed, to avoid the infiltration of unconditioned air;
•
the flexible hose is correctly positioned, without sharp bends or curves.
F-GAS REGULATION (EC) no. 842/2006
Do not release R410A into the atmosphere: R410A is a fluorinated greenhouse gas covered by the
Kyoto protocol, with a global warming potential (GWP) of 1975.
INFORMATION FOR THE CORRECT DISPOSAL OF THE PRODUCT IN ACCORDANCE WITH EUROPEAN
DIRECTIVE 2012/19/EU
When this appliance reaches the end of its useful life, it must not be disposed of with household waste. It must
be delivered to appropriate separated waste disposal plants or to dealers that provide a similar service. Separate
waste disposal of an electrical appliance prevents potential negative effects on the environment and human
health resulting from inadequate disposal, and also allows the materials from which it is made to be recovered
and recycled in order to achieve significant savings in terms of energy and resources. The separate disposal
obligation is underlined by the crossed-out dustbin symbol appearing on the product. Illegal disposal of the
product by the user shall result in the application of administrative sanctions as defined by current regulations.
www.argoclima.com
V 03/14
18