1
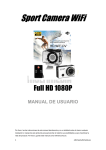
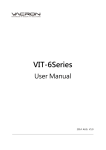
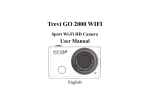
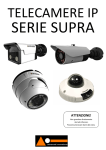
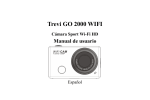
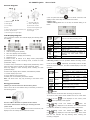
AC-5000W Quick
Start Guide
Camera Diagram:
2,Turn off: press and hold the
button for about 3 seconds, LCD
displays “OFF” and a beep can be heard from buzzer.
1) Shutter button
8) Micro B USB port
2) Microphone
9) Mini C HDMI port
3) LCD display
10) Micro SD card slot
4) Lens
11) External microphone port
3)Start to Use
1.Default setting: After turn on the DV, the default setting is as
below:
5) Wi-Fi switch and status indicator (red) 12) Battery cover push
6) Power / Mode button
13) LED light
7) Infrared signal reception light
LCD Display Diagram:
Video
recording
mode
icon
Video
resolution
Recordin
g time
Micro SD
card icon
Battery
level
Turn on the Wi-Fi camera, the LCD will display the following status
and settings:
HI
1.
Camera mode
2.
Video recording mode (default)
3.
Wi-Fi icon (display when enabled)
4.
Micro SD card icon (display when loaded)
5.
Resolution icon:
The DV is in video recording mode.
FHD: 1080p@30fps
Stands for 0 hour and 00 minute.
Display when a Micro SD card is
inserted, otherwise no display.
Battery is full
Mute icon
The DV is in Mute mode, no Beep will
be heard when pressing the buttons. It
displays only when Mute mode is
activated.
Wi-Fi
icon
Display when activated.
In camera mode, HI stands for 8 Mega Pixels (interpolated)
(3264x2448), and in video recording mode, it stands for FHD
(1920x1080, 30fps);
In camera mode, LO stands for 5 Mega Pixels (2592x1920), and in
video recording mode, it stands for 720P (1280x720, 30fps);
HILO only displays in video recording mode, standing for 720P
2,Shooting modes. The DV provides different shooting modes.
Press the button
repeatedly, the following first two modes
will show on the DV screen , and other models display on the APP
operation.
HI stands for FHD (1920x1080,30 fps)
video
Lo stands for 720P (1280x720,30 fps)
video
HILO stands for 720P (1280x720,60
fps) video
HI stands for 8M (3264 x 2448)
resolution
(1280x720,60fps).
6. Mute mode, displays when enabled, and disabled by default.
Video
7. Counter, displays up to 999.
8. Timer, displays hours and minutes.
9. Battery icon: current battery level of the camera.
Note: The above icons may vary according to the status of the
Photo
Lo stands for 5M (2592 x 1920)
resolution
camera.
Using your camera:
Continuou
s shot
The DV supports taking 3 photos
continuously (only via App)
Self-timer
In self-timer mode , you can set 0s, 2s
or 10s (only via App)
1)When you use the camera for the first time, please:
Insert a micro SD or micro SDHC card (not included), as shown in
the following picture.
3,
Video
( With maximum 29 minutes video recording per sequence)
To record a video, please check whether the DV is under Video
mode. If the icon
the
A Class 10 Micro SD Card is required for this camera.
Turn off the camera before inserting or removing the card.
2)Turn on/off
1, Turn on: press and hold the
is not displayed on the screen, press
button repeatedly until it appears.
Start recording: Press
icon
and
release the
button,
the
and [:] displayed in LCD will flash. At the same time the
red indicator will flash too, meaning the recording is in process.
button for about 3 seconds, LCD
displays “ON” and a beep can be heard from buzzer.
Stop
icon
recording:
Press
and
release
the
button,
the
and [:] displayed in LCD will stop flashing. At the same
time the red indicator will stop flashing either, meaning the
recording is stopped.
AC-5000W Quick
Start Guide
When the Micro SD card is full, or the battery runs out, the
signal, the LED will be red
recording will stop automatically, and the recorded video will be
3. Search for the wireless signal “DENVER AC-5000W” on your
saved before the DV turns off.
smartphone or tablet using
4.
the password “1234567890”.
Photo
To take a photo, please check whether the DV is under Camera
mode. If the icon
the
4. You can now start using the camera once the wireless signal is
connected and you have opened the app.
is not displayed on the screen, press
button repeatedly until it appears.
Press and release the
button, a beep will be heard and the red
ALL RIGHTS RESERVED, COPYRIGHT DENVER
ELECTRONICS A/S
indicator will flash, meaning a photo is taken.(If you take photos
more than 999 copies, the LCD screen display only 999)
5. Enable/disable Wi-Fi
The Wi-Fi is disabled by default. Press the Wi-Fi button on the side
of the DV to enable it. When starting connecting to Wi-Fi network,
the indicator will flash, and when a Wi-Fi network is connected, the
indicator will remain on, and the Wi-Fi icon will display on LCD
screen.( In order to save power, Wi-Fi will be automatically disabled
if no terminal is connected after 30 seconds)
Electric and electronic equipment contains materials, components
and substances that can be hazardous to your health and the
environment, if the waste material (discarded
electric and
electronic equipment) is not handled correctly.
Wi-Fi er disabled by
default
When Wi-Fi is enabled, the
Wi-Fi icon will display on LCD
4) Using the Battery
Electric and electronic equipment is marked with the crossed out
trash can symbol, seen below. This symbol signifies that electric
and electronic equipment should not be disposed of with other
household waste, but should be disposed of separately.
All cities have established collection points, where electric and
electronic equipment can either be submitted free of charge at
recycling stations and other collection sites, or be collected from
the households. Additional information is available at the technical
department of your city.
1. Install the battery.
Please install the lithium battery correctly as shown:
Fill in the blank with the model number of this player, so you can
find it again later.
Figure 1
Figure 2
Figure 3
Figure 4
Step 1. Push the battery cover switch to the lock position(
),
and remove the battery cover. As shown in figure 1.
Step 2. Place the lithium battery into the battery slot. Make sure the
polarity of the battery is corresponding to the symbols of the
camera shell(
). As shown in figure 2 and figure 3.
Step 3. Install the battery cover back in place, and lock the switch to
the lock position(
)to fix the battery. As shown in figure 4.
2. Charging the battery:
The camera uses removable rechargeable lithium battery. When
the camera is off, connect it to the PC via the USB cable to charge
the battery.
During charging, the status indicator (blue) will be lit up and
the indicator will turnoff when charging completes.
Note: When the camera is on, connecting it to the PC will not
charge.
5) Pair the Camera to Your Smartphone or Pad.
1. Download and install the app “SYMAGIX”
from Apple
Appstore® or Google Play
2. Press the Wi-Fi button on the side of the camera to initialize the
Imported by:
DENVER ELECTRONICS A/S
Stavneagervej 22
DK-8250 EGAA
Denmark
www.facebook.com/denverelectronics