1
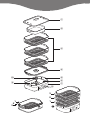
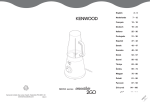
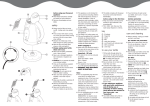
3
2
3
1
2
1
ma
x
+
m
u
en
–
sta
rt
p
sto
FS470 series
햲
햳
3
3
2
햴
2
1
1
햵
햶
햻
햷
햺
ma
햸
x
+
–
u
햹
3
en
m
t
star
stop
2
3
3
1
2
2
1
1
2
3
1
1
x
1
ma
�
�
+
u
en
m
–
t
star
stop
safety
●
●
●
before using your Kenwood
appliance
Read these instructions carefully and
retain for future reference.
Remove all packaging and any
labels.
●
●
●
●
●
●
●
●
●
●
●
●
●
●
machine safety
This machine produces steam which
can burn you.
Don't get burnt by steam coming
out of your steamer, especially when
removing the lid.
Be careful when handling anything:
any liquid or condensation will be
very hot. Use oven gloves.
Never let the cord hang down where
a child could grab it.
Never use a damaged steamer. Get
it checked or repaired: see 'service
and customer care'.
Never put the steamer, cord or plug
in water – you could get an electric
shock. Keep the controls clean and
dry.
Always unplug the steamer when not
in use.
Never put your steamer on a cooker
or in an oven.
Never move your steamer if it
contains anything hot.
This appliance is not intended for
use by persons (including children)
with reduced physical, sensory or
mental capabilities, or lack of
experience and knowledge, unless
they have been given supervision or
instruction concerning use of the
appliance by a person responsible
for their safety.
Children should be supervised to
ensure that they do not play with the
appliance.
Only use the appliance for its
intended domestic use. Kenwood
will not accept any liability if the
appliance is subject to improper use,
or failure to comply with these
instructions.
●
●
●
●
●
●
●
2
food safety
Cook meat, poultry, fish and seafood
thoroughly. And never cook them
from frozen.
If you're using more than one
basket, put meat, poultry and fish in
the bottom basket so that its raw
juice cannot drip onto food below.
Do not reheat cooked rice in your
steamer.
before plugging in
Make sure your electricity supply is
the same as the one shown on the
underside of your steamer.
Important – UK only
The wires in the cord are coloured
as follows:
Green and Yellow = Earth,
Blue = Neutral,
Brown = Live.
The appliance must be protected by
a 13A approved (BS1362) fuse.
WARNING: THIS APPLIANCE
MUST BE EARTHED.
Note:
For non-rewireable plugs the fuse
cover MUST be refitted when
replacing the fuse. If the fuse cover
is lost then the plug must not be
used until a replacement can be
obtained. The correct fuse cover is
identified by colour and a
replacement may be obtained from
your Kenwood Authorised Repairer
(see Service).
If a non-rewireable plug is cut off it
must be DESTROYED
IMMEDIATELY. An electric shock
hazard may arise if an unwanted
non-rewireable plug is inadvertently
inserted into a 13A socket outlet.
This appliance conforms to EC
directive 2004/108/EC on
Electromagnetic Compatibility and
EC regulation no. 1935/2004 of
27/10/2004 on materials intended
for contact with food.
before using for the first time
1 Operate the assembled steamer with
water in the tank for 5-10 minutes in
order to flush the appliance through
before use.
2 Wash the parts: see ‘care and
cleaning’.
3 Wipe the water tank with a damp
cloth, then dry.
4 Push excess cord into the back of
the appliance.
water filters are widely available).
Don't add anything (even salt or
pepper) to the water – it could
damage the heating element.
● To avoid the water level dropping too
low, you can top up during cooking.
Simply add water via the
handle/water fill inlet, taking care not
to overfill.
4 Sit the drip tray inside the base.
5 Stack the baskets on the base,
starting with the lowest numbered
basket at the bottom and the
highest number at the top �. (The
numbers are marked on the basket
handles).
●
know your Kenwood
food steamer
햲
햳
햴
햵
햶
햷
햸
햹
햺
햻
lid
rice bowl
baskets
drip tray
handle/water fill inlet
water tank
base
controls
strainer
steam diffuser
using the rice bowl
Put water and rice in the rice bowl.
Put the rice bowl into a basket. (You
can also cook something in the
other basket(s) if required).
6 Fit the lid, plug in. The whole display
will illuminate and the buzzer will
sound. (Should the display fail to
illuminate press the ‘start’ button.)
●
to select from the menu
Press the ‘menu’ button, and each
time the button is pressed the menu
will scroll around to display a pre-set
time and suggested usage. The
choices are as follows:- 10 minutes
‘keep warm’, then to cook the
following, shellfish 10 minutes, eggs
12 minutes, fish 15 minutes,
vegetables 20 minutes, chicken
portions 35 minutes and rice 40
minutes. Once the time is displayed
on the menu it can if necessary be
adjusted higher or lower using the
‘+’ and ‘-’ buttons. Once the desired
time has been selected press the
‘start’ (I) button.
To stop the steaming process press
and hold down the ‘stop’ (O) button.
to use your steamer
●
●
●
Keep your steamer away from walls
and overhanging cupboards: the
steam could damage them.
Season food after cooking. If
seasoning gets into the water, it
could damage the heating element.
See the cooking guides on pages 6
and 7.
1 Fit the strainer inside the water tank.
(It stops bits getting into the
element.)
2 Make sure the steam diffuser is
correctly fitted in the centre of the
water tank.
3 Pour cold water into the tank.
Always make sure the water is below
the ‘Max’ level marked. (When filled
to ‘Max’, this will produce steam for
approximately 50-60 minutes.)
● Filtered water is best as it reduces
limescale prolonging the life and
efficiency of your steamer (Kenwood
3
to select a time
To select a time different to the
displayed time of 45 minutes, press
the ‘+’ or ‘-’ buttons to increase or
decrease the time. When the desired
time is displayed, press the ‘start’
button and the steamer will switch
on and the cook symbol will flash.
To stop the steaming process press
and hold down the ‘stop’ button.
●
●
●
●
●
●
●
●
After 1 minute, if the time/menu is
displayed but the start button has
not been selected, the display will
switch off. To re-select a programme
press the ‘start’ button.
A buzzer will sound whenever the
start button is pressed or when the
steamer switches off.
●
●
keep warm function
The flavour and nutritional value of
steamed food is best when freshly
cooked. However, should you wish
to keep food warm for a short period
of time, select ‘keep warm’ on the
menu and if necessary adjust the
time accordingly.
7 Unplug and clean after use.
care and cleaning
●
●
important
At the end of the cooking cycle your
steamer will automatically switch
to the keep warm setting for 10
minutes. During this time the
steamer will cycle on and off, so take
care as steam may be produced
when you’re not expecting it.
●
●
●
●
To switch the steamer off or to
cancel the keep warm setting, press
and hold down the stop button.
●
●
●
Leave gaps between pieces of food.
Stir large amounts half way through
cooking.
Smaller amounts cook faster than
larger amounts.
Similar-sized pieces of food cook evenly.
Like a conventional oven, you can add
food as you go along. If something
needs less time, add it later.
If you lift the lid, steam will escape
and cooking will take longer.
The cooking times on pages 6 - 7
are guides based on using the lower
basket. The higher the food is, the
slower it cooks. So allow an extra
5 - 10 minutes for food in the next
basket above. Check that food is
thoroughly cooked before eating.
If your food's not cooked enough,
reset the time. You may need to top
up with water.
hints
Condensation will drip from the
upper basket into the lower basket.
So make sure the flavours go well
together.
Liquid left over in the drip tray is
good for making soup or stock. But
be careful: it will be very hot.
You can also use the rice bowl for
cooking anything in liquid (eg
vegetables in sauces or poaching
fish in water).
●
Before cleaning, always switch off,
unplug and let everything cool.
Never put your steamer base in
water or let the cord or plug get wet.
cleaning the water tank
Empty, then rinse out with warm
water and dry.
cleaning the outside
Wipe with a damp cloth, then dry.
all other parts
Wash in warm soapy water, then dry.
For storage, stack the baskets one
inside the other, starting with the
highest numbered basket and
finishing with basket number 1 �.
Push excess cord into the back of
the steamer.
descaling
The appliance should be de-scaled
once a month or after every 30 uses
depending upon which comes first.
1 Fill the water tank with 200ml of
household appliance descaler, then
fill the water tank up to the MAX
level with water (approximately
800ml).
●
4
2 Fit the drip tray, one basket and the
lid.
3 Plug in the appliance, switch on and
allow the steamer to operate for 5
minutes.
4 Switch off and unplug the appliance
and allow to stand overnight.
5 Empty and discard the descaling
liquid.
6 Rinse out the water tank several
times with fresh warm water.
7 Wash the drip tray, basket and lid in
warm soapy water, then dry.
8 Refill the water tank with fresh water,
refit the parts and allow to run for 5
minutes. Empty and discard any
remaining water.
9 Rinse the water tank several times
with fresh warm water.
10 Wash the drip tray, basket and lid in
warm soapy water.
11 The appliance is now ready for use.
IMPORTANT INFORMATION FOR
CORRECT DISPOSAL OF THE
PRODUCT IN ACCORDANCE
WITH EC DIRECTIVE
2002/96/EC.
At the end of its working life, the product
must not be disposed of as urban
waste.
It must be taken to a special local
authority differentiated waste collection
centre or to a dealer providing this
service.
Disposing of a household appliance
separately avoids possible negative
consequences for the environment and
health deriving from inappropriate
disposal and enables the constituent
materials to be recovered to obtain
significant savings in energy and
resources. As a reminder of the need to
dispose of household appliances
separately, the product is marked with
a crossed-out wheeled dustbin.
guarantee (UK only)
If your steamer goes wrong within
one year from the date you bought
it, we will repair or replace it free of
charge provided:
● you have not misused, neglected or
damaged it;
● it has not been modified (unless by
Kenwood);
● it is not second-hand;
● it has not been used commercially;
● you have not fitted a plug incorrectly;
and
● you supply your receipt to
show when you bought it.
service and customer
care
●
If the cord is damaged it must, for
safety reasons, be replaced by
Kenwood or an authorised Kenwood
repairer.
UK
If you need help with:
● using your steamer
● servicing or repairs (in or out of
guarantee)
콯 call Kenwood Customer Care on
023 9239 2333. Have your
model number ready - it's on
the underside of your steamer.
●
●
●
other countries
Contact the shop where you bought
your steamer.
Designed and engineered by
Kenwood in the UK.
Made in China.
This guarantee does not affect your
statutory rights.
5
cooking guides
●
These cooking times are only guidelines.
Read 'food safety', page 2, and 'hints', page 4.
●
vegetables
Clean vegetables before cooking. Remove stems and peel if you like.
●
vegetable
Asparagus
Beans, green
Beans, runner
Broccoli
Brussels sprouts
Cabbage
Carrots
Cauliflower
Courgettes
Celery
Leeks
Mange tout
Mushrooms, button
Parsnips
Peas
Potatoes, new
eggs
Boiling* or poaching
quantity
454g (1lb)
454g (1lb)
454g (1lb)
454g (1lb)
454g (1lb)
1 small
454g (1lb)
1 medium
454g (1lb)
1 head
3-4
227g (8oz)
454g (1lb)
454g (1lb)
454g (1lb)
454g (1lb)
preparation
Trim
Trim
Trim and thinly slice
Cut into florets
Trim and cut bases
Shred
Thinly slice
Cut into florets
Thinly slice
Thinly slice
Thinly slice
Trim
Wipe
Dice or thinly slice
Shell
Wipe
preparation
Use a cup or
ramekin dish
for poaching
minutes
15
15-20
15-20
20
25
25
20
20-25
15
15
15
15
10
15
15
30-40
minutes
10-15 for soft,
15-20 for hard
* When boiling eggs, place them in the built in egg holders in the bottom
of the basket.
●
poultry and fish
Don't overcrowd the baskets.
food
quantity
minutes
Chicken,
4-5
boneless breasts
Clams
454g (1lb)
Prawns, medium
454g (1lb)
Fish, fillets
227g (8oz)
Fish, steak
2.5cm (1") thick
Fish, whole
340g (12oz)
Lobster tails
2-4
Mussels
454g (1lb)
Oysters
6
Scallops
227g (8oz)
30
10
10
10-20
15-20
15-20
20
15
15
15
6
comments
Steam until thoroughly
cooked and tender
Steam until open
Steam until pink
Steam until it flakes
Steam until it flakes
Steam until it flakes
Steam until red
Steam until open
Steam until open
Steam until hot and
tender
cooking guides continued
●
cereals and grains
When using the rice bowl, you still put water in the tank. But you can put a
different liquid, such as wine or stock, inside the rice bowl to cook your rice in.
You can also add seasoning, chopped onions, parsley, almonds or sliced
mushrooms.
food
White long-grain
rice (eg Basmati,
easy cook)
Brown rice
Couscous
Porridge
Rice pudding
quantity
liquid to add
to rice bowl
100g (4oz) 125ml (4fl oz)
200g (8oz) 250ml (9fl oz)
300g (12oz) 375ml (13fl oz)
100g (4oz) 125ml (4fl oz)
200g (8oz) 250ml (9fl oz)
300g (12oz) 375ml (13fl oz)
200g (8oz) 150ml (5fl oz)
warm water
75g (3oz)
450ml (16fl oz)
milk/water
75g (3oz)
25g (1oz) caster
pudding rice sugar and
375-500ml
(3/4-1pt) milk
7
minutes
25
30
35
40
45
50
15-20
40 (stir half way
through)
80 (stir half way
through)
Head Office Address:
Kenwood Limited, New Lane, Havant, Hampshire PO9 2NH, UK
www.kenwoodworld.com
Designed and engineered by Kenwood in the UK
Made in China
18163/3