1
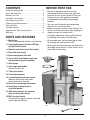
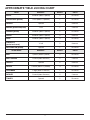
INSTRUCTION BOOKLET
Recipe
Booklet
Reverse Side
Cuisinart® Juice Extractor
CJE-1000
For your safety and continued enjoyment of this product, always read the instruction book carefully before using.
IMPORTANT
SAFEGUARDS
When using any electrical appliance, basic safety
16. The appliance is wired for domestic use only.
17. D
o not use the appliance for anything other
than the intended purpose, as outlined
in the instruction booklet.
18. Never juice with the spout in the closed position.
19. Do not operate without the pulp container
in place.
20. Do not operate your appliance in an appliance
garage or under a wall cabinet. When storing in
an appliance garage always unplug the unit
from the electrical outlet. Not doing so could
create a risk of fire, especially if the appliance
touches the walls of the garage or the door
touches the unit as it closes.
precautions should always be followed, including
the following:
1. Read instructions thoroughly
2. Always unplug unit from outlet when not in
use, before putting on or removing parts
and before cleaning.
3. To protect against electrical shock, do not
immerse the juice extractor motor housing in
water or other liquids.
4. When any appliance is used by or near
children, supervise closely.
5. Avoid contact with moving parts.
6. If the juice extractor has a damaged cord or
plug or malfunctions, DO NOT OPERATE.
Contact our Customer Service Center to return
for examination, repair or adjustment.
7. Using accessory attachments not sold or
recommended by the manufacturer can cause
fire, electric shock or injury.
8. Do not allow the power cord to come into
contact with any hot surfaces, including stove,
or to hang over table edge or counter.
9. Before turning the motor on, always make sure
juice extractor cover is properly positioned and
securely in place. Do not open cover while the
juice extractor is in operation.
10. Switch to OFF position after each use and
be sure the motor stops completely before
disassembling.
11. Do not put fingers or other objects into the juice
extractor opening while it is in operation. If food
becomes stuck in the opening, use food pusher
or another piece of fruit or vegetable to push it
down. Or turn the motor off and disassemble
the unit to remove the remaining food.
12. If the rotating sieve is damaged, do not use.
13. Always make sure the juice extractor cover is
properly positioned and secured before motor
is turned on. If it is not, the safety interlock
will not operate. Do not loosen cover while the
juice extractor is in use.
14. Not designed for outdoor use.
15. Appliance should be plugged into a 120V
household outlet only.
SAVE THESE
INSTRUCTIONS
HOUSEHOLD USE ONLY
No user-serviceable parts are inside. Do not
attempt to service this product.
Maximum rating of 1000 watts is based on the
food chopper attachment that draws the greatest
power. Other recommended attachments may
draw less power.
A short power supply cord is provided to reduce
the risk resulting from becoming entangled in or
tripping over a long cord. AN EXTENSION CORD
MAY BE USED WITH CARE: HOWEVER, THE
MARKED ELECTRICAL RATING SHOULD BE AT
LEAST AS GREAT AS THE ELECTRICAL RATING
OF THE JUICE EXTRACTOR.
The extension cord should not be allowed to drape
over the countertop or tabletop, where it can be
pulled on by children or tripped over.
POLARIZED PLUG
This appliance has a polarized plug (one blade is
wider than the other). To reduce the risk of electric
shock, this plug is intended to fit into a polarized
outlet only one way. If the plug does not fit fully
into the outlet, reverse the plug. If it still does not
fit, contact a qualified electrician. Do not attempt to
modify the plug in any way. If the plug fits loosely
into the AC outlet or if the AC outlet feels warm,
do not use that outlet.
2
CONTENTS
before first use
Important Safeguards . . . . . . . . . . . . . . . . . . . 2
Parts and Features . . . . . . . . . . . . . . . . . . . . . 3
Before First Use . . . . . . . . . . . . . . . . . . . . . . . 3
Assembly Instructions . . . . . . . . . . . . . . . . . . . 4
Operating Instructions . . . . . . . . . . . . . . . . . . . . 5
Cleaning and Maintenance����������������������������� 5
Tips and Hints . . . . . . . . . . . . . . . . . . . . . . . . . 5
Troubleshooting . . . . . . . . . . . . . . . . . . . . . . . . . 6
Approximate Yield Juicing Chart����������������������7
Warranty . . . . . . . . . . . . . . . . . . . . . . . . . . . . . . 8
• Remove all packaging materials and any
promotional labels or stickers from your juice
extractor. Be sure all parts (listed in Parts and
Features) of your new appliance have been
included before discarding any packaging
materials.
• You may want to keep the box and packing
materials for use at a later date.
• Before using your Cuisinart® Juice Extractor for
the first time, remove any dust from shipping by
wiping the base with a damp cloth.
PARTS and features
• Thoroughly clean cover, pusher, pulp container,
juice pitcher, filter basket, and filter bowl.
1. Motor base
Die-cast and brushed stainless steel housing.
• All removable parts can be submerged in water
for cleaning and are dishwasher safe.
2. 5-speed dial control with blue LED light
ring and On/Off button
• Never place the motor housing in the dishwasher,
nor should you immerse it in water. Always use a
damp cloth to wipe clean.
3. Stainless steel micro-mesh filter basket
4. Filter bowl (not shown)
5. Foam management filter disk
7
6. Cover with 3-inch diameter feed tube
and pyramid design fruit stabilizer
3
7. Food pusher
6
5
8. Juice spout (adjustable)
Controls the flow rate.
9. 1-liter juice pitcher
10. 2-liter pulp container
1
11. 4-second safety break (not shown)
Stops the filter basket with blades
when handle tab is released.
8
12. Push box cord storage (not shown)
13. Heavy-duty cleaning brush to
clean filter basket
14. 1000 watts of power for maximum
juice extraction (not shown)
9
15. BPA Free (not shown)
All materials that come in contact with food
and/or liquid are BPA free.
10
2
13
3
assembly instructions
Assembling the Juice Pitcher
3.
2.
1.
1. Place the juice pitcher on a flat surface.
2. Insert the foam separator.
3. Put cover in place. Set pitcher aside.
Assembling the Juice Extractor
1. Place base on a clean, flat surface.
2. Insert filter bowl, positioning spout on right side,
on top of motor housing.
2.
3.
4.
3. Place foam management filter disk in filter
bowl.
4. Place mesh filter basket firmly in place in
the filter bowl.
5. Hold the juice extractor cover by the handle
with the feed tube facing back and the hinge
straight down over the hinge slot on the
7.
6.
5.
motor housing. Insert the hinge into the slot
and lower into position.
6. Make sure the handle lock is in the "open"
position. Press handle in with an upward
motion to close.
7. Slide the food pusher down the feed tube by
aligning the groove in the food pusher with
9.
8.
8.
the small indent on the inside of the top of
the feed tube.
8. Place the pulp container in position by tilting
opening slightly under the cover.
9. Place the assembled juice pitcher under the
spout, with the handle facing forward.
10. Make sure the spout is in the open position. Never juice with the spout in the closed position.
Disassembling the Juice Extractor
1. Unplug the juice extractor.
3.
2.
4.
2. Remove the food pusher.
3. Press the handle tab release to unlock
the cover.
4. Lift and remove cover.
5. Carefully remove the filter basket by pulling
up on either side of the rim. Be careful not
7.
5.
6.
to touch the blades in the bottom of the
basket.
6. Remove foam management filter disk.
7. Remove the filter bowl by pulling up on
either side.
Foam Management System
If you prefer less foam in your juice, use the foam management filter disk and adjust the spout to a smaller
opening. If you prefer more foam, do not use the disk and adjust the spout to a larger opening.
4
OPERATING INSTRUCTIONS
are very sharp. For best juicing
results, always thoroughly clean
the filter basket with the nylon
brush provided. (See image.)
1. Make sure your juice extractor is properly
assembled. (See Assembly Instructions.)
2. Plug the power cord into a 120V electrical
outlet.
2. Take juice extractor apart,
following Disassembly
Instructions (page 4). First, rinse with cold water.
Then wash the pulp container, juice pitcher,
pusher, lid and rotating filter basket in hot, sudsy
water, or place in top rack of dishwasher. Do not
use a metal brush or pad.
3. Make sure that the spout is in the open
position. Never juice with the spout in
the closed position.
4. Wash all selected fruits or vegetables.
5. While most fruits such as apples, pears, carrots,
etc. will not need cutting, any fruit or vegetable
with a diameter larger than 3 inches will need to
be cut.
3. Towel-dry all parts.
6. Set the dial to the desired speed. The blue LED
light ring on the control dial will start to blink.
TIPS AND HINTS
4. Any other servicing should be performed by an
authorized service representative.
• Extracted juice from fresh fruits and vegetables
contains 95% of their nutrients. Drinking extracted
juices is the fastest way to digest fruits and
vegetables so that your body can absorb all of
those nutrients. As opposed to eating the whole
fruit, which can take about 1 hour to digest,
extracted juices take only 15 minutes.
7. Press the button in the center of the control dial
to start the juice extractor. The LED light ring
will stop blinking and stay on.
8. Lift the food pusher out of the feed tube and
drop your food into the feed tube. Push through
by inserting the food pusher and pressing firmly.
• Fresh juices are excellent for aiding in cleanses
(ridding the body of toxins) and in weight
management.
9. The juice will flow into the juice pitcher and the
pulp will accumulate in the pulp container.
10. When finished juicing, press the On/Off button
to stop the motor. Turn the control dial to “0”
to shut off the juice extractor.
• Always use fresh, organic and seasonal produce.
Organic produce is grown without synthetic
fertilizers and chemicals, which is very important
when juicing whole foods. When buying foods in
season, they are considerably less expensive than
purchasing off season, and the flavors are much
better.
11. Before removing the juice pitcher from under
the spout, turn the spout to the closed position.
This will prevent juice from dripping on the
counter.
• Wash all vegetables immediately after purchasing
and store them in the refrigerator. This way they
are ready to juice at any time.
Cleaning and
maintenance
• Always juice fresh fruits and vegetables soon after
purchasing. The longer produce is held, the more
nutrients it loses.
Do not immerse the motor housing in water or
spray it with water. Clean only by wiping with a
damp sponge, cloth or paper towel. Use any liquid
dishwashing detergent, but do not use any products
containing ammonia or scouring powders, as these
products will dull, scratch or mar the finish.
• Always wash vegetables and fruit before juicing.
• Fresh juices should be consumed immediately.
They lose nutrients as they sit.
For easy cleaning, always clean immediately after
each use. Vegetables and fruits will harden if left to
dry on the unit parts, making it harder to clean.
• Certain fruits should be peeled first before juicing.
Examples of such fruits are pineapples, melons,
mangos, papayas, citrus – any fruit with skin
that you cannot eat. Also remove all pits and
hard seeds from fruit such as peaches, cherries,
mangos, etc.
1. Unplug juicer.
Warning: Be careful when handling the filter
basket during cleaning, as the blades at the bottom
5
• Citrus fruit juice is delicious and creamy, plus it is more nutrient rich than citrus juice that is manually
pressed.
• If cucumbers are waxy, peel them before you juice them.
• When juicing, softer ingredients should be juiced before the harder ones. As a rule, softer ingredients
should be juiced at the low speed, while harder ingredients are juiced on higher speeds (refer to Juicing
Chart, page 7).
• When juicing herbs or leafy greens, juice them in the middle of a combination of ingredients in order to
extract the greatest amount of juice.
• Use your taste to guide you on fruit and vegetable combinations for juices. The recipes provided are a
guideline, but the possibilities are endless. Experiment to see what your favorite combinations are.
• Carrots make a great and tasty base for vegetable juices, and apples do the same for fruit juices.
• Beets and carrots both have naturally high sugar content, so when added to vegetable juices they balance
out any bitter flavors juiced vegetables may have.
• Use your juice extractor in tandem with your blender. Blend fresh juices with ingredients like bananas,
yogurt, and protein powders for delicious power smoothies.
• It is also possible to make a healthier, fresher version of your favorite cocktail with fresh juices.
• Blend fruit juices with sparkling water or seltzer to make a natural soda.
• The pulp that is separated from the juice has its own health benefits. It is high in fiber and can be used in
a variety of ways. See our recipes as guides on how you can incorporate the fibrous pulp into your diet.
TroubleShooting
Problem
Solution
Juice extractor does not
turn on
The handle safety lock is not engaged. (See Assembly Instructions page 4.)
Press On/Off button to start juicing.
Make sure the spout is opened all the way.
Decreased juice rate
Excess pulp in filter basket can slow juice rate. Stop the juice extractor
and clean filter basket.
Handle lock is not
closing
Make sure that lock is fully opened by pushing down on the locking tab.
Position your finger on the raised lines on the locking tab and press closed.
6
approximate yield juicing chart
fruit
AMOUNT
SPEED
YIELD
apple
3 medium (about 1 pound)
5
10 ounces
cantaloupe (peeled)
½ fruit (about 1¼ pounds)
1
16 ounces
1 pound
1
8 ounces
1 fruit
2
3 ounces
orange (peeled)
2 medium (about 1 pound)
2
12 ounces
peach
3 medium (about 1 pound)
3
8 ounces
pear
2 medium (about 1 pound)
4
10 ounces
½ fruit
3
8 ounces
1 pound
1
14 ounces
AMOUNT
SPEED
YIELD
beet
3 pieces (about 1 pound)
5
10 ounces
beet greens
1 bunch (about 8 ounces)
5
5 ounces
carrot
1 pound
5
8 ounces
celery
1 bunch (about 1¼ pounds)
4
12 ounces
cucumber
1 large (about 12 ounces)
1
10 ounces
parsley
1 bunch (about 6 ounces)
5
2 ounces
tomato
1 pound
2
10 ounces
grapes
mango (peeled and pitted)
pineapple
(peeled and cored)
watermelon (peeled)
vegetable
7
WARRANTY
Limited Three-Year
Warranty
and shipping and handling for such nonconforming
products under warranty.
BEFORE RETURNING YOUR
CUISINART® PRODUCT
This warranty is available to consumers only. You are
a consumer if you own a Cuisinart® Juice Extractor
that was purchased at retail for personal, family or
household use. Except as otherwise required under
applicable law, this warranty is not available to retailers
or other commercial purchasers or owners. We warrant
that your Cuisinart® Juice Extractor will be free of
defects in materials and workmanship under normal
home use for 3 years from the date of original purchase.
If your Cuisinart® Juice Extractor should prove to be
defective within the warranty period, we will repair or,
if we think necessary, replace it. To obtain warranty
service, please call our Customer Service Center
toll-free at 1-800- 726-0190 or write to: Cuisinart,
7811 North Glen Harbor Blvd.Glendale, AZ 85307. To
facilitate the speed and accuracy of your return, enclose
$10.00 for shipping and handling. (California residents
need only supply a proof of purchase and should call
1-800-726-0190 for shipping instructions.) Please be
sure to include your return address, description of
the product’s defect, product serial number, and any
other information pertinent to the return. Please pay by
check or money order. NOTE: For added protection and
secure handling of any Cuisinart® product that is being
returned, we recommend you use a traceable, insured
delivery service. Cuisinart cannot be held responsible
for in-transit damage or for packages that are not
delivered to us. Lost and/or damaged products are not
covered under warranty.
We recommend that you visit our website,
www.cuisinart.com for a fast, efficient way to
complete your product registration. However, product
registration does not eliminate the need for the
consumer to maintain the original proof of purchase in
order to obtain the warranty benefits. In the event that
you do not have proof of purchase date, the purchase
date for purposes of this warranty will be the date of
manufacture.
CALIFORNIA RESIDENTS ONLY
Your Cuisinart® Juice Extractor has been manufactured
to the strictest specifications and has been designed
for use only in 120 volt outlets and only with authorized
accessories and replacement parts. This warranty
expressly excludes any defects or damages caused
by attempted use of this unit with a converter, as well
as use with accessories, replacement parts or repair
service other than those authorized by Cuisinart.
This warranty does not cover any damage caused
by accident, misuse, shipment or other than ordinary
household use. This warranty excludes all incidental
or consequential damages. Some states do not allow
the exclusion or limitation of these damages, so these
exclusions may not apply to you. You may also have
other rights, which vary from state to state.
California law provides that for In-Warranty Service,
California residents have the option of returning a
nonconforming product (A) to the store where it was
purchased or (B) to another retail store that sells
Cuisinart® products of the same type. The retail store
shall then, according to its preference, either repair the
product, refer the consumer to an independent repair
facility, replace the product, or refund the purchase
price less the amount directly attributable to the
consumer’s prior usage of the product. If neither of the
above two options results in the appropriate relief to
the consumer, the consumer may then take the product
to an independent repair facility, if service or repair
can be economically accomplished. Cuisinart and not
the consumer will be responsible for the reasonable
cost of such service, repair, replacement, or refund for
nonconforming products under warranty. California
residents may also, according to their preference, return
nonconforming products directly to Cuisinart for repair
or, if necessary, replacement by calling our Consumer
Service Center toll-free at 800-726-0190. Cuisinart will
be responsible for the cost of the repair, replacement,
Important: If the nonconforming product is to be
serviced by someone other than Cuisinart’s Authorized
Service Center, please remind the servicer to call our
Consumer Service Center at 1-800-726-0190 to ensure
that the problem is properly diagnosed, the product is
serviced with the correct parts, and to ensure that the
product is still under warranty.
8
NOTES
9
Coffeemakers
Blenders
Juicers
Cookware
Tools and
Gadgets
Cuisinart offers an extensive assortment of top quality products to make life in the
kitchen easier than ever. Try some of our other countertop appliances, cookware,
tools and gadgets.
www.cuisinart.com
©2012 Cuisinart
150 Milford Road
East Windsor, NJ 08520
Printed in China
Any trademarks or service marks of third parties referred to herein are the
trademarks or service marks of their respective owners.
11CE127830
IB-9269B