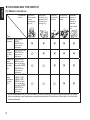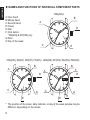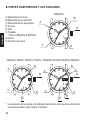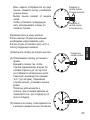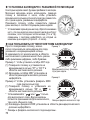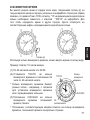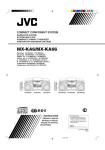
1
ENGLISH
ENGLISH
MECHANICAL WATCHES
INSTRUCTION MANUAL
Thank you for choosing our product. To ensure prolonged use and optimum
performance, please read this instruction manual carefully and familiarize
your-self with the terms of the guarantee.
Please keep this Instruction Manual handy for future reference.
SAFETY PRECAUTIONS
Make absolutely sure to observe the demarcated contents indicated below to
prevent any possible physical danger and property damage to you as well as
other people concerned.
!
WARNING
!
CAUTION
... A demarcation with this symbol represents the contents
assuming possibility for death or serious injury
when the product is used in any manner different from
given instructions.
... A demarcation with this symbol represents the contents
assuming possibility of causing human injury or
material damage only when a product is used in any
manner different from given instructions.
1
ENGLISH
IN HANDLING THE WATCH
(1) Water-resistance
Conditions
of use
Type
Non water
resistant
Exposure to
small amounts
of water
(facewashing,
rain, etc.)
Water sports
(swimming, etc.),
frequent contact
with water (carwashing, etc.)
Skin diving
(air tanks are
not used)
Scuba diving
(air tanks are
used)
Underwater
operation of
crown and
operation of
crown with
drops of water
on it
Watch without
WATER
RESISTANT on
back cover of
watchcase.
Water
Watch with WATER
resistant
RESISTANT on
for daily
back cover of
life
watchcase.
Reinforced Watch with 50M
water
(5BAR) on back
resistance cover or dial face
for daily
along with WATER
life I
RESISTANT on
back cover of
watchcase.
Reinforced Watch with 100M
water
(10BAR), 150M
resistance (15BAR), 200M
for daily
(20BAR) on back
life II
cover or dial face
along with WATER
RESISTANT on
back cover of
watchcase.
* It is recommended that you use the watch correctly following the above-mentioned scope of usage
after ascertaining water resistance precautions marked on the dial face of the watch or on the back
of the watchcase.
2
×
×
×
×
×
×
×
×
×
×
×
×
×
×
WARNING
!
CAUTION
4 Keep the crown pushed in at all times (in the normal position) while using
the watch. If the crown is the screwed-down type, check that it is securely
screwed down.
5 Do not operate the crown underwater, or while the watch is wet. Water
may enter the interior of the watch and defeat the water resistance.
6 If your watch is non-water resistant, beware of splashes of water (during
face washing, rain, etc.) and sweat. If the watch becomes wet from water
or sweat, wipe the moisture off with a dry, soft cloth.
7 Even with a water resistant watch for everyday use, avoid directing strong
jets of mains water onto the watch. Water pressure above the limit can
apply, which may defeat the water resistance.
8 With a water resistant watch for everyday use, rinse sea water off the case
after exposure, then wipe it thoroughly to avoid corrosion and other effects.
9 The interior of the watch contains some amount of moisture, which may
cause fogging on the inside of the glass when the outside air is cooler than
the internal temperature of the watch. If the fogging is temporary it causes
no harm inside the watch, but if prolonged, or if water enters the watch,
consult your place of purchase and do not leave the problem untreated.
3
ENGLISH
!
1 A watch with water resistance for daily life 30M (3 bar) can be used during
face-washing, etc. but cannot be used in an environment in which it will be
submerged in water.
2 A watch with reinforced water resistance for daily life I 50M (5 bar) can be
used while swimming, etc. but cannot be used during any type of diving
including skin diving.
3 A watch with reinforced water resistance for daily life II 100M or 200M (10
or 20 bar) can be used while skin diving, but cannot be used while scuba
diving using oxygen tanks or saturation diving using helium gas, etc.
ENGLISH
(2) Shock
1 Be sure not to carry the watch when you engage in strenuous
sports, whereas playing such light sports as golf, etc., will not
adversely influence the watch.
2 Avoid a violent shock such as dropping the watch on the
floor.
(3) Magnetism
1 If the watch is left at a location with strong magnetism for an extended
period of time, the components may be magnetized, resulting in
malfunction. Be careful.
2 The watch may temporarily speed up or slow down when exposed to
magnetism. Precision is restored when placed away from magnetism. In
such a case, reset the time.
(4) Vibration
The watch may lose precision if subjected to strong
vibrations such as from riding motorcycles, using
jackhammers, chain saws, etc.
(5) Temperature
In environments below and above normal temperatures (5°C-35°C), the
watch may malfunction and stop.
!
CAUTION
Do not use the watch at high temperatures, such as in a sauna. The watch
may heat and cause burns.
(6) Chemicals, Gases, etc.
Utmost caution must be exercised when coming into contact with gases,
mercury, chemicals (paint thinner, gasoline, various solvents, detergents
containing such components, adhesives, paint, drugs, perfumes,
cosmetics, etc.), and so forth. Such may cause discoloration of the
watchcase, watchband, and dial face. Discoloration, deformation, and
damage to various resin-based component parts may also occur.
4
!
WARNING
Store the bracelet/strap pin and other small parts out of the reach of
children.
If any small parts are swallowed, immediately contact a doctor.
(8) Allergic reactions
!
CAUTION
If you develop a skin rash or your skin becomes abnormally irritated due to
contact with the watch or strap, stop wearing the watch immediately and
consult a doctor.
(9) About “luminous light”
Some products have luminous light on the hands and dial.
The luminous light is a safe paint that stores sunlight and artificial light
without using any radioactive material, and emits that light in a dark
setting. As the paint discharges the stored light, it will become dimmer
over time. The amount of light emitted and the time that light is emitted
depends on various factors when the light is stored, such as the shape
of the glass, the thickness of the paint, surrounding brightness level, the
distance from the watch to the light source, and the light absorption level.
Please note that when not enough light energy is stored, the watch may
emit weak light or emit light for only a short time.
(10) Water resistant watchband
Some products employ leather and nylon bands on which a special
treatment to resist perspiration and water absorption have been applied.
Please understand that the water resisting effect of this watchband can be
lost depending on the period and conditions of use.
5
ENGLISH
(7) About accessory parts
ENGLISH
HOW TO IDENTIFY THE CALIBER NUMBER
Check the caliber number by referring to the model number of your watch or
the case code on the watch’s case back.
1. Searching by 10-digit model number
Check the 10-digit model number on the guarantee supplied with your watch.
You can also see the number on the product tag put on the watch. Its second
and third digits indicate the caliber number of your watch.
Example: If the model number is “CDB05001B0”, the caliber number is “DB”.
2. Searching by the case code
See the case code on the case back of your watch.
A: If the case code is 6 digits, the first two digits indicate the caliber number.
B: If the case code is 8 or 9 digits, the first three digits indicate the movement
number. Search the caliber number corresponding to the movement
number referring to the correspondence table.
Example A
Example B
Case code
Case code
Example A : When the case code is “DB05-C0”, the caliber number is “DB”.
Example B : When the case code is “469396-81”, the movement number is
“469”. The caliber number corresponding the number will be
found “EM” on the table.
* The place of case code may vary and its letter size may be small and
difficult to see depending on the characteristics of watches.
* The pictures and illustrations on this manual may differ from the actual
appearance of your watch but the function and operation procedures are
the same.
6
Hand winding
Daily accuracy
DB
46A
–
–
–
–
+25~-15s/day
–
DW
Caliber
48D
Click-B
–
–
–
+25~-15s/day
9:00PM-2:00AM
EM
469
○
○
○
○
○
○
○
○
○
○
ER
487
–
NP
558
○
NQ
559
–
NR
557
–
PF
597
–
PM
599
–
Date
Day of week
Remark1*
–
+25~-15s/day
9:00PM-4:00AM
–
–
+25~-15s/day
9:00PM-2:00AM
○
○
○
○
○
○
○
+40~-30s/day
8:30PM-2:00AM
+40~-30s/day
8:30PM-4:00AM
+40~-30s/day
8:30PM-0:30AM
+40~-30s/day
8:30PM-0:30AM
+40~-30s/day
8:30PM-4:00AM
–
–
○
ENGLISH
SPECIFICATIONS
(1) Vibrations: 21,600 vibrations/1 hour
(2) Number of jewels: 21 jewels
(3) Running time: More than 40 hours
(4) Shock-proof bearings to protect the balance with hairspring from shocks.
The stated daily accuracy is in the following conditions:
• After 24 hours at room temperature with the mainspring wound fully and the dial facing up.
• Due to the characteristics of the automatic winding watch, the time may deviate from the
stated “daily accuracy” depending on the following conditions: amount of time the watch
is worn each day, position of the watch, movement of your arm, winding condition of the
mainspring.
Product specifications may change without notice, for improvement.
!
CAUTION
* Avoid setting the date during the time periods listed in “Remark1” above since the calendar
changes during this time. If the date is set during this time period, the date may not change
or the watch may malfunction. Be sure to move the hour and minute hands away from this
time period when setting the date.
7
ENGLISH
NAMES AND FUNCTIONS OF INDIVIDUAL COMPONENT PARTS
<DB(46A)>
A: Hour hand
B: Minute hand
C: Second hand
D: Crown
E: Dial
F: Click button
* EM(469) & NP(558) only
G:Date
H: Day of the week
B
A
D
C
E
<DW(48D), ER(487), NR(557), PF(597)> <EM(469), NP(558), NQ(559), PM(599)>
B
B
A
F
A
D
D
C
G
E
C
G
E
H
* The position of the crown, date indicator, or day of the week window may be
different, depending on the model.
8
ENGLISH
AUTOMATIC WINDING MECHANISM
(1) The mainspring is wound by natural movements of your
arm when wearing the watch on your wrist.
(2) If your watch stops, swing the watch back and forth ten
or more times to re-start the second hand. After it starts
moving, set the date and time.
(3) This watch will run approximately 40 hours after it is fully
wound. If it is not wound enough, the watch may lose
accuracy. In order to maintain the watch’s accuracy, we
recommend wearing the watch at least 8 hours a day.
HAND WINDING MECHANISM
(1) The mainspring is wound up manually.
(2) To wind the spring, turn the crown clockwise.
When you turn the crown counterclockwise, the spring will not be wound.
(3) Once the spring is fully wound, the crown will no longer turn. Be careful not
to keep trying to turn it, or the spring or other parts may be broken.
(4) This watch will run approximately 40 hours after the spring is fully wound.
MODELS WITH SCREWED-DOWN CROWN
Depending on the model, you may not be able to pull the crown out without
unscrewing it (models with screwed-down crown).
Operate this type of watch as follows:
(1) Before setting the date and time, first turn the crown to the left to loosen
the screw lock.
(2) After setting the date and time, turn the crown to the right while pressing
in, until it stops turning to securely tighten the screw.
9
ENGLISH
HOW TO SET THE TIME [DB(46A)]
(1) Pull the crown out.
(The second hand does not stop.)
(2) Turn the crown clockwise and set the
current time.
When setting the time, first bring the
hand back slightly later than the actual
time and then move it forward to the
actual time.
(3) Press the crown in to the normal
position.
10
Turn clockwise
ENGLISH
HOW TO SET THE TIME & CALENDAR [EM(469), NP(558)]
(1) Press the click button and set the
previous day of the week.
The day of the week can be
displayed in two languages. Press
the click button to select your desired
languages.
The languages available differ
depending on the model.
(2) Pull the crown out to the first click.
The crown on this watch can be pulled
out to the first and second clicks.
(3) Turn the crown counterclockwise to set
the date indicator to the previous date.
About date correction at month’s end:
Date correction is necessary for months
with 30 days or less. In this case, set the
date to the [1st day] on the first day of the
next month.
Turn
counterclockwise
11
ENGLISH
(4) Pull the crown out to the second click.
(5) Turn the crown to set the time.
Turn the crown in the direction to
advance the hand (clockwise) until
today’s date is displayed. It is the
“a.m.” when the date changes. Set the
hands further forward to adjust to the
current time.
Since the calendar changes at midnight,
take care not to confuse a.m. and p.m.
when setting the time.
(6) Push the crown back to the normal
position.
12
Turn clockwise
ENGLISH
HOW TO SET THE TIME & DATE
[DW(48D), ER(487), NR(557), PF(597)]
(1) Pull the crown out to the first click.
The crown on this watch can be pulled
out to the first and second clicks.
(2) Turn the crown counterclockwise to set
the date indicator to the previous date.
About date correction at month’s end:
Date correction is necessary for months
with 30 days or less. In this case, set the
date to the [1st day] on the first day of the
next month.
Turn
counterclockwise
(3) Pull out the crown to the second click.
The second hand does not stop.
13
ENGLISH
(4) Turn the crown clockwise and set the
current time.
Since this watch comes with a calendar,
make sure that you set either a.m. or
p.m. without fail.
The date changes at [twelve o’clock
midnight].
When setting the time, first bring the
hand back slightly later than the actual
time and then move it forward to the
actual time.
Turn clockwise
(5) Press the crown in to the normal
position.
HOW TO SET THE TIME & CALENDAR [NQ(559), PM(599)]
(1) Pull the crown out to the first click.
The second hand does not stop.
(2) At first turn the crown clockwise to the
previous day of the week.
The day of the week can be
displayed in two languages. Press
the click button to select your desired
languages.
The languages available differ depending on the model.
14
About date correction at month’s end:
Date correction is necessary for months
with 30 days or less. In this case, set the
date to the [1st day] on the first day of the
next month.
Turn clockwise
(Day setting)
ENGLISH
Turn the crown counterclockwise to set
the date indicator to the previous date.
Turn
counterclockwise
(Date setting)
(3) Pull the crown out to the second click.
Turn clockwise
(4) Turn the crown to set the time.
Turn the crown in the direction to
advance the hand (clockwise) until
today’s date is displayed.
It is the “a.m.” when the date changes.
Set the hands further forward to adjust
to the current time.
Since the calendar changes at midnight,
take care not to confuse a.m. and p.m.
when setting the time.
(5) Press the crown in to the normal
position.
15
ENGLISH
U HOW TO SET THE MONTHLY CALENDAR
Some models come with a monthly calendar.
The monthly calendar can be used by turning the
crown at the 4 o’clock position to set the rotating ring
inside the watchcase and aligning it with the day of
the week that is printed on the dial.
Turn the crown to align the first day of the month to
the appropriate day of the week.
* Note that when setting the first day of the month, if the
days at the end of the month (31st, etc.) are aligned
with the section that does not have the days of the
week printed on the dial (3 - 4 o’clock side), days of
the week will not be indicated at the end of the month.
U HOW TO USE “MULTI-YEAR CALENDAR”
You can easily use the calendar for the year Example 1:
printed on the rotating ring by operating the
crown.
Depending on the model, the month on the Month
six o’clock side may be printed in roman
numerals or alphabet.
Example 1: To set October 2007
(1) Turn the crown and set “07” on the rotating Rotating ring:
ring to “OCT” on the six o’clock side.
Year and day of the week are printed.
(2) The calendar for October 2007 is set on
Example 2:
the twelve o’clock side of the dial.
Example 2: To set February 2008 (Leap year)
(1) Turn the crown and set “08” on the rotating
” on the six o’clock side.
ring to “
* Set to “
” or “
” only for leap years.
Other months are the same for leap and
non leap years.
(2) The calendar for February 2008 is set on January and February of a leap year
the twelve o’clock side of the dial.
* January and February for leap years are highlighted.
16
You can see the time in cities around the world by turning the crown (2) to
the present time of one of the cities printed on the dial. In the figure on the
right, since the time in Tokyo is 10:08, align “10” on the rotating indicator ring
to “TOKYO” on the dial. To tell the time in other cities, simply look at the
corresponding numbers on the rotating indicator ring.
Crown (2)
Using the World Time Ring, you can see the times all around the world.
Example: It is 10 p.m. now.
(1) In the 24-hour system, 10 p.m. is 22:00 hours.
(2) Set TOKYO on the World Time Ring
to the 22-hour position of the 24-hour
scale.
TOKYO
* The World Time Ring comes in various
types, such as with a crown for setting
world time or with a rotating bezel.
(3) The position that CHICAGO on the
World Time Ring indicates is the time in
Chicago.
World
Time Ring
CHICAGO
24-hour
scale
* The position indicated by each scale on the World Time Ring represents the
time in that country.
17
ENGLISH
U WORLD TIME
* The city names are major cities in various countries around the world.
* Some countries use daylight savings time.
* Note that in some countries policies regarding daylight savings time may be
changed by the government ordinance.
USING THE ROTATING INDICATOR BEZEL
dT
ime
Please notice that some models come with a rotating indicator bezel, which
should be used properly.
Rotating indicator bezel
Turn the bezel by pointing the mark to the minutehand. While certain time goes by, you can measure
the elapsed time from the distance between minutehand and figures on the rotating indicator bezel.
You can also set the mark as a desired time
to remind you how long time is still remain for an
appointment.
You cannot turn the bezel reversely since it comes
with a protection mechanism for preventing wrong
operation by force or shock. Figures on the bezel
could also help you to read the current time easily.
* Depending on design, anti-reversely and 1 minute
“click” sound mechanism on rotating indicator ring
does not apply to some models.
18
se
ENGLISH
Using this method, you can simultaneously see the time in countries around
the world by using the scales on the World Time Ring and reading the dial.
p
Ela
The above shows
that 20 minutes have
elapsed from 10:10.
ITALIANO
OROLOGI MECCANICI
Grazie di aver acquistato il nostro prodotto. Per garantire un uso prolungato e
le migliori prestazioni, leggere con attenzione questo Manuale di istruzioni e
familiarizzarsi con le clausole della garanzia.
Tenere questo Manuale di istruzioni a portata di mano e consultarlo nel
momento di bisogno.
PRECAUZIONI PER LA SICUREZZA
Osservare con la massima attenzione quanto specificato dai contrassegni
sotto indicati per evitare qualsiasi pericolo di danneggiare cose e di ferire voi
stessi e altre persone.
!
AVVERTENZA
... Questo simbolo indica la possibilità di causare morte
o ferite gravi quando il prodotto viene utilizzato in modo
diverso rispetto alle istruzioni fornite.
!
ATTENZIONE
... Questo simbolo indica la possibilità di ferire persone
o danneggiare cose quando il prodotto viene utilizzato
in modo diverso rispetto alle istruzioni fornite.
19
ITALIANO
MANUALE DI ISTRUZIONI
CURA DELL’OROLOGIO
(1) Resistenza all’acqua
Condizioni
di impiego
ITALIANO
Schizzi
occasionali
(lavaggio del
viso, pioggia,
ecc.)
Sport acquatici
(nuoto, ecc.) e
frequenti contatti
con l’acqua
(lavaggio dell’auto,
ecc.)
Immersioni in
apnea
(senza
bombola
d’aria)
Immersioni
con
respiratore
(con bombola
d’aria)
Utilizzo della
corona con
l’orologio
bagnato o
immerso in
acqua
Tipo
Non
resistente
all’acqua
“WATER
RESISTANT” non
è scritto sul retro
dell’orologio.
Resistente “WATER
all’ acqua RESISTANT” è
per l’uso
scritto sul retro
giornaliero. dell’orologio.
Resistente “WATER
all’acqua
RESISTANT” è
rinforzato scritto sul retro
per l’uso
e 50M (5BAR) è
giornaliero scritto sul retro o sul
I
quadrante.
Resistente “WATER
all’acqua
RESISTANT” è
rinforzato scritto sul retro e
per l’uso
100M (10BAR)
giornaliero 150M (15BAR)
II
200M (20BAR) è
scritto sul retro o sul
quadrante.
* Si raccomanda di usare l’orologio correttamente, seguendo le note sopra riportate relative all’utilizzo, dopo
aver verificato le precauzioni per la resistenza all’acqua riportate sul quadrante o sul retro dell’orologio.
20
×
×
×
×
×
×
×
×
×
×
×
×
×
×
!
AVVERTENZA
!
ATTENZIONE
4 Mantenere sempre la corona premuta (in posizione normale) quando si utilizza
l’orologio. Se la corona è del tipo a vite ci si deve accertare che sia ben serrata.
5 Non utilizzare la corona con l’orologio immerso in acqua o bagnato.
L’acqua potrebbe penetrare all’interno dell’orologio e comprometterne la
resistenza all’acqua.
6 Se il modello non è impermeabile, fare attenzione agli spruzzi d’acqua
(durante le abluzioni, la pioggia, ecc.) e al sudore. Se l’orologio si bagna
con acqua o sudore, asciugarlo con un panno soffi ce e asciutto.
7 Anche con orologi resistenti all’acqua per uso normale, evitare forti getti
o fl ussi diretti d’acqua verso l’orologio. Potrebbe essere applicata una
pressione dell’acqua superiore al limite, che potrebbe comprometterne la
resistenza all’acqua.
8 Con orologi resistenti all’acqua per uso normale, asciugare con cura
l’acqua di mare dalla cassa dopo l’esposizione, per evitare corrosione e
altri effetti indesiderati.
9 L’interno dell’orologio contiene una certa quantità di umidità, che potrebbe
provocare formazione di condensa all’interno del vetro, quando l’aria
esterna diventa più fredda della temperatura interna dell’orologio. Se la
formazione di condensa è temporanea, non provoca danni all’interno
dell’orologio, altrimenti, se prolungata o se all’interno dell’orologio penetra
acqua, rivolgersi al rivenditore per risolvere il problema quanto prima
possibile.
21
ITALIANO
1 I comuni orologi impermeabili resistenti sino alla profondità di 30 metri (3
bar) possono essere usati a contatto con l’acqua, ad esempio quando ci si
lava il viso, ma non dovrebbero essere impiegati in immersione.
2 I comuni orologi impermeabili rinforzati per profondità sino a 50 metri (5
bar) possono essere usati durante il nuoto ma non dovrebbero essere
impiegati in alcun tipo d’immersione, compresa quella in apnea.
3 I comuni orologi impermeabili rinforzati per profondità sino a 100-200 metri
(10-20 bar) possono essere usati durante le immersioni in apnea ma non
dovrebbero essere impiegati durante quelle con respiratore e ossigeno o
o in saturazione d’elio.
ITALIANO
(2) Urti
1 Si raccomanda di togliere l’orologio dal polso durante la
pratica di sport pesanti, mentre la pratica di quelli leggeri, ad
esempio il golf, non v’influisce negativamente.
2 Evitare urti violenti, come il lasciare cadere l’orologio per
terra.
(3) Magnetismo
1 Qualora l’orologio venga lasciato nelle vicinanze di un forte magnetismo
per un tempo più o meno lungo, le parti componenti possono rimanere
magnetizzate fino al punto di causare malfunzionamenti. È opportuno
prestare la dovuta attenzione.
2 L’orologio può temporaneamente andare avanti o indietro mentre rimane
esposto al magnetismo, ma quando viene allontanato dal magnetismo
esso riprende il suo funzionamento con la precisione originale. In questo
caso correggere l’ora.
(4) Vibrazioni
L’orologio può risultare meno preciso se esposto a forti
vibrazioni, come in caso di guida di motociclette, o per
l’uso di martelli pneumatici, seghe a catena, ecc.
(5) Temperatura
Alle temperature inferiori o superiori a quelle normali (5-35°C) l’orologio
potrebbe non funzionare correttamente o addirittura arrestarsi.
!
ATTENZIONE
Non utilizzare l’orologio alle alte temperature, come ad esempio nelle
saune. Potrebbe infatti riscaldarsi eccessivamente a causare ustioni.
(6) Prodotti chimici, gas, ecc.
Prestare la massima cautela in caso di contatto con gas, mercurio,
prodotti chimici (diluenti, benzina, solventi vari, detergenti contenenti
tali componenti, prodotti adesivi, vernici, medicine, profumi, cosmetici) e
così via. In questi casi si potrebbe verificare lo scolorimento della cassa
dell’orologio, del cinturino e del quadrante. Si potrebbe anche verificare lo
scolorimento, la deformazione e il danneggiamento di vari componenti a
base di resina.
22
(7) Informazioni sugli accessori
!
AVVERTENZA
!
ATTENZIONE
In caso di arrossamento cutaneo, o se la pelle dovesse presentare
irritazioni anomale causate dal contatto con l’orologio o con il cinturino,
toglierlo immediatamente e consultare un medico.
(9) Vernice luminescente
Le lancette e il quadrante di questo orologio sono ricoperti da una vernice
luminescente.
Tale vernice, di tipo sicuro poiché non radioattiva, immagazzina la luce del
sole e quella artificiale restituendola quindi al buio. Via via che libera la luce
l’intensità luminosa si riduce gradualmente. La quantità di luce emessa
e la durata dell’emissione dipendono dai vari fattori in atto nel periodo
d’immagazzinamento, tra i quali la forma del vetro, lo spessore della
vernice stessa, il livello di luminosità circostante, la distanza dell’orologio
dalla sorgente luminosa e il livello di assorbimento. Va infine notato che
quando la quantità di energia luminosa immagazzinata è insufficiente
l’orologio ne potrebbe emettere poca, oppure per un tempo limitato.
(10) Cinturino impermeabile
Alcuni prodotti impiegano cinturini di pelle e nylon sottoposti a uno speciale
trattamento per renderli impermeabili e resistenti alla traspirazione. La
durata dell’effetto di resistenza all’acqua dipende dal periodo e dalle
condizioni di utilizzo del cinturino.
23
ITALIANO
Conservare perni e altri elementi di piccole dimensioni fuori dalla portata
dei bambini.
In caso di ingestione accidentale di piccoli pezzi, chiamareimmediatamente
un medico.
(8) Reazioni allergiche
COME IDENTIFICARE IL CALIBRO DELL’OROLOGIO
ITALIANO
Il calibro va ricavato dal nome di modello dell’orologio o dal codice impresso
sul fondello della cassa.
1. Individuazione dal nome del modello a 10 cifre
Il nome del modello a 10 cifre è ricavabile dalla scheda di garanzia fornita con
l’orologio. È altresì ricavabile dall’etichetta che appare sull’orologio stesso. La
seconda e la terza cifra ne indicano, appunto, il calibro.
Esempio: se il nome del modello è “CDB05001B0” il calibro è “DB”.
2. Individuazione dal codice della cassa
Il codice della cassa è riportato sul fondello dell’orologio.
A: Se il codice della cassa è formato da sei cifre, le prime due indicano il
calibro.
B: Se il codice della cassa è formato da 8 o 9 cifre, le prime tre indicano il
numero di movimento. Cercare il calibro in base al numero di movimento
facendo riferimento alla tabella corrispondente.
Esempio A
Esempio B
Codice
della
cassa
Codice
della
cassa
Esempio A: Se il nome del modello è “DB05-C0” il calibro è “DB”.
Esempio B: Se il codice della cassa è “469396-81”, il numero di movimento è
“469”. Il calibro corrispondente è indicato nella tabella da “EM”.
* L’ubicazione del codice della cassa può cambiare, e i relativi caratteri essere
più piccoli e pertanto difficili da leggere, a seconda delle caratteristiche
dell’orologio.
* Le immagini e le illustrazioni riportate nel manuale potrebbero differire
dall’aspetto effettivo dell’orologio in proprio possesso, pur rimanendo
identiche le funzioni e le procedure d’uso.
24
CARATTERISTICHE TECNICHE
Pulsante
a scatto
Data
Giorno della
settimana
Caricamento
manuale
Precisione
giornaliera
DB
46A
–
–
–
–
+25~-15sec/giorno
–
DW
48D
–
–
–
+25~-15sec/giorno
9:00PM-2:00AM
EM
469
○
○
–
+25~-15sec/giorno
9:00PM-4:00AM
ER
487
–
–
–
+25~-15sec/giorno
9:00PM-2:00AM
NP
558
○
–
+40~-30sec/giorno
8:30PM-4:00AM
NR
557
–
+40~-30sec/giorno
8:30PM-0:30AM
PF
597
–
+40~-30sec/giorno
8:30PM-0:30AM
PM
599
–
○
○
○
○
○
8:30PM-2:00AM
559
○
○
+40~-30sec/giorno
NQ
○
○
○
○
○
○
○
○
+40~-30sec/giorno
8:30PM-4:00AM
Calibro
–
○
(1) Frequenza: 21.600 oscillazioni l’ora
(2) Numero di rubini: 21 rubini
(3) Autonomia di carica: più di 40 ore
(4) Supporti antiurto di protezione della spirale del bilanciere
La precisione giornaliera dichiarata è valida alle seguenti condizioni:
• Dopo 24 ore trascorse alla normale temperatura ambiente, con una carica completa della
molla principale e con il quadrante rivolto verso l’alto.
• Per via delle caratteristiche dell’orologio a carica automatica, in base alle seguenti condizioni
la precisione dell’ora indicata potrebbe deviare rispetto alla “precisione giornaliera”
dichiarata: durata quotidiana d’uso dell’orologio e sua posizione, movimento del braccio e
condizione di avvolgimento della molla motrice.
Le caratteristiche tecniche dell’orologio sono soggette a modifiche migliorative senza preavviso.
!
ATTENZIONE
* Evitare di impostare la data durante i periodi di tempo indicati sopra nella colonna
“Osservazioni 1”, in quanto il calendario si aggiorna in questi intervalli di tempo. Se si
imposta la data in questo periodo di tempo, la data potrebbe non cambiare sul giorno
successivo oppure l’orologio potrebbe non funzionare correttamente. Quando si imposta la
data, accertarsi di spostare la lancetta lontano da questo periodo di tempo.
25
ITALIANO
–
Osservazioni 1*
NOME E FUNZIONI DELLE PARTI
<DB(46A)>
ITALIANO
A: Lancetta delle ore
B: Lancetta dei minuti
C: Lancetta dei secondi
D: Corona
E: Quadrante
F: Pulsante
* Solo EM(469) & NP(558)
G:Data
H: Giorno della settimana
B
A
D
C
E
<DW(48D), ER(487), NR(557), PF(597)> <EM(469), NP(558), NQ(559), PM(599)>
B
B
A
F
A
D
D
C
G
E
C
G
E
H
* La posizione della corona, dell’indicatore della data o del giorno della
settimana può variare a seconda del modello.
26
MECCANISMO DI CARICAMENTO AUTOMATICO
MECCANISMO DI CARICAMENTO MANUALE
(1) La molla principale viene caricata manualmente.
(2) Per caricare la molla, girare la corona in senso orario.
In caso contrario, la molla non verrà caricata.
(3) Quando la molla è stata caricata completamente, non è più possibile girare
la corona. Non tentare di forzare la rotazione della corona per evitare di
danneggiare la molla o altre parti.
(4) Caricando la molla completamente questo orologio funzionerà per circa 40
ore.
MODELLO DI TIPO CON CORONA AD AVVITAMENTO
A seconda del modello, potrebbe non essere possibile estrarre la corona
senzasvitarla (Modello di tipo con corona ad avvitamento).
Azionare questo tipo di orologio nel modo descritto di seguito:
(1) Prima di impostare data e ora, ruotare la corona verso sinistra per
allentarel’avvitamento.
(2) Dopo aver impostato data e ora, ruotare la corona verso destra, mentre la
si tiene premuta, fino a quando smette di ruotare. In questo modo la vite
sarà avvitata saldamente.
27
ITALIANO
(1) La molla principale viene caricata dai movimenti naturali
del braccio mentre si porta l’orologio sul polso.
(2) Se l’orologio si ferma, far oscillare l’orologio avanti indietro
dieci o più volte, per avviare il movimento della seconda
lancetta. Dopo l’avvio del movimento si può impostare la
data e l’ora.
(3) Con un caricamento completo, l’orologio funziona per circa
40 ore. Se non ha abbastanza carica, l’orologio potrebbe
ritardare. Per mantenere la precisione dell’orologio si raccomanda d’indossarlo
almeno 8 ore al giorno.
IMPOSTAZIONE DELL’ORA [DB(46A)]
(1) Estrarre la corona.
(La lancetta dei secondi non si ferma).
ITALIANO
(2) Ruotare la corona in senso orario per
impostare l’ora corrente.
Quando si imposta l’ora, portare per
una volta la lancetta leggermente
indietro rispetto all’ora corretta e poi
farla avanzare sull’ora corretta.
(3) Premere la corona per riportarla in
posizione normale (gradino 0).
28
Ruotare in
senso orario
IMPOSTAZIONE DELL’ORA E DEL CALENDARIO
[EM(469), NP(558)]
ITALIANO
(1) Premere il pulsante a scatto per
impostare il giorno precedente della
settimana.
Il giorno della settimana può essere
visualizzato in due lingue. Premere il
pulsante a scatto per selezionare la
lingua desiderata.
Le lingue disponibili variano a seconda
del modello.
(2) Estrarre la corona fino al primo clic.
È possibile estrarre la corona di questo
orologio fino al primo e secondo clic.
(3) Girare la corona in senso antiorario per
impostare l’indicatore della data alla
data precedente.
Correzione della data alla fine del mese:
La correzione di data è necessaria per i
mesi di 30 o meno giorni. In questo caso,
impostare la data su [1st day] sul primo
giorno del mese successivo.
Ruotare in
senso antiorario
29
(4) Estrarre la corona fino al secondo
scatto.
ITALIANO
(5) Girare la corona per impostare l’ora.
Girare la corona nella direzione di
rotazione delle lancette in avanti
(in senso orario) fino a quando non
appare la data di oggi. Quando la
data cambia, l’ora indicata è quella
mattutina (a.m.). Far avanzare le
lancette ulteriormente per impostare
l’ora corrente.
Dato che il calendario cambia a
mezzanotte, fare attenzione a non
confondere a.m. e p.m. quando si
imposta l’ora.
(6) Spingere la corona per riportarla alla
posizione normale.
30
Ruotare in
senso orario
IMPOSTAZIONE DELL’ORA E DELLA DATA
[DW(48D), ER(487), NR(557), PF(597)]
ITALIANO
(1) Estrarre la corona fino al primo
gradino.
La corona di questo orologio può
essere estratta a livello del primo e del
secondo gradino.
(2) Girare la corona in senso antiorario per
impostare l’indicatore della data alla
data precedente.
Correzione della data alla fine del mese:
La correzione di data è necessaria per i
mesi di 30 o meno giorni. In questo caso,
impostare la data su [1st day] sul primo
giorno del mese successivo.
Ruotare in
senso antiorario
(3) Estrarre la corona fino al secondo clic.
La lancetta dei secondi non si ferma.
31
ITALIANO
(4) Ruotare la corona in senso orario e
impostarla sull’ora corrente.
Poiché questo orologio è dotato di
calendario, accertarsi di impostare l’ora
a.m. o p.m. senza errori.
Quando la data cambia, passa a [ore
dodici, mezzanotte].
Quando si imposta l’ora, portare per
una volta la lancetta leggermente
indietro rispetto all’ora corretta e poi
farla avanzare sull’ora corretta.
Ruotare in
senso orario
(5) Premere la corona per riportarla in
posizione normale (gradino 0).
IMPOSTAZIONE DELL’ORA E DELLA DATA [NQ(559), PM(599)]
(1) Estrarre la corona fino al primo
gradino.
La lancetta dei secondi non si ferma.
(2) Per prima cosa ruotare la corona
in senso orario fino a quando viene
visualizzato il giorno precedente della
settimana.
Il giorno della settimana può essere
visualizzato in due lingue. Premere il pulsante a scatto per selezionare
la lingua desiderata.
Le lingue disponibili variano a seconda del modello.
32
Ruotare in
senso orario
(Impostazione del giorno)
Correzione della data alla fine del mese:
La correzione di data è necessaria per i
mesi di 30 o meno giorni. In questo caso,
impostare la data su [1st day] sul primo
giorno del mese successivo.
Ruotare in
senso antiorario
(Impostazione della data)
(3) Estrarre la corona fino al secondo
scatto.
Ruotare in
senso orario
(4) Girare la corona per impostare l’ora.
Girare la corona nella direzione di
rotazione delle lancette in avanti
(in senso orario) fino a quando non
appare la data di oggi. Quando la
data cambia, l’ora indicata è quella
mattutina (a.m.). Far avanzare le
lancette ulteriormente per impostare
l’ora corrente.
Dato che il calendario cambia a
mezzanotte, fare attenzione a non
confondere a.m. e p.m. quando si
imposta l’ora.
(5) Premere la corona per portarla alla
posizione normale (gradino 0).
33
ITALIANO
Girare la corona in senso antiorario per
impostare l’indicatore della data alla
data precedente.
UIMPOSTAZIONE DEL CALENDARIO MENSILE
ITALIANO
Alcuni modelli sono dotati di un calendario mensile.
È possibile utilizzare il calendario mensile ruotando
la corona sul lato delle 4, in base all’anello rotante
che si trova all’interno della cassa dell’orologio e ai
giorni della settimana stampati sul quadrante.
Ruotare la corona sul lato delle 4 e impostare il primo
giorno su un giorno della settimana del mese desiderato.
* Fare attenzione all’intervallo di regolazione per il primo
giorno, perché alla fine del mese (31, ecc.) è inclusa una
sezione in cui non ci sono giorni della settimana stampati
sul quadrante (sul lato delle 3-4) e quindi ci si può trovare
senza nessun giorno della settimana da impostare.
UUTILIZZO DEL “CALENDARIO MULTI-ANNO”
Mediante la corona è possibile utilizzare il calendario Esempio 1:
degli anni stampati sulla ghiera girevole.
A seconda del modello, i mesi (situati nella parte
inferiore) possono essere stampati in numeri Mese
romani o in lettere.
Esempio 1: per impostare il mese di ottobre 2007
(1) Girare la corona e posizionare “07” sulla
ghiera girevole in corrispondenza di “OCT”
nella parte inferiore.
Ghiera girevole:
(2) Il calendario per ottobre 2007 viene visualizzato sono stampati l’anno e il giorno della
settimana.
nella parte superiore del quadrante.
Esempio 2: per impostare il mese di febbraio Esempio 2:
2008 (anno bisestile)
(1) Girare la corona e posizionare “08” sulla
”
ghiera girevole in corrispondenza di “
nella parte inferiore.
* Posizionare su “
”o“
” solo per gli
anni bisestili.
Gli altri mesi vengono impostati nello stesso
modo sia per gli anni bisestili che per gli
Gennaio e febbraio di un anno bisestile
anni non bisestili.
(2) Il calendario per febbraio 2008 viene visualizzato nella parte superiore del
quadrante.
* I mesi di gennaio e febbraio per gli anni bisestili sono evidenziati.
34
U ORA INTERNAZIONALE
Corona (2)
Grazie alla ghiera dell’ora internazionale è possibile sapere che ore sono in
tutto il mondo.
Esempio: ora sono le 22:00.
(1) Nel sistema a.m./p.m., le 22:
Ghiera dell’ora
TOKYO
corrispondono alle 10 p.m.
internazionale
(2) Impostare TOKYO sulla ghiera dell’Ora
internazionale alla posizione delle 22:00
nella scala del ciclo orario di 24 ore.
* Esistono diversi tipi di ghiera dell’ora
internazionale; ad esempio può essere
CHICAGO
presente la corona per l’ora internazionale
oppure una ghiera girevole.
Scala
(3) La posizione di CHICAGO sulla ghiera del ciclo orario
dell’ora internazione riporta l’ora di di 24 ore
Chicago.
* La posizione indicata da ciascuna scala della ghiera dell’ora internazionale,
inoltre, rappresenta l’ora in quel determinato paese.
35
ITALIANO
Per vedere l’ora delle città di tutto il mondo girare la corona (2) sull’ora
corrente di una delle città stampate sulla ghiera. Nella figura sulla destra,
poiché a Tokyo sono le 10:08, allineare la ghiera girevole di indicazione su
“TOKYO” sul quadrante. Per conoscere l’ora nelle altre città è sufficiente
leggere i relativi numeri sulla ghiera girevole di indicazione.
USO DELL’ANELLO INDICATORE ROTANTE
tra
scorso
Si prega di notare che alcuni modelli sono provvisti di un anello indicatore
rotante.
Lunetta rotante
Ruotare l’anello sino a far coincidere il simbolo con la lancetta dei minuti. È così possibile misurare
il tempo trascorso osservando la distanza angolare
tra la lancetta dei minuti e le cifre riportate sulla
lunetta rotante. Ruotando lo stesso simbolo sul
punto desiderato si può inoltre ottenere l’indicazione
del tempo residuo.
Essendo provvista di un meccanismo di protezione
che ne impedisce la rotazione a forza o per impatto,
la lunetta non può essere ruotata al contrario. Le
cifre disposte sulla lunetta facilitano infine la lettura
dell’ora attuale.
po
ITALIANO
Questo metodo consente di visualizzare l’ora in tutto il mondo
contemporaneamente, utilizzando le scale della ghiera dell’ora
internazionale e leggendo il quadrante.
* I nomi di città riportati sono quelli dei principali centri urbani di tutto il
mondo.
* In alcuni paesi può essere in vigore l’ora legale.
* Si noti che, in alcuni paesi, i criteri relativi all’ora legale possono essere
modificati per decreto governativo.
m
Te
La figura precedente
mostra che dalle
10:10 sono trascorsi
20 minuti.
* A seconda del design dell’orologio l’anello
indicatore rotante non è provvisto del meccanismo di prevenzione della
rotazione antioraria né dello “scatto” udibile ad ogni minuto di rotazione.
36
ESPAÑOL
RELOJES MECÁNICOS
MANUAL DE INSTRUCCIONES
PRECAUCIONES DE SEGURIDAD
Asegúrese absolutamente de observar los contenidos demarcados indicados
abajo para evitar de antemano ocasionar daños materiales, o personales a
usted u otras personas involucradas.
!
ADVERTENCIA
!
PRECAUCIÓN
... Un contenido demarcado con este símbolo indica
peligro de muertte o de sufrir graves daños
personales si el producto no es usado como se
especifica en las instrucciones suministradas.
... Un contenido demarcado con este símbolo indica
la posibilidad de ocasionar solamente daños
personales o materiales si el producto no es usado
como se especifica en las instrucciones suministradas.
37
ESPAÑOL
Gracias por adquirir un producto de nuestra compañía. Lea cuidadosamente
este manual de instrucciones para familiarizarse con la operación y los
términos de la garantía.
Guarde este manual a mano para futuras consultas.
ACERCA DEL MANEJO DEL RELOJ
(1) Resistencia al agua
Condiciones Exposición
de uso a pequeñas
cantidades de
agua (lavarse
las manos,
lluvia, etc.)
Deportes
acuáticos
(natación, etc.),
contacto frecuente
con agua (lavado
de autos, etc.)
Buceo sin
botellas
de aire
(no se utilizan
tanques de aire)
Buceo con
botellas
de aire
(se utilizan
tanques de
aire)
Operación de
la corona bajo
el agua con
gotas de agua
sobre ella
ESPAÑOL
Tipo
No
resistente
al agua
Reloj sin WATER
RESISTANT en la
tapa posterior de la
caja del reloj.
Resistente Reloj con WATER
al agua para RESISTANT en la
uso diario
tapa posterior de la
normal
caja del reloj.
Resistente Reloj con 50M (5BAR)
al agua
en la tapa posterior o
reforzado en la esfera junto con
para uso
WATER RESISTANT
diario
en la tapa posterior de
normal I
la caja del reloj.
Resistente Reloj con la marca
al agua
100M (10BAR),
reforzado 150M (15BAR) o
para uso
200M (20BAR) en la
diario
tapa posterior o en
normal II
la esfera junto con
WATER RESISTANT
en la tapa posterior
de la caja del reloj.
* Se recomienda que utilice el reloj correctamente observando las limitaciones indicadas arriba
después de haber confirmado el tipo de resistencia al agua marcado en la esfera del reloj o en la
tapa posterior de la caja del reloj.
38
×
×
×
×
×
×
×
×
×
×
×
×
×
×
!
ADVERTENCIA
!
PRECAUCIÓN
4 Mantenga siempre la corona hacia adentro (en la posición normal)
mientras lleva puesto el reloj. Si la corona es del tipo de bloqueo por
rosca, compruebe que esté firmemente enroscada.
5 No opere la corona bajo el agua o cuando el reloj esté mojado. El agua
podría entrar en el interior del reloj y dañar la resistencia al agua.
6 Si su reloj no es resistente al agua, cuídese de las salpicaduras de agua
(durante el lavado de cara, lluvia, etc.) y del sudor. Si el reloj llegara a
mojarse con agua o sudor, séquelo con un paño suave y seco.
7 Incluso con un reloj resistente al agua para el uso diario, evite poner el
reloj debajo de un chorro fuerte de agua. Podría aplicarse una presión de
agua por encima del límite, y dañar la resistencia al agua.
8 Con un reloj resistente al agua para el uso diario, limpie la caja si ha estado
expuesto al agua del mar, y a continuación séquelo por completo para evitar
la oxidación y otros efectos perjudiciales.
9 El interior del reloj contiene una cierta cantidad de humedad, la cual
podría causar el empañamiento sobre el lado interior del cristal cuando
la temperatura del aire exterior esté por debajo de la temperatura interna
del reloj. Si el empañamiento es temporal, no causará ningún daño en el
interior del reloj, pero si es prolongado, o si penetrara agua en el reloj, no
deje este problema sin tratar, póngase en contacto con el vendedor.
39
ESPAÑOL
1 Un reloj de uso diario, con estanqueidad para 30 m (3 bar), puede usarse
para el lavado diario de la cara, etc., pero no podrá sumergirse en agua.
2 Un reloj con estanqueidad reforzada para uso diario I 50 m (5 bar) puede
utilizarse para practicar natación, etc., pero no puede utilizarse para
practicar buceo, inclusive buceo libre.
3 Un reloj con estanqueidad reforzada de uso diario II, 100 m o 200 m
(10 ó 20 bar) puede utilizarse para practicar buceo libre, pero no puede
utilizarse para practicar buceo de profundidad, con tanques de oxígeno, ni
buceo de saturación que utilice gas helio, etc.
ESPAÑOL
(2) Golpes
1 Asegúrese de quitarse el reloj cuando participe en deportes
extenuantes, aunque el uso del reloj para un deporte ligero
como el golf, etc., no tendrá efectos perjudiciales.
2 Evite los impactos fuertes, como dejarlo caer al suelo.
(3) Magnetismo
1 Si deja el reloj en un lugar cerca de un campo magnético fuerte durante
largo tiempo, los componentes del mismo podrán magnetizarse y
ocasionar una avería. Tenga cuidado.
2 El reloj se podrá adelantar o atrasar temporalmente cuando sea expuesto a
un campo magnético. El reloj se adelantará o atrasará temporalmente cuando
sea expuesto a un campo magnético, pero volverá a funcionar con la precisión
original cuando lo retire del magnetismo. En este caso, corrija la hora.
(4) Vibraciones
El reloj puede retrasarse temporalmente si se expone
a vibraciones fuertes, como al conducir una moto o al
utilizar martillos mecánicos, sierras de cadena, etc.
(5) Temperaturas
En ambientes por debajo o por encima de la gama de temperaturas
normales (5°C a 35°C), el reloj puede funcionar defectuosamente y
detenerse.
!
PRECAUCIÓN
No utilice el reloj a altas temperaturas, por ejemplo, en un sauna. El reloj
podría calentarse y causarle quemaduras.
(6) Sustancias químicas, gases, etc.
Preste suma atención al entrar en contacto con gases, mercurio, sustancias
químicas (diluyente, gasolina, diversos disolventes, detergentes que contengan
tales componentes, adhesivos, pinturas, medicinas, perfumes, cosméticos,
etc.), y otros productos similares. El contacto con tales sustancias podrá
ocasionar la decoloración de la caja del reloj, la correa y la esfera. También
podrán decolorarse, deformarse y dañarse varios componentes fabricados a
base de resinas.
40
(7) Acerca de los accesorios
!
ADVERTENCIA
Guarde el broche de la pulsera/correa y otras piezas pequeñas fuera del
alcance de los niños.
Si se ingiere accidentalmente alguna pieza pequeña, consulte
inmediatamente a un médico.
(8) Reacciones alérgicas
PRECAUCIÓN
41
ESPAÑOL
!
Si ha experimentado irritación en la piel o ha sufrido una irritación
anormal a causa del contacto con el reloj o la correa, deje de usar el reloj
inmediatamente y consulte a un médico.
(9) Sobre la “luz luminosa”
Este reloj cuenta con una luz luminosa para las manecillas y la esfera.
La luz luminosa es una pintura segura que almacena luz solar y luz
artificial, sin hacer uso de ningún material radioactivo, y que emite luz en
lugares oscuros. La luminosidad se desvanece gradualmente, a medida
que la pintura descarga la luz almacenada. La cantidad de luz emitida y su
duración dependen de varios factores vinculados al almacenamiento de
la luz, por ejemplo la forma del cristal, el espesor de la pintura, el nivel de
brillo circundante, la distancia entre el reloj y la fuente de luz, y el nivel de
absorción de luz. Por favor tenga en cuenta que cuando no se almacene
suficiente energía lumínica, el reloj podría emitir una luz débil o emitirla
sólo por un tiempo breve.
(10) Correa resistente al agua
Algunos productos emplean correas de cuero y nilón que han recibido un
tratamiento especial para resistir la transpiración y la absorción de agua.
Tenga en cuenta que el efecto de resistencia al agua de esta correa se
puede perder, dependiendo de los periodos y condiciones de uso.
CÓMO IDENTIFICAR EL NÚMERO DE CALIBRE
ESPAÑOL
Compruebe el número de calibre consultando el número de modelo del reloj
o el código de caja en la parte posterior de la caja del reloj.
1. Búaqueda por número de modelo de 10 dígitos
Compruebe el número de modelo de 10 dígitos en la garantía suministrada
con su reloj. Asimismo el número podrá encontrarse en la etiqueta del
producto que viene con el reloj. Los dígitos segundo y tercero indican el
número de calibre de su reloj.
Ejemplo: Si el número de modelo es “CDB05001B0”, el número de calibre
será “DB”.
2. Búsqueda por código de la caja
Vea el código de la caja en la parte posterior de la caja de su reloj.
A: Si el código de la caja es de 6 dígitos, los dos primeros dígitos indican el
número de calibre.
B: Si el código de la caja es de 8 o 9 dígitos, los tres primeros dígitos indican
el número de movimiento. Busque el número del calibre correspondiente
al número de movimiento en la tabla de correspondencias.
Ejemplo A
Ejemplo B
Código
de caja
Código
de caja
Ejemplo A: Si el código de la caja es “DB05-C0”, el número de calibre será
“DB”.
Ejemplo B: Si el código de la caja es “469396-81”, el número de movimiento
es “469”. El número de calibre correspondiente en la tabla es
“EM”.
* Dependiendo de las características del reloj, el lugar en que está inscrito el código
de la caja puede variar y sus letras pueden ser pequeñas y difíciles de leer.
* La apariencia de su reloj puede diferir de aquella en las fotos e ilustraciones de
este manual, pero las funciones y los procedimientos operativos son los mismos.
42
ESPECIFICACIONES
Calibre
Pulsador
Fecha
Día de semana Cuerda manual
Precisión diaria
Observaciones 1*
46A
–
–
–
–
+25~-15seg/día
–
48D
–
–
–
+25~-15seg/día
9:00PM-2:00AM
EM
469
○
○
○
○
○
○
○
○
○
○
–
+25~-15seg/día
9:00PM-4:00AM
–
–
+25~-15seg/día
9:00PM-2:00AM
○
○
○
○
○
○
○
+40~-30seg/día
8:30PM-2:00AM
+40~-30seg/día
8:30PM-4:00AM
+40~-30seg/día
8:30PM-0:30AM
+40~-30seg/día
8:30PM-0:30AM
+40~-30seg/día
8:30PM-4:00AM
ER
487
–
NP
558
○
NQ
559
–
NR
557
–
PF
597
–
PM
599
–
(1)
(2)
(3)
(4)
–
–
○
Vibraciones:21.600 vibraciones/1 hora
Número de joyas: 21 joyas
Tiempo de funcionamiento:más de 40 horas
Rodamientos a prueba de choques para proteger, contra choques, el equilibro con muelles
de compresión.
La precisión diaria indicada se cumple en las siguientes condiciones:
• Después de 24 horas a temperatura ambiente, con el muelle principal con cuerda completa y
la esfera hacia arriba.
• Debido a las características del reloj de cuerda automática, la hora puede desviarse de la
“precisión diaria” indicada, dependiendo de las siguientes condiciones: el tiempo de uso
diario del reloj, la posición del reloj, el movimiento de su brazo, el estado de cuerda del
muelle principal.
Para fines de mejora, las especificaciones del producto se encuentran sujetas a cambios sin
previo aviso.
!
PRECAUCIÓN
* Evite ajustar la fecha durante los periodos de tiempo enumerados en “Observaciones 1”,
ya que el calendario cambia durante ese periodo. Si ajusta la fecha en esta zona horaria,
puede suceder que no cambie de fecha al día siguiente, o que el reloj funcione de manera
incorrecta. Cuando efectúe el ajuste de la fecha, asegúrese de mover la manecilla fuera de
esta zona.
43
ESPAÑOL
DB
DW
PARTES COMPONENTES Y SUS FUNCIONES
<DB(46A)>
ESPAÑOL
A: Manecilla de la hora
B: Manecilla de los minutos
C: Manecilla de los segundos
D: Corona
E: Dial
F: Pulsador
* Sólo en EM(469) & NP(558)
G:Fecha
H: Día de la semana
B
A
D
C
E
<DW(48D), ER(487), NR(557), PF(597)> <EM(469), NP(558), NQ(559), PM(599)>
B
B
A
F
A
D
D
C
G
E
C
G
E
H
* La ubicación de la corona, del indicador de fecha o de la ventana del día de
la semana puede variar según el modelo.
44
MECANISMO DE CUERDA AUTOMÁTICO
(1) Lo que le da cuerda al muelle principal son los movimientos
naturales del brazo mientras lleva el reloj en su muñeca.
(2) De pararse su reloj, agítelo en vaivén unas diez veces o más,
hasta que la manecilla de los segundos se empiece a mover.
Después que se empiece a mover, ajuste la fecha y la hora.
(3) Con toda la cuerda, este reloj funcionará durante aproximadamente
40 horas. Si le falta cuerda al reloj, podría empezar a retrasarse.
Para mantener la precisión del reloj, recomendamos usarlo por lo
menos, 8 horas diarias.
(1) Se da cuerda manualmente.
(2) Para dar cuerda al muelle principal, gire la corona hacia la derecha.
Si gira la corona en el sentido contrario a las agujas del reloj, no se enrollará el muelle
principal.
(3) Una vez que se ha dado cuerda completamente, ya no se puede mover la corona. No
intente seguir girándola; si lo hace, pueden romperse el resorte principal y otras partes
del reloj.
(4) Con toda la cuerda, este reloj funciona durante aproximadamente 40 horas.
MODELO CON CORONA DEL TIPO DE BLOQUEO POR ROSCA
Dependiendo del modelo, es posible que no pueda extraer la corona sin desenroscarla
(modelo con corona del tipo de bloqueo por rosca).
Si su reloj es de este tipo, proceda de la siguiente manera:
(1) Cuando desee ajustar la fecha y la hora, primero gire la corona hacia la izquierda para
aflojar la rosca.
(2) Después de ajustar la fecha y la hora, gire la corona hacia la derecha mientras la
presiona hacia adentro, hasta que deje de girar. La rosca quedará firmemente
apretada.
45
ESPAÑOL
MECANISMO DE CUERDA MANUAL
PUESTA EN HORA [DB(46A)]
(1) Tire de la corona hacia afuera.
(El segundero no se detiene.)
ESPAÑOL
(2) Gire la corona hacia la derecha y
ponga el reloj en hora.
Cuando pone el reloj en hora, sitúe la
manecilla ligeramente retrasada con
respecto a la hora correcta, y luego
hágala avanzar hasta la hora correcta.
(3) Introduzca la corona hasta la posición
normal.
46
Gire hacia la
derecha
CÓMO AJUSTAR LA HORA Y EL CALENDARIO
[EM(469), NP(558)]
ESPAÑOL
(1) Oprima el pulsador y ajuste el día de la
semana al día anterior.
El día de la semana puede aparecer
en dos idiomas. Oprima el pulsador
para seleccionar el idioma que desee.
Los idiomas disponibles dependen del
modelo.
(2) Saque la corona hasta la primera
posición.
La corona de este reloj cuenta con dos
posiciones, primera y segunda.
(3) Gire la corona hacia la izquierda para
ajustar el indicador de fecha al día
anterior.
Corrección de la fecha a fin del mes:
Es necesario efectuar la corrección de la
fecha en los meses que tienen 30 días o
menos. En este caso, ajuste la fecha al
día [1], el primer día del siguiente mes.
Gire hacia la
izquierda
47
(4) Extraiga la corona hasta la segunda
posición.
ESPAÑOL
(5) Gire la corona para ajustar la hora.
Gire la corona hacia la derecha hasta
llegar a la fecha de hoy.
Cuando la fecha cambia, son las
“a.m.”. Adelante más las manecillas
hasta ajustarlas a la hora actual.
Puesto que el calendario cambia a las
doce de la noche, procure no confundir
a.m. con p.m. al poner la hora.
(6) Presione la corona de vuelta a su
posición normal.
48
Gire hacia la
derecha
PUESTA EN HORA Y AJUSTE DE LA FECHA
[DW(48D), ER(487), NR(557), PF(597)]
(1) Saque la corona hasta la primera
posición.
La corona de este reloj cuenta con dos
posiciones, primera y segunda.
ESPAÑOL
(2) Gire la corona hacia la izquierda para
ajustar el indicador de fecha al día
anterior.
Corrección de la fecha a fin del mes:
Es necesario efectuar la corrección de la
fecha en los meses que tienen 30 días o
menos. En este caso, ajuste la fecha al día
[1], el primer día del siguiente mes.
Gire hacia la
izquierda
(3) Saque la corona hasta la segunda
posición.
El segundero no se detiene.
49
ESPAÑOL
(4) Gire la corona hacia la derecha y ponga
el reloj en hora.
Debido a que este reloj dispone de
calendario, ajuste sin falta a a.m. o
p.m.
Cada vez que cambia la fecha, se
ajusta a [las doce de la noche].
Cuando pone el reloj en hora, sitúe la
manecilla ligeramente retrasada con
respecto a la hora correcta, y luego
hágala avanzar hasta la hora correcta.
Gire hacia la
derecha
(5) Introduzca la corona hasta la posición
normal.
PUESTA EN HORA Y AJUSTE DE LA FECHA [NQ(559), PM(599)]
(1) Saque la corona hasta la primera
posición.
El segundero no se detiene.
(2) En primer lugar, gire la corona hacia
la derecha hasta llegar al día anterior
de la semana.
El día de la semana puede aparecer en
dos idiomas. Oprima el pulsador para seleccionar el idioma que desee.
Los idiomas disponibles dependen del modelo.
50
Gire la corona hacia la izquierda hasta
que aparezca la fecha del día anterior.
Corrección de la fecha a fin del mes:
Es necesario efectuar la corrección de la
fecha en los meses que tienen 30 días o
menos. En este caso, ajuste la fecha al día
[1], el primer día del siguiente mes.
Gire hacia la
izquierda
(Ajuste de la fecha)
ESPAÑOL
(3) Extraiga la corona hasta la segunda
posición.
Gire hacia la
derecha
(Ajuste del día)
Gire hacia la
derecha
(4) Gire la corona para ajustar la hora.
Gire la corona hacia la derecha hasta
llegar a la fecha de hoy.
Cuando la fecha cambia, son las
“a.m.”. Adelante más las manecillas
hasta ajustarlas a la hora actual.
Puesto que el calendario cambia a las
doce de la noche, procure no confundir
a.m. con p.m. al poner la hora.
(5) Introduzca la corona hasta la posición
normal (posición 0).
51
U AJUSTE DEL CALENDARIO MENSUAL
Algunos modelos disponen de un calendario mensual.
Con la corona de la posición de las 4 horas, podrá
visualizar el calendario mensual de acuerdo con el
aro giratorio del interior de la caja del reloj y los días
de la semana impresos en el dial.
Gire la corona de la posición de las 4 horas y ajuste el día
primero al día de semana correspondiente a ese mes.
ESPAÑOL
* Cuando efectúe el ajuste del día primero, tenga en
cuenta que si el fin de mes (día 31, etc.) coincide
con una parte del dial sin ningún día impreso
(lado de las 3 - 4 horas), no se podrá efectuar
correctamente el ajuste del día de semana.
U USO DEL “CALENDARIO MULTIANUAL”
Mediante la corona, se puede usar de forma Ejemplo 1:
sencilla el calendario para el año que aparece
en el bisel giratorio.
Según el modelo, el mes que se encuentra Mes
en la mitad de las seis aparecerá impreso en
números romanos o con palabras.
Ejemplo 1: Para poner octubre de 2007
(1) Gire la corona y ajuste en “07” el bisel
giratorio en “OCT” en la mitad de las seis. Bisel giratorio:
(2) El calendario para el mes de octubre Aparecen el año y el día de la semana.
aparece en la mitad del dial en que se Ejemplo 2:
encuentran las 12.
Ejemplo 2: Para poner febrero 2008 (año bisiesto)
(1) Gire la corona y ajuste en “08” el bisel
giratorio correspondiente a “
” en la
mitad de las seis.
”o“
” solo en años bisiestos.
* Ajuste a “
Los demás meses son los mismos para
años bisiestos y no bisiestos.
Enero y febrero en un año bisiesto.
(2) El calendario para febrero de 2008
aparece en la mitad del dial en que se encuentran las 12.
* Enero y febrero aparecen resaltados en los años bisiestos.
52
HORA INTERNACIONAL
Puede ver la hora en ciudades de todo el mundo girando la corona (2) hasta
la hora actual en una de las ciudades impresas en la esfera. En la figura de la
derecha, dado que son las 10:08 en Tokio, alinee las “10” en el bisel giratorio de
indicación con “TOKYO” en la esfera. Para ver la hora en otras ciudades, sólo
tiene que mirar los números correspondientes en el bisel giratorio de indicación.
ESPAÑOL
Corona (2)
Con el bisel de hora internacional, puede ver la hora en todo el mundo.
Ejemplo: Ahora son las 10 p.m.
(1) En el sistema de 24 horas, las 10 p.m. son las 22:00 horas.
(2) En el bisel de hora internacional,
ajuste TOKYO a la posición de las 22
horas en la escala de 24 horas.
* El bisel de hora internacional está
disponible en varios tipos: con una
corona para ajustar la hora internacional
o con un bisel giratorio.
TOKYO
Bisel de hora
internacional
CHICAGO
Escala de
(3) La posición de CHICAGO en el bisel
24 horas
de hora internacional indica la hora en
Chicago.
* La posición indicada por cada escala en el bisel de hora internacional
representa la hora en ese país.
53
Utilizando este método, puede ver la hora en diferentes países del mundo
de forma simultánea mediante las escalas del bisel de hora internacional y
la lectura de la esfera.
* Los nombre de las ciudades corresponden a ciudades importante de
diversos países del mundo.
* Algunos países utilizan horario de verano.
* Debe tenerse en cuenta que, en algunos países, la política relativa al
horario de verano puede cambiar por disposición del gobierno.
El aro no puede girarse en sentido inverso ya que
está provisto de un mecanismo de protección para
prevenir el mal funcionamiento debido a operaciones
forzadas o golpes. Las cifras del aro podrán asistirle
además a leer fácilmente la hora actual.
* Dependiendo del diseño, el mecanismo antiinversión y el sonido de chasquido de 1 minuto
en el aro indicador giratorio no se emplea en
algunos modelos.
54
tra
nscu o
rrid
Por favor tenga en cuenta que algunos modelos están equipados con un aro
indicador giratorio, el cual deberá ser utilizado correctamente.
Gire el aro dirigiendo la marca hacia la manecilla
Bisel giratorio
de minutos. Después de un cierto tiempo, podrá
medir el tiempo transcurrido a partir de la distancia
entre la manecilla de minutos y las cifras del aro
indicador giratorio. Asimismo podrá ajustar la marca
a una hora dada, como un recordatorio del tiempo
que le falta para un compromiso.
o
ESPAÑOL
USO DEL ARO INDICADOR GIRATORIO
mp
Tie
La ilustración superior
indica que han pasado
20 minutos desde las
10:10.
РУССКИЙ
МЕХАНИЧЕСКИЕ ЧАСЫ
ИНСТРУКЦИЯ ПО ЭКСПЛУАТАЦИИ
Благодарим Вас за то, что Вы выбрали наше изделие! Для длительного и
эффективного пользования изделием прочитайте данную инструкцию и
ознакомьтесь с условиями гарантии.
Сохраните эту инструкцию для использования в дальнейшем.
МЕРЫ ПРЕДОСТОРОЖНОСТИ
!
ПРЕДУПРЕЖДЕНИЕ
!
ВНИМАНИЕ
... Данный символ означает возможность летального
исхода или серьезных травм в случае, если
данный продукт будет использоваться любым
способом, отличным от приведенных инструкций.
... Данный символ означает возможность серьезных
травм или материального ущерба только в том
случае, если данный продукт будет использоваться
любым иным способом, отличным от приведенных
инструкций.
55
РУССКИЙ
Строго соблюдайте приведенные ниже инструкции для предотвращения
любого ущерба здоровью и повреждения Вашего имущества и имущества
других лиц.
ПРИ ОБРАЩЕНИИ С ЧАСАМИ
(1) Водонепроницаемость
Условия эксплуатации
Воздействие
небольших
количеств
воды
(умывание,
дождь и т. д.)
Водные
виды спорта
(плавание и
т. п.), частые
контакты с
водой (мойка
автомобиля
и т. п.)
Подводное
плавание (без
использования
кислородных
баллонов)
Подводное
плавание (с
использованием
кислородных
баллонов)
Работа головки
под водой и
работа головки
с каплями
воды на ней
Тип
РУССКИЙ
Водопроницаемые Часы без
маркировки WATER
RESISTANT на
задней крышке
корпуса.
×
×
×
×
×
Водонепроницаемые Часы с маркировкой
для повседневного
WATER RESISTANT
использования
на задней крышке
корпуса.
×
×
×
×
Усиленная
водонепроницаемость
класса I для
повседневного
использования
Часы с маркировкой
50M (5БАР) на
задней крышке
или на лицевой
части циферблата
и с маркировкой
WATER RESISTANT
на задней крышке
корпуса часов.
×
×
×
Усиленная
водонепроницаемость
класса II для
повседневного
использования
Часы с маркировкой
100M (10БАР),
150M (15БАР),
200M (20БАР) на
задней крышке
или на лицевой
части циферблата
и с маркировкой
WATER RESISTANT
на задней крышке
корпуса часов.
×
×
* Рекомендуется использовать часы бережно, следуя приведенным выше инструкциям
по эксплуатации. Перед началом использования проверьте наличие маркировки о
водонепроницаемости на лицевой стороне циферблата или на задней крышке корпуса часов.
56
!
ПРЕДУПРЕЖДЕНИЕ
1 Часы с водонепроницаемостью для повседневного использования 30 М (3 бар) могут
использоваться во время умывания и т. п., но не могут использоваться в условиях, при
которых они будут погружаться в воду.
2 Часы с усиленной водонепроницаемостью для повседневного использования класса I 50
М (5 бар) могут использоваться во время плавания и т. п., но не могут использоваться во
время ныряния или подводного плавания.
3 Часы с усиленной водонепроницаемостью для повседневного использования класса II
100 М или 200 М (10 или 20 бар) могут использоваться во время ныряния или подводного
плавания, но не могут использоваться во время подводного плавания с кислородным
баллоном или выполнения водолазных работ с автономными дыхательными аппаратами
на гелии.
ВНИМАНИЕ
57
РУССКИЙ
!
4 При эксплуатации часов головка должна находиться в утопленном (нормальном)
положении. Если головка относится к типу завинчиваю¬щихся, то она должна быть
плотно завинчена.
5 Не используйте головку под водой или если на часах имеется влага. Вода может
проникнуть внутрь корпуса часов и нарушить их герметич¬ность.
6 Если Ваши часы не являются водонепроницаемыми, то не допускайте попадания
на них водяных брызг (во время умывания, в дождливую погоду и т. д.), а также
запотевания. При попадании на часы воды или при запотевании удалите влагу с
помощью сухой мягкой ткани.
7 Даже если Ваши часы, предназначенные для повседневного использо¬вания,
обладают водонепроницаемостью, не допускайте воздействия на них сильной струи
воды. При превышении допустимого уровня давления воды может быть нарушена
герметичность часов.
8 При попадании на Ваши водонепроницаемые часы, предназначенные для
повседневного использования, морской воды, стряхните воду и протрите корпус насухо,
чтобы не допустить возникновения коррозии или иных негативных последствий.
9 Внутри корпуса часов содержится небольшое количество влаги. Поэтому когда
температура окружающего воздуха ниже температуры воздуха внутри корпуса
часов, на внутренней поверхности стекла может образовываться запотевание. Если
запотевание носит временный характер, то это не наносит вреда часам. Однако если
запотевание остается на стекле продолжительное время или если в часы попала вода,
проконсультируйтесь по месту приобретения часов и не остав¬ляйте эту проблему без
внимания.
(2) Ударопрочность
1 Снимайте часы во время занятий энергичными видами спорта,
однако, занятие такими видами спорта, как гольф и т. д., не
окажет негативного воздействия на состояние часов.
2 Избегайте сильного удара типа падения часов на пол.
(3) Воздействие магнитных полей
1 Запрещается подвергать часы воздействию сильных
магнитных полей в течение длительного периода времени, поскольку
компоненты часов могут намагнититься, что приведёт к нарушению работы
часов. Соблюдайте осторожность.
2 Под воздействием магнитного поля часы могут временно спешить или
отставать.Точность показаний часов будет восстановлена, если устранить
воздействие магнитного поля на часы. В таком случае повторно установите
время.
РУССКИЙ
(4) Вибрация
Часы могут потерять точность, если будут подвержены
сильной вибрации, например, вызываемой поездкой на
мотоцикле, использованием отбойного молотка, цепной
пилы и т. д.
(5) Температура
Часы могут идти неправильно или остановиться при температурах ниже или
выше нормального диапазона (5°С – 35°С).
!
ВНИМАНИЕ
Не пользуйтесь часами при высокой температуре (например, в сауне). Часы
могут нагреваться и вызывать ожоги.
(6) Химические вещества, газы и т.п.
Следует соблюдать максимальную осторожность при контакте с газами,
ртутью, химическими веществами (разбавителем для краски, бензином,
различными растворителями, моющими средствами, содержащими такие
вещества, клеями, красками, лекарственными препаратами, парфюмерией,
косметикой и пр.) и т.п. Эти вещества могут изменить цвет корпуса часов,
браслета/ремешка и циферблата. Возможны также изменение цвета,
деформация и повреждение полимерных компонентов.
58
(7) Дополнительные детали
!
ПРЕДУПРЕЖДЕНИЕ
He давайте шпильки браслета/ремешка и другие мелкие детали детям.
B случае проглатывания мелкой детали немедленно обратитесь к врачу.
(8) Аллергические реакции
!
ВНИМАНИЕ
Боли после контакта c браслетом на коже появляется сыпь или раздражение,
прекратите носить часы и незамедлительно обратитесь к врачу.
(9) Люминесцентное покрытие
(10) Водонепроницаемый браслет
B некоторых моделях используются кожаные и нейлоновые ремешки,
подвергнутые специальной обработке для защиты от потоотделения и
воздействия воды. Свойство водонепроницаемости данного браслета может
быть потеряно в зависимости от периода и условий эксплуатации.
59
РУССКИЙ
Ha стрелках и кольце часов имеется люминесцентное покрытие.
Оно выполнено из безопасной нерадиоактивной краски, накапливающей
солнечный и искусственный свет и отдающей его в темноте. Отдавая
накопленный свет, покрытие постепенно становится более тусклым.
Количество отдаваемого света и время свечения зависят от различных
факторов: формы стекла, толщины слоя краски, уровня яркости окружающей
среды, расстояния от часов до источника света и степени поглощения света.
Помните, что если накоплено немного света, часы будут светиться слабо
или недолго.
ОПРЕДЕЛЕНИЕ НОМЕРА КАЛИБРА
РУССКИЙ
Проверьте номер калибра Ваших часов по номеру модели часов или коду
корпуса на задней крышке корпуса часов.
1. Поиск по 10-значному номеру модели
Проверьте 10-значный номер модели на гарантийном талоне, прилагаемом
в комплекте поставки часов. Вы также можете найти номер на этикетке
изделия, прикрепленной к часам. Второй и третий знак номера указывают
номер калибра Ваших часов.
Пример: Если номер модели представляет собой “CDB05001B0”, то номер
калибра — “DB”.
2. Поиск по коду корпуса
Найдите код корпуса на задней крышке корпуса Ваших часов.
A: Если код корпуса шестизначный, первые две цифры соответствуют
номеру калибра.
B: Если код корпуса 8- или 9-значный, первые три цифры соответствуют
номеру механизма. Ниже приводится таблица соответствий номеров
калибра и номеров механизма.
Пример A
Пример B
Код
корпуса
Код
корпуса
Пример A: Если код корпуса “DB05-C0”, то номер калибра — “DB”.
Пример B: Если код корпуса “469396-81”, то номер механизма – “469”. В
таблице этому номеру будет соответствовать номер калибра “EM”.
* В зависимости от характеристик часов расположение кода корпуса может
отличаться, его знаки могут иметь маленький размер и быть трудно
различимыми.
* Рисунки и иллюстрации в данной инструкции могут отличаться от
реального вида Ваших часов, однако функции и рабочие процедуры
остаются неизменными.
60
ТЕХНИЧЕСКИЕ ХАРАКТЕРИСТИКИ
Кнопка
Дата
День недели
С ручным
подзаводом
Суточная
точность
DB
46A
–
–
–
–
+25~-15сек./сутки
–
DW
48D
–
–
–
+25~-15сек./сутки
9:00PM-2:00AM
EM
469
○
○
–
+25~-15сек./сутки
9:00PM-4:00AM
ER
487
–
–
–
+25~-15сек./сутки
9:00PM-2:00AM
NP
558
○
–
+40~-30сек./сутки
8:30PM-4:00AM
NR
557
–
+40~-30сек./сутки
8:30PM-0:30AM
PF
597
–
+40~-30сек./сутки
8:30PM-0:30AM
PM
599
–
○
○
○
○
○
8:30PM-2:00AM
559
○
○
+40~-30сек./сутки
NQ
○
○
○
○
○
○
○
○
+40~-30сек./сутки
8:30PM-4:00AM
Калибр
–
–
○
Примечании 1*
Заявленная суточная точность хода обеспечивается при соблюдении следующих условий:
• После 24 часов пребывания в условиях комнатной температуры, с полностью
заведенной пружиной и циферблатом, обращенным вверх.
• Технические особенности часов с автоматическим ходом могут стать причиной
отклонения суточной точности хода от заявленного значения; на это влияют
следующие факторы: продолжительность ежедневного ношения часов, положение
часов, движение руки и условия завода пружины.
Технические характеристики могут быть изменены без предварительного уведомления в
связи с модернизацией изделия.
!
ВНИМАНИЕ
* Не рекомендуется корректировать дату в промежутках, указанных в “Примечании
1” выше, поскольку в это время происходит смена даты. При установке даты в этот
промежуток времени она может не смениться вовремя, либо может возникнуть сбой
в работе часов. При установке даты обязательно переведите часовую и минутную
стрелку на другой промежуток времени.
61
РУССКИЙ
(1) Частота колебаний: 21 600 колебаний/1 час
(2) Количество камней: 21 камней
(3) Продолжительность хода: более 40 часов
(4) Ударостойкие подшипники для защиты балансира с волосковой пружинкой от ударов.
НАЗВАНИЯ И НАЗНАЧЕНИЕ КОМПОНЕНТОВ
<DB(46A)>
A: Часовая стрелка
B: Минутная стрелка
A
C: Секундная стрелка
D: Головка
E: Циферблат
F: Кнопка
* Только для EM(469) & NP(558)
G:Дата
H: День недели
B
D
C
РУССКИЙ
E
<DW(48D), ER(487), NR(557), PF(597)> <EM(469), NP(558), NQ(559), PM(599)>
B
B
A
F
A
D
D
C
G
E
C
G
E
H
* Положение головки, индикатора даты и дня недели в разных моделях
часов могут отличаться.
62
МЕХАНИЗМ АВТОМАТИЧЕСКОГО ЗАВОДА
(1) При ношении часов на запястье пружина заводится от
естественных движений руки.
(2) Если часы остановились, встряхните их не менее
десяти раз, чтобы запустить секундную стрелку. После
того, как стрелка будет запущена, установите дату и
время.
(3) C полным заводом часы будут идти приблизительно
40 часов. Если часы заведены недостаточно, точность
хода может отличаться от заявленной. Для обеспечения точности
хода часы рекомендуется носить не менее 8 часов в день.
МЕХАНИЗМ РУЧНОГО ПОДЗАВОДА
МОДЕЛИ С ЗАВИНЧИВАЮЩЕЙСЯ ГОЛОВКОЙ
B некоторых моделях Вы не сможете вытянуть головку, не выкрутив ее
(модели с завинчивающейся головкой).
Для эксплуатации часов данного типа:
(1) Перед установкой даты и времени поверните головку против часовой
стрелки, чтобы разблокировать винт.
(2) Установив дату и время, нажмите на головку и поверните ее по
часовой стрелке до упора, чтобы заблокировать винт.
63
РУССКИЙ
(1) Пружина заводится вручную.
(2) Чтобы завести пружину, поворачивайте головку по часовой стрелке.
При повороте головки против часовой стрелки пружина заводиться
не будет.
(3) При полном заводе пружины головка перестает поворачиваться. Не
поворачивайте головку дальше, так как это может привести к поломке
пружины или других деталей.
(4) С полным заводом часы идут приблизительно 40 часов.
УСТАНОВКА ВРЕМЕНИ [DB(46A)]
(1) Вытяните головку.
(Секундная стрелка не
останавливается.)
РУССКИЙ
(2) Для установки текущего времени
поворачивайте головку по часовой
стрелке.
При установке времени сначала
переведите стрелку немного назад по
сравнению с фактическим временем,
затем переведите ее вперед до
значенияе фактического времени.
(3) Нажмите на головку, чтобы
перевести ее в исходное
(незавинченное) положение.
64
Поверните по
часовой стрелке
КАК УСТАНОВИТЬ ВРЕМЯ И КАЛЕНДАРЬ [EM(469), NP(558)]
(1) Нажмите на кнопку и установите
предыдущий день недели.
День недели отображается на двух
языках. Нажмите кнопку и выберите
нужные языки.
Выбор языков зависит от модели
часов.
РУССКИЙ
(2) Вытяните головку до первого щелчка.
На данных часах головку можно
выдвигать до первого и второго
щелчка.
(3) Чтобы установить предыдущую дату,
поворачивайте головку по часовой
стрелке.
Коррекция даты в конце месяца:
Если в месяце 30 дней или меньше,
необходимо корректировать дату.
В этом случае установите дату на [1-е
число] следующего месяца.
Поворачивайте
против часовой
стрелки
65
(4) Вытяните головку до второго щелчка.
РУССКИЙ
(5) Поворачивая головку, установите
время.
Вращайте головку так, чтобы
стрелка перемещалась вперед (по
часовой стрелке), до тех пор пока
не отобразится сегодняшнее число.
Смена дат производится в режиме
“a.m.” (до полудня). Перемещая
стрелки дальше, установите нужное
время.
Поскольку дата меняется в
полночь, при установке времени не
перепутайте a.m. (до полудня) и p.m.
(после полудня).
(6) Поверните головку в обычное
положение.
66
Поверните по
часовой стрелке
УСТАНОВКА ВРЕМЕНИ И ДАТЫ
[DW(48D), ER(487), NR(557), PF(597)]
(1) Вытяните головку до первого
щелчка.
На данных часах головку можно
выдвигать до первого и второго
щелчка.
Коррекция даты в конце месяца:
Если в месяце 30 дней или меньше,
необходимо корректировать дату.
В этом случае установите дату на [1-е
число] следующего месяца.
Поворачивайте
против часовой
стрелки
(3) Вытяните головку до второго щелчка.
Секундная стрелка не остановится.
67
РУССКИЙ
(2) Чтобы установить предыдущую
дату, поворачивайте головку против
часовой стрелки.
РУССКИЙ
(4) Для установки текущего времени
поворачивайте головку по часовой
стрелке.
Поскольку уасы оснащены
календарем, убедитесь, что
установлено правильное время суток:
a.m. (до полудня) или p.m. (после
полудня).
Дата меняется в [двенадцать часов
ночи].
При установке времени сначала
переведите стрелку немного назад
по сравнению с фактическим
временем, затем переведите ее
вперед до значения фактического
времени.
Поверните по
часовой стрелке
(5) Нажмите на головку, чтобы перевести
ее в исходное (незавинченное)
положение.
УСТАНОВКА ВРЕМЕНИ И ДАТЫ [NQ(559), PM(599)]
(1) Вытяните головку до первого щелчка.
Секундная стрелка не
останавливается.
(2) Поворачивайте головку по часовой
стрелке до тех пор, пока стрелка
не будет указывать на предыдущий
день недели.
68
День недели отображается на двух
языках. Нажмите кнопку и выберите
нужные языки.
Выбор языков зависит от модели
часов.
Чтобы установить предыдущую
дату, поворачивайте головку по
часовой стрелке.
Поверните по
часовой стрелке
(Установка дня недели)
Поверните по
часовой стрелке
(Установка даты)
(3) Вытяните головку до второго щелчка.
(4) Поворачивая головку, установите
время.
Вращайте головку так, чтобы
стрелка перемещалась вперед (по
часовой стрелке), до тех пор пока
не отобразится сегодняшнее число.
Смена дат производится в режиме
“a.m.” (до полудня). Перемещая
стрелки дальше, установите нужное
время.
Поскольку дата меняется в
полночь, при установке времени не
перепутайте a.m. (до полудня) и p.m.
(после полудня).
Поверните по
часовой стрелке
(5) Нажмите на головку, чтобы перевести ее
в исходное (незавинченное) положение.
69
РУССКИЙ
Коррекция даты в конце месяца:
Если в месяце 30 дней или меньше,
необходимо корректировать дату.
В этом случае установите дату на [1-е
число] следующего месяца.
УСТАНОВКА КАЛЕНДАРЯ С РАЗБИВКОЙ ПО МЕСЯЦАМ
Некоторые модели имеют функцию разбивки по месяцам.
Месячный календарь можно использовать, повернув
головку в положение 4 часов, чтобы установить
вращающееся кольцо внутри корпуса часов и совместить
его с днем недели, указанным на циферблате.
Поверните головку, чтобы совместить первый
день месяца с соответствующим днем недели.
* Устанавливая первый день месяца, обратите внимание
на то, что дни недели в конце данного месяца не будут
показаны, если последние числа месяца (31-е и т.д.)
совмещены с сектором циферблата, на который не
нанесены дни недели (сторона 3 - 4 часов).
КАК ПОЛЬЗОВАТЬСЯ “МНОГОЛЕТНИМ КАЛЕНДАРЕМ”
РУССКИЙ
Просто поворачивая головку, можно
Пример 1:
легко пользоваться календарем для года,
указанного на вращающемся кольце.
В зависимости от модели месяц в области
Месяц
шестичасового деления может быть указан
либо римскими цифрами, либо буквами.
Пример 1: Чтобы установить октябрь 2007 года
(1) Поверните головку и установите на
вращающемся кольце “07” и “OCT” в
Вращающееся кольцо: Нанесены
области шестичасового деления.
год и день недели.
(2) Календарь октября 2007 установлен в
области двенадцатичасового деления
Пример
2:
циферблата.
Пример 2: Чтобы установить февраль 2008
года (високосный год)
(1) Поверните головку и установите на
вращающемся кольце “08” и “
” в
области шестичасового деления.
* Устанавливайте “
” или “
” только
для високосного года. Другие месяцы
остаются прежними как для високосного, Январь и февраль високосного года
так и для обычного года.
(2) Календарь февраля 2008 установлен в области двенадцатичасового
деления циферблата.
* Январь и февраль високосного года выделены.
70
U ВСЕМИРНОЕ ВРЕМЯ
Вы можете увидеть время в городах всего мира, поворачивая головку (2) на
текущее время в одном из городов, указанных на циферблате. На рисунке справа
показано, что время в Токио 10:08, и отметку “10” на вращающемся индикаторном
кольце необходимо совместить с отметкой “TOKYO” на циферблате. Для
того чтобы определить время в других городах, просто посмотрите на
соответствующие цифры на вращающемся индикаторном кольце.
РУССКИЙ
Головка (2)
Используя кольцо всемирного времени, можно видеть время по всему миру.
Пример: Сейчас 10 часов вечера.
(1) По 24-часовой шкале это 22:00.
(2) Установите
TOKYO
на
кольце
всемирного времени в положение 22
часа по 24-часовой шкале.
TOKYO
* Кольцо всемирного времени бывает
разных типов - например, с головкой
для установки всемирного времени
или с вращающимся кольцом.
(3) Положение CHICAGO
всемирного времени
время в Чикаго.
на кольце
показывает
Кольцо
всемирного
времени
CHICAGO
24часовая шкала
* Положение, соответствующее каждой отметке на кольце всемирного
времени, показывает время в конкретных странах.
71
Используя данный метод, вы можете одновременно узнавать время в
разных странах мира, используя шкалу на кольце всемирного времени
и читая показания циферблата.
* Представлены названия крупных городов в различных странах мира.
* В некоторых странах в целях энергосбережения используется летнее
время.
* Помните, что дневное время в разных странах может быть разным (это
определяется правительством страны).
ИСПОЛЬЗОВАНИЕ ВРАЩАЮЩЕГОСЯ КОЛЬЦА ИНДИКАТОРА
емя
кш
ее
вр
РУССКИЙ
Обратите внимание, что некоторые модели оснащены вращающимся
кольцом индикатора, которое следует использовать надлежащим
образом.
Вращающееся кольцо
Поверните кольцо таким образом, чтобы
совместить метку с минутной стрелкой.
При прохождении определенного времени
Вы можете измерить истекшее время по
расстоянию между минутной стрелкой и
цифрами на вращающемся кольце индикатора.
Вы также можете установить метку на
желаемое время, чтобы напоминать себе,
сколько времени остается до условленного
те
Ис
времени.
На рисунке выше
Кольцо не может поворачиваться в
показано, что с момента,
противоположном направлении, поскольку
когда было 10:10,
оно оснащено защитным механизмом,
прошло 20 минут.
предназначенным для защиты от ошибочной
операции в результате приложения силы
или удара. Цифры на вращающемся кольце также могут упрощать
считывание текущего времени.
* В зависимости от конструкции защита от поворота в обратном
направлении и 1-минутный “щелчок” на некоторых моделях
отсутствует.
72