1
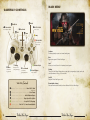
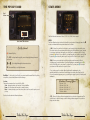
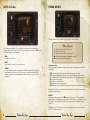
WARNING Before playing this game, read the Xbox 360® console and accessory manuals for important safety and health information. Keep all manuals for future reference. For replacement console and accessory manuals, go to www.xbox.com/support. Table of Contents Gameplay Controls . . . . . . . . . . . . . . . . . . . . . . . . . . . . . . . . 2 Main Menu . . . . . . . . . . . . . . . . . . . . . . . . . . . . . . . . . . . . 3 The Game Screen . . . . . . . . . . . . . . . . . . . . . . . . . . . . . . . . . 4 Important Health Warning About Playing Video Games Photosensitive seizures A very small percentage of people may experience a seizure when exposed to certain visual images, including flashing lights or patterns that may appear in video games. Even people who have no history of seizures or epilepsy may have an undiagnosed condition that can cause these “photosensitive epileptic seizures” while watching video games. These seizures may have a variety of symptoms, including lightheadedness, altered vision, eye or face twitching, jerking or shaking of arms or legs, disorientation, confusion, or momentary loss of awareness. Seizures may also cause loss of consciousness or convulsions that can lead to injury from falling down or striking nearby objects. Immediately stop playing and consult a doctor if you experience any of these symptoms. Parents should watch for or ask their children about the above symptoms—children and teenagers are more likely than adults to experience these seizures. The risk of photosensitive epileptic seizures may be reduced by taking the following precautions: Sit farther from the screen; use a smaller screen; play in a well-lit room; do not play when you are drowsy or fatigued. If you or any of your relatives have a history of seizures or epilepsy, consult a doctor before playing. Compass and Activation Icons . . . . . . . . . . . . . . . . . . . . . . . . . . 5 The Pip-Boy 3000 . . . . . . . . . . . . . . . . . . . . . . . . . . . . . . . . . 6 Stats Menu . . . . . . . . . . . . . . . . . . . . . . . . . . . . . . . . . . . . 7 S.P.E.C.I.A.L. . . . . . . . . . . . . . . . . . . . . . . . . . . . . . . . . . . . 8 Items Menu . . . . . . . . . . . . . . . . . . . . . . . . . . . . . . . . . . . . 9 Data . . . . . . . . . . . . . . . . . . . . . . . . . . . . . . . . . . . . . . . 10 Hardcore Mode . . . . . . . . . . . . . . . . . . . . . . . . . . . . . . . . . 11 XP and Leveling Up . . . . . . . . . . . . . . . . . . . . . . . . . . . . . . . 11 Combat . . . . . . . . . . . . . . . . . . . . . . . . . . . . . . . . . . . . . 12 V.A.T.S. . . . . . . . . . . . . . . . . . . . . . . . . . . . . . . . . . . . . . 14 Companions . . . . . . . . . . . . . . . . . . . . . . . . . . . . . . . . . . 15 Aid . . . . . . . . . . . . . . . . . . . . . . . . . . . . . . . . . . . . . . . 16 Stealth . . . . . . . . . . . . . . . . . . . . . . . . . . . . . . . . . . . . . 17 Reputation . . . . . . . . . . . . . . . . . . . . . . . . . . . . . . . . . . . 17 PEGI ratings and guidance applicable within PEGI markets only. Crime and Punishment . . . . . . . . . . . . . . . . . . . . . . . . . . . . . 18 What is the PEGI System? The PEGI age-rating system protects minors from games unsuitable for their particular age group. PLEASE NOTE it is not a guide to gaming difficulty. Comprising two parts, PEGI allows parents and those purchasing games for children to make an informed choice appropriate to the age of the intended player. The first part is an age rating: Dialogue . . . . . . . . . . . . . . . . . . . . . . . . . . . . . . . . . . . . 19 Containers . . . . . . . . . . . . . . . . . . . . . . . . . . . . . . . . . . . 20 Bartering . . . . . . . . . . . . . . . . . . . . . . . . . . . . . . . . . . . . 20 Gambling . . . . . . . . . . . . . . . . . . . . . . . . . . . . . . . . . . . . 21 Options and Preferences . . . . . . . . . . . . . . . . . . . . . . . . . . . . 24 The second is icons indicating the type of content in the game. Depending on the game, there may be a number of such icons. The age-rating of the game reflects the intensity of this content. The icons are: Connect to Xbox LIVE . . . . . . . . . . . . . . . . . . . . . . . . . . . . . . 24 Warranty Information . . . . . . . . . . . . . . . . . . . . . . . . . . . . . . 25 Technical and Customer Support . . . . . . . . . . . . . . . . . . . . . . . . 25 For further information visit http://www.pegi.info and pegionline.eu Fallout New Vegas Fallout New Vegas Main Menu Gameplay Controls Attack ] Aim/Block _ View Switch Xbox Guide Hold to Adjust Camera <Wait V.A.T.S. Mode Hold to Scan >Pause Y Jump B Pip-Boy 3000 Hold to Activate Pip-Boy Light Continue Continue playing from your most recent saved game. New Begin a new game of Fallout: New Vegas. L Move Click Down to Toggle Sneak Activate Objects lHotkeys Press up onlto change ammo type C Look Around Click Down to Pick Up/Drop Items X Reload Weapon Hold to Holster Load Allows you to select from a list of previously saved games. Settings Takes you to the Settings Menu where you can adjust your gameplay, display, audio, and control preferences. See pg. 24 for more info. Credits View the Fallout: New Vegas credits. V.A.T.S. Controls Downloadable Content View any Downloadable Content you have obtained for Fallout: New Vegas. ������������������������������������������������� Enter V.A.T.S. Mode Hold to Scan ������������������������������������������������������������� Select Target ���������������������������������������������� Switch Between Targets ������������������������������������������ Target Specific Body Parts �������������������������������������������� Accept V.A.T.S. Targeting B ��������������������������� Exit V.A.T.S., Cancel Queued Attacks 2 Fallout New Vegas Fallout New Vegas 3 The Game Screen Compass and Activation Icons Rad Meter XP Bar Action Points Hit Points Compass Damage Threshold Shield Enemy Health Bar Weapon Ammo Condition Hit Points (HP) Your overall health. When you run out of HP, your character dies. Compass The compass indicates the direction you are heading, as well as enemies, nearby locations, enemies, and quest markers. Action Points (AP) The total number of AP available is based on your character’s agility. Action Points are only used in V.A.T.S. Mode (see pg. 14) Weapon Condition (CND) The shorter the bar, the worse the condition of your weapon. Clear triangle Indicates a location that you have not yet discovered. Filled triangle Indicates a location that you have previously discovered Quest Target If you have an active quest, any quest targets will be displayed on your compass as a solid arrow. The quest target will flash faster and faster as you get closer to it. Map Marker If you have placed your own marker on the map, this will be displayed as a transparent arrow. Friend/Foe Markers People and creatures that you perceive are displayed on the compass as vertical bars. Yellow bars indicate friendly people/creatures. Red bars indicate enemies. Your Perception stat affects if you can “detect” them. Crosshair Your crosshair will change whenever you are able to interact with an object. Press A to interact with the highlighted object. Ammo The ammo for your equipped weapon. The first number is how many rounds you have before a reload, and the second number is your remaining ammo. Enemy Health Bar Shows the current health of the targeted enemy. Rad Meter Will appear whenever radiation damage is taken. XP Bar Will appear whenever experience points are earned. Damage Threshold Shield Will appear when the damage inflicted by your weapon is lower than the Damage Threshold for the armor of the enemy you’re attacking. When this appears you should switch to a more effective weapon (see pg 13). 4 Fallout New Vegas Fallout New Vegas 5 The Pip-Boy 3000 Stats Menu Rad Meter The Stats Menu has five menus: Status, S.P.E.C.I.A.L., Skills, Perks, General. Stats, Items, Data Sections Pip-Boy Controls B - Enter/exit Pip-Boy. l or L - Scroll up/down through lists; move left and right through menus in each section. ] and ^ - Cycle left/right through the three main sections. C - Pan around Maps, scroll right side menus. Rad Meter - To the top left of your Pip-Boy is a personal radiation meter that tells you how many Rads you’ve currently taken in radiation damage. Sections There are three main sections in your Pip-Boy 3000: Stats – Information about your character’s stats and abilities. Items – All of the items your character is currently carrying. Data – Contains your maps, quest info, notes, and access to any radio signals you can pick up. Each section is broken into different sub-menus. 6 Fallout New Vegas STATUS The Status Menu has basic info about the health of your character. Moving up/down on the L moves you between the three important subsections for Status: • CND – Shows the condition of each part of your character’s body indicated by a bar. The shorter the bar, the more damaged that body part is. When the bar is gone, that part is considered crippled and will appear as a dotted line. If you have any Doctor’s Bags, pressing Y will heal all of your limbs. If you have Stimpaks, you can heal a specific limb by pressing X and selecting which specific one you’d like to heal. See Aid, page 16. • RAD – Shows your current level of radiation resistance and how many total Rads of damage your character has taken. If you have RadAway in your inventory, press A to use it to flush RADs out of your system. If you have Rad-X, you can press X to increase your character’s RAD resistance for a period of time. • You can be exposed to radiation either directly from the environment, or by ingesting irradiated food and water. A small amount of radiation will not hurt you, but as your accumulated exposure goes up, you will begin to suffer ill effects (including death, eventually). Radiation Poisoning Effects * 200 rads: -1 EN * 400 rads: -2 EN, -1 AG * 600 rads: -3 EN, -2 AG, -1 ST * 800 rads: -3 EN, -2 AG, -2 ST * 1000 rads: Death! • EFF – Shows all of the positive and negative effects you character is experiencing. This could be due to radiation damage, certain clothing you have equipped, Aid you may be using, and other effects. Fallout New Vegas 7 S.P.E.C.I.A.L. Items Menu The Items Menu has five sections: Weapons, Apparel, Aid, Misc. and Ammo. Your seven primary attributes. A (-) to the right of the number indicates that attributes is suffering a negative effect, while a (+) indicates it is enjoying a boost. Check the CND section of your Status menu for more information. SKILLS Information on your skills. PERKS Special abilities you can choose every other level. GENERAL Lists your Reputation with the various factions in the Mojave Wasteland. Press X to toggle between Reputation and a list of your many accomplishments while playing the game as well as your current Karma status and level. See page 17 for more on Reputation. Menu Controls A – Equip, Unequip or Use the selected item. X – Drop the selected item. Y – Repair the selected item (see Repair, pg 13). _ – Mod the selected weapon (see Weapon Mods, pg 12). – Hot Key the selected item (see below). Item Characteristics Items in your inventory may have a number of characteristics that will appear when the item is highlighted: DAM – How much Damage the weapon does (the higher the number, the better). DPS – How much Damage the weapon does per second (the higher the number, the better). DT – The Damage Threshold (the higher the number, the better. See Armor/Apparel, page 13). WG – How much the item weighs. VAL – The item’s value in Bottlecaps. CND – The current condition of the weapon. EFFECTS – Any positive or negative effects your character will experience if the item is equipped. Weapons will also display the caliber Ammo the weapon uses along with the current rounds loaded and remaining rounds. HOTKEYS In the Inventory Menu, press and hold and press a direction on l. Then highlight the weapon, apparel, or healing item you want in that slot. Note that you can still change sections and menus in your Pip-Boy with the Hotkeys open and the item will be assigned when you release l. While playing, use l to select any of your seven Hotkeyed items. You can also press and hold l to see all your hotkeys. 8 Fallout New Vegas Fallout New Vegas 9 Data Hardcore Mode After creating your character, you will be given the choice to turn on Hardcore Mode. Separate from difficulty levels, this special way of playing the game creates a more strategic and complex experience that is tailored for more experienced Fallout players. In Hardcore Mode, you will have to eat, sleep and remain hydrated. Any damaged limbs can only be healed using Doctor’s Bags or visiting a doctor. Ammunition is given weight in hardcore mode, requiring you to closely monitor your inventory at all times. While fast traveling via the Pip-Boy does still work in Hardcore Mode, you may not fast travel if your character would die due to dehydration or starvation in the time it would take you to get there. The top portion of the Data section will always display your current location and the current date and time. The Data section includes five menus: Local Map, World Map, Quests, Notes, and Radio. You may toggle Hardcore Mode at any time via the Options menu, however in order to earn the Hardcore achievement you must play the entire game, from the point you are first prompted until the endgame sequence without ever turning it off. XP and Leveling Up LOCAL MAP The Local Map displays an overhead map of your current location, as well as any nearby doors. WORLD MAP The World Map shows an overhead map of the entire Mojave Wasteland area, and markers for any places that have been discovered during the course of your adventures. You can fast travel directly to any place you have previously visited by highlighting the location and pressing A. Move Up/Down on the L to zoom in/out on the map. Use the C to move around the map. QUESTS The Quests screen in your Pip-Boy’s Data section tracks your progress in every quest you have undertaken. To the left is a list of quests: those with bright text are active; those with darkened text have been completed or failed. Your active quest is marked by a small box. On the right-hand side of the screen are the objectives for each quest. The active objectives have bright text and are on the top of the list; the completed objectives have darkened text and are at the bottom of the list. Objectives marked as “(Optional)” are not necessary to successfully complete the quest. NOTES Contains all quest related and miscellaneous notes you find in the game, both written and audio. Press A to listen to an Audio note (the audio will continue to play even if you close your Pip-Boy menu). Press X to toggle between All Notes and only Active Quest Notes. When you reach the required number of Experience Points, you will level up automatically, so long as you’re not in combat. Every time you level up, your Health increases and you gain Skill Points to assign to your skills. You may choose a new perk for every two levels you increase. Note: When leveling up, the level for your skills is their natural level and does not include any bonuses you may be receiving due to items or Chems. RADIO All the radio signals you have discovered are listed on the Radio screen in the Data tab of your Pip-Boy. Signals listed in bright text are within range, and can be listened to. Signals listed in darkened text have been discovered, but you are no longer within range – in order to listen to one of these stations, you have to move back into the signal’s receiving range. 10 Fallout New Vegas Fallout New Vegas 11 Combat Modding Your Weapons As you make your way through the Mojave Wasteland, you may find weapon mods for sale or in various containers. Each of your weapons can accommodate up to three unique modifications, and these can add new features like enhanced zooming with a scope, additional bullets per clip, or increased damage. Modding a weapon also increases its value to merchants. To activate a mod, select the weapon in the Items list of your Pip-Boy and press _. Then select the mod you want to attach. Once a mod is attached to a weapon it is indicated with a + sign in your weapons list. You cannot remove a mod once it has been attached. Mods are specific to each individual weapon, so you cannot attach the sight for the 9mm Pistol to the .357 Magnum Revolver. MELEE AND UNARMED ATTACKS The Mojave Wasteland is a dangerous place, and combat is a fact of life for all but the most diplomatic of survivors. WEAPONS Weapons fall into several categories: ranged weapons, melee weapons, unarmed weapons, grenades and mines. Your effectiveness with any weapon depends on your character’s skills, the condition of the weapon, and the Damage Threshold of your opponents. You can attack an enemy with melee or unarmed attacks when they are within range of your character. As you increase your Melee skill, you may notice your weapons have unique moves in V.A.T.S. (see page 14 for more on V.A.T.S.). At higher levels of the Unarmed skill, you will automatically use advanced unarmed attacks while fighting. In addition, there are several unique unarmed moves that can be learned from characters throughout the Mojave Wasteland. ^: Performs a melee attack. Hold to do a power attack that does double damage. ]: Block. Blocking incoming melee attacks provides a large bonus to your damage resistance. When using any weapon, aim with your crosshair and pull ^ to attack. When using an automatic weapon, holding down ^ will continuously fire. Your character will automatically reload a weapon when you use up your current rounds, provided you have additional ammo available. To reload at any time, you can tap X. Damage is calculated by subtracting the DAM rating of the weapon you are firing against the Damage Threshold of your target’s armor. You will always cause some damage, but if you see a red shield, it means you would be better off using a different weapon. If you see a shredded shield image this means you are doing large amounts of damage to your target. Your accuracy and damage in combat is determined by your Strength level, as well as the governing skill for the type of weapon you are firing (Guns, Energy Weapons, Explosives, etc.). Weapon condition also affects how much damage is done, as well as the chance the gun jams when reloading. Repairing weapons can increase the amount of damage they do (see “Repairing Weapons and Apparel” below) and reduce the chance of your weapon jamming. Holding ] will allow you to aim and fire more accurately, but move slowly. When you are sneaking (press down on L to toggle) your character will move slowly but has a chance of a sneak attack bonus on any target that has not detected you. For more information on Stealth mode, see pg. 17. ARMOR/APPAREL Each piece of armor you wear adds to your Damage Threshold. The higher your DT, the less damage you will take from attacks. The amount of protection you receive from a piece of armor depends on the armor itself and whether the armor is in good repair. As your armor’s condition is lowered, you lose points off your Damage Threshold. Be sure to repair your armor regularly to avoid ineffective armor! Some pieces of apparel have a low Damage Threshold, but add different bonuses such as increases to Skills or Stats. REPAIRING WEAPONS AND APPAREL An item’s condition affects how well the item works, as well as its value. Weapons of lower condition will do less damage, and jam more frequently. Armor of lower condition will offer less protection. You can repair items in your Pip-Boy by selecting Repair (Y) on the item. You can only do this if you have similar items to use for parts. 12 Fallout New Vegas Fallout New Vegas 13 V.A.T.S. Companions Action Points Limb Condition Enemy Health The Vault-Tec Assisted Targeting System, or V.A.T.S., allows you to pause the game, assess any combat situation tactically, and target the specific body parts of any enemies onscreen. As you venture across the wasteland, you will encounter friendly characters who will offer to join you on your journey. At any time you can have one human (or humanoid creature, such as a mutant or ghoul) and one non-human (robot or animal) companion with you. Having a companion adds specific bonuses for each character, such as increases to the effectiveness of healing items, or stat increases. These bonuses are only in effect while that character is with you, and go away as soon as you dismiss them from your party. Limb Condition: Displays the relative health of each part of an enemy. When the bar disappears, the body part is crippled. Companions also have unique storylines to be followed as you play through the game. Get to know them and they’ll reveal more about themselves and the wasteland. AP (Action Points): This bar will deplete as you queue up attacks. The Flashing part is the amount of AP needed to do an attack. Controlling your companions Enemy Health: How much health your target has left. To bring up the Companion Wheel walk up to your party member and press A. You can then issue these commands: • Be Aggressive/Be Passive: Toggles attack states for your companion. When set to aggressive, your companion will attack any hostile target within range. When set to passive, your companion will wait for you to attack before going after targets. • Use Stimpak: Allows you to use a Stimpak from your inventory to heal your companion. The companion’s current health and maximum health are displayed here, along with the number of Stimpaks currently in your inventory. Note that companions will automatically use any healing items in their inventory when their health gets low. • Wait Here/Follow Me: Asks the companion to wait for you or follow along. You may find situations where it is best to have your companion wait for you at a distance. • Talk To: Opens up a dialog with your companion. Use this to learn more about them. Doing so will open up new quests and new abilities for you and your companions! • Back Up: Tells your companion to step back a bit. • Keep Distance/Stay Close: Sets how far away your companion walks behind you. • Open Inventory: Opens a screen where you can exchange items with your companion. Be sure to upgrade their armor and weapons as you wander the wasteland together, and keep them stocked with ammo and healing items! • Use Ranged/Use Melee: Tells your companion to switch between ranged and melee attacks. Certain companions will be better suited to one or the other fighting style. Pressing and holding will pause the game and scan the area of targets. To zoom in on an enemy, simply select enemy with C and release . You are now able to target the individual body parts of that enemy using L. When using a melee weapon or unarmed combat, you will need to be close to have a chance to hit. Both melee and grenades are “full body” attacks, and you cannot specify a specific body part. If your Melee skill is high enough, you will see a unique attack move listed on the screen. Press Y to initiate this move. Every attack on a body part uses up Action Points. Heavier weapons use more Action Points for every shot. When you’ve used up all of your Action Points, and are ready to perform the attacks, press A. Companions will follow you wherever you go and automatically aid you in combat. However for more control over them, you can use the Companion Wheel to issue commands. The number of attacks you can make is limited by your Action Points. 14 Fallout New Vegas Fallout New Vegas 15 Aid Stealth When you are hurt, there are several ways to restore your health: Your stealth state is displayed when you crouch (click L). [HIDDEN] means nobody detects you. [CAUTION] means someone is searching for you. [DANGER] means you have been detected by an enemy. • Visit a doctor and pay for healing. • Use a Stimpak, Super Stimpak, or Doctor’s Bag. • Eat food or drink water. • Sleep in a bed. Each time you take a chem or drink alcohol, your chance of becoming addicted to it goes up. If you stop using the drug for a while, this chance will drop. Each drug has its own addiction chance, so using one type will not increase your chance of becoming addicted to another. Addiction will hurt some of your S.P.E.C.I.A.L. attributes. These penalties go away temporarily if you take that drug again. A doctor can cure you of any addiction, for a price. In order to heal a crippled limb, you have three choices: sleep in a bed, find a doctor, or use a healing item to heal yourself. Stimpaks can be used for general healing (which will also slightly heal crippling damage), or they can be applied directly to a limb to heal crippling damage. Doctor’s Bags can heal multiple crippled limbs, however they are much rarer in the world than Stimpaks. To heal a crippled limb directly using a Stimpak, navigate to the Stats screen in your Pip-Boy, then select the limb and use the Stimpak directly on that limb. How stealthy you are is affected by many factors: • Sneak skill: Your Sneak skill only helps you when you are crouching. The higher your Sneak skill, the easier it is to remain undetected, steal an item, or pick someone’s pocket. • Enemy’s perception: Some enemies are less perceptive than others, and therefore less likely to detect you. • Line of sight: An enemy is much less likely to detect you if he can’t see you. • Light level: You are harder to see in darker areas. • Movement: You are hardest to detect when motionless, easiest to detect when running. • Apparel weight: Heavier apparel makes more noise when moving. • Sound: Most melee weapons make very little noise; bigger guns make a lot of noise. Successfully attacking while undetected gives you an automatic “sneak” critical. Reputation Your actions in the Mojave Wasteland contribute to your Reputation with each of the major towns and factions in the game. At any time you can check your reputation with every faction and town by going to your Pip-Boy and selecting the General tab (for more on the Pip-Boy 3000, see page 6). Reputation numbers increase and decrease as you help or harm each individual faction or major location, and you are given a title for your current status. Having a positive reputation with a faction will enable different dialog options and people will be more likely to help you. If your reputation is overly negative, members of that faction may attack you on sight. In addition to your reputation, simply wearing the uniforms of an opposing faction may affect how characters react to you. Members of one faction may decide to shoot you if you’re wearing the clothing of their hated enemy. Be careful! 16 Fallout New Vegas Fallout New Vegas 17 Crime and Punishment Dialogue Crimes are divided into two categories: major and minor. When in dialogue with a character, simply select the response that seems most appropriate to the situation... and be prepared for the character you’re talking with to react accordingly. Minor crimes cause only the victim to become hostile to you: • Theft: If the owner sees you steal something that she owns, she will try to take it back from you. If you try to escape, or persist in stealing from her, she will attack you (or run for help). If you fight back, you are now committing a major crime (Assault, see below). • Trespass: If the owner sees you open a locked door, container, or computer, he will immediately attack you. Major crimes cause the victim and the victim’s friends to become hostile to you: You may occasionally be presented with dialog options that are preceded by the name of a skill (e.g., [Sneak]) or a specific faction that you may have reputation with (e.g., [NCR]). This means the line in question is available because you possess the necessary perk or your skill/ reputation is high enough, and would not be available otherwise. If you see a line with a skill name and a set of numbers after it that highlights in red when selected (e.g., [Barter 25/50]) it means your current skill level is too low to be successful with this line of dialog. The first number represents your skill level, the second represents the level needed to be successful. You may reach that level by taking Chems, reading skill magazines or other temporary means. Note that there are never any long-lasting effects to failing skill dialog options, so you can always try again later. • Assault: Attacking someone without provocation, or fighting back when someone attacks you for a minor crime. • Murder: If there are witnesses who care about the victim, they will become hostile to you. If a fight starts that you did not intend, you can attempt to yield by holstering your weapon. This may or may not be successful depending on how the attacker feels about you. 18 Fallout New Vegas Fallout New Vegas 19 CONTAINERS Gambling On the New Vegas strip and elsewhere, you will find casinos and bars that are more than happy to take your hard-earned caps away from you. Outcomes are affected by your Luck stat. Note that Casinos may require you to exchange your caps for in-house chips before letting you gamble in their establishment. Blackjack The goal of Blackjack is to have the sum total of your cards higher than the dealer’s up to 21. Going over 21 is a “bust” and results in that player losing the hand. Numbered cards are equal to their face value, with face cards (jack, king, queen) valued at 10, and aces at either 1 or 11. Containers include things like dead bodies, desks, boxes, lockers, and more. To see what’s inside a container, direct your Crosshair over the object and press A. If the rollover text is red, someone else owns the container, and taking anything from the container is stealing, and a crime if you are detected. Your inventory is displayed on the left, the container’s is on the right. You can switch between the two lists using ] and ^. Use L or l to filter the lists (All, Weapons, Apparel, Aid, Misc, Ammo). You can take things from the container, or move them from your inventory into the container, by selecting an item in either list and pressing A. Scroll up and down in lists with L or l. Press X to take everything from a container. The B button closes the container. Warning! Don’t leave things in containers you don’t own! They may not be there when you come back for them! Bartering The Barter screen allows you to trade, buy or sell items. The prices you get for buying or selling depend on your Barter skill. To Barter, simply select an item and hit A to move it from your inventory into the other person’s (if you want to sell or trade one of your own items) or from the other person’s inventory into your own (if you want to buy or trade for one of their items). As items are moved back and forth, caps will also be automatically moved between both parties. This is represented by the large “caps” arrow in the middle. If the arrow is darkened, it means one of you doesn’t have enough caps to complete the transaction. You cannot accept the barter if you don’t have enough caps. But you can accept it if the other person doesn’t have enough, but at this point, you are giving items away for free. 20 Fallout New Vegas Payout rules vary from casino to casino throughout the wasteland. Controls To play, activate the Blackjack table. Choose your bet by using ] and ^ to raise or lower the amount, or pressing X to choose the maximum bet for that table. Place your bet by hitting Y. Once your bet is placed, you will receive your cards. At this point you can make one of several moves: • Hit: Press A to receive another card. • Stay: Press B to end your hand. • Surrender: Press X to cede the round to the dealer and receive half of your bet back (note that not all casinos in the Mojave Wasteland support this option). • Split: If you receive two identical cards, you can press ^ to split your hands and double your bet. You will then receive two new cards, one for each hand. The green arrow indicates the currently selected hand. Press ] to switch between your hands. • Double Down: After being dealt two cards, you can double your bet and receive one (and only one) additional card. Slot Machines Slot Machines are as basic as gambling gets. Put down your money and spin the wheel. Controls To activate a Slot Machine, just walk up to it and press A. Once you’ve chosen a machine, set your bet by increasing or decreasing the amount with ] and ^ (or choose the maximum by hitting X) and press A to give it a spin. You can also check the payout list of the current machine by pressing Y. Fallout New Vegas 21 Roulette In Roulette, gamblers put their money down however they like before a ball is placed on the wheel and spins until it stops, landing on one of the numbers. Payouts are given according to where the ball lands. Controls To activate a Roulette table, walk up to it and press A. The next step is to place your bet (or bets, as it were). Move your cursor around the layout using L. As you pass over each area, you will see the details of the bet and the payout in the upper left corner of the screen. You can choose to bet on an exact number, a group of two or four numbers, a bank of 12 or 18 numbers, all even or odd numbers, or the colors red or black. To place a bet, choose the amount using ] and ^, and place your chips down by pressing A. You may place up to 10 bets per round. When you have placed all of your bets, press X to spin the wheel and try your luck. Caravan Out in the wasteland, the game of choice is Caravan. Created by caravan guards using whatever cards they could find lying around, this is a one-on-one card game played with a cobbled together deck of loose playing cards. Building a Deck Caravan decks are comprised of at least 30 cards from one or more traditional playing card sets. The deck may have any number of cards of any type, although it cannot have duplicate cards from the same source deck. A balanced deck has a mixture of numerical and face cards, with the specific balance tailored to the player’s personal style. Rules Caravan is played with players building three opposing piles (or “caravans”) of numbered cards. The goal is to outbid your opponent’s caravan with the highest value of numbered cards without being too light (under 21) or overburdened (over 26). The game begins with each player taking eight cards from their deck and placing one numerical card (or ace, valued at 1) on each caravan. Players may not discard during this initial round. Once both players have started their three caravans, each player may do one of the following on their turn: •Play one card and draw a new card from his or her deck to their hand. •Discard one card from their hand and draw a new card from his or her deck. •Disband one of their three caravans by removing all cards (numeric and face) from that pile. Caravans have a direction (either ascending or descending numerically) and a suit. The suit is determined with the first card placed on a caravan, the direction by the second. All subsequent cards must continue the numerical direction or match the suit of the previous card. Cards of the same numerical value cannot be played in sequence, regardless of suit. Face cards can be attached to numeric cards in a caravan, either on one of player’s own or one of their opponent’s and affect them in various ways. 22 Fallout New Vegas Card values: • Joker - Played against A, 2-10. Effects change based on whether it is an ace or numbered card (see below). Multiple jokers may be played on the same card. • Ace - Value of 1. Jokers played on aces remove all other non-face cards of the ace’s suit from the table. E.g. a joker played on an ace of spades removes all spades (except face cards and that card, specifically) from the table. • 2-10 - Listed value. Jokers played on these cards remove all other cards of this value from the table. E.g. a joker played on a 4 of hearts removes all 4s (other than that card, specifically) from the table. • Jack - Played against A, 2-10. Removes that card, along with any face cards attached to it. • Queen - Played against A, 2-10. Reverses the current direction of the hand, changes the current suit of the hand. Multiple queens may be played on the same card. • King - Played against A, 2-10. Adds the value of that card again. E.g. a king played on a 9 adds 9 to that hand. Multiple kings may be played on the same card for multiplicative effects. E.g. 4 + king = 8. 4 + two kings = 16. Winning A player’s caravan is considered sold when the value of its cards is over 20 and under 27, however the other player may still outbid by increasing the value of their opposing pile (while still staying within the 21 – 26 range). When each of the three competing caravans has sold, the game is over. In the event that one of the three caravan values are tied between players, the game continues until all three caravans have sold. The player with two or more sales wins the pot. Controls Certain NPCs in the Mojave Wasteland will offer to play you in a game of Caravan. In dialog, challenge them in a game to start playing. Betting The first phase is betting. Here you can see the amount your opponent has put down listed in the lower left hand corner, along with your current bet and your total funds. Press A to meet your opponent’s wager, or X to raise them. When you’ve completed your bet, press Y to exit and move to the next phase. Building a Deck Before playing a game of Caravan, you can first create or modify your deck. The top row of cards represents the contents of your deck. On the second row are all the cards you own. Navigate through the cards with L, and add to your deck by pressing A. You can remove cards from your deck using X. You can also randomize a deck by pressing . When you have built a deck, press Y to move on to the next phase. Playing the Game When it’s your turn, select a card from your hand using L. Press A to choose a card. Choose the position for the card (either as a part or modifier to your own Caravan, or as a modifier to one of your opponent’s cards) and press A to place the card. The numbers in the middle of the screen show the current value of each player’s Caravans. Fallout New Vegas 23 Options and Preferences Warranty Information You can access the Options Menu from the Main Menu when you load Fallout: New Vegas or at any point during the game, by pressing the > button. The Options Menu allows you to adjust your gameplay, audio, video, and control settings, and gives you access to the Download option. ZeniMax Europe Limited guarantees to the original purchaser of this computer software product that the disk/cartridge supplied with this product shall not show any fault during the first 90 days from the date of receipt of ownership. In the first instance please return the faulty product to the point of purchase, along with any proof of purchase. If for any reason this is not possible then please return the product to ZeniMax Europe Limited at the address below along with any proof of purchase, location of purchase, a statement describing the fault and any original packaging you may have. ZeniMax Europe Limited will reimburse the postage costs of returning any faulty products. This warranty is in addition to and does not affect your existing statutory rights regarding the product and your statutory rights are in no way restricted or affected by this warranty. If you require further advice regarding your statutory rights then please contact your local consumer affairs office or a lawyer. GAMEPLAY Using this menu, you can adjust several game settings: • Kill Cam Mode: This changes the slow-motion effect when killing the last of a group of enemies. By default this is set to “Cinematic” which is a third person, sweeping camera movement. Other options are “Player View” which slows down time without changing perspective, or “None” which turns the feature off entirely. • Hardcore Mode: Hardcore Mode is a much more difficult way of playing Fallout: New Vegas. For more information on Hardcore Mode, see page 11. • Difficulty: Separate from Hardcore Mode is the difficulty level of the gameplay. These range from Very Easy to Very Hard. This setting affects the amount of damage your attacks do to enemies and how much damage you take when hit. It also modifies how much experience you earn when killing enemies. • Save on Rest/Wait/Travel: These options set whether or not the game saves automatically when each of these actions are performed. By default they are set to “On”. • True Iron Sights: This toggles the level with which the camera zooms in when looking down your weapon’s sight in combat. Turning it off will have the camera zoom in but leave the crosshair on-screen for targeting. ZeniMax Europe Ltd. Skypark – 9th Floor 8 Elliot Place Glasgow, G3 8EP United Kingdom DISPLAY Adjust the Brightness slider with this menu. If you have certain TVs (e.g. DLP or LCD projection) or play in a bright room we recommend increasing the brightness. You can also adjust the Pip-Boy colors, HUD Opacity, and Subtitles. AUDIO Use this menu to adjust volume levels. Note the Radio has its own volume setting for your Pip-Boy. CONTROLS In this menu you can adjust Vertical and Horizontal Sensitivity, and Invert the Y Axis. You can also reassign the Action Mapping for the game’s controls. Xbox LIVE Xbox LIVE® is your connection to more games, more entertainment, more fun. Go to www.xbox.com/live to learn more. Connecting Before you can use Xbox LIVE, connect your Xbox 360 console to a high-speed Internet connection and sign up to become an Xbox LIVE member. For more information about connecting, and to determine whether Xbox LIVE is available in your region, go to www.xbox.com/live/countries. Family Settings These easy and flexible tools enable parents and caregivers to decide which games young game players can access based on the content rating. Parents can restrict access to mature-rated content. Approve who and how your family interacts with others online with the Xbox LIVE service, and set time limits on how long they can play. For more information, go to www.xbox.com/familysettings. Fallout New Vegas Technical and Customer Support For technical and customer support, please call +44 203 0270982, UK opening hours: 8:00am to 7:00pm Monday to Friday with the exception of UK public holidays, and Saturday from 09:00 am to 5:00pm, email [email protected] or visit www.bethsoft.com. For warranty claims send your game disc to ZeniMax Europe Limited, Skypark – 9th Floor, 8 Elliot Place, Glasgow, G3 8EP, United Kingdom, together with a dated proof of purchase, your product number, a brief description of the error or defect, and your return address. Fallout New Vegas Fallout®: New Vegas™ © 2010 Bethesda Softworks LLC, a ZeniMax Media company. Bethesda, Bethesda Softworks, ZeniMax and related logos are registered trademarks or trademarks of ZeniMax Media Inc. in the U.S. and/or other countries. Fallout, Fallout: New Vegas and related logos are trademarks or registered trademarks of Bethesda Softworks LLC in the U.S. and/or other countries. Developed in association with Obsidian Entertainment Inc. Obsidian and related logos are trademarks or registered trademarks of Obsidian Entertainment Inc. Uses Havok™. © Copyright 1999-2010 Havok.com Inc. (or its licensors). All Rights Reserved. See www.havok.com for details. Portions of this software utilize SpeedTree technology. © 2001-2004 Interactive Data Visualization, Inc. SpeedTree® is a registered trademark of Interactive Data Visualization, Inc. All rights reserved. Uses Bink Video. Copyright © 1997-2009 by RAD Game Tools, Inc. Uses Gamebryo software © 1999-2006 Emergent Game Technologies. All rights reserved. FaceGen from Singular Inversions, Inc. FaceFX software used for facial animation. © 2002-2006, OC3 Entertainment, Inc. and its licensors. All Rights Reserved. KINECT, Xbox, Xbox 360, Xbox LIVE, and the Xbox logos are trademarks of the Microsoft group of companies and are used under license from Microsoft.