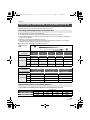
1
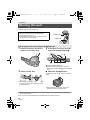
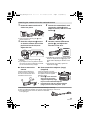
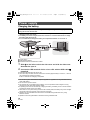
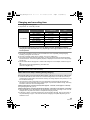
HX-A100_VQT4X90_mst.book 1 ページ 2013年1月22日 火曜日 午後8時8分 Basic Operating Instructions Wearable Camera Model No. HX-A100 Please read these instructions carefully before using this product, and save this manual for future use. This document explains basic operations of the unit. For more detailed explanation, please refer to “Operating Instructions (PDF format)” which is recorded in the enclosed CD-ROM. VQT4X90 GN until 2013/2/28 HX-A100_VQT4X90_mst.book 2 ページ 2013年1月22日 火曜日 午後8時8分 Information for Your Safety WARNING: To reduce the risk of fire, electric shock or product damage, ≥ Do not let water or other liquids drip or splash inside the unit. ≥ Do not expose accessories (battery pack, battery charger, AC adaptor, SD memory card and etc.) to rain, moisture, dripping or splashing. ≥ Do not place objects filled with liquids, such as vases, on accessories. ≥ Use only the recommended accessories. ≥ Do not remove covers. ≥ Do not repair this unit by yourself. Refer servicing to qualified service personnel. CAUTION! To reduce the risk of fire, electric shock or product damage, ≥ Do not install or place this unit in a bookcase, built-in cabinet or in another confined space. Ensure this unit is well ventilated. ≥ Do not obstruct this unit’s ventilation openings with newspapers, tablecloths, curtains, and similar items. ≥ Do not place sources of naked flames, such as lighted candles, on this unit. This unit is intended for use in moderate climates. For E only ∫ EMC Electric and magnetic compatibility This symbol (CE) is located on the rating plate. Product Identification Marking is located on the bottom of the unit. 2 VQT4X90 ∫ Cautions for use Keep this unit as far away as possible from electromagnetic equipment (such as microwave ovens, TVs, video games etc.). ≥ If you use this unit on top of or near a TV, the pictures and/or sound on this unit may be disrupted by electromagnetic wave radiation. ≥ Do not use this unit near cell phones because doing so may result in noise adversely affecting the pictures and/or sound. ≥ Recorded data may be damaged, or pictures may be distorted, by strong magnetic fields created by speakers or large motors. ≥ Electromagnetic wave radiation generated by microprocessors may adversely affect this unit, disturbing the pictures and/or sound. ≥ If this unit is adversely affected by electromagnetic equipment and stops functioning properly, press the reset button. Do not use this unit near radio transmitters or high-voltage lines. ≥ If you record near radio transmitters or high-voltage lines, the recorded pictures and/ or sound may be adversely affected. About connecting to a PC ≥ Do not use any other USB cables except the supplied one. HX-A100_VQT4X90_mst.book 3 ページ 2013年1月22日 火曜日 午後8時8分 Declaration of Conformity (DoC) Hereby, “Panasonic Corporation” declares that this product is in compliance with the essential requirements and other relevant provisions of Directive 1999/5/EC. Customers can download a copy of the original DoC to our R&TTE products from our DoC server: http://www.doc.panasonic.de Contact to Authorized Representative: Panasonic Marketing Europe GmbH, Panasonic Testing Centre, Winsbergring 15, 22525 Hamburg, Germany This product is intended for general consumer. (Category 3) This product on purpose to connect to access point of 2.4 GHz WLAN. 3 VQT4X90 HX-A100_VQT4X90_mst.book 4 ページ 2013年1月22日 火曜日 午後8時8分 -If you see this symbol- ∫ Information for Users on Collection and Disposal of Old Equipment and used Batteries These symbols on the products, packaging, and/or accompanying documents mean that used electrical and electronic products and batteries should not be mixed with general household waste. For proper treatment, recovery and recycling of old products and used batteries, please take them to applicable collection points, in accordance with your national legislation and the Directives 2002/96/ EC and 2006/66/EC. By disposing of these products and batteries correctly, you will help to save valuable resources and prevent any potential negative effects on human health and the environment which could otherwise arise from inappropriate waste handling. For more information about collection and recycling of old products and batteries, please contact your local municipality, your waste disposal service or the point of sale where you purchased the items. Penalties may be applicable for incorrect disposal of this waste, in accordance with national legislation. For business users in the European Union If you wish to discard electrical and electronic equipment, please contact your dealer or supplier for further information. [Information on Disposal in other Countries outside the European Union] These symbols are only valid in the European Union. If you wish to discard these items, please contact your local authorities or dealer and ask for the correct method of disposal. Note for the battery symbol (bottom two symbol examples): This symbol might be used in combination with a chemical symbol. In this case it complies with the requirement set by the Directive for the chemical involved. Cd 4 VQT4X90 HX-A100_VQT4X90_mst.book 5 ページ 2013年1月22日 火曜日 午後8時8分 Contents ∫ How to open the Operating Instructions (PDF format) When you insert the CD-ROM and open the [INDEX.pdf] in the CD-ROM, the Operating Instructions list will be displayed. Click the document name of the Operating Instructions you would like to open. ≥ Adobe Reader is required to view the PDF file. Please download it from the homepage of Adobe Systems Incorporated. Information for Your Safety......................2 (Important) About the Waterproof/ Dustproof................................................... 6 Accessories...............................................9 Read this first ..........................................10 What you can do with this unit .............. 11 Preparation Wearing this unit..................................... 12 Power supply........................................... 14 Charging the battery ......................... 14 Charging and recording time............. 15 Recording to a card ................................ 16 Cards that you can use with this unit .................................................... 16 Inserting/removing a microSD card ................................................... 16 Turn this unit on/off ................................ 17 Wi-Fi® function........................................ 18 Connecting directly with a smartphone .............................................19 Installing Image App.......................... 19 Connecting this unit with a smartphone ....................................... 19 Starting Image App............................ 20 Setting up with Setup Wizard ................ 21 Setting date and time.............................. 22 Basic Recording ................................................23 Recording motion pictures ................ 23 Recording still pictures ...................... 23 Playback ..................................................24 Others Recordable time/Number of recordable pictures.................................................... 25 Requests when disposing of this unit ...... 26 Specifications ......................................... 28 About copyright ...................................... 29 Limited Warranty (ONLY FOR AUSTRALIA) ....................... 30 For United Kingdom and Ireland customers ∫ Sales and Support Information Customer Communications Centre ≥ For customers within the UK: 0844 844 3899 ≥ For customers within lreland: 01 289 8333 ≥ Monday–Friday 9:00 am – 5:00 pm (Excluding public holidays). ≥ For further support on your product, please visit our website: www.panasonic.co.uk Direct Sales at Panasonic UK ≥ Order accessory and consumable items for your product with ease and confidence by phoning our Customer Communications Centre Monday–Friday 9:00 am – 5:00 pm (Excluding public holidays). ≥ Or go on line through our Internet Accessory ordering application at www.pas-europe.com. ≥ Most major credit and debit cards accepted. ≥ All enquiries transactions and distribution facilities are provided directly by Panasonic UK. ≥ It couldn’t be simpler! ≥ Also available through our Internet is direct shopping for a wide range of finished products. Take a browse on our website for further details. 5 VQT4X90 HX-A100_VQT4X90_mst.book 6 ページ 2013年1月22日 火曜日 午後8時8分 (Important) About the Waterproof/ Dustproof Waterproof/Dustproof Performance This unit’s waterproof/dustproof rating complies with the “IP58” rating. Provided the care and maintenance guidelines described in this document are strictly followed, this unit can operate underwater, to a depth not exceeding 1.5 m for a time not exceeding 30 minutes. * This does not guarantee no destruction, no malfunction, or waterproofing in all conditions. * This means that this unit can be used underwater for specified time in specified pressure in accordance with the handling method established by Panasonic. ∫ Handling of this unit ≥ Waterproofing is not guaranteed if the unit is subject to an impact as a result of being hit or dropped etc. If an impact to this unit occurs, it should be inspected (subject to a fee) by a Panasonic’s Service Centre to verify that the waterproofing is still effective. ≥ The waterproof performance may be degraded due to the strong water pressure when this unit is used deeper than 1.5 m underwater. ≥ When this unit is splashed with detergent, soap, hot spring, bath additive, sun oil, sun screen, chemical, etc., wipe it off immediately. ≥ Do not rinse with running water, such as tap water. ≥ Waterproof function of this unit is for sea water and fresh water only. ≥ Any malfunction caused by customer misuse, or mishandling will not be covered by the warranty. ≥ Cards are not waterproof. Do not handle with a wet hand. Also, do not insert wet card into this unit. ≥ Do not open or close the side cover when your hands are wet or water droplets are present on this unit. Failure to do so may lead to damage such as rusty terminals caused by water droplets. ≥ Foreign objects may adhere to the inner side of the side cover (around the rubber seal or connecting terminals) when the side cover is opened or closed in places with sand or dust etc. If you close the side cover with foreign objects adhering to it, water may enter the inside. Be very careful because doing so may cause malfunctions. ≥ Do not leave this unit for a long period of time in places where temperature is very low (at high altitude etc.) or very high (inside a car under strong sunlight, close to a heater, on the beach, etc.) Waterproof performance may be degraded. ≥ The inside of this unit is not waterproof. Water leakage will cause malfunction. ≥ If any foreign object has adhered to the inner side of the side cover, remove it. ≥ If any liquid such as water droplets has adhered to this unit or inner side of the side cover, wipe off with a soft dry cloth. Do not open or close the side cover near the water, when underwater, using wet hands, or when this unit is wet. It may cause water leakage. 6 VQT4X90 HX-A100_VQT4X90_mst.book 7 ページ 2013年1月22日 火曜日 午後8時8分 ∫ When inner side of the lens is fogged (condensation) Condensation may occur and the inner side of the lens may be fogged when this unit is moved to a warm area from a cold area, such as at high altitude. It is not a malfunction or failure of this unit. It may be caused by the environment in which this unit is used. ≥ Be careful of condensation since it causes lens stains, fungus and unit malfunction. What to do when inner side of the lens is fogged ≥ Turn off this unit and open the side cover in a place with constant ambient temperature, away from high temperatures, humidity, sand and dust. The fog will disappear naturally in about 2 hours with the side cover open when the temperature of this unit gets close to the ambient temperature. ≥ Contact Panasonic’s Service Centre if the fogging does not disappear. Check before using underwater Do not open or close the side cover in places with sand and dust, close to water, or with wet hands. Sand or dust adhering may cause water leaks. 1 Open the side cover. Slide the LOCK switch A to the left to unlock the side cover. B: Unlocked when the red indicator is visible 2 Slide the side cover downward to open it. 1 B A 2 Check that there are no foreign objects on the inner side of the side cover. ≥ If there are any foreign objects, such as lint, hair, sand, etc., on the surrounding area, water will leak within a few seconds causing malfunction. 3 If there is foreign matter adhering to the unit, remove it. ≥ Be extremely careful to remove any sand etc. that may adhere to the sides and corners of the rubber seal. ≥ Wipe it off with a dry soft cloth if there is any liquid. It may cause water leaks and malfunction if you use this unit with liquid adhered. 4 Check for cracks and deformation of the rubber seal on the side cover. ≥ The integrity of the rubber seals may decrease after about 1 year, with use and age. To avoid permanently damaging this unit the seals should be replaced once every two years. Please contact Panasonic’s Service Centre for related costs and other information. 5 Close the side cover securely. 1 2 Close the side cover and slide it upward. Slide the LOCK switch to the right to lock the side cover. ≥ Lock securely to the points where the red portion of the LOCK switch is no longer visible. ≥ Securely close it until it clicks. ≥ To prevent water seeping into this unit, be careful not to trap foreign objects such as liquids, sand, hair or dust etc. 7 VQT4X90 HX-A100_VQT4X90_mst.book 8 ページ 2013年1月22日 火曜日 午後8時8分 Using this unit underwater ≥ Use this unit underwater at a depth of down to 1.5 m with the water temperature between 0 oC and 35 oC. ≥ Do not use this unit at a depth of over 1.5 m. ≥ Do not use it in hot water over 35 oC (in a bath or hot spring). ≥ Do not use this unit underwater not longer than 30 minutes continuously. ≥ Do not open or close the side cover. ≥ Do not apply shock to this unit underwater. (Waterproof performance may not be maintained, and there is a chance of water leak.) ≥ Do not dive into the water holding this unit. Do not use this unit in a location where the water will splash strongly, such as rapid flow or waterfall. (Strong water pressure may be applied, and it may cause malfunction.) ≥ This unit will sink in the water. Take care not to drop this unit. Caring for this unit after using it underwater Do not open or close the side cover until the sand and dust is removed by rinsing the camera with water. Make sure to clean the camera after using it. ≥ Thoroughly wipe off any water droplets, sand, and saline matter on your hands, body, hair, etc. ≥ It is recommended to clean the camera indoors, avoiding places where water spray or sand may fall. Do not leave this unit uncared for longer than 60 minutes after using it underwater. ≥ Leaving this unit with foreign objects or saline matter on it may cause damage, discolouration, corrosion, unusual odour, or deterioration of the waterproof performance. 1 Rinse with water with the side cover closed. ≥ After use at the seaside or underwater, soak the unit in fresh water pooled in a shallow container for about 10 minutes. 2 Drain water by holding this unit and shaking it lightly a few times. ≥ After using this unit at the seaside or underwater, or after washing it, water will remain at the speaker site or mic site of this unit for a while and it may cause lower sound or sound distortion. ≥ Pay careful attention to prevent this unit from dropping. 3 Wipe off water drops on this unit with a soft, dry cloth and dry this unit in a shaded area that is well ventilated. ≥ Dry this unit approx. 1 hour or more. ≥ Dry this unit on a dry cloth. ≥ Do not dry this unit with hot air from dryer or similar. It will deteriorate the waterproof performance or cause failure due to deformation. ≥ Do not use chemicals such as benzine, thinner, alcohol or cleanser, soap or detergents. 4 Confirm that there are no water droplets, open the side cover, and wipe off any water droplets or sand left inside using a soft, dry cloth. ≥ Water droplets may adhere to the card, etc. when the side cover is opened without thoroughly drying. Also, water may accumulate in the gap around the card slot or the terminal connector. Be sure to wipe any water off with a soft, dry cloth. ≥ The water droplets may seep into this unit when the side cover is closed while it is still wet, causing condensation or failure. In case water enters this unit, stop the use and consult your dealer. Malfunctions resulting from water leakage due to wrong handling by customers are not subject to compensation. 8 VQT4X90 HX-A100_VQT4X90_mst.book 9 ページ 2013年1月22日 火曜日 午後8時8分 Accessories Check the accessories before using this unit. Keep the accessories out of reach of children to prevent swallowing. Product numbers correct as of January 2013. These may be subject to change. Earhook* VYK6C87 (Including Adjuster (Small)) Adjuster (Large) Adjuster (Large): VGQ1L74 Adjuster (Small): VGQ1L38 * Join the earhook parts together before use. Slide the adjuster (small) A into the opening beneath the tabs B and C and push it in until it clicks into place. Armband Case Extended Band VFC4920 Optional accessories USB cable K2KYYYY00221 Multi Mount (VW-MKA100) CD-ROM Software CD-ROM Operating Instructions VFF1187 9 VQT4X90 HX-A100_VQT4X90_mst.book 10 ページ 2013年1月22日 火曜日 午後8時8分 Read this first ∫ About recording formats and compatibility of this unit ≥ This unit is an MP4 format (MPEG-4 AVC file standard) Wearable Camera for recording highdefinition motion pictures. ≥ AVCHD and MPEG2 motion pictures are different formats, and are not therefore supported by this unit. ∫ About the portrait rights Be sure to pay special attention to the privacy, the portrait rights, etc. of the subject when you use this unit. Use it at your own risk. ∫ Indemnity about recorded content Panasonic does not accept any responsibility for damages directly or indirectly due to any type of problems that result in loss of recording or edited content, and does not guarantee any content if recording or editing does not work properly. Likewise, the above also applies in a case where any type of repair is made to this unit. ∫ About the clock setting Make sure to set date and time before recording. (l 22) ∫ For the purposes of these Operating Instructions ≥ Pictures may be slightly different from the original. ≥ Depending on the firmware version you are using, captured screens described in these operating instructions may differ from the actual screens. ≥ Names, icons, contents and services of applications may be changed with no prior notice. Please note that they may differ from the descriptions of these operating instructions. ≥ microSD Memory Card and microSDHC Memory Card are referred to as the “microSD card”. ≥ Smartphone and tablet computer are referred to as the “smartphone”. ≥ Pages for reference are indicated by an arrow, for example: l 00 ∫ Cards that you can use with this unit microSD Memory Card and microSDHC Memory Card 10 VQT4X90 HX-A100_VQT4X90_mst.book 11 ページ 2013年1月22日 火曜日 午後8時8分 What you can do with this unit You can enjoy a variety of functions by connecting this unit to a smartphone or an access point. For detail, refer to the Operating Instructions. (PDF format) DLNA-compatible devices Playback on DLNA-compatible devices You can play back the contents stored in this unit on the DLNA-compatible devices. Connecting to Access Point Live broadcasting *1 Using the “LUMIX CLUB” and USTREAM services, you can broadcast live motion pictures. LUMIX CLUB USTREAM Image App Connecting direct to the smartphone*2 XXXXX XXXXX XXXXX ≥ Live view ≥ Facebook ≥ YouTube™, etc. ≥ Remote control ≥ Playback ≥ Deletion/Copy ≥ Data uploading to web services Recording*3 *1 *2 *3 Once you make the settings, you can perform a live broadcast with only the button operation on this unit from the next time on. The functions available for the direct connection to the smartphone are also available for the connection via an access point. You can record motion pictures or still pictures without connecting to the smartphone. 11 VQT4X90 HX-A100_VQT4X90_mst.book 12 ページ 2013年1月22日 火曜日 午後8時8分 Preparation Preparation Wearing this unit Wear the main unit and camera unit. ≥ If you have felt discomfort after a long period of use, stop the use or loosen the tight fit by slightly loosening the adjuster, etc. ≥ For the direction of the camera, check the actual image on the Live view screen. Camera unit Main unit Fastening the main unit using the Armband Case 1 Insert so that you can see the buttons on the main unit. 2 If the band is not long enough, attach the extended band C. 3 A: Hook and loop fastener ≥ Attach by passing the tip of the armband through the buckle portion B of the extended band. Fasten to your arm. ∫ About the Armband Case The Armband Case can be used as a portable holder. ≥ When fastening the main unit, try not to drop the camera unit to avoid a shock and try not to scratch the lens. ≥ When fastening to your arm, remove the camera unit from the armband case. ≥ When removing the camera/main unit from the Armband Case, avoid pulling the camera/main unit connection cable. ≥ You can use an optional Multi Mount (VW-MKA100) for a variety of scenes. 12 VQT4X90 HX-A100_VQT4X90_mst.book 13 ページ 2013年1月22日 火曜日 午後8時8分 Attaching the camera unit to the earhook to wear 1 2 Insert the camera unit until it clicks into place. UP Loosen the camera/main unit connection cable B to the shape of an ear, and fit it in the holder C. L ≥ Insert so that the projecting part A of the camera will face up. 3 Hook the earpieces D to ears so that the camera unit will be positioned on the left, and adjust the size. UP 4 L Hold the camera attachment portion F , and adjust the direction of the lens. UNLOCK ≥ Adjust by slowly pulling the adjuster E sideways. ≥ If you adjust in such a way that the camera unit comes into close contact with the cheek, you can record less blurry images. LOCK ≥ If the direction of the lens cannot be changed, loosen the adjustment knob G slightly and tighten it after adjusting the direction of the lens. ≥ If the camera unit is shaky, tighten the adjustment knob G. ∫ How to remove the camera ∫ How to attach the adjuster (Large) (supplied) Hold the camera attachment portion as shown in the figure, and remove the camera unit in the direction of the arrow. When the earhook is too tight, remove the adjuster of the earhook, and replace it with the supplied adjuster (Large). 2 Press H in the direction of the arrow using the supplied adjuster (Large) to pull out the attached adjuster. Insert the both side of supplied adjuster (Large) until it clicks into place. (l 9) PUSH 1 ≥ Do not touch the lens or pull the cable while attaching or removing. ≥ When you adjust the adjuster, do so slowly without applying too much force. ≥ If the adjustment knob comes off, attach it as indicated in the right figure. 13 VQT4X90 HX-A100_VQT4X90_mst.book 14 ページ 2013年1月22日 火曜日 午後8時8分 Power supply Charging the battery When this unit is purchased, the battery is not charged. Charge the battery fully before using this unit for the first time. ≥ This unit has a built-in rechargeable lithium-ion battery. Do not remove except when disposing of this unit. (l 26) ≥ The battery will not be charged if this unit is turned on. Connect it with the PC to charge the battery after turning it off. ≥ It is recommended to charge the battery in a temperature between 10 oC and 30 oC. B C A A: LOCK switch B: USB cable (supplied) C: Unlocked when the red indicator is visible 1 Slide A to the left to unlock the side cover and slide the side cover downward to open it. 2 Connect the USB terminal of this unit to a PC with the USB cable B (supplied). ≥ Insert the USB cable securely all the way. ≥ The Power lamp will flash red at an interval of 2 seconds (approximately 1 second on, 1 second off), indicating that charging has begun. It will turn off when the charging is completed. ≥ Do not use any other USB cables except the supplied one. (Operation is not guaranteed with any other USB cables.) ≥ Do not heat or expose to flame. ≥ Do not leave the unit (including built-in battery) in a car exposed to direct sunlight for a long period of time with doors and windows closed. ≥ If operating time is short even after fully charging the battery, the battery is worn out and needs to be replaced. Please contact your dealer. ≥ When the PC is in a power saving mode such as a standby state, the battery may not be charged. Cancel the power saving mode, and connect this unit again. ≥ Operation is not guaranteed when devices are connected through USB hubs or by using extension cables. ≥ Operation cannot be guaranteed on all devices having a USB terminal. 14 VQT4X90 HX-A100_VQT4X90_mst.book 15 ページ 2013年1月22日 火曜日 午後8時8分 Charging and recording time ∫ Charging/Recording time ≥ Temperature: 25 oC/humidity: 60%RH Charging time Recording mode Actual recordable time 1920k1080/50p 2h 1h 1920k1080/25p 2 h 30 min 2 h 20 min 1 h 15 min 1 h 10 min 2 h 45 min 2 h 55 min 1 h 25 min 1 h 30 min 1280k720/100fps 2h 2 h 15 min 1h 1 h 10 min 640k360/200fps 2 h 30 min 1 h 15 min 1280k720/50p 4 h 30 min Maximum continuous recordable time 1280k720/25p 640k360/25p 1920k1080/50fps ≥ These times are approximations. ≥ The indicated charging time is for when the battery has been discharged completely. Charging time and recordable time vary depending on the usage conditions such as high/ low temperature. ≥ The actual recordable time refers to the recordable time when repeatedly starting/stopping recording, turning this unit on/off, etc. ≥ The main unit heats up after use or charging. This is not a malfunction. ≥ The power lamp flashes (Flashing with approx. 0.5 second period) when the remaining battery time becomes low. The remaining battery capacity is displayed on the screen when using Image App (l 19). ≥ For information about charging with a mobile USB charger or an AC adaptor, check the support site. http://panasonic.jp/support/global/cs/e_cam/index.html (This site is English only.) The mains plug is the disconnecting device. Install this unit so that the mains plug can be unplugged from the socket outlet immediately. When the Power lamp is flashing during charging Flashing with approx. 0.5 second period (off for approx. 0.25 second, on for approx. 0.25 second): ≥ Check that the USB terminals of this unit or the connecting device, such as PC are not dirty or covered with a foreign object, and reconnect correctly. If a foreign object or dirt is present, turn off this unit before removing. ≥ The environment is at an extremely high or low temperature. Wait until the temperature has returned to an appropriate level and try charging again. If you are still unable to charge, there may be a fault in this unit or the connecting device. Flashing with approx. 2 second period (off for approx. 1 second, on for approx. 1 second): During charging normally (l 14) Flashing with approx. 4 second period (off for approx. 2 seconds, on for approx. 2 seconds): ≥ When the battery is over discharged or the temperature of the battery is too high or low. It can be charged, but it may take a few hours to complete the charging normally. ≥ It will flash in approx. 2 second intervals when normal charging resumes. Even in such cases, it may start flashing in approx. 4 second intervals until charging is completed depending on the conditions of use. 15 VQT4X90 HX-A100_VQT4X90_mst.book 16 ページ 2013年1月22日 火曜日 午後8時8分 Recording to a card This unit can record motion pictures or still pictures to a microSD card. Cards that you can use with this unit Use microSD Memory Card (512 MB/1 GB/2 GB) or microSDHC Memory Card (4 GB/8 GB/ 16 GB/32 GB) conforming to Class 4*2 or higher of the SD Speed Class Rating*1 for motion picture recording. ≥ Operation of microSD cards other than described above is not guaranteed. *1 SD Speed Class Rating is the speed standard regarding continuous writing. Check via the label on the card, etc. e.g.: *2 Use microSD cards conforming to Class 6 or higher of the SD Speed Class Rating for “Slow motion mode”. If you use microSD cards conforming to Class 4 or less of that, the recording may stop suddenly. ≥ Please check the latest information on the support website below. http://panasonic.jp/support/global/cs/e_cam/index.html (This website is in English only.) ≥ Keep the Memory Card out of reach of children to prevent swallowing. Inserting/removing a microSD card Caution: Check that the access lamp A has gone off. ≥ When this unit is accessing the microSD card (such as recognition, recording, playback and deletion), the access lamp lights up. A C B C: Unlocked when the red indicator is visible 1 D Slide the LOCK switch B to the left to unlock the side cover and slide the side cover downward to open it and then insert (remove) the microSD card into (from) the card slot. ≥ Face the terminal side D upward and press it straight in as far as it will go. ≥ Press the centre of the microSD card and then pull it straight out. 2 Close the side cover and slide the LOCK switch B to the right to lock it. ≥ Close the side cover and slide it upward and then lock it. ≥ Securely close it until it clicks. 16 VQT4X90 HX-A100_VQT4X90_mst.book 17 ページ 2013年1月22日 火曜日 午後8時8分 When using a microSD card not from Panasonic, or one previously used on other equipment, for the first time on this unit, format the microSD card. When the microSD card is formatted, all of the recorded data is deleted. Once the data is deleted, it cannot be restored. ≥ When the microSD card is removed, a notification sound rings, and the access lamp flashes fast. (a state in which a microSD card is not inserted) ≥ Do not touch the terminals on the back of the microSD card. ≥ Do not apply strong shocks, bend, or drop the microSD card. ≥ Electrical noise, static electricity or the failure of this unit or the microSD card may damage or erase the data stored on the microSD card. ≥ Do not expose the terminals of the microSD card to water, dirt or dust. ≥ Do not place microSD cards in the following areas: j In direct sunlight j In very dusty or humid areas j Near a heater j Locations susceptible to significant difference in temperature (condensation can occur.) j Where static electricity or electromagnetic waves occur ≥ About disposing of or giving away the microSD card. (Refer to the Operating Instructions (PDF format)) ∫ About the access lamp ≥ When the access lamp is lit, do not: j Remove the microSD card j Turn this unit off j Insert and remove the USB cable j Expose this unit to vibrations or shock Performing the above while the lamp is on may result in damage to data/microSD card or this unit. Turn this unit on/off Press the power button to turn on this unit. The power lamp is turned on. To turn off this unit Hold down the power button until the power lamp goes off. Proceed to “Connecting directly with a smartphone” (l 19) and “Setting up with Setup Wizard” (l 21) to finish the setup of this unit. You can enjoy the functions of this unit after finishing the setup. 17 VQT4X90 HX-A100_VQT4X90_mst.book 18 ページ 2013年1月22日 火曜日 午後8時8分 Wi-Fi® function ∫ Use this unit as a wireless LAN device When using equipment or computer systems that require more reliable security than wireless LAN devices, ensure that the appropriate measures are taken for safety designs and defects for the systems used. Panasonic will not take any responsibility for any damage that arises when using the camera for any purpose other than as a wireless LAN device. ® ∫ Use of the Wi-Fi function of this unit is presumed to be in countries where this unit is sold There is the risk that this unit violates the radiowave regulations if used in countries other than those where this unit is sold, and Panasonic takes no responsibility for any violations. ∫ There is the risk that data sent and received via radio waves may be intercepted Please note that there is the risk that data sent and received via radio waves may be intercepted by a third party. ∫ Do not use the camera in areas with magnetic fields, static electricity or interference ≥ Do not use this unit in areas with magnetic fields, static electricity or interference, such as near microwave ovens. Radio waves may not reach the camera. ≥ Using the camera near devices such as cordless telephones or any other wireless LAN device that use the 2.4 GHz radio wave band may cause a decrease in performance in both devices. ∫ Do not connect to the wireless network you are not authorised to use Do not attempt to connect to the wireless networks that you are not authorised to use (SSID*) as it may be considered as unauthorised access. * SSID refers to the name of device that is used to identify a network over a wireless LAN connection. If the SSID matches for both devices, transmission is possible. ∫ Before use To use a Wi-Fi function with this unit, you need an access point or destination device equipped with a wireless LAN function. ≥ Do not connect to the wireless LAN connection via unknow wireless access point. ≥ Use a IEEE802.11b, IEEE802.11g or IEEE802.11n compatible device when using an access point. ≥ When using an access point, we strongly recommend that you set a encryption to maintain information security. ≥ Before sending motion pictures or still pictures, we recommend you charge the battery fully. ≥ When sending data on a mobile network or tethering, high packet communication fees may be incurred depending on the details of your contract. ≥ This unit may not connect to an access point depending on the radio wave condition. ≥ When using the Wi-Fi function, do not cover the Wi-Fi transmitter with your hand. ≥ The Wi-Fi transmitter may become warm when using the Wi-Fi function; however this is not a sign of a malfunction. 18 VQT4X90 HX-A100_VQT4X90_mst.book 19 ページ 2013年1月22日 火曜日 午後8時8分 Connecting directly with a smartphone Installing Image App The Image App is an application for the smartphone provided by Panasonic. Required Operating Systems for Image App The following Operating Systems of the smartphone are supported. AndroidTM device: iOS device: Android 2.2 to Android 4.2 iOS 4.3 to iOS 6.0 ≥ The service may not be able to be used properly depending on the type of smartphone being used. For compatible devices, see the following support site. http://panasonic.jp/support/global/cs/e_cam/index.html (This Site is English only.) 1 2 Connect your device (Android or iOS) to a network. 3 4 Enter “Panasonic Image App” into the search box. Android device: Select “Play Store”. iOS device: Select “App StoreSM”. Select “Image App” and install it. ≥ The icon will be added to the menu. Connecting this unit with a smartphone Connecting with a WPS-compatible smartphone Please read the manual of your smartphone and check if the smartphone is compatible with WPS*. ≥ If your smartphone is not compatible with WPS, connect this unit with the smartphone according to “Selecting SSID of this unit to connect with a smartphone”. (l 20) * WPS stands for “Wi-Fi Protected SetupTM”. 1 Press the Wi-Fi/WPS button continuously to change the Wi-Fi mode lamp to [ ]. ≥ The Wi-Fi mode lamp [ 2 ] flashes. Set the Wi-Fi function to ON on the smartphone setup menu. ≥ Refer to the manual of your smartphone. 3 Press and hold the Wi-Fi/WPS button for 3 seconds or more. ≥ The Wi-Fi mode lamp [ 4 ] flashes faster. Select the connection using the WPS button (or WPS function) in the Wi-Fi settings of the smartphone within 3 minutes. ≥ Wi-Fi mode lamp [ ] will turn on when the connection is completed. 19 VQT4X90 HX-A100_VQT4X90_mst.book 20 ページ 2013年1月22日 火曜日 午後8時8分 Selecting SSID of this unit to connect with a smartphone Select this unit's SSID (Wireless network name) on a smartphone and enter password to connect with the smartphone. ≥ Change the default SSID and password after completing the first setting. (l 21) 1 Press the Wi-Fi/WPS button continuously to change the Wi-Fi mode lamp to [ ]. ≥ The Wi-Fi mode lamp [ 2 ] flashes. Set the Wi-Fi function to ON on the smartphone setup menu. ≥ Refer to the manual of your smartphone. 3 Tap the SSID of this unit (below) on the Wi-Fi network screen of the smartphone . ≥ Password entry screen is displayed. 4 Enter password (below). ≥ Wi-Fi mode lamp [ ] will turn on when the connection is completed. Default setting SSID: Password: A100-wearable paR9We58n ≥ Wi-Fi mode and Wi-Fi mode lamp will turn off if this unit cannot be connected with the smartphone in approx. 30 minutes. Retry the connection setting from the Step1. ≥ If this unit and the smartphone are too far apart from each other when making the settings, the connection may not be established. Move the devices closer to each other before making the settings. ≥ Even if you have changed the SSID/password, the default SSID/password (above) are restored when you initialise the network settings. We recommend you keep this manual in a safe place. Starting Image App Start Image App. ≥ When the [Date & time] screen appears, perform the clock setting. (l 22) 20 VQT4X90 HX-A100_VQT4X90_mst.book 21 ページ 2013年1月22日 火曜日 午後8時8分 Setting up with Setup Wizard After making the settings according to the setup wizard screens, you can use the main functions of this unit. Proceed to complete the setup by following the on-screen instructions. ≥ The setup wizard is displayed at the time of purchase and after a long period of non-use during which the battery ran down. 1 Synchronize the time of this unit with that of smartphone. ≥ Once the clock is set, recording, live broadcasting, and other functions of this unit can be used correctly. ≥ It may take approximately 60 seconds to synchronize the time of the smartphone with that of this unit. 2 Change the SSID and password for this unit. ≥ If the default SSID and password for this unit are used, a third party may obtain compromised information or use the SSID and password for unlawful purposes. Make sure to change the SSID and password. ≥ We recommend you periodically change the SSID and password for this unit. ≥ Set a password different from an SSID. Avoid setting a password that can be easily guessed, and set the one consisting of both alphabetic and numeric characters. ≥ If a new SSID and password have been written down on a piece of paper, etc., manage them so that they will not be compromised. ≥ When the SSID and password for this unit are set to the default ones, the setup wizard is displayed. ≥ Change the SSID and password for this unit. j Enter an SSID consisting of alphanumeric characters and/or symbols. The length must be between 1 to 32 characters. j Enter a password consisting of both alphabetic and numeric characters. The length must be between 8 to 64 characters. j When connecting to the smartphone after changing the SSID and password, connect with a new SSID and password. 3 Make the connection settings for the access point mode to use devices connected to a wireless router, etc. ≥ Enter the SSID and password (authentication key) of the access point. ∫ When connecting by (If the device is Android) 1 Tap . 2 Tap the wireless access point to connect. 3 Enter password. ≥ This allows you to operate this unit via an access point using your smartphone. 4 Make the connection destination settings for a live broadcast. ≥ Enter the SSID and password (authentication key) of the access point. Up to three access points can be registered. Register the access point you use, such as the wireless router in your home or the mobile router you use outside. ≥ The settings can also be made from the Image App menu. ≥ You can perform a live broadcast by setting the following. j Make the live broadcast settings. For detail, refer to the Operating Instructions. (PDF format) For compatible access points, see the following support site. http://panasonic.jp/support/global/cs/e_cam/index.html (This Site is English only.) 21 VQT4X90 HX-A100_VQT4X90_mst.book 22 ページ 2013年1月22日 火曜日 午後8時8分 Acquire a USTREAM ID/Password/Program using a smartphone or a PC. About the USTREAM With this video-sharing website, you can stream and watch motion pictures this unit is recording. Refer to the USTREAM site for details. http://www.ustream.tv/ About “LUMIX CLUB” Refer to the “LUMIX CLUB” site for details. http://lumixclub.panasonic.net/eng/c/ To use the Live broadcast, access following website. http://lumixclub.panasonic.net/eng/c/ ≥ Refer to the Operating Instructions (PDF format) for how to play back on a DLNA-compatible TV or broadcast a motion picture. Setting date and time The clock of this unit is synchronised with that of the smartphone. Synchronise to adjust the clock, etc. When you start Image App connecting with this unit for the first time, a message asking you to set the date and time will appear. (This message will also be displayed if this unit remains unused for a long period of time.) Perform Steps 2 below to set the date and time. Preparation: 1 2 Tap Connect this unit with the smartphone and start Image App. (l 19) # [Camera setup]. Tap [Date & time]. ≥ When you want to adjust the clock, change the time of the smartphone first, and then synchronise the time with this unit. ≥ It may take approximately 60 seconds to synchronize the time of the smartphone with that of this unit. ≥ When the built-in clock battery runs down, the clock setting returns to the default state. When the battery of this unit is in a charged state, the built-in clock battery is also charged automatically. If you leave the battery in this unit in a charged state for approximately 24 hours, the built-in clock battery stores the clock setting for approximately 4 months. ≥ The setting range from 1 January 2013 through 31 December 2039 is available for time synchronisation with the smartphone. 22 VQT4X90 HX-A100_VQT4X90_mst.book 23 ページ 2013年1月22日 火曜日 午後8時8分 Basic Basic Recording Record motion pictures or still pictures using the smartphone as a remote control. ≥ For details, refer to the help of the Image App. Preparation: Connect this unit with the smartphone and start Image App. (l 19) 1080/25p Angle of view Select Standard or Wide mode. Live view Displays an image from the camera of this unit. ≥ Also outputs sound from the microphone of this unit. XXXXX Motion picture recording icon Still picture recording icon Recording motion pictures 1 Tap . ≥ This unit is set to the recording mode. 2 Tap the motion picture recording icon to start. ≥ Starts recording. 3 Tap the motion picture recording icon again to stop recording. ≥ Stops recording. Recording still pictures 1 Tap . ≥ This unit is set to the recording mode. 2 Tap the still picture recording icon to record still picture. ≥ Updating Live view images may stop while recording still pictures. ∫ About recording with this unit You can record images using this unit without any connection with this unit, turning the Wi-Fi mode off. ≥ Motion pictures and still pictures cannot be recorded at the same time. Recording start/ stop button Photoshot button 23 VQT4X90 HX-A100_VQT4X90_mst.book 24 ページ 2013年1月22日 火曜日 午後8時8分 Playback Motion pictures or still pictures stored in this unit are played back with the smartphone. ≥ For more information, refer to the help of the Image App. Preparation: 1 Tap Connect this unit with the smartphone and start Image App. (l 19) . ≥ Thumbnails of motion picture or still picture stored in this unit are displayed. 2 Tap ( ). ∫ For playing back motion pictures 3 4 Tap MP4. Tap the thumbnail of motion picture you want to play back. ≥ Motion picture playback screen is displayed. 5 Tap the playback icon on the screen to play back motion pictures. ≥ Tapping or dragging the slide bar will start playback from the desired position of a motion picture file. A A: Slide bar ∫ For playing back still pictures 3 4 Tap JPEG. Tap the thumbnail of still picture you want to play back. ≥ Still picture playback screen is displayed. ≥ Dragging (Flicking) to right or left will play back the next or previous still picture. ∫ To copy the data stored in this unit to the smartphone Copy using "Picture Share" settings. ≥ For "Picture Share" settings, refer to the Operating Instructions. (PDF format). 24 VQT4X90 HX-A100_VQT4X90_mst.book 25 ページ 2013年1月22日 火曜日 午後8時8分 Others Others Recordable time/Number of recordable pictures microSD cards are only mentioned with their main memory size. Recording modes/approximate recordable time ≥ The default setting is [1920k1080/25p] Mode. ≥ The stated times are the approximate recordable times for continuous recording. ≥ The recordable time may be reduced if recording with a lot of action is recorded or recording of short scene is repeated. ≥ Maximum continuously recordable time: 6 hours ≥ The recording is paused once when the continuous recording time exceeds 6 hours, and the recording will automatically resume after a few seconds. A: Favours image quality, B: Favours Recording time Normal shooting mode Picture size/ Frame rate 1920k1080/ 50p Transfer rate (VBR) 4 GB microSD card 1920k1080/ 25p 1280k720/ 50p 1280k720/ 25p 640k360/25p Max.28 Mbps Average 15Mbps Average 15Mbps Average 9Mbps Average 3Mbps 19 min 35 min 35 min 1h 3h 8 GB 40 min 1 h 10 min 1 h 10 min 2h 6h 16 GB 1 h 20 min 2 h 20 min 2 h 20 min 4 h 10 min 12 h 32 GB 2 h 40 min 4 h 40 min 4 h 40 min 8 h 20 min 25 h Slow motion mode Picture size/ Frame rate 1920k1080/50fps 1280k720/100fps 640k360/200fps Average 15Mbps Average 9Mbps Average 3Mbps 4 GB 15 min 13 min 21 min 8 GB 30 min 27 min 45 min 16 GB 1h 55 min 1 h 30 min 32 GB 2h 1 h 50 min 3h Transfer rate (VBR) microSD card Approximate number of recordable pictures ≥ The number of recordable pictures depends on the subject being recorded. Picture size 5.3M (3072k1728) 3M (2304k1296) 4 GB 1100 1600 8 GB 2200 3400 microSD card 16 GB 4500 6500 32 GB 8500 13500 25 VQT4X90 HX-A100_VQT4X90_mst.book 26 ページ 2013年1月22日 火曜日 午後8時8分 Requests when disposing of this unit When disposing of your used products, remove the battery built into this unit after initialising the network settings, and please cooperate in recycling of the battery. Please refer to page 27 about how to remove the battery. ≥ Please make sure that the battery is disposed of at an officially assigned location, if there is one in your country. Do not disassemble this unit other than when disposing of this unit. This is the rechargeable battery for this unit. Do not use other than with this unit. Do not charge the rechargeable battery when it has been removed. ≥ Do not place in fire or heat it. ≥ Do not puncture with nails, subject it to impact, disassemble or modify it. ≥ Do not touch metal to the r and s terminals. ≥ Do not store or carry together with necklaces or hairpins, etc. ≥ Do not heat in microwaves or ovens, etc. ≥ Do not charge, use or leave in hot places such as next to fires or in extremely hot weather. ≥ Do not put into water. This may cause leaking, overheating, fire or rupture. ≥ If a leak should occur, by no means touch the liquid with bare hands. If the liquid gets on the body or clothes, wash well with water. If the liquid gets into your eyes, there is a danger of blindness. Do not rub the eyes; after washing immediately with clean water, consult your physician. Keep removed screws etc. out of the reach of small children. If accidentally ingested there will be adverse physical effects. ≥ Should you suspect that such an object has been ingested, consult your physician immediately. Battery used for this unit Name: Nominal voltage: 26 VQT4X90 Lithium ion (Li-ion) rechargeable battery DC 3.7 V HX-A100_VQT4X90_mst.book 27 ページ 2013年1月22日 火曜日 午後8時8分 How to remove the battery 4 When disposing of your used products, delete personal information from this unit by initialising the network settings. Remove the 4 screws indicated in the figure below, and remove the heatsink E. This figure describes the disposal of this unit, it is not instruction for repair. If disassembled, repair is not possible. ≥ Disassemble after the battery runs out. ≥ If it cannot be removed smoothly, contact Panasonic’s Service Centre. ≥ Keep disassembled parts out of reach of children. 1 5 Remove the connector F of the camera unit, and lift up the circuit board. Open the side cover, and remove all of the 6 screws indicated in the figure below. ≥ Use a cross-slot screwdriver (commercially available). 6 2 Remove the circuit board on the front side (button side) of this unit, and remove the flexible circuit board A. 3 Remove the battery by using a screwdriver. Regarding the handling of used batteries ≥ Insulate the terminals with cellophane tape or similar. ≥ Do not disassemble. After pulling out the built-in battery connector B, pull out the flexible circuit board C, and pull out the speaker connector D upwards. 27 VQT4X90 HX-A100_VQT4X90_mst.book 28 ページ 2013年1月22日 火曜日 午後8時8分 Specifications Wearable camera Information for your safety Power source: 3.7 V (When using battery)/5.0 V (When using USB) Power consumption: Recording; 3.8 W Charging; 5.3 W Motion picture recording format (Normal shooting mode/Slow motion mode): MPEG-4 AVC file format compliant (.MP4) ≥ For picture size, recordable time and transfer rate of a motion picture, refer to page 25. Motion picture compression: MPEG-4 AVC/H.264 Audio compression: AAC, 128 kbps Still picture recording format: JPEG (Design rule for Camera File system, based on Exif 2.2 standard) ≥ For picture size of a still picture and number of recordable pictures, refer to page 25. Recording media: microSD Memory Card (512 MB/1 GB/2 GB), microSDHC Memory Card (4 GB/8 GB/16 GB/32 GB) Image sensor: 1/4.1 type (1/4.1z) 1MOS image sensor Total; Approx. 3320 K Effective pixels (Motion picture/Still picture); Approx. 2800 K (Wide mode), Approx. 1620 K (Standard mode/Image stabilizer: Off), Approx.1310 K (Standard mode/Image stabilizer: On) (16:9) Lens: F2.5 mm Focal length; 1.68 mm Field of view; Approx.160° (Wide mode) Approx.117° (Standard mode/Image stabilizer: Off) Approx.104° (Standard mode/Image stabilizer: On) Minimum focus distance; Approx. 30 cm Shutter speed: 1/25 to 1/12000 Image stabilizer function: Electronic image stabilizer Level shot function: Available Microphone: MONO 28 VQT4X90 Minimum required illumination: Approx. 6 lx Approx. 1 lx with the Color Night Rec function Wireless transmitter: Compliance standard; IEEE802.11b/g/n Frequency range used; Central frequency 2412 MHz to 2462 MHz [11ch] Encryption method; Wi-Fi compliant WPA™/ WPA2™/WEP Access method; Infrastructure mode USB: Reader function microSD card; Read only (No copyright protection support) Battery charging function (Charges from USB terminal when the main unit is off) Hi-Speed USB (USB 2.0), USB terminal Type micro-B Dimensions: Camera unit; 26 mm (W)k26.5 mm (H)k66 mm (D) Main unit; 59.5 mm (W)k94 mm (H)k25 mm (D) Mass: Camera unit; Approx.30 g (Excluding the cable portion) Main unit; Approx. 117 g [without a microSD card (optional)] Mass in operation: Approx. 167 g [with a microSD card (optional)] Operating temperature: 0 oC to 40 oC Operating humidity: 10%RH to 80%RH Waterproof/Dustproof performance: Equivalent to IEC 60529 “IP58” Battery operation time: See page 15 HX-A100_VQT4X90_mst.book 29 ページ 2013年1月22日 火曜日 午後8時8分 About copyright ∫ Carefully observe copyright laws Recording of pre-recorded tapes or discs or other published or broadcast material for purposes other than your own private use may infringe copyright laws. Even for the purpose of private use, recording of certain material may be restricted. ∫ Licenses ≥ microSDHC Logo is a trademark of SD-3C, LLC. ≥ Microsoft®, Windows® and Windows Vista® are either registered trademarks or trademarks of Microsoft Corporation in the United States and/or other countries. ≥ Microsoft product screen shot(s) reprinted with permission from Microsoft Corporation. ≥ IBM and PC/AT are registered trademarks of International Business Machines Corporation of the U.S. ≥ Intel®, Pentium®, Celeron® and Intel® Core™ are trademarks of Intel Corporation in the U.S. and/or other countries. ≥ AMD Athlon™ is a trademark of Advanced Micro Devices, Inc. ≥ iMovie, Mac and Mac OS are trademarks of Apple Inc. registered in the U.S. and other countries. ≥ App Store is a service mark of Apple Inc. ≥ Android and YouTube are trademarks or registered trademarks of Google Inc. ≥ Facebook® is a trademark of Facebook, Inc. ≥ The Wi-Fi CERTIFIED Logo is a certification mark of the Wi-Fi Alliance. ≥ The Wi-Fi Protected Setup Mark is a mark of the Wi-Fi Alliance. ≥ “Wi-Fi”, “Wi-Fi Protected Setup”, “WPA” and “WPA2” are marks or registered marks of the Wi-Fi Alliance. ≥ DLNA, the DLNA Logo and DLNA CERTIFIED are trademarks, service marks, or certification marks of the Digital Living Network Alliance. ≥ Other names of systems and products mentioned in these instructions are usually the registered trademarks or trademarks of the manufacturers who developed the system or product concerned. This product is licensed under the AVC patent portfolio license for the personal and non-commercial use of a consumer to (i) encode video in compliance with the AVC Standard (“AVC Video”) and/or (ii) decode AVC Video that was encoded by a consumer engaged in a personal and non-commercial activity and/or was obtained from a video provider licensed to provide AVC Video. No license is granted or shall be implied for any other use. Additional information may be obtained from MPEG LA, LLC. See http://www.mpegla.com. This product incorporates the software licensed under the GNU General Public License Version 2.0 (GPL V2.0), the GNU LESSER General Public License Version 2.1 (LGPL V2.1) or the other open source software licenses. A copy of the corresponding source code licensed under GPL V2.0 or LGPL V2.1 is available to you in response to your request. For the detailed terms and conditions thereof and the contact information, please refer to the Operating Instructions shown in the attached Operating Instructions CD-ROM. 29 VQT4X90 HX-A100_VQT4X90_mst.book 30 ページ 2013年1月22日 火曜日 午後8時8分 Limited Warranty (ONLY FOR AUSTRALIA) Panasonic Warranty 1. The product is warranted for 12 months from the date of purchase. Subject to the conditions of this warranty Panasonic or its Authorised Service Centre will perform necessary service on the product without charge for parts or labour, if in the opinion of Panasonic, the product is found to be faulty within the warranty period. 2. This warranty only applies to Panasonic products purchased in Australia and sold by Panasonic Australia or its Authorised Distributors or Dealers and only where the products are used and serviced within Australia or it's territories. Warranty cover only applies to service carried out by a Panasonic Authorised Service Centre and only if valid proof of purchase is presented when warranty service is requested. 3. This warranty only applies if the product has been installed and used in accordance with the manufacturer’s recommendations (as noted in the operating instructions) under normal use and reasonable care (in the opinion of Panasonic). The warranty covers normal domestic use only and does not cover damage, malfunction or failure resulting from use of incorrect voltages, incorrect installation, accident, misuse, neglect, build-up of dirt or dust, abuse, maladjustment of customer controls, mains supply problems, thunderstorm activity, infestation by insects or vermin, tampering or repair by unauthorised persons (including unauthorised alterations), introduction of sand, humidity or liquids, commercial use such as hotel, office, restaurant, or other business or rental use of the product, exposure to abnormally corrosive conditions or any foreign object or matter having entered the product. 4. This warranty does not cover the following items unless the fault or defect existed at the time of purchase: (a) Cabinet Part(s) (e) DVD, Blu-ray or Recordable Discs (b) Video or Audio Tapes (f) Video / Audio Heads from wear and tear in normal use (c) SD cards or USB devices (g) Information stored on Hard Disk Drive, USB stick or SD card (d) User replaceable Batteries (h) DTV reception issues caused by TV Aerial / Cabling / Wall socket(s) etc 5. Some products may be supplied with Ethernet connection hardware. The warranty is limited on such products and will not cover (a) Internet and or DLNA connection / setup related problems (b) Access fees and or charges incurred for internet connection (c) The use of incompatible software or software not specifically stipulated in the product operations manual; and (d) Any indirect or consequential costs associated with the incorrect use or misuse of the hardware, its connection to the internet or any other device. 6. To claim warranty service, when required, you should: Telephone Panasonic’s Customer Care Centre on 132600 or visit our website referred to below and use the Service Centre Locator for the name/address of the nearest Authorised Service Centre. Send or take the product to a Panasonic Authorised Service Centre together with your proof of purchase receipt as a proof of purchase date. Please note that freight and insurance to and / or from your nearest Authorised Service Centre must be arranged by you. Note that home or pick-up/delivery service is available for the following products in the major metropolitan areas of Australia or the normal operating areas of the nearest Authorised Service Centres: Plasma/LCD televisions / displays (screen size greater than 103 cm) 7. The warranties hereby conferred do not extend to, and exclude, any costs associated with the installation, de-installation or re-installation of a product, including costs related to the mounting, de-mounting or remounting of any screen, (and any other ancillary activities), delivery, handling, freighting, transportation or insurance of the product or any part thereof or replacement of and do not extend to, and exclude, any damage or loss occurring by reason of, during, associated with, or related to such installation, de-installation, re-installation or transit. Panasonic Authorised Service Centres are located in major metropolitan areas and most regional centres of Australia, however, coverage will vary dependant on product. For advice on exact Authorised Service Centre locations for your product, please telephone our Customer Care Centre on 132600 or visit our website and use the Service Centre Locator. In addition to your rights under this warranty, Panasonic products come with consumer guarantees that cannot be excluded under the Australian Consumer Law. If there is a major failure with the product, you can reject the product and elect to have a refund or to have the product replaced or if you wish you may elect to keep the goods and be compensated for the drop in value of the goods. You are also entitled to have the product repaired or replaced if the product fails to be of acceptable quality and the failure does not amount to a major failure. If there is a major failure in regard to the product which cannot be remedied then you must notify us within a reasonable period by contacting the Panasonic Customer Care Centre. If the failure in the product is not a major failure then Panasonic may choose to repair or replace the product and will do so in a reasonable period of time from receiving notice from you. THIS WARRANTY CARD AND THE PURCHASE DOCKET (OR SIMILAR PROOF OF PURCHASE) SHOULD BE RETAINED BY THE CUSTOMER AT ALL TIMES If you require assistance regarding warranty conditions or any other enquiries, please visit the Panasonic Australia website www.panasonic.com.au or contact by phone on 132 600 If phoning in, please ensure you have your operating instructions available. Panasonic Australia Pty. Limited ACN 001 592 187 ABN 83 001 592 187 1 Innovation Road, Macquarie Park NSW 2113 PRO-031-F11 Issue: 4.0 30 VQT4X90 01-01-2011 HX-A100_VQT4X90_mst.book 31 ページ 2013年1月22日 火曜日 午後8時8分 31 VQT4X90 HX-A100_VQT4X90_mst.book 32 ページ 2013年1月22日 火曜日 午後8時8分 EU Pursuant to the applicable EU legislation Panasonic Marketing Europe GmbH Panasonic Testing Centre Winsbergring 15, 22525 Hamburg, Germany Panasonic Corporation Web site: http://panasonic.net © Panasonic Corporation 2013 VQT4X90 F0113MT0 ( 9000 )