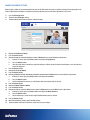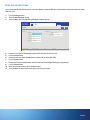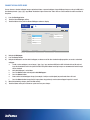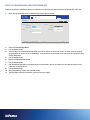
1
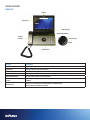
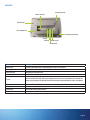
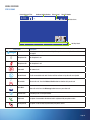
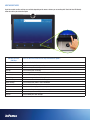
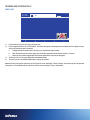
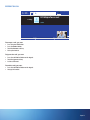
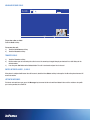
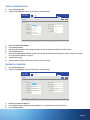
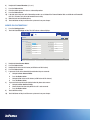
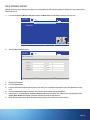
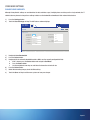
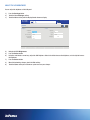
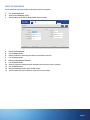
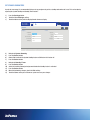
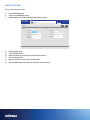
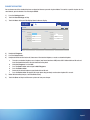
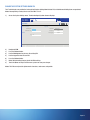
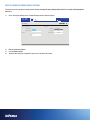
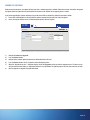
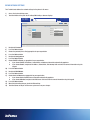
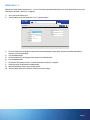
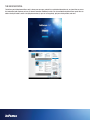
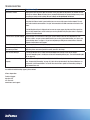
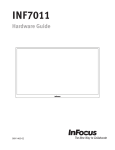
CONTENTS Phone Overview..................................................................................................................................................................................................4 Front Side....................................................................................................................................................................................................4 Back Side....................................................................................................................................................................................................5 Control Panel...............................................................................................................................................................................................6 Phone Capabilities and Requirements.........................................................................................................................................................8 Menu Overview...................................................................................................................................................................................................9 Status Icons.................................................................................................................................................................................................9 Use the Soft Keys......................................................................................................................................................................................10 Navigate the Menu System.......................................................................................................................................................................11 Incoming and Outgoing Calls............................................................................................................................................................................12 Make a Call................................................................................................................................................................................................12 Respond to a Call.......................................................................................................................................................................................13 Hold and Resume Calls..............................................................................................................................................................................14 Transfer Calls.............................................................................................................................................................................................14 Switch between Lines 1, 2, and 3..............................................................................................................................................................14 Listen to Messages....................................................................................................................................................................................14 Turn Call Forwarding On/Off......................................................................................................................................................................15 Program Call Forwarding...........................................................................................................................................................................15 Answer Calls Automatically.......................................................................................................................................................................16 Turn Do Not Disturb On/Off........................................................................................................................................................................17 Missed Calls.....................................................................................................................................................................................................18 Review Missed Calls..................................................................................................................................................................................18 Clear Call History.......................................................................................................................................................................................18 Add a Personal Contact ...................................................................................................................................................................................19 Review Status Information...............................................................................................................................................................................20 Other User Settings .........................................................................................................................................................................................21 Change Phone Bandwidth.........................................................................................................................................................................21 Adjust the LCD Brightness.........................................................................................................................................................................22 Adjust the Screensaver.............................................................................................................................................................................23 Set Standby Parameters............................................................................................................................................................................24 Adjust the Ring Volume.............................................................................................................................................................................25 Adjust the Key Tone...................................................................................................................................................................................26 Change the Ring Tone................................................................................................................................................................................27 Change the Camera Settings.....................................................................................................................................................................28 Define Date and Time Settings..................................................................................................................................................................28 Change the Wallpaper Image.....................................................................................................................................................................30 Administrative/IT Features...............................................................................................................................................................................31 Access the System Settings menu............................................................................................................................................................31 Define the Provisioning Mode and Authentication Code............................................................................................................................32 Page 1 Change the System Settings Admin PIN....................................................................................................................................................33 Reset the Phone to Factory Default Settings.............................................................................................................................................34 Upgrade the Software................................................................................................................................................................................35 Define Network Settings............................................................................................................................................................................36 Define Lines #1 - 3....................................................................................................................................................................................37 The InFocus Portal............................................................................................................................................................................................38 Maintenance.....................................................................................................................................................................................................39 Clean the LCD screen................................................................................................................................................................................39 Clean the phone.........................................................................................................................................................................................39 Troubleshooting................................................................................................................................................................................................40 Appendix...........................................................................................................................................................................................................41 Declaration of Conformity..........................................................................................................................................................................41 Safety Information.....................................................................................................................................................................................43 Warranty....................................................................................................................................................................................................44 Page 3 PHONE OVERVIEW FRONT SIDE Camera LCD screen Soft key LEDs Speaker/Microphone Handset and cord USB 2.0 Port SD slot Control Panel Feature Description Camera Use for video calls. The camera can be adjusted up and down 20°. LCD screen Displays video calls and menu functions. Handset and cord Provides audio for calls that use the handset. Soft key LEDs Touching the blue LED located directly below a soft key activates the soft key option. Speaker/Microphone Provides audio for hands-free conversations. USB 2.0 Port SD slot Use to import wallpaper images and ring tones. The SD slot is also used for upgrading the phone’s firmware. Control Panel Use for accessing the menu, selecting features and making calls. See the Control Panel Overview section. BACK SIDE Power cord jack Security Lock slot USB 2.0 Port Rear Support Leg Handset cord routing PC jack LAN jack Handset jack Headset jack Feature Description USB 2.0 Port Use with a USB thumb drive to import wallpaper images and ring tones. Rear Support Leg Use to raise and lower the phone’s height. Power cord jack Connection for the power cord. Security Lock slot Use with a security cable system. PC jack Connect an Ethernet (RJ45) cable to your computer to create a daisy-chain between the network, the phone and the computer, simplifying cabling and utilizing the integrated Ethernet switch in the phone. LAN jack Connect an Ethernet (RJ45) cable to the local area network. Headset jack Connect a standard headset with an RJ9 connector to this RJ9 jack. Handset jack Connect the handset to this RJ9 jack. Phone cord channel Route the phone cord through the channel to avoid pinching the cord. Page 5 CONTROL PANEL Arrow keys Scroll wheel Keypad Home key Function buttons Function Buttons Select key Function buttons Description Contacts Press to access your personal contact list. Use the scroll wheel and arrow keys to navigate through the list. Missed Calls Press to review the details of all missed calls. Blinks blue when calls have been missed. Messages Press to review your voice mail. If voice mail has not been set up, the call will fail. Blinks blue when new messages exist. Settings Press to enter the Settings menu and make changes to the phone settings. Press again to exit the Settings menu. Camera On/Off Press to turn the camera on and transmit video to your caller. Press again to stop transmitting video to your caller. Displays solid red when the camera is turned off. Volume +/- When a call is ringing in, press + to increase the ring tone volume or press - to decrease ring tone volume. When a call is in progress, press + to increase the volume of the current session and press - to decrease the volume of the current session. Mute Press to mute and unmute the phone’s internal microphone. Displays solid red when muted. Headset Press to activate or de-activate a headset. Displays solid blue when the headset is activated. Speaker Press to turn the speaker on and off. Displays solid blue when the speaker is on. Navigation Keys Description Home key Press to go to the previous menu screen. Also returns you to the Home screen. Arrow keys Use to navigate through the menu system. If the Call History is visible, the left and right arrow keys will toggle between the Call History, Contacts, and Most Often (called) lists, and the up and down arrow keys navigate through the displayed list. Scroll wheel Use to navigate through the menu system. If the menu system is not visible, the Call Log will appear. Select key Use this key to make menu selections or accept an incoming call. Keypad Keys 0-9,*,# Description Call Press to place an outgoing call or accept an incoming call. Backspace Press to delete the last character entered. End Call Press to terminate a call, reject an incoming call, or delete all text in an text field. Alphanumeric Characters Use the alphanumeric characters to dial a call or to enter information into an text field. To bring up the alphanumeric options, press and hold the associated number key. When the alphanumeric options appear, press the number key to toggle through the available characters. Page 7 PHONE CAPABILITIES AND REQUIREMENTS This phone is a SIP end-point which supports high definition resolutions with upload resolution up to 720p and the download resolution up to 1080p @ 30 frames per second. This phone supports G.711 and G.722-1 audio codec and H.264 video codec. Communication with H.323, PSTN and other SIP systems is dependent on the SIP provider used. In order for this phone to work successfully, you need the following: 1) Network with Internet connection 2) Upstream and downstream speeds of 128 kbps (kilobytes per second) are supported, however a minimum of 512 kbps is recommended for good performance. By default, the phone is linked to InFocus' SIP service, however you are free to use any SIP provider. Your phone has three lines (Line 1, Line 2 and Line 3) which can support different SIP services. Each line can accept many calls; however only one active call is allowed at a time. The other call can be on hold or in an incoming/ringing state. Conference calls can be made using your SIP provider's bridge services. MENU OVERVIEW STATUS ICONS Current Date and Time 6:30 PM Do Not Disturb Status Icons Outbound Calling Number Volume Level Your SIP Number [email protected] 22 2 Mon Line Select Most Often Call History 2 Status Icons Self View Soft Key Labels Description Volume Level Indicates your current speaker volume. Adjust the speaker volume using the Volume buttons on the keypad. Microphone On The microphone is on. Microphone Off The microphone is off. Camera Off The camera is off. Do Not Disturb All calls are routed to voice mail. If voice mail has not been set up, the calls are rejected. 2 Missed Calls Missed calls exist. Press the Missed Calls button to view the calls you missed. 2 Voice Mails Voice mails exist. Press the Message button to access your voice mail. Forward Calls All incoming calls are being forwarded. Registered Your phone is connected to the internet and is registered with your phone service. Not Registered Your phone is not currently registered with your phone service. Page 9 USE THE SOFT KEYS Up to five context sensitive soft keys are available depending on the menu or feature you are working with. Touch the blue LED directly below the soft key to activate the option. Context-Sensitive Soft Keys Press the blue LED under the soft key to activate the option... Do Not Disturb Toggles the "Do Not Disturb" feature on and off. Line Select Toggles between up to three phone lines. Most Often Press to review your most frequent calls. Call Log Press to review your call history. Self View Press to toggle between a small and full-screen Self View window, or close the Self View window. New Contact Press to add a new person to your Contact List. User Settings Press to access general user setting options. System Settings Press to access the administrative setting options. Status Settings Press to review your phone's status information. Exit Press to exit the menu system. Next Press to view the next page of the menu system. Previous Press to go to the previous page of the menu system. Save Press to save your menu changes. Discard Press to delete your menu changes. NAVIGATE THE MENU SYSTEM 1) 2) 3) 4) 5) 6) 7) Press the Settings button to open the menu system. Use the soft keys, scroll wheel, arrow keys to move through the menu system. To make changes to a menu item, press the Select button and: a. If the option is a slider bar (such as LCD Brightness), use the scroll wheel (or arrow keys) to make adjustments. The right and down arrow keys increase the level, and the left and up arrow keys decrease the level. b. If the option has a drop-down box (such as Time Format), use the scroll wheel (or arrow keys) to make adjustments. The right and down arrow keys go down the option list, and the left and up arrow keys go up the option list. c. If the option is an text field (such as Forward Number 1), use the keypad to type in the field. The alphanumeric options associated with the keypad number will appear. Press the key again to toggle to the desired alphanumeric character and then wait for the alphanumeric options box disappears. To erase an incorrect entry, click the Backspace button. When done making changes to the menu item, press the Select button. If desired, navigate to the next menu item. When done making changes to the menu items, touch the Exit soft key. Touch the Save soft key to save changes (or touch the Discard soft key to cancel your changes). Page 11 INCOMING AND OUTGOING CALLS MAKE A CALL 6:30 PM Do Not Disturb 1) 2) 3) 4) [email protected] 22 Mon Line Select Most Often Call History Self View Lift the handset or go to the next step to dial hands-free. Use the keypad to enter the SIP or PSTN number. The number will appear in the outgoing call box. Note: PSTN is an optional service. See your SIP provider for more information. a. To toggle through the alphanumeric characters, press and hold the keypad number. b. When the alphanumeric characters appear, press the button repeatedly until the desired character is selected. c. Before pressing another keypad button, wait until the alphanumeric character box disappears. To place the call, press the green Call button or the Select button. To end the call, press the red End Call button or hang up the handset. Note: If the other party chooses Ignore, the call will fail and the screen will display "Failed - Declined." If the other party does not pickup or if the phone is set to Do Not Disturb, the call will fail and the screen will display "Failed - Not Available." RESPOND TO A CALL 6:30 PM [email protected] 22 Mon [email protected] Calling... Other Answer Ignore To accept a call, you can: • Press the green Call button. • Press the Select button. • Touch the Answer soft key. • Pick up the handset. To ignore the call, you can: • Press the red End Call button on the keypad. • Touch the Ignore soft key. • Let the call timeout. To end the call, you can: • Press the red End Call button on the keypad. • Hang up the handset. Page 13 HOLD AND RESUME CALLS 6:30 PM [email protected] 22 Mon 01:03 Hold Transfer To put the caller on hold: Touch the Hold soft key. To resume the call: 1) Touch the Hold Queue soft key. 2) Touch the Resume soft key. TRANSFER CALLS 1) 2) 3) Touch the Transfer soft key. Dial the number you are transferring the caller to or use the arrow keys to toggle through your Contacts list or Call History for the desired number. Press the green Call button or the Select button. The call is transferred and your line is released. SWITCH BETWEEN LINES 1, 2, AND 3 If the phone is configured with two or three SIP accounts, touch the Line Select soft key to change the line ID on the phone from one SIP account to another. LISTEN TO MESSAGES To listen to voice mail messages, press the Message key to connect to the voice mail box. Note: If voice mail has not been set up with your service provider, the call will fail. TURN CALL FORWARDING ON/OFF 1) 2) Press the Settings button. Touch the User Settings soft key. The Call Features submenu displays. 6:30 PM [email protected] 22 Mon USER 1 2 3 4 Call Features Call Forward Mode Forward All Calls To Off Auto Answer Mode Off Forward Number 1 Auto Answer Mute Off Auto Answer Delay 8 sec Forward Number 1 [email protected] Forward Number 2 [email protected] Call Rate Forward Number 3 [email protected] Auto Bandwidth Clear Call History Status Settings 3) 4) 5) 6) 7) 8) 9) 768 kbps Off Clear System Settings Exit Next Navigate to Call Forward Mode. Press the Select button. Navigate to All to forwards all calls, Busy to forward calls when on another call or Off to turn off this feature. Press the Select button. Verify that the Forward All Calls To selection and associated forwarding number information is correct. If changes are needed, see "Program Call Forwarding" on page 15. Touch the Exit soft key. Touch the Save soft key to exit the menu system and save your changes. PROGRAM CALL FORWARDING 1) 2) Press the Settings button. Touch the User Settings soft key. The Call Features submenu displays. 6:30 PM [email protected] 22 Mon USER 1 2 3 4 Call Features Call Forward Mode Forward All Calls To Auto Answer Mode Off Forward Number 1 Auto Answer Mute Off Auto Answer Delay 8 sec Forward Number 1 [email protected] Forward Number 2 [email protected] Call Rate Forward Number 3 [email protected] Auto Bandwidth Clear Call History Status Settings 3) 4) 5) Off 768 kbps Off Clear System Settings Exit Next Navigate to Forward All Calls To. Press the Select button. Highlight the Forward Number (1, 2, or 3) option you want to forward calls to. Press the Select button. Page 15 Navigate to Forward Number (1, 2, or 3). Press the Select button. Enter the number you wish to store as a forwarding number. Press the Select button. If desired, repeat steps 6-9 until all forwarding numbers are set. Note: If the Forward Number fields are left blank and Forward All Calls To is set to On, calls will not be forwarded successfully. 11) When finished, touch the Exit soft key. 12) Touch the Save soft key to exit the menu system and save your changes. 6) 7) 8) 9) 10) ANSWER CALLS AUTOMATICALLY 1) 2) Press the Settings button. Touch the User Settings soft key. The Call Features submenu displays. 6:30 PM [email protected] 22 Mon USER 1 2 3 4 Call Features Call Forward Mode Forward All Calls To Forward Number 1 Off Auto Answer Mode Off Forward Number 1 Auto Answer Mute Off Auto Answer Delay 8 sec [email protected] Forward Number 2 [email protected] Call Rate Forward Number 3 [email protected] Auto Bandwidth Clear Call History Status Settings Off Clear System Settings Exit Navigate to Auto Answer Mode. Press the Select button. Navigate to On to turn on this feature (or Off to turn off this feature). Press the Select button. If you want all calls to be automatically muted when they are answered: a. Navigate to Auto Answer Mute. b. Press the Select button. c. Navigate to On to turn on this feature (or Off to turn off this feature). d. Press the Select button. 8) If you want to change the length of delay before the phone auto answers: a. Navigate to Auto Answer Delay. b. Choose the desired time delay before the call is auto answered. c. Press the Select button. 9) Touch the Exit soft key. 10) Touch the Save soft key to exit the menu system and save your changes. 3) 4) 5) 6) 7) 768 kbps Next TURN DO NOT DISTURB ON/OFF 1) Touch the Do Not Disturb soft key from the main screen. The Do Not Disturb icon blinks. 6:30 PM Do Not Disturb 2) 22 Mon [email protected] [email protected] Line Select Most Often Call History Self View Touch the Do Not Disturb soft key again to turn off the feature. The Do Not Disturb icon disappears. Page 17 MISSED CALLS REVIEW MISSED CALLS The Missed Calls contains details on all missed calls, so that you can easily call the person back. 1) Press the Missed Calls key. 4 6:30 PM [email protected] 22 4 Mon Missed Calls Mary Jones 01:44 PM 10/22/12 00:00:00 Tim Smith 08:03 AM 10/22/12 00:0:00 [email protected] 10:19 AM 10/21/12 00:00:00 David Cromby Add Contact 2) 3) 02:34 PM 10/21/12 00:00:00 Most Often Call History Use the scroll wheel or arrow keys to review the missed call history. Note: To call someone back, navigate to the number and press the Call button. Press the Home key to return to the main screen. CLEAR CALL HISTORY If the Call History is too long, you can clear the call history from the phone’s memory. 1) 2) Press the Settings button. Touch the User Settings soft key. The Call Features submenu displays. 6:30 PM [email protected] 22 Mon USER 1 2 3 4 Call Features Call Forward Mode Forward All Calls To Auto Answer Mode Off Forward Number 1 Auto Answer Mute Off Auto Answer Delay 8 sec Forward Number 1 [email protected] Forward Number 2 [email protected] Call Rate Forward Number 3 [email protected] Auto Bandwidth Clear Call History Status Settings 3) 4) 5) 6) Off 768 kbps Off Clear System Settings Navigate to Clear Call History. Press the Select button. Touch the Yes soft key. The Call History is deleted. Touch the Exit soft key to exit the menu system. Exit Next ADD A PERSONAL CONTACT Although you may be able to add contacts through your service provider (the InFocus portal provides this option), you can also add a contact from the phone itself. 1) Press the Contacts or Missed Calls button. Note: The Most Often or Call History soft key can also be used. 6:30 PM [email protected] 22 Mon Bill Smith video Contacts New Contact 2) Most Often Call History Touch the New Contact soft key. 6:30 PM [email protected] 22 Mon Add Contact Firstname : Video Lastname : Work Company : Mobile Display Name : Home Save 3) 4) 5) 6) 7) 8) Cancel Navigate to Firstname. Press the Select button. Using the alphanumeric keypad, enter the person's first name. (Press and hold the keypad key to access the alphanumeric characters.) Press the Select button. Note: At minimum, the Firstname and the Number fields must be filled in. Repeat steps #3 - 6 for Lastname, Company, Display Name and the number fields. Note: You can also highlight the label (Video, Work, Mobile and Home) and choose a different label from the drop-down list. When finished making changes, touch the Save soft key to exit the menu system and save your changes. Page 19 REVIEW STATUS INFORMATION You can find the software version, serial number, MAC address and provisioning information of your phone, and information related to your call, by pressing the Settings button and reviewing the read-only Status information. Press the Settings button again or the Home key to go back to the main screen. 6:30 PM [email protected] 22 Mon STATUS System Call Status Software Version 0.0.6 Remote URI Call Rate Serial Number BKGE22000189 MAC Address 04:7D:7B:A6:1A:E6 Provisioning On, Authenticated Lines IP Address 192.168.10.13 Address [email protected] Proxy 50.23.115.79 Status Registered User Settings System Settings Exit VIDEO Codec Resolution Frame Rate Bit Rate Packet Loss Jitter Transmit Receive AUDIO Codec Bit Rate Packet Loss Jitter Transmit Receive OTHER USER SETTINGS CHANGE PHONE BANDWIDTH Although Factory Default settings are considered best for data and video usage, if multiple phones are being used in a single network, the IT administrator may choose to change these settings to better use the bandwidth and workload of their network infrastructure. 1) 2) Press the Settings button. Touch the User Settings soft key. The Call Features submenu displays. 6:30 PM [email protected] 22 Mon USER 1 2 3 4 Call Features Call Forward Mode Forward All Calls To Off Forward Number 1 Auto Answer Mute Off Auto Answer Delay 8 sec [email protected] Forward Number 2 [email protected] Call Rate Forward Number 3 [email protected] Auto Bandwidth Status Settings 6) 7) 8) Auto Answer Mode Forward Number 1 Clear Call History 3) 4) 5) Off 768 kbps Off Clear System Settings Exit Next Navigate to Auto Bandwidth. Press the Select button. Navigate to On for automatic bandwidth control or Off to use the manually configured Call Rate. a. If Off is chosen, press the Select button and navigate to Call Rate. b. Press the Select button. c. Use the navigational arrow keys or scroll wheel to choose the desired call rate. Press the Select button. When finished making changes, touch the Exit soft key. Touch the Save soft key to exit the menu system and save your changes. Page 21 ADJUST THE LCD BRIGHTNESS You can adjust the brightness of the LCD panel. 1) 2) 3) Press the Settings button. Touch the User Settings soft key. Touch the Next soft key until the Display/Sound submenus display. 6:30 PM [email protected] 22 Mon USER 1 2 3 4 Display Sound LCD Brightness Screensaver Screensaver Timeout System Standby Standby Timer Status Settings 4) 5) 6) 7) 8) 9) Ring Volume Off Key Tone On 20 mins Ringtone Default Add Ringtone Off Select 5 mins System Settings Exit Previous Next Navigate to LCD Brightness. Press the Select button. Using the scroll wheel or arrow keys, adjust the LCD Brightness slider to the left to decrease the brightness, or to the right to increase the brightness. Press the Select button. When finished making changes, touch the Exit soft key. Touch the Save soft key to exit the menu system and save your changes. ADJUST THE SCREENSAVER You can activate the screensaver feature and change the time interval it appears. 1) 2) 3) Press the Settings button. Touch the User Settings soft key. Touch the Next soft key until the Display/Sound submenus display. 6:30 PM [email protected] 22 Mon USER 1 2 3 4 Display Sound LCD Brightness Screensaver Screensaver Timeout System Standby Standby Timer Status Settings 4) 5) 6) 7) 8) 9) 10) 11) 12) 13) Ring Volume Off Key Tone On 20 mins Ringtone Default Add Ringtone Off Select 5 mins System Settings Exit Previous Next Navigate to Screensaver. Press the Select button. Navigate to Off to turn the feature off or On to use the default screensaver. Press the Select button. Navigate to Screensaver Timeout. Press the Select button. Select the screensaver timeout period you want before the screensaver feature is activated. Press the Select button. When finished making changes, touch the Exit soft key. Touch the Save soft key to exit the menu system and save your changes. Page 23 SET STANDBY PARAMETERS In order to save energy, it is recommended that you set up your phone to go into a standby mode when not in use. This can be done by adjusting the System Standby and Standby Timer features. 1) 2) 3) Press the Settings button. Touch the User Settings soft key. Touch the Next soft key until the Display/Sound submenus display. 6:30 PM [email protected] 22 Mon USER 1 2 3 4 Display Sound LCD Brightness Screensaver Screensaver Timeout System Standby Standby Timer Status Settings 4) 5) 6) 7) 8) 9) 10) 11) 12) 13) Ring Volume Off Key Tone On 20 mins Ringtone Default Add Ringtone Off Select 5 mins System Settings Exit Previous Navigate to System Standby. Press the Select button. Choose On to activate the System Standby feature or Off to turn this feature off. Press the Select button. Navigate to Standby Timer. Press the Select button. Select the inactivity timeout period you want before the Standby feature is activated. Press the Select button. When finished making changes, touch the Exit soft key. Touch the Save soft key to exit the menu system and save your changes. Next ADJUST THE RING VOLUME You can adjust the volume of the ringtone by pressing the volume up and down keys on the keypad while the phone is ringing or by using the following method: 1) 2) 3) Press the Settings button. Touch the User Settings soft key. Touch the Next soft key until the Display/Sound submenus display. 6:30 PM [email protected] 22 Mon USER 1 2 3 4 Display Sound LCD Brightness Screensaver Screensaver Timeout System Standby Standby Timer Status Settings 4) 5) 6) 7) 8) 9) Ring Volume Off Key Tone On 20 mins Ringtone Default Add Ringtone Off Select 5 mins System Settings Exit Previous Next Navigate to Ring Volume. Press the Select button. Using the scroll wheel or arrow keys, adjust the ring volume slider to the left to decrease the volume, or to the right to increase the volume. Press the Select button. When finished making changes, touch the Exit soft key. Touch the Save soft key to exit the menu system and save your changes. Page 25 ADJUST THE KEY TONE You can turn the key tone on or off. 1) 2) 3) Press the Settings button. Touch the User Settings soft key. Touch the Next soft key until the Display/Sound submenus display. 6:30 PM [email protected] 22 Mon USER 1 2 3 4 Display Sound LCD Brightness Screensaver Screensaver Timeout System Standby Standby Timer Status Settings 4) 5) 6) 7) 8) 9) Ring Volume Off Key Tone On 20 mins Ringtone Default Add Ringtone Off Select 5 mins System Settings Exit Navigate to Key Tone. Press the Select button. Navigate to Off to turn the feature off or On to turn the feature on. Press the Select button. When finished making changes, touch the Exit soft key. Touch the Save soft key to exit the menu system and save your changes. Previous Next CHANGE THE RING TONE You can choose one of the standard ring tones or upload and choose a personal ring tone. Note: To associate a specific ring tone to a Personal Contact, go to the Contacts list and navigate to Edit. 1) 2) 3) Press the Settings button. Touch the User Settings soft key. Touch the Next soft key until the Display/Sound submenus display. 6:30 PM [email protected] 22 Mon USER 1 2 3 4 Display Sound LCD Brightness Screensaver Screensaver Timeout System Standby Standby Timer Status Settings 4) 5) 6) 7) 8) Ring Volume Off Key Tone On 20 mins Ringtone Default Add Ringtone Off Select 5 mins System Settings Exit Previous Next Navigate to Ringtone. Press the Select button. Navigate to Off to turn the feature off, choose one of the standard ringtones, or create a customized ringtone. a. To create a customized ringtone, save a ringtone (.wav format; maximum 2MB) onto a USB 2.0 thumb drive or SD card and insert the thumb drive/card in the right-hand slot on the phone. b. Verify that Ringtone is set to User. c. Press the Select button and navigate to Add Ringtone. d. Press the Select button. e. Browse to the desired ringtone on your thumb drive or SD card. f. Press the Select button to copy the file to your phone. Any previously saved custom ringtone file is erased. When finished making changes, touch the Exit soft key. Touch the Save soft key to exit the menu system and save your changes. Page 27 CHANGE THE CAMERA SETTINGS Before starting a video call, we recommend that you turn on Self View, adjust the camera's position and review the image quality. If the camera's White Balance, Brightness or Contrast needs to be adjusted, you can make these adjustments in this menu. 1) 2) 3) Press the Settings button. Touch the User Settings soft key. Touch the Next soft key until the Camera submenu displays. 6:30 PM [email protected] 22 Mon USER 1 2 3 4 Camera Brightness Mode Auto Brightness Contrast Mode Default Contrast White Balance Mode Auto White Balance Status Settings 4) 5) 6) 7) 8) 9) 10) 11) 12) 13) 14) 15) 16) 17) System Settings Exit Previous Next Navigate to Brightness Mode. Press the Select button. Navigate to Auto for automatic brightness control or Manual to use manual Brightness adjustments. a. If Manual is chosen, press the Select button and navigate to Brightness. b. Press the Select button. c. Using the scroll wheel or arrow keys, adjust the Brightness slider to the left to decrease the brightness, or to the right to increase the brightness. Press the Select button. Navigate to Contrast Mode. Press the Select button. Navigate to Default to use the factory default contrast level or Manual to use manual Contrast adjustments. a. If Manual is chosen, press the Select button and navigate to Contrast. b. Press the Select button. c. Use the navigational arrow keys or scroll wheel to adjust the Contrast level as desired. Press the Select button. Navigate to White Balance Mode. Press the Select button. Navigate to Auto for automatic White Balance control or Manual to use manual White Balance adjustments. a. If Manual is chosen, press the Select button and navigate to White Balance. b. Press the Select button. c. Use the arrow keys or scroll wheel to adjust the White Balance level as desired. Press the Select button. When finished making changes, touch the Exit soft key. Touch the Save soft key to exit the menu system and save your changes. DEFINE DATE AND TIME SETTINGS You can personalize the date and time formats, and choose between automatic SNTP time synchronization or manual time/date entry modes within this menu. 1) 2) 3) Press the Settings button. Touch the User Settings soft key. Touch the Next soft key until the General/Wallpaper submenus display. 6:30 PM [email protected] 22 Mon USER 1 2 3 4 General Wallpaper System Name Language English Timezone GMT Time Format 12H Date Format mm/dd/yyyy Status Settings 4) 5) 6) 7) 8) 9) 10) 11) Wallpaper Nemo System Settings InFocus Add Wallpaper Exit Select Previous Navigate to and select the Timezone. Select the GMT equivalent for your time zone. Press the Select button. Navigate to and select Time Format. Select standard (12H) or military time (24H). Press the Select button. Navigate and select the Date Format. Select the date format mm/dd/yyyy, dd/mm/yyyy or yyyy/mm/dd. Press the Select button. When finished making changes, touch the Exit soft key. Touch the Save soft key to exit the menu system and save your changes. Page 29 CHANGE THE WALLPAPER IMAGE You can choose a standard wallpaper image or upload and choose a personal wallpaper image. Wallpaper images can be up to 2MB and in the following formats: *.jpeg, *.jpg, *.png. Note: Resolutions higher or lower than 1366 x 768 are scaled to match the native resolution of the phone. 1) 2) 3) Press the Settings button. Touch the User Settings soft key. Touch the Next soft key until the General/Wallpaper submenus display. 6:30 PM [email protected] 22 Mon USER 1 2 3 4 General Wallpaper System Name Language English Timezone GMT Time Format 12H Date Format mm/dd/yyyy Status Settings 4) 5) 6) 7) 8) Wallpaper Nemo System Settings InFocus Add Wallpaper Exit Select Previous Navigate to Wallpaper. Press the Select button. Navigate to InFocus to use the default wallpaper, or choose one of the other standard wallpaper options, or create a customized wallpaper. a. To add a custom wallpaper, save an image (*.jpeg, *.jpg, *.png; maximum 2MB) onto a USB 2.0 thumb drive or SD card and insert the thumb drive/card in the right-hand slot on the phone. Note: Landscape images are recommended. Portrait images will be stretched. b. Verify that Wallpaper is set to User. c. Press the Select button and navigate to Add Wallpaper. d. Press the Select button. e. Browse to the desired wallpaper image (for example, a family or vacation photo) on your thumb drive or SD card. f. Press the Select button to copy the file to your phone. Any previously saved custom wallpaper image file is erased. When finished making changes, touch the Exit soft key. Touch the Save soft key to exit the menu system and save your changes. ADMINISTRATIVE/IT FEATURES ACCESS THE SYSTEM SETTINGS MENU A PIN is required to access the phone's Advanced Settings. By default, this PIN is "1234," but this can be changed by the IT Administrator. See"Change the System Settings Admin PIN" on page 33. 1) 2) Press the Settings button. Touch the System Settings soft key. 6:30 PM [email protected] 22 Mon STATUS System Call Status Software Version 0.0.6 Enter Administrator PIN: Serial Number BKGE22000189 MAC Address 04:7D:7B:A6:1A:E6 Provisioning On, Authenticated Lines IP Address 192.168.10.13 Address [email protected] Proxy 50.23.115.79 Status Registered Remote URI Call Rate VIDEO Codec Resolution Frame Rate Bit Rate Packet Loss Jitter Transmit Receive AUDIO Codec Bit Rate Packet Loss Jitter Transmit Receive Accept 3) 4) 5) Cancel Enter the Administrator PIN code (default 1234) using the keypad. Press the Select button (or touch the Accept soft key). You can now begin making System Settings changes. Note: If you enter an incorrect PIN, you will remain on the Enter Administrator PIN field. When you leave the Settings menu, the System Settings become locked again. Page 31 DEFINE THE PROVISIONING MODE AND AUTHENTICATION CODE By default, your phone is provisioned by InFocus.net, however you can provision your phone with another SIP provider URL in this menu. 1) Access the System Settings menu. The Auto Configure/System submenu displays. 6:30 PM [email protected] 22 Mon ADMIN 1 2 3 4 5 Auto Configure System Provisioning Mode Serial Number Off Authentication Code Factory Reset Admin Software Upgrade PIN User Settings BKGE22000189 Reset Upgrade **** Status Settings Exit Next Navigate to Provisioning Mode. Press the Select button. Select On to turn on the provisioning mode or Off to turn off this feature. By default, this feature is on which allows the system to be configured by the InFocus.net server automatically. If you do not want to use the InFocus.net service, turn this feature off to allow manual configuration. 5) Press the Select button. 6) Navigate to Authentication Code. 7) Press the Select button. 8) Enter the Authentication Code you received from your service provider. If you are using InFocus.net, the email you receive has the subject line: "Activation Success". 9) Press the Select button. 10) When finished making changes, touch the Exit soft key. 11) Touch the Save soft key to exit the menu system and save your changes. 2) 3) 4) CHANGE THE SYSTEM SETTINGS ADMIN PIN The IT administrator can redefine the factory default System Settings Administrator PIN, so that Advanced Setting items are protected. Note: Accomplishing a Factory Reset resets the PIN to "1234". 1) Access the System Settings menu. The Auto Configure/System submenu displays. 6:30 PM [email protected] 22 Mon ADMIN 1 2 3 4 5 Auto Configure System Provisioning Mode Serial Number Off Authentication Code Factory Reset Admin Software Upgrade PIN User Settings 2) 3) 4) 5) 6) 7) 8) BKGE22000189 Reset Upgrade **** Status Settings Exit Next Navigate to PIN. Press the Select button. Use the Backspace key to erase the existing PIN. Use the keypad to enter the new PIN. Press the Select button. When finished making changes, touch the Exit soft key. Touch the Save soft key to exit the menu system and save your changes. Note: The PIN can only contain alphanumeric characters, underscores and periods. Page 33 RESET THE PHONE TO FACTORY DEFAULT SETTINGS A Factory Reset resets everything to factory default settings, including the System Settings Admin PIN. All user settings and the phonebook will be lost. 1) Access the System Settings menu. The Auto Configure/System submenu displays. 6:30 PM [email protected] 22 Mon ADMIN 1 2 3 4 5 Auto Configure System Provisioning Mode Serial Number Off Authentication Code Factory Reset Admin Software Upgrade PIN User Settings 2) 3) 4) BKGE22000189 Reset Upgrade **** Status Settings Exit Navigate to Factory Reset. Press the Select button. Touch the Yes soft key to accomplish a factory reset. The phone will re-boot. Next UPGRADE THE SOFTWARE Under normal circumstances, your phone will alert you when a software upgrade is available. Follow the onscreen instructions to upgrade your phone. Note: Your phone must be connected to the internet via the network for the upgrade process to work. If you prefer upgrading the software manually using an SD card or USB 2.0 thumb drive, follow the instructions below: 1) Insert a USB 2.0 thumb drive or SD card with the software upgrade into the right-hand side of the phone. 2) Access the System Settings menu. The Auto Configure/System submenu displays. 6:30 PM [email protected] 22 Mon ADMIN 1 2 3 4 5 Auto Configure System Provisioning Mode Serial Number Off Authentication Code Factory Reset Admin Software Upgrade PIN User Settings 3) 4) 5) 6) 7) 8) BKGE22000189 Reset Upgrade **** Status Settings Exit Next Navigate to Software Upgrade. Press the Select button. Navigate to the software update located on the USB thumb drive or SD card. Press the Select button. The file is copied to and verified by the phone. When the "Upgrade to version..." dialog box displays, touch the Upgrade soft key to start the upgrade process. The menu screen will turn black and then display an "Upgrading Firmware" message. Note: The upgrade process will take several minutes to finish. After the upgrade is complete, the phone will reboot. Page 35 DEFINE NETWORK SETTINGS The IT administrator defines the network settings for the phone in this menu. 1) 2) Access the System Settings menu. Touch the Next soft key until the IP Settings/DNS Settings submenu displays. 6:30 PM [email protected] 22 Mon ADMIN 1 2 3 4 5 IP Settings DNS Settings Protocol Assignment Address Subnet Mask Gateway User Settings 3) 4) 5) 6) 7) 8) 9) 10) 11) 12) 13) 14) 15) 16) IPv4 DNS Mode DHCP DNS Server 172.20.5.252 172.20.10.53 DNS Server 10.10.11.18 255.255.255.0 DNS Server 66.240.48.9 Auto 172.20.10.1 Status Settings Exit Previous Next Navigate to Protocol. Press the Select button. Choose the protocol (IPv4 or IPv6) appropriate for your organization. Press the Select button. Navigate to Assignment. Press the Select button. Choose DHCP or Static as appropriate for your organization. a. If you choose DHCP, the Address, Subnet Mask, and Gateway information automatically populates. b. If you choose Static, navigate to the Address, Subnet Mask, and Gateway fields and enter the correct information using the keypad. Press the Select button. Navigate to DNS Mode. Press the Select button. Choose Auto or Manual as appropriate for your organization. a. If you choose Auto, the DNS Server information automatically populates. b. If you choose Manual, navigate to the DNS Server fields and enter the correct information using the keypad. Press the Select button. When finished making changes, touch the Exit soft key. Touch the Save soft key to exit the menu system and save your changes. DEFINE LINES #1 - 3 Although the IT administrator can define Lines 1, 2, and 3 via the InFocus portal (http://www.InFocus.net), the IT administrator can also make adjustments in the Admin > Account (1-3) submenus. 1) 2) Access the System Settings menu. Touch the Next soft key until the Account 1, 2, or 3 submenu displays. 6:30 PM [email protected] 22 Mon ADMIN 1 2 3 4 5 Account 1 Address Display Name Transport Proxy Mode Proxy Address [email protected] Username 30135 Melinda Password ********** Mailbox TCP Manual proxy.infocus.net Proxy Address User Settings Status Settings Exit Previous Next 3) Use the navigation keys and keypad to navigate to the desired field (Address, Display Name, Transport, Proxy Mode, Proxy Address, Username, Password and Mailbox). 4) Press the Select button. 5) Use the navigation keys and keypad to make changes to the field information. 6) Press the Select button. 7) Go to the next field and repeat steps 4-7 until the information for Account 1 is complete. 8) Repeat this process for Account 2 and Account 3. 9) When finished making changes, touch the Exit soft key. 10) Touch the Save soft key to exit the menu system and save your changes. Page 37 THE INFOCUS PORTAL The InFocus portal (http://www.InFocus.net) is where your messages, contact lists, registration information, etc. are stored. You can access this information from anywhere you have an internet connection. Additional services are also available through the InFocus portal. You can obtain a Vanity SIP address, order a 10-digit phone number (so you can call any phone), port your existing number, and more. MAINTENANCE CLEAN THE LCD SCREEN 1) 2) Apply a LCD screen cleaner to a soft, dry cloth. Lightly wipe the cleaning cloth over the LCD screen to remove fingerprints, dust and grime. WARNING: Do not spray anything on the LCD screen. CLEAN THE PHONE 1) 2) 3) 4) Unplug the phone from power. Moisten a soft, dry cloth with water. Lightly wipe the cleaning cloth over the phone. Wipe dry with a soft, dry cloth. WARNING: Do not allow liquids to enter the phone. Spilled liquid may damage your phone. WARNING: Do not attempt to service this product yourself as opening and removing covers may expose you to dangerous voltage and other hazards. Refer all servicing to qualified service personnel. Page 39 TROUBLESHOOTING Symptom Troubleshooting Tips The menu is frozen. Unplug power from the phone. Wait 10 seconds and re-plug. Wait for the phone to re-initialize. All user settings are retained. Note: A Factory Reset (accomplished through the System Settings menu) resets everything to factory default settings. All user settings and the phonebook will be lost. I cannot make a call If the Not Registered icon is displayed and a network error appears, check your network connection. Verify that the Ethernet cable is good and that you can successfully connect to the network. The network cable should be connected to a live jack and connected to the LAN connector on the back of the phone. If the Not Registered icon is displayed and no error messages appear, log into your InFocus portal account at http://www.InFocus.net or contact your service provider. Verify that your device is displayed, registered and authenticated. I cannot access System Settings System Settings are meant to be used by your system administrator and are PIN-protected. To access these items, see your system administrator. If you are the system administrator, see "Access the System Settings menu" on page 31. If you have forgotten your PIN, please contact InFocus Technical Support at www.infocus.com/support. The video image is poor. See "Change the Camera Settings" on page 28 How do I see myself to verify the camera position? Toggle the Self View soft key until your image encompasses the entire screen. Adjust the phone and camera position to center yourself in the image. Calls are not coming in If the Do Not Disturb icon is visible, touch the Do Not Disturb soft key to turn off this feature. If the Call Forwarding icon is visible, turn off the Call Forwarding feature (See "Turn Call Forwarding On/ Off" on page 15). My calls are not forwarding properly If the Call Forwarding icon is visible, verify that the Call Forwarding feature has been set up correctly (See "Program Call Forwarding" on page 15). Calls will not be forwarded if the Forward Numbers are left blank or if Call Forward Mode is set to Off. Also check InFocus portal Call Forwarding settings at http://www.InFocus.net. For additional troubleshooting support, please contact: InFocus Corporation Technical Support 6am-5pm PST 877-388-8385 www.infocus.com/support APPENDIX DECLARATION OF CONFORMITY Manufacturer: InFocus Corporation, 13190 SW 68th Parkway, Suite 200, Portland, Oregon 97223-8368 USA We declare under our sole responsibility that this phone conforms to the following directives and norms: ErP Directive 2009/125/EC EMC Directive 2004/108/EC EMC: EN 55022, EN 55024, EN 61000-3-2, EN 61000-3-3 Low Voltage Directive 2006/95/EC Safety: IEC 60950-1: 2005;EN 60950-1:2006 +A11:2009 Trademarks Apple, Macintosh, and PowerBook are trademarks or registered trademarks of Apple Computer, Inc. IBM is a trademark or registered trademark of International Business Machines, Inc. Microsoft, PowerPoint, and Windows are trademarks or registered trademarks of Microsoft Corporation. Adobe and Acrobat are trademarks or registered trademarks of Adobe Systems Incorporated. InFocus, In Focus, and INFOCUS (stylized) are either registered trademarks or trademarks of InFocus Corporation in the United States and other countries. Note: This product is covered electrical and electronic equipment under the European Union’s Waste from Electrical and Electronic Equipment (“WEEE”) Directive (2002/96/EC). The WEEE Directive requires that covered equipment be collected and managed separately from typical household waste in all EU member states. Please follow the guidance of your local environmental authority or ask the shop where you purchased the product for collection or recycling options. FCC Warning This device complies with part 15 of the FCC Rules. Operation is subject to the following two conditions: (1) This device may not cause harmful interference, and (2) this device must accept any interference received, including interference that may cause undesired operation. Note: This equipment has been tested and found to comply with the limits for a Class B digital device, pursuant to part 15 of the FCC Rules. These limits are designed to provide reasonable protection against harmful interference in a residential installation. This equipment generates, uses and can radiate radio frequency energy and, if not installed and used in accordance with the instructions, may cause harmful interference to radio communications. However, there is no guarantee that interference will not occur in a particular installation. If this equipment does cause harmful interference to radio or television reception, which can be determined by turning the equipment off and on, the user is encouraged to try to correct the interference by one or more of the following measures: --Reorient or relocate the receiving antenna. --Increase the separation between the equipment and receiver. --Connect the equipment into an outlet on a circuit different from that to which the receiver is connected. --Consult the dealer or an experienced radio/TV technician for help. Changes or modifications not expressly approved by InFocus Corporation may void authority to operate the equipment. Canada This Class B digital apparatus complies with Canadian ICES-003. Cet appareil numérique de la classe B est conforme à la norme NMB-003 du Canada. Agency Approvals cULus Other specific Country Approvals may apply. Please see product certification label. Page 41 Power Adapter Information: Bestec Power Electronics Co., Ltd. NA0181WTA I/P: 100-240V 50/60Hz, 1A, Cl. II, O/P: 12Vdc, 1.5A The phone can also receive power using the PoE (Power over Ethernet) standard IEE 802.3af-2003. The phone must not consume more than 12.95W. This document applies to regulatory model INV100. InFocus reserves the right to alter product offerings and specifications at any time without notice. SAFETY INFORMATION Please read and follow all safety instructions provided below and on the phone before connecting the phone to a power source. Failure to comply with safety instructions may result in fire, electrical shock, or personal injury and may damage or impair protection provided by the equipment. Please save all safety instructions. CAUTION: Do not drop the phone. CAUTION: Do not spill liquid on the phone. Spilled liquid may damage your phone. CAUTION: Do not place the phone in direct sunlight, humid, greasy or dusty places or in places where the phone may come into contact with heat, smoke, steam or excessive vibration. CAUTION: Keep small objects (like paper clips and staples) away from the phone. Small objects can enter into the ventilation openings and may damage the product. CAUTION: Do not block ventilation openings. Locate the phone in a well-ventilated area without obstructions to the intake or exhaust vents. Do not place the phone on a tablecloth or other soft covering that may block vents. CAUTION: Do not force the phone’s LCD screen down. It is not designed to lay flat. Forcing it to down will damage the LCD screen. Such damage is not covered by warranty. WARNING: Use the power cord provided. WARNING: Only use replacement parts specified by InFocus. Unauthorized substitutions may result in fire, electrical shock or injury, and may void the warranty. WARNING: Wash hands after handling the cables supplied with this product. WARNING: Refer all service to qualified service personnel. Servicing your own phone can be dangerous to you and will void the warranty. CAUTION: Always use the correct battery type. When replacing the battery, be aware that using a battery of the incorrect type may cause an explosion and equipment damage. When disposing of the battery, be sure to do so in an environmentally proper manner and according to local regulations. Page 43 WARRANTY LIMITED WARRANTY Subject to the Limitations, Exclusions and Disclaimers hereof, InFocus Corporation ("InFocus") warrants that this videophone and its accessories (hereinafter collectively or individually referred to as "Product" as appropriate) will conform to InFocus' specifications and be free from defects in material or workmanship for the respective Limited Warranty period provided below. If the Product, while subject to this Limited Warranty, is defective in material or workmanship during the warranty period, then InFocus, at its option, will REPAIR, REPLACE or REFUND the Product. InFocus' sole obligation is to supply (or pay for) all labor necessary to repair the Product found to be defective within the Limited Warranty period and to repair or replace defective parts with new parts or, at the option of InFocus, serviceable used parts that are equivalent or superior to new parts performance, but shall not exceed the return of the amount of the purchase price paid by the purchaser. Limited Warranty Periods are as follows: • Product Limited Warranty Period: One (1) year from date of proof of purchase. • Accessory Product Limited Warranty Period: Ninety (90) days from date of purchase. WARRANTY LIMITATION AND EXCLUSION THIS WARRANTY SETS FORTH INFOCUS' MAXIMUM LIABILITY FOR ITS PRODUCT. THIS WARRANTY EXTENDS ONLY TO PRODUCTS PURCHASED FROM INFOCUS OR AN INFOCUS AUTHORIZED RESELLER. InFocus shall have no further obligation under the foregoing Limited Warranty if the Product has been damaged due to abuse, misuse, exposure to smoke, accident, service other than by InFocus or its authorized agents, or failure caused other than from ordinary use or failure to properly use the Product in the application for which said Product was intended. In addition, failure of the end-user to follow maintenance procedures as outlined in the Product's user guide will not be covered under this Warranty. Finally, InFocus shall have no further obligation if InFocus Product was subjected to operating conditions outside of the range specified in the user's guide or in this warranty. This warranty does not cover maintenance/repair/replacement of parts due to normal wear and tear. Remanufactured Products are exempt from the foregoing Limited Warranty. Please refer to the appropriate Remanufactured Product Limited Warranty for applicable Warranty information. DISCLAIMER OF UNSTATED WARRANTIES THE WARRANTY PRINTED ABOVE IS THE ONLY WARRANTY APPLICABLE TO THIS PRODUCT. ALL OTHER WARRANTIES, EXPRESS OR IMPLIED, INCLUDING, BUT NOT LIMITED TO, THE IMPLIED WARRANTIES OF MERCHANTABILITY AND FITNESS FOR PARTICULAR PURPOSE ARE DISCLAIMED. THERE ARE NO WARRANTIES THAT EXTEND BEYOND THE DESCRIPTION ON THE FACE HEREOF AND THE FOREGOING WARRANTY SHALL NOT BE EXTENDED, ALTERED OR VARIED EXCEPT BY WRITTEN INSTRUMENT SIGNED BY INFOCUS. SOME JURISDICTIONS DO NOT ALLOW LIMITATIONS ON HOW LONG AN IMPLIED WARRANTY MAY LAST, SO SUCH LIMITATIONS MAY NOT APPLY TO YOU. LIMITED WARRANTY PERIOD The Limited Warranty periods hereof commence on the date of proof of purchase by the end-user customer. SOME JURISDICTIONS MAY GRANT YOU CONSUMER RIGHTS WITH MINIMUM WARRANTY DURATION THAT DIFFER FROM THE DURATIONS PROVIDED HEREIN, AND INFOCUS WILL HONOR ALL SUCH CONSUMER RIGHTS UPON PROOF OF PURCHASE IN THAT JURISDICTION. To Obtain Warranty Service: During the Limited Warranty period, to exercise this Limited Warranty, the purchaser must first contact 1) InFocus (Mailing address: InFocus Corporation, 13190 SW 68th Parkway, Suite 200, Portland, OR 97223-8368 USA; or via the web at www.infocus.com/support), 2) a service facility authorized by InFocus or 3) the place of original purchase. For Warranty service, the purchaser will pay to return or deliver the defective Product and will pay all freight, duty, taxes, VAT, fees, incidental clearance and customs charges to ship the unit to an InFocus Service Center or to a service facility authorized by InFocus. When returning Product to InFocus, a Return Material Authorization Number (RMA #) is required and must be clearly displayed on the outside of the shipping carton or a similar package affording an equal degree of protection. InFocus or the service facility authorized by InFocus will return the repaired/replaced Product freight prepaid to the purchaser. LIMITATION OF LIABILITY TO THE FULL EXTENT ALLOWED BY LAW, INFOCUS EXCLUDES FOR ITSELF AND ITS SUPPLIERS ANY LIABILITY, WHETHER BASED IN CONTRACT OR TORT (INCLUDING NEGLIGENCE), FOR INCIDENTAL, CONSEQUENTIAL, INDIRECT, SPECIAL, OR PUNITIVE DAMAGES OF ANY KIND, OR FOR LOSS OF REVENUE OR PROFITS, LOSS OF BUSINESS, LOSS OF INFORMATION OR DATA, OR OTHER FINANCIAL LOSS ARISING OUT OF OR IN CONNECTION WITH THE SALE, INSTALLATION, MAINTENANCE, USE, PERFORMANCE, FAILURE, OR INTERRUPTION OF ITS PRODUCTS, EVEN IF INFOCUS OR ITS AUTHORIZED RESELLER HAS BEEN ADVISED OF THE POSSIBILITY OF SUCH DAMAGES, AND LIMITS ITS LIABILITY TO REPAIR, REPLACEMENT, OR REFUND OF THE PURCHASE PRICE PAID, AT INFOCUS’ OPTION. THIS DISCLAIMER OF LIABILITY FOR DAMAGES WILL NOT BE AFFECTED IF ANY REMEDY PROVIDED HEREIN SHALL FAIL OF ITS ESSENTIAL PURPOSE.Where applicable national or state law prohibits the exclusion or limitation of liability, InFocus excludes or limits its liability to the maximum extent permitted by national law. Limitation on Bringing Action - No action, regardless of form, arising out of the agreement to purchase the Product may be brought by purchaser more than one year after the cause of action has accrued. Governing Law - Any action, regardless of form, arising out of the agreement to purchase the Product is governed by the laws of the state of Oregon, USA. Mandatory Arbitration - Any action, regardless of form, arising out of the agreement to purchase the Product is subject to mandatory arbitration. THIS WARRANTY DOES NOT AFFECT YOUR LEGAL RIGHTS UNDER APPLICABLE NATIONAL LAWS RELATING TO THE SALE OF CONSUMER PRODUCTS. Page 45