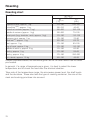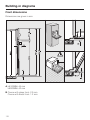
1
Operating and installation instructions
Microwave combination ovens
To avoid the risk of accidents or damage to the appliance it is essential
to read these instructions before it is installed and used for the first time.
en - GB
M.-Nr. 09 610 310
Contents
Warning and Safety instructions . . . . . . . . . . . . . . . . . . . . . . . . . . . . . . . . . . . . . 6
Caring for the environment . . . . . . . . . . . . . . . . . . . . . . . . . . . . . . . . . . . . . . . . . 21
Overview . . . . . . . . . . . . . . . . . . . . . . . . . . . . . . . . . . . . . . . . . . . . . . . . . . . . . . . . 22
Controls . . . . . . . . . . . . . . . . . . . . . . . . . . . . . . . . . . . . . . . . . . . . . . . . . . . . . . . . 23
On/Off sensor K . . . . . . . . . . . . . . . . . . . . . . . . . . . . . . . . . . . . . . . . . . . . . . . . . . 24
Function selector . . . . . . . . . . . . . . . . . . . . . . . . . . . . . . . . . . . . . . . . . . . . . . . . . . 24
Functions . . . . . . . . . . . . . . . . . . . . . . . . . . . . . . . . . . . . . . . . . . . . . . . . . . . . . 24
Display . . . . . . . . . . . . . . . . . . . . . . . . . . . . . . . . . . . . . . . . . . . . . . . . . . . . . . . . . . 24
Symbols in the display . . . . . . . . . . . . . . . . . . . . . . . . . . . . . . . . . . . . . . . . . . . 25
Rotary selector . . . . . . . . . . . . . . . . . . . . . . . . . . . . . . . . . . . . . . . . . . . . . . . . . . . . 25
Sensor controls . . . . . . . . . . . . . . . . . . . . . . . . . . . . . . . . . . . . . . . . . . . . . . . . . . . 26
Features . . . . . . . . . . . . . . . . . . . . . . . . . . . . . . . . . . . . . . . . . . . . . . . . . . . . . . . . 28
Model numbers . . . . . . . . . . . . . . . . . . . . . . . . . . . . . . . . . . . . . . . . . . . . . . . . . . . 28
Data plate . . . . . . . . . . . . . . . . . . . . . . . . . . . . . . . . . . . . . . . . . . . . . . . . . . . . . . . 28
Items supplied . . . . . . . . . . . . . . . . . . . . . . . . . . . . . . . . . . . . . . . . . . . . . . . . . . . . 28
Accessories supplied and available to order . . . . . . . . . . . . . . . . . . . . . . . . . . . . 28
Glass tray . . . . . . . . . . . . . . . . . . . . . . . . . . . . . . . . . . . . . . . . . . . . . . . . . . . . . 29
Rack with non-tip safety notches . . . . . . . . . . . . . . . . . . . . . . . . . . . . . . . . . . . 29
Oven controls. . . . . . . . . . . . . . . . . . . . . . . . . . . . . . . . . . . . . . . . . . . . . . . . . . . . . 33
Safety features . . . . . . . . . . . . . . . . . . . . . . . . . . . . . . . . . . . . . . . . . . . . . . . . . . . . 33
System lock 0. . . . . . . . . . . . . . . . . . . . . . . . . . . . . . . . . . . . . . . . . . . . . . . . . . 33
Cooling fan . . . . . . . . . . . . . . . . . . . . . . . . . . . . . . . . . . . . . . . . . . . . . . . . . . . . 33
Safety switch-off . . . . . . . . . . . . . . . . . . . . . . . . . . . . . . . . . . . . . . . . . . . . . . . . 33
PerfectClean treated surfaces . . . . . . . . . . . . . . . . . . . . . . . . . . . . . . . . . . . . . . . . 34
Using for the first time. . . . . . . . . . . . . . . . . . . . . . . . . . . . . . . . . . . . . . . . . . . . . 35
Before using for the first time . . . . . . . . . . . . . . . . . . . . . . . . . . . . . . . . . . . . . . . . . 35
Setting the time of day for the first time . . . . . . . . . . . . . . . . . . . . . . . . . . . . . . . . . 35
Heating up the oven for the first time. . . . . . . . . . . . . . . . . . . . . . . . . . . . . . . . . . . 36
Settings . . . . . . . . . . . . . . . . . . . . . . . . . . . . . . . . . . . . . . . . . . . . . . . . . . . . . . . . . 37
Altering the time of day . . . . . . . . . . . . . . . . . . . . . . . . . . . . . . . . . . . . . . . . . . . . . 37
Changing factory default settings . . . . . . . . . . . . . . . . . . . . . . . . . . . . . . . . . . . . . 38
System lock 0 . . . . . . . . . . . . . . . . . . . . . . . . . . . . . . . . . . . . . . . . . . . . . . . . . . . 42
To activate the system lock . . . . . . . . . . . . . . . . . . . . . . . . . . . . . . . . . . . . . . . 42
Deactivating the system lock for a cooking process . . . . . . . . . . . . . . . . . . . . 43
Deactivating the system lock . . . . . . . . . . . . . . . . . . . . . . . . . . . . . . . . . . . . . . 43
Minute minder N . . . . . . . . . . . . . . . . . . . . . . . . . . . . . . . . . . . . . . . . . . . . . . . . . 44
To set the minute minder . . . . . . . . . . . . . . . . . . . . . . . . . . . . . . . . . . . . . . . . . . . . 44
2
Contents
To change the time set for the minute minder . . . . . . . . . . . . . . . . . . . . . . . . . . . . 45
To cancel the time set for the minute minder . . . . . . . . . . . . . . . . . . . . . . . . . . . . 45
Overview of functions . . . . . . . . . . . . . . . . . . . . . . . . . . . . . . . . . . . . . . . . . . . . . 46
Functions which do not use microwave energy . . . . . . . . . . . . . . . . . . . . . . . . . . 46
Microwave solo _ . . . . . . . . . . . . . . . . . . . . . . . . . . . . . . . . . . . . . . . . . . . . . . . . 47
Microwave combination programmes . . . . . . . . . . . . . . . . . . . . . . . . . . . . . . . . . . 47
Microwave power . . . . . . . . . . . . . . . . . . . . . . . . . . . . . . . . . . . . . . . . . . . . . . . . . 48
How it works. . . . . . . . . . . . . . . . . . . . . . . . . . . . . . . . . . . . . . . . . . . . . . . . . . . . . . 48
Power levels . . . . . . . . . . . . . . . . . . . . . . . . . . . . . . . . . . . . . . . . . . . . . . . . . . . . . . 48
Suitable containers for microwave use . . . . . . . . . . . . . . . . . . . . . . . . . . . . . . . 49
Suitable containers for microwave use . . . . . . . . . . . . . . . . . . . . . . . . . . . . . . . . . 49
Unsuitable . . . . . . . . . . . . . . . . . . . . . . . . . . . . . . . . . . . . . . . . . . . . . . . . . . . . . . . 51
Testing dishes for their suitability . . . . . . . . . . . . . . . . . . . . . . . . . . . . . . . . . . . . . 52
Placing the dish in the oven. . . . . . . . . . . . . . . . . . . . . . . . . . . . . . . . . . . . . . . . . . 53
Cover . . . . . . . . . . . . . . . . . . . . . . . . . . . . . . . . . . . . . . . . . . . . . . . . . . . . . . . . . . . 53
Tips on saving energy . . . . . . . . . . . . . . . . . . . . . . . . . . . . . . . . . . . . . . . . . . . . . 55
Using residual heat . . . . . . . . . . . . . . . . . . . . . . . . . . . . . . . . . . . . . . . . . . . . . 55
Energy save mode . . . . . . . . . . . . . . . . . . . . . . . . . . . . . . . . . . . . . . . . . . . . . . 55
Functions without microwave power . . . . . . . . . . . . . . . . . . . . . . . . . . . . . . . . . 56
Simple operation . . . . . . . . . . . . . . . . . . . . . . . . . . . . . . . . . . . . . . . . . . . . . . . . . . 56
Cooling fan. . . . . . . . . . . . . . . . . . . . . . . . . . . . . . . . . . . . . . . . . . . . . . . . . . . . . . . 56
Recommended temperature . . . . . . . . . . . . . . . . . . . . . . . . . . . . . . . . . . . . . . . . . 57
Changing the temperature . . . . . . . . . . . . . . . . . . . . . . . . . . . . . . . . . . . . . . . . 57
Temperature indicator light. . . . . . . . . . . . . . . . . . . . . . . . . . . . . . . . . . . . . . . . 58
Pre-heating the oven . . . . . . . . . . . . . . . . . . . . . . . . . . . . . . . . . . . . . . . . . . . . . . . 58
Switching on and off automatically . . . . . . . . . . . . . . . . . . . . . . . . . . . . . . . . . . . . 59
Setting the duration. . . . . . . . . . . . . . . . . . . . . . . . . . . . . . . . . . . . . . . . . . . . . . 59
Setting a cooking duration and finish time . . . . . . . . . . . . . . . . . . . . . . . . . . . . 60
At the end of the cooking duration . . . . . . . . . . . . . . . . . . . . . . . . . . . . . . . . . . 61
Altering the cooking duration . . . . . . . . . . . . . . . . . . . . . . . . . . . . . . . . . . . . . . 61
Deleting a cooking duration . . . . . . . . . . . . . . . . . . . . . . . . . . . . . . . . . . . . . . . 62
Deleting a finish time . . . . . . . . . . . . . . . . . . . . . . . . . . . . . . . . . . . . . . . . . . . . 62
Microwave solo _ . . . . . . . . . . . . . . . . . . . . . . . . . . . . . . . . . . . . . . . . . . . . . . . 63
Simple operation . . . . . . . . . . . . . . . . . . . . . . . . . . . . . . . . . . . . . . . . . . . . . . . . . . 63
Cooling fan. . . . . . . . . . . . . . . . . . . . . . . . . . . . . . . . . . . . . . . . . . . . . . . . . . . . . . . 64
Altering the power level . . . . . . . . . . . . . . . . . . . . . . . . . . . . . . . . . . . . . . . . . . . . . 64
Altering the cooking duration. . . . . . . . . . . . . . . . . . . . . . . . . . . . . . . . . . . . . . . . . 64
3
Contents
Switching on and off automatically . . . . . . . . . . . . . . . . . . . . . . . . . . . . . . . . . . . . 65
Setting a finish time. . . . . . . . . . . . . . . . . . . . . . . . . . . . . . . . . . . . . . . . . . . . . . 65
Deleting a finish time . . . . . . . . . . . . . . . . . . . . . . . . . . . . . . . . . . . . . . . . . . . . 65
Microwave combination programmes . . . . . . . . . . . . . . . . . . . . . . . . . . . . . . . . 66
Simple operation . . . . . . . . . . . . . . . . . . . . . . . . . . . . . . . . . . . . . . . . . . . . . . . . . . 66
At the end of the cooking duration . . . . . . . . . . . . . . . . . . . . . . . . . . . . . . . . . . 67
Cooling fan. . . . . . . . . . . . . . . . . . . . . . . . . . . . . . . . . . . . . . . . . . . . . . . . . . . . . . . 67
Altering the cooking duration. . . . . . . . . . . . . . . . . . . . . . . . . . . . . . . . . . . . . . . . . 68
Changing the power level and the temperature . . . . . . . . . . . . . . . . . . . . . . . . . . 68
Changing the power level. . . . . . . . . . . . . . . . . . . . . . . . . . . . . . . . . . . . . . . . . 68
Changing the temperature . . . . . . . . . . . . . . . . . . . . . . . . . . . . . . . . . . . . . . . . 69
Switching on and off automatically . . . . . . . . . . . . . . . . . . . . . . . . . . . . . . . . . . . . 69
Quick MW W. . . . . . . . . . . . . . . . . . . . . . . . . . . . . . . . . . . . . . . . . . . . . . . . . . . . . 70
Popcorn Æ . . . . . . . . . . . . . . . . . . . . . . . . . . . . . . . . . . . . . . . . . . . . . . . . . . . . . 71
Baking . . . . . . . . . . . . . . . . . . . . . . . . . . . . . . . . . . . . . . . . . . . . . . . . . . . . . . . . . . 72
Notes on the baking chart . . . . . . . . . . . . . . . . . . . . . . . . . . . . . . . . . . . . . . . . . . . 73
Baking chart. . . . . . . . . . . . . . . . . . . . . . . . . . . . . . . . . . . . . . . . . . . . . . . . . . . . . . 74
Roasting . . . . . . . . . . . . . . . . . . . . . . . . . . . . . . . . . . . . . . . . . . . . . . . . . . . . . . . . 76
Notes on the roasting chart . . . . . . . . . . . . . . . . . . . . . . . . . . . . . . . . . . . . . . . . . . 77
Roasting chart . . . . . . . . . . . . . . . . . . . . . . . . . . . . . . . . . . . . . . . . . . . . . . . . . . . . 78
Grilling . . . . . . . . . . . . . . . . . . . . . . . . . . . . . . . . . . . . . . . . . . . . . . . . . . . . . . . . . 80
Notes on the grilling chart . . . . . . . . . . . . . . . . . . . . . . . . . . . . . . . . . . . . . . . . . . . 80
Grilling chart . . . . . . . . . . . . . . . . . . . . . . . . . . . . . . . . . . . . . . . . . . . . . . . . . . . . . 83
Microwave defrosting, reheating and cooking . . . . . . . . . . . . . . . . . . . . . . . . . 84
Charts for defrosting, reheating and cooking food . . . . . . . . . . . . . . . . . . . . . . . . 87
Chart for defrosting food. . . . . . . . . . . . . . . . . . . . . . . . . . . . . . . . . . . . . . . . . . 88
Chart for reheating food . . . . . . . . . . . . . . . . . . . . . . . . . . . . . . . . . . . . . . . . . . 89
Chart for cooking food . . . . . . . . . . . . . . . . . . . . . . . . . . . . . . . . . . . . . . . . . . . 90
Defrosting without microwave power . . . . . . . . . . . . . . . . . . . . . . . . . . . . . . . . 91
Gentle bake. . . . . . . . . . . . . . . . . . . . . . . . . . . . . . . . . . . . . . . . . . . . . . . . . . . . . . 92
Frozen food / Ready meals . . . . . . . . . . . . . . . . . . . . . . . . . . . . . . . . . . . . . . . . . 93
Note for test institutes . . . . . . . . . . . . . . . . . . . . . . . . . . . . . . . . . . . . . . . . . . . . . 94
Test food acc. to EN 60350 (Function: Microwave solo _). . . . . . . . . . . . . . . . . 94
Test food acc. to EN 60350 (functions without microwave power) . . . . . . . . . . . . 95
4
Contents
Cleaning and care . . . . . . . . . . . . . . . . . . . . . . . . . . . . . . . . . . . . . . . . . . . . . . . . 96
Unsuitable cleaning agents . . . . . . . . . . . . . . . . . . . . . . . . . . . . . . . . . . . . . . . . . . 96
Tips . . . . . . . . . . . . . . . . . . . . . . . . . . . . . . . . . . . . . . . . . . . . . . . . . . . . . . . . . . . . 97
Normal soiling . . . . . . . . . . . . . . . . . . . . . . . . . . . . . . . . . . . . . . . . . . . . . . . . . . . . 97
Stubborn soiling . . . . . . . . . . . . . . . . . . . . . . . . . . . . . . . . . . . . . . . . . . . . . . . . . . . 98
Lowering the top heat/grill element . . . . . . . . . . . . . . . . . . . . . . . . . . . . . . . . . . . . 99
Problem solving guide . . . . . . . . . . . . . . . . . . . . . . . . . . . . . . . . . . . . . . . . . . . 100
After Sales / Guarantee . . . . . . . . . . . . . . . . . . . . . . . . . . . . . . . . . . . . . . . . . . . 106
Electrical connection . . . . . . . . . . . . . . . . . . . . . . . . . . . . . . . . . . . . . . . . . . . . . 107
Building-in diagrams . . . . . . . . . . . . . . . . . . . . . . . . . . . . . . . . . . . . . . . . . . . . . 108
Appliance and niche dimensions . . . . . . . . . . . . . . . . . . . . . . . . . . . . . . . . . . . . 108
Installation in a tall unit . . . . . . . . . . . . . . . . . . . . . . . . . . . . . . . . . . . . . . . . . . 108
Installation in a base unit . . . . . . . . . . . . . . . . . . . . . . . . . . . . . . . . . . . . . . . . 109
Front dimensions . . . . . . . . . . . . . . . . . . . . . . . . . . . . . . . . . . . . . . . . . . . . . . . . . 110
Installation . . . . . . . . . . . . . . . . . . . . . . . . . . . . . . . . . . . . . . . . . . . . . . . . . . . . . 111
Addresses. . . . . . . . . . . . . . . . . . . . . . . . . . . . . . . . . . . . . . . . . . . . . . . . . . . . . . 115
5
Warning and Safety instructions
This appliance complies with statutory safety requirements.
Inappropriate use can, however, lead to personal injury and
damage to property.
To avoid the risk of accidents and damage to the appliance,
please read these instructions carefully before using it for the first
time. They contain important notes on installation, safety, use and
maintenance.
Miele cannot be held liable for non-compliance with these
instructions.
Keep these instructions in a safe place and ensure that new users
are familiar with the contents. Pass them on to any future owner.
6
Warning and Safety instructions
Correct application
~ This oven is intended for use in domestic households and similar
working and residential environments.
~ The oven is not intended for outdoor use.
~ It is intended for domestic use only to cook food, and in particular
to bake, roast, grill, cook, reheat, defrost and dry food.
Any other use is not supported by the manufacturer and could be
dangerous.
~ Do not use the microwave combination oven to store or dry items
which could ignite easily.
If such items were dried in the microwave oven, the moisture in the
item would evaporate causing it to dry out and even self-ignite.
~ People with reduced physical, sensory or mental capabilities, or
lack of experience or knowledge who are not able to use the
appliance safely on their own must be supervised whilst using it.
They may only use it unsupervised if they have been shown how to
use it safely and recognise and understand the consequences of
incorrect operation.
7
Warning and Safety instructions
Safety with children
~ Children under 8 years of age must be kept away from the
appliance unless they are constantly supervised.
~ Children 8 years and older may only use the oven unsupervised if
they have been shown how to use it safely and recognise and
understand the consequences of incorrect operation.
~ Children must not be allowed to clean or maintain the appliance
unsupervised.
~ Please supervise children in the vicinity of the oven and do not let
them play with it.
~ Danger of suffocation. Packaging, e.g. plastic wrappings, must
be kept out of the reach of babies and children. Whilst playing,
children could become entangled in packaging or pull it over their
head and suffocate.
8
Warning and Safety instructions
~ Danger of burning.
Children's skin is far more sensitive to high temperatures than that of
adults. External parts of the oven such as the door glass, control
panel and the vents become quite hot during use. Do not let
children touch the oven whilst it is in use.
~ Danger of injury
The oven door can support a maximum weight of 8 kg. Do not let
children sit on the door, lean against it or swing on it.
9
Warning and Safety instructions
Technical safety
~ Unauthorised installation, maintenance and repairs can cause
considerable danger for the user. Installation, maintenance and
repairs must only be carried out by a Miele authorised technician.
~ Never use a damaged oven. It could be dangerous. Check it for
visible signs of damage before using it.
~ Operating a damaged appliance can result in microwave leakage
and present a hazard to the user. Do not use the appliance if:
– the door is warped,
– the door hinges are loose,
– holes or cracks are visible in the casing, the door, the door seal or
the oven interior walls.
~ The electrical safety of this appliance can only be guaranteed
when correctly earthed. It is essential that this standard safety
requirement is met. If in any doubt please have the electrical
installation tested by a qualified electrician.
~ To avoid the risk of damage to the oven, make sure that the
connection data on the data plate (voltage and frequency) match
the mains electricity supply before connecting the oven to the
mains. Consult a qualified electrician if in doubt.
~ Do not connect the appliance to the mains electricity supply by a
multi-socket unit or an extension lead. These do not guarantee the
required safety of the appliance (fire hazard).
10
Warning and Safety instructions
~ For safety reasons, this appliance may only be used after it has
been built in.
~ The oven must not be used in a non-stationary location
(e.g. on a
ship).
~ Tampering with electrical connections or components and
mechanical parts is highly dangerous to the user and can cause
operational faults.
Never open the casing of the appliance.
~ While the appliance is under guarantee, repairs should only be
undertaken by a Miele authorised service technician. Otherwise the
guarantee is invalidated.
~ Miele can only guarantee the safety of the appliance when
genuine original Miele replacement parts are used. Faulty
components must only be replaced by Miele spare parts.
~ If the connection cable is damaged or if the oven is supplied
without a cable, it must be replaced or fitted with a special
connection cable by a Miele authorised technician (see "Electrical
connection").
11
Warning and Safety instructions
~ During installation, maintenance and repair work, the appliance
must be disconnected from the mains electricity supply, e.g. if the
oven lighting is faulty (see "Problem solving guide" and "Electrical
connection").
~ In order to function correctly, the oven requires an adequate
supply of cool air. Ensure that the supply of cool air is not impaired
(e.g. by heat insulation strips in the housing unit). Please also ensure
that the cool air supply is not unduly heated by other heat sources
such as a solid fuel stove.
~ If the oven is installed behind a furniture panel (e.g. a door),
ensure that the door is never closed whilst the oven is in use. Heat
and moisture can build up behind a closed furniture panel and
cause subsequent damage to the oven, the housing unit and the
floor. Do not close the door until the oven has cooled down
completely.
12
Warning and Safety instructions
Correct use
, Danger of burning.
The oven becomes hot when in use.
Depending on function being used, you could burn yourself on
the heating elements, oven interior, cooked food or oven
accessories.
Wear oven gloves when placing food in the oven, turning or
removing it and when adjusting oven shelves etc. in a hot oven.
~ Due to the high temperatures radiated, objects left near the oven
when it is in use could start to burn.
Do not use the oven to heat up the room.
~ Oil and fat can ignite if overheated. Never leave the oven
unattended when cooking with oil and fat. Do not use the oven for
deep fat frying.
Never use water to extinguish ignited oil or fat. Switch the oven off
immediately and then suffocate the flames by keeping the oven door
closed.
13
Warning and Safety instructions
~ Please be aware that durations when using microwave power are
often considerably shorter when cooking, reheating and defrosting
than when using functions without microwave power. Excessively
long cooking times can lead to food drying out and burning or could
even cause it to catch fire.
Make sure you keep to recommended grilling times when using the
grill. Do not use Microwave solo _ for drying items such as flowers,
herbs, bread or rolls. Never use functions with the grill for bake-off
products such as bread or bread rolls, or for drying flowers or herbs.
Use Fan plus U for these procedures and monitor the process
carefully.
~ If using alcohol in your recipes, please be aware that high
temperatures can cause the alcohol to vaporise. The vapour can
catch fire on hot heating elements.
~ When using residual heat to keep food in the oven warm, the high
humidity and amount of condensation in the oven can cause
corrosion in the oven. The control panel, the worktop or the housing
unit can also suffer damage.
Always cover food when using the Microwave solo _. Once food is
cooked through, use a lower power for continued cooking to reduce
the amount of steam produced from the food.
When using residual heat do not switch the oven off. Instead set the
temperature to the lowest setting and leave the oven on the selected
function.
The fan will then remain on automatically and dissipate the moisture.
~ Food which is stored in the oven or left in it to be kept warm can
dry out and the moisture released can lead to corrosion damage in
the oven.
Always cover food that is left in the oven to keep warm.
14
Warning and Safety instructions
~ A build-up of heat can cause damage to the enamel on the floor
of the oven.
When using Fan plus U do not line the floor of the oven with
anything, e. g. aluminium foil or so-called protective liners. Neither
should you place roasting pans or glass trays directly on the oven
floor.
~ It is important that the heat is allowed to spread evenly
throughout the food being cooked. This can be achieved by stirring
and/or turning the food, and observing a sufficiently long standing
time, which should be added to the time needed for cooking,
reheating or defrosting.
~ When heating food and drinks, remember that the heat is created
in the food itself, and that the container will normally be cooler. The
dish is only warmed by the heat of the food.
Before serving, remember to allow a sufficient standing time and
then always check the temperature of the food after taking it out of
the microwave oven. The temperature of the container is not an
indication of the temperature of the food or liquid in it. This is
particularly important when preparing food for babies, children,
and the elderly or infirm. Shake or stir baby milk and food
thoroughly after heating, and try it for temperature to ensure that it
will not scald the baby.
~ The oven is not suitable for cleaning or disinfecting items. Items
can get extremely hot and there is a danger of burning when the
item is removed from the appliance.
~ Do not cook or reheat food or liquids in sealed containers, jars or
bottles. With baby bottles, the screw top and teat must be removed.
Otherwise pressure will build up which can cause the bottle or
container to explode, posing a severe risk of injury.
15
Warning and Safety instructions
~ The boiling rod ensures that the liquid heats up evenly with
bubbles forming at the right time.
When reheating liquids, always place the boiling rod supplied into
the cup or glass.
When boiling and in particular when re-heating liquids, milk, sauces
etc, using microwave power without the boiling rod, the boiling point
of the liquid may be reached without the production of typical
bubbles. The liquid does not boil evenly throughout. This so-called
'boiling delay' can cause a sudden build up of bubbles when the
container is removed from the oven or shaken. This can lead to the
liquid boiling over suddenly and explosively. Danger of scalding and
burning. The formation of bubbles can be so strong that the
pressure forces the oven door open, with a danger of injury and
damage. The user could be injured and the appliance damaged.
~ Eggs can be cooked without their shells using microwave power
only if the yolk membrane has been punctured several times first.
The pressure could otherwise cause the egg yolk to explode.
16
Warning and Safety instructions
~ Eggs in their shells will explode if cooked with microwave power,
even after taking them out of the oven.
They can only be cooked in their shells using microwave heat in a
specially designed egg-boiling device available from specialist
shops. Hard-boiled eggs must not be reheated in the microwave
oven either as they too will explode.
~ Food with a thick skin or peel, such as tomatoes, sausages,
jacket potatoes and aubergines, should be pierced or cut in several
places to allow steam to escape and prevent the food from bursting.
~ To check food temperature, first interrupt the cooking process.
Only use a thermometer specifically approved for food use to
measure the temperature of the food. Do not use a thermometer
containing mercury or liquid as these are not suitable for use with
very high temperatures and break very easily.
~ Do not use the oven to heat up cushions or pads filled with cherry
kernels, wheat grains, lavender or gel, such as those used in
aromatherapy.
These pads can ignite when heated even after they have been
removed from the oven.
~ To avoid fuelling any flames, do not open the oven door if smoke
occurs inside the appliance. Interrupt the process by switching the
appliance off and disconnect it from the mains electricity supply. Do
not open the door until the smoke has dispersed.
~ Dishes with hollow knobs or handles are not suitable for use with
microwave power. Moisture which has gathered in the hollow
recesses can cause pressure to build up and the item can explode.
If the hollow recess is sufficiently ventilated, the item could be used.
However, we recommend that you do not use such dishes in the
microwave oven.
17
Warning and Safety instructions
~ Fire hazard. Using Microwave solo _ or Microwave combination
programmes with plastic dishes which are not microwave safe can
cause them to melt and damage the appliance. Do not use any
containers or cutlery made from or containing metal, aluminium foil,
lead crystal glassware, temperature-sensitive plastics, wooden
utensils or cutlery, metal clips or plastic or paper covered wire ties.
Do not use bowls with milled rims, or plastic pots with the foil lid only
partially removed (see "Suitable containers for microwave use").
~ For functions without microwave power: plastic containers which
are not suitable for use in an oven can melt at high temperatures
and can even damage the oven or catch fire. Only use containers
which are declared by the manufacturer as being suitable for use in
an oven. Follow the manufacturer's instructions on use.
~ Do not leave the microwave oven unattended when reheating or
cooking food in disposable containers made of plastic, paper or
other inflammable materials.
Before using single-use containers make sure they are suitable for
use in microwave ovens. See "Suitable containers for microwave use
- Plastics".
~ Do not reheat food in the oven in heat-retaining bags which are
intended for use in normal ovens.
These heat-retaining bags usually contain a thin layer of aluminium
foil which reflects microwaves. This reflected energy can, in turn,
cause the outer paper covering to become so hot that it ignites.
18
Warning and Safety instructions
~ The oven can suffer damage when using Microwave solo _ or
Combination programmes if it is empty or incorrectly loaded.
For this reason please do not use functions with microwave power to
pre-heat crockery or to dry herbs.
Instead use Fan plus U for these procedures.
~ Do not heat up food in closed containers e.g. tins or sealed jars in
the oven, as pressure will build up in the container, causing it to
explode.
~ You could injure yourself on the open oven door or trip over it.
Avoid leaving the door open unnecessarily.
~ The door can support a maximum weight of 8 kg.
Do not sit on or lean against an open door, and do not place heavy
objects on it. Also make sure that nothing can get trapped between
the door and the oven cavity. The oven could get damaged.
19
Warning and Safety instructions
Cleaning and care
~ Do not use a steam cleaning appliance to clean this appliance.
The steam could reach electrical components and cause a short
circuit.
~ Scratches on the door glass can result in the glass breaking. Do
not use abrasive cleaners, hard sponges, brushes or sharp metal
tools to clean the door glass.
~ Try to avoid the interior walls being splashed with food or liquids
containing salt. If it does happen, wipe these away thoroughly to
avoid corrosion on the stainless steel surface.
Accessories
~ Only use genuine original Miele accessories. Using accessories
from other manufacturers will invalidate the guarantee, and Miele
cannot accept liability.
20
Caring for the environment
Disposal of the packing
material
Disposing of your old
appliance
The packaging is designed to protect
the appliance from damage during
transportation. The packaging materials
used are selected from materials which
are environmentally friendly for disposal
and should be recycled.
Electrical and electronic appliances
often contain valuable materials. They
also contain materials which, if handled
or disposed of incorrectly, could be
potentially hazardous to human health
and to the environment. They are,
however, essential for the correct
functioning of your appliance. Please
do not therefore dispose of it with your
household waste.
Recycling the packaging reduces the
use of raw materials in the
manufacturing process and also
reduces the amount of waste in landfill
sites.
Please dispose of it at your local
community waste collection / recycling
centre.
Ensure that it presents no danger to
children while being stored for
disposal.
21
Overview
a Controls
b Grill element
c Three shelf levels for the glass tray and rack
d Front frame with data plate
e Door
22
Controls
a On/Off sensor K
b Function selector
c Display
d Rotary selector V W
e OK, # sensors
f Sensors for W, Æ, X, I, N
23
Controls
On/Off sensor K
Display
The On/Off sensor K is recessed and
reacts to touch.
The display shows the time of day or
your settings (depending on model).
It is used for switching the oven on and
off.
3
Function selector
0:0:0:0
NX + 0 6 _ T S
g lb/oz
°C °F W
h
Start
V
For selecting oven functions.
It can be turned clockwise or
anti-clockwise and in the ß position,
can be retracted by pressing it in.
Functions
Y
P
_
a
L
S
U
\
[
K
24
Grill
Defrost
Microwave
Microwave + Fan plus
Microwave + Auto roast
Rapid heat-up
Fan plus
Fan grill
Auto roast
Gentle bake
min
3
0:0:0:0
NX + 0 6 _ T S
g lb/oz
°C °F W
h
min
J
V
Controls
Symbols in the display
Rotary selector
Depending on the position of the
function selector V and/or whether a
sensor has been touched, the following
symbols appear:
Use the rotary selector V W to enter
temperatures and durations.
Symbol/function
N
Minute minder
3
Temperature indicator
light
6
Temperature
_
Microwave
T
Duration
S
End of cooking
duration
V
Any
Function
Turning it clockwise will increase the
values, and turning it anti-clockwise will
decrease them.
It can also be used to highlight a
function by moving the triangle V in
the display.
It can be turned clockwise or
anti-clockwise. It can be retracted in
any position by pressing it in.
Start/ Start Microwave *
J
X
Settings P
+
Time of day
0
System lock
ß
* depending on model
You can only set or change a function if
the function selector is in the correct
position.
25
Controls
Sensor controls
The OK, #, W, Æ, X, I, N sensors react to touch. Each touch is confirmed
with a keypad tone.
This keypad tone can be switched off by changing the status of setting P 3 to S i
(see "Settings").
Sensor Function
26
Notes
Functions marked with triangle V can be called up
by touching OK. The selected function can be
changed whilst triangle V is flashing.
Touch OK to save the changes.
OK
For calling up
functions and
saving settings
#
To go back a step
W
Quick MW
The oven starts with maximum power 1000 W and a
duration of 1 minute (see "Settings – P 9"). Touching
the sensor repeatedly increases the duration in
stages.
The function selector must be pointing to ß.
Æ
Popcorn
The ovens start with 850 W and a duration of
3 minutes (see "Settings – P i0").
The function selector must be pointing to ß.
Controls
Sensor Function
Notes
X
To call up a
function
I
For switching the If the time of day display is visible, the oven interior
oven interior
lighting can be switched on and off by touching the
lighting on and off I sensor, for example when cleaning the oven.
If the time of day display is switched off, the I
sensor will not react until the oven is switched on.
The oven interior lighting switches off after
15 seconds during a cooking process or remains
constantly switched on, depending on the setting
selected.
N
For setting the
minute minder
If the time of day is visible in the display and the
rotary selector is at the ß position, the symbols for
settings X time of day + and system lock 0 will
appear when the X sensor is touched.
If the time of day display is switched off, the X
sensor will not react until the oven is switched on.
During a cooking process you can set the
temperature 6, cooking duration T and finish time S
by touching this sensor. With microwave combination
programmes you can also set the microwave power
level _ .
If the time of day is visible you can enter a minute
minder duration at any time, e. g. when boiling eggs
on the hob.
If the time of day display is switched off, the N
sensor will not react until the oven is switched on.
27
Features
Model numbers
A list of the ovens described in these
operating instructions can be found on
the back page.
Data plate
Accessories supplied and
available to order
This oven is supplied with a glass
tray and a rack.
The data plate is located on the front
frame, visible when the door is open.
All the accessories listed as well as the
cleaning and care products are
designed for Miele ovens.
The data plate states the model number
of your oven, the serial number as well
as connection data (voltage, frequency
and maximum connected load).
These can be ordered via the internet
at www.miele-shop.com, from Miele
(see back cover for contact details) or
from your Miele dealer.
Please have this information to hand,
should you need to contact Miele
regarding any questions or problems.
When ordering, please quote the model
number of your oven and the reference
number of the accessories required.
Items supplied
The oven is supplied with:
– the operating and installation
instructions for using the oven,
– screws for securing your oven in the
housing unit,
– various accessories.
28
Features
Glass tray
Rack with non-tip safety notches
The glass tray is suitable for use with all
cooking functions.
The rack is suitable for use with
functions without microwave and for
Microwave combination programmes. It
is not suitable for use with Microwave
solo _.
Always use the glass tray when
using the Microwave (Solo) function
_.
Do not place items weighing more
than 8 kg on it.
Do not place the hot glass tray on a
cold surface, such as a tiled or
granite worktop. The glass tray
could get damaged. Use a suitable
heat-resistant mat or pot rest.
Danger of burning. The rack gets
hot when used with combination
programmes which use the
microwave function.
Wear oven gloves when placing
food in a hot oven and when taking
it out.
Do not place the rack directly on the
floor of the oven and do not use it
with Microwave solo.
This could cause arcing which could
damage the oven.
Do not place items weighing more
than 8 kg on the rack.
29
Features
The rack has non-tip safety notches
which prevent it being pulled right out
when it only needs to be pulled out
partially.
When pushing the rack back in,
always ensure that the safety
notches are at the back of the oven
(see illustration).
^ To remove the rack, lift it upwards
slightly at the front when the safety
notches connect with the sides of the
oven.
^ We recommend using the rack
together with the glass tray when
cooking items on the rack which
might drip.
30
Boiling rod
The boiling rod helps liquids to heat
evenly.
^ When reheating liquids, place the
boiling rod supplied into the cup or
glass.
Features
Round baking tray HBF 27-1
Do not use the round baking tray
with Microwave solo _ or with
Microwave combination
programmes.
HUB oven dishes and HBD oven dish
lids
Do not use the gourmet oven dish
with Microwave solo _ or with
Microwave combination
programmes.
Miele gourmet oven dishes can be
placed on the rack on shelf level 1.
They have an anti-stick coating.
The round baking tray is suitable for
cooking pizza, shallow cakes made
with yeast or whisked mixtures, sweet
and savoury tarts, baked desserts, flat
bread, and can also be used for frozen
cakes and pizzas.
The Miele oven dishes are either 22 cm
or 35 cm deep. The width and height
are the same.
Place the round baking tray on the
rack.
Depth: 22 cm
Depth: 35 cm
HUB61-22
HUB62-22*
HUB61-35**
HBD 60-22
HBD 60-35
The enamelled surface has been
treated with PerfectClean.
Lids are also available. These are
ordered separately.
* suitable for use on induction hobs
** Oven dish HUB61-35 cannot be
used in conjunction with its lid
because the total height of these two
items exceeds the height of the
cavity.
31
Features
Miele microfibre cloth
Light soiling and fingerprints can be
easily removed with the microfibre
cloth.
Miele oven cleaner
Miele oven cleaner is suitable for
removing very stubborn soiling. It is not
necessary to pre-heat the oven
beforehand.
32
Features
Oven controls
Cooling fan
In addition to operating the various
cooking functions for baking, roasting
and grilling, the oven controls are also
used to operate
The cooling fan will come on
automatically when a cooking
programme is started. The cooling fan
mixes hot air from the oven cavity with
cool room air before venting it out into
the kitchen through vents located
between the appliance door and the
control panel.
– the time of day display,
– a minute minder,
– a timer to automatically switch
cooking programmes on and off,
Safety features
The cooling fan will continue to run for a
while after a cooking process to
prevent moisture building up in the
oven, on the control panel or on the
oven housing unit. It will switch itself off
automatically after a while.
System lock 0
Safety switch-off
The system lock prevents the oven from
being used unintentionally (see "System
lock 0").
A function without microwave can be
started without selecting a cooking
duration. To prevent over-use and the
consequent danger of fire, the oven will
switch itself off automatically after a
certain length of time. This can be
between 1 hour and 12 hours
depending on the function and
temperature chosen.
– settings that can be customised.
The system lock will remain activated
even after an interruption to the power
supply.
If a combination programme is
followed in quick succession by
another programme using microwave
power, the magnetron (which produces
the microwaves) cannot be switched on
again until approx. 10 seconds have
elapsed. Therefore wait a short while
before starting the second process.
33
Features
PerfectClean treated surfaces
PerfectClean surfaces have very good
non-stick properties and are much
easier to keep clean than conventional
enamel surfaces, if cleaned regularly.
Food can be taken off these surfaces
easily, and soiling from baking and
roasting is simple to remove.
Food can be sliced or cut up on
PerfectClean surfaces.
However, do not use ceramic knives
as these will scratch the
PerfectClean surface.
Surfaces treated with PerfectClean
enamel can be cleaned as you would
clean glass.
Read the instructions in "Cleaning and
care" so that the benefits of the
non-stick properties and easy cleaning
are retained.
The oven compartment and the rack
have a PerfectClean finish.
34
Using for the first time
Before using for the first time
,The oven must not be operated
until it has been correctly installed in
its housing unit.
^ Press and release the function and
temperature selectors if they are
retracted.
Setting the time of day for the
first time
The time of day is shown in 24 hour
clock format.
After connecting the oven to the
electricity supply, 12:00 will appear in
the display and the triangle V will flash
under +:
The time of day can only be changed
when the function selector is at ß.
^ Set the time of day
+
V
i2:00
^ Use the rotary selector to enter the
time of day.
^ Touch the OK sensor.
The time of day is now saved.
The time of day can be displayed in
12 hour format by setting P 4 in the
settings menu to status i2 h (see
"Settings").
In the event of a power cut the time of
day is saved for approx. 200 hours. If
power is restored within this time the
current time of day is displayed.
After a longer power cut, the time of
day needs to be re-entered.
The time of day display is switched
off by default (see "Settings – P i").
The display appears dark when the
oven is switched off. The time of day
continues to run unseen in the
background.
35
Using for the first time
Heating up the oven for the
first time
New ovens can give off an unpleasant
smell on first use. Heating up the oven
for at least 1 hour with nothing in it will
get rid of this smell.
Ensure that the kitchen is well
ventilated during this operation.
Close doors to other rooms to
prevent the smell spreading
throughout the house.
^ Remove any stickers or protective foil
from the oven and accessories.
^ Take the accessories out of the oven
and clean them (see "Cleaning and
care").
^ Before heating the oven up, wipe the
interior with a damp cloth to remove
any dust or bits of packaging that
may have accumulated in the oven
compartment during storage and
unpacking.
^ Switch the oven on.
The recommended temperature will
appear in the display with the triangle
V flashing under 6:
°C
6
V
^ Use the rotary selector to set the
maximum possible temperature
(250 °C).
36
The oven heating will switch on.
Heat the empty oven for at least an
hour.
After at least an hour:
^ Turn the function selector to ß.
After heating up for the first time
,Danger of burning. Allow the
oven interior to cool down before
cleaning by hand.
^ Touch I, to switch on the oven
interior lighting.
^ Clean the oven interior with a clean
sponge and a solution of hot water
and washing-up liquid or a damp
microfibre cloth.
^ Dry all surfaces with a soft cloth.
^ Switch the interior lighting and the
oven off.
Leave the oven door open until the
oven interior is completely dry.
^ Select Fan plus U.
i60
^ Touch the OK sensor.
Settings
Altering the time of day
The time of day can only be changed
when the function selector is at ß.
^ Touch X.
^ Use the rotary selector to move the
V triangle until it appears under +.
^ Touch the OK sensor.
The triangle V will flash under +.
^ Use the rotary selector to enter the
time of day.
^ Touch the OK sensor.
The time of day is now saved.
In the event of a power cut the time of
day is saved for approx. 200 hours. If
power is restored within this time the
current time of day is displayed.
After a longer power cut, the time of
day needs to be re-entered.
37
Settings
Changing factory default
settings
Settings can only be changed when
the oven is switched on and the
rotary selector is at ß.
Your appliance is supplied with a
number of standard default settings
(see the "Settings overview" chart).
A setting is changed by altering its
status.
^ Touch X.
^ If necessary use the rotary selector to
move the triangle V until it appears
under X.
P:
X + 0
V
:
P i will appear:
:i
^ If you wish to change another setting,
use the rotary selector to select the
appropriate number.
^ Touch the OK sensor.
38
0
The setting is selected and the current
status appears, e.g. S 0.
To alter the status:
^ Use the rotary selector to select the
status you want.
^ Touch the OK sensor.
The selected status is saved and the
setting appears again.
If you wish to alter more settings,
proceed as described previously.
Touch # if you have not changed one
setting and wish to switch to another.
^ Press X if you do not want to change
any more settings.
^ Touch the OK sensor.
P:
S:
The settings remain in the memory
even after a power cut.
Settings
Settings overview
Setting
P I
Time of day
display
Status
S 0*
S I
P 2
Buzzer volume
S 0
S I to
S 30 *
P 3
Keypad tone
P 4
Clock format
S 0
S I*
24^ *
i2^
The time of day display is switched off.
The display is dark when the oven is switched off.
The time of day continues to run unseen in the
background.
If you have selected status S 0, the oven must be
switched on before it can be used. This also applies
for the minute minder N and lighting I.
The oven also switches off automatically if no
settings are selected within a certain period of time
(approx. 30 minutes).
The time of day display is switched on
and is visible in the display.
The buzzer is switched off.
The buzzer is switched on.
The volume can be altered. When you select a
status you will hear the corresponding buzzer.
Keypad tone deactivated.
Keypad tone activated.
The time of day is shown in 24 hour format.
The time of day is shown in 12 hour format.
If you change the clock after 13:00 from a 12 hour
clock to a 24 hour clock you will need to update the
hour numerical block for the clock accordingly.
* Factory default setting
39
Settings
Setting
P 5
Temperature
units
P 6
Display
brightness
Status
°C *
°F
P 7
Lighting
S 0*
P 8
Keeping warm
S i to
S 7,
S 4*
S I
S 0*
S I
* Factory default setting
40
The temperature is displayed in degrees Celsius.
The temperature is displayed in degrees
Fahrenheit.
You can choose different levels of brightness for
the display.
S i minimum brightness
S 7 maximum brightness.
The oven interior light is switched on for 15
seconds and then switches off automatically.
The oven interior light is switched on constantly.
Keeping warm is deactivated.
Keeping warm is activated.
The Keeping warm function is activated as standard with Microwave solo _ if a power level of
min. 450 W and a cooking duration of at least
5 minutes has been selected. If food is not
removed from the oven at the end of the
programme, the Keeping warm function will start
automatically after about 2 minutes. The food will
be kept warm for approx. 15 minutes using a
power level of 80 W. The Keeping warm function
switches itself off if the door is opened during this
phase.
Settings
Setting
P 9
Quick MW
Status
P i0
Popcorn
P ii
Demo mode
S 0*
S i
A power level of 1000 W and a duration of 1 minute are
the default settings for the Quick start microwave
function.
The microwave power level can be changed to 80 W,
150 W, 300 W, 450 W, 600 W or 850 W. The cooking
duration can also be changed. The maximum duration
that can be set depends on the power level selected:
80–300 W: maximum 10 minutes
450–1000 W: maximum 5 minutes
A power level of 850 W and a duration of 3 minutes are
the default settings.
These settings are suitable for most brands of
microwave popcorn. The duration can be altered up to
a maximum of 4 minutes. The microwave power level
cannot be changed.
Select S 0 and touch OK for approx. 4 seconds. If---appears briefly, demo mode is deactivated.
Select S i and touch OK for approx. 4 seconds. If
MES_ appears briefly, demo mode is activated.
The oven can be operated but will not heat up and
functions using microwave power will not work.
Do not activate this setting for domestic use.
* Factory default setting
41
System lock 0
The system lock 0 prevents the oven
from being used unintentionally, for
example by children.
The oven is delivered with the system
lock deactivated.
The setting for the system lock can be
be changed by altering its status s:
– S 0 = off
– S i = on
To activate the system lock
The status of the system lock can
only be altered when the oven is
switched on and the rotary selector is
at ß.
^ Touch X.
^ Use the rotary selector to move the
triangle V until it appears under 0.
P
X + 0
V
^ Touch the OK sensor.
42
The currently set status S 0 appears:
S
0
V
0
^ Use the rotary selector to select
status S I.
S
0
V
i
^ Touch the OK sensor.
^ Touch X.
The current time of day will appear.
^ Switch the oven off.
When the appliance is switched on
again the 0 symbol will appear in the
display to remind you that the system
lock has been activated.
The system lock will remain activated
even after an interruption to the
power supply.
System lock 0
Deactivating the system lock for a
cooking process
^ Switch the oven on.
The 0 and V symbols and the current
time of day will appear:
i2:25
0
;
^ Touch OK until 0 goes out.
The oven can now be used.
Deactivating the system lock
The status of the system lock can
only be altered when the oven is
switched on and the rotary selector is
at ß.
^ Switch the oven on.
^ Touch OK until 0 goes out.
^ Touch X.
^ Use the rotary selector to move the
triangle V until it appears under 0.
^ Touch the OK sensor.
The currently set status S i appears.
^ Use the rotary selector to set
status S 0.
^ Touch the OK sensor.
^ Touch X.
The system lock is switched off.
The 0 symbol disappears.
43
Minute minder N
The minute minder can be used to time
other activities in the kitchen, e.g.
boiling eggs.
The minute minder can also be used at
the same time as a cooking programme
in which the start and finish times have
been set, e.g. as a reminder to stir a
dish or add seasoning etc.
A maximum minute minder time of 99
minutes and 55 seconds can be set.
To set the minute minder
Example:
You want to boil some eggs and set a
minute minder time of 6 minutes and 20
seconds.
If you have selected the setting "P i –
S 0" for the time of day display, you
will need to switch the oven on before
you can set a minute minder time.
^ Touch N.
00:00 will appear in the display with the
triangle V flashing under N:
N
V
0o:00
min
^ Use the rotary selector to set the
minute minder time you require.
N
V
06:20
^ Touch the OK sensor.
44
min
Minute minder N
The minute minder is saved and will
count down in seconds.
N
V
6:i9
To change the time set for the
minute minder
^ Touch N.
min
The minute minder time selected
appears.
^ Use the rotary selector to set the
minute minder time.
The N symbol indicates the minute
minder has been set.
^ Touch the OK sensor.
At the end of the minute minder time
The changed minute minder is saved
and will count down in seconds.
– N will flash,
– the display will show the time
counting upwards,
To cancel the time set for the
minute minder
^ Touch N.
– a buzzer will sound three times if this
option is selected (see "Settings –
P 2").
^ Use the rotary selector to reduce the
minute minder time to 00:00.
^ Touch N.
^ Touch the OK sensor.
The buzzer will stop and the symbols in
the display will go out.
The minute minder is now cancelled.
45
Overview of functions
Your oven has a range of oven
functions for preparing food.
Fan grill \
Grill Y
For grilling thicker cuts of meat
(e. g. roulades, chicken). Lower
temperatures can be used than when
using the Grill Y function, as the fan
distributes the heat to the food straight
away.
For grilling thin cuts (e.g. steaks) and
browning baked dishes.
Auto roast [
Functions which do not use
microwave energy
Defrost P
For the gentle defrosting of frozen food.
Rapid heat-up S
For pre-heating the oven quickly.
The oven function required must then
be selected.
Fan plus U
This function is used for baking and
roasting on different levels at the same
time.
A lower temperature can be selected
than when using other functions,
because the fan distributes the heat to
the food straight away.
46
This is used for roasting at a high
temperature and continued cooking at
a lower temperature.
During the searing phase the oven
heats up to a high temperature (230°C)
to seal the meat and keep it succulent
and tasty. As soon as this temperature
has been reached, the oven
temperature automatically drops back
down to the pre-selected temperature
for continued roasting.
Gentle bake K
Ideal for cooking bakes and gratins that
need to be crispy on top.
Overview of functions
Microwave solo _
This function is used to rapidly defrost,
reheat and cook food
Microwave combination
programmes
With Microwave combination
programmes the heating element and
the magnetron switch on and off
alternating one after the other. The
heating element browns the food and
the magnetron helps it cook quickly.
A maximum microwave power level of
300 W can be used with Microwave
combination programmes.
Microwave + Fan plus a
For rapid reheating and cooking of
food, browning it at the same time.
This combination programme saves the
most time and energy.
When baking do not set the microwave
power higher than 150 W.
Microwave + Auto roast L
This is used for roasting at a high
temperature and continued cooking at
a lower temperature.
During the searing phase the oven
heats up to a high temperature (230°C)
to seal the meat and keep it succulent
and tasty. As soon as this temperature
has been reached, the oven
temperature automatically drops back
down to the pre-selected temperature
for continued roasting.
47
Microwave power
How it works
In a microwave combination oven there
is a high-frequency tube called a
magnetron. This converts electrical
energy into microwaves. These
microwaves are distributed evenly
throughout the oven interior, and
rebound off the metal sides of the oven
interior to reach the food from all sides.
In order for microwaves to reach the
food, they must be able to penetrate
the cooking utensil being used.
Microwaves can penetrate porcelain,
glass, cardboard and plastics, but not
metal. Do not, therefore, use utensils
made of metal, or which contain metal,
for example in the form of gold or silver
trim. The metal reflects the microwaves
and this could cause sparking. The
microwaves cannot be absorbed.
Microwaves pass through a suitable
container and find their way directly into
the food. All food contains moisture
molecules which, when subjected to
microwave energy, start to oscillate 2.5
thousand million times a second. The
friction caused by this vibration creates
heat, which first starts developing
around the outside of the food and then
slowly penetrates towards the centre.
The moisture, fat and sugar content of
food will affect the speed at which it is
cooked. The more water a food
contains, the quicker it is to reheat or
cook.
48
As heat is produced directly in the
food,
– food can generally be cooked
without adding much liquid or
cooking oil.
– cooking, reheating and defrosting is
quicker than using conventional
methods.
– nutrients, such as vitamins and
minerals, are generally retained.
– the colour, texture and taste of food
are not impaired.
Microwaves stop being produced as
soon as the cooking process is
interrupted or the appliance door is
opened.
When the appliance is in operation, the
closed, sealed door prevents
microwaves escaping from the
appliance.
Power levels
The following power levels can be
selected:
80 W, 150 W, 300 W, 450 W, 600 W,
850 W, 1000 W
Suitable containers for microwave use
Fire hazard. Non-microwave safe
dishes can suffer damage or
damage the oven if used with
Microwave solo _ or Microwave
combination programmes.
Microwaves are reflected by metal,
The material and shape of the
containers used affect cooking results
and times.
Heat distribution is more even in round
and oval shaped flat containers than in
rectangular containers, providing better
results.
Suitable containers for
microwave use
Glassware
pass through glass, porcelain, plastic
and card,
Heat-resistant glass or ceramic glass
are ideal for use with microwave power.
Exception: Do not use crystal glass
as it contains lead which can crack
or shatter in a microwave oven.
Porcelain
Porcelain is a suitable material.
and are absorbed by food.
Exception: Do not use porcelain with
gold or silver edging or items with
hollow knobs or handles, as
insufficient ventilation may cause a
build-up of pressure.
49
Suitable containers for microwave use
Earthenware
– Plastic microwave containers
Decorated earthenware is only suitable
if the decoration is beneath an all-over
glaze.
These are readily available from retail
outlets.
Danger of burning. Wear oven
gloves when removing earthenware
dishes from the oven.
Styrofoam containers can be used for
short, timed warming and reheating of
food.
Plastics
Plastic containers and plastic
disposable containers may only be
used for Microwave solo _ if they
have been declared as suitable for
microwave use by the manufacturer. To
protect the environment it is best to
avoid using single-use containers.
Do not leave the oven unattended
when reheating or cooking food in
disposable containers made of
plastic, paper or other inflammable
materials.
Plastic containers must only be used
with Microwave solo _. They must
not be used with Microwave
combination programmes. They
must be heat-resistant to a minimum
of 110 °C.
Otherwise the plastic may melt and
fuse with the food.
– Styrofoam containers
– Plastic "Boil-in-the-bag" bags
Plastic boiling bags can be used for
cooking and reheating. They should be
pierced beforehand so that steam can
escape.
This prevents a build-up of pressure
and reduces the risk of the bag
bursting.There are also special
steaming bags available which do not
need to be pierced. Please follow
instructions given on the packet.
– Roasting bags and tubes
Please follow the manufacturer's
instructions when using roasting bags
and tubes.
,Do not use metal clips, plastic
clips containing metal parts, or
paper ties containing wire. There is
a danger that they will ignite when
heated.
– Melamine containers
Melamine is not suitable for use in this
oven. Melamine absorbs microwave
energy and gets hot. When purchasing
plasticware, make sure that it is suitable
for use in a microwave oven.
50
Suitable containers for microwave use
Unsuitable
,Dishes with hollow knobs or
handles are not suitable for use with
microwave power. Moisture which
has gathered in the hollow recesses
can cause pressure to build up and
the item can explode. If the hollow
recess is sufficiently ventilated, the
item could be used. However, we
recommend that you do not use
such dishes in the microwave oven.
Metal
Metal reflects microwaves and
obstructs the cooking process.
^ Do not use metal containers,
aluminium, foil, metal cutlery and
china with metallic decoration such
as gold rims or cobalt blue with
Microwave combination
programmes.
Do not use containers where the foil
lid has not been completely
removed as small pieces of foil can
cause sparking.
Exceptions:
The rack supplied with the oven is
suitable for use with all functions
that do not use microwave power
and with Microwave combination
programmes.
The rack should be used on shelf
level 1. Do not place it on the oven
floor.
– Metal bakeware can be used with
microwave combination
programmes.
– Ready-meals in aluminium foil trays
can be defrosted and reheated using
microwave power as long as the lid
is removed.
When using foil trays there is a risk
of arcing or sparks occurring in the
oven. For this reason place the foil
tray on the glass tray and not on the
rack.
The foil tray must be at least 2 cm
away from the oven walls. It must
not touch them.
However, as food is only heated from
the top it is better to remove the food
from the aluminium foil container and
transfer it to a dish suitable for use in
a microwave oven. The heat
distribution will be more even.
51
Suitable containers for microwave use
– For even defrosting and to avoid
overcooking unevenly shaped cuts
of meat, poultry or fish, small pieces
of aluminium foil may be used to
mask wingtips or other thin parts for
the last few minutes of the
programme.
Make sure that the aluminium foil is
at least 2 cm from the oven walls at
all times. It must not touch the walls.
– Metal meat skewers or clamps
should only be used if they are very
small in comparison to the size of the
cut of meat.
Glazes and colours
Some glazes and colours contain metal
and are therefore unsuitable for
microwave functions.
Wood
Wooden dishes are not suitable.
Moisture contained in the wood
evaporates when exposed to
microwave energy, causing the wood to
dry and crack.
Testing dishes for their
suitability
If in doubt as to whether glass,
earthenware or porcelain plates or
dishes are suitable for use with
microwave energy, a simple test can be
performed:
^ Place the container in the middle of
the glass tray and slide the tray into
shelf level 1.
^ Close the door.
^ Select Microwave solo _.
^ Set the highest power level (1000 W)
and a duration of 30 seconds.
^ Start the programme.
At the end of the test, the water in
the glass should be hot and the dish
cool. If the dish is hot, it would be
unwise to use the dish.
If a cracking noise is heard
accompanied by sparks during the
test, switch the appliance off immediately. Any crockery which causes
this reaction is unsuitable for use
with microwave power.
If any doubt exists about the
suitability of a container, please
contact the supplier.
This test cannot be used to check
whether items with hollow knobs or
handles are suitable for use with
microwave power.
52
Suitable containers for microwave use
Placing the dish in the oven
Cover
A cover:
– prevents too much steam escaping,
especially when cooking foods which
need longer to cook, such as
potatoes.
– speeds up the cooking process.
– prevents food from drying out.
– helps keep the oven interior clean.
^ Insert the glass tray on shelf level 1.
^ The dish containing the food should
always be placed in the middle of the
glass tray.
Placing the food directly on the floor
of the oven would give unsatisfactory
and uneven results as the
microwaves would not be able to
reach the food from below.
^ When using Microwave solo _
always cover the food with a lid or
cover made of microwave safe glass
or plastic.
These are available from retail
outlets.
Alternatively, use a clingfilm
recommended for use in a microwave
oven (pierce as instructed by the
manufacturer). Heat can cause normal
clingfilm to distort and fuse with the
food.
53
Suitable containers for microwave use
,The cover can only withstand
temperatures up to 110 °C.
Higher temperatures (e. g. those
used for grilling and Fan plus) can
cause the plastic to distort and fuse
with the food.
The cover should only be used with
Microwave solo _.
The cover should not form a seal
with the container. If the cover is
used with a container which only
has a narrow diameter, there might
not be enough room for
condensation to escape through the
holes in the top. The cover could get
too hot and could start to melt.
54
Do not use a cover if:
– cooking breaded food,
– cooking food which requires a crisp
finish,
– cooking food with a Microwave
combination programme.
,Do not cook or reheat food or
liquids in sealed containers, jars or
bottles. With baby bottles, the screw
top and teat must be removed.
Otherwise pressure builds up which
can cause the bottle or container to
explode, posing a severe risk of
injury.
Tips on saving energy
– Remove any accessories from the
oven that you do not require for
cooking.
– The factory default setting "P i – S 0"
for the time of day display gives the
lowest possible energy consumption.
– Pre-heat the oven only if instructed to
do so in the recipe or the cooking
chart.
– With the factory default setting "P 7 –
S 0" the oven interior lighting
switches off automatically after
15 seconds. It can be switched on
again at any time by touching I.
– If possible, do not open the door
during a programme.
If the door is opened during a
programme that is not using
microwave power, the heat in the
oven automatically switches off. The
fans continue to operate. As soon as
the door is closed again, the
programme will continue.
– In general, if a range of temperatures
is given, it is best to select the lower
temperature and to check the food
after the shortest given time.
– Use Fan plus U as you can cook at
temperatures 10–30 °C lower than
when using other functions.
– Fan grill \ can be used for a wide
variety of food. With Fan grill you can
use lower temperatures than with
other grill functions which use the
maximum temperature setting.
Using residual heat
When cooking using temperatures
above 140 °C and cooking durations
longer than 30 minutes you can turn the
rotary selector to the ß position about 5
minutes before the end of cooking. The
heating elements will switch off and the
residual heat in the oven will be
sufficient to finish cooking the food.
Energy save mode
The oven will switch itself off
automatically to save energy if no other
action is taken within a certain time
frame after switching it on or after the
end of a cooking programme.
The time when this happens will
depend on the selected settings
(function, temperature and duration).
The time of day will be displayed or the
display will remain dark (see "Settings Time - Display").
55
Functions without microwave power
Simple operation
After cooking:
^ Switch the oven on.
^ Turn the function selector to ß.
^ Place the food in the oven.
^ Take the food out of the oven.
^ Select the required oven function with
the function selector.
Cooling fan
The recommended temperature will
appear:
i60
°C
The cooling fan will switch off
automatically when the temperature in
the oven interior has fallen sufficiently.
6
V
The oven heating, lighting and cooling
fan will switch on.
^ Use the rotary selector to change the
temperature if necessary.
The current temperature and
temperature indicator light 3 will
appear after a short time.
3
42
°C
You will see the temperature
increasing. A buzzer will sound when
the oven temperature is reached if this
option is selected (see "Settings P 2").
56
The cooling fan will continue to run for a
while after a cooking process to
prevent moisture building up in the
oven, on the control panel or on the
oven housing unit.
Functions without microwave power
Recommended temperature
Changing the temperature
As soon as a cooking function is
selected, a recommended temperature
will appear in the display.
Example:
You have selected Fan plus U and
170 °C and can see the temperature
increasing.
Recommended Temperature
temperature
range
Y
–*
–*
P
25°C
25 - 50 °C
S
160°C
100 - 250 °C
U
160°C
30 - 250 °C
\
200 °C
100 - 220 °C
[
160°C
100 - 230 °C
K
190 °C
100 - 230 °C
* Set temperature, cannot be changed
3
92
°C
You want to reduce the target
temperature to 155 °C.
^ Use the rotary selector to reduce the
temperature.
The triangle will flash under the
temperature symbol and the
temperature is altered in 5°C-steps.
3
I55
°C
6
V
The altered target temperature is
saved. The actual temperature is
displayed.
Touch X to change between
displaying the current and target
temperatures.
57
Functions without microwave power
Temperature indicator light
Pre-heating the oven
The temperature indicator light 3 lights
up whenever the oven heating is
switched on.
It is only necessary to pre-heat the oven
in a few instances.
As soon as the set temperature is
reached,
– a buzzer will sound, if this option is
selected (see "Settings – P 2").
– the temperature indicator light 3 will
go out,
Most dishes can be placed in a cold
oven. They will then make use of the
heat produced during the heating-up
phase.
Pre-heat the oven for the following
when using Fan plus U:
– dark bread dough,
– the oven heating switches off.
– beef sirloin joints and fillet.
The temperature control unit ensures
that the oven heating and the
temperature indicator light switch back
on if the temperature in the oven
temperature falls bellow the level set.
Rapid heat-up
With Rapid heat-up S the heating up
phase can be shortened.
Do not use Rapid heat-up S.
to pre-heat the oven when baking
pizzas or biscuits and small cakes.
They will brown too quickly on top.
^ Select Rapid heat-up S.
^ Select a temperature.
^ When the temperature indicator light
3 goes out for the first time, set the
oven function you require for
continued cooking.
^ Place the food in the oven.
58
Functions without microwave power
Switching on and off
automatically
Cooking programmes can be switched
off, or on and off automatically.
To do this, set a duration or a duration
and finish time after selecting an oven
function and a temperature.
The maximum duration which can be
set for a cooking programme is
12 hours.
We recommend switching on and off
automatically when roasting.
If using it for baking, do not delay the
start for too long as the cake mixture or
dough will dry out, and the raising
agents will lose their effectiveness.
Setting the duration
Example: To bake a cake for 1 hour 5
minutes
^ Place the food in the oven.
^ Select the required oven function and
the temperature.
The oven heating, lighting and cooling
fan will switch on.
^ Touch X.
3
6
V
I60
°C
T S
^ If necessary, use the rotary selector
to move the triangle V until it
appears under T.
^ Touch the OK sensor.
00:00 h will appear in the display with
the triangle V flashing under T.
3
0i:05
h
T
;
^ Use the rotary selector to set the
cooking duration (0i:05).
^ Touch the OK sensor.
The cooking duration is saved and then
counts down in minutes, with the last
minute counting down in seconds.
The T symbol indicates a cooking
duration has been set.
59
Functions without microwave power
Setting a cooking duration and finish
time
Example:
The time is now 11:15 ;
you want a dish with a cooking duration
of 90 minutes to be ready by 13:30 .
Now set the finish time:
^ Use the rotary selector to move the
triangle V until it appears under S.
-:- - will appear:
3
^ Place the food in the oven.
^ Select the required oven function and
the temperature.
The oven heating, lighting and cooling
fan will switch on.
^ Touch X.
^ If necessary, use the rotary selector
to move the triangle V until it
appears under T.
^ Touch the OK sensor.
00:00 h will appear in the display with
the triangle V flashing under T.
^ Use the rotary selector to set the
cooking duration (0i:30).
The cooking duration is saved and then
counts down in minutes:
6
T S
;
T S
;
^ Touch the OK sensor.
3
i2:45
6
T S
;
^ Use the rotary selector to enter the
cooking duration finish time (i3:30).
^ Touch the OK sensor.
^ Touch the OK sensor.
i:29
6
i2:45 will appear in the display (=
current time of day + cooking duration
= ii:i5 + i:30):
Set the cooking duration first:
3
-:-:-
h
The finish time S is now saved.
i3:30
6
T S
;
The oven heating, lighting and cooling
fan will switch off.
As soon as the start time
(i3:30 - i:30 = i2:00) is reached, the oven
heating, lighting and cooling fan will
switch on.
60
Functions without microwave power
At the end of the cooking duration
Altering the cooking duration
– 0:00 will appear
^ Touch X.
– T will start to flash,
^ If necessary, use the rotary selector
to move the triangle V until it
appears under T.
– the oven heating and lighting will
switch off,
– the cooling fan will continue to run for
a while,
– a buzzer will sound if the buzzer is
switched on (see "Settings – P 2"),
^ Turn the function selector to ß.
^ Switch the oven off.
^ Take the food out of the oven.
The cooking duration remaining will
appear in the display.
^ Touch the OK sensor.
^ Use the rotary selector to alter the
cooking duration.
^ Touch the OK sensor.
The altered cooking duration is now
saved.
If the food is not cooked to your
satisfaction you can prolong the
cooking duration by entering a new
duration.
61
Functions without microwave power
Deleting a cooking duration
Deleting a finish time
^ Touch X.
^ Touch X.
^ If necessary, use the rotary selector
to move the triangle V until it
appears under T.
^ If necessary use the rotary selector to
move the triangle V until it appears
under S.
^ Touch the OK sensor.
^ Touch the OK sensor.
The triangle V will flash under T.
The triangle V will flash under S.
^ Use the rotary selector to set the
cooking duration to 00:00.
^ Use the rotary selector to set the
finish time to - -:- -.
^ Touch the OK sensor.
^ Touch the OK sensor.
The cooking duration and any finish
time will be deleted.
The cooking duration finish time is now
deleted.
^ Touch X.
The current temperature will appear.
The oven heating remains switched on.
If you want to finish the cooking
programme:
^ Turn the function selector to ß.
^ Take the food out of the oven.
If you turn the function selector to ß
or switch the oven off, the settings for
the cooking duration and the finish
time will be deleted.
62
Microwave solo _
Simple operation
^ Touch the OK sensor.
^ Switch the oven on.
i:30 min will appear in the display with
the triangle V flashing under Start/J:
^ Place the food in the oven.
i:30
^ Turn the function selector to
Microwave solo _.
The recommended power level of
1000 W will appear in the display with
the triangle V flashing under _:
i000
Start
;
^ Touch the OK sensor.
W
_
V
The magnetron, lighting and cooling fan
will come on and the cooking
programme will start.
At the end of the cooking duration
The following power levels can be
selected:
80 W, 150 W, 300 W, 450 W, 850 W
and 1000 W.
^ If necessary, change the power level
using the rotary selector.
^ Touch the OK sensor.
00:00 min will appear in the display with
the triangle V flashing under T.
0i:30
min
min
T
;
– 0:00 will appear
– T will start to flash,
– the cooling fan will continue to run for
a while,
– a buzzer will sound if the buzzer is
switched on (see "Settings – P 2"),
^ Turn the function selector to ß.
^ Take the food out of the oven.
If the food is not cooked to your
satisfaction you can prolong the
cooking duration by entering a new
duration.
^ Use the rotary selector to set the
cooking duration (e. g. to 0i:30
minutes).
The maximum duration that can be
set depends on the power level
selected.
63
Microwave solo _
Cooling fan
The cooling fan will continue to run for a
while after a cooking process to
prevent moisture building up in the
oven, on the control panel or on the
oven housing unit.
To follow the cooking duration in the
display:
^ Touch X.
^ If necessary, use the rotary selector
to move the triangle V until it
appears under T.
The cooling fan will switch off after a set
time.
^ Touch X.
Altering the power level
The cooking duration remaining will
appear in the display.
^ Touch X.
^ If necessary use the rotary selector to
move the triangle V until it appears
under _.
The microwave power level will appear.
^ Touch the OK sensor.
The triangle V will flash under _.
Altering the cooking duration
The duration shows in the display
counting down.
^ Use the rotary selector to alter the
cooking duration.
^ Touch the OK sensor.
^ Use the rotary selector to alter the
power level.
The altered duration will appear in the
display with the triangle V flashing
under Start/J.
^ Touch the OK sensor.
^ Touch the OK sensor.
^ Touch X.
The programme will restart with the new
duration.
The altered power level is now saved
and will show in the display.
64
Microwave solo _
Switching on and off
automatically
Cooking programmes can be switched
off, or on and off automatically.
To do this, set a finish time after
selecting an oven function and a
duration.
Setting a finish time
^ First set the power level and then set
the duration.
^ Touch X after setting the duration.
^ If necessary use the rotary selector to
move the triangle V until it appears
under S.
-:- - will appear:
-:-:_T S
;
^ Touch the OK sensor.
The finish time will appear in the display
(current time of day + duration).
The finish time S is now saved.
The programme will start as soon as the
start time is reached.
Deleting a finish time
^ Touch X.
^ If necessary use the rotary selector to
move the triangle V until it appears
under S.
^ Touch the OK sensor.
The triangle V will flash under S.
^ Turn the rotary selector
anti-clockwise until - -:- - appears in
the display.
^ Touch the OK sensor.
^ Touch X.
The duration will appear with the
triangle V flashing under Start/J.
^ Touch the OK sensor.
The cooking duration finish time is now
deleted.
The programme will start using the
duration set.
^ If necessary, set the finish time using
the rotary selector.
^ Touch the OK sensor.
65
Microwave combination programmes
Microwave combination programmes
use microwave power with another
cooking function (e.g. Fan plus, Grill
or Auto roast).
This combination enables shorter
cooking durations.
I60
°C
6
V
Simple operation
^ Select the function you want.
The following recommended
temperatures and temperature ranges
apply:
The oven will show a recommended
power level of 300 W with the
triangle V flashing under _:
300
W
_
V
The following power levels can be
selected:
80 W, 150 W and 300 W.
^ If necessary, change the power level
using the rotary selector.
^ Touch the OK sensor.
66
The recommended temperature will
appear in the display with the triangle
V flashing under 6:
Recommended Temperature
temperature
range
a
160°C
30–220 °C
L
160°C
100–200 °C
^ If necessary, adjust the temperature
within the given range using the
rotary selector.
^ Touch the OK sensor.
00:00 h will appear in the display with
the triangle V flashing under T.
00:00
T
;
h
Microwave combination programmes
At the end of the cooking duration
You can set a maximum duration of
2:00 hours.
– T will start to flash,
^ Use the rotary selector to set the
cooking duration (e. g. 0i:45 h).
– the oven heating will switch off
automatically,
^ Touch the OK sensor.
i:45 h will appear in the display with the
triangle V flashing under Start/J:
i:45
– 0:00 will appear
h
Start
;
^ Touch the OK sensor.
The cooking programme will start. The
oven heating, lighting and cooling fan
will switch on.
You will see the temperature
increasing. A buzzer will sound when
the oven temperature is reached if this
option is selected (see "Settings P 2").
The time remaining will appear in the
display.
– the cooling fan will continue to run for
a while,
– a buzzer will sound if the buzzer is
switched on (see "Settings – P 2"),
^ Turn the function selector to ß.
^ Switch the oven off.
^ Take the food out of the oven.
If the food is not cooked to your
satisfaction you can prolong the
cooking duration by entering a new
duration.
Cooling fan
The cooling fan will continue to run for a
while after a cooking process to
prevent moisture building up in the
oven, on the control panel or on the
oven housing unit.
The cooling fan will switch off
automatically when the temperature in
the oven interior has fallen sufficiently.
67
Microwave combination programmes
Altering the cooking duration
^ Touch X.
^ If necessary, use the rotary selector
to move the triangle V until it
appears under T.
The cooking duration remaining will
appear in the display.
^ Touch the OK sensor.
The triangle V will flash under T.
^ Use the rotary selector to alter the
cooking duration.
^ Touch the OK sensor.
^ Touch X.
The altered duration will appear in the
display with the triangle V flashing
under Start/J.
^ Touch the OK sensor.
The programme will restart with the new
duration.
Changing the power level and
the temperature
Changing the power level
^ Touch X.
^ If necessary use the rotary selector to
move the triangle V until it appears
under _.
The power level will appear.
^ Touch the OK sensor.
The triangle V will flash under _.
^ Use the rotary selector to alter the
power level.
^ Touch the OK sensor.
^ Touch X.
The altered power level will appear.
To follow the cooking duration in the
display:
^ Touch X.
^ If necessary, use the rotary selector
to move the triangle V until it
appears under T.
^ Touch X.
The cooking duration remaining will
appear in the display.
68
Microwave combination programmes
Changing the temperature
^ Use the rotary selector to change the
temperature if necessary (see
"Functions without microwave power Changing the temperature").
Switching on and off
automatically
You can set this procedure to switch on
and off automatically (see "Microwave
solo _ – Switching on and off
automatically").
69
Quick MW W
If you touch the Quick-MW sensor W,
the oven will start with a set power level
and duration, e. g to reheat a drink.
^ Touch W, to start cooking.
Touching it repeatedly increases the
duration in set stages.
The maximum pre-set power level is
1000 W and the maximum duration is
1 minute.
The time left until the end of the
programme will appear in the display.
You can alter the power level and the
duration. The maximum duration will
depend on the power level selected
(see "Settings – P 9").
This function can only be used when
no other cooking programmes are in
use and the function selector is at ß.
70
You can cancel the programme at any
time by touching the On/Off sensor K.
At the end of the programme
– a buzzer will sound if the buzzer is
switched on (see "Settings – P 2"),
– the oven switches off automatically.
Popcorn Æ
If you touch the Popcorn sensor Æ
the oven will start with a set power level
and duration.
The power level is pre-set at 850 W and
the duration at 3 minutes. This is
suitable for most brands of microwave
popcorn.
The duration can be changed up to a
maximum of 4 minutes. The power level
cannot be changed (see "Settings –
P i0").
^ Touch Æ, to start the programme.
The time left until the end of the
programme will appear in the display.
You can cancel the programme at any
time by touching the On/Off sensor K.
Do not leave the oven unattended
during this programme and make
sure you follow the instructions on
the packaging.
At the end of the programme
This function can only be used when
no other cooking programmes are in
use and the function selector is at ß.
– a buzzer will sound if the buzzer is
switched on (see "Settings – P 2"),
– the oven switches off automatically.
71
Baking
Eating food which has been cooked
correctly is important for good
health.
Only bake cakes, pizza, chips etc.
until they are golden. Do not
overcook them.
Functions
Fan plus U
Ideal for baking biscuits, sponges,
choux pastry, puff pastry and filo
pastry.
Microwave + Fan plus a
Suitable for dough which requires
longer baking, such as rubbed in,
beaten mixtures and yeast recipes.
The baking duration is shorter.
During baking the microwave power
level must not exceed 150 W.
Bakeware
The choice of bakeware depends on
the oven function.
– Fan plus U:
Bakeware made of any ovenproof
material is suitable. Light-coloured,
thin-walled, non-reflective metal tins
can be used, but results may not be
as good as with dark non-reflective
tins.
72
– Microwave + Fan plus a:
Only use ovenproof dishes suitable
for microwave use (see "Suitable
containers for microwave use"), such
as ovenproof glass or ceramic
dishes as these allow microwaves
through them.
Metal containers reflect microwaves
so food will only cook from above.
Cooking durations would therefore
be longer and metal tins could also
cause sparking. Place the dish on
the glass tray such that it cannot
touch the oven walls. If the dish
being used causes sparking do not
use it for combination cooking again.
Baking parchment
Place chips, croquette potatoes and
similar types of food on baking
parchment.
Baking
Notes on the baking chart
Temperature 6
As a general rule, select the lower
temperature given in the chart.
Baking at temperatures higher than
those recommended may reduce the
cooking time, but will lead to uneven
browning, and unsatisfactory cooking
results.
Baking duration +
Check if the food is cooked at the end
of the shortest time quoted.
To check if a cake is ready, insert a
wooden skewer into the centre. It is
ready if the skewer comes out clean,
without dough or crumbs sticking to it.
ß Microwave + Fan plus a
Insert the glass tray on shelf level 1
and place the baking container on it.
Tips
– Set the cooking duration. When
baking, the oven should not be set to
start a long time off. Otherwise the
cake mixture or dough will dry out,
and the raising agents will lose their
effectiveness.
– Position rectangular tins with the
longer side across the width of the
oven for optimum heat distribution
and even baking results.
Shelf level ³
ß Fan plus U
– Cakes in baking tins: Shelf level 1
– Flat items (e. g. biscuits, tray bakes):
Shelf level 2
– Baking on two levels at once
(depending on the depth of the items
to be baked):
Shelf levels 1+3 or
Shelf levels 2+3
73
Baking
Baking chart
The data for the recommended function is printed in bold.
Unless otherwise stated, the durations given are for an oven which has not been
pre-heated. With a pre-heated oven, shorten durations by up to 10 minutes.
Please observe specified temperature ranges, microwave power levels, shelf
levels and durations. They take into account the different types of baking tins,
amount of cake mixture and baking practices.
In general, if a range of temperatures is given, it is best to select the lower
temperature and to check the food after the shortest duration.
U
Cakes / biscuits
a
6
[°C]
+
[min]
_
[W]
6
[°C]
+
[min]
140–160
60–80
–
–
–
Creamed mixture
Sponge cake
Ring cake
150–170
65–80
80
160
60–70
Muffins 1)
150–170
25–35
–
–
–
Marble cake (tin)
150–170
60–70
–
–
–
Fresh fruit cake, with meringue
topping (glass tray)1)
150–170
35–45
–
–
–
Fresh fruit cake (glass tray) 1)
150–170
35–45
–
–
–
Fresh fruit cake (tin)
150–170
55–65
80
160
45–60
Flan base
150–170
30–35
–
–
–
Small cakes/biscuits
150–170
15–30
–
–
–
150–170
30–38
–
–
–
Rubbed in mixture
Flan base
1)
150–170
40–50
–
–
–
Biscuits 1)
150–170
20–30
–
–
–
Cheese cake
150–170
75–85
–
–
–
Apple pie
150–170
65–75
–
–
–
Apricot tart with topping (tin)
150–170
60–70
–
–
–
Streusel cake (glass tray)
74
Baking
U
Cakes / biscuits
a
6
[°C]
+
[min]
_
[W]
6
[°C]
+
[min]
150–170
30–35
–
–
–
Sponge mix
Sponge cake
Tart / flan base (2 eggs)
150–170
25–30
–
–
–
Swiss roll 1)
150–170
20–25
–
–
–
150–170
35–45
–
–
–
Yeast mixtures and quark dough
Streusel cake (glass tray) 1)
1)
150–170
40–50
150
170
35–45
Gugelhupf
140–160
55–65
–
–
–
Stollen
150–170
55–75
–
–
–
White bread
160–180
40–50
–
–
–
Dark rye bread
150–170 110–130
Pizza (glass tray) 1)
170–190
Fresh fruit cake (glass tray)
40–50
–
–
–
80
180
30–40
Onion cake (glass tray) 1)
150–170
35–40
–
–
–
Apple turnovers 1)
150–170
25–35
–
–
–
Choux pastry, Eclairs 1)
160–180
30–40
Puff pastry 1)
170–190
25–35
–
–
–
–
–
–
Meringues, macaroons
1)
120–140
35–45
200
12–16
Frozen pizza (rack) 1) 2)
U Fan plus / a Microwave + Fan plus
6 Temperature / + Duration / _ Microwave power level in Combination programmes
As a general rule, use shelf level 1.
1) Use shelf level 2.
2) Pre-heat the oven.
75
Roasting
Functions
Pot roasting
Fan plus U / Auto roast [
We recommend roasting in covered
oven dishes. Meat will be tender and
there will be sufficient stock for making
gravy. The oven also stays cleaner than
when roasting on the rack.
Use this programme for roasting meat,
fish and poultry that needs to be well
browned.
Microwave + Fan plus a /
Microwave + Auto roast L
The programme duration is shorter with
these functions.
The following microwave power levels
should be used throughout roasting:
– For meat and fish: max. 300 W,
^ Season the meat and place it in the
roasting dish. Dot with butter or
margarine or brush with oil if
necessary.
For large lean cuts of meat (2-3 kg)
and fatty poultry add about 1/8 litre of
water to the dish.
^ When using a roasting bag, follow the
manufacturer's instructions.
– For poultry: 150 W.
These combination programmes are
not suitable for roasting sirloin joints or
fillet. The centre would be too well
cooked before the exterior is browned.
Roasting dishes
Please take into account the material of
your bakeware in your choice of oven
function:
– Fan plus U / Auto roast [:
Gourmet oven dishes, oven proof
ceramic dishes and glass dishes.
Make sure that the pot and lid have
heat-resistant handles.
– Microwave + Fan plus a /
Microwave + Auto roast L:
Dishes must be suitable for use in a
microwave oven and must not have
metal lids (see "Suitable containers
for microwave use").
76
Roasting on the rack
Add a little fat or oil to very lean meat or
place a few strips of streaky bacon on
the top.
Do not add too much liquid during
cooking as this will hinder the browning
process.
Roasting
Notes on the roasting chart
Shelf level ³
Temperature 6
– Fan plus U / Auto roast [:
Rack with meat on it on shelf level 1
As a general rule, select the lower
temperature given in the chart. If higher
temperatures are used, the meat will
brown on the outside, but will not be
properly cooked through.
– Microwave + Fan plus a /
Microwave + Auto roast L:
Rack or glass tray with meat on it on
shelf level 1
For cuts which weigh more than 3 kg,
select a temperature approx. 10 °C lower
than that given in the roasting chart.
Roasting will take longer at the lower
temperature, but will be more even.
Tips
When roasting on the rack, set a
temperature approx. 20 °C lower than
for roasting in an oven dish.
Pre-heating
Pre-heating is required when roasting
beef sirloin joints and fillet.
Roasting duration +
The traditional British method for
calculating the roasting time is to allow
15 to 20 minutes per lb/450 grammes,
according to type of meat, plus approx.
20 minutes, adjusting the length of time
as roasting proceeds to obtain the
required result. The roasting time can
also be determined by multiplying the
thickness of the roast [cm] with the time
per cm [min/cm], depending on the
type of meat:
Browning
Browning only occurs towards the end
of the roasting time. Remove the lid
about halfway through the roasting time
if a more intensive browning result is
desired.
Standing time
At the end of the programme, take the
roast out of the oven, wrap in aluminium
foil and leave to stand for about
10 minutes. This helps retain juices
when the meat is carved.
Roasting poultry
For a crisp finish, baste the poultry
10 minutes before the end of the
cooking time with slightly salted water.
Beef/venison: . . . . . . . . . 15–18 min/cm
Pork/veal/lamb: . . . . . . . . 12–15 min/cm
Sirloin/fillet: . . . . . . . . . . . 12–15 min/cm
Check if the meat is cooked after the
shortest duration quoted.
77
Roasting
Roasting chart
U/[
Meat/Fish
Topside of beef, approx. 1 kg
Sirloin/fillet 3) 4), approx. 1 kg
Haunch of venison (approx. 1 kg)
Saddle of venison (approx. 1 kg)
Roast pork (Leg, shoulder, neck, approx. 1 kg)
Gammon joint, approx. 1 kg
Meat loaf 4), approx. 1 kg
Veal, approx. 1 kg
Leg of lamb, approx. 2 kg
Saddle of lamb 3), approx. 2 kg
Poultry, approx. 1 kg
Poultry, approx. 4 kg
Fish, whole, approx. 1.5 kg
6
+
[°C] 1) 2)
170–190
190–210
180–200
180–200
170–190
170–190
160–180
170–190
170–190
170–190
170–190
170–190
160–180
[min]
100–120
40–60
100–120
70–100
110–130
70–80
65–75
80–100
110–130
60–80
55–65
200–220
45–55
Unless otherwise stated, the durations given are for an oven which has not been
pre-heated.
In general, if a range of temperatures is given, it is best to select the lower
temperature and to check the food after the shortest duration.
Take note of the temperature range, the microwave power level, the shelf levels
and the durations. These also take the type of cooking container, the size of the
meat and cooking practices into account.
78
Roasting
_
a/L
6
+
[W]
–
–
–
–
150
150
300
150
150
–
150
150
150
[°C]
–
–
–
–
180
180
180
180
180
–
180
160
170
[min]
–
–
–
–
90–100
60–70
35–45
70–80
90–110
–
45–55
120–150
35–45
U Fan plus / [ Auto roast / a Microwave + Fan plus / L Microwave + Auto roast
6 Temperature / + Duration / _ Microwave power level in Combination programmes
As a general rule, use shelf level 1.
1) Roast in a covered dish.
When roasting on the rack, set the temperature approx. 20 °C lower than for roasting in a
covered oven dish.
2) Do not select a higher temperature than that advised.
The meat will become brown, but will not be cooked properly.
3) Do not cover the food.
4) Pre-heat the oven, but do not use Rapid heat-up S.
79
Grilling
,Danger of burning.
Grill with the oven door closed. If
you grill with the door open, hot air
will escape from the oven instead of
being cooled by the cooling fan.
The controls will get hot.
Functions
Grill Y
For grilling thin cuts e.g. steak, burgers
or toast.
Fan grill \
For grilling thicker items, e.g. rolled
meat, poultry pieces.
The top heating / grill element and the
fan switch on and off alternately.
Trays and racks
^ Grill on the rack.
^ Brush the rack with oil, and place the
food on it.
It is best to grill food of a similar
thickness at the same time so that the
grilling duration for each item does
not vary too greatly.
80
Notes on the grilling chart
Temperature 6
– Grill Y:
The grilling temperature is fixed and
cannot be changed.
– Fan grill \:
As a general rule, select the lower
temperature given in the chart.
If higher temperatures are used, the
meat will brown on the outside, but
will not be properly cooked through.
Thin cuts can generally be grilled at
220 °C, thicker cuts at 180–200 °C.
Grilling
Pre-heating
Testing to see if cooked
Always pre-heat the grill for approx.
5 minutes with the door closed.
One way of finding out how well a piece
of meat has been cooked is to press
down on it with a spoon:
Do not set a microwave power level
during pre-heating.
Rare:
If the meat gives easily to
the pressure of the spoon,
it will still be red on the
inside.
Medium:
If there is some resistance,
the inside will be pink.
Shelf level ³
– Grill Y:
Use shelf level 2 or 3 depending on
the height of the food.
– Fan grill \:
Use shelf level 1 or 2 depending on
the height of the food.
Grilling duration +
– Flat pieces of fish and meat usually
take 6–8 minutes per side.
It is best to grill food of a similar
thickness at the same time so that
the grilling duration for each item
does not vary too greatly.
– Thicker pieces need about 7–9
minutes
– With rolled meat, allow
approx. 10 minutes per cm diameter.
Well-done If there is very little
resistance, it is cooked
through.
Check if the meat is cooked after the
shortest time quoted.
Tip
If the surface of thicker cuts of meat is
cooked but the centre is still raw,
continue grilling at a lower temperature
setting or use a lower shelf level to
allow the food to cook through to the
centre.
81
Grilling
Preparing food for grilling
Grilling
Trim the meat. Do not season meat with
salt before grilling as this draws the
juices out.
^ Pre-heat the grill for approx. 5
minutes with the door closed.
Add a little oil to lean meat if necessary.
Do not use other types of fat as they
can burn and cause smoke.
Clean fish in the normal way. To
enhance the flavour, add a little salt or
squeeze a little lemon juice over the
fish.
Do not set a microwave power level
during pre-heating.
^ Place the food on the rack.
^ Select the required oven function and
the temperature (only with Fan grill
\)..
,Danger of burning.
Use oven gloves when placing food
in the oven, turning or removing it
and when adjusting oven shelves
etc. in a hot oven.
^ Place the food on the appropriate
shelf level (see the Grilling chart).
^ Close the door.
^ Turn the food halfway through
cooking.
82
Grilling
Grilling chart
Pre-heat the grill for approx. 5 minutes with the door closed. Do not use
microwave power whilst pre-heating the oven.
The data for the recommended function is printed in bold.
Check the food after the shortest duration quoted.
Take note of the temperature range, the microwave power level, the shelf levels
and the durations. These take the size of the meat and cooking practices into
account.
³
Y
+
[min] 1)
6
[°C]
+
[min] 1)
2/3 2)
2
2
2/3 2)
2/3 2)
2/3 2)
2/3 2)
2/3 2)
2/3 2)
2
2/3 2)
2
18–22
–
–
–
20–25
15–20
15–20
–
2–4
5–9
10–12
4–8
200
200
200
200
200
–
–
200
–
–
200
200
10–16
15–20
15–20
14–18
20–25
–
–
20–25
–
–
6–8
7–10
1/2 3)
1
50–60
80–100
180–200
180–200
45–55
80–100
1
–
180–200
100–120
Food to be grilled
Thin cuts
Steak
Kebabs
Chicken kebabs
Escalopes
Burgers
Sausages
Fish fillet
Trout
Toast
Cheese toast
Tomatoes
Peaches
Thicker cuts
Chicken, approx. 1 kg
Rolled meat, C 10 cm, approx.1.5
kg
Pork, approx.1kg
\
³ Shelf level / Y Grill / \ Fan grill / 6 Temperature / + Duration
1) Turn the food halfway through grilling.
2) Select the shelf level according to the thickness of the food.
3) Use shelf level 2 for Fan grill \.
83
Microwave defrosting, reheating and cooking
Defrost
Reheat
Cooking
Function
_
_/6
80 W
Suitable for:
Very delicate foods such as cream, butter,
cream and butter cream gateaux, cheese
All other types of food
Baby food
All types of food; frozen ready-meals
which do not need browning.
150 W
_
450 W
600 W
850 W
1000 W
Drinks
_
850 W
Casseroles;
Heating up
porridge and rice pudding;
frozen foods which do not need browning.
450 W
Continued cooking
150 W
Simmering
Select a Microwave combination programme if you want to shorten
cooking durations and have a crisp finish to the dish.
L
300 W +
Sear using a high temperature to start
160–180 °C
with, then continue cooking with a lower
temperature.
a
300 W +
Ready-meals which need to be browned,
150–170 °C
e.g. gratins
_ Microwave / L Microwave + Auto roast / a Microwave + Fan plus / 6 Temperature
The duration required depends largely on the nature of the food, the amount and
its initial temperature. Food that has been refrigerated, for example, takes longer
to reheat than food at room temperature.
Please refer to the relevant charts.
84
Microwave defrosting, reheating and cooking
Before defrosting, reheating and
cooking
After defrosting, reheating and
cooking
^ Place food (including frozen) in a
dish that is suitable for microwave
use, and cover it.
Allow the food to stand at room
temperature for a few minutes to enable
the heat to spread evenly throughout
the food.
^ Place the dish in the middle of the
glass tray on shelf level 1.
With Microwave combination
programmes
Only use heat-resistant containers
which are microwave safe.
A lid is not usually required.
Never use a lid with Microwave +
Auto roast L as the food will not
brown.
^ Place the glass tray on shelf level 2.
Place ready-meals in aluminium foil
dishes on the glass tray.
During the defrosting, reheating and
cooking process
^ Turn or stir the food several times.
Stir the food from the outside towards
the middle, as food heats more
quickly from the outside.
,After reheating food, especially
food for babies and small children,
stir the food or shake the container
and check that the temperature
does not pose any danger. Double
check after it has been left to stand.
Danger of burning.
,Danger of burning. Be careful
when removing dishes from the
appliance. Although heat is not
normally produced in the container
itself by the microwaves (apart from
stoneware), heat transfer from the
food to the container may be
considerable, making the container
itself hot.
Always ensure that food is
sufficiently cooked or reheated.
If in any doubt that the food has been
sufficiently reheated/cooked, place it
back in the appliance and reheat/cook
it for a little longer.
It is very important to make sure that
food which goes off easily, such as fish,
poultry and minced meat is cooked
sufficiently.
85
Microwave defrosting, reheating and cooking
Tips on reheating
,We do not recommend heating or
reheating food or drinks for babies or
young children in the microwave
oven. Any decision to do this is the
responsibility of the user, and should
only be done with the utmost care.
Pasteurised or sterilised cooked food
should be gently heated for 1/2 to 1
minute at 450 W, and tasted to make
sure it is not too hot for a baby's
palate before serving. When reheating
other food or drink, heat to a high
temperature and allow to cool to a
suitable heat for eating. For formula
milk follow the manufacturer's
instructions.
Do not cook or reheat food or liquids
in sealed containers, jars or bottles.
With baby bottles, the screw top and
teat must be removed.
Otherwise pressure will build up
which can cause the bottle or
container to explode, posing a
severe risk of injury.
When heating liquids, the boiling rod
provided should always be placed
in the container.
It helps liquids to heat evenly and
make sure the bubble are produced
at the right time.
Never reheat hard boiled eggs
using Microwave solo _. even
without the shell. The eggs can
explode.
86
Tips on cooking
Food with a thick skin or peel, such
as tomatoes, sausages, jacket
potatoes and aubergines, should be
pierced or cut in several places to
allow steam to escape and prevent
the food from bursting.
Eggs can only be cooked in their
shells using Microwave solo _ in a
specially designed egg-boiling
device available from specialist
shops. Eggs can burst, even after
they have been taken out of the
oven.
Eggs can be cooked without their
shells using microwave power only if
the yolk membrane has been
punctured several times first.
The pressure could otherwise cause
the egg yolk to explode.
Microwave defrosting, reheating and cooking
Use
Notes
Defrosting large
quantities of food at
once, e.g. 2 kg fish
The glass tray can be used on shelf level 1 for defrosting
food.
Reheating food
Always cover food when reheating it, except when
reheating meat/fish coated in breadcrumbs.
Cooking vegetables
Add a little water to vegetables which have been kept
stored.
Vegetable cooking times depend on the texture of the
vegetable. Fresh vegetables contain more water than
vegetables which have been stored and usually cook
more quickly.
Cooking frozen
ready-meals
Deep-frozen, ready-made meals can be defrosted and
then reheated or cooked in one process. Follow the
instructions on the packet.
Charts for defrosting, reheating and cooking food
The following notes apply to all charts:
– Take note of the recommended microwave power levels, durations and
standing times. These take the consistency, the quantity and the initial
temperature of the food into account.
– You are generally advised to select the middle duration.
– Place the food on the glass tray and use shelf level 1.
87
Microwave defrosting, reheating and cooking
Chart for defrosting food
_
Dairy products
Cream
Butter
Cheese slices
Milk
Quark
Cakes / Pastry / Bread
Sponge cake
Sponge cake
Fresh fruit cake
Butter cake
Cream cake
Yeast buns, puff pastries
Fruit
Strawberries, raspberries
Red / blackcurrants
Plums
Meat
Minced beef
Chicken
Vegetables
Peas
Asparagus
Beans
Red cabbage
Spinach
Quantity
150 W
+ [min]
80 W
+ [min]
Standing time
[min]1)
250 ml
250 g
250 g
500 ml
250 g
–
–
–
14–16
10–12
13–17
8–10
6–8
–
–
10–15
5–10
10–15
10–15
10–15
Qty 1, approx. 100 g
300 g
Qty 3, approx. 300 g
Qty 3, approx. 300 g
Qty 1, approx. 100 g
Qty 3, approx. 300 g
Qty 4
1–2
4–6
6–8
5–7
–
–
6–8
–
–
–
–
1.5
4–4.5
–
5–10
5–10
10–15
5–10
5–10
5–10
5–10
250 g
250 g
500 g
7–8
8–9
12–16
–
–
–
5–10
5–10
5–10
500 g
1000 g
16–18
34–36
–
–
5–10
10–15
250 g
250 g
500 g
500 g
300 g
8–12
8–12
13–18
15–20
12–14
–
–
–
–
–
5–10
10–15
10–15
10–15
10–15
_ Microwave power / + Defrosting duration
1) Allow the food to stand at room temperature for a few minutes to enable the heat to
spread evenly throughout the food.
88
Microwave defrosting, reheating and cooking
Chart for reheating food
Drinks 2)
_
Quantity
1000 W
+ [min]
Coffee,
drinking temperature 60–65 °C
Milk,
drinking temperature 60–65 °C
Water, bringing to the boil
450 W
+ [min]
1 cup
(200 ml)
00:50–1:10
–
1 cup
(200 ml)
1–1:50 3)
–
1 cup
(125 ml)
1–1:50
–
3)
approx.
200
ml
–
00:50–1
Baby bottle (milk)
1 glass
Mulled wine, grog
(200 ml)
–
00:50–1:10
drinking temperature 60–65 °C
3)
Food
_
Quantity
600 W
450 W
+ [min]
+ [min]
Baby food
1 jar (200 g)
–
00:30–1
(room temperature)
Cutlets, roasted
200 g
3–5
–
Fish fillet, roasted
200 g
3–4
–
Roast meat in gravy
200 g
3–5
–
Side dishes
250 g
3–5
–
Vegetables
250 g
4–5
–
Gravy
250 ml
4–5
–
Soup / casserole
250 ml
4–5
–
Soup / casserole
500 ml
7–8
–
Standing time
[min]1)
–
–
–
1
–
Standing time
[min]1)
1
2
2
1
1
1
1
1
1
_ Microwave power / + Reheating duration
1) Allow the food to stand at room temperature for a few minutes to enable the heat to
spread evenly throughout the food.
2) Place the boiling rod supplied into the cup or glass.
3) Durations assume food is approx. 5 °C to start with.
For food not normally refrigerated, durations assume food is at room temperature or
approx. 20 °C.
With the exception of baby food and delicate whisked sauces food should be reheated
to a temperature of 70–75 °C.
89
Microwave defrosting, reheating and cooking
Chart for cooking food
Quantity
Meat
Meatballs in gravy (400 g meat)
Stew (750 g meat)
Poultry
Chicken in mustard sauce
Chicken curry
Chicken risotto
Fish
Fillet in sauce
Fish curry
Fresh vegetables
Carrots
Cauliflower florets
Peas
Peppers, cut into strips
Kohlrabi batons
Brussels sprouts
Asparagus
Broccoli florets
Leeks
Green beans
Frozen vegetables
Peas, mixed veg.
Spinach
Brussels sprouts
Broccoli
Leeks
Desserts
Quark souffle (500 g quark)
Fruit compote (500 ml fruit juice
or 500 g fruit)
850 W
+ [min]
_
+
450 W
+ [min]
Standing
time1)[min]
10–12
16
+
15
2–3
2–3
Approx. 800 g
Approx. 900 g
Approx. 1.6 kg
4
5
10
+
+
+
12
12
15
2–3
2–3
3–5
Approx. 900 g
Approx. 1.5 kg
8–10
5
+
12
2–3
3–5
300 g
500 g
450 g
500 g
500 g
300 g
500 g
300 g
500 g
500 g
2
6
5
5
3
3
5
4
5
4
+
+
+
+
+
+
+
+
+
+
6
10
10
10
8
9
8
4
8
12
2
2
2
2
2
2
2
2
2
2
450 g
450 g
300 g
300 g
450 g
5
5
4
3
4
+
+
+
+
+
11
7
6
6
8
2
2
2
2
2
10–12
–
–
6–8
–
–
_ Microwave power / + Duration
1) Allow the food to stand at room temperature for a few minutes to enable the heat to
spread evenly throughout the food.
90
Defrosting without microwave power
Function
Defrosting durations
ß Defrost P
The duration needed for defrosting
depends on the type and weight of the
food.
The air in the oven is kept at room
temperature and circulated by the fan
to gently defrost frozen food.
,Danger of salmonella poisoning.
It is particularly important to observe
food hygiene rules when defrosting
poultry. Do not use the liquid from
the defrosted poultry. Pour it away,
and wash the tray, the sink and your
hands.
Tips
– Place the food to be defrosted on the
glass tray or into a suitable dish.
Frozen food
Chicken
Meat
Sausages
Fish
Strawberries
Butter cake
Bread
Weight
[g]
800
500
1000
500
1000
300
500
500
Duration
[min]
90–120
60–90
90–120
30–50
60–90
30–40
20–30
30–50
– Small pieces of poultry can be
placed on an upturned saucer in the
glass tray. This way it will not be lying
in defrosted liquid.
– Meat, poultry and fish do not need to
be fully defrosted before cooking.
Defrost so that the surface is
sufficiently soft to take herbs and
seasoning.
– Use shelf level 1 or 2 depending on
the height of the food.
91
Gentle bake
The Gentle bake K function is ideal for bakes and gratins which require a crisp
top.
Food
6
[°C]
³
+
[min]
Lasagne
180
1
45–60
Potato gratin
170
1
55–65
Vegetable bake
170
1
55–65
Pasta bake
170
1
40–50
6 Temperature / ³ Shelf level / + Duration
The table contains just a few examples.
For other recipes, use the temperature and duration settings given for Fan
plus U as a guide.
92
Frozen food / Ready meals
Tips
Cakes, pizza, baguettes
– Bake on a layer of baking parchment
placed on the rack.
– Use the lowest temperature
recommended on the manufacturer's
packaging.
Oven chips, croquettes or similar
items
– Place them on baking paper on the
rack.
– Use the lowest temperature
recommended on the manufacturer's
packaging.
– Turn several times during cooking.
Method
Eating food which has been cooked
correctly is important for good
health.
Only bake cakes, pizza, chips etc.
until they are golden. Do not
overcook them.
^ Select the function and temperature
recommended on the manufacturer's
packaging.
^ Pre-heat the oven.
^ Place the food in the pre-heated oven
on the shelf level recommended on
the packaging.
^ Check the food at the end of the
shortest duration recommended on
the packaging.
93
Note for test institutes
Test food acc. to EN 60350 (Function: Microwave solo _)
Function
_
[W]
+
[min]
Standing
time
[min] 1)
Defrost raspberries,
250 g 2)
_
150
7
3
Defrost minced beef,
500 g 2)
_
150
16–18
5–10
Cook meat loaf,
900 g2)
_
600 + 450
8:30 + 11
5
Container: Pyrex
03.838.80, 28 cm long,
do not cover
Cook potato
gratin,1105 g 2)
a
300/180 °C
30–35
5
Container: Pyrex
03.827.80
Bake sponge cake,
475 g2)
_
450
7:30–8:30
5
Container: Pyrex
03.827.80, do not cover
Cook custard,
1000 g2)
_
450
25–27
120
Test food
Notes
Do not cover
Do not cover, turn
halfway through
defrosting
Container: Pyrex
07.227.8
(25 x 25 cm)
_ Microwave power / a Microwave + Fan plus / + Defrost or cooking duration
1) Leave the food to stand at room temperature.
This allows the heat to be distributed evenly through the food.
2) Place the glass tray on shelf level 1.
94
Note for test institutes
Test food acc. to EN 60350 (functions without microwave power)
Function
6
[°C]
+
[min]
1 glass tray 1)
U
140
38–45
2 glass trays 2)
U
140
50–55
Sponge cake
Springform, 1)
26 cm, dark
U
170
32–37
Apple pie
Springform, 3)
20 cm, dark
U
160
110–120
Small cakes
1 glass tray 1)
U
150
26–34
2 glass trays 2)
U
150
30–36
Y
–
5–7
+ 5 min. Pre-heat
Y
–
1st side: 16–18,
2nd side: 12–14
+ 5 min. pre-heating
Test food
Tin/
glass tray
Drop cookies
4)
Toast
Rack
Grill Beefburgers
(qty 12)
Rack on top of glass tray 1)
U Fan plus / Y Grill / 6 Temperature / + Duration
1) Use shelf level 2.
2) Use shelf level 1+3.
3) Use shelf level 1.
4) Use shelf level 3.
95
Cleaning and care
,Danger of burning. Make sure
the oven heating elements are
switched off and that the oven cavity
is cool.
,Danger of injury. Do not use a
steam cleaning appliance to clean
this appliance. The steam could
reach electrical components and
cause a short circuit.
Unsuitable cleaning agents
To avoid damaging the surfaces, do not
use:
– cleaning agents containing soda,
ammonia, acids or chlorides,
– cleaning agents containing
descaling agents on the oven front,
– abrasive cleaning agents, e.g.
powder cleaners and cream
cleaners,
– solvent-based cleaning agents,
Clean the oven interior, inside of the
door and door seal as soon as the
oven has cooled down. Waiting too
long can make cleaning
unnecessarily difficult and in some
cases impossible. In certain
circumstances, very heavy soiling
can even damage the appliance.
– stainless steel cleaning agents,
Check the door and door seal for
any sign of damage.
If any damage is noticed, the oven
should not be used again in
microwave mode until the fault has
been rectified by a service
technician.
– melamine eraser blocks,
– dishwasher cleaner,
– glass cleaning agents,
– cleaning agents for ceramic hobs,
– hard, abrasive brushes or sponges,
e. g. pot scourers, brushes or
sponges which have been previously
used with abrasive cleaning agents,
– sharp metal scrapers or tools,
– wire wool or metal scourers,
– stainless steel spiral pads,
– spot cleaning,
– oven cleaner*,
* these can, however, be used to
remove very heavy soiling from
PerfectClean treated surfaces.
96
Cleaning and care
Normal soiling
Soiling might become impossible to
remove if it is not dealt with.
Continued use of the oven without
regular cleaning will make it much
harder to keep clean.
Soiling is, therefore, best removed
after each use of the oven.
Only the glass tray and the boiling
rod are dishwasher proof.
Tips
– Soiling caused by spilt juices and
cake mixtures is best removed whilst
the oven is still warm. Exercise
caution and make sure the oven is
not too hot - danger of burning.
– The top heat/grill element can be
lowered to make it easier to clean the
oven.
Do not use too much water on the
cloth or sponge and do not let water
or any other liquid find its way into
any openings.
^ It is best to remove normal soiling immediately using a clean sponge and
a solution of hot water and
washing-up liquid or with a clean,
damp microfibre cloth.
^ After cleaning make sure all residual
cleaning agent is thoroughly
removed with clean water. This is
particularly important when cleaning
PerfectClean surfaces as cleaning
agent residues can impair the
non-stick properties.
^ After cleaning and rinsing, wipe the
surfaces dry using a soft cloth.
– To neutralise odours in the oven, put
a container of water with some lemon
juice in the oven and heat for a few
minutes.
97
Cleaning and care
Stubborn soiling
Spilt fruit and roasting juices may
cause lasting discolouration or matt
patches on enamelled surfaces.
This discolouration is permanent but
will not affect the efficiency of the
finish. Do not try to remove this
discolouration! Clean these
following the instructions given here.
^ Moisten stubborn soiling with a
solution of hot water and washing-up
liquid and leave for a few minutes to
take effect.
^ You can then also use the scouring
pad on the back of a washing-up
sponge to remove the soiling.
^ After cleaning, rinse thoroughly with
clean water, and dry with a soft cloth.
98
^ Very stubborn soiling on
PerfectClean treated enamel can be
cleaned using Miele oven cleaner. It
must be applied to surface when
cold. Follow instructions on the
packaging.
Non-Miele oven spray must only be
used in a cold oven and for no longer
than a maximum of 10 minutes.
^ You can then also use the scouring
pad on the back of a washing-up
sponge to remove the soiling.
^ After cleaning, remove all oven
cleaning agent residues thoroughly
with clean water, and dry with a soft
cloth.
Cleaning and care
Lowering the top heat/grill
element
If the oven interior roof is badly soiled,
the top heat/grill element can be
lowered to make cleaning easier.
Do not use force to lower it as this
can cause it to break.
,Danger of burning.
Make sure the oven heating
elements are switched off and cool.
^ Carefully lower the top heat/grill
element.
^ Clean the roof of the oven regularly
with a damp cloth or a dishwashing
sponge.
^ To lower the top heat/grill element,
the nut needs to be unscrewed.
^ After cleaning, raise the top heat/grill
element gently back up again. Refit
the nut and tighten to secure the
element back in position.
99
Problem solving guide
With the aid of the following guide, minor problems can be easily corrected
without contacting Miele. If having followed the suggestions below, you still cannot
resolve the problem, please contact Miele (see back cover for contact details).
,Danger of injury.
Installation, maintenance and repairs may only be carried out by a suitably
qualified and competent person. Repairs and other work by unqualified
persons could be dangerous.
Miele cannot be held liable for unauthorised work.
Do not attempt to open the casing of the oven yourself.
Problem
Possible cause and remedy
The display is dark.
The time of day display is deactivated, so when the
appliance is switched off, the time of day display is
switched off
^ As soon as the oven is switched on, the time of day
will appear. If you want it to be displayed constantly,
the setting to switch the time of day display back on
must be changed (see "Settings – P i").
There is no power to the oven.
^ Check whether the mains fuse has tripped. If it has,
contact a qualified electrician or Miele.
A programme will not
start.
^ If using a programme with microwave power, make
sure the door is shut properly.
^ If using a programme with microwave power, make
sure that you have entered a power level and a
duration.
^ If using a microwave combination programme, make
sure you have entered a power level and a duration
for the microwave mode and a temperature for the
conventional oven function.
100
Problem solving guide
Problem
Possible cause and remedy
A function has been
The system lock 0 has been switched on.
selected and the time of ^ Switch off the system lock (see "System lock 0").
day and the 0 symbol
are still in the display.
The oven does not heat Demo mode has been activated. MES_ appears in the
up.
display.
The oven can be operated but does not heat up.
^ Deactivate demo mode (see "Settings – P 8").
A function has been
There has been a power cut which has caused a
selected but the oven is current process to stop.
not working.
^ Turn the function selector to the ß position and switch
the oven off.
Start the cooking process again.
i2:00 will appear in the The power supply was interrupted for longer than 200
display with the triangle hours.
V flashing under +.
^ Reset the time of day (see "Using for the first time").
0:00 appears
The oven has been operating for an unusually long time
unexpectedly in the
and this has activated the safety switch-off function.
display and T is
^ Turn the function selector to ß. The oven is now ready
flashing at the same
to use again immediately.
time. The buzzer might
also be sounding.
F xx appears in the
display.
There is a problem that you cannot resolve.
^ Call the Miele Service Department.
101
Problem solving guide
Problem
If the door is opened
whilst using Microwave
solo _, the oven stops
making a noise.
A noise can be heard
after a cooking process.
Possible cause and remedy
This is not a fault. If microwave power is being used the
cooling fan will switch off when the door is opened.
The cooling fan is switched on.
It will switch off automatically after a while.
An abnormal sound can ^ Check if there are sparks caused by using metal
be heard when the oven dishes (see "Suitable containers for microwave use").
is operating in
^ Check if the food is covered with aluminium foil. If it is,
microwave mode.
remove the foil.
^ Check if the rack is inside the oven.
Always use the glass tray when using the oven with
Microwave power.
The oven has switched
itself off.
102
The oven will switch itself off automatically to save
energy if no other action is taken within a certain time
frame after switching it on or after the end of a cooking
programme.
^ Switch the oven back on.
Problem solving guide
Problem
Possible cause and remedy
Cakes and biscuits are
not cooked properly
after following the
durations given in the
chart.
A different temperature from the one given in the recipe
was used.
^ Select the temperature required for the recipe.
Browning is uneven.
The wrong temperature or shelf level was selected.
^ There will always be a slight unevenness. If the
unevenness is pronounced, check that the correct
temperature and shelf level have been selected.
The ingredient quantities are different from those given
in the recipe.
^ Double check the recipe. The addition of more liquid
or more eggs makes a moister mix which would take
longer to cook.
The material or colour of the baking tin is not suitable for
the oven function.
Bright shiny tins are not very suitable. These reflect
heat, which means that the heat does not penetrate to
the food effectively, resulting in uneven or poor
browning.
^ Dark matt tins are best for baking.
103
Problem solving guide
Problem
Possible cause and remedy
^ Check that you remembered to restart the programme
The food is not
after interrupting a cooking process using microwave
sufficiently heated or is
power.
not cooked at the end
of a set duration when
^ Check that the correct duration was selected for the
using Microwave solo
power level chosen when cooking or reheating with
_.
microwave power.
The lower the power level the longer the duration.
Food has cooled down
too quickly after being
reheated or cooked in
microwave mode.
Microwaves cause food to heat from the outside first.
This heat then moves towards the middle of the food.
If food is cooked at a high power level it is possible that
the heat may not have reached the centre of the food.
Food may be hot on the outside but cool in the middle.
When reheating food with different densities, such as
plated meals, it is sensible to start with a low power
level and select a longer reheating duration.
The oven lighting
switches off after a
short time.
The oven lighting is set to switch off after 15 seconds
(default setting).
You can change the default setting for this (see
"Settings - P 7").
104
Problem solving guide
Problem
Possible cause and remedy
The oven lighting does
not switch on.
The halogen lamp needs replacing.
Danger of burning.
Make sure the oven heating elements are switched
off and cool.
^ Disconnect the appliance from the mains.
The lamp cover consists of two parts: a glass piece
and a mounting.
Hold the lamp cover securely when removing it so
that it does not fall. Place a tea towel over the floor of
the oven and the open door to protect them.
^ Remove the screw to the lamp cover using a T20 Torx
screwdriver, and take off the cover.
Do not touch the halogen lamp with bare fingers.
Please follow the manufacturer's instructions.
^ Pull the halogen lamp out.
^ Replace it with a new halogen lamp
(Osram 66725, 230V, 25 W, G9). It must be thermally
stable up to 300 °C.
^ Replace the glass piece in the mounting, and refit the
lamp cover. Make sure that the lug on the mounting is
correctly located in the notch in the roof of the oven,
then screw the mounting back into place.
^ Reconnect the oven to the electricity supply.
105
After Sales / Guarantee
After sales service
Guarantee
In the event of any faults which you
cannot remedy yourself, or if the
appliance is under guarantee, please
contact
For further information on the appliance
guarantee specific to your country
please contact Miele. See back cover
for contact details.
– your Miele Dealer
In the U.K. your appliance is
guaranteed for 2 years from the date of
purchase. However, you must activate
your cover by calling 0845 365 6640 or
registering online at www.miele.co.uk.
or
– The Miele service department.
See back cover for contact details.
When contacting your Dealer or Miele,
please quote the model and serial
number of your appliance.
This information is given on the data
plate, visible on the front frame of the
oven, with the door fully open.
Please note that telephone calls may
be monitored and recorded for
training purposes.
N.B. A call-out charge will be applied to
service visits where the problem could
have been resolved as described in
these instructions.
106
Electrical connection
All electrical work should be carried out
by a suitably qualified and competent
Miele approved service technician in
strict accordance with current national
and local safety regulations (BS 7671 in
the UK).
This appliance is supplied with a mains
cable for connection to a 230 - 240 V,
50 Hz single phase supply.
The voltage and connected load are
given on the data plate situated at the
front of the oven interior. Please ensure
that these match the household mains
supply.
Connection should be made via a fused
connection unit or a suitable isolator,
which complies with national and local
safety regulations, and the on/off switch
should be easily accessible after the
appliance has been installed.
This appliance conforms with European
Standard EN 55011 as a Group 2,
Class B product. Group 2 appliances
use high frequency energy in the form
of electro-magnetic waves to create
heat in food. Class B is assigned to
appliances that are suitable for
domestic use.
Important UK
The wires in the mains lead are
coloured in accordance with the
following code:
Green/yellow = earth
Blue = neutral
Brown or black = live
WARNING
THIS APPLIANCE MUST BE
EARTHED
If the switch is not accessible after
installation (depending on country) an
additional means of disconnection must
be provided for all poles.
Switches with a minimum all-pole
contact gap of 3mm are suitable for
isolating the appliance. These include
circuit breakers, fuses and protective
devices.
For extra safety it is advisable to protect
the appliance with a suitable residual
current device (RCD). Please contact a
qualified electrician for advice.
If the cable is damaged a new cable
must be fitted by a Miele approved
service technician.
107
Building-in diagrams
Appliance and niche dimensions
Dimensions are given in mm.
Installation in a tall unit
* Ovens with glass front
** Ovens with metal front
108
Building-in diagrams
Installation in a base unit
If fitted underneath a hob, the installation instructions for the hob must also be
taken into account.
* Ovens with glass front
** Ovens with metal front
109
Building-in diagrams
Front dimensions
Dimensions are given in mm.
A H6100BM: 45 mm
H6200BM: 42 mm
B Ovens with glass front: 2.2 mm
Ovens with metal front: 1.2 mm
110
Installation
,The oven must not be operated
until it has been correctly installed in
its housing unit.
^ Connect the mains cable from the
oven to the isolator.
^ Push the oven into the housing unit
up to the oven trim and align it.
^ Open the door and use the screws
supplied to secure the oven to the
side walls of the housing unit through
the holes in the oven trim.
111
112
113
114
115
H6100BM; H6200BM
en - GB
M.-Nr. 09 610 310 / 01