1
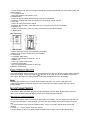
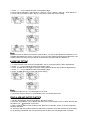
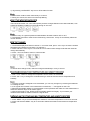
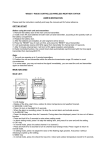
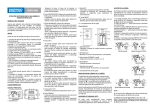
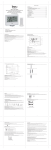
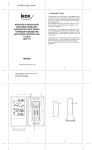
Please read the instructions carefully and keep the manual well for future reference.
1. Remove the battery door of the main unit and transmitter.
2. Install 2 new AA size batteries for both main unit and transmitter, according to the polarity mark on
the battery compartment.
3. Replace the battery door.
4. After the batteries are installed, all LCD segment will be shown.
5. Press the “RESET” key of main unit first, and press the “RESET” key of transmitter.
6. It will automatically receive 433 MHz signal from transmitter for channel test in 8 seconds.
7. After 5 minutes channel test, it will turn to RC signal reception automatically.
8. Radio controlled function, the current time & date automatically synchronized with the time signal
transmitted from Germany(DCF77).
1. The unit can operate up to 3 remote transmitters.
2. Position the unit and transmitter within the effective transmission range: 50 meters in usual
circumstances.
3. In some cases, you may not receive the signal immediately, you can reset the unit and transmitter
again as described above.
1. LCD display
- Display of the time, alarm time, outdoor & indoor temperature & humidity and weather forecast.
2. SNOOZE / LIGHT key
- Press it to turn on backlight for 5 seconds.
- When the alarm is sounding, press it to stop the current alarm and activate snooze.
3. ALARM SET key
- Press it to display alarm time for 5 seconds. During alarm time displayed, press it to turn on/
off alarm function.
- Press and hold it for 3 seconds to enter alarm setting mode.
- In alarm setting mode, press it to step the setting item, and press it to save and exit the setting.
4. CH/+ key
- In normal mode, Press it to select channel 1 to channel 3.
- Press and hold it for 3 seconds to turn to channel auto-change mode. Press it again to return to
normal mode.
- In setting mode, press it to adjust the value of the flashing digit upwards. And press it without
releasing to speed up the setting.
5. MEM/- key
- In normal mode, press it to check the max./min. indoor and outdoor temperature record for 5
seconds.
- Press and hold it for 3 seconds to delete the max./min. temperature record.
- In setting mode, press it to adjust the value of the flashing digit downwards. And press it without
releasing to speed up the setting.
6. DISPLAY SET key
- In normal mode, press and hold it for 3 seconds to enter time setting mode.
- In time setting mode, press it to step the setting item, and press and hold it for 3 seconds to save and
exit the setting.
7. °C/°F slide switch
- Select temperature unit between °C/°F.
8. SENSOR key
- Press it to start 433 MHz channel test for main unit & transmitter.
- During the channel test, press and hold it for 3 seconds to manual turn off.
9. RCC key
- Press it to manual receive RC signal.
- During the RC reception, press and hold it for 3 seconds to turn off synchronisation.
10. RESET key
- In case of mal-function, press it by using a metal wire to reset all the values.
11. Battery door
1. LED indicator
- Flashes when the remote unit transmitting a reading.
- Display of the channel, temperature and humidity.
2.LCD display
3. CHANNEL slide switch
- Assign the transmitter to Channel 1, 2 or 3.
4. RESET key
- Press it to reset the transmitter.
5. Wall-mounting holder
- Use it to support the transmitter on the wall.
6. Battery compartment
The signal indicator flashing means time signals are being received. If the RC weather station receives
signal successfully, a sync-time symbol “ ” appears on the LCD. The unit has already received the
time signal. Otherwise, the signal strength symbol will disappear from the LCD display.
You may press “RCC” key to receive the time signal manually. The receive mode will be off
automatically after 6-16 minutes. Receive mode consumes more battery power that may reduce
battery lifetime.
The weather station has been programmed to automatically switch when daylight saving time is in
effect. Your weather station will display “DST” on the LCD during the summer.
If the weather station does not receive the time signal successfully, you can set the time manually. As
soon as the transmitter is received again, the clock will automatically synchronize with the received
time.
1. In normal mode, press and hold “DISPLAY SET” key for 3 seconds until the Hour format digit
flashing.
2. Press “+” / “-” key to select 12/24 hour format.
3. Press “DISPLAY SET” key again to step the setting item to Hour with the Hour digit flashing.
4. Press “+” / “-” key to adjust the value of the flashing digit.
5. Do the above operation in this sequence: 12/24 Hr > Hour > Minute > Second > Time difference.
6. Press and hold “DISPLAY SET” key for 3 seconds to save and exit the setting.
If your local time is different from the RC received time, you can set the desired time difference. The
available time difference is from -23 hours to +23 hours. After setting the desired time difference, the
weather station will show the time that RC received time plus/minus the time difference.
1. In normal mode, press and hold “ALARM SET” key for 3 seconds until the Hour digit flashing.
2. Press “+” / “-” key to adjust the value of the flashing digit.
3. Press “ALARM SET” key again to step the setting value to Minute with the Minute digit flashing.
4. Press “+” / “-” key to adjust the value of the flashing digit.
5. Press “ALARM SET” key to save and exit the setting.
1. In alarm mode, the “AL” icon will display on the LCD.
2. The alarm function will turn on automatically once you set the alarm time.
1. Set the desired alarm time as described in the above section.
2. Or press “ALARM SET” key to display the alarm time, press it again to turn on alarm function with
the alarm icon “ ” displayed on the LCD.
3. When weather station reach the alarm time, alarm sound will start. Where, it can be stopped by
following operation:
a). Auto-stop after two minutes alarming if without any operation and it will re-alarm by the next day.
b). By pressing “SNOOZE” key to enter snooze that the alarm will sound again after 5 minutes.
c). By pressing “ALARM SET” key to turn off the alarm function.
1. The snooze could be used continuously in 24 hours.
2. During the snooze, the alarm icon will keep flashing.
The built-in barometer can notice atmosphere pressure changes. Based on the data collected, it can
predict the weather conditions in the forthcoming 12-24 hours.
1. The accuracy of a general pressure-based weather forecast is about 70% to 75%.
2. The weather forecast is meant for the forthcoming 12-24 hours. It may not necessarily reflect the
current situation.
1. The default displayed channel is channel 1. In normal mode, press “+CH” key to check the outdoor
temperature & humidity from channel 1 to channel 3.
2. Press and hold “+/CH” key for 3 seconds to turn to channel auto-change mode that the channels
change automatically.
3. Press “+/CH” key again to return to normal mode.
In channel auto-change mode, channels change automatically in every 4 second.
1. Push “°C/°F” switch to change the temperature unit to Celsius or Fahrenheit.
2. Press “CH/+” key to change the channels among 3 channels and check their temperature and
humidity.
1. Once the channel is assigned to one transmitter, you can only change it by removing the batteries
or resetting the unit.
2. If no signals are received or the transmission is interfered, “---” will appear on the LCD.
3. Relocate the weather station or the transmitter in other positions and make sure the transmission is
within the effective range of 50 meters approx.
4. After several trials in vain, please reset the weather station thoroughly. Try out where your
multifunctional weather station receives the signals best.
1. Press “MEM/-” key to check and keep the maximum / minimum temperature record for 5 seconds.
2. Press and hold the “MEM/-” key for 3 seconds to delete the maximum and minimum temperature
records.
Once you reset or re-install batteries for the main unit, all the value will be defaulted.
1. When the outdoor temperature within the range of -2°C~3°C (28°F~37°F), the Ice Alert icon “
will display on LCD & flashing continuously.
2. Ice Alert icon “ ” will disappear when outdoor temperature out of above temperature range.
”
When the LCD becomes dim, replace with 2 AA size batteries at once; while if the low battery indicator
“ ” displays in the outdoor window, it indicates that the battery power of the transmitter is not enough,
and you should replace with 2 AA size batteries at once.
1. Everyday the unit will automatically search for the time signal at 2:00, 8:00, 14:00 and 20:00.
2. Always place the unit away from interfering sources such as TV set, computer, etc.
3. Avoid placing the unit on or next to metal plate.
4. Closed area such as airport, basement, tower block or factory is not recommended.
5. Do not start reception on a moving article such as vehicle or train.
Temperature measurement range:
-40.0~70.0°C
(-40.0~158.0°F)
Recommended operating range:
0~45.0°C
(32.0~113.0°F)
Resolution:
0.1°C/°F
Humidity measurement range:
20%~90%RH
Recommended operating range:
20%~90%RH
Resolution:
1%RH
Radio Controlled signal:
DCF77
Temperature measurement range:
-40.0~70.0°C
(-40.0~158.0°F)
Recommended operating range:
-20.0~55.0°C
(-4.0~131.0°F)
Resolution:
0.1°C/°F
Humidity measurement range:
20%~90%RH
Recommended operating range:
20%~90%RH
Resolution:
1%RH
RF transmission frequency:
433 MHz
RF transmission range:
Maximum 50 meters
No. of remote sensor:
Up to 3 units
Temperature sensing cycle:
Around 60~64seconds
Main unit:
3V, use 2×AA 1.5V battery
Remote sensor:
3V, use 2×AA 1.5V battery
Main unit:
140(W)×100(H)×47(D)mm
Remote sensor:
65(W)×100(H)×35(D)mm