1
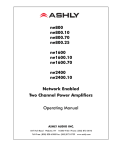
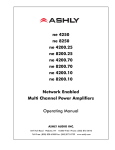
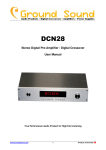
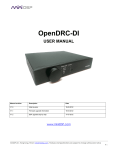
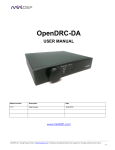
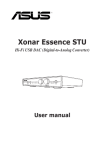
LDAC-Pro Digital / Analogue Audio Converter with Asynchronous USB User Guide English LINDY No. 70410 www.lindy.com © LINDY ELECTRONICS LIMITED & LINDY-ELEKTRONIK GMBH – SECOND EDITION (December 2012) LDAC-Pro User Guide Introduction Thank you for purchasing the LINDY LDAC-Pro. The LDAC-Pro is an incredibly powerful tool for both home enthusiasts and audio professionals, featuring multiple analogue and digital audio connections with bidirectional conversion and up scaling to cater for the most demanding applications. Incorporating multiple analogue and digital audio connections with bi-directional conversion and upscaling, this professional DAC can cater for the most demanding applications. Featuring bit perfect Asynchronous USB 2.0 with a highly accurate PLL and low jitter reduction clock system, the LDAC-Pro provides a superb digital audio listening experience. Sampling rates of up to 192KHz (up to 24bits) are supported via each of the four digital inputs, ensuring you get the most out for your audio devices. For professionals the LDAC-Pro utilizes the high performance Burr-Brown PCM4104 4 channel DAC chipset, for low out-of-band-noise and a high tolerance to system clock phase jitter, and the industry leading Texas Instruments TI TPA6120A2 high fidelity headphone amplifier, as well as low noise balanced XLR outputs and a 6.3mm headphone jack to offer unparalleled audio quality. Features Provides audiophile sound quality up to 24bit/192KHz Analogue or digital inputs are simultaneously output in analogue and digital formats Sampling Rate Conversion (SRC) for all digital inputs to 44.1/48/88.2/96/176.4/192KHz output Accepts 2 channel digital audio and works with any LPCM stream with Dolby Digital or DTS disabled HDMI, Optical, Coaxial and USB 2.0 (USB Audio Class 2) digital audio interfaces Phono, XLR, Line-In and Headphone analogue audio interfaces Renowned, high performance Burr-Brown PCM4104 DAC chipset Integrated headphone amplifier, with high quality TI TPA6120A2 chipset USB 2.0 audio interface compatible with Windows XP/Vista/7 and Mac OS X Package Contents LINDY LDAC-Pro IR Remote Control with CR2025 battery 6.3mm to 3.5mm stereo jack adapter 5V 3.6 Amp DC power adapter CD-ROM This manual 1 LDAC-Pro User Guide Specification Input ports: o Digital: USB 2.0, HDMI v1.4, TOSLink Optical & SPDIF Coaxial o Analogue: Phono L/R & Front-In 3.5mm Stereo Supported Digital Input Frequencies: 16 bit and 24 bit, 44.1/48/88.2/96/176.4/192KHz Output ports: o Digital: HDMI v1.4, TOSLink Optical & SPDIF Coaxial o Analogue: XLR L/R, Phono L/R & 6.3mm Stereo Headphone XMOS Asynchronous USB Chipset Texas Instruments / Burr-Brown PCM4104 24 bit, 216KHz 4Channel DAC Chipset Texas Instruments TPA6120A2 Headphone Amplifier Digital Input / Output format: PCM 2 Channel Total Harmonic Distortion: o @1Khz 0dBFs: -100db o @1Khz -10dBFs: -95db o @20Khz 0dBFs: -75db Signal to Noise Ratio: 110dB Stereo Input / Output level: 2Vrms Stereo XLR Output level: 4Vrms HDMI Video – v1.4 with Automatic bypass and 3D compatibility Headphone Output o Headphone Impedance: 16-600Ω o Total Harmonic Distortion: -92dB o Signal to Noise Ratio: 100dB o Frequency Response: ±0.5dB Input / Output Combinations USB 2.0 In HDMI In Optical In Coaxial In Line In Front In HDMI Out * Optical Out Coaxial Out Phono Out XLR Out Headphone Out * Only when HDMI Tx mode is set to Bypass, see page 5 for more information. Please Note: The LDAC-Pro is not compatible with Dolby Digital or DTS formats, which are both forms of compressed audio. If you play back CDs, DVDs or BDs encoded in Dolby Digital or DTS, you will only hear some unwanted noise that may damage your speakers. To work around this you need to access the menu setting of the source device and adjust Dolby Digital or DTS to PCM. This USB DAC works with any PCM stream from CD players, DVD players and set-top boxes. 2 LDAC-Pro User Guide Overview Front Panel 4 1 2 5 3 1. 6.3mm Stereo Headphone Socket Connect headphones with a 6.3mm jack (or 3.5mm using an adapter) 2. 3.5mm Stereo Front In Analogue 3.5mm stereo input 3. IR Eye IR interface 4. OLED Display Displays input selection, volume setting and input & output sampling rate 5. Menu & Volume Dial Change settings and adjust the menu Rear Panel 5 1 2 4 8 3 7 9 10 6 1. Power Input Connect the supplied 5V 3.6A Power supply, once all AV connections have been made 2. HDMI Input / Output Allows HDMI Signals to be looped through for audio up-scaling and conversion 3. Asynchronous USB 2.0 Input Jitter free, high definition digital audio interface for connection to PC and Mac 4. SPDIF Coaxial Input Audio interface for connecting digital audio source equipment 5. SPDIF Coaxial Output Audio interface, with optional upsampling, for connecting digital amplifiers and mixers 6. TOSLink Optical Input Optical digital audio interface 7. TOSLink Optical Output Optical audio interface, with optional upsampling, for connecting digital amplifiers and mixers 8. Phono L/R Unbalanced Input Standard stereo interface for connecting stereo source equipment 9. Phono L/R Unbalanced Output Standard stereo interface for use with the amplifiers and mixers 10. XLR L/R Balanced Output High quality analogue interface for use with powered monitors, amplifiers and mixers 3 LDAC-Pro User Guide Installation Note: Before beginning the installation, please ensure that all source and receiver equipment is powered off. Do not connect the power supply until instructed to do so. AV Connections 1. Connect your source equipment to the relevant input ports of the LDAC-Pro using good quality cables 2. With more good quality cables connect the LDAC-Pro output ports to your amplifier, receiver, mixer or headphones 3. Connect the power supply to the LDAC-Pro and switch it on 4. Power up your source and receiver equipment Warning: Always start with the volume dial at the minimum setting before connecting headphones and receiver equipment. This will help ensure you don’t get unexpected high volume levels that could damage your hearing or equipment. USB Connections PC The LDAC-Pro is a USB Audio 2.0 device and requires the installation of a driver to operate with a Windows PC. 1. Insert the supplied CD-ROM into the optical drive of your PC, or download the latest driver from www.lindy.com 2. Open the Driver folder and double click on setup.exe, this will begin the installation process. 3. You will see some warnings from Windows about installing this driver, it is perfectly safe to select to accept these warnings and proceed. 4. After a short while you will see a message prompting you to connect the LDAC-Pro. Connect it to your PC via a USB A/B cable. 5. Connect the power supply and power on the LDAC-Pro, then click OK, the installation will continue. 6. Next you will then see a message confirming that the installation is complete, click Next and then Finish to close the window. 7. Once the driver has been installed, click the Windows Logo/Start Button on your PC and navigate to Control Panel > Sound. 8. In the Playback tab you will see your computer’s onboard sound devices and the LDAC-Pro, click once on the LDAC-Pro and then click Set Default. 9. Connect the LDAC-Pro to your amplifier, receiver, mixer or headphones using good quality cables. 10. Now click Configure and follow the instructions. This will test the audio output of the PC via the LDAC-Pro. 11. Installation and configuration is now complete. Mac There is native support for audio up to 24bit 192KHz in OSX, so no drivers or software is required. 1. Connect the LDAC-Pro to your Mac using a USB A/B cable, then connect the power supply and power on the LDAC-Pro. 2. Navigate to Go > Applications > Utilities > Audio/Midi Set Up. 3. The LDAC-Pro will appear as an option under the Audio Output Field, allowing you to select it as your default output and to configure the settings according to your requirement. 4 LDAC-Pro User Guide Operation OLED Display The LDAC-Pro features an OLED display, which allows key information to be clearly viewed from a wide range of angles. Below is an example of the information provided on the display. Input Source Headphone Volume Input Sample Rate Output Sample Rate Menu To enter the menu system press the volume/menu controller dial in, you can then navigate through the menus below and make selections by turning the dial and pressing the dial to confirm. Menu Source Selection SRC Set HDMI Tx Set Display Set HP Impedance Reset to Default Return Source Selection allows you to choose which of the 6 available inputs you want to choose. Sub Menu HDMI In USB In Optical In Coaxial In Line In Front In Return Bypass 192 KHz 176.4 KHz 96 KHz 88.2 KHz 48 KHz 44.1 KHz Bypass Input Return Time Out 5s Time Out 10s Time Out 15s Return 16 Ω 32 Ω 64 Ω 200 Ω 300 Ω 600 Ω Return OK SRC Set allows you to choose the sample rate you want to use for the output signal. If you do not want to use SRC then select Bypass. HDMI TX Set allows you to choose how the HDMI Output operates. Bypass allows HDMI audio and video, Input allows video only, ideal for use with AV receivers. Display Set allows you to define the amount of time before the display reverts to the home screen after making a selection. HP Impedance makes it possible to change the output impedance of the headphone port to best match the specification of your headphones. 5 CE / FCC Statement CE Certification This equipment complies with the requirements relating to Electromagnetic Compatibility Standards EN55022/EN55024 and the further standards cited therein. It must be used with shielded cables only. It has been manufactured under the scope of RoHS compliance. CE Konformitätserklärung Dieses Produkt entspricht den einschlägigen EMV Richtlinien der EU für IT-Equipment und darf nur zusammen mit abgeschirmten Kabeln verwendet werden. Diese Geräte wurden unter Berücksichtigung der RoHS Vorgaben hergestellt. Die formelle Konformitätserklärung können wir Ihnen auf Anforderung zur Verfügung stellen. FCC Certification This equipment has been tested and found to comply with the limits for a Class B digital device, pursuant to part 15 of the FCC Rules. These limits are designed to provide reasonable protection against harmful interference in a residential installation. You are cautioned that changes or modification not expressly approved by the party responsible for compliance could void your authority to operate the equipment. This device complies with part 15 of the FCC Rules. Operation is subject to the following two conditions: 1. This device may not cause harmful interference, and 2. This device must accept any interference received, including interference that may cause undesired operation. LINDY Herstellergarantie – Hinweis für Kunden in Deutschland LINDY gewährt für dieses Produkt über die gesetzliche Regelung in Deutschland hinaus eine zweijährige Herstellergarantie ab Kaufdatum. Die detaillierten Bedingungen dieser Garantie finden Sie auf der LINDY Website aufgelistet bei den AGBs. 6 Recycling Information WEEE (Waste of Electrical and Electronic Equipment), Recycling of Electronic Products Europe, United Kingdom In 2006 the European Union introduced regulations (WEEE) for the collection and recycling of all waste electrical and electronic equipment. It is no longer allowable to simply throw away electrical and electronic equipment. Instead, these products must enter the recycling process. Each individual EU member state has implemented the WEEE regulations into national law in slightly different ways. Please follow your national law when you want to dispose of any electrical or electronic products. More details can be obtained from your national WEEE recycling agency. Germany / Deutschland Die Europäische Union hat mit der WEEE Direktive Regelungen für die Verschrottung und das Recycling von Elektro- und Elektronikprodukten geschaffen. Diese wurden im Elektro- und Elektronikgerätegesetz – ElektroG in deutsches Recht umgesetzt. Dieses Gesetz verbietet das Entsorgen von entsprechenden, auch alten, Elektro- und Elektronikgeräten über die Hausmülltonne! Diese Geräte müssen den lokalen Sammelsystemen bzw. örtlichen Sammelstellen zugeführt werden! Dort werden sie kostenlos entgegen genommen. Die Kosten für den weiteren Recyclingprozess übernimmt die Gesamtheit der Gerätehersteller. France En 2006, l'union Européenne a introduit la nouvelle réglementation (DEEE) pour le recyclage de tout équipement électrique et électronique. Chaque Etat membre de l’ Union Européenne a mis en application la nouvelle réglementation DEEE de manières légèrement différentes. Veuillez suivre le décret d’application correspondant à l’élimination des déchets électriques ou électroniques de votre pays. Italy Nel 2006 l’unione europea ha introdotto regolamentazioni (WEEE) per la raccolta e il riciclo di apparecchi elettrici ed elettronici. Non è più consentito semplicemente gettare queste apparecchiature, devono essere riciclate. Ogni stato membro dell’ EU ha tramutato le direttive WEEE in leggi statali in varie misure. Fare riferimento alle leggi del proprio Stato quando si dispone di un apparecchio elettrico o elettronico. Per ulteriori dettagli fare riferimento alla direttiva WEEE sul riciclaggio del proprio Stato. LINDY No. 70410 2nd Edition December 2012 www.lindy.com