1
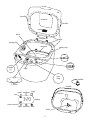
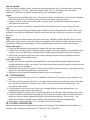
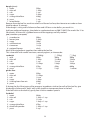
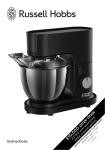
0
,0
0
0
pr
iz
e
dr
aw
w
w FR TR
w
.p E E A
ro
ye
R du rew ar
eg ct
is re ar gu
Se ter gis ds a
e on te
g ra
de bac lin r.co al nte
ta k e n .u ler e
ils fo o k/
y
r w rh
!
ob
bs
EX
£1
instructions
lid
handle
window
handle
vents
drive
hinges
vents
spring clip
element
spring clip
size
crust
menu
Z
colour
light
start
stop
T
-
+
paddle
T timer
handle
size
large
small medium
3:20
loaf tin
display
crust colour
light medium dark
shaft
2
Read the instructions, keep them safe, pass them on if you pass the breadmaker on.
Remove all packaging, but keep it till you know the breadmaker works.
A IMPORTANT SAFEGUARDS
Follow basic safety precautions, including:
1 This appliance can be used by children aged from 8 years and
above and persons with reduced physical, sensory or mental
capabilities or lack of experience and knowledge if they have
been supervised/instructed and understand the hazards involved.
2Children shall not play with the appliance.
3Cleaning and user maintenance shall not be done by children
unless they are older than 8 and supervised.
4Keep the appliance and cable out of reach of children under 8
years.
5Don’t connect the appliance via a timer or remote control system.
6If the cable is damaged, return the appliance, to avoid hazard.
¬The surfaces of the appliance will get hot.
HDon’t put the breadmaker in liquid, don’t use it in a bathroom, near water, or outdoors.
7 Don’t touch internal surfaces till the breadmaker has cooled down fully.
8 Keep clear of the vents in the sides and back of the breadmaker and the top of the dispenser.
9 Don’t plug the breadmaker in till after you’ve loaded the loaf tin (with the ingredients), into it.
10 Unplug before inserting or removing the loaf tin.
11 Sit the breadmaker on a stable, level, heat-resistant surface.
12 Leave a clear space of at least 5cm all round the breadmaker when in use.
13 Don’t use the breadmaker near or below curtains or other combustible materials.
14 Don’t cover the breadmaker or put anything on top of it.
15 Unplug the breadmaker when not in use, before moving and before cleaning.
16 Don’t use accessories or attachments other than those we supply.
17 Don’t use the breadmaker for any purpose other than those described in these instructions.
18 Don’t use metal or sharp tools on the loaf tin or paddle, you’ll scratch the non-stick surfaces.
19 Don’t use the breadmaker if it’s damaged or malfunctions.
household use only
C HOW IT WORKS – IN BRIEF
1 Choosea recipe (see page 13).
2 Measure the ingredients into the loaf tin in the correct order – this is essential.
3 Put the loaf tin into the breadmaker and close the lid.
4 Use the menu Z button to choose a program – basic, French, wholewheat, cake, sweet,
dough, jam, sandwich, gluten free, fastbake 1, fastbake 2, speciality
5 Use the colour button to choose the crust colour – light , medium , dark
6 Use the size button to choose the size – small i (500g), medium j (750g), large k (1kg)
7 Use the + and - buttons to set the timer (optional)
8 Press the start/stop button to start the program.
9 The display counts down, then, when it’s finished, it’ll beep.
,After the beep, the breadmaker will keep the bread warm for an hour, on the basic, French,
wholewheat, sweet, sandwich, gluten free, fastbake I , and fastbake II programs.
3
CPREPARATION
10 Sit the breadmaker on a stable, level, heat-resistant surface.
11 Don’t plug it in yet.
12 Open the lid.
13 Grip the loaf tin handle and pull the loaf tin up and out of the breadmaker.
14 Fit the paddle to the shaft in the bottom of the loaf tin.
15 The top of the shaft and the hole in the paddle are flattened (D-shaped), so you’ll have to
rotate the paddle to fit it on the shaft.
16 Measure the ingredients, and have them all to hand, ready to add to the loaf tin.
17 Set out a wire tray (for the bread), a heatproof placemat (for the loaf tin), and oven gloves (for
your hands – protect both hands).
C MEASURE THE INGREDIENTS
18 It’s important that ingredients are measured accurately
19 For example – if you have 6 ingredients and get each one only 1% out, the difference will be
the same as adding an extra heaped teaspoon of sugar to a cup of tea – not nice! – so:
a) use the same measuring spoons for all the ingredients
b) use the back of a knife to level all spoons for measurements given in spoons
c) don’t use a measuring jug – electronic scales are much more accurate than looking at lines
on a jug, so weigh the water
d) 1 millilitre of water weights 1 gram, so we’ve shown the water in the recipes as grams (g),
rather than millilitres (ml)
e) if you still want to measure the water with a measuring jug, simply replace the “g” with “ml”
(millilitres), but the results may not be consistent
f) if you’re using a recipe from elsewhere, replacing millilitres (ml) of water with grams (g)
will help with accuracy and consistency
C ADD THE INGREDIENTS IN ORDER
20 It’s important that you add the ingredients in the correct order:
a) if the yeast gets wet, it may activate too early
b) if it comes in contact with salt, it may not work properly
c) we’ve numbered them, to make it easier to follow the recipes
21 First, add the liquid:
a) it’s usually water, but it might include milk and/or eggs
b) the water should be warm (20°C-25°C/68°F-77°F), but only warm, not hot or cold
c) both hot and cold water will inhibit the yeast
,Don’t use milk if you’re using the timer, it’ll curdle before the program starts.
22 Add any sugar and salt required by the recipe.
23 Add any “wet” ingredients – honey, syrup, molasses ...
24 Add the dry ingredients – flour, dried milk, herbs, spices ...
25 Finally – add the dried yeast (or baking powder/baking soda).
a) lay it on top of the other ingredients
b) don’t get it wet, or it’ll start working too soon
C TAKE EXTRA CARE WITH THE TIMER
26 If you’re using the timer, it’s even more important to make sure that the yeast/(baking
powder/baking soda and water/liquid are well separated.
a) they’ll have all day to get together, while you’re not looking
b) the yeast will activate, grow, and die before the program starts
c) your bread will be hard, dense, coarse, and about as edible as a house brick
C NUTS AND RAISINS
27 You shouldn’t normally add nuts and raisins at the start, as they might upset the recipe.
4
28 They’re normally added later, during the second kneading.
29 The breadmaker will give a long beep when it wants them.
,The beep comes about 22 minutes after the start of programs 1 (basic) and 5 (sweet), but 47
minutes after the start of program 3 (wholewheat), to allow for 30 minutes preheating.
C LOAD THE BREADMAKER
30 Clean any spillage off the outside of the loaf tin.
a) spillage inside the machine will burn on to the surfaces
b) spillage on the element will reduce its life
31 Lower the loaf tin into the breadmaker.
32 If it won’t sit on the drive, lift it out, turn the drive slightly (less than ¼ of a turn), and try again.
33 If you spill, take the loaf tin out and clean up the spillage.
34Close the lid.
C POWER UP
36 Plug the breadmaker into the wall socket (switch the socket on, if it’s switchable).
a) the breadmaker will beep
b) the display shows 1P (program 1, with medium crust), then 3:20 (the program duration)
choose your program from the menu
38 Use the menu Z button to change the program number to the one you want – they are:
1 basic
7jam
2 French
8sandwich
3 wholewheat
9 gluten free
4 cake
10 fastbake I
5 sweet
11 fastbake II
6dough
12speciality
39 The time will change as you cycle through the program numbers – ignore it for now.
C CRUST COLOUR
40 Use the crust colour button to move the arrow on the bottom of the display to the crust
colour you want – the options are: light
(display = L ), medium
(display = P ), dark
(display = H ).
41 The crust colour button only works with the basic, French, wholewheat, and sweet programs.
CSIZE i j k
42 Use the size button to move the arrow on the top of the display to the size you want – the
options are: small i (500g), medium j (750g), large k (1kg).
43 These sizes are approximate – think of them as small, medium, and large.
44 The size button only works with the basic, French, wholewheat, sweet, and sandwich
programs.
program
No. name
program
buttons
colour
size
timer
No. name
1
basic
²
²
²
7
jam
2
French
²
²
²
8
sandwich
3
wholewheat
²
²
²
4
cake
5
sweet
6
dough
²
²
²
5
9
gluten free
10
fastbake I
11
fastbake II
12
speciality
buttons
colour
size
²
timer
C USING THE TIMER
45 Using the timer is optional – if you don’t want to use it, jump to point 51.
46 You may use the timer to set the finishing time up to 13 hours ahead (including the recipe
time).
47 The timer only works with the basic, French, wholewheat, and sweet programs.
48 Don’t use the timer with a recipe containing fresh milk, yoghurt, cheese, eggs, fruit, onions,
or anything else that might go off if left for a few hours in a warm moist environment.
49 It’s a great convenience, and it’s really nice to come home to the smell of freshly cooked
bread, but, like most things, there’s a downside:
a) leaving the ingredients together for an extended period will inevitably cause some
interaction, especially on a hot or humid day
b) the results probably won’t be quite as good as bread made right away
c) the bread will still be nice, but it’ll be “good”, rather than “great”
50 Here’s how:
a) carry out the instructions up to point 44 (page 5)
b) don’t use fruit, or anything moist – you’ll speed up the interaction
c) if your recipe uses nuts or raisins, add them after the flour
d) decide when you want your bread to be ready, e.g. 6 p.m.
e) check the time now, e.g. 7 a.m.
f) work out the difference between the two times, e.g. 11 hours
g) use the + and - buttons to change the time shown on the display from the program time
to the time you’ve just worked out (e.g. 11 hours)
h) each press will decrease - or increase + the time displayed by 10 minutes
i) you can’t reduce the time to less than the program time.
j) the maximum time which can be shown on the display is 13 hours
k) when you’ve set the time, go to point 51 (press start/stop)
l) go to work/shopping/whatever, and on your return, you’ll be welcomed home by the
aroma of freshly baked bread
C START THE BREADMAKER
51 When you’re happy with the settings, press the start/stop button.
a) the breadmaker will beep
b) the timer colon (:) flashes, to let you know the program is operating
c) the timer starts counting down, to show the amount of time left
C NOTHING HAPPENING ON PROGRAM 3? – DON’T WORRY
52 If you’re using the wholewheat program, you won’t hear any movement for about 30
minutes.
53 Don’t worry, nothing’s wrong – this program needs the time to preheat the ingredients to
about 25°C.
C NUTS AND RAISINS
54If the recipe uses nuts, raisins, or the like, they should be added during the kneading process
a) this affects only programs 1 (basic), 3 (wholewheat), and 5 (sweet)
b) you’ll know when it’s kneading – you’ll hear the paddles whirring
c) the new ingredients should be as dry as possible
d) if you’re using fresh fruit or vegetables, dry them with kitchen towel
55 The breadmaker will beep 15 times when it wants them:
e) open the lid
f) sprinkle the nuts/raisins/etc. evenly over the dough
g) close the lid
6
C HAVE A LOOK/GIVE IT A STIR
56 Have a look at the dough (through the window) after about 30 minutes of kneading.
57 If you spot any unincorporated ingredients round the walls of the loaf tin, use a soft spatula
to ease them away from the walls, and into the dough.
58 Work only round the walls of the loaf tin, to avoid the paddle.
,If you hit the paddle, you may dislodge it – having to stop, replace the paddle, and start
again isn’t much fun, so try to avoid it.
COOPS!
59 If you discover you’ve made a mistake after starting, press the start/stop button, and hold it
down for 2 seconds, to stop the breadmaker.
60Sort out the problem, then restart the breadmaker.
61 Don’t leave it too long.
62 If the program is substantially into the cycle before you stop it, the results will be affected.
63 In that case, you have to decide whether it’s best to:
a) let the program run, and put up with the result
b) stop the program, throw out the ingredients, and start from scratch
CFINISHING
64When it’s done, the breadmaker beeps to let you know your bread is ready.
65 Press the START/STOP button, and hold it down for 2 seconds, to stop the breadmaker.
66Remove the bread (point 70, below).
C KEEP WARM
67 If you don’t press the START/STOP button, the element will cycle on and off, to keep the
bread warm for an hour.
68After the hour is up, it’ll beep 10 times, then power down.
69 Don’t leave the bread in the loaf tin after the keep warm hour is up.
C REMOVING THE BREAD
70 As it cools, moisture in the bread evaporates, drying it out and firming it up.
a) leaving the bread in the loaf tin traps the moisture
b) it can’t evaporate, so it soaks into the bread as it cools down
c) this will eventually affect the flavour and texture
d) the “keep warm” feature will avoid this, up to a point, but the sooner the bread is removed,
the better
71 This is where you need the wire tray, the heatproof placemat, and the oven gloves
(remember, protect both hands).
72 Check that you’ve pressed the start/stop button – the display will revert to program number
and duration.
73 Unplug the breadmaker (switch the socket off first, if it’s switchable).
74 Hot air and steam will billow out when you open the lid – keep away from the area above the
breadmaker.
75 Put on the oven gloves (both hands).
76 Open the lid (use the handles).
77 Grip the loaf tin handle and pull the loaf tin up and out of the breadmaker.
78 Turn the loaf tin upside down and shake it to release the bread.
79 Put the bread on the wire tray to cool.
80Put the loaf tin on the heatproof placemat, and leave it to cool.
81 If the bread won’t come out, run a heatproof plastic or wooden spatula round the inside of
the loaf tin – don’t use anything metal or sharp, to avoid scratching the non-stick surface.
82Check that the paddle is still in the loaf tin.
7
83If the paddle has come off with the bread:
a) use something blunt, to avoid scratching the non-stick surfaces of the paddle
b) use something slim, to avoid digging a hole in the bread
c) a wooden kebab, ice lolly, or cocktail stick will do nicely
d) turn the bread upside down (with the oven gloves)
e) gently ease the paddle out with the stick
84For best results, let the bread sit for 20-30 minutes to firm up and dry out before cutting.
85Cutting the bread while it’s still warm and moist may make it soggy.
86On the other hand, if you’d rather tear a bit off, smother it in butter, and eat it hot, hold a bit
of kitchen towel under your chin, to keep the drips off your clothes.
87Don’t cut the bread till you’ve checked the paddles.
88If the knife hits the paddles:
a) you’ll score the non-stick surface
b) you may damage the knife
c) if you’re really unlucky, you may even cut yourself
C CONTINUOUS USE
89Before reusing the breadmaker, let it cool, and check the inside for crumbs and other debris.
90If you try to use it while it’s hot, you’ll get an error message on the display.
91 Unplug it, remove the loaf tin, and let the breadmaker cool down fully before trying again.
C THE PROGRAMS
basic
For basic white bread, or recipes based on white bread dough.
French
This program makes French-type bread, with a lighter texture and crispier crust. Recipes suitable
for this program don’t normally use butter (or margarine) or milk. French-type bread doesn’t
keep very well, so it’s best eaten within hours of being made.
wholewheat
The heavier flour needs preheating for about 30 minutes before kneading. Wholewheat/
wholemeal loaves tend to be smaller and denser. They don’t work very well with the timer.
cake
This program is for cake and batter recipes, rather than dough, generally using baking powder
or baking soda as the raising agent, rather than yeast.
sweet
This program is used for sweeter bread recipes, often containing fruit. Don’t put the fruit in till
the breadmaker beeps, or the fruit may be mashed, and the bread too moist.
dough
This program uses the breadmaker as a mixing/kneading machine, to save your labour. You
must remove the finished dough as soon as the program has finished, or it will deteriorate.
Punch it back, cover, and let it rest for ten minutes or so before cutting/shaping.
jam
1 This program preheats the ingredients, then boils them.
2 Allow plenty of room for the jam to expand when boiling. If jam boils over into the inside of
the breadmaker, it will be very, very difficult to clean.
3 If it does boil over, press the start/stop button, unplug the breadmaker, let it cool down, and
clean it out before it sets.
caution Don’t mess with hot jam – it retains its heat for a long time and it sticks like glue. If it
gets on to your skin it won’t let go till it’s given you a nasty burn.
sandwich
This program provides a loaf with a loose texture and a thin crust, ideal for making sandwiches.
8
gluten free
Gluten free bread uses other substances to give the dough elasticity and bounce. Gluten free
loaves tend to be denser and coarser than bread made with strong flour.
Our baker prefers Juvela® (www.juvela.co.uk) gluten-free bread mix – N.B. this is gluten-free, not
wheat-free – it’s available from pharmacists.
fastbake I and II
The are variations on the basic program, with reduced kneading, rising, and baking times.
for
they cut the program times to 55 and 80 minutes respectively
against because of this, your bread will be smaller, denser, and coarser than normal, and any
additional ingredients (raisins, nuts, etc.) may be mashed, or unevenly distributed
speciality
This program is specially designed for the malt loaf recipe.
CINGREDIENTS
flour
The type of flour used is important. You can’t use “ordinary” plain flour for making bread. Buy
flour with “strong” or “bread” in its title. The commonest is normally marketed as strong white
flour. These “strong” or “bread” flours contain more gluten than ordinary baking flour. Gluten is
the protein that gives the bread its structure and texture. It retains the carbon dioxide produced
by the yeast, putting the elasticity, the bounce, into the dough.
other bread flours
These include strong brown or “Farmhouse” flour, strong wholemeal, and whole wheat bread
making flours. These provide an excellent source of dietary fibre, but contain lower levels of
gluten than strong white flour. This means that brown loaves tend to be smaller and denser than
white loaves. Generally speaking, if you substitute strong white flour for half of the brown flour
in the recipe, you can make bread with a “brown bread” flavour and a “white bread” texture.
yeast
1 Yeast is a living organism. Given moisture, food, and warmth, the yeast will grow and release
carbon dioxide gas. This forms bubbles which are trapped in the dough, making it rise.
2 Of the various types of yeast available, we recommend using “dried active yeast”, also known
as “dry active yeast”, and “instant yeast” or “easy blend dried yeast”. These are usually sold in
7 gram sachets and don’t have to be dissolved in water first.
3 If you don’t use all the yeast in a sachet, throw it away, don’t save it – it’ll go stale.
4 Don’t use fresh or tinned yeast – they won’t work properly with your breadmaker.
5 Check the “best before” date on the sachet of yeast – if it’s approaching its “best before” date,
don’t take any chances – throw it out and buy some more.
6 You may also see “fast action’ or “bread machine” yeast – really potent yeasts that can make
dough rise up to 50% faster. If you want to use these, you’ll need to do a bit of experimenting
to get the best results. You could start off by trying them with the fastbake programs.
liquid
1 The liquid ingredient is normally water or milk, or a mixture of the two.
2 Water makes a crispier crust. Milk gives a softer crust with a velvety texture.
3 The liquid should be warm, not hot or cold. Both hot and cold water will inhibit the yeast.
4 Some recipes call for hand-hot water (that’s 35°C-50°C/95°F-122°F), to speed up the process.
Only the fast yeasts can handle this temperature.
5 Don’t use milk with the timer; it might curdle before the bread-making process starts.
butter/fat
These make the dough more tender and enhance the flavour, giving the finished loaf a richer
quality. They help to retain moisture, making the bread keep fresh longer. Margarine or olive oil
can be used instead of butter, but they are less effective.
9
low fat spread
Don’t use low fat spread. Never mind what the manufacturer says, it’s designed for spreading,
not for cooking. It’s “low fat”, where the recipe needs “fat”. It’s also likely to be full of the
additives, E-numbers and other gunge we’ve so far managed to avoid.
sugar
1 Sugar activates and feeds the yeast, allowing it to grow. It adds flavour and texture, and helps
with browning the crust. Many sachet yeasts do not need sugar to activate.
2 Honey, syrup, or molasses may be used instead of sugar, provided the liquid ingredient is
adjusted to compensate.
3 Don’t use artificial sweeteners. None of these will feed the yeast, some of them will kill it.
salt
Salt helps to control the growth of the yeast. Without salt, the bread could rise too much, then
collapse. It also adds to the flavour. Keep it away from the yeast till the last minute, or it might
inhibit it.
eggs
Eggs will make your bread richer and more nutritious, add colour, and help with the structure
and texture. Eggs count as part of the liquid ingredient of the bread, so adjust the other liquid
ingredients if you are adding egg(s). Otherwise the dough may be too wet to rise properly.
herbs and spices
1 These can be added at the beginning, along with the main ingredients.
2 Dried herbs and spices like cinnamon, ginger, oregano, parsley, and basil will add flavour and
interest. Use small quantities (a teaspoon) to avoid overpowering the flavour of the bread.
3 Fresh herbs, like garlic and chives may contain enough liquid to upset the balance of the
recipe, so adjust the liquid content.
nuts and raisins
1 Dried fruit and nuts should be chopped finely; cheese should be grated; chocolate chips
should definitely be chips, not lumps. Don’t add more than the recipe requires, otherwise the
bread may not rise properly.
2 Be careful with fresh fruit and nuts. These contain liquids (juices and oils), so you may need to
adjust the main liquid ingredient to compensate.
3 Add these only when the breadmaker beeps, early in the program.
C STORING BREAD
1 Commercial bread contains all sorts of additives (chlorine, chalk, coal-tar dye, sorbitol, soya,
etc.).
2 Your bread won’t have any of these, so it won’t keep like commercial bread, and it won’t look
like commercial bread. On the plus side, it won’t taste like commercial bread either – it’ll
taste like bread should.
3 It’s best eaten fresh, but you can store it for a couple of days at room temperature, in a
polythene bag with the air squeezed out.
4 To freeze bread, let it cool, put it in a polythene bag, suck all the air from the bag, then seal it.
5 Don’t put bread in the fridge. Bread going stale is due to chemical reactions. Most chemical
reactions have an ideal temperature range, at which they work best. Guess what? – the
chemical reactions involved in bread going stale work best at fridge temperatures.
6 Remember – freezing bread is OK – just don’t stick it in the fridge.
C KITCHEN TEMPERATURE
Kitchen temperature can affect the outcome of your baking. The breadmaker works best in a
kitchen with a temperature between 15°C and 34°C (59°F and 93°F).
10
C POWER CUTS
1 If you suffer from a power cut lasting less than 7 minutes, the breadmaker will carry on when
power is restored, and the program time will be extended by the duration of the power cut.
2 If the power cut is more than 7 minutes, the program will fail – unplug the breadmaker, let it
cool down, then empty the loaf tin, dispose of the ingredients, clean it, and start again.
3 This also works if you unplug the breadmaker or switch it off accidentally.
, Make sure you remove the paddles before you dispose of the ingredients.
C ERROR MESSAGES
1 If the breadmaker is too hot, the display will show an error message – an odd set of letters
and/or numbers.
2 If this happens, press the start/stop button for 2 seconds, remove the loaf tin, and let the
breadmaker reach room temperature before trying again.
3 If this doesn’t work, then the problem isn’t overheating, it’s probably broken.
C CARE AND MAINTENANCE
1 Unplug the breadmaker (switch the socket off first, if it’s switchable).
2 Open the lid, and let it cool down fully before cleaning.
3 If the paddle has stuck to its shaft, fill the loaf tin with warm water. This should soften any
dough residues and allow the paddle to be removed. Don’t leave it to soak.
4 If the inside of the paddle gets clogged with flour, soak it in warm water, then dig out the
flour with a wooden cocktail stick.
5 Wash the loaf tin and paddle in warm soapy water, rinse, then dry thoroughly.
6 Wipe all other surfaces, internal and external, with a damp cloth. Use a little washing-up
liquid if necessary, but be sure to clean it all off, otherwise it might taint the next lot of bread.
7 Make sure everything is dry before reusing the breadmaker or storing it away.
8 Don’t immerse the breadmaker in water or any other liquid.
9 Don’t use harsh or abrasive cleaners or solvents.
10 You may wash the loaf tin and paddles in a dishwasher, but we don’t recommend this, as the
harsh environment inside the dishwasher may affect the surface finishes. If you do, then you
must put the paddle, on its own, in a compartment of the cutlery basket.
CRECIPES
1 Many external factors affect the taste and texture of your bread (e.g. yeast type, flour type,
sugar type, kitchen temperature, even air pressure and height above sea level).
2 The recipes supplied have been designed specially for this breadmaker.
3 If you want to experiment, use the recipes as a guide, but vary the ingredients, vary the
quantities, taste the results. Keep notes, write down what changes you make, and you’ll build
up a range of recipes which suit your taste. Keep notes of the not-so-successful ones too, so
you know what not to do next time.
4 You’ll find it’s best to change only one ingredient at a time – if you change more than one,
you won’t know which one was responsible for the effect you got.
5 If you already have bread recipes, or find recipes in other publications, compare them with
the recipes given here, to find out which program to try first, then experiment till the results
match your desires.
5 Be careful with quantities when using other recipes. For the first trial, don’t fill the loaf tin
above about a quarter full, certainly not as much as a third full. If you overfill it, the rising
bread may push the lid off. That’s on a good day. On a bad day, it’ll spill over the side, burn on
to the element and clog the drive.
C USING THE RECIPES
1 Tablespoons (tbsp) are 15ml, teaspoons (tsp) are 5ml.
2 Spoons should be level, not heaped.
11
3 Measure everything with the same set of measuring spoons.
4 Weighing water (1g=1ml) is more accurate than using a measuring jug.
5 Dried milk should be dried skimmed milk.
6 Use new, unopened, sachets of dried yeast – check the “best before” dates.
7 If you don’t use all the yeast in a sachet, throw it away, don’t save it – it’ll go stale.
8 Use flour marketed as “strong flour” or “bread-making flour” – ordinary flour won’t work.
9 Don’t open the lid unless you absolutely have to – then close it again.
10 The best bread knife has a toothed blade a bit like a hacksaw blade – use it to saw the bread,
without much pressure, so the bread doesn’t become distorted.
,Put the ingredients into the loaf tin in the correct order – we’ve numbered them, to make it
easier to follow the recipes.
C TROUBLESHOOTING – WHAT TO DO IF:
the bread collapsed
1 The dough may have been too moist. Reduce the recipe liquid by 2 tbsp. If tinned fruit was
used, it may not have been properly drained.
2 Leaving the bread in the loaf tin while it cools can cause moisture released in the baking
process to soak back into the bread.
3 The flour may have been too coarsely ground. Try using finer flour.
the bread didn’t rise
1 One or more ingredients were added in the wrong quantities – accuracy is essential
2 The yeast is stale – check the “best before” date – use a fresh, unopened sachet every time
the core of the bread is too moist
1 The dough may have been too moist, see above.
2 The flour may have been too heavy. This problem can occur with rye, bran and wholemeal
flours. Reduce the amount of heavy flour and replace with white flour.
the bread has swollen too much
1 You may have used too much yeast, try reducing it slightly.
2 Too much sugar can cause the yeast to work too fast, and the bread to rise too much. Try
reducing the amount of sugar. If you add sweet/sugary ingredients such as dried fruit, honey
or molasses, reduce the amount of sugar to compensate.
3 You might try reducing the recipe liquid by 2 tbsp, as this will slow the action of the yeast.
4 Use a coarser flour. Less yeast is needed with fine flour than with the same type of flour
ground coarsely.
the bread tastes bland
Try increasing the amount of salt by up to ¼ of a teaspoon.
12
i (500g)
190g
1 tbsp
1 tsp
1 tbsp
1 tbsp
350g
1½ tsp
j (750g)
260g
1 tbsp + 1 tsp
1½ tsp
1 tbsp + 1 tsp
1½ tbsp
500g
1¼ tsp
k (1kg)
360g
2 tbsp
2 tsp
2 tbsp
2 tbsp
650g
2 tsp
French
1water
2 salt
3 strong white flour
4 yeast
i (500g)
200g
1 tsp
360g
1 tsp
j (750g)
300g
1½ tsp
545g
1½ tsp
k (1kg)
400g
2 tsp
725g
1 sachet
wholewheat
1water
2 olive oil
3 salt
4 sugar
5 dried milk powder
6 strong wholewheat flour
7 strong white flour
8 yeast
i (500g)
200g
1 tbsp
¾ tsp
2 tsp
1 tbsp
150g
150g
½ tsp
j (750g)
300g
1 tbsp
1¼ tsp
1 tbsp
1½ tbsp
220g
220g
¾ tsp
k (1kg)
400g
2 tbsp
2 tsp
1½ tbsp
2 tbsp
300g
300g
1 tsp
cake (mixed fruit cake)
1 lemon juice
1 tsp
2egg-small
2
3 vanilla extract
¼ tsp
4 butter, melted
50g
5 mixed dried fruit (soaked)
175g
6 plain flour
250g
7sugar
150g
8 cinnamon
¼ tsp
9 nutmeg
¼ tsp
10 baking powder
2 tsp
11 brandy (optional)
a dash
If the butter isn’t melted, the recipe won’t work. If, during the first 30 minutes of the program,
ingredients stick to the walls of the loaf tin, give the dough a little careful “help” with a soft
spatula to incorporate them in the loaf.
sweet (chocolate bread)
i (500g)
j (750g)
This is not a cake – it’s nice just buttered, or toasted and buttered.
1milk
200g
300g
2 olive oil
1 tbsp
1½ tbsp
3 salt
1 tsp
1½ tsp
4 sugar
2 tbsp
3 tbsp
5 vanilla extract
½ tsp
¾ tsp
6 strong wholemeal flour
300g
450g
7 cocoa powder
25g
40g
8 yeast
1½ tsp
2 tsp
9 chopped hazelnuts
7 tbsp
5 tbsp
13
k (1kg)
400g
2 tbsp
2 tsp
4 tbsp
1 tsp
600g
50g
1 sachet
3 tbsp
recipes
basic (white bread)
1water
2 olive oil
3 salt
4 sugar
5 dried milk powder
6 strong white flour
7 yeast
dough (pizza)
1water
250g
2 olive oil
1 tbsp
3 salt
1 tsp
4 sugar
2 tbsp
5 strong white flour
400g
6 yeast
1 tsp
7 mixed herbs
1 tsp
Remove from the loaf tin, work into a ball on a floured surface, then leave to rest under a clean
cloth for about 15 minutes.
If the dough is sticky, add a little extra flour and it’ll form a nice ball as you work it in.
Add your preferred toppings, then bake in a preheated oven at 200°C/400°F/Gas mark 6 for 15 to
20 minutes, till the crust is golden brown and the toppings are fully cooked.
jam (strawberry compote)
1strawberries
500g
2 lemon juice
2 tbsp
3sugar
100g
4 vanilla extract
¼ tsp
5 cinnamon
¼ tsp
6 optional liqueur
dash
Mash all the ingredients together, then add to the loaf tin.
This is beautiful with vanilla ice cream, natural yoghurt, or cheesecake.
sandwich
1milk
2 olive oil
3 salt
4 sugar
5 strong white flour
6 yeast
i (500g)
250g
1 tbsp
1 tsp
1½ tbsp
370g
1½ tsp
j (750g)
300g
1½ tbsp
1½ tsp
2 tbsp
450g
2 tsp
k (1kg)
400g
2 tbsp
2 tsp
3 tbsp
600g
1 sachet
gluten free
1water
350g
2 olive oil
1½ tbsp
3 salt
½ tsp
4 sugar
1 tbsp
5 Juvela gluten free mix
400g
6 yeast
1 tsp
If, during the first 30 minutes of the program, ingredients stick to the walls of the loaf tin, give
the dough a little careful “help” with a soft spatula to incorporate them in the loaf.
If the loaf sticks to the loaf tin, gently free it with a wooden spatula.
fastbake 1
1water
2 olive oil
3 salt
4 sugar
5 strong white flour
6 dried milk powder
7 yeast
300g
1 tbsp + 1 tsp
1½ tsp
1 tbsp + 1 tsp
470g
1 tbsp + 1 tsp
2 tsp
14
fastbake 2
1water
2 olive oil
3 salt
4 sugar
5 strong white flour
6 dried milk powder
7 yeast
speciality (malt loaf)
1water
2 olive oil
3 salt
4 dried milk powder
5 plain flour
6 yeast
7sultanas
8 honey
9 malt extract
10 black treacle
400g
2 tbsp
2 tsp
2 tbsp
630g
2 tbsp
1 sachet
270g
1 tbsp
1 tsp
1 tbsp
450g
1½ tsp
200g
1 tbsp
2 tbsp
1½ tbsp
notes
15
W
ENVIRONMENTAL PROTECTION
To avoid environmental and health problems due to hazardous substances in electrical
and electronic goods, appliances marked with this symbol mustn’t be disposed of with unsorted
municipal waste, but recovered, reused, or recycled.
SSERVICE
If you ring Customer Service, please have the Model No. to hand, as we won’t be able to help
you without it. It’s on the rating plate (usually underneath the product).
The product isn’t user-serviceable. If it’s not working, read the instructions, check the plug fuse
and main fuse/circuit breaker. If it’s still not working, consult your retailer.
If that doesn’t solve the problem – ring Customer Service – they may be able to offer technical
advice.
If they advise you to return the product to us, pack it carefully, include a note with your name,
address, day phone number, and what’s wrong. If under guarantee, say where and when
purchased, and include proof of purchase (till receipt). Send it to:
Customer Service
Spectrum Brands (UK) Ltd
Fir Street, Failsworth, Manchester M35 0HS
email: [email protected]
telephone: 0845 658 9700 (local rate number)
EGUARANTEE
Defects affecting product functionality appearing within two years of first retail purchase will be
corrected by replacement or repair provided the product is used and maintained in accordance
with the instructions. Your statutory rights are not affected. Documentation, packaging, and
product specifications may change without notice.
J ONLINE
www.russellhobbs.co.uk for more products
I REGISTER ONLINE FOR –
552-198 h h h h h h h h h h
£10,000 prize draw, EXTRA year guarantee, FREE rewards gallery
Visit www.productregister.co.uk/rhobbs
You must register within 28 days of purchase.
16