1
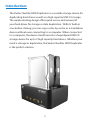
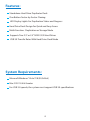
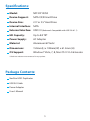
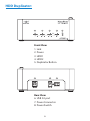
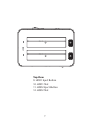
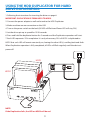
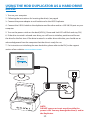
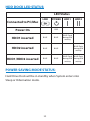
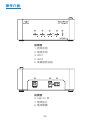
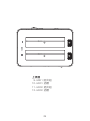
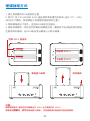
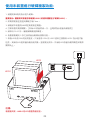
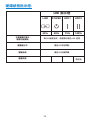
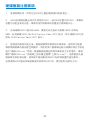
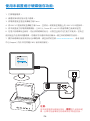
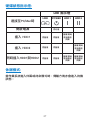
User Manual
Model: NST-DP100S3
w w w.vantecusa.com
All Registerd Trademarks Belong To Their Respective Companies. Copyright © 2013 Vantec Thermal Technologies.
Table of Contents:
TABLE OF CONTENTS
2
INTRODUCTION
3
SYSTEM REQUIREMENTS AND FEATURES
4
SPECIFICATIONS AND PACKAGE CONTENTS
5
HDD DUPLICATOR
6
HARD DRIVE INSERTION AND REMOVAL
8
USING THE HDD DUPLICATOR FOR HARD DRIVE
DUPLICATION
9
USING THE HDD DUPLICATOR AS A HARD DRIVE
DOCK
12
WARRANTY
15
CONTACT
15
2
Introduction:
The Vantec NexStar HDD Duplicator is a versatile storage device for
duplicating hard drives as well as a high capacity USB 3.0 storage.
The simple docking design offers quick access and removal of
your hard drives for storage or data duplication. With its’ built-in
one-button cloning; you can copy sector-by-sector as a standalone
device without even connecting to a computer. When connected
to a computer, the device transforms into a SuperSpeed USB 3.0
storage device for up to 2 high capacity hard drives. Whether your
need is storage or duplication, the Vantec NexStar HDD Duplicator
is the perfect solution.
3
Features:
Standalone Hard Drive Duplicator Dock
One Button Sector-by-Sector Cloning
LED Display Lights For Duplication Status and Progress
Hard Drive Dock Design For Quick and Easy Access
Multi-Function: Duplication or Storage Mode
Supports Two 2.5” or 3.5” SATA I/II/III Hard Drives
USB 3.0 Transfer Rates With Hard Drive Dock Mode
System Requirements:
Microsoft Windows® Vista/7/8 (32/64-bit)
Mac OS X 10.4 & Greater
For USB 3.0 speeds, the system must support USB 3.0 specifications
4
Specifications:
Model:
NST-DP100S3
Device Support:
SATA I/II/III Hard Drive
Device Size:
2.5” or 3.5” Hard Drive
Internal Interface: SATA
External Interface: USB 3.0 (Backwards Compatible with USB 2.0 & 1.1)
HD Capacity:
Up to 8.0 TB*
Power Supply:
AC Adapter
Material:
Aluminum & Plastic
Dimensions:
150mm(L) x 108mm(W) x 61.5mm (H)
OS Support:
Windows® Vista, 7, 8, Mac OS X 10.4 & Greater
*Check our website www.vantecusa for any updates.
Package Contents:
NexStar HDD Duplicator
USB 3.0 Cable
Power Adapter
User’s Manual
5
HDD Duplicator:
1
2
3
4
Front View
1. Link
2. Power
3. HDD1
4. HDD2
5. Duplicator Button
6
7
Rear View
6. USB 3.0 port
7. Power Connector
8. Power Switch
6
8
5
10
9
12
11
Top View
9. HDD1 Eject Button
10. HDD1 Slot
11. HDD2 Eject Button
12. HDD2 Slot
7
HARD DRIVE INSERTION AND REMOVAL:
1. Note the location of SATA connector in the slot
2. Align the 2.5” or 3.5” HDD/SSD SATA connector on the drive with the connector
in the slot (Due to the size of 2.5” HDD/SSD, make sure to align the connector
carefully for proper insertion)
3. Insert the drive straight down until the connection is secured
4. To remove, locate the Eject button corresponding to the drive you are
removing, press the Eject button slowly while holding the drive as it disconnect
from the SATA connector.
Align SATA Connector
Master Drive
Slave Drive
Insert HDD
Remove HDD
NOTE:
FOR DUPLICATION: Make sure your Main Drive is in HDD1 and slave in HDD2.
DO NOT remove or insert any drive while the power is ON. You may damage the drive(s)
and/or the Duplicator.
8
USING THE HDD DUPLICATOR FOR HARD
DRIVE DUPLICATION:
1. Following the instructions for inserting the drives on page 8
IMPORTANT: DUPLICATION IS FROM HDD1 TO HDD2.
2. Connect the power adapter to wall outlet and to the HDD Duplicator
3. Make sure there are no connection on the USB
4. Turn on the power switch on the back [All LED will flash and Power LED will stay ON]
5. Let the drive spin up to speed for 15-20 seconds
6. Press and hold the duplicator button for 5 seconds and the Duplication operation will start.
7. Each LED represents 25% completion. It is only when every 25% of HDD1 is duplicated to
HDD2 that such LED will remain constantly on, leaving the other LED(s) scrolling back and forth.
When Duplication operation is fully completed, all LEDs will flash regularly until the device is
power off
HDD1
HDD2
NOTE:
If the Duplication fails, the LED on HDD2 will be red.
9
HDD DUPLICATION LED STATUS:
LED Status
LINK
POWER
HDD1
HDD2
25%
50%
75%
100%
Both HDD inserted
Duplication started
Solid Orange LED for every 25% done incrementally
Duplication in progress
Orange LED moving back and forth
Duplication complete
Orange LED blinking
Duplication Failure
RED
10
ABOUT DUPLICATION:
1. All data in HDD2 will be deleted once duplication starts.
2. The capacity of HDD2 must be equal or bigger than HDD1. If the capacity for
HDD2 is bigger than HDD1, the capacity remaining in HDD2 upon completion of
the duplication can be formulated to a new partition. Follow the HDD formatting
guide in this manual for further instructions.
3. If the original drive was initialized using MBR, the copied drive will be MBR
upon completion. If the original drive was initialized using GUID Partition Table
(GPT), the copied drive will in GUID Partition Table (GPT) upon completion.
4. Using of both of the same HDDs under the same OS after clone operation
completes may result in drive’s signature conflict, thus having the 2nd HDD
unrecognized & forced to “Offline” status. To have both HDDs work under the
same OS, right click the “Offline” wording and select “Online”. Doing so will have
this HDD assigned with a new drive’s signature, which makes it NOT identical to
the source Hard drive (HDD1). This practice will is not recommended for those
intending to use the cloned Hard Drive (HDD2) as a system or replacement drive
with the original HDD.
11
USING THE HDD DUPLICATOR AS A HARD DRIVE
DOCK:
1. Turn on your computer
2. Following the instructions for Inserting the drive(s) on page 8
3. Connect the power adapter to wall outlet and to the HDD Duplicator
4. Connect the USB 3.0 cable to the duplicator and the other end to a USB 3.0/2.0 port on your
computer
5. Turn on the power switch on the back [HDD(s), Power and Link LED will flash and stay ON]
6. If the drive inserted is a brand new drive, you will have to initialize, partition and format
the drive for the first time. If the drive inserted is an older drive with data, you should see an
acknowledgement from the computer that the drive is ready for use.
7. For instruction on initializing the new hard drive, please refer to the FAQ in the support
section of our website. www.vantecusa.com
NOTE:
DO NOT remove or insert any drive while the
power is ON. You may damage the drive(s) and/or
the Duplicator.
12
HDD DOCK LED STATUS:
LED Status
Connected to PC/Mac
LINK
Power On
POWER
HDD1
HDD2
RED
BLUE Flash
during R/W
activity
HDD1 inserted
BLUE
BLUE
HDD2 inserted
BLUE
BLUE
BLUE Flash
during R/W
activity
HDD1/HDD2 inserted
BLUE
BLUE
BLUE Flash BLUE Flash
during R/W during R/W
activity
activity
POWER SAVING MODE STATUS:
Hard Drive Dock will be in standby when System enters into
Sleep or Hibernation mode.
13
ABOUT HARD DRIVE DOCK:
1. If you are using hard drives over 2TB, make sure the OS you are using can
support GUID Partition Table (GPT) and the drive is formatted correctly.
2. This device is designed to support 2.5” and 3.5” using standard SATA HDD/
SSDs. Other hard drives using non-standard placement of the SATA interface is
not support.
3. This device detects PC power status and turn on & off itself automatically.
When PC power off and/or hibernates, HDD(s) spin down and all LEDs off, except
that Power LED remains constantly on in red until main power is shut down.
4. In some OS, when system reaches sleep mode, only monitor and peripheral
are turned off while motherboard is powered on. In this case, HDD and LED will
be still on.
5. To enhance smart power synchronization, do not turn off main power of this
device.
6. The equipped USB3.0 port is backward compatible with USB2.0 PC/notebook
by simply plug and play.
7. This device only supports HDDs of 512byte sectors. HDDs that use 4KB
sector (the advanced format) will be asked for formatting before it can come to
operation. All data will be lost. Make sure you backup all data before using 4KB
sector HDD with this device.
14
Warranty:
The NexStar comes with a 1 year limited warranty (90 day parts). If
your unit should become defective within that time frame, please
go to www.vantecusa.com for information on how to receive
warranty exchange or repair. Cosmetic defects and missing parts
are not covered under this warranty. Please check the contents
of the unit to make sure you received all parts. Also, check for any
cosmetic flaws. If any parts are missing or if there are cosmetic
defects, please contact the retailer from which you purchased the
unit immediately and ask for a replacement.
CONTACT:
Vantec Thermal Technologies
www.vantecusa.com
15
目錄:
目錄
16
產品介紹
17
系統需求與產品特色
18
產品規格與包裝內容
19
操作介面
20
硬碟抽取方式
22
使用本裝置進行硬碟複製功能
23
使用本裝置進行硬碟儲存功能
26
產品保固
29
聯絡我們
29
16
產品介紹:
凡達克傳輸方塊Clone是一多用途的硬碟複製與儲存裝置,且支
援USB 3.0傳輸介面。簡便的基座式設計,提供您快速的操作方
式,無論是存取硬碟內容或者複製硬碟,都可輕鬆的完成。透
過內建的 ”一鍵複製” 功能,不必連接到電腦即可進行 ”硬碟對硬
碟”的獨立複製。當連接到電腦時,本裝置將變成一USB 3.0介面
之硬碟外接座,最多可安裝2顆硬碟。無論您需要的是硬碟外接
座的傳輸與儲存功能,或者是想複製硬碟資料,凡達克傳輸方塊
Clone都可提供您完整且方便的解決方案。
17
產品特色:
本機硬碟拷貝功能
單鍵啟動一對一複製功能
LED 顯示複製進度與硬碟狀態
可快速更換硬碟
複合式功能: 可進行複製或標準外接座功能
支援兩個2.5” 或3.5” SATA I/II/III硬碟
外接座模式時可使用USB 3.0傳輸速度
系統需求:
Microsoft Windows® Vista/7/8 (32/64-bit)
Mac OS X 10.4 或以上
For USB 3.0 speeds, the system must support USB 3.0 specifications
18
產品規格:
型號:
NST-DP100S3
支援裝置:
SATA I/II/III 硬碟
裝置規格:
2.5” 或 3.5” 硬碟
內部介面:
SATA
外部介面:
USB 3.0
硬碟容量:
最高可至 8.0 TB*
電源形式:
專用電源變壓器
材質:
鋁 & 塑膠
產品尺寸:
150mm(L) x 108mm(W) x 61.5mm (H)
系統支援:
Windows® Vista, 7, 8, Mac OS X 10.4 或以上
(向下相容 USB 2.0 & 1.1)
*請至官網 www.vantecusa 以獲得最新資訊。
包裝內容:
傳輸方塊 Clone
USB 3.0 傳輸線
專用電源變壓器
使用手冊
19
操作介面:
1
2
3
4
前視圖
1. 連線狀態
2. 電源狀態
3. HDD1
4. HDD2
5. 單鍵複製按鈕
6
7
後視圖
6. USB 3.0 埠
7. 電源插孔
8. 電源開關
20
8
5
上視圖
9. HDD1
10. HDD1
11. HDD2
12. HDD2
10
9
12
11
退出鈕
插槽
退出鈕
插槽
21
硬碟抽取方式:
1. 請注意插槽內SATA接頭的位置。
2. 將2.5” 或 3.5” HDD/SSD SATA 連接頭對準插槽內的接頭 (由於 2.5” HDD/
SSD的尺寸關係,將硬碟插入前請確認連接頭的位置)。
3. 將硬碟筆直向下插入,直到SATA接頭完全連結。
4. 要移除硬碟時,請先找到對應的硬碟退出鈕,慢慢按下退出鈕的同時請扶
住要移除的硬碟,在SATA連結埠分離後小心取出硬碟。
對齊 SATA 連接埠
母硬碟 (HDD1)
子硬碟 (HDD2)
筆直插入硬碟
移除硬碟
注意:
硬碟複製模式: 確認您的母硬碟位於 HDD1 且子硬碟位於 HDD2。
當電源為開啟時,切勿移除或插入硬碟。 否則硬碟或本裝置將可能受到損傷。
22
使用本裝置進行硬碟複製功能:
1. 請遵照第8頁的指示插入硬碟。
重要提示: 複製模式將會把母硬碟(HDD1)的資料複製至子硬碟(HDD2)。
2. 將電源連接至插座與傳輸方塊Clone。
3. 請確認本裝置的USB埠並無連接至電腦。
4. 打開背面的電源開關。 [所有LED將會閃滅一次,且電源指示燈會持續發亮]
5. 請等待15-20 秒,讓硬碟轉動提昇轉速。
6. 長壓複製鍵約 5 秒之後將會自動開始複製功能。
7. 每格LED代表25%的完成進度。只有當每 25% 的 HDD1資料已複製到 HDD2 指示燈才會
恆亮,其餘的LED燈將會持續前後閃動。當複製完成時,所有的LED將會持續閃爍直到電源
關閉為止。
HDD1
HDD2
注意:
若複製失敗,HDD2 的LED將會亮起紅燈。
23
硬碟狀態指示燈:
LED 指示燈
LINK
POWER
HDD1
HDD2
25%
50%
75%
100%
子母硬碟已插入
複製功能開始
每25%進度完成,將會顯示橘色 LED 恆亮
複製進行中
橘色LED來回閃動
複製完成
橘色LED持續閃爍
複製失敗
亮紅燈
24
硬碟複製注意事項:
1.
當複製開始時,所有位於HDD2位置的硬碟資料將被清空。
2.
HDD2的硬碟容量必須大於或等於HDD1。若HDD2容量大於HDD1,剩餘的
容量可分配至新的分區,請參照指示將剩餘的容量進行硬碟格式化。
3.
若母硬碟(HDD1)格式為 MBR,複製完成之後的子硬碟(HDD2)亦將為
MBR。若母硬碟(HDD1)為 GUID Partition Table (GPT) 格式,則子硬碟(HDD2)亦
將為 GUID Partition Table (GPT) 格式。
4.
當因使用複製功能之後,兩個硬碟帶有相同的作業系統,使用時可能會
導致兩個硬碟的簽名檔互相衝突,而使得第二個硬碟在無法辨識的情況下被迫
進入” 離線(Off Line) ” 狀態。要讓兩個硬碟在相同作業系統下正常運作,請再
顯示” 離線(Off Line) ” 的硬碟上按右鍵並選擇” 上線(On Line)” 。 這將會使此硬
碟被賦予新的簽名檔,使系統不會判斷成與HDD1為相同裝置而產生衝突。
若想要將HDD2當做系統硬碟使用或取代HDD1時,請勿使用此操作方式。
25
使用本裝置進行硬碟儲存功能:
1. 打開電腦電源。
2. 請遵照第8頁的指示插入硬碟。
3. 將電源連接至插座與傳輸方塊Clone。
4. 將USB 3.0 連接線接至傳輸方塊Clone,並將另一端連接至電腦上的 USB 3.0/2.0連接埠。
5. 將本裝置後方的電源開關開啟。 [HDD(s), Power 和 Link LED 將會閃爍之後保持恆亮]
6. 若插入的硬碟為全新的,您必須將硬碟初始化,分割並且格式化之後方可使用。若為已
使用過且內含資料的舊硬碟,您應該可以看到系統判斷出一個已知的硬碟供您使用。
7. 關於新硬碟的使用與初始化步驟指導,請至我們的官網 www.vantecusa.com, 參考 服務
中心(Support) 內的 常見問題(F&Q) 有詳細的解說。
注意:
當本裝置電源為開啟狀態時,請勿插入或移除硬
碟,此舉可能會導致您的硬碟或是本裝置受損。
26
硬碟狀態指示燈:
LED 指示燈
連接至PC/Mac時
LINK
開啟電源
POWER
HDD1
HDD2
亮紅燈
插入 HDD1
亮藍燈
亮藍燈
插入 HDD2
亮藍燈
亮藍燈
同時插入HDD1與HDD2
亮藍燈
亮藍燈
當讀/寫時
會有藍燈
閃爍
當讀/寫時
會有藍燈
閃爍
當讀/寫時
會有藍燈
閃爍
當讀/寫時
會有藍燈
閃爍
休眠模式:
當作業系統進入休眠或待命模式時,傳輸方塊亦會進入待機
狀態。
27
硬碟儲存注意事項:
1. 當您的硬碟超過2TB時, 請確認您的作業系統可支援 GUID Partition Table
(GPT) 且硬碟為正確格式。
2. 本裝置僅支持標準 2.5” 或 3.5” SATA HDD/SSDs。 其餘非標準 SATA 介面
之硬碟並無法使用。
3. 本裝置將會隨著電腦狀態而自動的開始運轉或進入休眠模式。當電腦關機
或是進入休眠/待命狀態,硬碟將會停止運轉且除了電源指示燈之外的LED將會
熄滅,電源指示燈將持續閃爍直到本裝置的電源關閉。
4. 在某些作業系統中,當系統進入休眠狀態,只有顯示器和外接裝置會關
閉而電腦主機板仍進行供電,此狀態下,本裝置將會繼續運作。
5. 為了有效的運用本裝置的智慧型電源同步功能,請勿關閉本裝置的主要
電源。
6. 本裝置的 USB3.0 埠可向下相容 USB 2.0 電腦/筆記型電腦,且可隨插即
用。
7. 本裝置僅支援 512byte sectors的硬碟,使用4KB sector的硬碟將被要求格
式化後方可使用,格式化將會失去所有硬碟上原有的資料。若要將4KB sector
硬碟使用於本裝置,請確認您已將所有資料備份。
28
產品保固:
傳輸方塊Clone提供一年的保固維修(配件為90天保固維修),當您
的裝置在保固期限內出現瑕疵,請至www.vantecusa.com查詢如
何獲得保固更換或維修的資訊。一經使用後的外觀瑕疵或是配件
短少並不屬於保修範圍內。請在獲得本包裝時即檢查所有配件是
否完善,並檢查外觀上受否有任何缺陷,若有配件短少或是外觀
損壞之情形,請連繫您購買本產品的零售商要求立即更換新品。
聯絡我們:
凡達克國際股份有限公司
www.vantecusa.com
29