1
Simplicity Series
Simplicity Series
Safety Instructions
Warnings and Precautions
KNOW THESE SAFETY SYMBOLS
TO PREVENT DAMAGE WHICH MAY RESULT IN FIRE
OR ELECTRIC SHOCK HAZARD, DO NOT EXPOSE THIS
APPLIANCE TO RAIN OR MOISTURE.
The Socket-outlet should be installed near the apparatus and
be easily accessible.
Read and follow these instructions
when connecting and using your Public
Information Display:
• Unplug the display if you are not going to use it for an
extensive period of time.
CAUTION:TO REDUCE THE RISK OF ELECTRIC SHOCK,
DO NOT REMOVE COVER (OR BACK).
NO USER SERVICEABLE PARTS INSIDE.
REFER SERVICING TO QUALIFIED SERVICE
PERSONNEL.
This symbol indicates high voltage is present
inside. It is dangerous to make any kind of
contact with any inside part of this product.
This symbol alerts you that important literature
concerning operation and maintenance has
been included with this product.
CAUTION:FCC/CSA regulations state that any unauthorized
changes or modifications to this equipment may
void the user’s authority to operate it.
CAUTION:To prevent electric shock, match the wide blade
of plug to the wide slot, and fully insert the plug.
• Unplug the display if you need to clean it with a slightly
damp cloth. The screen many be wiped with a dry cloth
when the power is off. However, never use alcohol, solvents
or ammonia-based liquids.
• Consult a service technician if the display does not operate
normally when you have followed the instructions in this
manual.
• The casing cover should be opened only by qualified service
personnel.
• Keep the display out of direct sunlight and away from stoves
or any other heat sources.
• Remove any object that could fall into the vents or prevent
proper cooling of the display’s electronics.
• Do not block the ventilation holes on the cabinet.
• Keep the display dry. To avoid electric shock, do not expose
it to rain or excessive moisture.
• If turning off the display by detaching the power cable, wait
for 6 seconds before re-attaching the power cable for normal
operation.
• To avoid the risk of shock or permanent damage to the set
do not expose the display to rain or excessive moisture.
• When positioning the display, make sure the power plug and
outlet are easily accessible.
• IMPORTANT: Always activate a screen saver program
during your application. If a still image in high contrast
remains on the screen for an extended period of time, it may
leave an ‘after-image’ or ‘ghost image’ on the front of the
screen. This is a well-known phenomenon that is caused by
the shortcomings inherent in LCD technology. In most cases
the afterimage will disappear gradually over a period of time
after the power has been switched off. Be aware that the
after-image symptom cannot be repaired and is not covered
under warranty.
ii
Simplicity Series
Important Safety Instructions
1. Read these instructions.
2. Keep these instructions.
3. Heed all warnings.
4. Follow all instructions.
5. Do not use this apparatus near water.
6. Clean only with dry cloth.
7. Do not block any ventilation openings. Install in accordance
with the manufacturer’s instructions.
8. Do not install near any heat sources such as radiators, heat
registers, stoves, or other apparatus (including amplifiers)
that produce heat.
9. Do not defeat the safety purpose of the polarized or
grounding-type plug. A polarized plug has two blades with
one wider than the other. A grounding type plug has two
blades and a third grounding prong. The wide blade or the
third prong are provided for your safety. If the provided
plug does not fit into your outlet, consult an electrician for
replacement of the obsolete outlet.
10.Protect the power cord from being walked on or pinched
particularly at plugs, convenience receptacles, and the point
where they exit from the apparatus.
11.Only use attachments/accessories specified by the
manufacturer.
12.Use only with the cart, stand, tripod, bracket,
or table specified by the manufacturer, or
sold with the apparatus. When a cart is used,
use caution when moving the cart/apparatus
combination to avoid injury from tip-over.
13.Unplug this apparatus during lightning storms or when
unused for long periods of time.
WARNING:To prevent injury, this apparatus must be securely
attached to the floor/wall in accordance with the
installation instructions.
CAUTION:These servicing instructions are for use by
qualified service personnel only. To reduce the
risk of electric shock,do not perform any servicing
other than that contained in the operating
instructions unless you are qualitified to do so.
CAUTION:Excessive sound pressure from earphones and
headphones can cause hearing loss. Adjustment
of the equalizer to maximum increases the
earphone and headphone output voltage and the
sound pressure level. Therefore, to protect your
hearing, adjust the equalizer to an appropriate
level.
For UL/CUL application: For use only with UL Listed Wall
Mount Bracket with minimum weight/load:
SL3250
SL4250
SL4650
SL5550
Minimum weight/load (kg)
19.8
35.7
41.1
63.6
For CB application: The equipment and its associated
mounting means still remain secure during the test:
SL3250
SL4250
SL4650
SL5550
Unit Weight
(kg)
6.6
11.9
13.7
21.2
VESA Size
Mounting Screws
(X=Thickness of wall-mount plate)
(mm)
200 × 100
M6 × (16 + X)
400 × 400
M6 × (20 + X)
400 × 400
M6 × (20 + X)
400 × 400
M6 × (24 + X)
14.Refer all servicing to qualified service personnel. Servicing
is required when the apparatus has been damaged in any
way, such as power-supply cord or plug is damaged, liquid
has been spilled or objects have fallen into the apparatus,
the apparatus has been exposed to rain or moisture, does
not operate normally, or has been dropped.
WARNING:TO REDUCE THE RISK OF FIRE OR ELECTRIC
SHOCK, DO NOT EXPOSE THIS APPARATUS
TO RAIN OR MOISTURE.
WARNING:Apparatus shall not be exposed to dripping or
splashing and no objects filled with liquids, such
as vases, shall be placed on the apparatus.
WARNING:The batteries (batteries installed) shall not be
exposed to excessive heat such as sunshine, fire
or the like.
WARNING:The mains plug or appliance coupler is used as
the disconnect device,the disconnect device shall
remain readily operable.
WARNING:To prevent the spread of fire, keep candles or
other open flames away from this product at all
times.
iii
Simplicity Series
Regulatory Information:
Products: SL3250, SL4250, SL4650 and
SL5550; Regulatory Models: DS323QBT,
DS423QBT, DS463QBT and DS553QBT.
CE Declaration of Conformity
We declare under our responsibility that the product is in
conformity with the following standards:
• EN60065:2002+A1:2006+A11:2008+A2:2010+A12:2011
(Safety requirement of Audio, video and similar electronic
apparatus)
• EN55022:2010 (Radio Disturbance requirement of
Information Technology Equipment)
• EN55024:2010 (Immunity requirement of Information
Technology Equipment)
• EN61000-3-2:2006 +A1:2009+A2:2009 (Limits for Harmonic
Current Emission)
• EN61000-3-3:2008 (Limitation of Voltage Fluctuation and
Flicker)
• EN 50581:2012 (Technical documentation for the
assessment of electrical and electronic products with respect
to the restriction of hazardous substances)
following provisions of directives applicable:
• 2006/95/EC (Low Voltage Directive)
• 2004/108/EC (EMC Directive)
• 2009/125/EC (ErP Directive, EC No. 1275/2008, 642/2009
Implementing Directive for Standby and Off mode power
consumption)
• 93/68/EEC (Amendment of EMC and Low Voltage Directive)
and is produced by a manufacturing organization on
ISO9000 level.
• 2011/65/EU (RoHS 2 Directive)
iv
Federal Communications Commission (FCC)
Notice (U.S. Only)
This equipment has been tested and found
to comply with the limits for a Class B digital
device, pursuant to Part 15 of the FCC Rules.
These limits are designed to provide reasonable
protection against harmful interference when
the equipment is operated in a commercial
environment. This equipment generates, uses
and can radiate radio frequency energy and,
if not installed and used in accordance with
the instructions manual, may cause harmful
interference to radio communications. Operation
of this equipment in a residential area is likely
to cause harmful interference in which case the
user will be required to correct the interference
at his own expense.
Changes or modifications not expressly
approved by the party responsible for
compliance could void the user’s authority to
operate the equipment.
Use only an RF shielded cable that was supplied with the
display when connecting this display to a computer device.
To prevent damage which may result in fire or shock hazard, do
not expose this appliance to rain or excessive moisture.
THIS CLASS B DIGITAL APPARATUS MEETS ALL
REQUIREMENTS OF THE CANADIAN INTERFERENCECAUSING EQUIPMENT REGULATIONS.
This device complies with Part 15 of the FCC
Rules. Operation is subject to the following
two conditions: (1) this device may not cause
harmful interference, and (2) this device must
accept any interference received, including
interference that may cause undesired
operation.
Simplicity Series
End-of-Life Disposal
Your new Public Information Display contains materials that can
be recycled and reused. Specialized companies can recycle
your product to increase the amount of reusable materials and
to minimize the amount to be disposed of.
Please find out about the local regulations on how to dispose of
your old display from your local dealer.
(For customers in Canada and U.S.A.)
Dispose of in accordance to local-state and federal regulations.
For additional information on recycling contact www.eia.org
(Consumer Education Initiative)
Waste Electrical and Electronie EquipmentWEEE
Attention users in European Union private
households
This marking on the product or on its packaging
illustrates that, under European Directive
2002/96/EC governing used electrical and
electronic appliances, this product may
not be disposed of with normal household
waste. You are responsible for disposal of
this equipment through a designated waste
electrical and electronic equipment collection.
To determine the locations for dropping off such
waste electrical and electronic, contact your
local government office, the waste disposal
organization that serves your household or the
store at which you purchased the product.
End of Life Directives-Recycling
Your new Public Information Display contains
several materials that can be recycled for new
users.
Please dispose of according to all Local, State,
and Federal laws.
v
Simplicity Series
Table Of Contents
1. Unpacking and Installation...................... 1
1.1.Unpacking.......................................... 1
1.2. Package Contents.............................. 1
1.3. Installation Notes................................ 1
1.4. Mounting on a Wall............................. 2
1.5. Cable Management............................ 3
1.6. Orientating in Portrait......................... 3
2. Parts and Functions................................. 4
2.1. Control Panel..................................... 4
2.2. Input/Output Terminals....................... 6
2.3. Remote Control.................................. 8
2.3.1.General functions..................... 8
2.3.2.Inserting batteries in the remote
control...................................... 9
2.3.3.Handling the remote control..... 9
2.3.4.Operating range of the remote
control...................................... 9
2.4. RS232 Control................................. 10
2.5. LAN control..................................... 10
3.Connection.............................................. 11
3.1. Connecting External Equipments..... 11
3.2. Connecting Multiple Displays........... 12
3.2.1.RS232 Loop Through ............ 12
3.2.2.IR Loop Through ................... 12
3.3. IR Pass-through Connection............ 13
3.4. Connecting Display to the Network.. 13
3.5. Connecting Display to a Wireless
Device.............................................. 14
4.Operation................................................. 15
4.1. Watch the Connected Video Source.15
4.2. Change Picture Format.................... 15
4.3. Play Multimedia Files....................... 15
4.3.1.Play files from computer........ 15
4.3.2.Play multimedia files from USB
device..................................... 15
vi
4.3.3.Play files from wireless
device..................................... 16
4.4. Play options...................................... 16
4.4.1.Playing music files................. 16
4.4.2.Playing movie files................. 17
4.4.3.Playing photo files.................. 17
5. Change your settings............................. 18
5.1.Settings............................................ 18
5.1.1.Picture menu.......................... 18
5.1.2.Sound menu........................... 19
5.1.3.General settings menu........... 19
5.2. Network Settings.............................. 20
6. Input mode.............................................. 21
7. Cleaning and Troubleshooting.............. 22
7.1.Cleaning........................................... 22
7.2.Troubleshooting................................ 23
8. Technical Specifications........................ 24
8.1.SL3250............................................. 24
8.2.SL4250............................................. 25
8.3.SL4650............................................. 26
8.4.SL5550............................................. 27
Simplicity Series
1.
Unpacking and Installation
1.1. Unpacking
• This product is packed in a carton, together with the standard accessories.
• Any other optional accessories will be packed separately.
• Due to the size and weight of this display it is recommended for two people to move it.
• After opening the carton, ensure that the contents are complete and in good condition.
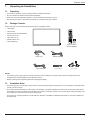
1.2. Package Contents
Please verify that you received the following items with your package content:
• LCD display
• User manual
• Remote control with AAA batteries
• Power cord (1.8 m)
• VGA cable (1.8 m)
• RS232 cable (1.8 m)
• Cable Clamps (2)
Remote Control
and AAA Batteries
Power Cord
VGA Cable
RS232 Cable
Quick Start Guide
Cable clamps (2)
NOTES:
• For all other regions, apply a power cord that conforms to the AC voltage of the power socket and has been approved by and
complies with the safety regulations of the particular country.
• Keep the package box and packing material for shipping the display.
1.3. Installation Notes
• Due to the high power consumption, always use the plug exclusively designed for this product. If an extended line is required, please
consult your service agent.
• The product should be installed on a flat surface to avoid tipping. The distance between the back of the product and the wall should
be maintained for proper ventilation. Avoid installing the product in the kitchen, bathroom or any other places with high humidity so as
not to shorten the service life of the electronic components.
• The product can normally operate only under 2000 m in altitude. In installations at altitudes above 2000 m, some abnormalities may
be experienced.
1
Simplicity Series
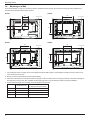
1.4. Mounting on a Wall
To mount this display to a wall, you will have to obtain a standard wall-mounting kit. We recommend using a mounting interface that
complies with UL1678 standard in North America.
SL3250:
SL4250:
200
400
Protective Sheet
100
Protective Sheet
400
Table
Table
SL4650:
SL5550:
400
400
Protective Sheet
400
Protective Sheet
400
Table
Table
1. Lay a protective sheet on a table, which was wrapped around the display when it was packaged, beneath the screen surface so as
not to scratch the screen face.
2. Ensure you have all accessories for mounting this display.
3. Follow the instructions that come with the base mounting kit. Failure to follow correct mounting procedures could result in damage to
the equipment or injury to the user or installer. Product warranty does not cover damage caused by improper installation.
4. For the wall-mounting kit, use mounting screws and tighten them securely:
VESA Size (mm)
2
Mounting Screws
(X=Thickness of wall-mount plate)
SL3250
200 × 100
M6 × (16 + X)
SL4250
400 × 400
M6 × (20 + X)
SL4650
400 × 400
M6 × (20 + X)
SL5550
400 × 400
M6 × (24 + X)
Simplicity Series
Caution:
To prevent the display from falling:
• To lessen the probability of injury and damage resulting from fall of the display in case of earthquake or other natural disaster, be sure
to consult the bracket manufacturer for installation location.
Ventilation Requirements for enclosure locating
To allow heat to disperse, leave space between surrounding objects as shown in the diagram below.
10 mm
10 mm
10 mm
10 mm
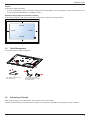
1.5. Cable Management
To use cable clamps for cable management.
Use cable clamp A to lock
the power cord
Use cable clamp B to
arrange the wires / cables
in side terminals
1.6. Orientating in Portrait
When using the display in the portrait position and looking at the front of the display,
it should be rotated clockwise so that the IR sensor window is on the bottom of the display. This will allow for proper ventilation.
3
Simplicity Series
2.
Parts and Functions
2.1. Control Panel
SL3250:
SL4250:
1
1
2
INPUT
MENU
3
MENU
3
INPUT
2
4
4
5
5
6
6
7
8
SL4650:
1
INPUT
2
INPUT
MENU
3
MENU
3
4
4
5
5
6
6
7
4
8
SL5550:
1
2
7
8
7
8
Simplicity Series
1
[
] button
Press to switch the display on or off.
2
[
] button
[
] button
Press to select input source.
3
Press to access the OSD menu.
4
[ ] button
Press to move the highlight bar right to selected item while OSD menu is on.
5
[ ] button
Press to move the highlight bar left to deselected item while OSD menu is on.
6
[ ] button
Press to move the highlight bar up or increase the adjustment while OSD menu is on, or to increase the audio output level while OSD
menu is off.
7
[ ] button
Press to move the highlight bar down or decrease the adjustment while OSD menu is on, or to decrease the audio output level while
OSD menu is off.
8
Remote control sensor and power status indicator
• Receives command signals from the remote control.
-- Light off when the display is turned on
-- Lights red when this display is in standby mode
-- Lights off when the main power of this display is turned off
5
Simplicity Series
2.2. Input/Output Terminals
SL4250:
15
13
12
2
1
13
12
11
10
10
R
11
9
R
R
L
L
9
8
L
L
8
Y
3
4
5
Pb
Y
Pr
3
7
6
4
5
Pb
Pr
7
6
SL5550:
15
13
12
2
1
13
12
11
10
10
R
11
9
R
R
L
L
9
8
L
L
8
Y
3
4
5
6
Pb
7
14
IN
14
OUT
OUT
IN
15
IN
1
16
R
2
16
OUT
OUT
IN
SL4650:
6
14
IN
14
OUT
OUT
IN
15
IN
2
16
R
1
16
OUT
OUT
IN
SL3250:
Y
Pr
3
4
5
6
Pb
7
Pr
Simplicity Series
1
AC IN
AC power input.
2
MAIN POWER SWITCH
Main power on/off switch.
3
HDMI IN
HDMI video/audio input.
4
DVI IN
DVI-D video input.
5
RJ-45
LAN control function for the use of remote control signal from control center.
6
VGA IN (D-Sub)
VGA video input.
7
COMPONENT IN (RCA)
Component YPbPr video source input.
8
AUDIO IN (RCA)
Audio input from external AV device.
9
AUDIO OUT (RCA)
Audio signal output to connect your external AV device.
10 AUDIO
IN (3.5mm)
Audio input from your PC.
11 SPDIF
OUT
Digital audio signal output to connect your external AV device.
12 IR
OUT /
13
IR IN (3.5 mm)
IR signal output/input for the loop-through function.
NOTES:
• This display’s remote control sensor will stop working if the jack [IR IN] is connected.
• To remotely control your A/V device via this display, refer to page 13 for IR Pass Through connection.
14 RS232C
OUT /
15
RS232C IN (2.5 mm)
RS232C network output/input for the loop-through function.
16 USB
PORT
Connect your USB storage device.
7
Simplicity Series
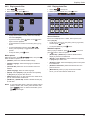
2.3. Remote Control
7
2.3.1. General functions
8
1
9
2
3
14
11 4
5
15
6
16
9
10
13
POWER button
Switch this display on or off.
PLAY buttons
Control playback of media files.
3
4
5
6
8
14 15 10
11
12
2
BACK button
Return to the previous menu page or exit from the previous
function.
VOLUME button
Adjust volume.
MUTE button
Press to turn the mute function on/off.
COLOR buttons
Select tasks or options for media player.
buttons
Enter text for network setting.
8
12 ADJUST button
Access currently available options, picture and sound
menus.
13 NUMERIC
7
1
10 button
Confirm an entry or selection.
SOURCE button
Select input source. Press [ ] or [ ] button to select from
USB, Network, HDMI, DVI, YPbPr, AV, or VGA. Press [
] button to confirm and exit.
HOME button
Access the OSD menu.
LIST
Not applicable.
NAVIGATION buttons
Navigate through menus and select items.
16 FORMAT button
Change picture format.
INFO button
Display information about current activity.
OPTIONS
Access currently available options, picture and sound
menus.
Simplicity Series
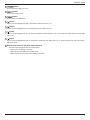
2.3.2. Inserting batteries in the remote control
The remote control is powered by two 1.5V AAA batteries.
To install or replace batteries:
1. Press and then slide the cover to open it.
2. Align the batteries according to the (+) and (–) indications inside
the battery compartment.
3. Replace the cover.
Caution:
The incorrect use of batteries can result in leaks or bursting. Be sure to follow these instructions:
• Place “AAA” batteries matching the (+) and (–) signs on each battery to the (+) and (–) signs of the battery compartment.
• Do not mix battery types.
• Do not combine new batteries with used ones. It causes shorter life or leakage of batteries.
• Remove the dead batteries immediately to prevent them from liquid leaking in the battery compartment. Don’t touch exposed battery
acid, as it can damage your skin.
NOTE:If you do not intend to use the remote control for a long period, remove the batteries.
2.3.3. Handling the remote control
• Do not subject to strong shock.
• Do not allow water or other liquid to splash the remote control. If the remote control gets wet, wipe it dry immediately.
• Avoid exposure to heat and steam.
• Other than to install the batteries, do not open the remote control.
2.3.4. Operating range of the remote control
Point the front of the remote control toward this display’s remote control sensor
when pressing a button.
Use the remote control within a distance of less than 10m/33ft from this
display’s sensor, and a horizontal and vertical angle of less than 30 degrees.
NOTE:The remote control may not function properly when the remote control
sensor on this display is under direct sunlight or strong illumination, or
when there is an obstacle in the path of signal transmission.
30
30
9
Simplicity Series
2.4.
RS232 Control
See www.planar.com for Simplicity RS-232 manual.
2.5.
LAN control
The Simplicity Series supports extending access to the RS232 commands over a
network connection. Below are the steps to follow for controlling the display over LAN through the RJ45 connector:
1. Connect display & PC to hub or connect display to PC with LAN cable directly.
2. SET display IP address
Step 1: In Network Settings menu, select ”Network configuration”->”Static IP”
Step 2: Then go to “Static IP configuration” and enter the pertinent information.
Step 3: “View network settings” to check IP address
3. Commands are sent via TCP connection to port 5000. The commands are the same as for the RS232 port (see Simplicity RS-232
manual on www.planar.com).
4. You can test commands using any TCP utility program that allows you to enter binary data in hexadecimal format. (Note: Contact
Planar Technical Support for recommended programs.)
10
Simplicity Series
3.
Connection
Note: VGA cable and power cord included with display. All other cables to be purchased separately.
3.1. Connecting External Equipments
USB
PC
OUT
COMPONENT OUT (YPbPr)
AUDIO
IN SPDIF OUT
AUDIO OUT
AUDIO IN
DVI OUT
VGA OUT
IN
STEREO AMPLIFIER
AUDIO OUT
IN
RS232C
IR
AUDIO OUT
AUDIO IN
USB
USB
DVD / VCR / VCD
HDMI OUT
R
L
R
L
AC IN
Y
HDMI IN
DVI IN
RJ-45
VGA IN
Pb
Pr
COMPONENT IN
11
Simplicity Series
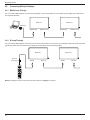
3.2. Connecting Multiple Displays
3.2.1. RS232 Loop Through
You can control multiple displays at one time through RS232. Loop through cables are not included with the display and would need to
be purchased separately.
DISPLAY 2
DISPLAY 1
[RS-232C]
PC
[RS232C IN]
[RS232C OUT]
[RS232C IN]
[RS232C OUT]
3.2.2. IR Loop Through
You can control multiple displays at one time with one remote using the IR in/out connectors on the display. External IR Receivers and IR
loop through cables are not included with the display and would need to be purchased separately.
DISPLAY 1
External
IR Receiver
[IR IN]
[IR OUT]
NOTE:This display’s remote control sensor will stop working if the [IR IN] is connected.
12
DISPLAY 2
[IR IN]
[IR OUT]
Simplicity Series
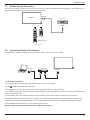
3.3. IR Pass-through Connection
You can use your display remote to control one of your sources if they are connected by IR loop through cables. These cables are not
included with the display and would need to be purchased separately.
[IR OUT]
DISPLAY
DVD / VCR / VCD
[IR IN]
(DVD / VCR / VCD)
Remote Control
(Simplicity Series)
3.4. Connecting Display to the Network
If you connect the display to a network, you can play photos, videos, and music from your computer.
[RJ-45]
Hub
[RJ-45]
PC
To set up the connection::
1. Connect the display with a LAN cable connected to a hub or router on your network.
2. Press
HOME button to display the OSD menu.
3. Press or button to select the menu item {Network setting}. Press OK button to enter its submenu.
4. Go to network configuration and select DHCP & Auto IP or Static IP. If you select Static IP, you will need to enter the information in the
Static IP Configuration menu.
5. Connect the PC with a LAN cable connected to the Ethernet using a hub or router. Identify the network on your computer.
6. Confirm that a media server is running on your computer, such as Windows Media Player (11 or higher) for PC or Twonky for Mac.
7. Make sure you have the appropriate settings on your computer firewall to allow you to run the media server through the network.
8. See Play Multimedia Files (Page 15) for more detail on playing content.
Manage security to files using standard Windows and Mac privacy features..
13
Simplicity Series
3.5. Connecting Display to a Wireless Device
If you connect the display to a wireless router, you can access files from a wireless device, like a smartphone, tablet, or laptop. For best
results, we recommend using a device with built-in DLNA functionality. Do not connect multiple device at the same time.
To set up the connection:
1. Connect your wireless device to the internet to download app that are designed to send media via DLNA (Examples: iMediashare,
ArkMC)
2. Connect your device to the wireless router.
3. Enable network sharing on your device. This varies for different phone/tablet models.
4. Enable DMR (Digital Media Renderer) feature on the display under Network Settings. Got to Digital Media Renderer submenu and
select ON.
5. See Play Multimedia Files (Page 15) for more detail on playing content.
14
Simplicity Series
Operation
NOTE:The control button described in this section is mainly on
the remote control unless specified otherwise.
4.1. Watch the Connected Video Source
See page 13 for external equipments connection.
or
button to select a device, then press
• Select the top bar to filter your files by type.
• Select [Sort] to arrange the files by album name, artist,
or other fields.
• To clear the list of offline media servers, press
button, then select [Clear offline servers]
and press OK button.
4.3.2. Play multimedia files from USB device
4.2. Change Picture Format
You can change the picture format to suit the video source.
Each video source has its available picture formats.
This display can play music, movie, or photo files from your
USB device.
1. Connect your USB device to the USB port on this display.
The available picture formats depend on the video source:
USB
1. Press
USB
button.
RS232C
2. Press or button to select a picture format, then press
button.
IR
IN
• {Auto zoom}: Enlarge the picture to fill the screen.
Recommended for minimal screen distortion but not for
HD or PC.
IN
2. Press
button.
button.
Tips:
OUT
1. Press
6. Use the remote control to control the media files on the
display.
• {Movie expand 16:9}: Scale 4:3 format to 16:9. Not
recommended for HD or PC.
• {Wide screen}: Shows widescreen format content
unstretched. Not recommended for HD or PC.
AUDIO OUT
• {Unscaled}: Provide maximum detail for PC. Only
available when PC mode is selected in the {Picture}
menu.
AUDIO
IN SPDIF OUT
4.
AUDIO IN
• {4:3}: Display the classic 4:3 format.
4.3. Play Multimedia Files
You can play videos, photos, and music on your display from:
• Your computer connected to your network.
• A USB device connected to the display.
• A device connected wirelessly to a router connected to the
display
2. Press
button.
button, select USB, then press
3. The connected USB device is detected automatically for all
its playable files, which will be automatically sorted into 3
types:
,
, and
.
Supported file system:
• FAT32
Supported file format:
• Music: MP3, WMA, M4A, AAC, AC3
• Movie: AVI, MP4, MOV, MPG/MPEG
• Photo: JPEG, BMP, GIF
4.3.1. Play files from computer
1. Connect your display to the network (see page 13)
2. Confirm that the computer, hub or router, and display are
turned on and connected.
3. Switch on media sharing on your computer using the media
server. For more information on how to set up the media server,
refer to the website of the media server.
4. Press the
BACK button to go up to the top layer in the
screen. Press
button to select the file type. Press
button to enter its play list.
4. Press the SOURCE button on the remote and Select
Network.
5. Select the file you want. Press
6. Follow the on-screen instruction to control the play option.
5. Select a file from the content browser, then press OK button
to start playing.
7. Press the PLAY buttons (H F G I J) to control
button to start playing.
15
Simplicity Series
playing.
Caution:
• The manufacturer is not responsible if the USB device is not
supported, nor is it responsible for damage to or loss of data
in the device.
• Do not overload the USB port. If you connect a USB storage
device that consumes more than 500mA power, make sure
that it is connected to its own external power supply.
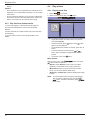
4.4. Play options
4.4.1. Playing music files
1. Select
in the top bar.
2. Select one music track, then press
button.
Album
4.3.3. Play files from wireless device
1. Music
05:05
1. Connect the display to a wireless device (see page 14).
2. Press the SOURCE button on the remote and Select
Network.
3. Select a file from the content browser, than press OK button
to start playing.
4. Use the remote control to control the media files on the
display.
Info
Play All
Sort
USB device
Options
• To play all the tracks in a folder, select one music file,
then select {Play All}.
• To pause the track, press
button. Press
button
again to resume playback.
or
• To skip backward or forward 10 seconds, press
button.
• To search backward or forward, press G or J
button, press repeatedly to toggle between different
speeds.
• To stop the music, press H button.
Music options
While you play music, press
button to select an option:
button, then press
• {Repeat}: Select {Repeat} to play a track or an album
repeatedly, or select {Play once} to play a track once.
• {Media Server}: When you play content from a media
server, you can select another media server.
• {Shuffle On} / {Shuffle Off}: Enable or disable random play
of tracks.
NOTE: To view information about a song (for example, title,
artist or duration), select the song, then press
button. To hide the information, press
button again.
16
Simplicity Series
4.4.2. Playing movie files
4.4.3. Playing photo files
1. Select
1. Select
in the top bar.
2. Select a video, then press
button.
2. Select a photo thumbnail, then press
Track
Info
in the top bar.
button.
Date
Play All
USB device
Options
• To play all the videos in a folder, select one video file,
then select {Play All}.
• To pause the video, press
button. Press
button
again to resume playback.
or
• To skip backward or forward 10 seconds, press
button.
• To search backward or forward, press G or J
button, press repeatedly to toggle between different
speeds.
• To stop the video, press H button.
Movie options
While playing video, press
button to select an option:
button, then press
• {Subtitles}: Select the available subtitle settings.
• {Subtitle Language}: Select the language for subtitles if
available.
• {Character Set}: Select the correct character set for the
subtitles.
• {Audio Language}: Select an audio language.
• {Repeat}: Select {Repeat} to play the video file repeatedly
or {Play once} to play the video file once.
Info
Play All
Sort
USB device
Options
Start a slideshow
If there are multiple photos in a folder, select a photo, then
select {Play All}.
or
button,
• To skip to the previous or next photo, press
and then press
button.
• To stop the slideshow, press H button.
Slideshow options
While you play a slideshow, press
press
button to select an option:
button, then
• {Shuffle Off} / {Shuffle On}: Enable or disable random
display of pictures in the slideshow.
• {Repeat}: Select {Repeat} to watch a slideshow repeatedly
or {Play once} to watch once.
• {Slideshow Time}: Select the displaying time for each photo
in the slideshow.
• {Slideshow Transitions}: Select the transition from one
photo to the next.
• {Media Server}: When you play content from a media
server, you can select another media server.
• {Media server}: When you play content from a media server,
you can select another media server.
• {Shuffle On} / {Shuffle Off}: Enable or disable random play
of video files.
NOTE: To view information about a video (for example, played
position, duration, title, or date), select the video, then
press
button. To hide the information, press
button again.
17
Simplicity Series
5.
Change your settings
Using the remote control:
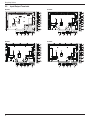
5.1. Settings
5.1.1. Picture menu
Picture
Picture style
Sound
Backlight
General settings
Contrast
Network settings
Brightness
Color
Sharpness
Advanced
Video or PC
Format and edges
Restore style
1. Press
button to display the OSD menu.
2. Press , , , or
its value. Press
3. Press
layer.
4. Press
button to select its menu item or to adjust
button to confirm.
button to go back to the previous menu
button to exit the OSD menu.
Using this display’s control buttons:
Picture style
Select a predefined picture setting.
Backlight
Adjust the brightness of this display’s backlight.
Contrast
Adjust video contrast.
Brightness
Adjust screen brightness.
Color
INPUT
Adjust the color saturation of the picture.
MENU
Sharpness
Adjust the sharpness of the picture.
Advanced
Access advanced settings such as gamma, tint settings and
video contrast settings.
• {Noise reduction}: Select the amount of noise reduction
for the picture.
1. Press
button to display the OSD menu.
2. Press[ ] [ ] [ ] or [ ] button to select menu item or
adjust its value.
• {Gamma}: Adjust the non-linear setting for picture
luminance and contrast.
• {Color temp.}: Change the color balance.
• {Custom color temp.}: Customize color balance setting.
3. Press
submenu.
button to confirm menu selection and enter its
• {Advanced sharpness}: Enable superior sharpness,
especially on lines and contours in the picture.
4. Press
button to exit the OSD menu.
• {Dynamic contrast}: Adjusts contrast depending on
content.
• {Dynamic backlight}: Adjusts backlight depending on
content.
• {Color enhancement}: Color saturation changes
depending on content.
Video or PC
When viewing content from a video source , select {Video} to
apply video setting. When a computer is connected through
HDMI , select {PC}.
Make sure that {Format and edges} {Picture format}
{Unscaled} is selected so as to view maximum detail.
18
Simplicity Series
Format and edges
Access advanced settings to control the displaying format of the
picture.
• {Picture format}: Change the picture format.
• {Screen edges}: Change the picture size.
• {Picture shift}: If available, move the position of the
picture.
5.1.3. General settings menu
Picture
Menu language
Sound
Monitor id
General settings
Eco mode
Network settings
Auto search
Clock
USB scheduling
Restore style
Restore the last-selected predefined picture setting.
Sleep timer
5.1.2. Sound menu
Control settings
Auto switch off
Factory settings
Picture
Sound style
Sound
Restore style
General settings
Bass
Menu language
Network settings
Treble
Select language used for OSD menus.
Audio out
Advanced
Monitor id
Set the ID number for controlling this display via the RS232C
connection. Each display must have a unique ID number when
multiple sets of this display are connected.
Eco mode
Sound style
Access predefined sound settings.
Select low power standby for lowest power consumption setting.
Note: LAN control is not available under low power standby.
Must use normal if using LAN control while display is in standby.
Auto search
Restore style
Choose to let this display detect and display available signal
sources automatically.
Restore the last-selected predefined sound setting.
Clock
Bass
Adjust clock settings.
Adjust the bass level of the speaker and headphones.
USB scheduling
Treble
This function allows you to program up to 3 different scheduled
time intervals for this display to activate, and auto play USB
media file of your setting.
Adjust the treble level of the speaker and headphones.
Audio out
Adjust audio output volume.
Advanced
Access advanced settings to enhance your audio experience.
• {Auto volume leveling}: Enable the reduction of sudden
volume changes.
• {Speaker}: Turn on or off the internal speakers.
• {Clear sound}: Enhance sound quality.
• {Audio out format}: Select the type of audio output
through the digital audio output connector.
• {Audio out delay}: Automatically sync the image on this
display to the audio from a connected home theatre.
• {Audio out offset}: Adjust the setting for audio output
delay. Available if {Audio out delay} is switched on.
After changing the {Clock} option in the {General settings}
menu, you need to set this {USB scheduling} again.
Sleep timer
Switch off this display after a specified time.
Auto switch off
Set the time for this display to be switched off after a period of
no activity. Press any key on the remote control to disable this
function.
Control settings
• {Local KB lock}: Choose to enable or disable the keyboard
(control buttons) function of this display.
• {Unlock}: Enable the keyboard function.
• {Lock all}: Lock all keyboard function.
• {Lock but volume}: Disable all the keyboard function
except the
and
button.
• {Lock but power}: Disable all the keyboard function
except the
button.
• {RC lock}: Choose to enable or disable the button function
of the remote control.
• {Unlock}: Enable the button function.
19
Simplicity Series
• {Lock all}: Lock all button function.
• {Lock but volume}: Disable all the button function
except the
button.
• {Lock but power}: Disable all the button function except
the
button.
NOTE: To disable the lock function from [Local KB lock] or
[RC lock] item, press buttons
1 9 9 8 on the remote
control.
Factory settings
Reset all your customized settings to the factory defaults.
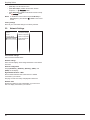
5.2. Network Settings
Picture
View network settings
Sound
Network configuration
General settings
Static IP configuration
Network settings
Digital Media Render...
Network name
View network settings
View connected network status.
Network settings
Select how this display should assign addresses to the network
resources.
Static IP Configuration
Assign {IP address}, {Netmask}, {Gateway}, {DNS1}, and
{DNS2} for this display.
Digital Media Renderer - DMR
Receive multimedia files from Smart Phones or Tablets
connected to your network.
See page 15 and 16 for setup and playback instructions.
Network name
Rename this display for easy identification if you have more
than one display connected to your network.
20
Simplicity Series
6.
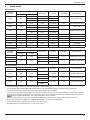
Input mode
PC Resolution:
Standard
Resolution
Active Resolution
H Pixels
Refresh Rate
Pixel Rate
480
60 Hz
25.175 MHz
480
72 Hz
31.5 MHz
480
75 Hz
31.5 MHz
400
70 Hz
33.75 MHz
600
60 Hz
40 MHz
600
75 Hz
49.5 MHz
768
60 Hz
65 MHz
768
75 Hz
78.75 MHz
V Lines
Aspect Ratio
Stand for Mode
4:3
Video Graphic Array
16:9
Wide Video Graphic Array
4:3
Super VGA
4:3
Extended Graphic Array
VGA
640
WVGA
720
SVGA
800
XGA
1024
WXGA
1280
768
60 Hz
79.5 MHz
5:3
Wide XGA
WXGA
1280
800
60 Hz
79.5 MHz
16:10
Wide XGA
SXGA
1280
1024
60 Hz
108 MHz
5:4
Super XGA
WXGA
1360
768
60 Hz
85.5 MHz
16:9
Wide XGA
UXGA
1600
1200
60 Hz
162 MHz
4:3
Ultra XGA
HD1080
1920
1080
60 Hz
148.5 MHz
16:9
HD1080
Refresh Rate
Pixel Rate
Aspect Ratio
Stand for Mode
29.97 Hz
13.5 MHz
59.94 Hz
27 MHz
4:3
Modified NTSC Standard
25 Hz
13.5 MHz
50 Hz
27 MHz
4:3
Modified PAL Standard
Refresh Rate
Pixel Rate
Aspect Ratio
Stand for Mode
74.25 MHz
16:9
Normally DVB Mode
74.25 MHz
16:9
Normally ATSC Mode
148.5 MHz
16:9
Normally ATSC Mode
SDTV Resolution:
Standard
Resolution
480i
480p
576i
576p
Active Resolution
H Pixels
V Lines
720
480
720
480
HDTV Resolution:
Active Resolution
Standard
Resolution
H Pixels
V Lines
720p
1280
720
1080i
1920
1080
1080p
1920
1080
50 Hz
60 Hz
25 Hz
30 Hz
50 Hz
60 Hz
• The PC text quality is optimum in HD 1080 mode (1920 × 1080, 60 Hz).
• Your PC display screen might appear different depending on the manufacturer (and your particular version of Windows).
• Check your PC instruction book for information about connecting your PC to a display.
• If a vertical and horizontal frequency-select mode exists, select 60 Hz (vertical) and 31.5 KHz (horizontal). In some cases, abnormal
signals (such as stripes) might appear on the screen when the PC power is turned off (or if the PC is disconnected). If so, press the
[
] button to enter the video mode. Also, make sure that the PC is connected.
• When horizontal synchronous signals seem irregular in RGB mode, check PC power saving mode or cable connections.
• This display settings table complies to the IBM/VESA standards, and based on the analog input.
• The DVI support mode is regarded as same to the PC support mode.
• The best timing for the vertical frequency to each mode is 60 Hz.
21
Simplicity Series
7.
Cleaning and Troubleshooting
7.1. Cleaning
Caution When Using the Display
• Do not bring your hands, face or objects close to the ventilation holes of the display. The top of the display is usually very hot due
to the high temperature of exhaust air being released through the ventilation holes. Burns or personal injuries may occur if any
body parts are brought too close. Placing any object near the top of the display could also result in heat related damage to the
object as well as the display itself.
• Be sure to disconnect all cables before moving the display. Moving the display with its cables attached may damage the cables
and thus cause fire or electric shock.
• Disconnect the power plug from the wall outlet as a safety precaution before carrying out any type of cleaning or maintenance
procedure.
Front Panel Cleaning Instructions
• The front of the display has been specially treated. Wipe the surface gently using only a cleaning cloth or a soft, lint-free cloth.
• If the surface becomes dirty, soak a soft, lint-free cloth in a mild detergent solution. Wring the cloth to remove excess liquid. Wipe
the surface of the display to remove dirt. Then use a dry cloth of the same type to dry.
• Do not scratch or hit the surface of the panel with fingers or hard objects of any kind.
• Do not use volatile substances such as insert sprays, solvents and thinners.
Cabinet Cleaning Instructions
• If the cabinet becomes dirty, wipe the cabinet with a soft, dry cloth.
• If the cabinet is extremely dirty, soak a lint-free cloth in a mild detergent solution. Wring the cloth to remove as much moisture as
possible. Wipe the cabinet. Use another dry cloth to wipe over until the surface is dry.
• Do not allow any water or detergent to come into contact with the surface of the display. If water or moisture gets inside the unit,
operating problems, electrical and shock hazards may result.
• Do not scratch or hit the cabinet with fingers or hard objects of any kind.
• Do not use volatile substances such as insert sprays, solvents and thinners on the cabinet.
• Do not place anything made from rubber or PVC near the cabinet for any extended periods of time.
22
Simplicity Series
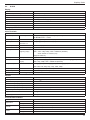
7.2. Troubleshooting
Symptom
Possible Cause
Remedy
No picture is displayed
1. The power cord is disconnected.
1. Plug in the power cord.
2. The main power switch on the back of
the display is not switched on.
2. Make sure the power switch is switched
on.
3. The selected input has no connection.
3. Connect a signal connection to the
display.
4. The display is in standby mode.
Interference displayed on the display or
audible noise is heard
Caused by surrounding electrical appliances Move the display to another location to see
or fluorescent lights.
is the interference is reduced.
Color is abnormal
The signal cable is not connected properly.
Make sure that the signal cable is attached
firmly to the back of the display.
Picture is distorted with abnormal
patterns
1. The signal cable is not connected
properly.
1. Make sure that the signal cable is
attached firmly.
2. The input signal is beyond the
capabilities of the display.
2. Check the video signal source to see
if it is beyond the range of the display.
Please verify its specifications with this
display’s specification section.
Display image doesn’t fill up the full size The zoom mode is not correctly set.
of the screen
Use the Zoom mode or Custom zoom
function in the Screen menu to fine tune
display geometry and time frequency
parameter.
Can hear sound, but no picture
Improperly connected source signal cable.
Make sure that both video inputs and sound
inputs are correctly connected.
Can see picture but no sound is heard
1. Improperly connected source signal
cable.
1. Make sure that both video inputs and
sound inputs are correctly connected.
2. Volume is turned all the way down.
2. Press [
3. [MUTE] is turned on.
3. Switch MUTE off by using the
[
] button.
4. No external speaker connected.
] or [
] button to hear sound.
4. Connect external speakers and adjust
the volume to a suitable level.
Some picture elements do not light
up
Some pixels of the display may not turn on.
After-Images can still be seen on the
A still picture is displayed for an over
display after the display is powered off. extended period of time
(Examples of still pictures include logos,
video games, computer images, and
images displayed in 4:3 normal mode)
This display is manufactured using an
extremely high level of precision technology:
however, sometimes some pixels of the
display may not display. This is not a
malfunction.
Do not allow a still image to be displayed
for an extended period of time as this can
cause a permanent after-image to remain
on the display.
23
Simplicity Series
8.
Technical Specifications
8.1.
SL3250
Display:
Item
Screen Size (Active Area)
Aspect Ratio
Number of Pixels
Pixel Pitch
Displayable Colors
Brightness
Contrast Ratio (Typical)
Viewing Angle
Specifications
31.5” LCD (80 cm)
16:9
1920 (H) × 1080 (V)
0.36375 (H) × 0.36375 (V) [mm]
16.7 Million colors
350 cd/m²
3000:1
178 degrees
In/Out Terminals:
Item
Speaker Output
Internal Speakers
Specifications
5W (L) + 5W (R) [RMS]/16Ω, 1 Way 1 Speaker System
Audio Output
Audio Input
RCA Jack × 2
3.5 mm Stereo × 1
82 dB/W/M/160 Hz ~ 13 KHz
0.5V [rms] (Normal) / 2 Channel (L+R)
0.5V [rms] (Normal) / 2 Channel (L+R)
RS232C Input/Output
LAN
HDMI Input
RCA Jack × 2
2.5 mm × 2
RJ-45 Jack × 1 (8 pin)
HDMI Jack × 1
(Type A) (19 pin)
TXD + RXD (1:1)
10/100 LAN Port
Digital RGB: TMDS (Video + Audio)
MAX:
Video: 720p, 1080p, 1920 × 1080/60 Hz (WUXGA)
Audio: 48 KHz / 2 Channel (L+R)
Supports LPCM only
Digital RGB: TMDS (Video)
Analog RGB: 0.7V [p-p] (75Ω), H/CS/V: TTL (2.2kΩ), SOG: 1V [p-p] (75Ω)
DVI-D Input
VGA Input
DVI-D jack
D-Sub Jack × 1
(15 pin)
Component Input
RCA Jack × 3
MAX: 720p, 1080p, 1920 × 1080/60 Hz (WUXGA)
Y: 1V [p-p] (75Ω), Pb: 0.7V [p-p] (75Ω), Pr: 0.7V [p-p] (75Ω)
SPDIF Output
IR Input/Output
USB Input
SPDIF Port
3.5 mm × 2
USB × 1 (Type B)
MAX: 480i, 576i, 480p, 576p, 720p, 1080i, 1080p
Serial digital audio output when input is HDMI
IR pass through or IR daisy chain
USB 2.0, External PC connection
General:
Item
Power Input
Power Consumption (Max.)
Power Consumption (Typical)
Power Consumption (EPA6.0)
Power Consumption (Standby & Off)
Dimensions [W × H × D]
Weight
Specifications
100-240V
50-60Hz, 1.5A
68 W
55 W
40 W
< 0.5W (OSD: APM mode off)
745 × 439.5 × 39.8 mm
6.6 Kg
Gross Weight
9.0 Kg
Environmental Condition:
Item
Temperature
Humidity
Altitude
24
Operational
Storage
Operational
Storage
Operational
Storage
Specifications
5 ~ 40°C
-20 ~ 60°C
20 ~ 80% RH (No condensation)
10 ~ 90% RH (No condensation)
0 ~ 2,000 m
0 ~ 5,000 m
Simplicity Series
8.2.
SL4250
Display:
Item
Specifications
Screen Size (Active Area)
42” LCD (106.7 cm)
Aspect Ratio
16:9
Number of Pixels
1920 (H) × 1080 (V)
Pixel Pitch
0.4845 (H) × 0.4845 (V) [mm]
Displayable Colors
16.7 Million colors
Brightness
350 cd/m²
Contrast Ratio (Typical)
3000:1
Viewing Angle
178 degrees
In/Out Terminals:
Item
Specifications
Speaker Output
Internal Speakers
7W (L) + 7W (R) [RMS]/16Ω, 1 Way 1 Speaker System
Audio Output
RCA Jack × 2
0.5V [rms] (Normal) / 2 Channel (L+R)
Audio Input
3.5 mm Stereo × 1
0.5V [rms] (Normal) / 2 Channel (L+R)
82 dB/W/M/160 Hz ~ 13 KHz
RCA Jack × 2
RS232C Input/Output
2.5 mm × 2
LAN
RJ-45 Jack × 1 (8 pin) 10/100 LAN Port
TXD + RXD (1:1)
HDMI Input
HDMI Jack × 1
(Type A) (19 pin)
Digital RGB: TMDS (Video + Audio)
MAX:
Video: 720p, 1080p, 1920 × 1080/60 Hz (WUXGA)
Audio: 48 KHz / 2 Channel (L+R)
Supports LPCM only
DVI-D Input
DVI-D jack
Digital RGB: TMDS (Video)
VGA Input
D-Sub Jack × 1
(15 pin)
Analog RGB: 0.7V [p-p] (75Ω), H/CS/V: TTL (2.2kΩ), SOG: 1V [p-p] (75Ω)
Component Input
RCA Jack × 3
Y: 1V [p-p] (75Ω), Pb: 0.7V [p-p] (75Ω), Pr: 0.7V [p-p] (75Ω)
SPDIF Output
SPDIF Port
Serial digital audio output when input is HDMI
IR Input/Output
3.5 mm × 2
IR pass through or IR daisy chain
USB Input
USB × 1 (Type B)
USB 2.0, External PC connection
MAX: 720p, 1080p, 1920 × 1080/60 Hz (WUXGA)
MAX: 480i, 576i, 480p, 576p, 720p, 1080i, 1080p
General:
Item
Specifications
Power Input
100-240V
Power Consumption (Max.)
104 W
Power Consumption (Typical)
88 W
Power Consumption (EPA6.0)
61 W
Power Consumption (Standby & Off)
< 0.5W (OSD: APM mode off)
Dimensions [W × H × D]
980.4 × 572.9 × 38.5 mm
Weight
11.9 Kg
Gross Weight
15.3 Kg
50-60Hz, 2.5A
Environmental Condition:
Item
Temperature
Humidity
Altitude
Specifications
Operational
5 ~ 40°C
Storage
-20 ~ 60°C
Operational
20 ~ 80% RH (No condensation)
Storage
10 ~ 90% RH (No condensation)
Operational
0 ~ 2,000 m
Storage
0 ~ 5,000 m
25
Simplicity Series
8.3.
SL4650
Display:
Item
Screen Size (Active Area)
Aspect Ratio
Number of Pixels
Pixel Pitch
Displayable Colors
Brightness
Contrast Ratio (Typical)
Viewing Angle
Specifications
46” LCD (116.8 cm)
16:9
1920 (H) × 1080 (V)
0.53025 (H) × 0.53025 (V) [mm]
16.7 Million colors
350 cd/m²
4000:1
178 degrees
In/Out Terminals:
Item
Speaker Output
Internal Speakers
Specifications
7W (L) + 7W (R) [RMS]/16Ω, 1 Way 1 Speaker System
Audio Output
Audio Input
RCA Jack × 2
3.5 mm Stereo × 1
82 dB/W/M/160 Hz ~ 13 KHz
0.5V [rms] (Normal) / 2 Channel (L+R)
0.5V [rms] (Normal) / 2 Channel (L+R)
RS232C Input/Output
LAN
HDMI Input
RCA Jack × 2
2.5 mm × 2
RJ-45 Jack × 1 (8 pin)
HDMI Jack × 1
(Type A) (19 pin)
TXD + RXD (1:1)
10/100 LAN Port
Digital RGB: TMDS (Video + Audio)
MAX:
Video: 720p, 1080p, 1920 × 1080/60 Hz (WUXGA)
Audio: 48 KHz / 2 Channel (L+R)
Supports LPCM only
Digital RGB: TMDS (Video)
Analog RGB: 0.7V [p-p] (75Ω), H/CS/V: TTL (2.2kΩ), SOG: 1V [p-p] (75Ω)
DVI-D Input
VGA Input
DVI-D jack
D-Sub Jack × 1
(15 pin)
Component Input
RCA Jack × 3
MAX: 720p, 1080p, 1920 × 1080/60 Hz (WUXGA)
Y: 1V [p-p] (75Ω), Pb: 0.7V [p-p] (75Ω), Pr: 0.7V [p-p] (75Ω)
SPDIF Output
IR Input/Output
USB Input
SPDIF Port
3.5 mm × 2
USB × 1 (Type B)
MAX: 480i, 576i, 480p, 576p, 720p, 1080i, 1080p
Serial digital audio output when input is HDMI
IR pass through or IR daisy chain
USB 2.0, External PC connection
General:
Item
Power Input
Power Consumption (Max.)
Power Consumption (Typical)
Power Consumption (EPA6.0)
Power Consumption (Standby & Off)
Dimensions [W × H × D]
Weight
Specifications
100-240V
50-60Hz, 2.5A
104 W
88 W
66 W
< 0.5W (OSD: APM mode off)
1068 × 622.5 × 38.8 mm
13.7 Kg
Gross Weight
17.2 Kg
Environmental Condition:
Item
Temperature
Humidity
Altitude
26
Operational
Storage
Operational
Storage
Operational
Storage
Specifications
5 ~ 40°C
-20 ~ 60°C
20 ~ 80% RH (No condensation)
10 ~ 90% RH (No condensation)
0 ~ 2,000 m
0 ~ 5,000 m
Simplicity Series
8.4.
SL5550
Display:
Item
Screen Size (Active Area)
Aspect Ratio
Number of Pixels
Pixel Pitch
Displayable Colors
Brightness
Contrast Ratio (Typical)
Viewing Angle
Specifications
54.6” LCD (138.7 cm)
16:9
1920 (H) × 1080 (V)
0.630 (H) × 0.630 (V) [mm]
16.7 Million colors
350 cd/m²
1400:1
178 degrees
In/Out Terminals:
Item
Speaker Output
Internal Speakers
Specifications
7W (L) + 7W (R) [RMS]/16Ω, 1 Way 1 Speaker System
Audio Output
Audio Input
RCA Jack × 2
3.5 mm Stereo × 1
82 dB/W/M/160 Hz ~ 13 KHz
0.5V [rms] (Normal) / 2 Channel (L+R)
0.5V [rms] (Normal) / 2 Channel (L+R)
RS232C Input/Output
LAN
HDMI Input
RCA Jack × 2
2.5 mm × 2
RJ-45 Jack × 1 (8 pin)
HDMI Jack × 1
(Type A) (19 pin)
TXD + RXD (1:1)
10/100 LAN Port
Digital RGB: TMDS (Video + Audio)
MAX:
Video: 720p, 1080p, 1920 × 1080/60 Hz (WUXGA)
Audio: 48 KHz / 2 Channel (L+R)
Supports LPCM only
Digital RGB: TMDS (Video)
Analog RGB: 0.7V [p-p] (75Ω), H/CS/V: TTL (2.2kΩ), SOG: 1V [p-p] (75Ω)
DVI-D Input
VGA Input
DVI-D jack
D-Sub Jack × 1
(15 pin)
Component Input
RCA Jack × 3
MAX: 720p, 1080p, 1920 × 1080/60 Hz (WUXGA)
Y: 1V [p-p] (75Ω), Pb: 0.7V [p-p] (75Ω), Pr: 0.7V [p-p] (75Ω)
SPDIF Output
IR Input/Output
USB Input
SPDIF Port
3.5 mm × 2
USB × 1 (Type B)
MAX: 480i, 576i, 480p, 576p, 720p, 1080i, 1080p
Serial digital audio output when input is HDMI
IR pass through or IR daisy chain
USB 2.0, External PC connection
General:
Item
Power Input
Power Consumption (Max.)
Power Consumption (Typical)
Power Consumption (EPA6.0)
Power Consumption (Standby & Off)
Dimensions [W × H × D]
Weight
Specifications
100-240V
50-60Hz, 2.5A
128 W
109 W
73 W
< 0.5W (OSD: APM mode off)
1264.7 × 735.5 × 42.8 mm
21.2 Kg
Gross Weight
25.7 Kg
Environmental Condition:
Item
Temperature
Humidity
Altitude
Operational
Storage
Operational
Storage
Operational
Storage
Specifications
5 ~ 40°C
-20 ~ 60°C
20 ~ 80% RH (No condensation)
10 ~ 90% RH (No condensation)
0 ~ 2,000 m
0 ~ 5,000 m
27
Simplicity Series
PLANAR SUPPORT
Technical Support
Visit Planar at http://www.planar.com/support for user manuals and warranty information.
To speak with Planar Customer Support please have you model and serial number available and dial:
Planar Support
Tel: 1-866-PLANAR1 (866-752-6271) or +1 503-748-5799 outside the US.
Hours: 24 hours a day, 7 days a week.
Toll or long distance charges may apply.
28
Simplicity Series
PN: 020-1242-00
29