1
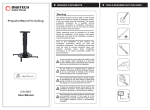
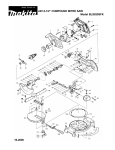
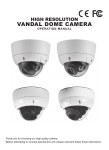
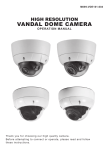
Model Number:
AMR DCP100KIT
Installation & Assembly: Universal Drop Ceiling Mount
IMPORTANT! Read instruction sheet before you start installation and assembly.
Before you start make sure all parts listed
are included with your product.
Parts List
Part #
A
B
Parts Description
Qty. Part Image
M5x45 Drywall
Screw
2
Plastic Anchor
2
M6.5 Washer
Parts Description
Qty. Part Image
P
Mount plate
1
Q
Middle Piece
1
R
Ceiling Plate
1
S
Caddy® Speed Link
1
T
Hold Down Clips
Not used with 2x2 plate
Not used with 2x2 plate
C
Part #
2
Not used with 2x2 plate
D
M4x16 screw
4
E
M4x40 screw
4
F
M6x16 screw
4
G
M6x40 screw
4
H
8MM hex bolts
2
I
M5x16 arm screw
4
J
M5 washer
4
K
S=3mm Allen
wrench
1
L
S=6mm Allen
wrench
1
M
M5 washer
4
N
Arm
4
O
Universal Spider
1
www.amer.com
2
For assistance, call 1-800-241-1644
Installation Instructions
Step 1
Step 4
Decide where you want to hang your projector in the ceiling.
Remove the existing ceiling tile and place the 2’x2’ plate in the
ceiling using the best orientation for your alignment.
Push Hold Down Clips (T)
down to snap over t-bar as
shown:
Step 2
Select the location hole to run wires and cables from the ceiling. Plug the four other holes with the provided plugs.
Use two 8mm hex bolts (H) to attach mount plate (P) to ceiling
plate (R).
Step 5
Attach the three or four arms (M) to the universal spider (N) using
the screws (H) and washers (I) & (L). Do not completely tighten
the screws yet.
hex bolt
hex bolt
Step 6
Attach your projector to the arms (M). Several different screw sizes
sure all screws from step 3 are tightened.
Step 3
Insert two Y-Toggles (S) through two of the sixteen slots on
the back of the ceiling plate (R) and wrap cable over rafter or
ceiling grid as shown:
Step 7
Carefully hook the universal spider (N)
with your projector attached to the ceiling.
Installation is now complete.
Adjustment
Integrated Cable
Y-Toggle
You can change the tilt of your mount by carefully moving it to the
desired position. You may need to tighten the two tilt adjustment
screws to hold the projector in place.
screws using the allen wrench. Turn the projector to the desired
facing and retighten the screws.
DO NOT CONTINUALLY TURN THE PROJECTOR IN A COUNTER-CLOCKWISE DIRECTION! This can cause the mount to
come apart and may cause injury or damage.
swivel screw
swivel screw
Support/Safety
connection slots
(choose 2, depending
on installation)
www.amer.com
tilt screw
tilt screw
For assistance, call 1-800-241-1644