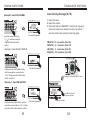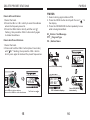
1
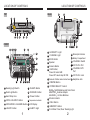
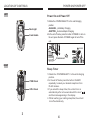
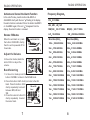
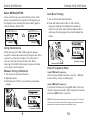
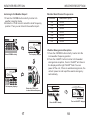
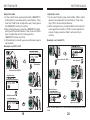
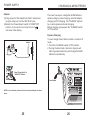
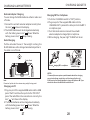
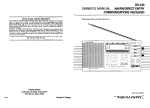
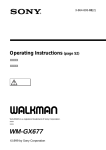
KA600
FM/AM/SW/LW/WEATHER MUTI-BAND RECEIVER
DYNAMO & SOLAR POWER SUPPLY
WITH FLASHLIGHT & READING LIGHT
TEMPERATURE AND MOISTER INDICATOR
OPERATION MANUAL
D
VOICE
SIREN
TE
ALERT
ZZZ
NOAA
AIR
FM
AM
WB
PM
COUNTY
ALL SINGLE
MULTIPLE
ENABLE
DISABLE
%
KEY FEATURES
Thank You:
Thank you for purchasing the KA 600 muti-band
receiver. Please read the manual thoroughly before
operating and keep this book in a safe place for future
reference. Hope the radio can give you much happiness.
FM Band:
AM (10K):
AM (9K):
SW:
LW:
WEATHER
87.0-108.0MHZ
520-1710KHz
522-1710KHz
2300-23000KHz
150-521KHz
CH1-CH7
POWER SUPPLY
Ni-MH Battery
AA Battery
Adapter
CHARGING Ni-MH Batteries:
Dynamo Charging
External Adapter Charging
Solar Charging
Charging via PC
The radio can charge cellphone, MP 3, MP 4
and other gadgets.
LED flashlight plus 5-LED reading lamp
Built-in dynamic wide range speaker for
crystal clear sound.
INDEX
LOCATION OF CONTR........................................ 1
POWER ON AND POWER OFF
INDEX
SET THE CLOCK.................................................... 20
MOISTER and TEMPERATURE DISPLAY................. 21
Power On and Power Off.................................... 4
USING FLASHLIGHT.............................................. 21
Sleep Timer..................................................... 4
USING READING LIGHT......................................... 21
Alarm On and Alarm Off..................................... 5
RADIO OPERATION
Adjust the Volume............................................ 7
KEY LOCK FUNCTION............................................ 22
RESET THE UNIT................................................... 22
POWER SUPPLY
Band Selection. ............................................... 7
Ni-MH Battery / AA Battery.................................... 23
Select AM Step................................................ 9
Adapter............................................................... 25
TUNING INTO STATIONS
CHARGING Ni-MH Batteries
Manual Tuning in Stations................................. 9
Dynamo Charging................................................ 26
Auto Scan Tuning............................................. 10
External Adapter Charging................................... 27
Direct Frequency Entry.................................... 10
Solar Charging................................................... 27
Auto Tuning Storage........................................ 12
Charging via PC................................................. 27
Listening to Preset Station............................... 13
CHARGING GADGETS........................................... 28
Manual Tuning Storage.................................... 14
PRECAUTIONS..................................................... 29
Delete Preset Stations..................................... 15
SPECIFICATION.................................................... 30
FM RDS............................................................ 16
WEATHER RECEPTION
Listening to the Weather Report........................ 17
Weather EmergenciesReception...................... 18
SET THE DATE................................................... 19
LOCATION OF CONTROLS
LOCATION OF CONTROLS
TOP
REAR
3
26
25
2
32
4
5
7
6
8
FRONT
27
15 14 13 12
11
9
13
14
24
D
VOICE
SIREN
TE
ALERT
ZZZ
NOAA
COUNTY
ALL SINGLE
MULTIPLE
ENABLE
DISABLE
AIR
FM
AM
WB
PM
%
23
15
16
16
17
22
18
19
16
17
28 24
29 30
18 19 20 21
<LOW BATT> Light
<CHARGE> Light
M+/M- Button
Speaker
Numeric Button
<AM> Button;
Power On:select AM
Power Off: select step 9K/10K
7 <SLEEP> Button
2 Flash Light Button
8 <SNOOZE> Button
3 Hand Strap Hole
9 <Power> Button
4 <RDS>/<ALARM1> Button
10
Temperature Indicator
5 <RDS MODE>/<ALARM2> Button 11 LCD Display
6 <ALERT> Button
12
1
<ALERT> Light
26 Telescopic Antenna
27
Battery Compartment
28
<CHARGE> Switch
29
24
<DC IN 5V> Port
30
<CHARGE OUT>
Port
31
<DC IN 6V> Jack
Numeric 0 Button:select meter band 32 Earphone Jack
<FM/WB> Button
<POWER SELECT> Switch
Ni-MH Ni-MH Batteries and Solar Panel
ADAPTOR External Adapter
ALKALINE AA Size Batteries
22 Moister Indicator
23 <DEL> Button
24 <MEMORY> Button
25 Front:Solar Panel; Rear: Reading Light
20
21
Reading Light Switch
31
10
2
LOCATION OF CONTROLS
POWER ON/POWER OFF
LEFT
Power On and Power Off
Flash Light
1.Rotate the <POWER SELECT> to the valid charging
position.
ALKALINE. AA Battery Charging
ADAPTOR. External Adapter Charging
2.In the unit off mode, press the button <POWER> to turn on
the%
unit, press the butto <POWER> again to turn off the
unit.
D
VOICE
SIREN
TE
ALERT
Crank Handle
ZZZ
NOAA
AIR
FM
AM
WB
PM
COUNTY
ALL SINGLE
MULTIPLE
ENABLE
DISABLE
9
POWER
21
POWER SELECT
VOICE
SIREN
D
TE
ALERT
ZZZ
NOAA
AIR
FM
AM
WB
PM
RIGHT
COUNTY
ALL SINGLE
MULTIPLE
ENABLE
DISABLE
%
Sleep Timer
<TUN> Knob
<VOL> Knob
3
1.Rotate the <POWER SELECT> to the valid charging
position.
2.In the unit off mode, press the button < SLEEP>
repeatedly to select your desired sleep timer from
05~90 minutes.
3.If you select the sleep timer, the unit will turn on
automatically after a few seconds with the icon "
"
and the minute appearing in the display.
4. While reaching your setting sleep time,the unit will
turn off automatically.
4
POWER ON/POWER OFF
POWER ON/POWER OFF
D
Example:Set the ALARM1 on at 8:05, and alarm off
after 15 minutes.
TE
COUNTY
ALL SINGLE
MULTIPLE
ENABLE
DISABLE
NOTE:If the unit turn on by pressing the button<POWER>,you can
also select the sleep timer by pressing the button <SLEEP> shortly to
% desired sleep timer.
select your
7
A. In the unit off mode, press and hold the button
<ALARM1> with the icon " 1 " and the hour flashing.
Sleep Timer
1
D
ALERT
VOICE
SIREN
ZZZ
NOAA
05-90-60-30-10-05 %
COUNTY
ALL SINGLE
MULTIPLE
ENABLE
DISABLE
VOICE
SIREN
ZZZ
D
COUNTY
ALL SINGLE
MULTIPLE
ENABLE
DISABLE
Sleep Timer Icon and Sleep Timer
D
TE
TE
%
08 :30
D
90
Sleep Timer
PM
05 : 39
Dial TIME
The unit has two alarm function: alarm1 and alarm2.
1.In the unit off mode, press and hold the button
<ALARM1> or <ALARM2> with the icon " " flashing
to enter the alarm on/off function.
The setting order: hour, minute, presetting off time.
2. Press the button <ALARM1> or <ALARM2> to enter
the next setting.
3. Rotate the knob <TUN.> to adjust the alarm
time and presetting off time.
VOICE
SIREN
ZZZ
%
D
NOAA
AIR
FM
AM
WB
PM
%
Alarm On/Off
ALERT
TE
Sleep TimerD Icon
TE
1
89 MONO
Hour Flashes
%
B. Rotate the knob <TUN.> to adjust the hour.
AIR
FM
AM
WB
PM
FM
%
NOAA
TE
AIR
FM
AM
WB
PM
D
Press and Hold ALARM1
ALERT
TE
21
Dial TIME
03 :30
TE
Power Select
%
COUNTY
ALL SINGLE
MULTIPLE
ENABLE
DISABLE
C. Press the <ALARM1> and
then rotate the knob <TUN.>
to adjust the minute. Press
the button <ALARM1> to
set the off time by rotating
the knob <TUN.>
1
Dial delay
%
Off Time:01~99 minutes
1
D. Press the button <ALARM1> shortly to confirm.
D
TE
1
24-aeg-2010
08 : 05
%
ALERT
Press Shortly
NOAA
AIR
FM
AM
WB
PM
5
6
VOICE
SIREN
ZZZ
RADIO OPERATION
RADIO OPERATION
Frequency Diagram
Activate and Cancel the Alarm Function
In the unit off mode, press the button <ALARM1> or
<ALARM2> shortly with the icon " " flashing in the display,
the alarm function is activated. Press the button <ALARM1>
or <ALARM2> again, if the icon " " disappears from the
display, the alarm function is canceled.
1
FM 87-108MHz
AM MW LW SW
1
MW(10K) 520-1710KHz
D
LW 150-521KHz
SW 2300KHz-23000KHz
T
Snooze 5 Minutes
MW(9K) 522-1710KHz
E
When the unit alarm on, press
the button <SNOOZE> shortly,
then the unit is powered off for
5 seconds.
SNOOZE BUTTON
Meter Band(KHz)
Meter Band(MHz)
120m
120m
2300-2550KHz
2.300-2.550MHz
90m
3150-3450KHz
90m
3.150-3.450MHz
75m
3850-4050KHz
75m
3.850-4.050MHz
60m
4700-5100KHz
60m
4.700-5.100MHz
49m
5700-6500KHz
49m
5.700-6.500MHz
41m
7100-7700KHz
41m
7.100-7.700MHz
Band Selecting
31m
9200-10000KHz
31m
9.200-10.000MHz
1. In the unit on mode, press the
button <FM/WB> to listen to the FM/AM band.
25m
11400-12200KHz
25m
11.400-12.200MHz
22m
13500-13900KHz
22m
13.500-13.900MHz
19m
15000-15800KHz
19m
15.000-15.800MHz
16m
17450-17950KHz
16m
17.450-17.950MHz
15m
18850-19100KHz
15m
18.850-19.100MHz
13m
21450-21950KHz
13m
21.450-21.950MHz
D
D
ZZZ
NOAA
NOAA
AIR
FM
AM
WB
PM
AIR
FM
AM
WB
PM
ALERT
VOICE
SIREN
TE
VOICE
SIREN
TE
ALERT
ZZZ
Adjust the Volume
COUNTY
ALL SINGLE
MULTIPLE
ENABLE
DISABLE
COUNTY
ALL SINGLE
MULTIPLE
ENABLE
DISABLE
In the unit on mode,rotate the
knob <VOL> to adjust the
volume.
%
%
ALERT
VOICE
SIREN
ZZZ
NOAA
TE
D
AIR
FM
AM
WB
PM
COUNTY
ALL SINGLE
MULTIPLE
ENABLE
DISABLE
D
TE
2. Press the button <AM> shortly to listen to the AM
band. Press the button <AM>
%
FM and WB
shortly repeatedly to convert
Band
between MW, LW and
SW.
3. Press the numeric button<0>
shortly repeatedly to select
the meter band.
AM Band
Meter Band
7
8
TUNING INTO STATIONS
RADIO OPERATION
Select AM Step 9K/10K
Auto Scan Tuning
In the unit off mode, press and hold the button <AM>
about 5 seconds with the step 9K or 10K appearing in
the display. Press and hold the button <AM> again to
convert between 9K and 10K.
D
D
%
TE
TE
05 : 25
1. Turn on the unit and select the band.
2. Press and hold the button <M+> or <M-> with the
frequency changing in the display, then release the
button, the unit is auto scan tuning the stations. When
auto tuning the strong signal, the unit will broadcast the
station.
%
05 : 25
9KStep
10K Step
Using the Antenna
COUNTY
ALL SINGLE
MULTIPLE
ENABLE
DISABLE
Direct Frequency Entry
Input FM Band Frequency
After inputting FM band number, press the <FM/AM>
button shortly to listen to FM program.
Input AM Band Frequency
First select the frequency range(MW, AM or LW), then
input the frequency number. After inputting the number,
press the <AM> button to confirm.
%
NOTE: While inputting the frequency number, the number "0" at the end
of the frequency can be deleted. The time between two steps is limited,
please perform quickly otherwise the inputting is invalid.
Frequency Changes
9
D
TE
TE
FM
%
89 :80%
Frequency Changes
D
COUNTY
ALL SINGLE
MULTIPLE
ENABLE
DISABLE
FM
Press and Hold M+or M-
1. Turn on the unit and select the band.
2. Adjust the volume.
3. Rotate the knob <TUN.> to your listen to your desired
program.
MONO
MONO
ZZZ
AIR
FM
AM
WB
PM
Manual Tuning in Stations
D
VOICE
SIREN
NOAA
TE
ALERT
While listening to the FM or AM programs, please
extend the telescopic antenna fully and get close to the
window to get the best reception. The unit uses an
internal, ferrit bar antenna for AM or LW. While
listening to the AM or LW programs, please rotate the
unit to get the best reception.
10
%
T
E
TUNING IN STATIONS
TUNING INTO STATIONS
D
Auto Tuning Storage (ATS)
TE
VOICE
SIREN
ALERT
NOAA
ZZZ
Example1: Input FM 95.80MHz
COUNTY
ALL SINGLE
MULTIPLE
ENABLE
DISABLE
AIR
FM
AM
WB
PM
%
1. Select the band.
2. Adjust the volume.
% 3. Press and hold the < MEMORY > button until frequency
starts auto tuning, then release the button, the unit will
store the station while scanning the strong signal.
D
TE
MONO
FM
95 :80
MHz
The Input Frequency
Input the numeric button 9
5 8 0, and then press the
<FM/WB> button shortly to
confirm.
FM (ATS ): 50
AM (ATS ): 10
LW (ATS ): 5
SW( ATS ): 50
D
VOICE
SIREN
TE
ALERT
NOAA
ZZZ
Example 2: Input AM (9K) 1287KHZ
COUNTY
ALL SINGLE
MULTIPLE
ENABLE
DISABLE
AIR
FM
AM
WB
PM
%
memories, (from 50)
memories, (from 15)
memories, (from 05)
memories, (from 50)
D
TE
AM
%
D
KHz
D
E
The Input Frequency
Firstly press the <AM> button shortly,
and then press the numeric button
1,2,8,7, finally press the <AM> button
shortly to confirm.
VOICE
SIREN
TE
T
ALERT
ZZZ
NOAA
%
COUNTY
ALL SINGLE
MULTIPLE
ENABLE
DISABLE
AIR
FM
AM
WB
PM
Press and Hold the<MEMORY> button
D
NOAA
ZZZ
Example 3 Input SW 4900KHZ
COUNTY
ALL SINGLE
MULTIPLE
ENABLE
DISABLE
%
D
D
Firstly press the <AM> button, and then
press the numeric button 4, 9, 0, 0 , finally
press the <AM> button shortly to confirm.
11
4900
MONO
TE
60M
AM
%
KHz
The Input Frequency
TE
AIR
FM
AM
WB
PM
VOICE
SIREN
TE
ALERT
FM
89 :80
%
Icon "M" and Preset
Frequency Adress
Frequency Changes
12
TUNING INTO STATIONS
TUNING INTO STATIONS
Listening to Preset Stations
Manual Tuning Storage
(1) Manual
Press the <MEMORY> button shortly to enter into the
memory mode with "M" and the preset memory
address flashes, then press the <M+> or <M-> button
shortly to select the preset memory address.
2. Press the <MEMORY> button shortly once again to
confirm. The station address is stored in the memory.
1. Select the band.
2. Press the <M+> or <M-> button shortly to select the
preset frequency address. In this way, you can find
the preset station quickly.
D
MONO
ZZZ
NOAA
FM
TE
VOICE
SIREN
D
M55
D
ALERT
VOICE
SIREN
ZZZ
D
MONO
NOAA
AIR
FM
AM
WB
PM
Frequency Address Changes
COUNTY
ALL SINGLE
MULTIPLE
ENABLE
DISABLE
%
FM
Press and Hold <MEMORY>
(2) Direct Frequency Entry Listening
1. Select the band.
2. In the preset mode, input the frequency address directly,
and then press the <MEMORY> button shortly to listen to
the program.
NOTE In the preset mode, there are icon "M" and the frequency address
showing in the display. You can press the <M+> or <M-> button to entry into the
mode.
13
89 :80
TE
Press the <M+> or <M-> shortly
%
MHz
TE
89 :80 %
COUNTY
ALL SINGLE
MULTIPLE
ENABLE
DISABLE
AIR
FM
AM
WB
PM
TE
ALERT
M55
MHz
Frequency Changes
FM can store 100 memories and address 00 is advised to
be stored while manual tuning.
AM can store 25 memories and address 00 is advised to
be stored while manual tuning.
LW can store 10 memories and address 00 is advised to
be stored while manual tuning.
SW can store 100 memories and address 00 is advised to
be stored while manual tuning.
14
%
FM RDS
FM RDS
Delete A Preset Station
1. Select a strong signal station of FM.
2. Press the <RDS> button shortly with the icon "
" in
the display.
3. Press the <RDS MOOD> button repeatedly to see
what is being transmitted.
1.Select the band.
2.Press the <M+> or <M-> shortly to select the address
where the frequency saved in.
3.Press the <DEL> button shortly with the icon " "
flashing, then press the <DEL> button shortly again
to delete the address.
Rt Station Text Message
PTY Program Type
PS Station Name
Delete ALL Preset Stations
1.Select the band.
2.Press and hold the <DEL> button (about 3 seconds)
with " ALL " flashing, then press the <DEL> button
shortly once again to delete all the preset frequencies.
NO <PS>
FM
89 :80
Press <RDS> button shortly
D
D
COUNTY
ALL SINGLE
MULTIPLE
ENABLE
DISABLE
MONO
%
FM
Press <DEL> to delete an address
Press and hold <DEL> to delete all addresses
15
89 :80
55
D
MHz
The Delete Icon
%
NO <RT>
FM
89 :80
MHz
RDS information displays
TE
ZZZ
TE
TE
OICE
REN
DELETE PRESET STATIONS
%
Press <RDS MODE>
button shortly
16
MHz
%
WEATHER RECEPTION
WEATHER RECEPTION
Weather Band Channel Frequencies
Listening to the Weather Report
1.Press the <FM/WB> button shortly to enter into
weather reception mode.
2.Rotate the <TUN.> knob to select the local frequency
position. Then you can listen to the weather report.
CHANNEL
D
VOICE
SIREN
TE
ALERT
ZZZ
NOAA
%
COUNTY
ALL SINGLE
MULTIPLE
ENABLE
DISABLE
AIR
FM
AM
WB
PM
D
Ch-6
The frequency displays
Press <FM/MW> shortly
D
TE
PM 03 : 07
Ch-3
%
ALERT
VOICE
SIREN
D
TE
WB
ZZZ
TE
PM 03 : 05
WB
FREQUENCY(MHz)
CH1
CH2
162.400
CH3
162.450
CH4
CH5
162.475
162.500
CH6
CH7
162.525
162.550
162.425
%
Weather Emergencies Reception
1.Press the <FM/WB> button shortly to enter into the
local weather frequency position.
2.Press the <ALERT> button to enter into the weater
emergencies reception, the icon "ALERT" will show in
the display and the light "ALERT" flash. You can
power off the unit, if there is weather emergencies, the
unit will power on and report the weater emergency
automatically.
NOAA
AIR
FM
AM
WB
PM
COUNTY
ALL SINGLE
MULTIPLE
ENABLE
DISABLE
The frequency displays
%
Rotate the <TUN> knob
to select the local frequency
PM 03 : 05
ALERT
WB
The icon "ALERT" displays
Press <ALERT> shortly
17
Ch-6
18
%
SET THE DATE
SET THE CLOCK
Adjust the date
1.In the unit off mode, press and hold the <MEMORY>
button(about 2 seconds) with the year flashes. Then
tune the <TUN> knob to adjust the year, finally press
the<MEMORY> button to confirm.
2.After setting the year, press the <MEMORY> button
shortly with the month flashes. Then tune the <TUN>
knob to adjust the month, finally press the
<MEMORY>button to confirm.
3. After setting the month,you can use the same way to
set the date.
Example: set 2010.8.30
T
D
E
VOICE
SIREN
D
Example: set clock 8:35
TE
ALERT
Adjust the clock
1.In the unit off mode, press and hold the <DEL> button
(about 2 seconds) with the hour flashes. Then tune
the <TUN.> knob to adjust the hour.
2.After tuning the hour, press the <DEL> button shortly
once again,then tune the <TUN.> knob to adjust the
minute, finally press the <DEL> button shortly to
confirm.
ZZZ
D
NOAA
COUNTY
ALL SINGLE
MULTIPLE
ENABLE
DISABLE
DI AL YEAR
D
%
02 :30
TE
AIR
FM
AM
WB
PM
%
D
TE
Press and hold <DEL.>
D
COUNTY
ALL SINGLE
MULTIPLE
ENABLE
DISABLE
%
Hour flashes
Year flashes
D
ALERT
VOICE
SIREN
TE
ZZZ
ZZZ
NOAA
E
VOICE
SIREN
TE
ALERT
T
D
Press and hold <DATE>
NOAA
D
ALERT
VOICE
SIREN
TE
Adjust the date
ZZZ
NOAA
COUNTY D
ALL SINGLE
MULTIPLE
ENABLE
DISABLE
TE
AIR
FM
AM
WB
PM
DI AL DAY
AIR
FM
AM
WB
PM
COUNTY
ALL SINGLE
MULTIPLE
ENABLE
DISABLE
COUNTY
ALL SINGLE
MULTIPLE
ENABLE
DISABLE
AIR
FM
AM
WB
PM
%
%
Adjust the hour
%
30
Adjust the year
Minute flashes
D
VOICE
SIREN
TE
ALERT
ZZZ
D
NOAA
TE
Adjust the month
D
VOICE
SIREN
ZZZ
D
08
08 :35
AIR
FM
AM
WB
PM
COUNTY
ALL SINGLE
MULTIPLE
ENABLE
DISABLE
%
TE
NOAA
DI AL month
TE
ALERT
AIR
FM
AM
WB
PM
%
COUNTY
ALL SINGLE
MULTIPLE
ENABLE
DISABLE
%
19
%
Adjust the minute
%
NOTE: The clock mode is 12 H," PM" will show on the display if time is after
12:00.
20
%
RADIO OPERATION
Moister and Temperature Display
There is the moister and temperature indicator in the
left side of the unit, the upper indicator displays
temperature and the downside displays moister. You
can press the <C/F>jack in the battery compartment
with the pointy object to convert between the
fahrenheit and celsius.
Key Lock Function
Press and hold the <SNOOZE> button(about 2
seconds)with the icon "
" shows in the display, key
lock function is activated. Press the <SNOOZE> button
again with the icon disappearing, and the key lock
function is deactivated.
Temperature Displays
D
TE
%
D
TE
COUNTY
ALL SINGLE
MULTIPLE
ENABLE
DISABLE
RADIO OPERATION
MONO
FM
Moister Displays
89 :80
MHz
<C/F> Jack
Press and Hold <SNOOZE>
Key Loke Icon Displays
Using Flashlight
Press the <FLASH LIGHT> button on the top of the unit,
the flashlight will be on. Press the <Flash Light> button
once again shortly to turn off the light.
Reset the Unit
Using Reading Light
Firstly, open the solar panel, then push the <Reading
Light> switch to the "ON" side, the reading light is on.
Push the <Reading Light> switch to the "OFF" side,
the reading light is off.
21
If the unit operates erratically, please turn off the unit
and take out the AA batteries for several minutes
then install batteries again, the unit will work normally .
22
%
POWER SUPPLY
POWER SUPPLY
Ni-MH Battery
(1)Remove the battery compartment's cover by pushing
the cover in the direction of the arrow.
(2)Install the Ni-MH batteries in its compartment, and
then connect battery port with the unit.
(3)Rotate the <Power Select> to Ni-MH position, the
unit can work normally.
-
+
-
+
+
-
Ni-MH Batteries
AA Batteries
(1)Open the battery compartment's cover.
(2)Install 3 AA size batteries according to the polarity
diagram.
(3)Rotate the <Power Select> switch to "ALKALINE"
position, the unit can work normally.
NOTES:
(1)If you set the <Power Select> to "Ni-MH" position, the unit consume
the Ni-MH batteries, if you set the <Power Select> to "ALKALINE"
position, the unit consume the AA batteries.
(2)Please don't mix the rechargeable batteries with the alkaline ones.
(3)Please don't mix the used batteries with the new ones.
(4)Please don't mix AA batteries with the metal.
(5)If you don' t use the unit for a long period, please remove the AA batteries
lest battery corrosion.
Low Battery Power Warning
When the battery power is low, the <LOW BATT> light
will flash. In this condition, you can't turn on the unit.
If the warning displays, please select the other
charging mode or charge the unit immediately.
AA Batteries
Compartment
Note:The charging function of the unit is only used for the Ni-MH
batteries.
D
TE
TE
D
COUNTY
ALL SINGLE
MULTIPLE
ENABLE
DISABLE
%
-
<Power Select> Switch
23
-
+
+
-
+
Battery Port
24
POWER SUPPLY
CHARGING Ni-MH BATTERIES
Adapter
(1)Plug one port of the adapter into the AC socket and
plug the other port into the <DC IN 6V> jack.
(2)Select the <Power Select> switch to "ADAPTOR"
position. If you connect correctly, the icon "
"
will show in the display.
There are four ways to charge the Ni-MH batteries:
dynamo charging, solar charging, external adapter
charging and PC charging. The "CHARGE" light will
be on while dynamo and solar charging.
Before charging, please push the "CHARGE" switch
to"IN" position.
Dynamo Charging
AC Socket
Adapter
Adapter
Jack
You can charge the unit either in radio on mode or off
mode.
1. Push the <CHARGE> switch to "IN" position.
2.Turning the hand crank, the built-in dynamo will
start to generate electricity and charge the Ni-MH
batteries automatically.
D
TE
D
TE
COUNTY
ALL SINGLE
MULTIPLE
ENABLE
DISABLE
%
Select "Power Select" to
"ADAPTOR" Position
ALERT
VOICE
SIREN
ZZZ
NOAA
Crank Handle
AIR
FM
AM
WB
PM
NOTE:In unit off mode, please don't use the external adapter for three
hours.
25
26
COUNTY
ALL SINGLE
MULTIPLE
ENABLE
DISABLE
CHARGING GADGETS
CHARGING Ni-MH BATTERIES
External Adapter Charging
You can charge the Ni-MH batteries either in radio on or
off mode.
1.Connect the unit with external adapter correctly then
the icon "
" shows in the display.
2.The Ni-MH batteries will be charged automatically
with the battery power icon "
" flows. When the
battery power is full, " " stops flowing.
Charging MP 3 or Cellphone
1.Push the <CHARGE> switch to "OUT" position.
2.Plug one port of the suppied USB cable into the
<CHARGE OUT> jack and the other port into the MP 3
or cellphone jack.
3.Turn the handle crank or connect the unit with
external adapter to charge Mp3 or cellphone.
4.While charging, the powr light "CHAGE" will be on.
Solar Charging
Put the unit under the sun, if the sunlight is strong, the
Ni-MH batteries will be charged automatically either in
the radio on or off mode.
Solar Panel
ALERT
NOAA
USB Jack
+
+
Note:
Please don't put the unit in the extreme strong
sunlight for long period.
+
charging MP 3 or cellphone
AIR
FM
AM
WB
PM
NOTES:
1.Some cellphones require special demands about the charging
current and voltage, maybe they can't be charged by the unit.
2.While using the external adapter to charge cellphone or MP 3 you
should disconnect the Ni-MH cable with the unit.
Charging via PC
1.Plug one port of the supplied USB cable into the USB
jack of the PC and the other port into the "DC IN 5V"
jack of the radio.When the connection is correctly, the
icon "
" will show in the display.
2. The Ni-MH batteries will be charged automatically
with the battery power icon "
" flows. When the
battery power is full, "
" stops flowing.
27
<CHARGE> Light
28
VOICE
SIREN
ZZZ
PRECAUTIONS
SPECIFICATION
Do not expose the radio to rain or humid enviroment.
Do not expose the radio to extreme stronge sunlight,
close to heat sources, or leave it in the place with
excessive dust.
When charging the unit by solar, please do not put the
unit in the extreme sunlight for long period.
If the radio is not used for a long time, remove all the
batteries to prevernt battery leakage or corrosion.
1. Frequency
FM
MW(10K)
MW(9K)
LW
SW
87 - 108 MHz
520 - 1710 KHz
522 - 1710KHz
150 - 521KHz
2300- 23000KHz
WEATHER(MHz)
CH1 162.400
CH5 162.500
CH2 162.425
CH6 162.525
CH3 162.450
CH7 162.550
CH4 162.475
2. Noise Limit Sensitivity
FM
10 v
MW/LW
1mv/m
SW
30 v
3. Ni-MH Batteries
3.6V
AA alkaline Batteries
External Adapter
4.5V
6.0V
4. Internal Speaker
D66mm
5. Earphone
D3.5mm
6. Dimension
7. Weight
Approx
240 * 138* 70
Approx 560g(incl.Ni-MH batteries)
10-09-18
29
30