1
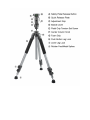
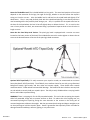
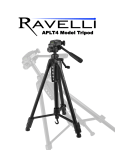
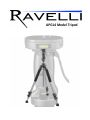
APGL4 Model Tripod
Product Overview:
The Ravelli APGL4 is a Professional Quality Tripod providing a solid base for high-end
photographic equipment. This model is all pressure treated aluminum alloy construction and
is unrivalled in stability. The adjustable pistol grip head provides smooth adjustment to any
angle. The center elevator is gearless and can be inverted for low angle shots. Dual foam
grips, quick release leg locks, a quick release camera plate and rubber/metal spiked feet
complete a very nice tripod.
Key Features:
● Supports Cameras Up To 17 LBS
● Height Adjustable Center Column
● Horizontal Quick Release Leg Lock Height Adjustments
● Padded Foam Grips On Two Of The Legs To Safely Grab and Transport Your Tripod
● Removable Rubber Feet With Turf Spikes For Grass/Carpeting
● Quick Release Plate With Locking Button
● Pistol Grip Tilt Adjustment Head
● Integrated Bubble Levels
Parts List:
Part
Description
Quantity
1
Pistol Grip Head
1
2
Quick Release Plates
1
3
Allen Wrench
1
4
Ravelli APGL4 Legs
1
5
Carry Bag
1
Specifications:
Model:
APGL4 Model Tripod
Unit Heights:
Height Leg Locks:
Collapsed: 34"
Min Operating: 23" 0" Inverted
Max Operating: 70"
Tripod: 8 LBS
Shipping Weight: 10 LBS
Tripod: 100% High Grade Aluminum
Carrying Case: Nylon
2 Height Adjustment Leg Locks
Feet Materials:
Removable/Adjustable Rubber feet. Aluminum Turf Spikes
Max Weight:
Supports Up To 17 LBS
Quick Release Plate
3.5" x 2.25"
Tilt:
180°, 90° Upward or 90° Downward
Center column:
Gearless Elevator Shaft Extension Up To 14 1/8"
Unit Weight
Unit Materials:
Set Up Instructions:
1. Setting Up The Tripod: To set up the tripod, Grasp the legs of the tripod, then pull each leg away
from the center until it reaches the first lock position. Do this for each leg then ensure the tripod is
stable before releasing it completely on the ground.
2. Mounting The Pistol Grip Head: To install the pistol grip head, first, position the head on the head
mounting plate located on top of the center column and thread it on in a clockwise rotation until the
head is tight.
3. The Quick Release Plate: To first remove
the quick release plate from the head, loosen
the silver knob located on the top and side of
the pistol grip head. Next, press the safety
lock button in and slide the plate off. Next,
position the plate on the bottom of your
camera aligning the screw threads with the
camera mounting hole, then rotate the screw
clockwise to tighten. Align and slide the
quick release plate back on the head until it is
centered and you hear the safety button
click. Finally, tighten the silver knob to secure
to plate to the head.
4. Height Adjustment: Adjusting the height of the tripod can be done by simply flipping the leg height
adjuster locks open, then pulling the legs downward until the desired height is obtained. flip the leg
locks back down to lock the legs into place. The leg height adjuster flaps are also equipped with Allen
screw heads to fine tune the tension used to lock the leg in place. You can also utilize the gearless
elevated center column to raise the height of tripod further by loosening the center column lock knob,
then pulling the head upwards until the desired height is achieved. Lock the column into place with the
elevator lock knob to prevent the head from retracting back down.
5. Adjusting The Tilt: To adjust the tilt or rotation angle of the head, Squeeze the pistol grip lever to
release tension on the ball, Now the head will rotate freely to the desired position.
6. Using The Feet: The rubber feet on the tripod can be removed or
retracted to reveal the turf spikes that are ideal for carpet, grass or any
area that has a soft surface. To remove the rubber feet, firmly hold the
tripod with one hand and with the other, grasp one of the feet, then
pull down and outward. To retract the rubber feet, simply turn the feet
in a clockwise rotation until it reaches the top of the threads.
Notes On The Bubble Level: The included bubble level is a guide. The exact level position of the tripod
depends on the extension of the legs, the angle of the legs, whether or not the surface the tripod is
sitting on is level or not etc. Also, the bubble level is mid-level on the tripod head and slightly off of
dead center. Thus, it may read perfectly level with the tripod head pointing in one directly and then
read something other than perfectly level during a pan. Also, it is possible for the tripod to be level at
the base of the head where the level is but off slightly above or below the level. If it is crucial to the
user to have perfect true level, we recommend using a professional separate level at least 6 inches in
length or more.
Notes On the Pistol Grip Head Tension: The pistol grip head is equipped with a tension set screw
located on the lower portion of the head. The included allen wrench is used to tighten or loosen the set
screw to the desired amount of tension of the pistol grip head movement.
Optional ATD Tripod Dolly*: To easily maneuver your tripod or stands, we recommend our universal
heavy duty Ravelli ATD Tripod Dolly. The ATD dolly is an excellent choice for use with your professional
background stands, light stands, and also video and camera tripods. These dollies offer smooth
movement with 3" rubber wheels and metal ball bearings. The Ravelli ATD also includes a one-step lock
on each wheel to securely hold your tripod in place. The dolly is easily folded and has a carrying handle
built in and includes a protective bag.
WARNING: There is a tipping risk for the fully extended tripods. This can be due to moving the tripods
while fully extended, things such as uneven surfaces or wind. To reduce the risk of tipping over, we
recommend placing one tripod leg facing the same direction as the camera or the heavy part of
mounted equipment to balance the weight. We also recommend purchasing sand bags or weights to set
on the tripod legs to hold the tripod in place. Ravelli™ guarantees the tripod only and is not liable for
damage caused to backdrops, cameras, lighting, or any other items.
© Ravelli™
Revision: 1.1.3
Revision Date: 3/4/13