1
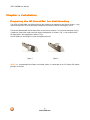
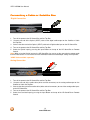
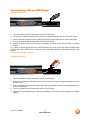
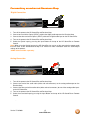
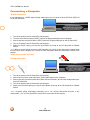
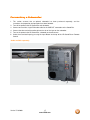
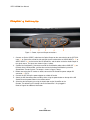
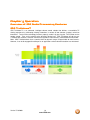
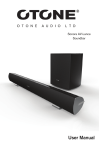
VIZIO VSB200 User Manual Dear VIZIO Customer, Congratulations on your new VIZIO High Definition Sound Bar purchase. Thank you for your support. For maximum benefit, please read these instructions before making any adjustments, and retain them for future reference. We hope you will experience many years of enjoyment from your new VIZIO HD Sound Bar. For assistance, please call (877) 668-8462 or visit us at www.vizio.com To purchase or inquire about accessories and installation services for your VIZIO HD Sound Bar, please visit our website at www.vizio.com or call toll free at (888) 849-4623. We recommend you register your VIZIO HD Sound Bar at our website www.VIZIO.com or fill in your registration card and mail it in. For peace of mind and to protect your investment beyond the standard warranty, VIZIO offers extended warranty service plans. These plans give additional coverage during the standard warranty period. Visit our website or call us to purchase a plan. Write down the serial number located on the back of your HD Sound Bar. __ __ __ __ __ __ __ __ __ __ __ __ __ Purchase Date _____________________ VIZIO is a registered trademark of VIZIO, Inc. dba V, Inc. HDMI logo and “High Definition Multimedia Interface” are registered trademarks of HDMI Licensing LLC. Manufactured under license from Dolby Laboratories. Dolby and the double-D symbol are trademarks of Dolby Laboratories. and are trademarks of SRS Labs, Inc. TruSurround HD and TruVolume technologies are incorporated under license from SRS Labs, Inc. THE TRADEMARKS SHOWN HEREIN ARE THE PROPERTY OF THEIR RESPECTIVE OWNERS; IMAGES USED ARE FOR ILLUSTRATION PURPOSES ONLY. BRAVO, VIZIO AND THE V LOGO AND WHERE VISION MEETS VALUE AND OTHER VIZIO TRADEMARKS ARE THE INTELLECTUAL PROPERTY OF VIZIO INC. PRODUCT SPECIFICATIONS ARE SUBJECT TO CHANGE WITHOUT NOTICE OR OBLIGATION. © 2008 VIZIO INC. ALL RIGHTS RESERVED. Version 7/16/2009 1 www.VIZIO.com VIZIO VSB200 User Manual Important Safety Instructions The HD Sound Bar is designed and manufactured to operate within defined design limits, and misuse may result in electric shock or fire. To prevent the HD Sound Bar from being damaged, the following rules should be observed for its installation, use, and maintenance. Please Read the following safety instructions before operating the HD Sound Bar. Keep these instructions in a safe place for future reference. • • • • • • • • • • • • • • • • • To reduce the risk of electric shock or component damage, switch off the power before connecting other components to the HD Sound Bar. Unplug the power cord before cleaning the HD Sound Bar. A damp cloth is sufficient for cleaning. Do not use a liquid or a spray cleaner on the HD Sound Bar. Do not use abrasive cleaners. Always use the accessories recommended by the manufacturer to insure compatibility. When moving the HD Sound Bar from an area of low temperature to an area of high temperature, condensation may form in the housing. Wait before turning on the HD Sound Bar to avoid causing fire, electric shock, or component damage. A distance of at least 3 feet should be maintained between the HD Sound Bar and any heat source, such as a radiator, heater, oven, amplifier etc. Do not install the HD Sound Bar close to smoke. Operating the HD Sound Bar close to smoke or moisture may cause fire or electric shock. Slots and openings in the back and bottom of the cabinet are provided for ventilation. To ensure reliable operation of the HD Sound Bar and to protect it from overheating, be sure these openings are not blocked or covered. Do not place the HD Sound Bar in a bookcase or cabinet unless proper ventilation is provided. Never push any object into the slots and openings on the HD Sound Bar enclosure. Do not place any objects on the top of the HD Sound Bar. Doing so could short circuit parts causing a fire or electric shock. Never spill liquids on the HD Sound Bar. The HD Sound Bar should be operated only from the type of power source indicated on the label on the AC/DC Adapters. If you are not sure of the type of power supplied to your home, consult your dealer or local power company. Only power of the marked voltage can be used for your HD Sound Bar. Any other voltage than the specified voltage may cause fire or electric shock The power cord must be replaced when using different voltage than the voltage specified. For more information, contact your dealer. The HD Sound Bar AC/DC Adapters are equipped with a three-pronged grounded plug (a plug with a third grounding pin). This plug will fit only into a grounded power outlet. This is a safety feature. If your outlet does not accommodate the three-pronged, have an electrician install the correct outlet, or use an adapter to ground the HD Sound Bar safely. Do not defeat the safety purpose of the grounded plug. When connected to a power outlet, power is always flowing into the HD Sound Bar. To totally disconnect power, unplug the power cord. • The lightning flash with arrowhead symbol within an equilateral triangle is intended to alert the user to the presence of un-isolated, dangerous voltage within the inside of the HD Sound Bar that may be of sufficient magnitude to constitute a risk of electric shock to persons. The exclamation point within an equilateral triangle is intended to alert the user to the presence of important operating and servicing instructions in the literature accompanying your HD Sound Bar. Do not overload power strips and extension cords. Overloading can result in fire or electric shock. The wall socket should be located near the HD Sound Bar and be easily accessible. Do not touch the power cord during lightning. To avoid electric shock, avoid handling the power cord during electrical storms. 2 www.VIZIO.com VIZIO VSB200 User Manual • • • • • • • • • • • Unplug the HD Sound Bar during a lightning storm or when it will not be used for long periods of time. This will protect the HD Sound Bar from damage due to power surges. Do not attempt to repair or service HD Sound Bar yourself. Opening or removing the front cover may expose you to high voltages, electric shock, and other hazards. If repair is required, contact your dealer and refer all servicing to qualified service personnel. Keep the HD Sound Bar away from moisture. Do not expose the HD Sound Bar to rain or moisture. If water penetrates into the HD Sound Bar, unplug the power cord and contact your dealer. Continuous use in this case may result in fire or electric shock. Do not use the HD Sound Bar if any abnormality occurs. If any smoke or odor becomes apparent, unplug the power cord and contact your dealer immediately. Do not try to repair the HD Sound Bar yourself. Avoid using dropped or damaged appliances. If the HD Sound Bar is dropped and the housing is damaged, the internal components may function abnormally. Unplug the power cord immediately and contact your dealer for repair. Continued use of the HD Sound Bar may cause fire or electric shock. Do not install the HD Sound Bar in an area with heavy dust or high humidity. Operating the HD Sound Bar in environments with heavy dust or high humidity may cause fire or electric shock. Ensure that the power cord and any other cables are unplugged before moving the HD Sound Bar. When unplugging the HD Sound Bar, hold the power plug, not the cord. Pulling on the power cord may damage the wires inside the cord and cause fire or electric shock. When the HD Sound Bar will not be used for an extended period of time, unplug the power cord. To reduce risk of electric shock, do not touch the connector with wet hands. Insert the battery in accordance with instructions. Incorrect polarity may cause the battery to leak which can damage the remote control or injure the operator. If any of the following occurs, contact the dealer: o The power cord fails or frays. o Liquid sprays or any object drops into your HD Sound Bar. o HD Sound Bar is exposed to rain or other moisture. o HD Sound Bar is dropped or damaged in any way. o The performance of the HD Sound Bar changes substantially. Version 7/16/2009 3 www.VIZIO.com VIZIO VSB200 User Manual Opening the Package IMPORTANT: Save the carton and packing material for future shipping. Package Contents VIZIO High Definition Sound Bar 1x AC/DC Power Adapter* 1x Power Cord* 1x Remote Control and Battery 2x Stand/Mount Base (Pre-installed) 2x Stand/Mount screws (Pre-installed) 1x RCA Stereo Cable* This manual* Quick Start Guide* *Not shown in illustration 4 www.VIZIO.com VIZIO VSB200 User Manual Table of Contents Important Safety Instructions .....................................................................................................................................2 Chapter 1 Installation...................................................................................................................................................6 Chapter 2 Basic Controls and Connections ...........................................................................................................7 Rear Panel Connections..............................................................................................................................................7 Top Panel Buttons .......................................................................................................................................................8 HD Sound Bar Remote Control ...................................................................................................................................9 Programming a Universal Remote to operate the HD Sound Bar............................................................................9 Installing the Battery in the Remote Control ...........................................................................................................10 Remote Control Range ..............................................................................................................................................10 VIZIO Remote Control Precautions ..........................................................................................................................10 Chapter 3 Connecting Equipment ............................................................................................................................11 Connecting a TV.........................................................................................................................................................11 Connecting a Cable or Satellite Box.........................................................................................................................12 Connecting a CD or DVD Player ...............................................................................................................................13 Connecting a VCR or Video Camera ........................................................................................................................14 Connecting a MP3 Player ............................................................................................................................................1 Connecting an external Receiver/Amp.....................................................................................................................15 Connecting a Computer ............................................................................................................................................16 Chapter 4 Setting Up..................................................................................................................................................18 Chapter 5 Operation...................................................................................................................................................19 SRS TruVolume™ ......................................................................................................................................................19 SRS TruSurround HD™ .............................................................................................................................................20 Audio Adjustments ....................................................................................................................................................21 Chapter 6 Error Detection / Corrective Action.........................................................................................................21 Chapter 7 Maintenance and Troubleshooting .........................................................................................................22 Maintenance ...............................................................................................................................................................22 Troubleshooting Guide..............................................................................................................................................22 Telephone & Technical Support ...............................................................................................................................23 Compliance.................................................................................................................................................................24 FCC Class B Radio Interference Statement.............................................................................................................24 Specifications.............................................................................................................................................................25 Version 7/16/2009 5 www.VIZIO.com VIZIO VSB200 User Manual Chapter 1 Installation Preparing the HD Sound Bar for Wall Mounting The VIZIO HD Sound Bar can either be kept on the stand base or mounted on the wall for viewing. If you choose to mount the TV on the wall, please follow the instructions below for removing the stand. The two feet provided with the HD Sound Bar can be used as brackets if it is to be wall mounted. Using a screwdriver, remove the stands from their original configuration as shown in Fig. 1, and re-attach to the HD Sound Bar in the configuration shown in Fig. 2. Use M5 (Metric) or #10 (English) screws for keyhole to mount. Figure 1 Figure 2 NOTE: It is recommended that Power and Audio cables be connected to the HD Sound Bar before placing it on the wall. . 6 www.VIZIO.com Chapter 2 Basic Controls and Connections Rear Panel Connections 1. DC IN – Plug the connector from the AC/DC Power Adapter here. 2. OPTICAL AUDIO IN – SPDIF Optical connector for connection from a device such as a home theatre system, Amplifier, Receiver, Set Top Box or DVD Player. 3. SUB OUT– (Analog Sub-Woofer Out) Connect to an amplified subwoofer input. Do NOT connect this directly to another Home Theater System 4. ANALOG AUDIO IN 2 – (ANALOG L/R) Connect the analog audio from a device such as a TV, Home Theatre System, Amplifier, Receiver, Set Top Box or DVD Player. 5. ANALOG AUDIO IN 1 – (ANALOG L/R) Connect the analog audio from an additional device such as a TV, Home Theatre System, Amplifier, Receiver, Set Top Box or DVD Player. Version 7/16/2009 7 www.VIZIO.com VIZIO VSB200 User Manual Top Panel Buttons 1. Power – Use this button to turn HD Sound Bar ON or OFF. 2. Input – Use this button to select the input desired. Repeated pressing will cycle through Analog Input 1, Analog Input 2 or Optical In. 3. Vol - – Pressing this button will decrease the volume level. 4. Vol+ – Pressing this button will increase the volume level. 5. Mute – Pressing this button will either mute or un-mute the Sound Bar. 6. TVOL– Pressing this button will set the sound system to have control over the level of the audio output, preventing commercials on regular programming to become louder than the volume of the program being viewed. Pressing this button will toggle SRS TruVolume ON and OFF 7. TSHD – Pressing this button will toggle SRS TruSurroundHD ON and OFF. Front LED Array The LED Array is located at the lower right side of the Sound Bar. There are a total of 10 LEDs. The first white LED is the Power indicator. The next 6 white LEDs are volume indicators. Each LED has three brightness levels for a total of 18 volume settings. Displayed as a bar graph representing the system volume, increasing from the left across the display. The display is constantly on when active. LED 2, 4 and 6 (from left) function as Input indicators. When the Input button is pressed, these three LED’s light up, with the status of the currently selected input LED flashing. The LED’s will turn off after 5 seconds. Pressing the Input button on the top of the Sound Bar or the remote will step through the inputs. LED 2 is Analog Input 1, LED 4 is Analog Input 2 and LED 6 is Optical Input. The next LED is for SRS TruVolume. Glows blue when on. The last LED is for SRS TSHD. Glows blue when on. After an adjustment or change in SRS settings is made, the LED’s turn off after 5 seconds. Press any button on the remote and the LEDs turn on to show status. When the bar is muted, the volume LEDs blink at the current volume setting. REMOTE CONTROL SENSOR – The Remote Sensor is located at the lower right side of the Sound Bar. This is the window through which all of the remote control signals pass to the sensor. Point the remote control directly at this window for the best response to the remote signal. 8 www.VIZIO.com HD Sound Bar Remote Control The VIZIO Remote Control supplied is designed to be used exclusively with this product. The remote button functions are described below: 1. Power – Use this button to turn HD Sound Bar ON or OFF. 2. Input – Use this button to select the input desired. Repeated pressing will cycle through Input 1, Input 2 or Optical In. 3. Vol+ – Pressing this button will increase the volume level. Hold for one-half second to continuously increase volume. 4. Vol - – Pressing this button will decrease the volume level. Hold for one-half second to continuously decrease volume. 5. Mute – Pressing this button will either mute or un-mute the Sound Bar/Subwoofer system. 6. TVOL– Pressing this button will set the sound system to have control over the level of the audio output, preventing commercials on regular programming to become louder than the volume of the program being viewed. Pressing this button will toggle SRS TruVolume ON and OFF. 7. TSHD – Pressing this button will toggle SRS TruSurround HD ON and OFF. Programming a Universal Remote to operate the HD Sound Bar If you own a VIZIO TV with a Universal Remote that uses a 5-digit programming code, you may program a device button (such as AUX or AUDIO) with code 31517. If your remote uses a 4-digit code, use 1517. This will map the Universal Remote button to operate the HD Sound Bar as follows: Vizio Remote key Power Input Volume Up Volume Down Mute Menu INFO Version 7/16/2009 HD Sound Bar Power Input Volume Up Volume Down Mute SRS TruSurround SRS TruVolume Pictured at right is the VIZIO VUR8P Universal Learning remote. 9 www.VIZIO.com VIZIO VSB200 User Manual Installing Installing the Battery Batter y in the Remote Control Turn the remote control over. Press inward to release the lock (1), and at the same time, slide the battery holder out of the remote with your fingernail (2). Remove the protective plastic sheet by pulling straight out from the remote. The supplied CR2025 Lithium Button Battery should match the (+) symbol on the battery with the (+) symbol on the battery holder. Re-insert the battery cover in the same orientation. Precautionary Tips for Inserting the Batteries: Only use the specified battery. Inserting the battery incorrectly may also result in damage to the remote control. Dispose of the battery in accordance with local laws and regulations. Keep the battery away from children and pets. Remote Control Range Point the remote control at the remote control sensor to transmit the commands. Do not place any obstacles between the remote control and the receiver window. The effective range of the remote control is approximately 30 feet (10 meters) from the front of the receiver window, 30° to the left and right, 20° up and down. VIZIO Remote Control Precautions The remote control should be kept dry and away from heat sources. Avoid humidity. If the HD Sound Bar responds erratically to the remote control or does not respond at all, check the battery. If the battery is low or exhausted, replace it with a fresh battery. When not using the remote control for a long period of time, remove the batteries. Do not take the battery apart, heat it, or throw it into a fire. Do not subject the remote control to undue physical stress, such as striking or dropping it. Do not attempt to clean the remote control with a volatile solvent. Wipe it with a clean, damp cloth. Cleaning the Housing and Remote Control If the housing or remote control is seriously contaminated, use a soft cloth moistened with diluted neutral cleaner to clean the display. Wring water out of the cloth before cleaning to prevent water from penetrating into the housing. Wipe with a dry cloth after cleaning. Changing Volume Lock (when using a VIZIO Universal remote with the Sound Bar) VIZIO Universal remotes are normally set to control the volume of the TV, even when one of the other programmable devices is selected. The remote control can be set to control the device volume, the Sound Bar in this case, by changing the Volume Lock. To change the volume lock: 1. Press and release the AUDIO button. 2. Press and hold the SETUP button until the LED on the remote flashes twice. 3. Press 9 9 3. The LED flashes twice. 4. Press VOL - The LED flashes four times. The Sound Bar volume will now be controlled using VOL+/VOL- while in the AUDIO device mode, and the TV, Cable/Satellite or DVD volume when in TV, Cable or DVD modes. 10 www.VIZIO.com Chapter 3 Connecting Equipment Equip ment Connecting a TV *Digital Connection: If your TV has a SPDIF (optical) digital audio output, you can connect it to the OPTICAL AUDIO IN on the HD Sound Bar 1. 2. 3. 4. 5. Turn off the power to the HD Sound Bar and TV. Connect one end of the Optical (SPDIF) cable to the digital audio output on the TV. Connect the other end of the Optical (SPDIF) cable to the Digital audio input on the HD Sound Bar. Turn on the power to the HD Sound Bar and TV. Select the Optical input by pressing the Input Button on the top of the HD Sound Bar or Remote Control. Note: When using the Optical Input on the HD Sound Bar, be sure to set the source device output mode to PCM. Refer to the TV user manual for more information about the audio output settings of the product. *SPDIF Cable available separately. Analog Connection: 1. Turn off the power to the HD Sound Bar and TV. 2. Connect one end of the audio cable (white and red connectors) to the analog audio output on the TV. 3. Connect the other end of the audio cable (white and red connectors) to one of the analog audio inputs on the HD Sound Bar. 4. Turn on the power to the HD Sound Bar and TV. 5. Select the associated input by pressing the Input Button on the top of the HD Sound Bar or Remote Control. Version 7/16/2009 11 www.VIZIO.com VIZIO VSB200 User Manual Connecting a Cable or Satellite Box *Digital Connection: 1. Turn off the power to the HD Sound Bar and Set-Top Box. 2. Connect one end of the Optical (SPDIF) cable to the digital audio output on the Satellite or Cable Set-Top Box. 3. Connect the other end of the Optical (SPDIF) cable to the Digital audio input on the HD Sound Bar. 4. Turn on the power to the HD Sound Bar and Set-Top Box. 5. Select the Optical input by pressing the Input Button on the top of the HD Sound Bar or Remote Control. Note: When using the Optical Input on the HD Sound Bar, be sure to set the source device output mode to PCM. Refer to the TV user manual for more information about the audio output settings of the product. *SPDIF Cable available separately. Analog Connection: 1. Turn off the power to the HD Sound Bar and Set-Top Box. 2. Connect one end of the audio cable (white and red connectors) to the analog audio output on the Satellite or Cable Set-Top Box. 3. Connect the other end of the audio cable (white and red connectors) to one of the analog audio inputs on the HD Sound Bar. 4. Turn on the power to the HD Sound Bar and Set-Top Box. 5. Select the associated input by pressing the Input Button on the top of the HD Sound Bar or Remote Control. 12 www.VIZIO.com Connecting a CD or DVD Player *Digital Connection: 1. 2. 3. 4. 5. Turn off the power to the HD Sound Bar and CD or DVD Player. Connect one end of the Optical (SPDIF) cable to the digital audio output on the CD or DVD Player Connect the other end of the Optical (SPDIF) cable to the Digital audio input on the HD Sound Bar. Turn on the power to the HD Sound Bar and CD or DVD Player. Select the Optical input by pressing the Input Button on the top of the HD Sound Bar or Remote Control. Note: When using the Optical Input on the HD Sound Bar, be sure to set the source device output mode to PCM. Refer to the CD/DVD user manual for more information about the audio output settings of the product. *SPDIF Cable available separately. Analog Connection: 1. Turn off the power to the HD Sound Bar and CD or DVD Player. 2. Connect one end of the audio cable (white and red connectors) to the analog audio output on the CD or DVD Player. 3. Connect the other end of the audio cable (white and red connectors) to one of the analog audio inputs on the HD Sound Bar. 4. Turn on the power to the HD Sound Bar and CD or DVD Player. 5. Select the associated input by pressing the Input Button on the top of the HD Sound Bar or Remote Control. Version 7/16/2009 13 www.VIZIO.com VIZIO VSB200 User Manual Connecting a MP3 Player 1. Turn off the power to the HD Sound Bar and MP3 Player. 2. Connect one end of the audio cable to the analog audio output on the MP3 Player Docking Unit*. 3. Connect the other end of the audio cable (white and red connectors) to one of the analog audio inputs on the HD Sound Bar. 4. Turn on the power to the HD Sound Bar and MP3 Player. 5. Select the associated input by pressing the Input Button on the top of the HD Sound Bar or Remote Control. *Note: MP3 analog audio output commonly uses a 1/8” (35mm) Stereo Mini-Jack port. In this configuration, a 1/8” (3.5mm) Stereo Mini-Jack to RCA stereo cable will be required. If wall mounting of the Sound Bar System is planned, purchase the above described cable having right-angle RCA connectors to avoid mounting interference. Refer to your MP3 Player user manual for more information about the audio output settings and connections of the product. CAUTION: Do not connect the MP3 Player headphone output directly to the HD Sound Bar. This can result in damage to the devices. A docking unit or equivalent conversion unit is required to adapt line level audio to the HD Sound Bar. Connecting Connecting a VCR or Video Camera 6. Turn off the power to the HD Sound Bar and VCR or Video Camera. 7. Connect one end of the audio cable (white and red connectors) to the analog audio output on the VCR or Video Camera. 8. Connect the other end of the audio cable (white and red connectors) to one of the analog audio inputs on the HD Sound Bar. 9. Turn on the power to the HD Sound Bar and VCR or Video Camera. 10. Select the associated input by pressing the Input Button on the top of the HD Sound Bar or Remote Control. Note: Refer to your VCR or Video Camera user manual for more information about the audio output settings of the product. 14 www.VIZIO.com Connecting an external Receiver/Amp *Digital Connection: 1. 2. 3. 4. 5. Turn off the power to the HD Sound Bar and Receiver/Amp. Connect one end of the Optical (SPDIF) cable to the digital audio output on the Receiver/Amp Connect the other end of the Optical (SPDIF) cable to the Digital audio input on the HD Sound Bar. Turn on the power to the HD Sound Bar and Receiver/Amp. Select the Optical input by pressing the Input Button on the top of the HD Sound Bar or Remote Control. Note: When using the Optical Input on the HD Sound Bar, be sure to set the source device output mode to PCM. Refer to the Stereo/Receiver/Amp user manual for more information about the audio output settings of the product. *SPDIF Cable available separately. Analog Connection: 1. Turn off the power to the HD Sound Bar and Receiver/Amp. 2. Connect one end of the audio cable (white and red connectors) to the analog audio output on the Receiver/Amp. 3. Connect the other end of the audio cable (white and red connectors) to one of the analog audio inputs on the HD Sound Bar. 4. Turn on the power to the HD Sound Bar and Receiver/Amp. 5. Select the associated input by pressing the Input Button on the top of the HD Sound Bar or Remote Control. . Version 7/16/2009 15 www.VIZIO.com VIZIO VSB200 User Manual Connecting a Computer *Digital Connection: If your Computer has a SPDIF (optical) digital audio output, you can connect it to the OPTICAL AUDIO IN on the HD Sound Bar 1. 2. 3. 4. 5. Turn off the power to the HD Sound Bar and Computer. Connect one end of the Optical (SPDIF) cable to the digital audio output on the Computer. Connect the other end of the Optical (SPDIF) cable to the Digital audio input on the HD Sound Bar. Turn on the power to the HD Sound Bar and Computer. Select the Optical input by pressing the Input Button on the top of the HD Sound Bar or Remote Control. Note: When using the Optical Input on the HD Sound Bar, be sure to set the source device output mode to PCM. Refer to the Computer user manual for more information about the audio output settings of the product. *SPDIF Cable available separately. Analog Connection: 1. Turn off the power to the HD Sound Bar and Computer. 2. Connect one end of the audio cable to the analog audio output on the Computer*. 3. Connect the other end of the audio cable (white and red connectors) to one of the analog audio inputs on the HD Sound Bar. 4. Turn on the power to the HD Sound Bar and Computer. 5. Select the associated input by pressing the Input Button on the top of the HD Sound Bar or Remote Control. *Note: Computer analog audio output commonly uses a 1/8” (3.5mm) Stereo Mini-Jack port. In this configuration, a 1/8” (3.5mm) Stereo Mini-Jack to RCA stereo cable will be required. 16 www.VIZIO.com Connecting a Subwoofer 1. This section assumes that an optional subwoofer has been purchased separately, and the instructions for preparation and operation have been followed. 2. Turn off the power to the HD Sound Bar and subwoofer. 3. Connect one end of a single RCA audio cable* to the SUB OUT connection on the Sound Bar. 4. Connect the other end of the audio cable to the sub or line input on the subwoofer. 5. Turn on the power to the HD Sound Bar, subwoofer and audio source. 6. Select the associated input by pressing the Input Button on the top of the HD Sound Bar or Remote Control. *Cable available separately Version 7/16/2009 17 www.VIZIO.com VIZIO VSB200 User Manual Chapter 4 Setting Up Figure 1 – Power, Input and Output connections 1. Connect an Optical (SPDIF) cable from the Optical Output on the source device to the OPTICAL input (2), or connect one end of the left and right channel audio cables to AUDIO-INPUT-1 (5) or AUDIO-INPUT-2 (4) on the back of the HD Sound Bar, and the other end to the Audio Output of the signal source. The Inputs are shown in figure 1 above. 2. (Optional for Sub-Woofer): Connect one end of the Sub-Woofer audio cable to SUB OUT (3) on the back of the HD Sound Bar, and the other end to the Analog Sub-Woofer Input of the Stereo/Home Theater System. The output is shown in figure 1 above. 3. Before connecting the AC cord to an outlet, connect the HD Sound Bar power adapter DC connector (1) (Fig 1). 4. Connect the AC cord of the power adapter to suitable AC outlet. 5. Switch the HD Sound Bar power to ON by either using the power button on the top of the HD Sound Bar or the power button in the remote control. Select the desired input by pressing the Input button on the Sound Bar or the Remote. The default input is Analog 2 when the Sound Bar is first plugged in. Refer to Page 8 for additional information. 18 www.VIZIO.com Chapter 5 Operation Overview of SRS Audio Processing Features SRS TruVolume™ SRS TruVolume™ is an advanced, intelligent volume control solution that delivers a remarkable TV viewing experience by eliminating irritating fluctuations in volume all too common in today’s television broadcasts. To ensure the technology functions properly, enable it by pressing the ‘TVOL’ button on the remote control. Then set the volume to the desired listening level. SRS TruVolume will do the rest. TruVolume will maintain a constant volume level regardless of the device(s) connected to the Sound Bar. Note: SRS TruVolume does have a nominal effect on dynamic range—unperceivable to most listeners. However, it can be disengaged for audio purists or applications where volume fluctuations are welcomed. Version 7/16/2009 19 www.VIZIO.com VIZIO VSB200 User Manual SRS TruSurround TruS urround HD™ HD ™ SRS TruSurround HD™ is the latest generation from the TruSurround® family. TruSurround was invented to ensure all listeners would be able to experience “surround sound.” SRS TruSurround HD builds upon its patented predecessor by providing clear dialog, crisp highs and explosive lows. Since many of today’s broadcasts are encoded in 5.1 surround sound, TruSurround HD enables listeners to experience up to 5.1 channels of audio over 2 channels or in this case 2.1 channels (with sub-woofer attached). Simply engage the technology by pressing the ‘TSHD’ button on the remote and TruSurround HD will provide a realistic, immersive surround sound experience. No need to purchase extra speakers or run wires around the home. By merely connecting the Sound Bar to the chosen audio source via composite cables or a digital TOSlink® cable allows the listener to experience sound as it was meant to be heard. 20 www.VIZIO.com Audio Adjustments Adjustment s Input - Pressing this button on the Remote Control or on the Sound Bar will sequence the input selection through Analog1, Analog 2 and Optical. Vol+ – Pressing this button on the Remote Control or on the Sound Bar will increase the volume level. Hold for one-half second to continuously increase volume Vol - – Pressing this button on the Remote Control or on the Sound Bar will decrease the volume level. Hold for one-half second to continuously decrease volume Mute – Pressing this button on the Remote Control or on the Sound Bar will either mute or un-mute the Sound Bar. TVOL – When the programming switches to a commercial or when changing from channel to channel, TM volume fluctuations occur. This SRS TruVolume provides the listener with a comfortable and consistent volume level. Pressing this button on the Remote Control or on the Sound Bar will set the HD Sound Bar to have control over the level of the audio output, preventing commercials on regular programming to become louder than the volume of the program being viewed. Pressing this button will toggle SRS TruVolume ON and OFF. TSHD – Pressing this button on the Remote Control or on the Sound Bar will toggle SRS TruSurround HD ON and OFF. Chapter 6 Error Detection / Corrective Action If an unsupported rate or sample depth is detected (via the Optical Input), or an overcurrent or thermal shutdown occurs, the LED’s flash certain error codes. An important example that if an AC3 (not PCM) input stream(from a DVD player in this instance) is sent to the Optical input, the HD Sound Bar will mute the audio output and flash the error pattern associated with this on the LED’s. For the error codes, the information is relative to the position in the volume bar section of the display. (LED positions as viewed from the front): A B C D E F G The following is a description of the LED error codes: A = SPDIF compressed format detected. B = SPDIF rate unsupported. C = Overcurrent error occurred. D = Thermal shutdown occurred. The other indicators are not currently used for error indication. When an error occurs, the volume strip goes on solid except that the active error condition is flashing. Corrective Action - If Error A, SPDIF compressed format detected error occurs, configure the DVD player (or audio source device) audio output format setting to PCM or PCM stream. Otherwise, use the Analog RCA inputs from the audio source to the Sound Bar without configuration of the audio source device. Version 7/16/2009 21 www.VIZIO.com VIZIO VSB200 User Manual - If Error B, an unsupported sample rate is detected on the Optical (SPDIF) input, configure the ‘audio sample rate of the audio source device to be either 44.1 KHz or preferably 48KHz. - If Error C, Over-current detection is indicated, reduce the volume setting of the Sound Bar and Subwoofer temporarily, and turn the unit off for a short period and back on to reset the circuitry. If this indication continues to occur, then reduce the volume level for the particular source content being played. - If Error D, Thermal shutdown, is indicated, turn off the Sound Bar and verify the ventilation slots in the Sound Bar are clear, the Sound Bar has proper ventilation and is not being operated in an environment that is too hot. If these conditions exist, reduce the volume level for the particular source content being played. - An error condition that is not detected or indicated by the LED error indications is distortion of audio. The Sound Bar is designed for standard line-in level input signals which are a MAXIMUM 2 Volt RMS. The Sound Bar is not intended to be connected to the output of an amplified audio source such as a Home Theater speaker output or MP3 Player headphone jack. Doing so may damage the Sound Bar. Chapter 7 Maintenance and Troubleshooting Maintenance Important 1. Make sure that the power cables are removed from their sockets before cleaning the Sound Bar. 2. Do not use volatile solvent (such as toluene, rosin and alcohol) to clean the Sound Bar. Such chemicals may damage the Sound Bar housing. Cleaning the Housing and Remote Control 1. 2. Use a soft cloth for cleaning. If the housing is seriously contaminated, use a soft cloth moistened with diluted neutral cleaner to clean the display. Wring water out of the cloth before cleaning to prevent water from penetrating into the housing. Wipe the housing with a dry cloth after cleaning. Troubleshooting Guide If the HD Sound Bar fails to operate, or the performance changes dramatically, check the operation in accordance with the following instructions. Remember to check the peripherals to pinpoint the source of the problem. If the HD Sound Bar still fails to perform as expected, contact the VIZIO for assistance by calling 1-877-MYVIZIO (1-877-698-4946) or e-mail us at [email protected] Problem Solution No power. Make sure AC power cord is securely connected to an AC socket and to the AC receptacle on the AC/DC Adapter. Make sure the power LED on the AC/DC adapter is glowing green. Plug another electrical device (like a radio) to the power outlet to verify that the outlet is supplying power. Press the Power button on the remote control or the top of the HD Sound Bar. No sound. Press the Volume + (Up) button on the remote control or the top of the 22 www.VIZIO.com Problem Solution Sound Bar. Press MUTE on the remote. If the source device has a mute function, check to make sure it is not engaged. Press the INPUT button on the remote control or the top of the HD Sound Bar to cycle through the inputs. No sound on Optical In The source device may be set to AC3 (Dolby Digital) output. SRS TS-HD requires PCM audio (Lt/Rt encoded for movies). Change the device output to PCM. Buzzing or humming Make sure that both ends of the audio cables are connected securely. Test on an alternate device or replace the audio cable. Test the device and cable on an alternate input on the HD Sound Bar. Settings are lost When the Sound Bar is powered off, settings are retained except when the AC power is removed. To keep settings, Leave AC/DC power adapter connected to AC. Otherwise, they will return to initial values. Telephone Tel ephone & Technical Support Products are often returned due to a technical problem rather than a defective product that may result in unnecessary shipping charges billed to you. Our trained support personnel can often resolve the problem over the phone. For more information on warranty service or repair, after the warranty period, please contact our Support Department at the number below. Customer support and quality service are integral parts of VIZIO’s commitment to service excellence. For technical assistance contact our VIZIO Technical Support Department via email or phone. Email: [email protected] Tel: (877) 698-4946 Fax: (949) 585-9563 Hours of operation: Monday - Friday: 6 am to 9 pm Saturday – Sunday: 8 am to 4 pm Please have your VIZIO model number, serial number, and date of purchase available before you call. VIZIO Address: 39 Tesla Irvine, CA 92618, USA Telephone: (949) 428-2525 Fax: (949) 585-9514 Web: www.vizio.com Version 7/16/2009 23 www.VIZIO.com VIZIO VSB200 User Manual Compliance Caution: Always use a power cable that is properly grounded. Please use the AC cords listed below for each area. USA Canada Germany UK Japan UL CSA VDE BASE/BS Electric Appliance Control Act FCC Class B Radio Interference Statement NOTE: This equipment has been tested and found to comply with the limits for a Class B digital device, pursuant to Part 15 of the FCC Rules. These limits are designed to provide reasonable protection against harmful interference in a residential installation. This equipment generates, uses and can radiate radio frequency energy, and if not installed and used in accordance with the instructions, may cause harmful interference to radio communications. However, there is no guarantee that interference will not occur in a particular installation. If this equipment does cause harmful interference to radio or television reception, which can be determined by turning the equipment off and on, the user is encouraged to try to correct the interference by one or more of the following measures: 1. Reorient or relocate the receiving antenna. 2. Increase the separation between the equipment and receiver. 3. Connect the equipment into an outlet on a circuit different from that to which the receiver is connected. 4. Consult the dealer or an experienced radio/TV technician for help. Notice: 1. 2. 3. Changes or modifications not expressly approved by the party responsible for compliance could void the user’s authority to operate the equipment. Shielded interface cables and AC power cord, if any, must be used in order to comply with the emission limits. The manufacturer is not responsible for any radio or TV interference caused by unauthorized modification to this equipment. It is the responsibility of the user to correct such interference. 24 www.VIZIO.com Specifications Model Number VSB200 Speakers 4 x 3" High Efficiency mid/bass transducers / 2 x 3/4" High Performance Aluminum Dome Tweeters Frequency Response 80Hz to 20 kHz Amplifier Integrated Class D @ 15x2 channel w/ .01% THD Frequency Response 35Hz up to 80Hz Inputs Output Features SPDIF 1 rear of HD Sound Bar Stereo Audio 2 rear of HD Sound Bar DC (24V) 1 rear of HD Sound Bar Analog Sub-Woofer 1 rear of HD Sound Bar Four 3" High-Efficiency hand built mid/bass transducers Two 3/4" High Performance aluminum dome neodymium tweeters Speaker bar frequency response: 80Hz to 20kHz, Integrated Class-D Amplifier at 15x2 channel with .01% THD Discrete 192kHz, 24-bit S/PDIF receiver enables up to 144dB dynamic range digital audio delivery SNR 105db, Support for up to 192kHz, 24-bit Linear PCM via TOSLINK input High Power Efficiency with Low Power Consumption Environmentally conscious, High-Performance 32-Bit 150MHz DSP Audio Engine, Impressive Sound Pressure Level measuring 90dB SPL (1W @ 1M) Advanced 24-Bit Linear PCM to PWM Engine with integrated thermal, overcurrent, over voltage, over current protection uncompressed audio transmission Sync response within 3 seconds Latency equal to the speed of sound (1 ms/ft.) Guaranteed equal and consistent latency High-efficiency Class D amplifier 2 Stereo RCA Input with Input Sensitivity: 2Vrms (max) 1 S/PDIF Fiber Optic TOSLINK Input Supported Sampling Frequencies: 44.1kHz & 48kHz / Support Linear PCM Bit Depths: 16-bit, 20-bit, 24-bit. SRS TruSurround / SRS TruVolume Sound Pressure Level 90dB @ 1m Power Input Power Adapter, AC-DC inverter type, Output: 24VDC, 2.7A 65W Max. Voltage 110V at 60 Hz Dimensions 39.95” W x 4.82” H x 4.33” D (1015mm x 122mm x 110mm) Net Weight 11.7lbs (5.3Kg) with stands, 9.3lbs (4.2Kg) without stands Gross Weight 13.3lbs (6.5Kg) Certifications SRS TruSurround HD/ SRS TruVolume Compliances UL, FCC Specifications subject to change without notice or obligation Version 7/16/2009 25 www.VIZIO.com VIZIO VSB200 User Manual Limited Product Warranty 26 www.VIZIO.com Version 7/16/2009 27 www.VIZIO.com VIZIO VSB200 User Manual 28 www.VIZIO.com Index A R Amplifier Connection…………………….15 Audio Adjustments………………………..20 Receiver Connection…………………..….15 Remote Control……………………………...9 Battery……………………………………10 C Cable Box Connection……………………12 CD Connection……………………………13 Computer Connection……………………16 Connections Rear Panel……………………………..….7 Controls……………………………………...8 Range……..………………………………10 Programming VIZIO Universal Remote…………………………………….9 S Error Detection……………………………..21 Safety Instructions……………………..…2, 3 Satellite Box Connection………………….12 Setup………………………………………...18 Specifications……………………..………. 25 SRS TruSurround HD™…………………..20 SRS TruVolume™…………………………19 H T Home Theater Connection……………….15 Installation……………………………………6 Technical Support………………………….23 Troubleshooting………………………….., 22 TV Connection……………………………..11 L V LED Blink Codes…………………………..21 VCR Connection…………………………..14 Video Camera Connection………………..14 D DVD Connection…………………………..13 E I M Maintenance………………………………..22 MP3 Player Connection…………………..14 Version 7/16/2009 W Warranty…………………….…….........26-28 29 www.VIZIO.com