Transcript
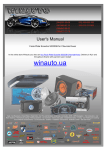
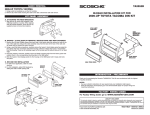
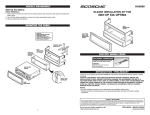
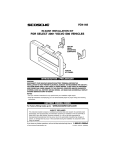
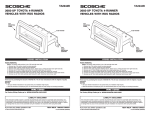
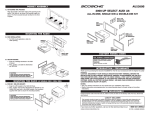
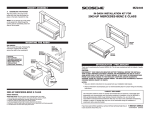
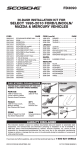
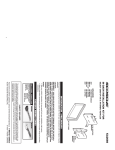
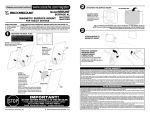
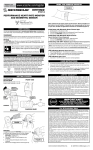
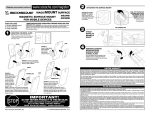
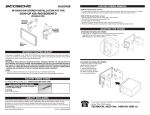
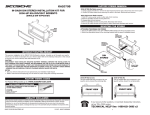
TA2051
2004 TOYOTA SIENNA KIT
TA2051
2004 TOYOTA SIENNA KIT
5510 LEFT
MOUNTING
BRACKET
5509
MOUNTING
PANEL
5510 LEFT
MOUNTING
BRACKET
5509
MOUNTING
PANEL
5510 RIGHT
MOUNTING
BRACKET
DIN
MOUNT
RADIO
INTRODUCTION / PRELIMINARY
5510 RIGHT
MOUNTING
BRACKET
DIN
MOUNT
RADIO
INTRODUCTION / PRELIMINARY
Thank you for purchasing the Scosche TA2051 Kit. This kit was manufactured with the highest of quality
standards.
Thank you for purchasing the Scosche TA2051 Kit. This kit was manufactured with the highest of quality
standards.
NOTES:
• See your vehicle's instructions for any special tools your installation might require.
• Read all instructions accompanying your car stereo/cassette player for proper wiring and mounting instructions.
NOTES:
• See your vehicle's instructions for any special tools your installation might require.
• Read all instructions accompanying your car stereo/cassette player for proper wiring and mounting instructions.
MOUNTING BRACKETS ASSEMBLY
A. ATTACHING MOUNTING BRACKETS (FRONT):
MOUNTING BRACKETS ASSEMBLY
A. ATTACHING MOUNTING BRACKETS (FRONT):
Align the (2) "L" wedges with location openings on the kit
panel. Pressure fit, push into locations unit in place.
Align the (2) "L" wedges with location openings on the kit
panel. Pressure fit, push into locations unit in place.
B. ATTACHING MOUNTING BRACKETS (BACK):
B. ATTACHING MOUNTING BRACKETS (BACK):
Align mounting hole of mounting bracket with hole locator
on pocket slide bracket on hole locator on pocket.
Align mounting hole of mounting bracket with hole locator
on pocket slide bracket on hole locator on pocket.
VEHICLE DISASSEMBLY
VEHICLE DISASSEMBLY
2004 TOYOTA SIENNA
2004 TOYOTA SIENNA
RADIO REMOVAL AND IN-DASH INSTALLATION
RADIO REMOVAL AND IN-DASH INSTALLATION
1. Carefully unsnap and remove trim panels from left and right of radio. Unplug and remove.
2. Carefully pry up on trim panel at top of radio. Unsnap and remove.
3. Remove (4) bolts securing factory radio. Unplug and remove.
1. Carefully unsnap and remove trim panels from left and right of radio. Unplug and remove.
2. Carefully pry up on trim panel at top of radio. Unsnap and remove.
3. Remove (4) bolts securing factory radio. Unplug and remove.
WIRE CODES
For Factory Wiring Codes go to:
WIRE CODES
www.scosche-cars.com or call.
For Factory Wiring Codes go to:
LIABILITY DISCLAIMER
LIABILITY DISCLAIMER
This instruction booklet is based on carefully documented data and research of automobile dash
disassembly, wire harness/codes and information pertaining to installation of this kit in the listed vehicles.
Manufacturer cannot be held responsible for discrepancies/inconsistencies that may occur due to the
automobile manufacturing changes or options, or damage that may occur in the automobile during the
installation of components while using this booklet.
If you have any further questions call:
© 2004 SCOSCHE INDUSTRIES, INC.
www.scosche-cars.com or call.
TECH HELP 1-800-621-3695x3
SI 10/04 - TA2051 (3000003)
This instruction booklet is based on carefully documented data and research of automobile dash
disassembly, wire harness/codes and information pertaining to installation of this kit in the listed vehicles.
Manufacturer cannot be held responsible for discrepancies/inconsistencies that may occur due to the
automobile manufacturing changes or options, or damage that may occur in the automobile during the
installation of components while using this booklet.
If you have any further questions call:
© 2004 SCOSCHE INDUSTRIES, INC.
TECH HELP 1-800-621-3695x3
SI 10/04 - TA2051 (3000003)