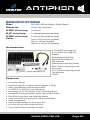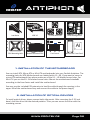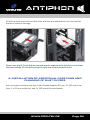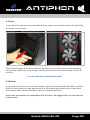
1
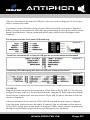
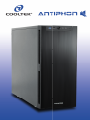
Congratulations on the purchase of your new Cooltek Antiphon PC tower. With it, you
have purchased a high standard PC case of excellent quality. We are confident that you
will be delighted by your new PC case for many years to come.
The Cooltek Antiphon is designed for ultra-silent operation of your computer system. The
case is lined with special insulation material (approx. 1.35 kg) and offers a sound-insulated door with first-class aluminum front. Hard disk drives and the power supply unit are
anti-vibration mounted.
The Cooltek Antiphon is equipped with a 2-way fan control for up to three fans. Three
120 mm silent fans, two behind the front and one at the back of the case, are included.
Other practical features of the Cooltek Antiphon:
• The feet of Cooltek Antiphon are de-coupled and contribute significantly to the
low noise levels of the case.
• You can install four 2.5 inch and 3.5 inch hard drives each. The installation is
toolfree, using anti-vibration mounting brackets.
• Easy to clean filters behind the front and under the case, protect the hardware
from dust.
• In the front I/O panel is 1 x USB 3.0 „Super Speed”, 1 x USB 2.0 as well as HD audio
connectors (Speaker and Mic available).
• For a clean case interior the Antiphon offers cable management with multiple
openings in the motherboard tray and brackets for fixing the cable to the back of
the tray
On the following pages, you can find some useful tips and explanations for the optimal
use of your new case and for the installation of your hardware. We wish you fun with
your new PC case.
Please visit our website under www.cooltek.de
Antiphon
Specifications
Size:
Material:
5.25“ drive bay:
2,5“ drive bay:
3,25“ drive bay:
Fans:
445 x 195 x 500 mm (Height x Width x Depth)
0.6 mm steel, aluminium
3 x external
4 x internal (decoupled mounting)
4 x internal (decoupled mounting)
Front: 2 x 120 mm fans (included)
Rear: 1 x 120 mm (included)
Bottom 1 x 120 mm fan (optional)
Accessories:
2.5 inch HDD mounting rails
3.5 inch HDD mounting rails
Speaker
Motherboard Stand-Offs
Stand-Off Mounting tool
EPS-extension
Motherboard mounting screws
Power Supply mounting screws
Fan screws
5.25 inch drive mounting screws
Thumbscrews
Zip ties
Features:
•
•
•
•
•
•
•
•
•
•
•
•
Ultra-Silent Design
Lined with special insulation material (approx. 1,35 kg)
Noise-insulated door with aluminum front
1 x USB 3.0, 1 x USB 2.0, Front audio ports
Mounting hole for CPU-coolers in the motherboard tray
Decoupled mounting of power supply and hard disk drives
Dust filters in the front and under the bottom
Seven vented PCI slot brackets for efficient ventilation
Cable management
Dual fan speed control for up to three fans
Air inlets on both sides of the case front
Three silent 120 mm case fans included
www.cooltek.de
Page 01
Antiphon
Low Noise
USB 3.0
3 x Low Noise Fan
Cable Management
27
AI
13
CPU Mounting Hole
Bottom Mounted PSU
H
S
L
Fan Control
Aluminium Front Panel
1. Installation of the motherboard
You can install ATX, Micro-ATX or Mini-ITX motherboards into your Cooltek Antiphon. The
mounting holes for ATX-Motherboards are labeled with A1 – A9. If you want to mount a
micro-ATX motherboard then please make use of the U1 – U9 labeled screw holes. For
Mini-ITX you use the B1 - B4 marked screw holes. Mount the motherboard standoffs
according to the form factor and install the motherboard.
You may use the included EPS-extension to lead the cable through the opening in the
upper left of the motherboard tray and connect the cable to the power supply
2. Installation of optical devices
To install optical drives, please remove both side panels. After removing the 5.25 inch
bezel, slide the drive into the desired position. Then you can secure the drive with the
mounting screws.
www.cooltek.de
Page 02
Antiphon
Please note that the bottom two 5.25 inch drive bays are covered with steel panels.
These must be taken out before you install more drives.
3. Installation of Hard Disk Drives
The installation of 2.5 inch and 3.5 inch hard disks is tool-free and vibration-insulated.
To install a hard disk drive please use the included mounting rails. These are attached on
both sides of the hard drive as seen in the picture – tightening of screws is not necessary.
www.cooltek.de
Page 03
Antiphon
To lock the drive, push the hard disk drive with the rails attached into the slot until the
bracket is locked in the cage.
Please note that 3.5 inch disk are inserted into the cage from the left side as seen from
the front and the 2.5 inch drives from the right side as seen from the front.
4. inStallation of additional caSe fanS and
cleaning of dUSt filterS
You can mount up to four case fans in the Cooltek Antiphon PC case: 2 x 120 mm in the
front, 1 x 120 mm at the rear, and 1 x 120 mm at the case bottom.
www.cooltek.de
Page 04
Antiphon
4.1 Front
If you want to replace the fans behind the front panel, you need to remove the dust filter,
as shown in the picture.
To the left and right of the fan control on the lower part of the front are two mounting
holes which allow it (by using a long screwdriver) to loosen the lower screws of the 120
mm fan.
It is not necessary to remove the front!
4.2 Bottom
If you want to install a fan at the case bottom, please first remove the dust filter carefully.
Hold the fans from the inside and secure it to the bottom by fastening the screws from
the outside. Next, put the dust filter back to its original position.
Case front and bottom are equipped with dust filters. We suggest they are cleaned on a
regular basis.
www.cooltek.de
Page 05
Antiphon
5. Operating the fan controller
The Cooltek Antiphon offers a twoway fan controller for up to three
fans at the lower end of the front.
You can choose between High speed
for maximum case ventilation or Low
speed for silent operation of your
case fans. If you move the switch to
the middle position (Stop), the connected fans are turned off.
Connection:
The fan controller is powered by a 4-pin Molex connector that is connected directly to
the power supply. The fans are connected to the three 3-pin Molex connectors. You can
control up to three fans.
6. Connecting the front connectors with the
motherboard
6.1 USB 2.0
Diagram 1 shows the standard pin assignment of the USB cable plug. The pins are assigned in a way to fit on current motherboards as shown in diagram 2. Please refer to the
motherboard and check that the internal USB port of your motherboard is identical to
the one shown in diagram 2.
www.cooltek.de
Page 06
Antiphon
If the pin allocation of the internal USB port is the one shown in diagram 2 it is then possible to connect the cable.
If, however, the pin allocation of the internal USB port and the one shown in diagram 2
differ, you have to customize the USB cable plug accordingly. In case of any doubt, please
consult a professional. Wrong connected cables might cause serious damage to your
hardware.
Pin assignment of the front panel USB cable plug
diagram 1
Typical pin assignment of an internal USB port on a current market motherboard
diagram 2
Connecting USB cables plug with internal USB port of the motherboard
diagram 3
6.2 USB 3.0
Diagram 4 shows the typical pin assignment of the internal 19-Pin USB 3.0. The pins are
assigned in a way to fit on a current motherboards. (diagram 4). Referring to the motherboard manual, please check that the internal 19-pin USB 3.0 port is identical to the one
shown in diagram 4.
If the pin allocation of the internal 19-Pin USB 3.0 plug and the one shown in diagram
4 are the same, please connect the cable. If, however, the pin allocation of the internal
19-Pin USB 3.0 plug and the one shown in diagram 4 differ, please consult a professional.
Wrong connected cables might cause serious damage to your hardware.
www.cooltek.de
Page 07
Antiphon
diagram 4
6.3 Audio
Diagram 5 shows the pin assignment of the standard HD audio cable plug. The pins are
assigned in a way to fit on a current motherboards.
Referring to the motherboard manual, please check that the HD audio port is identical to
the one shown in diagram 5. If the pin allocation of the HD audio plug and the one shown
in diagram 5 are the same, please connect the cable.
If, however, the pin allocation of the HD audio plug and the one shown in diagram 5 differ, please consult a professional. Wrong connected cables might cause serious damage
to your hardware.
Pin allocation of the internal HD Audio cable plug
diagram 5
If you have questions and / or suggestions regarding your Cooltek Antiphon, please contact us: [email protected]
www.cooltek.de
Page 08