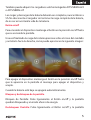
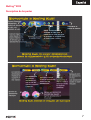
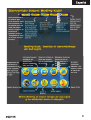
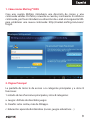
1
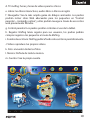
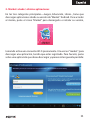
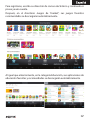
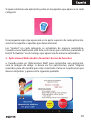
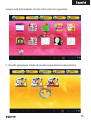
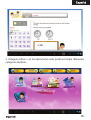
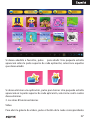
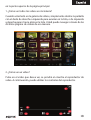
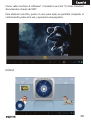
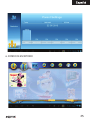
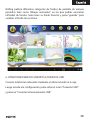
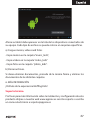
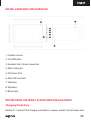
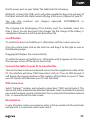
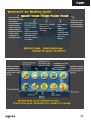
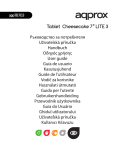
appTBKID7
Tablet Cheesecake 7”
INDEX
Español03
English28
Introducción y descripción del producto.
Gracias por elegir la tablet APPTBKID7.
La APPTBKID7 Tablet Cheesecake para niños incorpora pantalla táctil capacitiva
de 7”, sistema Android 4.2 Jelly Bean, procesador de doble núcleo a 1.5 GHz
y memoria ram de 512MB DDR3 y memoria interna de 8 GB. Con interfaz y
aplicación exclusiva para niños y control parental. Diseño ergonómico con funda
protectora de silicona.
¡Descubra una forma divertida, segura e interactiva de aprender a escribir,
dibujar, navegar con la APPTBKID7!
Contenido del embalaje
· APPTBKID7 + Funda protectora
· Guía rápida de instalación.
· Cable USB / Micro usb
· Cable OTG
· Cargador para Tablet.
Asegúrese de que su embalaje contiene los elementos descritos arriba. Si
encuentra que falta algún elemento o está dañado, por favor, contacte con su
distribuidor.
Requisitos del sistema
· 1 Puerto USB 2.0
· Sistema Operativo Windows 2000/XP/VISTA/7/8 (32 bits y 64 bits).
3
Instalación y configuración.
1. Cámara Frontal
6. Ranura Tarjeta Micro SD
2. Botón on/off
7. Volumen
3. Conector Auricular Jack 3.5mm
8. Altavoz
4. Puerto Micro Usb
9. Orificio Reset
5. Puerto de alimentación DC
Antes de nada, lea esta información:
Carga de la batería
Método 1. Conecte el cargador suministrado a una toma de red eléctrica
de su hogar y al puerto de alimentación DC de su Tablet. La Tablet
comenzará a cargar.
Método 2. Conecte el cable usb / micro usb suministrado al puerto micro
usb de la Tablet y con la Tablet apagada conéctelo a un puerto usb trasero
de su pc.
4
También puede adquirir los cargadores usb homologados APPUSBWALLV4
o APPUSBWALLIP
Las cargas y descargas de la batería deberán ser completas, nunca inferior a
5h. No desconecte el cargador sin terminar la carga completa de la batería,
de no ser así acortará la vida de la batería.
Botón on/off
Para encender el dispositivo mantenga el botón en la posición on/off hasta
que se encienda la pantalla.
Una vez finalizada la carga del sistema presione sobre el icono del candado
y arrástrelo hacia la derecha, como puede apreciar en la siguiente imagen:
Para apagar el dispositivo mantenga el botón en la posición on/off hasta
que le aparezca en la pantalla el mensaje para apagar el dispositivo y
acepte.
Cuando la batería esté baja se apagará automáticamente.
Bloqueo y desbloqueo de la pantalla.
Bloqueo de Pantalla: Pulse ligeramente el Botón on/off y la pantalla
quedará bloqueada y en modo ahorro de energía.
Desbloquear Pantalla: Pulse ligeramente el Botón on/off y la pantalla
5
mostrará el icono del candado
para el desbloqueo.
presiónelo y arrástrelo hacia la derecha
Conectar la tablet al Pc para la transferencia de archivos.
Encienda el dispositivo y una vez desbloqueado conéctelo mediante
el cable usb suministrado al PC, y le mostrará la interfaz “Conexión por
USB”, pulse sobre “Activar almacenamiento USB”, aparecerá el medio de
almacenamiento de la memoria de la tablet en su PC. Ahora podrá transferir
datos entre su Pc y la tablet.
Conexión Wifi
Seleccione ‘’Ajustes’’, “Conexiones inalambricas y redes”, ‘WiFi’ y actívelo. El
dispositivo le mostrará las redes detectada automáticamente, seleccione la
deseada e introduzca la contraseña de seguridad de la red si está protegida.
Una vez conectado aparecerá el icono de red Wifi como conectado en la
pantalla principal.
Botón Reset
En caso de bloqueo de sistema o no respuesta del mismo, introduzca un clic
o aguja en el orificio reset y pulse durante 3 segundos el micro interruptor
reset
6
MoFing™ KIDS
Description de las partes
7
8
1. Cómo iniciar MoFing™ KIDS
Cree una cuenta Mofing: introduzca una dirección de correo y una
contraseña válidas. Por favor, recuerde su cuenta y contraseña. Si olvida su
contraseña, por favor introduzca su dirección de e-mail en la siguiente URL
para establecer una nueva contraseña: http://market.mofing.com/users/
forgot.
2. Página Principal
La pantalla de Inicio le da acceso a 6 categorías principales y a otras 8
funciones:
1-Listado de las 6 funciones principales y otras 8 categorías:
a. Juegos: disfrute de divertidos juegos
b. Desafío: retos online, más de 300apps.
c. Educación: aprenda divirtiéndose (cursos, juegos educativos…)
9
d. TV mofing: horas y horas de vídeos para los chicos
e. Libros: lea libros interactivos, audio-libros o libros en inglés
f. Navegador: Vea la más amplia gama de dibujos animados. Los padres
podrán incluir sitios Web adecuados para los pequeños en “Control
parental – contenido online”, y ellos podrán navegar a través de esos sitios
web previamente filtrados.
g. Control parental: Los padres podrán controlar el uso de la tablet.
h. Regalos: Mofing lanza regalos para sus usuarios, los padres podrán
comprar regalos a los pequeños a través de Mofing.
i. Fondos de escritorio: Mofing publica fondos de escritorio periódicamente.
J. Vídeo: reproduce tus propios vídeos.
k. Foto: encuentra todas tus fotos.
l. Música: Disfruta de toda tu música.
m. Cuenta: Crea tu propia cuenta
10
2- Market: añade / elimina aplicaciones
En las tres categorías principales—Juegos, Educación, Libros-, tiene que
descargar aplicaciones desde su versión de “Market” Android. Para acceder
al mismo, pulse el icono “Market” para descargarlo e instalar su versión,
teniendo active una conexión Wi-Fi previamente. Una vez en “market”, para
descargar una aplicación, tendra que estar registrado. Para hacerlo, pulse
sobre una aplicación que desee descargar y aparecerá la siguiente pantalla:
11
Para registrarse, escriba su dirección de correo electrónico y contraseña si
posee ya una cuenta.
Después, en el directorio Juegos de “market”, sus juegos favoritos
recomendados se descargarán automáticamente.
Al igual que anteriormente, en la categoría Educación, sus aplicaciones de
educación favoritas y recomendadas se descargarán automáticamente.
12
Si quiere eliminar una aplicación, pulse en la papelera que aparece en cada
categoría:
Una pequeña aspa roja aparecerá en la parte superior de cada aplicación,
seleccione aquella o aquellas que desea eliminar.
Los “market” en cada categoría se actualizan de manera automática.
Cuando una actualización está lista, solo tiene que confirmar pulsando el
botón “Actualizar” en el mensaje que aparecerá de manera automática.
3. Aplicaciones Web, añadir a favoritos/ borrar de favoritos
a. Cuando pulse en “Aplicaciones Web” para comprobar una aplicación,
verá la imagen de abajo; si desea ver las aplicaciones, pulse “Hágase
miembro; para ello tendrá que estar conectado. Pulse en la aplicación que
desea comprobar y aparecerá la siguiente pantalla:
13
Después le aparecerá el siguiente interfaz de registro para registrarse.
1. Categoría Juegos-> Aplicaciones Web. Tal como aparece abajo
encontrará infinidad de juegos en diferentes categorías como juegos de
ciencias, matemáticas, dibujos animados, etc.
14
Juegos web relacionados con las artes como los siguientes:
2. Desafío (programa online de pruebas para alumnos de primaria)
15
3. Categoría Libros-> en las aplicaciones web, podrá encontrar diferentes
categorías de libros.
16
Si desea añadirlo a favoritos, pulse para añadir. Una pequeña estrella
aparecerá sobre la parte superior de cada aplicación, seleccione aquellas
que desea añadir.
Si desea eliminar una aplicación, pulse para borrar. Una pequeña estrella
aparecerá en la parte superior de cada aplicación, seleccione cuál o cuáles
desea eliminar.
3. Las otras 8 funciones básicas
Vídeo
Para abrir la galería de vídeos, pulse el botón de la nube correspondiente
17
en la parte superior de la página principal.
1-¿Cómo ver todos los videos en mi Galería?
Cuando usted esté en la galería de vídeos, simplemente deslice la pantalla
con el dedo de derecha a izquierda para avanzar en la lista, o de izquierda
a derecha para ir hacia atrás en la lista. Usted puede navegar a través de las
distintas páginas de vídeos de esa manera.
2-¿Cómo ver un vídeo?
Pulse en el video que desea ver, se pondrá en marcha el reproductor de
video. A continuación, puede utilizar los controles del reproductor.
18
a- Pulse este botón para ver el vídeo en pantalla completa o minimizar
b- Pulse en el pequeño círculo si quiere ir hacia delante o atrás en la película.
c- Play / Pausa: Durante la reproducción de un vídeo, pulse para hacer una
pausa. Pulse de nuevo para reanudar.
d- Botón de volumen: Presione para obtener un sonido más bajo.
e- Botón de Volumen: Presione para obtener un sonido más alto.
f- Pulse este botón para ir hacia atrás.
Cómo cargar o eliminar un vídeo del software? Consulte la sección “5)
Cómo transferir documentos a través de USB”
FOTOS
Para abrir la sección de fotos, pulse el icono correspondiente en la parte
superior de la página principal.
Para ver sus imágenes, basta con mover el dedo por la pantalla de derecha
a izquierda para ir hacia adelante en la lista de imágenes, o de izquierda a
derecha para ir hacia atrás en la lista de imágenes.
19
Cómo subir una foto al software? Consulte la sección “5) Cómo transferir
documentos a través de USB”
Para eliminar una foto, pulse en uno para estar en pantalla completa. A
continuación, pulse otra vez, y aparecerá una papelera.
MÚSICA
20
Para abrir la librería de música, pulse “play” para reproducir y pausar; el
fondo cambiará automáticamente.
Cómo subir música al software? Consulte la sección “5) Cómo transferir
documentos a través de USB”
CONTROL PARENTAL
Después de haber introducido su contraseña, puede acceder a la página
principal de control parental. Sólo tiene que seleccionar la opción que
desea comprobar o modificar.
1. CONTRASEÑA
21
1. En esta sección, usted puede elegir obtener una clave para llegar a la
categoría de control parental. En establecer una contraseña, seleccione
“Contraseña de control” en primer lugar, a continuación, escriba la nueva
contraseña y confírmela.
Si desea cambiar su contraseña, simplemente escriba la contraseña antigua
antes de la nueva.
2. APP MANAGER
En esta sección, seleccione la categoría (Juego, Educación, Libro) que desee
y, a continuación, seleccione la aplicación y pulse Guarda. La aplicación
aparecerá en la categoría seleccionada.
22
3. NAVEGACIÓN ONLINE
23
Los padres pueden añadir enlaces web adecuados en “Control Parental –
contenido online”, así los niños podrán seleccionar las webs filtradas en el
Navegador.
4. GESTIÓN DEL TIEMPO
Con esta opción usted puede elegir el tiempo que la tablet sea utilizada
diariamente. Primero, seleccione el máximo de horas que desea que el
interfaz esté activo. A continuación, puede elegir un intervalo de horas en
las que el niño pueda utilizar Mofing. Por último, pulse en la última flecha
para seleccionar la hora más tardía en la que el programa se puede utilizar.
5. ESTADÍSTICAS
Gracias a esta función, podrá comprobar con detalle lo que el niño hace
con el dispositivo. Sólo tiene que seleccionar si desea un informe de la
semana pasada, hoy o todos los tiempos.
24
6. FONDO DE ESCRITORIO
25
Mofing publica diferentes categorías de fondos de pantalla de manera
periódica tales como “dibujos animados”, en los que podrás encontrar
infinidad de fondos. Seleccione su fondo favorito y pulse “guardar” para
cambiar el fondo de escritorio.
6. CÓMO TRANSFERIR DOCUMENTOS A TRAVÉS DE USB?
Conecte la tablet al ordenador mediante el cable incluido en la caja.
Luego acceda a la configuración, pulse sobre el icono “Conexión USB”
y pulse en “Conectar almacenamiento USB”.
26
Ahora su tablet debe aparecer en la lista de los dispositivos conectados de
su equipo. Cada tipo de archivo se puede colocar en carpetas específicas.
a) Cargue música, vídeos and fotos
-Copie música en la carpeta “music_kids”,
-Copie vídeos en la carpeta “video_kids”
-Copie fotos en la carpeta “photo_kids”.
b) Borrar archivos.
Si desea eliminar documentos, proceda de la misma forma y elimine los
documentos de las distintas carpetas.
6. MÁS INFORMACIÓN
¡Disfrute de la experiencia Moffing Kids !
Soporte técnico.
Por favor para más información sobre la instalación y configuración de este
producto diríjase a nuestra web www.approx.es sección soporte o escriba
un correo electrónico a [email protected]
27
INTRODUCTION AND PRODUCT DESCRIPTION.
Thank you for choosing the tablet APPTBKID7.
The Cheesecake APPTBKID7 Kids Tablet incorporates capacitive 7” touch
screen Android 4.2 Jelly Bean system, 1.5 GHz dual-core processor and
512MB DDR3 RAM memory and 8GB internal memory. With interface and
applications exclusive for children and parental control. Ergonomic design
with silicone protective case.
Discover a fun, safe and interactive way to learn to write, draw, surf the net
with APPTBKID7!
PACKAGE CONTENTS
· APPTBKID7 + SILICON COVER
· Quick installation guide.
· USB / Micro usb Cable
· OTG Cable
· Charger for tablet
Make sure that your package contains the items described above. If you find any
items are missing or damaged, please contact your dealer.
SYSTEM REQUIREMENTS
· 1 USB 2.0 port
· OS: Windows 2000/XP/VISTA/7/8 (32 bits and 64 bits).
28
INSTALLATION AND CONFIGURATION.
1 Frontal camera
2. On/off button
3. Headset Jack 3.5mm connector
4. Micro Usb port
5. DC Power Port
6. Micro SD card slot
7. Volumen
8. Speakers
9. Reset hole
BEFORE USING THE TABLET, PLEASE READ THE FOLLOWING
Charging the battery
Method 1. Connect the charger provided to a power outlet of your home and
29
the DC power port on your Tablet. The tablet will start charging.
Method 2. Connect the USB / micro usb cable supplied to the micro usb port of
the tablet and with the tablet turned off plug it into a rear USB port of your PC.
You can also purchase usb chargers approved: APPUSBWALLIP or
APPUSBWALLV4
The charging and discharging of the battery must be complete, never less
than 5 hours. Do not disconnect the charger the full charge of the battery is
completed, otherwise it will shorten the battery life.
on/off button
To switch the device on hold the on / off position until the screen comes on.
Once the system loads click on the lock icon and drag it to the right as seen in
the following image:
Dragging left displays the camera directly
To switch the device on hold the on / off position until it appears on the screen
the message to turn off the device and accept.
Connect the tablet to your PC to transfer files.
Turn on the device and once unlocked connect via the supplied usb cable to the
PC, the interface will show “USB Connection”, click on “Turn on USB storage”, it
will display the storage medium of the memory of the tablet on your PC. Now
you can transfer data between your PC and the tablet.
Wifi connection
Select’’ Settings’’, “wireless and network connections”, ‘WiFi’ and activate it. The
device will show automatically detected networks, select and enter the desired
password if network security is protected. Once connected, the wireless network
icon. as connected to the main screen.
Reset button
In case of system crash or no response, enter a click or needle into the reset hole
and press for 3 seconds the micro reset switch.
30
MoFing™ KIDS
31
32
1. How to start MoFing™ KIDS
If you do not have a Mofing account, please create an account by clicking
on the button “Create Mofing account” and follow the instructions. If
you have an existing Mofing account, login with your email address and
password. If you forget your password, please insert your email please click
on the option “forgot your password click here” and follow the steps, or
visit the following address to set up new password.http://market.mofing.
com/users/forgot
33
2. The Home Page gives you access to 6 mains categories and to 8 other
functions:
1-Overview of the 6 main functions and 8 other categories:
a. Game: play fun games
b. E-challenge: testing on line, more than 300apps.
c. Education: learning with fun (courses sheet, educative games…)
d. TV mofing: hours and hours of kids videos
e. Books: read interactive books, audio books, Spanish books, English books
f. Navigate: Watch wider range of cartoons. The parents can add suitable
website link for kids in “Parent setting – online content”, and then kids can
browse these filtered website.
g. Parental control: Parents can control the use of the tablet
34
h. Gifts: Mofing release gifts for members, parents buy mofing gifts for kids
i. Wallpaper: Mofing release wallpaper in different series
J. Video: watch all your own videos
k. Photo: find all your pictures
l. Music: listen and enjoy your own music
m. Account: create your account
2- Market, add / delete applications
In the 3 mains categories—Games, Education,Books, you have to download
applications from the corresponding market. To access the market, press
on the market icon to download and install market base while connected
to the internet.
Once in the market, to download an application you will have to be logged
in. To do that, press on an application you want to download and this
screen will appear:
35
To login, write your email address and password if you already have an
account.
Then, in the Game directory in the market, your favorite games will be
downloaded automatically.
Same
as
above,
Education
categorymarket, your favorite
education
app
as
seen
below
will
be
downloaded
automatically.
36
If you want to delete an application, press on the trash which is present in
each category:
A little red cross will appear at the top of each application, select those you
want to delete.
The markets of each category are updated automatically. When an update
is ready, you just have to confirm this by pressing on the button “update” of
the message which will display automatically.
3- Web apps, add to favorites/ delete favorites
a. When you press on “WEB APPS” to check an application, you will see
the picture below. If you want to see the apps, please press “Become a
member”. You will have to be logged in. To do this, press on an application
you want to view and this screen will appear:
37
You will then see the login interface as shown below:
38
a -1 Game category->web apps, you will see below many web games in
different category like science game, math game, cartoon game etc.
Art web games as below
39
a-2 E-challenge(testing for primary school programme on line)
40
a-3 Books category->web apps, you will see different book categories.
41
b. If you want to add to favorites, press on the to add. A little pink pentacle
will appear at the top of each application, select those you want to add.
c. If you want to delete an application, press on the to delete. A little - will
appear at the top of each application, select those you want to delete.
3-The 8 other basics functions
a-Video
To open the video gallery, press the corresponding cloud button on the top
of the home page.
1-How to view all the videos in my gallery?
When in you are the video gallery, simply swipe the screen with your
finger from right to left to go forward in the list, or from left to right to
go backwards in the list. You can easily navigate through all the different
pages of videos that way.
42
2-How to watch a video?
Press on the video you want to watch, it will launch the video Player. Then
you can use the controls of the player.
43
a- Press on this button to watch your video in full screen
b- Press on the small round if you want to go forward in the movie.
c- Play / Pause: When a video is playing, press to pause it. Press again to
resume.
d- Volume button : Press it to increase the volume.
e- Volume button: Press it to decrease the volume
f- Press this button to go backwards.
How to upload or delete a video in the software ? Refer to page 16 5) “How
to transfer documents via USB”
b-Photos
To open the photo section, press the corresponding icon on the top of the
home page.
To see your pictures, move your finger on the screen from right to left to go
forward in the list of pictures, or from left to right to go backwards in the
list of pictures.
44
How to upload a picture in the software? Refer to page 18 5)” How to
transfer documents via USB”
To delete a picture, press on the picture you want to delete to be on full
screen. Then press another time, and a trash will appear.
c-Music
45
To open the music library, press “play button” to play and pause, the
background will change automatically.
How to upload / delete music in the software? Refer to page 18 5) “How to
transfer documents via USB”
d- Parental control
After you entered you password, you can access the parental control home
page. Just select the option you want to check or modify.
46
1-Password
In this section, you can choose to create a password to reach the parental
control category. In set password, select “Password control ”first, then write
your new password and confirm it.
If you want to change your password, just write your old password before
your new one.
2-APP manager
47
in this section, select category(Game, Education,Book) you want, and then
select app and press save, finish above, that application will appear in your
selected category.
3-Online Navigation
Parents can add suitable website link for kids in “ Parent setting – online
content”, and then kids can browse these filtered website in “Navigate”.
4- Time management
With this option you can just choose how long you want Mofing Kids to be
used per day. First select the maximum hours you want the interface to be
active. You can then choose an interval of hours during which the child is
able to use Mofing. Finally, press on the last arrow to select the latest hour
the program can be used.
48
5-Statistics
Thanks to this function, you will be able to check with details what the child
does with the device. Just select if you want a report from the last week,
today or all times.
49
e- Wallpaper. Mofing releases different wallpaper series like cartoon
characters. You will see many cartoon wallpapers. Select your favorite
picture and then press “save” to change the background accordingly.
Select your favorite picture as background.
50
5- How to transfer documents via USB ?
In order to do that, first connect your tablet to your computer with the
cable provided in the packaging.
Then access the Settings, press on the “USB Connection” icon and press on
“connect USB storage”.
Now your tablet should appear on your computer’s list of connected
devices. Every different kind of documents can be placed in specific folders.
a) upload music, videos and photos
-
Copy music in the folder “music_kids”,
-
Copy videos in the folder “video_kids”
-
Copy photos in the folder “photo_kids”.
b) Delete documents.
If you want to delete some documents, proceed the same way and cut the
documents you don’t want to see any more in the various folders.
51
With regards to the formats that can be accepted for every kind of
documents, it depends on your Android device so please verify this in
your manual.
6- More information
Enjoy Mofing Kids experience !
TECHNICAL SUPPORT.
Please for more information on installation and configuration of this product
visit the support section of our website www.approx.es or send an email to
[email protected]
52
53
Importado por / Imported by:
APPROX IBERIA S. L.
CIF: B-91202499
Soporte técnico / T
Technical
echnical support:
[email protected]
MADE IN PRC
El contenido de esta guía está
sujeto a errores tipográficos
The content of this guide is
subject to typographical errors
www.approx.es