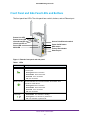
1
AC750 WiFi Range Extender Model E X6100 User Manual April 2014 202-11307-03 350 East Plumeria Drive San Jose, CA 95134 USA AC750 WiFi Range Extender Support Thank you for selecting NETGEAR products. After installing your device, locate the serial number on the label of your product and use it to register your product at https://my.netgear.com. You must register your product before you can use NETGEAR telephone support. NETGEAR recommends registering your product through the NETGEAR website. For product updates and web support, visit http://support.netgear.com. Phone (US & Canada only): 1-888-NETGEAR. Phone (Other Countries): Check the list of phone numbers at http://support.netgear.com/general/contact/default.aspx. Compliance For regulatory compliance information, visit http://www.netgear.com/about/regulatory. See the regulatory compliance document before connecting the power supply. Trademarks NETGEAR, the NETGEAR logo, and Connect with Innovation are trademarks and/or registered trademarks of NETGEAR, Inc. and/or its subsidiaries in the United States and/or other countries. Information is subject to change without notice. © NETGEAR, Inc. All rights reserved. 2 AC750 WiFi Range Extender Contents Chapter 1 Get to Know Your Extender Front Panel and Side Panel LEDs and Buttons . . . . . . . . . . . . . . . . . . . . . . . . . . . . . When to Use Your Extender . . . . . . . . . . . . . . . . . . . . . . . . . . . . . . . . . . . . . . . . . . . . How the Extender Works . . . . . . . . . . . . . . . . . . . . . . . . . . . . . . . . . . . . . . . . . . . . . . Use as a WiFi Range Extender . . . . . . . . . . . . . . . . . . . . . . . . . . . . . . . . . . . . . . . . Use as an Access Point . . . . . . . . . . . . . . . . . . . . . . . . . . . . . . . . . . . . . . . . . . . . . . Support for the 802.11ac Networking Standard. . . . . . . . . . . . . . . . . . . . . . . . . . Chapter 2 6 7 7 7 8 8 Install Your Extender Install the Extender as a Range Extender. . . . . . . . . . . . . . . . . . . . . . . . . . . . . . . . 10 Place the Extender . . . . . . . . . . . . . . . . . . . . . . . . . . . . . . . . . . . . . . . . . . . . . . . . 10 Connect to an Existing WiFi Network . . . . . . . . . . . . . . . . . . . . . . . . . . . . . . . . 10 Find the Best Location . . . . . . . . . . . . . . . . . . . . . . . . . . . . . . . . . . . . . . . . . . . . . 14 Extender Performance . . . . . . . . . . . . . . . . . . . . . . . . . . . . . . . . . . . . . . . . . . . . . 14 Connect a Computer or Device to the Ethernet Port . . . . . . . . . . . . . . . . . . . 14 Install the Extender as an Access Point . . . . . . . . . . . . . . . . . . . . . . . . . . . . . . . . . 16 Chapter 3 Manage the Extender Network and Settings Log In After Initial Setup. . . . . . . . . . . . . . . . . . . . . . . . . . . . . . . . . . . . . . . . . . . . . . 18 Change the admin Password . . . . . . . . . . . . . . . . . . . . . . . . . . . . . . . . . . . . . . . . . . 18 Set Up Password Recovery for admin . . . . . . . . . . . . . . . . . . . . . . . . . . . . . . . . . . 19 Use Smart Setup to Connect the Extender to a Network . . . . . . . . . . . . . . . . . . 20 Add a WPS Client to the Extender Network . . . . . . . . . . . . . . . . . . . . . . . . . . . . . 23 Change the Basic WiFi Settings . . . . . . . . . . . . . . . . . . . . . . . . . . . . . . . . . . . . . . . . 23 Change WiFi Security Settings . . . . . . . . . . . . . . . . . . . . . . . . . . . . . . . . . . . . . . . . 24 View or Change Advanced Wireless Settings . . . . . . . . . . . . . . . . . . . . . . . . . . . . 26 View or Change the WPS Settings . . . . . . . . . . . . . . . . . . . . . . . . . . . . . . . . . . . . . 27 Set Up a Wireless Access List . . . . . . . . . . . . . . . . . . . . . . . . . . . . . . . . . . . . . . . . . . 28 View or Change the Internet IP Address Setting . . . . . . . . . . . . . . . . . . . . . . . . . 29 Enable NAT in the Extender . . . . . . . . . . . . . . . . . . . . . . . . . . . . . . . . . . . . . . . . . . . 30 Manage Profiles . . . . . . . . . . . . . . . . . . . . . . . . . . . . . . . . . . . . . . . . . . . . . . . . . . . . . 31 Operating Mode. . . . . . . . . . . . . . . . . . . . . . . . . . . . . . . . . . . . . . . . . . . . . . . . . . . . . 32 Chapter 4 Monitor and Maintain the Extender Recover the admin Password. . . . . . . . . . . . . . . . . . . . . . . . . . . . . . . . . . . . . . . . . . 35 Back Up the Extender Configuration . . . . . . . . . . . . . . . . . . . . . . . . . . . . . . . . . . . 35 Restore Saved Configuration Settings . . . . . . . . . . . . . . . . . . . . . . . . . . . . . . . . . . 36 Return the Extender to Its Factory Settings . . . . . . . . . . . . . . . . . . . . . . . . . . . . . 37 Use the Factory Reset Button to Restore Factory Settings . . . . . . . . . . . . . . 37 Erase the Settings and Return to Factory Settings . . . . . . . . . . . . . . . . . . . . . 38 Update the Firmware . . . . . . . . . . . . . . . . . . . . . . . . . . . . . . . . . . . . . . . . . . . . . . . . 38 3 AC750 WiFi Range Extender View Wired and Wireless Network Devices. . . . . . . . . . . . . . . . . . . . . . . . . . . . . . 39 Chapter 5 FAQs and Troubleshooting FAQs . . . . . . . . . . . . . . . . . . . . . . . . . . . . . . . . . . . . . . . . . . . . . . . . . . . . . . . . . . . . . . 42 Cannot Log In to the Extender . . . . . . . . . . . . . . . . . . . . . . . . . . . . . . . . . . . . . . . . 43 Cannot Join an Extender WiFi Network . . . . . . . . . . . . . . . . . . . . . . . . . . . . . . . . . 44 Appendix A Supplemental Information Factory Default Settings . . . . . . . . . . . . . . . . . . . . . . . . . . . . . . . . . . . . . . . . . . . . . 46 Technical Specifications . . . . . . . . . . . . . . . . . . . . . . . . . . . . . . . . . . . . . . . . . . . . . . 46 4 1. Get to Know Your Extender 1 This chapter covers the following topics: • Front Panel and Side Panel LEDs and Buttons • When to Use Your Extender • How the Extender Works • Support for the 802.11ac Networking Standard For more information about the topics covered in this manual, visit the support website at http://support.netgear.com. Firmware updates with new features and bug fixes are made available from time to time on downloadcenter.netgear.com. Some products can regularly check the site and download new firmware, or you can check for and download new firmware manually. If the features or behavior of your product does not match what is described in this guide, you might need to update your firmware. 5 AC750 WiFi Range Extender Front Panel and Side Panel LEDs and Buttons The front panel has LEDs. The side panel has a switch, buttons, and an Ethernet port. Router Link LED Router Arrow LED Client Arrow LED Client Link LED Power LED WPS LED Access Point/Extender switch Power On/Off button WPS button Factory Reset button Ethernet port Figure 1. Extender front panel and side panel Table 1. LEDs LED Description Router Link LED This LED indicates the connection between the extender and the router or access point. • Solid green. Best connection. • Solid amber. Good connection. • Solid red. Poor connection. • Off. No connection. Client Link LED This LED indicates the connection between the extender and a computer or mobile device. • Solid green. Best connection. • Solid amber. Good connection. • Solid red. Poor connection. • Off. No connection. Power LED • • • Solid amber. The extender is booting. Solid green. The extender is powered on. Off. The extender is powered off. Get to Know Your Extender 6 AC750 WiFi Range Extender Table 1. LEDs (continued) LED Description WPS LED • • • Solid green. WiFi security is enabled (WPA or WPA2). Blinking green. The extender is making a WPS connection. Off. WiFi security is not enabled. Router Arrow If the Router Arrow or Client Arrow LED blinks, see Find the and Client Arrow Best Location on page 14. If no arrow LEDs are lit, the extender is in a good location. When to Use Your Extender NETGEAR recommends that you connect to the extender only when your WiFi network connection is poor. Data traffic routed through the extender is inherently slower than traffic routed directly from the network. How the Extender Works The extender increases the distance of a WiFi network. The extender can connect to your network’s WiFi signal and then boost that signal or it can connect to your network with a wired connection and work as an access point. You use the Access Point/Extender switch on the side of the extender to select which way you want to use the extender. Use as a WiFi Range Extender This is the most common way to use the extender. The extender connects to your existing network’s WiFi signal and it rebroadcasts two extender WiFi signals, one in the 2.4 GHz band, and another in the 5 GHz band. When you are too far away to connect to your network’s WiFi signal, you can connect to an extender WiFi signal instead. WiFi Range Extender Boosts the range of your existing WiFi and creates a stronger signal in hard-to-reach areas. Existing WiFi Sometimes your router does not provide the WiFi coverage you need. Figure 2. The extender WiFi signals reach areas outside the range of your router Get to Know Your Extender 7 AC750 WiFi Range Extender Use as an Access Point You can connect the extender to your router or gateway with a wired connection and use the extender as an 11ac access point. Figure 3. Extender as an access point Support for the 802.11ac Networking Standard The extender supports the 802.11ac networking standard. This new standard offers better speed, improved reliability, and more range than older WiFi networking standards. The extender is backward compatible with earlier WiFi standards. However, to get the benefits of 802.11ac, your wireless router must support the 802.11ac WiFi networking standard. To learn more about the 802.11ac WiFi networking standard, visit http://www.netgear.com/landing/80211ac/. Figure 4. Speed comparison between the 802.11n and 802.11ac standards Get to Know Your Extender 8 2. 2 Install Your Extender This chapter covers the following topics: • Install the Extender as a Range Extender • Install the Extender as an Access Point 9 AC750 WiFi Range Extender Install the Extender as a Range Extender The extender connects to your network’s WiFi signal and then rebroadcasts that signal to extend the WiFi signal coverage. Place the Extender NETGEAR recommends that you place the extender near the router during initial setup. Then you can move it farther away from the router as needed to increase the area that has a WiFi signal. To place the extender: 1. Place your extender in the same room as your WiFi router. 2. Plug the extender into an electrical outlet. The Power LED button. lights green. If the Power LED does not light, press the Power 3. Make sure that the switch on the extender is set to Extender. Connect to an Existing WiFi Network To extend the range of your WiFi network, you must connect the extender to your existing WiFi network. You can do this in one of two ways: • Connect with WPS. For more information, see Connect with WPS on page 10. • Connect with genie Smart Setup. For more information, see Connect with NETGEAR genie Smart Setup on page 11. Connect with WPS Wi-Fi Protected Setup (WPS) lets you join a secure WiFi network without typing the network name and password. The WPS button is a physical button on the router or access point. WPS does not support WEP network security. If you are using WEP security, see Connect with NETGEAR genie Smart Setup on page 11. To connect with WPS: 1. Press the WPS button on the side panel of the extender. The WPS LED blinks. 2. Within two minutes, press the WPS button on your router or access point. The WPS LED on the extender lights solid green, the Router Link LED the extender is connected to your existing WiFi network. lights, and Note: If the Router Link LED does not light, try again. If it still does not light, see Connect with NETGEAR genie Smart Setup on page 11. Install Your Extender 10 AC750 WiFi Range Extender 3. If your WiFi router supports the 5 GHz band, repeat steps 1 and 2 to connect the extender to the 5 GHz band. 4. Find the new extender network name. The extender’s wireless network name (SSID) changes to your existing WiFi network name, with _2GEXT or _5GEXT at the end of the name, depending on whether the extender is connecting to your WiFi network in 2.4 GHz or 5 GHz. For example: • Existing WiFi network name. MyNetworkName • New extended network name. MyNetworkName_2GEXT or MyNetworkName_5GEXT 5. Connect your existing WiFi devices to the new extended network. Use the same WiFi password that you use for your WiFi router. 6. Unplug the extender and move it to a new location closer to the area with a poor WiFi signal. The location that you choose must be within the range of your existing WiFi router network. 7. Plug the extender into an electrical outlet and wait one minute. The Power LED button. lights green. If the Power LED does not light, press the Power Use the Router Link LED on the front panel to help you choose a spot where the extender-to-router connection is optimal. Connect with NETGEAR genie Smart Setup You can use a web browser to connect to the extender and set it up. To connect with the browser-based Smart Setup: 1. Make sure that the switch on the extender is set to Extender. 2. Use a WiFi network manager on a computer or mobile device to find and connect to one of the extender WiFi networks. The extender is dual band, so it has two WiFi networks: • 2.4 GHz network. EX6100_NETGEAR_2GEXT • 5 GHz network. EX6100_NETGEAR_5GEXT After the connection with the computer or mobile device is established, the Client Link LED lights solid green. 3. Open a web browser window from the same computer or mobile device. The browser takes you directly to NETGEAR genie Smart Setup. Install Your Extender 11 AC750 WiFi Range Extender Note: If you are not automatically directed to NETGEAR genie, launch a web browser and enter www.mywifiext.net in the address field. Enter admin for the user name and password for the password. Smart setup detects the position of the extender switch. The extender finds the 2.4 GHz wireless networks in your area and displays a list. 4. Select a 2.4 GHz WiFi network to extend and click the Continue button. 5. To select the network you want the extender to join, do one of the following: • Select the radio button for the network. • Select the Manually input my wireless SSID radio button and type the name of the network. 6. Enter the security settings for the network that you selected. The extender finds the 5 GHz WiFi networks in your area and prompts you to select a 5 GHz WiFi network. 7. In the Password field, type the network password (also called passphrase or security key) and click the Continue button. 8. Select the Private Network or Public Network radio button, and click the Continue button. Install Your Extender 12 AC750 WiFi Range Extender 9. In the Name (2.4G SSID) and Name (5G SSID) fields, type names (SSIDs) for your new extender WiFi network and click the Continue button. Note: You can use the same security settings as your existing network by selecting the check box. The settings are applied and the following screen displays: 10. Use a WiFi network manager on the computer or mobile device to connect to the extender’s newly created WiFi network. 11. Use your password to connect. 12. Select the check box and click the Continue button. 13. Unplug the extender and move it to a new location closer to the area with a poor WiFi signal. Install Your Extender 13 AC750 WiFi Range Extender The location you choose must be within the range of your existing WiFi router network. 14. Plug the extender into an electrical outlet and wait one minute. The Power LED button. lights green. If the Power LED does not light, press the Power 15. Use the Router Link LED on the front panel to help you choose a spot where the extender-to-router connection is optimal. Find the Best Location If the WiFi signal is weak, the first time you join the extender network, an arrow LED blinks for two minutes. If this happens, adjust the position of the extender. The arrow LEDs act as follows: • • No arrow LEDs are lit. The extender is in a good location. Left arrow blinks. Move the extender closer to the router. • Right arrow blinks. Move the computer or mobile device closer to the extender. Extender Performance These extender LEDs indicate a WiFi connection: • WiFi signal between the router and the extender • WiFi signal between the extender and the computer or mobile device The LEDs are color coded: • Green indicates the best connection. • Amber indicates a good connection. • Red indicates a poor connection. An LED that is off indicates no WiFi connection. Connect a Computer or Device to the Ethernet Port You can use an Ethernet cable to connect a computer or device to the Ethernet port on the extender. Here are some examples of when you might want to do this: • You want to use a computer to log in to the extender to view or change its settings, but you are having trouble connecting to the extender WiFi networks. • You have already installed the extender and now you want to connect a device to the extender’s Ethernet port. If you are using the extender as an access point, then you already used the Ethernet port to connect the extender to your router. If you disconnect this cable, the extender will no longer be connected to your existing network. Install Your Extender 14 AC750 WiFi Range Extender To connect a computer to the extender Ethernet port: 1. Install the extender so that it is connected to your existing network with a WiFi link. 2. Connect an Ethernet cable to the Ethernet port on the extender and to an Ethernet port on your computer. The computer connects to the extender. Your computer might display a message notifying you of an Ethernet connection. To connect a device to the extender Ethernet port: 1. Install the extender so that it is connected to your existing network with a WiFi link. 2. Connect an Ethernet cable to the Ethernet port on the extender and to an Ethernet port on your device. Blu-ray player Extender WiFi router The device connects to the extender. Now the device can access your existing WiFi network through the extender. Install Your Extender 15 AC750 WiFi Range Extender Install the Extender as an Access Point You can also use the extender as a WiFi access point, which creates an AC750 WiFi hotspot within your local network. Figure 5. Extender as an access point To install the extender as an access point: 1. Set the Access Point/Extender switch to Access Point. 2. Plug the extender into an electrical outlet near a router Ethernet LAN port or a remote Ethernet jack that has access to your local area network (LAN). 3. Use an Ethernet cable to connect the extender to the router Ethernet LAN port or the remote Ethernet LAN jack with LAN access. The extender joins the LAN and creates a WiFi hotspot. 4. On your computer or mobile device, find and join a WiFi extender network. The extender is dual band, so it has two WiFi networks: • 2.4 GHz network. EX6100_NETGEAR_2GEXT • 5 GHz network. EX6100_NETGEAR_5GEXT When you join the network, the extender Client Link LED connected. lights to show that you are 5. Launch a web browser and enter www.mywifiext.net in the address field. 6. Enter admin for the user name and password for the password. NETGEAR genie displays and detects the Internet connection. 7. Follow the genie steps to set up WiFi security for both WiFi networks. Install Your Extender 16 3. Manage the Extender Network and Settings This chapter covers the following topics: • Log In After Initial Setup • Change the admin Password • Set Up Password Recovery for admin • Use Smart Setup to Connect the Extender to a Network • Add a WPS Client to the Extender Network • Change the Basic WiFi Settings • Change WiFi Security Settings • View or Change Advanced Wireless Settings • View or Change the WPS Settings • Set Up a Wireless Access List • View or Change the Internet IP Address Setting • Enable NAT in the Extender • Manage Profiles • Operating Mode 17 3 AC750 WiFi Range Extender Log In After Initial Setup After installation, you can log in to the extender to view or change its settings. To log in to the extender after the initial setup: 1. Connect a computer or mobile device to the extender’s network. 2. Launch a web browser and enter www.mywifiext.net in the address field. A login screen displays. 3. Enter admin for the user name and password for the password. If your extender has an Internet connection, the extender automatically checks for new firmware at the NETGEAR website. The Status screen displays. Change the admin Password The user name to access the extender is admin, and its default password is password. NETGEAR strongly recommends that you set a more secure password. To change the password for the extender: 1. On your computer, launch a web browser. 2. In the address field of your browser, enter http://www.mywifiext.net. Manage the Extender Network and Settings 18 AC750 WiFi Range Extender You are prompted to enter a user name and password. If you do not see the login prompt, make sure to include http:// when you type http://www.mywifiext.net in your browser. 3. Type admin for the user name and type your password. If you have not yet personalized your password, type password for the password. 4. Select Maintenance > Set Password. 5. (Optional) Select the Enable Password Recovery check box. NETGEAR recommends that you enable password recovery. This feature lets you recover the password if it is forgotten. Password recovery is supported in the Internet Explorer, Firefox, and Chrome browsers, but not in the Safari browser. 6. If you enabled password recovery, select two security questions and provide answers to them. 7. Type the old password. 8. Type the new password twice. 9. Click the Apply button. Your settings are saved. Set Up Password Recovery for admin NETGEAR recommends that you enable password recovery if you change the password for the extender user name admin. Then you can recover the password if it is forgotten. This recovery process is supported in the Internet Explorer, Firefox, and Chrome browsers, but not in the Safari browser. To set up password recovery: 1. On your computer, launch a web browser. 2. In the address field of your browser, enter http://www.mywifiext.net. You are prompted to enter a user name and password. If you do not see the login prompt, make sure to include http:// when you type http://www.mywifiext.net in your browser. 3. Enter admin for the user name and enter your password. If you have not yet personalized your password, type password for the password. Manage the Extender Network and Settings 19 AC750 WiFi Range Extender 4. Select Maintenance > Set Password. 5. Select the Enable Password Recovery check box. 6. Select two security questions and provide answers to them. 7. Click the Apply button. Your settings are saved. For information about how to recover the password, see Recover the admin Password on page 35. Use Smart Setup to Connect the Extender to a Network The first time that you use a browser to connect to the extender to install it, the NETGEAR genie installation wizard displays. If you want to use a wizard to set up the extender again, you can log in to the extender and use the Smart Wizard. To use smart setup to connect the extender to a WiFi network: 1. On your computer, launch a web browser. 2. In the address field of your browser, enter http://www.mywifiext.net. You are prompted to enter a user name and password. If you do not see the login prompt, make sure to include http:// when you type http://www.mywifiext.net in your browser. 3. Enter admin for the user name and enter your password. If you have not yet personalized your password, type password for the password. 4. Select Smart Setup. Smart setup displays the switch setting on your extender. In this example, the switch is set to Extender, which is the correct setting if you want your extender to use WiFi to connect to your network. Manage the Extender Network and Settings 20 AC750 WiFi Range Extender The extender finds the 2.4 GHz wireless networks in your area and displays a list. 5. To select the network you want the extender to join, do one of the following: • Select the radio button for the network. • Select the Manually input my wireless SSID radio button and type the name of the network. 6. Enter the security settings for the network that you selected. The extender finds the 5 GHz WiFi networks in your area and prompts you to select a 5 GHz WiFi network. 7. If your router or gateway broadcasts a 5 GHz WiFi network, select it from the list. Otherwise, click the Skip button. The extender prompts you to specify whether the network is private or public. 8. Specify if the network that you selected is private or public: • If your network is private, leave the Private Network radio button selected. • If you are connecting the extender to a public network, select the Public Network radio button. Selecting the Public Network radio button enables a firewall to protect your computer from others who are sharing this public network. Manage the Extender Network and Settings 21 AC750 WiFi Range Extender 9. Click the Continue button. You are prompted to name the extender networks. By default, the extender network names are the same as the networks that you selected with _2GEXT and _5GEXT at the end. 10. Either change the names or leave them as they are and click the Continue button. The settings are applied and the following screen displays: 11. Use a WiFi network manager on the computer or mobile device to connect to the extender’s newly created WiFi network. 12. Use your password to connect. 13. Select the check box and click the Continue button. Manage the Extender Network and Settings 22 AC750 WiFi Range Extender Add a WPS Client to the Extender Network The WPS Wizard helps you add a wireless computer or device to the extender’s WiFi networks without typing the WiFi password. WPS does not support WEP network security. If you are using WEP security, see Connect with NETGEAR genie Smart Setup on page 11. Note: For instructions about how to use the physical WPS button on the extender, see Connect with WPS on page 10. To add a WPS client: 1. Launch a web browser from a computer or wireless device that is connected to the network. 2. In the address field of your browser, enter http://www.mywifiext.net. A login screen displays. You are prompted to enter a user name and password. If you do not see the login prompt, make sure to include http:// when you type http://www.mywifiext.net in your browser. 3. Enter admin for the user name and enter your password. If you have not yet personalized your password, type password for the password. 4. Select Add a WPS Client. 5. Click the Next button. 6. Select a radio button: • Push button. Click the WPS button on this screen. • PIN Number. The screen adjusts. Enter the client security PIN, and click the Next button. 7. Within two minutes, go to the client device and use its WPS software to connect to the WiFi network. The WPS process automatically sets up your wireless computer with the network password when it connects. The extender WPS screen displays a confirmation message. Change the Basic WiFi Settings To view or change wireless setup: 1. Connect a computer or mobile device to the extender’s network. 2. Launch a web browser and enter http://www.mywifiext.net in the address field. A login screen displays. 3. Enter admin for the user name and enter your password. If you have not yet personalized your password, type password for the password. Manage the Extender Network and Settings 23 AC750 WiFi Range Extender 4. Select Setup > Wireless Setup. 5. In the Region list, select your region. In some locations, you cannot change this setting. 6. To change the network name (SSID), type a new name in the Name (SSID) field. The name can be up to 32 characters long and is case-sensitive. The default SSID is randomly generated and is on the product label. If you change the name, make sure to write down the new name and keep it in a safe place. 7. To change the wireless channel, select a number in the Channel list. In some regions, not all channels are available. Do not change the channel unless you experience interference (shown by lost connections or slow data transfers). If this happens, experiment with different channels to see which is the best. When you use multiple access points, it is better if adjacent access points use different channels to reduce interference. The recommended channel spacing between adjacent access points is four channels (for example, use Channels 1 and 5, or 6 and 10). 8. To change the mode, select it from the Wireless Mode list. Your settings are saved. If you connected wirelessly to the network and you changed the SSID, you are disconnected from the network. Change WiFi Security Settings NETGEAR strongly recommends that you use security to protect your WiFi network. WPA2 uses the newest standard for the strongest security, but some older computers and wireless Manage the Extender Network and Settings 24 AC750 WiFi Range Extender devices cannot use WPA2. By default, the WPA-PSK [TKIP] + WPA2-PSK [AES] radio button is selected so that new or old computers and wireless devices can connect to the WiFi network by using either WPA2 or WPA security. To change the WiFi security setting: 1. Connect a computer or mobile device to the extender’s network. 2. Launch a web browser and enter http://www.mywifiext.net in the address field. A login screen displays. 3. Enter admin for the user name and enter your password. If you have not yet personalized your password, type password for the password. 4. Select Setup > Wireless Setup. 5. Under Security Options, select a radio button. The Passphrase field displays. 6. In the Password (network key) field, enter the network key (password) that you want to use. It is a text string from 8 to 63 characters. 7. Write down the new password and keep it in a secure place for future reference. 8. Click the Apply button. Your changes are saved. Manage the Extender Network and Settings 25 AC750 WiFi Range Extender View or Change Advanced Wireless Settings Use care when changing the wireless settings. Incorrect settings might disable the extender’s WiFi networks unexpectedly. To view or change the advanced wireless settings: 1. On your computer, launch a web browser. 2. In the address field of your browser, enter http://www.mywifiext.net. You are prompted to enter a user name and password. If you do not see the login prompt, make sure to include http:// when you type http://www.mywifiext.net in your browser. 3. Enter admin for the user name and enter your password. If you have not yet personalized your password, type password for the password. 4. Select Advanced > Wireless Settings. All the check boxes are selected by default. 5. In the Advanced Wireless Settings section of the screen, select or clear the check boxes: • Enable Wireless Access Point (2.4 GHz). When this check box is selected, the extender allows WiFi connections in the 2.4 GHz band. Clearing this check box prevents wireless devices from connecting to the extender in the 2.4 GHz band. LAN devices can still connect to the extender over an Ethernet cable. • Enable SSID Broadcast (2.4 GHz). When this check box is selected, the extender broadcasts its wireless network name (SSID) for the 2.4 GHz band. Clearing this check box hides the extender’s 2.4 GHz network name. In such a situation, this network name does not display in a WiFi network manager. A user who wants to join this hidden network must know its network name. • Enable 20/40 MHz Coexistence (2.4 GHz). The extender 2.4 GHz WiFi network can run in either 40 MHz mode or 20 MHz mode. When this check box is selected, the Manage the Extender Network and Settings 26 AC750 WiFi Range Extender extender uses 40 MHz mode unless a nearby WiFi network is using 40 MHz mode. If that happens, the extender uses 20 MHz mode to coexist with that network. • Enable Wireless Access Point (5 GHz). When this check box is selected, the extender allows WiFi connections in the 5 GHz band. Clearing this check box prevents wireless devices from connecting to the extender in the 5 GHz band. LAN devices can still connect to the extender over an Ethernet cable. • Enable SSID Broadcast (5 GHz). When this check box is selected, the extender broadcasts its wireless network name (SSID) for the 5 GHz band. Clearing this check box hides the extender’s 5 GHz network name. In such a situation, this network name does not display in a WiFi network manager. A user who wants to join this hidden network must know its network name. 6. Click the Apply button. Your changes are saved. View or Change the WPS Settings Use care when changing the wireless settings. Incorrect settings might disable the extender’s WiFi networks unexpectedly. To view or change the advanced wireless settings: 1. On your computer, launch a web browser. 2. In the address field of your browser, enter http://www.mywifiext.net. You are prompted to enter a user name and password. If you do not see the login prompt, make sure to include http:// when you type http://www.mywifiext.net in your browser. 3. Enter admin for the user name and enter your password. If you have not yet personalized your password, type password for the password. 4. Select Advanced > Wireless Settings. The WPS Settings section of the screen displays the extender’s PIN. You cannot change this number. 5. In the WPS Settings section of the screen, change the settings as needed: • Enable Device’s PIN. By default, this check box is selected so that it is possible to use the WPS PIN method to connect to the extender’s network. Manage the Extender Network and Settings 27 AC750 WiFi Range Extender • To prevent PIN compromise... By default, this check box is selected. This feature lets you specify the maximum number of times someone can try to enter the extender’s PIN to connect with WPS before the extender disables its PIN. • Keep Existing Wireless Settings (2.4 GHz b/g/n). By default, this check box is selected so that the SSID and passphrase stay the same when you use WPS to connect to the 2.4 GHz band. NETGEAR recommends that you leave this check box selected. • Keep Existing Wireless Settings (5 GHz a/n/ac). By default, this check box is selected so that the SSID and passphrase stay the same when you use WPS to connect to the 5 GHz band. NETGEAR recommends that you leave this check box selected. 6. Click the Apply button. Your changes are saved. Set Up a Wireless Access List By default, any wireless device that is configured with the correct network name (SSID) can access the extender’s WiFi networks. For increased security, you can restrict access to the extender’s WiFi networks so that only wireless devices with the MAC addresses that you add to an access list can connect. Each network device has a MAC address, which is a unique 12-character physical address, containing the hexadecimal characters 0–9, a–f, or A–F only, separated by colons (for example, 00:09:AB:CD:EF:01). Typically, the MAC address is on the label of the wireless device. If you do not have access to the label, you can display the MAC address using the network configuration utilities of the computer. You might also find the MAC addresses on the Attached Devices screen (see View Wired and Wireless Network Devices on page 39). CAUTION: If you use a wireless device to set up the access list, add your wireless device to the access list. Otherwise, you are disconnected when you click the Apply button. To avoid this situation, use a computer with a wired connection to access the extender. Before you enable the access list, you must add the MAC addresses of the wireless devices that you want to allow to access the WiFi network of the extender. To set up and enable the access list: 1. On your computer, launch a web browser. 2. In the address field of your browser, enter http://www.mywifiext.net. You are prompted to enter a user name and password. If you do not see the login prompt, make sure to include http:// when you type http://www.mywifiext.net in your browser. Manage the Extender Network and Settings 28 AC750 WiFi Range Extender 3. Enter admin for the user name and enter your password. If you have not yet personalized your password, type password for the password. 4. Select Advanced > Wireless Settings and click the Setup Access List button. The Wireless Card Access List screen displays. 5. Click the Add button. The screen adjusts. 6. In the Device Name field, type a name for the wireless device. 7. In the MAC Address field, type the MAC address of the wireless device. 8. Click the Apply button. 9. Select the Turn Access Control On check box. 10. Click the Apply button. Now only computers and devices in the list can join the extender’s WiFi networks. View or Change the Internet IP Address Setting By default, the extender is set up to get the Internet IP address dynamically from the router. This setting is compatible with most Internet services. If your Internet service provides you with a static Internet IP address, you can specify that setting. To view or change the Internet Sstup: 1. Connect a computer or mobile device to the extender’s network. 2. Launch a web browser and enter http://www.mywifiext.net in the address field. A login screen displays. Manage the Extender Network and Settings 29 AC750 WiFi Range Extender 3. Enter admin for the user name and enter your password. If you have not yet personalized your password, type password for the password. 4. Select Setup > Internet Setup. 5. In the Internet IP Address section, select a radio button. 6. If you selected the Static IP Address radio button, complete the fields with the details of your connection. 7. Click the Apply button. Your changes are saved. Enable NAT in the Extender Network Address Translation (NAT) is a common feature in routers that process inbound traffic from the Internet. Secured NAT protects computers on the local area network (LAN) from attacks from the Internet but might prevent some Internet games, point-to-point applications, or multimedia applications from working. By default, NAT is disabled in the extender, but you can enable it. To enable NAT: 1. Connect a computer or mobile device to the extender’s network. 2. Launch a web browser and enter http://www.mywifiext.net in the address field. A login screen displays. 3. Enter admin for the user name and enter your password. If you have not yet personalized your password, type password for the password. Manage the Extender Network and Settings 30 AC750 WiFi Range Extender 4. Select Setup > LAN Setup. 5. Select the Enable NAT (for more secure connections to the Internet) check box. 6. Click the Apply button. Your change takes effect. Manage Profiles Each time the extender connects to a new network, the extender automatically saves the wireless network connection settings in a profile. The first profile is named wifi_profile_001. If the extender connects to more networks, each new profile name is assigned in numerical order. Profiles are handy if you take your extender with you to use in more than one location, such as at home and at an office or hotel. You can edit the profile names and settings and you can delete profiles. To edit a profile: 1. Connect a computer or mobile device to the extender’s network. 2. Launch a web browser and enter http://www.mywifiext.net in the address field. A login screen displays. 3. Enter admin for the user name and enter your password. If you have not yet personalized your password, type password for the password. 4. Select Profile. The Profile List displays a profile for each wireless network that the extender has connected to. 5. Select the radio button for the profile. Manage the Extender Network and Settings 31 AC750 WiFi Range Extender 6. Click the Edit button. 7. Change the details of the profile as needed. 8. Click the Apply button. Your settings are saved. To delete a profile: 1. Connect a computer or mobile device to the extender’s network. 2. Launch a web browser and type http://www.mywifiext.net in the address field. A login screen displays. 3. Enter admin for the user name and enter your password. If you have not yet personalized your password, type password for the password. 4. Select Profile. The Profile List displays a profile for each wireless network that the extender has connected to. 5. Select the radio button for the profile. 6. Click the Delete Profile button. The profile is removed from the list. Operating Mode You can use the extender in Internet Surfing mode or FastLane mode. In Internet Surfing mode, you can connect to the extender through either the 2.4 GHz band or the 5 GHz band and the extender connects to the router in both the 2.4 GHz band and the 5 GHz band. In FastLane mode, you can connect to the extender in only one of the bands and the extender connects to the router in the other band, based on the band that you select. The advantage of Internet Surfing mode is that the extender provides two bands for the clients. However, the bandwidth of each band is shared by the connections between the client and the extender and between the extender and the router, which reduces WiFi performance. On the other hand, FastLane provides only one band for the clients to connect to the extender but it offers maximum WiFi performance. Manage the Extender Network and Settings 32 AC750 WiFi Range Extender To view or change the operating mode: 1. Connect a computer or mobile device to the extender’s network. 2. Launch a web browser and enter http://www.mywifiext.net in the address field. A login screen displays. 3. Enter admin for the user name and enter your password. If you have not yet personalized your password, type password for the password. 4. Select Advanced > Operating Mode. By default, the Internet Surfing radio button is selected. 5. Select the radio button for the operating mode that you want to use: • Internet Surfing. • FastLane Technology.Select one of the following radio buttons: - Device-to-extender in 5 GHz only and extender-to-router in 2.4 GHz only - Device-to-extender in 2.4 GHz only and extender-to-router in 5 GHz only 6. Click the Apply button. Manage the Extender Network and Settings 33 4. Monitor and Maintain the Extender This chapter covers the following topics: • Recover the admin Password • Back Up the Extender Configuration • Restore Saved Configuration Settings • Return the Extender to Its Factory Settings • Update the Firmware • View Wired and Wireless Network Devices 34 4 AC750 WiFi Range Extender Recover the admin Password If you changed the password to access the extender and set up password recovery, you can recover your password if you lose it. For information about setting up password recovery, see Set Up Password Recovery for admin on page 19. If you did not set up password recovery and lose your password, you must reset the extender to factory default settings (see Return the Extender to Its Factory Settings on page 37). To recover your password to access the extender: 1. On your computer, launch a web browser. 2. In the address field of your browser, enter http://www.mywifiext.net. You are prompted to enter a user name and password. If you do not see the login prompt, make sure to include http:// when you type http://www.mywifiext.net in your browser. 3. Click the Cancel button. If password recovery is enabled, you are prompted to enter the serial number of the extender. The serial number is on the product label. 4. Enter the serial number of the extender. 5. Click the Continue button. A screen displays requesting the answers to your security questions. 6. Enter the saved answers to your security questions. 7. Click the Continue button. A screen displays your recovered password. 8. Click the Login again button. A login screen displays. 9. With your recovered password, log in to the extender. Back Up the Extender Configuration When the extender works correctly after initial setup, NETGEAR recommends that you back up the extender configuration settings. After you have backed up the settings, if you change the extender settings but are not content with the new settings, you can restore the extender backed-up configuration settings. To back up the extender configuration settings: 1. On your computer, launch a web browser. 2. In the address field of your browser, enter http://www.mywifiext.net. You are prompted to enter a user name and password. If you do not see the login prompt, make sure to include http:// when you type http://www.mywifiext.net in your browser. Monitor and Maintain the Extender 35 AC750 WiFi Range Extender 3. Enter admin for the user name and enter your password. If you have not yet personalized your password, type password for the password. 4. Select Maintenance > Backup Settings. 5. Click the Backup button. You are prompted to specify where to save the file. 6. When prompted, click the Save button. Your browser saves the configuration file from the extender. Restore Saved Configuration Settings You can restore the configuration file of the extender to a previously saved configuration file. To restore the extender configuration settings: 1. On your computer, launch a web browser. 2. In the address field of your browser, enter http://www.mywifiext.net. You are prompted to enter a user name and password. If you do not see the login prompt, make sure to include http:// when you type http://www.mywifiext.net in your browser. 3. Enter admin for the user name and enter your password. If you have not yet personalized your password, type password for the password. 4. Select Maintenance > Backup Settings. Monitor and Maintain the Extender 36 AC750 WiFi Range Extender 5. Click the Browse button. 6. Locate and select the previously saved backup file. By default, the name of the backup file is NETGEAR_EX6100.cfg. CAUTION: After you click the Restore button, do not try to go online, turn off the extender, shut down the computer, or do anything else to the extender until it finishes restarting! 7. Click the Restore button. A confirmation pop-up screen displays. 8. Confirm your decision. The extender restarts. This process takes about one minute. Return the Extender to Its Factory Settings To reset the extender to its factory settings, you can use the Factory Reset button or the Erase feature. For information about the factory settings, see Factory Default Settings on page 46. Use the Factory Reset Button to Restore Factory Settings CAUTION: This process erases any settings that you have configured in the extender. To restore factory settings: 1. Insert a paper clip into the Factory Reset hole and hold it until the Power LED blinks amber. 2. Release the button. All the LEDs turn off for about 3 seconds. The Power LED lights solid amber for about 30 seconds. The Power LED lights solid green. The extender returns to its factory settings. When you plug in the extender, it detects the position of its Access Point/Extender switch. Monitor and Maintain the Extender 37 AC750 WiFi Range Extender Erase the Settings and Return to Factory Settings CAUTION: This process erases any settings that you have configured in the extender. To erase the extender’s current settings: 1. On your computer, launch a web browser. 2. In the address field of your browser, enter http://www.mywifiext.net. You are prompted to enter a user name and password. If you do not see the login prompt, make sure to include http:// when you type http://www.mywifiext.net in your browser. 3. Enter admin for the user name and enter your password. If you have not yet personalized your password, type password for the password. 4. Select Maintenance > Backup Settings. CAUTION: After you click the Erase button, do not try to go online, turn off the extender, shut down the computer, or do anything else to the extender until it finishes restarting! 5. Click the Erase button. A confirmation pop-up screen displays. 6. Confirm your decision. The extender restarts. This process takes about one minute. Update the Firmware Unless you changed the settings in the Firmware Update screen previously, the extender is set up to check for new firmware automatically when you log in. You can also check for new firmware. Monitor and Maintain the Extender 38 AC750 WiFi Range Extender To check if new firmware is available and update the firmware: 1. On your computer, launch a web browser. 2. In the address field of your browser, enter http://www.mywifiext.net. You are prompted to enter a user name and password. If you do not see the login prompt, make sure to include http:// when you type http://www.mywifiext.net in your browser. 3. Enter admin for the user name and enter your password. If you have not yet personalized your password, type password for the password. 4. Select Maintenance > Firmware Update. 5. Click the Check button. 6. If new firmware is available, follow the onscreen prompts to download it onto your computer. Note: You might need to unzip the firmware file. 7. Click the Browse button. 8. Locate and select the new firmware file. CAUTION: After you click the Upload button, do not try to go online, turn off the extender, shut down the computer, or do anything else to the extender until it finishes restarting! 9. Click the Upload button. The firmware updates and the extender restarts. This process takes about two minutes. View Wired and Wireless Network Devices You can view the active wired and wireless devices in both the network to which the extender is connected and the extender network. If you do not recognize a wireless device, it might be an intruder. To view devices on the network: 1. On your computer, launch a web browser. 2. In the address field of your browser, enter http://www.mywifiext.net. Monitor and Maintain the Extender 39 AC750 WiFi Range Extender You are prompted to enter a user name and password. If you do not see the login prompt, make sure to include http:// when you type http://www.mywifiext.net in your browser. 3. Enter admin for the user name and enter your password. If you have not yet personalized your password, type password for the password. 4. Select Maintenance > Attached Devices. For each wired and wireless device, the IP address, device name, and MAC address display. 5. (Optional) Click the Refresh button. The information on the screen is updated. Monitor and Maintain the Extender 40 5. FAQs and Troubleshooting This chapter covers the following topics: • FAQs • Cannot Log In to the Extender • Cannot Join an Extender WiFi Network 41 5 AC750 WiFi Range Extender FAQs This section provides answers for difficulties you might experience with the extender. 1. Question. Will the extender work if I connect it to my wireless router with an Ethernet cable? It depends. If the switch is set to Extender, the extender connects to the router over WiFi. If the switch is set to Access Point, the extender connects to the router with an Ethernet cable. 2. Question. What are the user name and default password to log in to the extender? Answer. If you are online at http://www.mywifiext.net, you can use the following user name and password to log in: • User name. admin • Password. password 3. Question. The web browser setup guide keeps asking me for my network security key (passphrase), and I am sure I have entered the correct passphrase. What can I do? The extender is probably placed at the borderline of the range covered by the router or access point. For more information, see Place the Extender on page 10. If you are using WEP security, make sure that you are typing the wireless key in the correct field. 4. Question. I am connected to EX6100_NETGEAR_2GEXT or EX6100_NETGEAR_5GEXT and launched a browser. Why can’t I see the web browser setup genie? Try these troubleshooting steps: • Make sure that your computer is set up to use DHCP (most are). • Make sure that the Client Link LED is green and that you have a valid IP address. • Relaunch the web browser and type http://www.mywifiext.net or http://www.mywifiext.com in the address field of the web browser. Enter admin for the user name and password for the password. 5. Question. Is seamless roaming supported? During a VoIP call, when I move to a different location, the call is dropped. What should I do? Answer. No, the extender does not support seamless roaming. You might notice performance issues if your network device (laptop, smartphone, or tablet) connects to a different WiFi network. For example, you might connect to the extender WiFi network, begin a call, and then move to the location of your existing network. Your device automatically connects to the network in your current location, which takes a few seconds and might cause your call to be dropped.To prevent this problem, decide which WiFi network you want to use for your VoIP call and stay within the range of that network. 6. Question. My router security is WEP and I entered the wrong passphrase or security key on the extender. I cannot access the extender anymore. What can I do? FAQs and Troubleshooting 42 AC750 WiFi Range Extender Answer. The extender cannot detect if the WEP passphrase is correct. If you entered the wrong passphrase, your wireless device cannot get the IP address from the extender. You must reset the extender to the factory settings to get the IP address back. 7. Question. I have enabled a wireless MAC filter (wireless access control or ACL) on my wireless router. What should I do when installing the extender? Answer. When the wireless device connects through the extender to your router, the MAC address of the wireless device shown on the router is translated to another MAC address. If your router's MAC filter is enabled, the wireless device connects to the extender but cannot get an IP address from the extender and cannot access the Internet. To allow the wireless device to receive an IP address from the extender and access the Internet, you must provide the translated MAC address to the router. To get the translated MAC address: 1. Disable the MAC filter on your router. 2. Turn on the extender and connect all of your wireless devices to the extender. 3. Make sure that the Router Link LED remains lit. 4. Log in to the router and check the attached devices on the Attached Devices or similar screen. 5. Add any MAC addresses that begin with 02:0F:B5 to your router’s MAC filter table. Cannot Log In to the Extender If you have trouble connecting to the extender, try to locate the source of the problem: • Make sure that you use the correct user name and password to log in: - User name. admin - Password. The default is password. If you changed the password and enabled password recovery, you can recover the password. See Recover the admin Password on page 35. • If your browser displays an error page, make sure that you include http:// when you type http://www.mywifiext.net in the address field of your Internet browser. If you leave it out, you might not be able to connect. • If you already set up the extender but can no longer connect to it wirelessly, check if the Router Link LED is off or red. • If you cannot connect to the extender from your computer with WiFi, you can use an Ethernet cable to connect your computer to the Ethernet port on the extender. For more information, see Connect a Computer or Device to the Ethernet Port on page 14. FAQs and Troubleshooting 43 AC750 WiFi Range Extender Cannot Join an Extender WiFi Network To join a WiFi network, you must know its network name (also called the SSID) so that you can select it. If the network is secure, you must know the passphrase or key. If the extender does not connect to the network that you select, the following message displays: Connection was not established to the selected network. If this situation occurs, the cause might be one of the following: • You might have typed the network name, passphrase, or key incorrectly. Use the Setup Wizard to select a WiFi network from the list with detected networks, and retype the passphrase or key. The passphrase or key is case-sensitive. For example, PASSWORD25 is not the same as Password25 or password25. • If the extender cannot detect your WiFi network, check to see if your WiFi network is still up. Make sure that the wireless router is turned on. If possible, move the extender closer to the wireless router. • If the extender Router Link LED is red, a poor wireless connection exists between the wireless router and the extender. You can establish the best connection with a clear line of sight between the extender and the wireless router. Make sure that no physical obstacles exist between the extender and the wireless router and try to move the extender closer to the wireless router. If you use the Setup Wizard, and the extender cannot connect to the wireless router or cannot get an IP address from the wireless router, or the wireless router is not connected to the Internet, the Setup Wizard displays the following message: You are not able to connect to the Internet. Click Continue to run through setup again to connect to your network. Either run the Setup Wizard again or exit the Setup Wizard and try again later. FAQs and Troubleshooting 44 A. Supplemental Information This appendix includes the following sections: • Factory Default Settings • Technical Specifications 45 A AC750 WiFi Range Extender Factory Default Settings The following table includes the factory settings for the extender. You can use the Factory Reset button or the Erase feature to return the extender to these settings. (See Return the Extender to Its Factory Settings on page 37.) Table 2. Factory default settings Feature Setting Setup Wizard Enabled Wireless communication Enabled Wireless network names (SSID)s • • Security Disabled Transmission speed Auto1 Country/region Varies by region Operating mode 802.11ac, 802.11n, 802.11g, 802.11b, 802.11a Data rate Up to 300 Mbps for 2.4 GHz network and 433 Mbps for 5 GHz network DHCP Client enabled 2.4 GHz network: EX6100_NETGEAR_2GEXT 5 GHz network: EX6100_NETGEAR_5GEXT 1. Maximum wireless signal rate (IEEE Standard 802.11). Actual throughput will vary. Network conditions and environmental factors, including volume of network traffic, building materials and construction, and network overhead, lower actual data throughput rate. Technical Specifications The following table includes the product specifications. Table 3. Technical specifications Feature Default behavior Network protocol and standards compatibility Data and routing protocols: TCP/IP, DHCP server and client, DNS relay, NAT (many-to-one) Power consumption 100–240V~ 50/60 Hz, 0.21A maximum Physical specifications • • Dimensions: 122 x 74 x 38 mm Weight: 0.213 kg Supplemental Information 46 AC750 WiFi Range Extender Table 3. Technical specifications (continued) Feature Default behavior Environmental • • • Interface • • Operating temperature: 32° to 140°F (0° to 40°C) Operating humidity: 90% maximum relative humidity, noncondensing Electromagnetic emissions: Meets requirements of FCC Part 15 Class B. Local: 10BASE-T, 100/1000BASE-Tx, RJ-45 802.11ac, 802.11n, 802.11a, 802.11g, 802.11b Supplemental Information 47