1
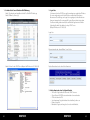
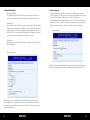
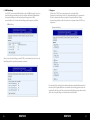
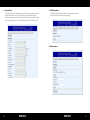
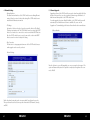
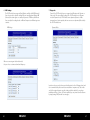
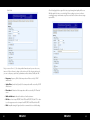
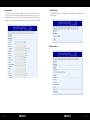
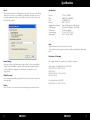
Brillantes Fernsehen SAT>IP Server Deutsch BENUTZERHANDBUCH 1. So finden Sie die Server IP mit dem UPnP Werkzeug Schritt 1: Downloaden und installieren Sie Intel-Tools für UPnP-Technologie Schritt 2: Öffnen Sie „Device Spy“ 2. Login Seite: Sie können sich in den SAT>IPServer mit Verwendung einer spezifischen IP Adresse. Als erstes wird gezeigt, wie die lokale IP-Adresse ermittelt wird. Durch einen Browsern sind Sie in der Lage, zur Login-Seite zu gelangen, die die auffordert ein Kennwort einzugeben. Das voreingestellte System-Passwort lautet: satip_admin. Das Passwort kann geändert werden, die ausführliche Vorgehensweise wird im folgenden Abschnitt 3 beschrieben: Lookup SAT> IP Server (Beispiel: IP-Adresse ist 192.168.30.35) Login Seite Passworteingabe: satip_admin. Klicken Sie aucf Log In Schritt 3: Sichen Sie den SAT>IP Server (Beispiel: die IP Adresse ist 192.168.30.35) Nach erfolgreichem Log In sehen Sie die Hauptseite 3. Auf der Hauptseite sehen Sie folgende Punkte • SW Version: Zeigt die aktuelle Version des SAT>IP Server an. • Clients: Wie viele SAT>IP Receiver sind mit dem Server verbunden. • CPU Load: Laden der CPU. • Speichernutzung: Zeigt den Verbrauch des aktuellen Speichers an. • Datum: Systemzeit • Betriebszeit: Zeigt an, wie lange der Server schon in Betrieb ist. 02 DEUTSCH DEUTSCH 03 4. Netzwerk Einstellung • Netzwerkschnittstelle: Das Standard Netzwerk des SAT>IP Servers nutzt das Ethernet-Netzwerk. Sie müssen in der Regel keine weitern Einstellungen am Netzwerk vornehmen. • IP Einstellung: Automatisch oder Statischer Modus kann ausgewählt werden. Die Standard Einstellung hierfür ist Automatisch. Der SAT>IP Server besitzt keine DHCP Funktion, daher muss er an einen Router mit DHCP Unterstützung betrieben werden. Sobald der SAT>IP Server mit einem DHCP-fähigen Router verbunden ist, müssen keine weiteren Netzwerkeinstellungen vorgenommen werden. 5. Software Upgrade: Ein Softwareupgrade des SAT>IP Servers kann über das Internet oder über ihre lokale Festplatte, bzw. USB Stick erfolgen. Sie können die zu aktualisierente Software von ihrer lokalen Festplatte wählen und auf den SAT>IP Server laden. Standardmäßig ist Online-Upgrade aktiviert, so dass der SAT>IP Server automatisch überprüft, ob eine neue Software verfügbar ist. Sie können auch „Jetzt aktualisieren“ klicken, um sofort die neueste Software des Geräteherstellers zu installieren. Software Upgrade • Zeitkorrektur: Einstellungen für die richtige Zeitzone, damit ein Onlineupdate richtig durchgeführt werden kann. Netzwerk Eistellung Sobald die Software erfolgreich aktualisiert wurde, wird eine Meldung in grün angezeigt. Das System wird automatisch neu gestartet, sobald Aktualisierung abgeschlossen ist. Auf der nächsten Seite (der Punkt Static) werden die Einstellungen im statischem Modus aufgeführt. Dies empfehlen wir nur professionellen Anwendern, die mit dem Netzwerk vertraut sind und Informationen über die IP Adresse, Netzmaske, StandardGateway und DNS haben. 04 DEUTSCH DEUTSCH 05 6. LNB Einstellung: Der SAT>IP Server unterstützt Quad, Quattro, und Uni-LNBs (Universal). Sie müssen keine Einstellungen vornehmen, wenn sie ein Quad und Quattro LNB installieren. In bestimmten Regionen oder Ländern können Frequenzen von LNBs unterschiedlich sein. Sie können die Einstellungen der Frwquenzen einstellen. LNB Einstellung 7.Diagnose Die Tuner des SAT>IP Server unterstützen zwei verschiedene Modi: Dynamischer und Statischer Modus. Die Standardeinstellung ist der dynamische Modus. Im dynamischen Modus werden die Transponder mit dem Clienten dynamisch angefordert, und die Tuner Ressourcen dynamisch dem SAT>IP Server zugewiesen. Dynamischer Modus Wenn Sie eine Unicable Anlage mit dem SAT>IP Server betreiben, können Sie hier die Einstellungen für die einzelnen Frequenzen vornehmen. Der statische Modus wird nur für sehr erfahrene Benutzer empfohlen. Bestimmte Informationen (siehe folgendes Bild) müssen vorhanden sein und eingegeben werden. Im statischen Modus können die Tuner und bestimmte Einstellungen zugeordnet werden, die für eine sehr große Anlage mit vielen Kunden erforderlich sind. 06 DEUTSCH DEUTSCH 07 Statischer Modus Nach Klicken auf die Schaltfläche Übernehmen, wird die Signalsperre, Signalstärke und Qualität angezeigt. Mit dem „Signal Lock Status“, können Sie herausfinden, ob obige Einstellung evtl. nicht korrekt sind oder etwas in den Einstellungen falsch ist. Bitte beachten Sie, dass dem statischen Modus eine PID zugeordnet werden muss. Hier sehen Sie die Einstellungen der Tuner 1, 2, 3, 4. Sie können jeden aus dieser 4 Tuner in den statischen Modus ändern. Nach der Änderung im statischen Modus wird sehen Sie folgende Begriffe: • Frequenz: Frequenzen (MHz) der Transponder die vom SAT> IP Server empfangen werden. • Symbolrate: Symbolrate (Ksym/s) der Transponder die vom SAT>IP Server empfangen werden. • Polarisation: Polarisation der Transponder die vom SAT>IP Server empfangen wird. • Multicast Addresse: vergibt die Adresse des Multicast-Streams. • Pid Liste: Hier können Sie PAT, PMT, Video PID, Audio PID, EIT, NIT und ETC eingeben, um Programme zu empfangen. Sie müssen mindestens PAT, PMT, Video-PID und Audio PID eingeben. • LNA: Verstärkt das Signal. Es wird emphohlen die Standardwerte zu verwenden. 08 DEUTSCH DEUTSCH 09 8. System Status: Alle 4 Tuner und der Streaming-Status kann in der Funktion überwacht werden. Darüber hinaus kann der System-Status helfen, wenn Probleme auftreten. Mit diesen Informationen können Sie sicherstellen, dass das erforderliche Signal die korrekte Einstellungen und eine Verbindung zu dem SAT>IP Receiver hat. 9. UPnP Einstellung Der UPnP Gerätename kann mit dieser Funktion geändert werden. Er wird bei den Clienten (Receivern) angezeigt: 10.Administration: 10 DEUTSCH DEUTSCH 11 Exportieren: Diese Funktion hilft Ihnen, die Einstellungen im System zu sichern und zur Klärung, falls Probleme auftreten sollten. Unternehmen die das System installieren, können die Einstellungen in der Firma vornehmen und dem Endverbraucher eine XML-Datei senden. Der Name der Export-Datei muss „satip_settings“ sein. Technische Daten: Prozessor Flash RAM Ethernet Applikation Unterstützung DVB-S Eingänge USB Anschluss Stromversorgung Abmessungen STi7108 2200 DMIPS 1 MB NOR / 128 MB NAND 512 MB DDR3-1066 RJ45 10/100/1000 Elgato (zur Nutzung auf mobile Endgeräte) 4x (Anschluss mit Quattro o. Quad LNB) für Software Updates AC 100V~230 V DC 12 V 3 A 195 x 117x 40 mm (L/B/H) Hinweis: Gewicht und Abmessungen sind nicht die absolut exakten Werte. Technische Details können jederzeit geändert werden (nach Hersteller) ohne vorherige Ankündigung. Konformitätserklärung Import Einstellungen: Wenn Sie nicht die nötigen Informationen für die Einstellungen haben, können Sie die Einstellungen, die Sie von Ihrem Händler bekommen, in das System importieren. Der Name der Import-Datei muss „Satip_settings“ sein. Passwort ändern: Hier können Sie das Passwort ändern. Bei ereutem Einloggen kann das neue Passwort verwendet werden. Neustart: Sie können diese Funktion nutzen, um das System neu zu starten ohne den EIN/AUS Schalter am Gerät zu betätigen. 12 DEUTSCH Hiermit wird die Übereinstimmung mit folgenden Richtlinien/Normen bestätigt: Richtlinie zur elektromagnetischen Verträglichkeit 2004/108/EG EN 55013: 2001 + A1: 2003 + A2: 2006 EN 55020: 2007 EN 61000-3-2:2006 + A1:2009 + A2:2009 EN 61000-3-3:2008 Niederspannungsrichtlinie 2006/95/EG EN 60065: 2002 + A1: 2006 + A11: 2008 DEUTSCH 13 Brillantes Fernsehen SAT>IP Server English Stand: v1.0 Juli 2013 USER MANUAL 1. Find out the Server IP with UPnP tool Step 1: Download and Install Intel Tools for UPnP technology Step 2: Open Device Spy 2. Login Page: Users can login into the SAT>IP switch/server by using a specific local IP address. Go to the first section to learn how to find the local IP address. By using browsers, users are able to see a login page, which requires password. The system default password is: satip_admin. The password can be changed; the detailed process will be addressed in the following section tep 3: Lookup SAT>IP Server (Sample: IP address is 192.168.30.35) Login Page Enter Password: satip_admin. Click login After successfully login, you can see main page Step 3: Lookup SAT>IP Server (Sample: IP address is 192.168.30.35) 3. In the main page, you can see SW version, Clients, CPU Load, Memory Usage, and Uptime: • • • • • • 02 ENGLISH SW version: Indicate current version in the SAT>IP Server. Clients: How many uni-cast clients are connected to server. Cpu Load: Loading of CPU. Memory Usage: Indicate how many memories are occupied at the moment. Date: System time Uptime: Indicate how long the server has been running. ENGLISH 03 4. Network Setting: • Network Interface: The default network interface of the SAT>IP switch/server is utilizing Ethernet network. Users do not need to adjust the setting if the SAT>IP switch/server is installed in the Ethernet environment. • IP Settings: Automatic or Static mode can be chosen by users in the function. The default IP setting is automatic mode. The SAT>IP switch/server does not include DHCP function, so it needs to be connected to a router or switch with DHCP function. Once the SAT>IP switch/server is correctly connected to a device with DHCP function, users do not need to adjust the setting. 5. Software Upgrade: Upgrading software of the SAT>IP switch/server can be done through the Web User Interface or Internet. Users can choose updated software images from their local hard driver and then upload to the SAT>IP switch/server. For online upgrade, the system default is Enabled, so the SAT>IP switch/server will automatically check whether new software is available. Also, users can click “upgrade now!” to immediately get the latest software from the device manufacturer. Software Upgrade • Time Correction: The function is to setup appropriate time zone for the SAT>IP switch/server, so online upgrade can be correctly conducte Network Settings Once the software is successfully upgraded, you can see message below in green. The system will automatically restart once update is completed; user might need to reconnect to WebUI. On the other hand, using static mode is recommended for professional users only. These professional users need to know specific information of IP, Netmask, Gateway, and DNS. 04 ENGLISH ENGLISH 05 6. LNB Settings: The SAT>IP switch/server supports Quad, Quattro, and Uni-cable LNB (Universal). Users do not need to adjust the settings if they are using Quad and Quattro LNB (Universal). In certain regions or countries, frequencies of LNBs may be different. Users can adjust the settings based on different frequencies in different regions or countries. 7.Diagnostic: Tuners of the SAT>IP switch/server can support two different modes: Dynamic or Static mode. The system default setting of the SAT>IP switch/server is Dynamic mode. In Dynamic mode, SAT>IP switch/servers dynamically tune to satellite transponders as client requested, and tuner resources are dynamically allocated by the SAT>IP switch/server. Dynamic Mode LNB Settings When users are using uni-cable multi-switch, they can choose certain user bands and frequency In static mode, users need to know specific information (see the following picture), and it is recommended for professional users or installation companies only. Static mode can lock the assigned tuner in a specific setting, and this is suitable for a very large installation with lots of clients. As Clients required, they can join and leave the streams by simply issuing IGMP join and leave messages. 06 ENGLISH ENGLISH 07 Static Mode After clicking Apply button, signal lock status, signal strength and quality will be seen. With the signal lock status, you can find out if above setting is not correct or there is something wrong in environment setup. Please note that the Static mode must assign required PIDs First, you can see Tuner 1, 2, 3, 4 settings in the information, and you can choose any tuner out of those 4 tuners to change to the static mode. After choosing static mode, you can see frequency, symbol rate, polarization, multicast address, Pid list, and LNA: • Frequency: Frequency (MHz) of the transponders will be received by SAT>IP switch/server. • Symbol Rate: Symbol rate (Ksym/s) of the transponders will be received by SAT>IP switch/server • Polarisation: Polarisation of the transponders will be received by SAT>IP switch/ server • Multicast Address: it indicates the address of multicast streams. • Pid List: user has to input PAT, PMT, Video PID, Audio PID, EIT, NIT, and ETC. In order to see the program, user has to input at least PAT, PMT, Video PID, and Audio PID. • LNA: it amplifies strength of signal, and it is recommended to use default setting. 08 ENGLISH ENGLISH 09 8. System Status: (1) Tuner (all four tuners) and Streaming Status can be monitored in the function. Moreover, system status can help on the debug/clarification once an issue occurs. With this information, you can make sure the required signal is locked with correct setting in a correct environment, and also the connection status with a SAT>IP client. 9. UPnP Settings: The UPnP device name can be changed by using the function. It will be showed on client devices: 10.Administration: 10 ENGLISH ENGLISH 11 Specifications Export: The function helps users store all settings in the system, and it also helps on the debug/ clarification once an issue occurs in the field. For installation companies, they can adjust settings in their labs and then send the XML file to end users. The name of export file will be “satip_settings”. Specifications: Prozessor Flash RAM Ethernet Applikation Unterstützung DVB-S Eingänge USB Anschluss Stromversorgung Abmessungen STi7108 2200 DMIPS 1 MB NOR / 128 MB NAND 512 MB DDR3-1066 RJ45 10/100/1000 Elgato (zur Nutzung auf mobile Endgeräte) 4x (Anschluss mit Quattro o. Quad LNB) für Software Updates AC 100V~230 V DC 12 V 3 A 195 x 117x 40 mm (L/B/H) Note: Weight and dimensions are not absolutely exact values. Technical details can be changed at any time (according to manufacturer) without prior notice. Declaration of Conformity Import Settings: Users may not have enough information to adjust settings, so they can get updated settings from their installation companies and then import the updated settings. It collocates with Export Setting function, and the name of import file has to be “satip_settings”. Change Password: Users can change password by using the function. New password can be used when users login again. Reboot: This is SW reboot. Users can use the function without using power switch on device. 12 ENGLISH This complies with the following directives / standards is confirmed: Electromagnetic Compatibility Directive 2004/108/EG EN 55013: 2001 + A1: 2003 + A2: 2006 EN 55020: 2007 EN 61000-3-2:2006 + A1:2009 + A2:2009 EN 61000-3-3:2008 Low Voltage Directive 2006/95/EG EN 60065: 2002 + A1: 2006 + A11: 2008 ENGLISH 13 Status: v1.0 Juli 2013