1
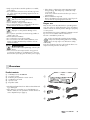
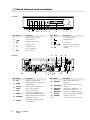
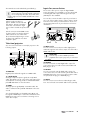
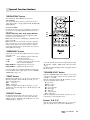
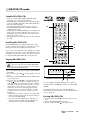
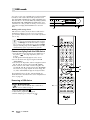
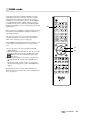
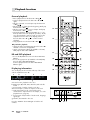
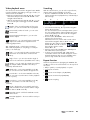
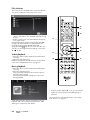
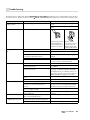
Technical Description and Operating Instructions IP 7000 BR BluRay receiver Contents General notes and information . . . . . . . . . . . . . . . . . 3 Notice . . . . . . . . . . Trademarks . . . . . . Original packaging . Complaints . . . . . . . Contact . . . . . . . . . . . . . . . . . . . . . . . . . . . . . . . . . . . . . . . . . . . . . . . . . . . . . . . . . . . . . . . . . . . . . . . . . . . . . . . . . . . . . . . . . . . . . . . . . . . . . . . . . . . . . . . . . . 3 3 3 3 3 Safety notes . . . . . . . . . . . . . . . . . . . . . . . . . . . . . . . 4 Overview . . . . . . . . . . . . . . . . . . . . . . . . . . . . . . . . . 5 Control elements and connections . . . . . . . . . . . . . . . 6 Setup and connection . . . . . . . . . . . . . . . . . . . . . . . . 8 Location tips . . . . . . . . . . Setting up the speakers . . . Center speaker . . . . . . . . Front speakers . . . . . . . . . Surround speakers . . . . . . Subwoofer . . . . . . . . . . . Rear speakers . . . . . . . . . Connecting the speakers . . Television/projector . . . . . Inputs for source devices . . FM antenna . . . . . . . . . . . Network/Internet . . . . . . . Connection to the grid . . . Remote control . . . . . . . . . Inserting batteries . . . . . . Functionality . . . . . . . . . . First activation . . . . . . . . . . . . . . . . . . . . . . . . . . . . . . . . . . . . . . . . . . . . . . . . . . . . . . . . . . . . . . . . . . . . . . . . . . . . . . . . . . . . . . . . . . . . . . . . . . . . . . . . . . . . . . . . . . . . . . . . . . . . . . . . . . . . . . . . . . . . . . . . . . . . . . . . . . . . . . . . . . . . . . . . . . . . . . . . . . . . . . . . . . . . . . . . . . . . . . . . . . . . . . . . . . . . . . . . . . . . . . . . . . . . . . . . . . . . . . . . . . . . . . . . . . . . . . . . . . . . . . . . . . . . . . . . . . . . . . . . . . . . . . . . . . . . . . . . . . 8 8 8 8 8 8 8 8 9 9 10 10 10 10 10 10 10 Basic functions . . . . . . . . . . . . . . . . . . . . . . . . . . . . . . 11 Sensor buttons . . . . . . . . . . . Activating and deactivating . Selecting a source . . . . . . . . Adjusting the volume . . . . . . Mute . . . . . . . . . . . . . . . . . . . . . . . . . . . . . . . . . . . . . . . . . . . . . . . . . . . . . . . . . . . . . . . . . . . . . . . . . . . . . . . . . . . . . . . . . . . . 11 11 11 11 11 Main menu . . . . . . . . . . . . . . . . . . . . . . . . . . . . . . . . 12 My Media . . . . . . . . Settings . . . . . . . . . “Display” menu . . . . “Audio” menu . . . . . “Language” menu . . “Network” menu . . . “System” menu . . . . “BD-Live Storage” . . “DivX® VOD DRM” . “Security” menu . . . . 2 . . . . . . . . . . . . . . . . . . . . . . . . . . . . . . • IP 7000 BR . . . . . . . . . . . . . . . . . . . . . . . . . . . . . . . . . . . . . . . . . . . . . . . . . . . . . . . . . . . . . . . . . . . . . . . . . . . . . . . . . . . . . . . . . . . . . . . . . . . . . . . . . . . . . . . . . . . . . . . . . . . . . . . . . . . . . . . . . . . . . . . . . . . . . . . . . . . . . . . . . . . . . . . . . . . . . . . . . . . . 12 13 13 13 14 14 14 15 15 15 Audio . . . . . . . . . . . . . . . . . . . . . . . . . . . . . . . . 15 Source . . . . . . . . . . . . . . . . . . . . . . . . . . . . . . . 16 Quick setup . . . . . . . . . . . . . . . . . . . . . . . . . . . . 16 Special function buttons . . . . . . . . . . . . . . . . . . . . . . . 17 “RESOLUTION” button . . . “SURROUND” button . . . . “TONE” button . . . . . . . . “LIPSYNC” button . . . . . . “SPEAKER LEVEL” button . . Buttons “A B C D” . . . . . . . . . . . . . . . . . . . . . . . . . . . . . . . . . . . . . . . . . . . . . . . . . . . . . . . . . . . . . . . . . . . . . . . . . . . . . . . . . . . . . . . . . . . . . . . . . . . . . . . . . . . . 17 17 17 17 17 17 Radio mode . . . . . . . . . . . . . . . . . . . . . . . . . . . . . . . . 18 Setting the radio stations . . . . . . . . . Station memory . . . . . . . . . . . . . . . Saving stations manually . . . . . . . . Saving stations automatically . . . . . Selecting stations from the memory . Deleting saved stations . . . . . . . . . . . . . . . . . . . . . . . . . . . . . . . . . . . . . . . . . . . . . . . . . . . . . . . . . . . . . . . . . . . . . . 18 18 18 18 18 18 BD/DVD/CD mode . . . . . . . . . . . . . . . . . . . . . . . . . . . 19 USB mode . . . . . . . . . . . . . . . . . . . . . . . . . . . . . . . . . 20 DLNA mode . . . . . . . . . . . . . . . . . . . . . . . . . . . . . . . 21 Playback functions . . . . . . . . . . . . . . . . . . . . . . . . . . 22 General playback . . . . . . . . . . BD and DVD playback . . . . . . . Displaying information . . . . . . . Video playback menu . . . . . . . Searching . . . . . . . . . . . . . . . . Repeat function . . . . . . . . . . . . File selection . . . . . . . . . . . . . . Video playback . . . . . . . . . . . . Music playback . . . . . . . . . . . . Image playback . . . . . . . . . . . AVCHD playback . . . . . . . . . . Playlist . . . . . . . . . . . . . . . . . . Including files in the playlist . . . . Playing the playlist . . . . . . . . . . Removing files from the playlist . . . . . . . . . . . . . . . . . . . . . . . . . . . . . . . . . . . . . . . . . . . . . . . . . . . . . . . . . . . . . . . . . . . . . . . . . . . . . . . . . . . . . . . . . . . . . . . . . . . . . . . . . . . . . . . . . . . . . . . . . . . . . . . . . . . . . . . . . . . . . . . . . . . . . . . . . . . . . . . . . . . . . . . . . . . . . . . . . . . . . . . . . . . . . . . . . . . . 22 22 22 23 23 23 24 24 24 25 25 25 25 25 25 Care and cleaning . . . . . . . . . . . . . . . . . . . . . . . . . . . 26 Troubleshooting . . . . . . . . . . . . . . . . . . . . . . . . . . . . . 27 Index . . . . . . . . . . . . . . . . . . . . . . . . . . . . . . . . . . . . 29 Protecting the environment . . . . . . . . . . . . . . . . . . . . 30 Technical data . . . . . . . . . . . . . . . . . . . . . . . . . . . . . . 30 General notes and information Notice The information in this document may change without prior notice and in no way constitutes any liability on the part of Lautsprecher Teufel GmbH. No part of these instructions may be reproduced in any form or be broadcasted in any way electronically, mechanically, by photocopy or recording without the written permission of Lautsprecher Teufel GmbH. © Lautsprecher Teufel GmbH Version 1.0, June 2013 Trademarks © All trademarks are the property of their respective owners. ABOUT DIVX VIDEO-ON-DEMAND This DivX Certified® device must be registered in order to play purchased DivX Video-on-Demand (VOD) movies. To obtain your registration code, locate the DivX® VOD section in your device setup menu. Go to www.divx.com for more information on how to complete your registration. Original packaging If you wish to exercise your eight-week right of return, we ask that you be absolutely sure to hold onto the packaging. We can only accept the return of a unit WITH THE ORIGINAL PACKAGING. Empty boxes are not available! Dolby Complaints Manufactured under license from Dolby Laboratories. Dolby, Pro Logic and the double-D symbol are trademarks of Dolby Laboratories. In case of complaint we will need the following information to process your enquiry: 1. Invoice number DTS Can be found on the sales slip (enclosed with the product) or on the order confirmation received as a PDF document, e.g. 4322543. Manufactured under license under U.S. Patent Nos: 5,956,674; 5,974,380; 6,226,616; 6,487,535; 7,392,195; 7,272,567; 7,333,929; 7,212,872 & other U.S. and worldwide patents issued & pending. DTS-HD, the Symbol, & DTS-HD and the Symbol together are registered trademarks & DTS-HD Master Audio | Essential is a trademark of DTS, Inc. Product includes software. © DTS, Inc. All Rights Reserved. 2. Serial number or batch number Located on the back of the unit, e.g. serial #: IL70009440122A-123 Many thanks for your support! Contact DivX®, DivX Certified® and associated logos are trademarks of Rovi Corporation or its subsidiaries and are used under license. Patents Protected by one or more of the following U.S. patents: 7,295,673; 7,460,668; 7,515,710; 7,519,274 ABOUT DIVX VIDEO For questions, suggestions or any other issues please contact our customer service department: Lautsprecher Teufel GmbH Gewerbehof Buelowbogen Buelowstrasse 66 10783 Berlin (Germany) Phone 00800 - 200 300 40 (toll-free) Fax: +49 (0)30 / 300 930 930 E-Mail: [email protected] www.teufelaudio.com DivX® is a digital video format created by DivX, LLC, a subsidiary of Rovi Corporation. This is an official DivX Certified® device that plays DivX video. Visit divx.com for more information and software tools to convert your files into DivX videos. • IP 7000 BR 3 Safety notes Caution icons You will find the following caution icons in these instructions: Danger High risk! Failure to observe the warning may result in severe personal injury or death. Attention Moderate risk! Failure to observe the warning may result in property damage. Minor risk! Points which should be observed when handling the unit. Safety notes Danger Risk of electric shock! Faulty installation of electrical equipment or mains voltage which is too high can cause electric shocks. • The device is exclusively suitable for mains voltage of 220 V – 240 V ~ / 50/60 Hz. Make sure that the mains voltage is correct. For more information, refer to the nameplate. • Check the unit regularly for damage. If the unit’s case or mains cable is defective or shows other signs of visible damage, disconnect the power plug immediately and do not operate the unit. • If the unit emits smoke or smells of burning or emits unusual sounds, disconnect it immediately from the power supply and do not operate it anymore. • The standby button does not disconnect the unit from the power supply. For this reason, set up the device so that the power plug is easily accessible and the vents are unobstructed. • Never open the unit’s housing. Repairs may only be carried out by an authorised specialist workshop. Only parts which conform with the original unit specifications may be used in this case. There are electrical and mechanical parts in this unit which are necessary in order to avoid exposure to sources of danger. • Do not insert any objects through the vent slots in the housing. • Only use the unit in indoor areas. • Do not operate the unit in damp areas and protect it from drops of water or splash water. Also take care not to stand vases or other containers filled with liquid on or near the speaker in order to avoid liquid getting into the case. If water or other debris penetrate the unit, immediately disconnect the power plug and, if necessary, remove any batteries. Then send the unit to our service address. • Never touch the mains adapter with damp hands. 4 • IP 7000 BR Danger Danger to children! Children can become trapped in the packing film when playing and suffocate. • Do not allow children to play with the unit or the packing film. Danger of suffocation. • Ensure that children do not remove small parts from the unit or take them off of the unit (e.g. control knobs or plug adapters). They could swallow the parts and choke. Never allow children to operate electrical units unsupervised. Danger Danger to eyes and skin! Opening the disc compartment with the lock deactivated will cause an invisible or visible laser beam to be emitted. • Do not look into the beam, even if you are using optical instruments. Danger to hearing! Extended listening at high volumes may lead to hearing loss. • To avoid damage to health, avoid extended listening at high volumes. • When the volume is set high, always keep a certain distance from the unit and never place your ear directly on the speaker. • Particularly when the subwoofer has been set to maximum volume and the unit is activated, very high noise pressure may suddenly be produced. This may have psychological consequences and also cause physical injury. Children and pets are particularly at risk. Set your signal source unit volume control to a low setting before turning on the power. Danger Danger of chemical burns! Leaking battery acid may lead to chemical burns. • Do not allow battery acid to come into contact with skin, eyes or mucus membranes. In case of contact with acid rinse the affected part immediately with plenty of plain water and if necessary see a doctor. Danger Danger of injury/damage! Incorrect location may result in damage. • Never use the units unmounted in vehicles, in unstable locations, on wobbly tripods or furniture, on underdimensioned brackets etc. The device could fall down and cause injury to persons or be damaged itself. • Place the speakers in such a way that they cannot be knocked over unseen and make sure that the cables do not pose a trip hazard. • If mounting the speakers on the wall, make sure that the job is carried out by a professional. • Only use suitable wall brackets for mounting. Verify the carrying capacity of the walls. • Only set up the device and the speakers on a stable, level surface. • Do not place the unit near sources of heat (e.g. heaters, ovens, other heat generating equipment such as amplifiers etc.). Danger Danger of explosion! Batteries and rechargeable batteries may explode if overheated. • Never attempt to charge normal batteries. • Do not expose batteries or rechargeable batteries to heat and never throw them in open fire. Attention Fire hazard! Improper use may lead to damage or fire. • Do not place open flames such as burning candles or similar on the unit. • Ensure sufficient ventilation. • Do not place the unit in direct sunlight. • Do not cover the vents with curtains, blankets, newspapers or similar. Heat build-up inside the unit can shorten its lifetime. Attention Risk of damage! External influences may damage or destroy the device. • If the unit is to be left unsupervised for a long period (e.g. during a holiday), or if a thunderstorm is forecast, disconnect the power plug from the mains power supply. • If the device is subjected to warm temperatures after being cold (e.g. after transport), condensation may occur inside of it. In this case, wait at least 2 hours before you connect and activate it. • Old used batteries may leak. Remove the batteries from the remote control if you do not use them for a prolonged period of time. Proper use Only use the unit as described in these operating instructions. Any other use will be deemed as not in accordance with the instructions and may lead to damage of property or even persons. The manufacturer accepts no liability for damage caused by use not in accordance with the instructions. The unit is intended for private use. Before operating the speakers please read the safety notes and operating instructions carefully. This is the only way to use all functions safely and reliably. Keep the operating instructions safe and pass them on to anyone who may own the unit after you. Overview Product contents a 1 x BluRay receiver IP 7000 BR b 1 x remote control c 2 x Battery micro/AAA for remote control d 1 x FM throw-out aerial e 1 x power cord f 6 x speaker cable • Check that all items have been delivered and that nothing is damaged. • If the delivery is incomplete or you find damage sustained in transit, do not operate the unit but contact our service department (see page 3). a b e c AAA AAA f d • IP 7000 BR 5 Control elements and connections Front side 12 Item Name 1 11 10 9 8 7 6 5 Description – 2 3 4 2 3 Item Name 1 Description Control dial for volume 8 Disc ejection button USB connection 9 Playback/pause Stop button Earphone connection 10 4 – Display panel 11 5 IR Infrared receiver 6 – Disc compartment 7 SRC Select a source / Skip button forward/back Switch the device on or to standby 12 Back side 13 14 15 16 – 25 Item Name 24 Description 13 FM Antenna connection FM 14 VIDEO Output jack for the TV/projector with FBAS video 15 Y CB/PB CR/PR Output jacks for TV/projector with component video 16 LAN Network connection 17 HDMI 1 + 2 Input jacks for digital source devices with a HDMI connection 18 HDMI OUT Output jack for TV/projector with a HDMI connection 19 AUX IN Input jacks for analogue audio source devices 6 • IP 7000 BR 23 22 21 20 19 18 Item Name 17 Description 20 AUX OUT Audio output jacks (stereo downmix) 21 RC/PRE OUT Audio output jacks for 7.1 rear channels 22 DIGITAL IN COAXIAL Input jack for digital audio signals via a Coax cable 23 DIGITAL IN OPTICAL Input jack for digital audio signals via optical lines (TOSLINK) 24 SPEAKER Speaker connections 25 – Connector jack for power cord Remote control Item Name 57 56 55 54 53 OSC 26 27 28 29 30 Description 26 TV/ARC Select TV as audio source 27 AUDIO SOURCE Select audio input 28 PROGRAM Player: Display options Radio: Save to station memory slots 29 POPUP MENU Access the popup menu 30 1...0 31 DELETE/CLEAR Delete button 32 – VOLUME + Increase/decrease volume 33 ▲▼◀▶ Navigation up, right, down, left 34 ENTER Select button Number buttons 35 52 31 32 33 34 51 50 49 48 47 46 45 44 35 ZOOM 36 37 38 39 40 41 42 43 Mute speaker 36 DISPLAY/RDS Additional display/RDS information 37 SUBTITLE STEREO/ MONO Video: Select subtitles Radio: Switch between stereo/mono 38 SPEAKER LEVEL Adjust the channel volume 39 TONE Adjust the sound 40 AUDIO Video: Configure the audio track 41 Playback/pause 42 / – PRESET + Audio/video: Skip back/forward Radio: Access the station memory 43 ABCD Control buttons for BD programs 44 / – TUNE + Fast rewind/forward Radio: Adjust the frequency 45 Stop playback 46 Open the disc compartment 47 SURROUND Surround settings 48 LIPSYNC Video: Set the audio delay 49 RESOLUTION Set the image resolution 50 REPEAT Adjust repeat 51 Skip back/exit the menu 52 AUTO SCAN SEARCH Player: Select the track, chapter, time Radio: Automatically save the station 53 DISC MENU Access the BD/DVD menu 54 MAIN MENU Main menu 55 RADIO Select “FM” radio (VHF) 56 AV SOURCE Select the audio/video source 57 Turn the device on or to standby • IP 7000 BR 7 Setup and connection Location tips Surround speakers • Select a stable, level base or a suitable wall. • Make sure that the environment is clean and free from dust. • Avoid placing the unit close to sources of heat or in direct sunlight. • Do not place any heavy objects on the cables, the speakers or the device. • The device should have approx. 10 cm of clearance on all sides to ensure adequate circulation of air. Setting up the speakers TV Front Center Subwoofer • The surround speakers are setup or hung to the side (a) or back (b) of the listener at a height of 1.20 m to 2.10 m. • There should be at least 100 cm distance to the listener. Subwoofer • The location of the subwoofer can be freely selected and does not influence the other speakers. However, do not place it in the corner of the room as this may result in irregular frequency overloads. A location between the front speakers is often ideal. Rear speakers Front The IP 7000 BR emits the rear channels via the jacks 21 “RC/PRE OUT” to set up a 6.1/7.1 system. You can connect an external stereo amplifier, active speaker or radio system (e.g. the RearStation 4) to it. Then the speakers are mounted behind (b) or above the viewers. Connecting the speakers Attention Risk of damage! Do not connect the unit to the mains yet! Stereo triangle (a) (a) Surround Surround (b) Surround/rear (b) Surround/rear Center speaker • Place the center speaker in a central position directly under the screen or ideally on a circular arc that is slightly curved towards the screen. You can also mount some speaker models directly on the wall using the keyhole on the rear panel. Front speakers • The front speakers are set up or hung to the right and left of the screen. • The speakers should be in line with the center speaker and form an equilateral triangle with the listener – the so-called stereo triangle (distance from the listener = distance between the speakers). • The speakers should project sound directly into the room or slightly towards the listener. 8 • IP 7000 BR Use the highest quality of speaker cords possible with a cross-section of at least 1.5 mm2 to connect to the speakers. You can order this type of cables in our webshop (www.teufelaudio.com) in the “Accessories” area. 24 – The connector terminals 24 “SPEAKER” for the six speakers are located on the back side of the receiver: Speaker Label Subwoofer SUBWOOFER Surround right SURR RIGHT Surround left SURR LEFT Center CENTER Front right FRONT RIGHT Front left FRONT LEFT The terminals are each marked red (+) and black (–). Make sure the polarity is correct! Connect the like coloured terminals. Otherwise the sound quality will suffer. The strands of the speaker single wire are marked with different colours or shapes. Split the single wire down to approx. 30 mm on both ends and strip approx. 10 mm of insulation off of each cord. Twist the single wire so that no strands are protruding. Inputs for source devices The receiver offers you two inputs for digital HDMI picture and audio sources (HDMI 1 + 2). An optical and coaxial digital audio input and analogue audio input (AUX IN) are also available. You can also connect the audio output of your television set to one of these audio inputs in order to listen to audio from the receiver when you watch television shows. See the operating instructions of your television set for more information. Turn the connector terminal 24 counterclockwise until loose. Run the stripped cable end into the now visible hole. Close the terminal by turning it counterclockwise. The cable has now been clamped in place. – 23 22 Television/projector You can connect a television set and/or projector to the following outputs: 14 15 19 17 17 HDMI 1 and 2 You can connect a source device with a digital picture and audio signal to each of these inputs. You will need a HDMI cable for this. Important You can only use these HDMI inputs if the playback device (TV or projector) is connected via HDMI. 20 18 18 HDMI OUT Digital picture and audio signals via a HDMI cable. 15 Y CB/PB CR/PR Analogue component picture signal via a triple RCA cable. Pay attention to the colour of the jacks (green, blue and red) when connecting. Audio is emitted via the RCA jacks 20 “AUX OUT” as stereo downmix. 22 COAXIAL You can connect the coaxial digital audio output of a source device here. You will need a coaxial cable with RCA plugs to do so. 23 OPTICAL You can connect the optical digital audio output of a source device here. You will need an optical cable with a TOSLINK plug for this. Your source device requires either an optical 3.5 mm plug or a TOSLINK plug. 19 AUX IN You can connect a source device with analogue audio here. You will need a stereo RCA cable for this (L and R). 14 VIDEO Analogue picture signal (FBAS) via an RCA cable. The audio is emitted via the jacks 23 “AUX OUT” in this case as well. You should preferably use the HDMI output 18 as only the signals of HDMI inputs 1 and 2 are emitted here. The HDMI inputs may not be used when connecting via one of the other outputs. • IP 7000 BR 9 FM antenna Remote control Danger Risk associated with lightning strike! If you use a roof or outdoor antenna, ensure that the antenna unit has suitable lightning protection. In order to operate the remote control, you will need two type AAA 1.5 Volt micro batteries (included in the product contents). Inserting batteries To receive FM/VHF stations, connect the antenna to the jack 13 “FM”. This may be a roof/outside antenna, but also a cable television connection. You will need a coaxial connector cable for this. If no antenna connection is available at the installation location, you can use the enclosed throw-out antenna d. Connect the antenna to the “FM” jack 13 and adjust the position of the throw-out aerial for optimal reception. Then fix the antenna in place with tape or a nail. 13 16 1.Gently push on the ridged surface of the battery compartment cover on the back of the remote control and push the lid down. Remove the cover. 2.If necessary, remove the old batteries (please observe the notes on page <?>). 3.Insert the batteries according to the image on the battery compartment; in the process, make sure the polarity is correct. 4.Place the cover back on the compartment and push it closed. Functionality Network/Internet The receiver requires a network connection for Internetbased functions (BD Live), media streaming (DLNA) and program updates. Connect your network or router to the jack 16 “LAN” using a network cable. Important The length of the network cable must not exceed 3 m. Connection to the grid 25 – • Connect the network jack 25 to a mains socket using the power cord mains cable e. 10 • IP 7000 BR The remote control relays the control signals by means of infrared light. For this, you will have to point the front of the remote control towards the receiver. Make sure that the infrared light is not obstructed by objects. Fluorescent lamps and energy-saving lamps installed in the direct vicinity may affect the functions of the remote control or impair them. First activation The first time you activate the IP 7000 BD, it will request the most important settings in “Quick setup”. You can change any of the settings later on. • Menu language – if applicable, select “English”. • TV resolution – you should select “Autom” when connecting the TV set via HDMI. Please observe the notes in the operating instructions for your TV set and the point “Resolution” on pages 13 and 17. • Aspect ratio – determines how videos in 4:3 format will be displayed on 16:9 screens and vice-versa (see “Aspect ratio” on page 13 for details). Basic functions Sensor buttons The buttons on the front of the receiver are illuminated sensor buttons: Lightly touching them will cause them to switch. Activating and deactivating • With the button 12 or 57 “ ”, you switch your receiver to the operational or standby mode. • The button 12 is illuminated in red in standby. Standby does not disconnect the device from the mains. Pull the mains plug out of the socket to completely deactivate it. OSC 12 57 Selecting a source ZOOM After turning the device on, the last used source device is selected. • With the “SRC” sensor button 7, switch the source in the following order: HDMI 1, HDMI 2, COAXIAL, OPTIICAL, AUX, FM (FM radio), MAIN MENU. • Or switch the source with the direct select buttons: 56 “AV SOURCE” – HDMI 1, HDMI 2, BD 55 “Radio” – FM 27 “AUDIO SOURCE” – COAXIAL, OPTICAL, AUX 7 4 1 The selected source is shown in the display panel 4. Playback of BD/DVD/CD, a USB stick or media server (DLNA) is started in the main menu under the item “My media” (see page 12). If you insert a CD, DVD or BluRay disc, it will start automatically (see page 19). 26 27 56 55 OSC You can switch to the audio signal of the TV set with the button 26 “TV/ARC”. Prerequisite: The receiver is connected to an ARC-capable HDMI input of the TV, the TV's CEC function (that is, “Viera Link”, “Anynet+”, “Simplink” or “Bravia Synch”) is activated just like the CEC function of the receiver (see page 14). 32 Adjusting the volume • Increase the volume: Turn the control 1 clockwise or push the “Volume” 32 button. • Decrease the volume: Turn the control 1 counter-clockwise or push the “Volume” button 32. The display panel 4 will show the selected volume in the range from -50 dB (quiet) to 10 dB (loud). 35 ZOOM Mute • You can turn off the audio with the button 35 “ ”. The notice “MUTE ON” will appear on the display panel 4. • Turn the sound back on: Push the button 35 “ ” again or adjust the volume. • IP 7000 BR 11 Main menu Most functions of your receiver are configured via the main menu. You can navigate through the menu with the remote control and it will be shown on the connected television set. Both devices must be turned on in order to view the picture from the receiver on the television set. To use the main menu: 1.Push the button 54 “MAIN MENU”. The main menu will open. 2.Select the desired menu with the navigation buttons 33 “▶” and “◀” and confirm with the select button 34 “ENTER”. The sub-menu will open. 3.Select the desired menu item with the navigation buttons 33 “▲▼◀▶ ” and confirm with the select button 34 “ENTER”. 4.You can open other sub-menus in the same manner and make settings. 5.To return to the previous menu, push the button 51 “ ” or the navigation button 33 “◀” several times. My Media Select data storage devices, servers and play lists for playback in this menu: USB1 BluRay Disc/ DVD Video/ CDDA/ Data Disc DLNA Server Playlist A USB stick or a USB hard-drive connected to the USB port 2 “ ” (see page 20). A BD, DVD or CD – the designation depends on the type and content of the disc (see page 19). DLNA media server connected via a network (see page 21). You can add tracks from a USB and BD/DVD/CD to this list in order to play them in a specific order (see page 25). More information on each menu item is displayed on the right side. After you select a data carrier or server, the available data and folders are shown in a list and can be selected for playback. 12 • IP 7000 BR 54 OSC 33 34 51 ZOOM Settings You can configure the settings of the device here. “Display” menu Here you can configure the settings for the connected image playback device (e.g. TV, projector): “TV Aspect Ratio” Configuring the display on the TV set: 16:9 Normal– 4:3 movies are displayed with the full height and black bars on the left and right side on a 16:9 TV set, which is optimal as with 16:9 movies. All movies are vertically stretched on a 4:3 device. 16:9 Full – 4:3 movies are displayed with the full height and stretched width on a 16:9 TV set, optimal for 16:9 movies. Both movie types are optimally rendered on a 4:3 TV which can be switched to 16:9 mode. 4:3 Pan&Scan – 16:9 movies are shown on a 4:3 television set in full height, but the sides are cut off. 4:3 movies are optimally rendered. 4:3 Letterbox – 16:9 movies are displayed on a 4:3 TV set with the full width, but black bars on the top and bottom and reduced resolution. 4:3 movies are optimally rendered. “Resolution” Set the resolution of the television set for HD playback. Possible values: Auto, 1080p, 1080i, 720p, 480p/576p, 480i/576i With “Auto”, the highest possible resolution is automatically selected. When the resolution changes, a window where you have to confirm the new resolution with “Yes” appears; otherwise it will switch back to the previous resolution after 15 seconds. You can also change this setting with the special function button “Resolution” 49 (see “Special function buttons” on page 17). “TV System“ Set the colour transfer system for the connected television set: NTSC – American standard, also suitable for playing PAL discs in NTSC – only suitable for NTSC-TVs. PAL – European standard, also plays NTSC discs in PAL – suitable for TVs without NTSC mode. Auto – automatic switching The colour standard is automatically selected corresponding to the inserted disc (DVD/BD). “HDMI Colour Space” Adjust colour playback to your TV set. Please closely follow the operating instructions for your TV set for this. Possible settings: Auto – automatic compensation. YCbCr (also referred to as YUV 4:4:4) – should only be used with corresponding suitable TVs. YCbCr422 (also referred to as YUV 4:2:2) – ideal for conventional HDMI televisions. Full RGB – 256 values per colour, for PC monitors). RGB (values per colour from 16 to 235, for HDMI TV sets, which display unclean colours with another setting). “HDMI Deep Colour” “Deep Colour” expands the colour range via HDMI; however, this function cannot be used by all TV sets. Auto – automatic setting. Off – e.g. for connecting via a video or component cables or if “Auto” displays incorrect colours. “HDMI 1080p 24Hz” Movies are saved on BluRay discs with the full resolution and 24 frames/second (1080p24). Not all television sets are capable of rendering such frame rates. Deactivate this option if the picture flickers or stutters excessively. However, BluRay discs will stutter slightly at regular intervals in this case. Note: 1080p are only emitted via HDMI. A maximum of 1080i is available at the component output regardless of this setting. “HDMI 3D” Activate and deactivate transmission of three-dimensional movies. “Audio” menu You can make special settings for audio processing here. “HDMI Out” Determines the audio output at the HDMI output 18 “HDMI OUT”. Possible values: PCM – The audio signal is mixed on 7.1 and transferred as PCM. Bitstream – Passes the data stream of the BluRay disc on unchanged. Bitstream Re-encode – Passes the data stream of the BluRay disc mixed and coded in a single data stream. Suitable for Dolby TrueHD and DTS-HD Master Audio. “Down Sampling” Determines the sampling rate of the audio signal. Possible values: 48 kHz – corresponds to CD quality 96 kHz – corresponds to DVD quality 192 kHz – no transfer (BluRay quality) “Dynamic range” This function is only active with Dolby Digital and increases the volume during excessively quiet passages and decreases it when they are too loud. Possible values: On, Off, Auto “Audio output” You should set which speakers are connected here: 2.0 Ch – only the front left and right speakers 5.1 Ch – all speakers are connected 7.1 Ch – additional rear center channels are connected via the jacks 21 “RC/PRE OUT” (see page 8). • IP 7000 BR 13 “Language” menu You can set the language for the system menus and for the playback of CD/DVD/BD here. OSD – language of the system menus Disc Menu – language of the DVD/BD menus* Disc Audio– language of the DVD/BD audio tracks* Disc Subtitles – language of the DVD/BD subtitles*. The setting “None” deactivates the subtitles. *) if available in the desired language “Network” menu Setting the network and Internet options. “Network Information” Provides an overview of current settings. The MAC address is the unchangeable identification of the Ethernet interface. All other values can be configured manually under “IP setting” (see below). “Connection Test” With this function, the IP 7000 checks whether there is a network connection and whether the Internet is available. “Successful” ore “Failed” will appear after completion, then push 34 “ENTER”. “IP Setting” Defining the network settings. Auto – Automatic determination of the required parameters. Prerequisite: An active DHCP server (e.g. a router). Manual– The IP address and all other values must be configured. Only a qualified professional should configure these settings. Use the number buttons on the remote control to make entries. • IP Address: The network address for the receiver consisting of four numbers each between 0 and 255, e.g. 192.168.001.100. • Subnet Mask: Based on the network mask, the receiver detects which addresses it reaches on its own network and which it only reaches via the gateway (router). Consists of four digits, each between 0 and 255, e.g. 255.255.255.0. • Default Gateway: Network address of the gateway (router), which monitors the connection to the Internet. • DNS1: Network address of the primary domain name server (DNS), which locates the corresponding IP address for domain names (e.g. www.teufelaudio.com). Comparable with a phone book. • DNS2: As before, is used when the primary DNS fails. This specification is optional. “BD-Live Connection” With many BluRay discs, you can download and view additional content from the Internet such as trailers, documentation or director's comments regarding the inserted movie via menu click. You can also participate in interactive online games or quizzes. Note: A USB stick with approx. 1 GB of free memory ”. must be inserted in the USB port 2 “ 14 • IP 7000 BR Here, you can specify whether BDs can use Internet access. Permitted – All BDs allowed. Partially Permitted – Only BD Live content, which has been certified (approved) by the content owner. Prohibited – Prevent access for all BDs. “Dlna” The IP 7000 BD is a digital media player (DMP) that complies with the specifications of the Digital Living Network Alliance (DLNA). If you operate a digital media server (DMS, also referred to as a DLNA server) on your network, the IP 7000 BD can play movies, music and images from this server (see page 21). This setting activates or deactivates the DMP. “System” menu “Screen Saver” This darkens the screen after a configurable period of inactivity, e.g. to prevent burn-in on plasma screens. Possible values: 5, 10, 15, 20 minutes. “Auto Off” After the screensaver activates (see above), the receiver waits for the configured period of time to elapse before automatically switching to standby. Possible values: 30 minutes, 60 minutes, never. “Disc Auto Playback” With this setting, you determine whether playback will automatically start or not after you insert a CD/DVD/BD. Possible settings: On (playback starts automatically, not possible with some BluRay discs), Off (playback does not start automatically). “CEC” If this function is activated, CEC-compatible devices are controlled by a control command via the HDMI connection. As a result, devices connected to the TV set are e.g. automatically activated and deactivated using the remote control for the television set. Possible values: On, Off. Note: Must be set to “On” to play back television audio using the ARC button (see page 11). “Firmware Update” If the receiver is constantly connected to the Internet, it will check every time it turns on whether an updated version of its operating software (“firmware”) is available and will initiate the update process after confirmation. You can manually load the update for your receiver via the Internet connection with this menu item by selecting “Network” and pushing 34 “ENTER”. Then follow the instructions on the screen. The update will take several minutes, during which time you may not turn off the device and interrupt the Internet connection. After the update, you reset the receiver to the default settings (see the following section). “Load Defaults” Here, you can reset all receiver settings to the default settings. After the reset, you will have to reconfigure your individual settings. “System Information” With this menu item, you can access the serial number and the status of your receiver's firmware. “BD-Live Storage” The BD Live function creates a folder “BUDA” stick for saving data on the USB. You can delete data here if the memory on your stick runs out. Information – Displays the available memory on the inserted USB stick or displays “No USB”. Erase BD-Live data – Clear the memory occupied by BD Live on the USB stick. “DivX® VOD DRM” You can find the DivX® VOD registration code for your IP 7000 BD here. You can register your device with this code in order to play DivX® videos protected by copyright or with copy protection. For more information, visit the website “vod.divx.com”. “Security” menu This menu time contains a child lock for BD/DVD playback. Some BD/DVDs are labelled for certain age groups and cannot be played back if a corresponding setting has been configured. Unfortunately, many BD/DVDs are not properly protected and even personally burned copies and video movies are not provided with this protection. You will need a four-digit password to change the setting. The default is “0 0 0 0” (the number zero four times). “Change Password” • First enter the current password with the number buttons 33 “1...0”. • Then enter the new password twice with the number buttons 33 “1...0”. Be sure to memorise the new password! You can reset the receiver to the default settings in an emergency (see the “System” menu). “Parental Control” Setting the protection level. Eight levels are available, which correspond to the recommendations of the MPAA (Motion Picture Association of America) for rating movies. This system only takes effect with American DVDs/BDs. You will be asked for a password in order to open this menu. Off – This turns protection off. All movies can be played back without restrictions. KID SAFE, Safe for kids. G All children and general guidance. PG Parental guidance. PG-13 Parents guidance for children under 13. PGR Parental guidance recommended. R Restricted viewing NC-17 No one 17 and under allowed. ADULTS, Adults only. Audio You can activate the sound system of the IP 7000 BD in this menu. “Level” You can increase or decrease the relative volume from “+10 dB” to “–10 dB” for each speaker. Select the “dB” value and change it with the navigation buttons 33 “▲▼”. FL – Front left Center – Center FR – Front right SR – Surround right RR – Rear right RL – Rear left SL – Surround links Sub – Subwoofer (also see the special button “SPEAKER LEVEL”, page 17.) “Test Tone” Volume adjustment with a test tone. As previously described with “Level”, you can increase or decrease the relative volume for each speaker. In the process, audio playback will be replaced by a test tone (a noise) whose volume can be adjusted using the volume controls 1 and 32 “Volume +/–”. The test tone mutes as soon as you leave the sub-menu. “Lipsync” Digital image processing in the television set requires some time. In order to keep the image and sound synchronous, television sets delay the sound by a few milliseconds. To ensure that the sound of your receiver is also synchronous, you can configure the audio delay for certain inputs from 0 to 200 ms here. (also see special button “LIPSYNC”, page 17.) “Tone” Here you can configure the sound within two ranges: Bass low tones Treble high tones You can configure either range from “–10 dB” (lower) to “+10 dB” (increase). (also see special button “TONE”, page 17.) “Distance” The surround sound effect may be corrupted if the speakers are positioned at different distances to the listening position. Set the distances from the listening position to each speaker from 0 to 400 cm in order to compensate these run-time differences. “Source Level” Here you can set the relative volume from –10 dB to +10 dB for each source in order to adjust different levels of the connected devices and of the tuner. • IP 7000 BR 15 Source “Audio Mapping” You can assign the audio inputs to the HDMI inputs here: Would you like to connect your PC or a source with DVI picture output via HDMI, but the sound card or the device only emit the sound via an optical output? Your IP 7000 BD is capable of doing this: Select the desired HDMI input and configure the desired audio input on the far right of the menu, which is “Optical” in this case. You can configure the player, one of the inputs or the radio receiver as a source here. Note: You can automatically start a CD, DVD or BluRay disc by selecting “BD”; you can start a data disc or USB playback from the main menu item “My media”. “HDMI Audio Out” This turns audio transmission at the HDMI output 18 “HDMI OUT” on and off. When playing back movies, you do not need to mute the television in the “Deactivate” position in order to hear sound from the receiver's speakers only. This setting first takes effect the next time the IP 7000 BD is turned on. This menu is automatically shown when using the device for the first time, after a firmware update or after a reset to the default settings. In a few steps, you can configure the default settings for language, display resolution and picture format here. For this, please follow the instructions on the screen (also see “First activation” on page 10). 16 • IP 7000 BR Quick setup OSC Special function buttons “RESOLUTION” button The “Resolution” button 49 has two functions: 1. Zoom factor You can change the zoom factor of the picture in this order during video or image playback: 2x, 3x, 4x, 1/2x, 1/3x, 1/4x, 1x 2. Screen resolution From the main menu, you can configure the resolution of the television set for HD playback with this button. Possible values: 480/576i, 480/586p, 720p, 1080i, 1080p, HDMI-Auto. HDMI-Auto automatically selects the highest possible resolution for your television set. Note: Only a resolution of 480/576p is available at the video output 14. Note: This function is also helpful if no picture appears after your television set was connected. Then push this button until the main menu becomes visible – always briefly wait until the TV has synchronised. Then you can make additional settings. 33 ZOOM 49 48 47 38 39 43 “SURROUND” button Pushing the “Surround” button 47 several times switches surround sound: 2.1 stereo Stereo playback with the subwoofer via the front channels. 5.1 Ch 5.1 channel surround sound. 7.1 Ch 7.1 channel surround sound (rear channels via external amplifier). Dolby PLII Movie Dolby® ProLogic II for movies. Dolby PLII Music Dolby® ProLogic II for music. Not all melodies are generally available. This depends on the available audio signal. (Also see menu “AUDIO/ SURROUND”, page 15.) “TONE” button With the button 39 “Tone”, you can access sound control. With the navigation buttons 33 “▲” and “▼” you can select the desired range: Bass low tones Treble high tones With the navigation buttons 33 “◀” and “▶”, you can configure the selected range from “–10 dB” (lower) to “10 dB” (increase). “LIPSYNC” button As with the menu function of the same name, you can configure the audio delay for certain inputs from 0 to 200 ms using the “LIPSYNC” button 48. (Also see menu “AUDIO/Lipsync”, page 15.) Select the desired input with the navigation buttons 33 “▲” and “▼” : HDMI 1, HDMI 2, BD, other Input (other inputs). Configure the desired delay with the navigation buttons 33 “◀” and “▶”. “SPEAKER LEVEL” button With the “SPEAKER LEVEL” button 38, you can increase or decrease the relative volume for each speaker from “+10 dB” to “–10 dB”. With the navigation buttons 33 “▲” and “▼”, you can select the desired speaker channel: FL – Front left Center – Center FR – Front right SR – Surround right RR – Rear right RL – Rear left SL – Surround links Sub – Subwoofer With the navigation buttons 33 “◀” and “▶”, you can configure the selected speaker level. Buttons “A B C D” With the coloured buttons 43 “A B C D”, you can navigate through the menus of interactive BluRay discs. • IP 7000 BR 17 Radio mode The radio is capable of receiving mono and stereo stations in a range from 87.5 to 108 MHz; RDS mode is also possible. Push the “RADIO” button 55 to activate radio as a source (also see page 11). 55 OSC Setting the radio stations With the navigation buttons 33 “◀” and “▶”, you can set the tuning frequency: • Automatically: Depressing the button for approx. one second initiates station scanning in the desired direction (then release the button) until the radio turns to the next station frequency with adequate transmission power. If you press and hold the button, the search will continue to run through all stations until you release it. • Manually: Each time you tap the button the frequency will be increased or decreased by 0.05 MHz. 28 30 52 31 The selected frequency will appear on the display panel 4 and on the screen. 33 34 If the station transmits an RDS signal, the name of the station and, if applicable, the radio text will appear on the display panel 4 and screen after a few seconds – you may first have to press the “RDS” button 36 for this. The program type will also be displayed on the connected screen. With the “RDS/Display” button 36, you can activate and deactivate the display of RDS information. ZOOM 36 37 In stereo mode, you may experience faults with weak stations. In this case, you should switch to mono mode by pushing the “Stereo/Mono” button 37. Station memory 44 42 Your radio can save 30 stations. You can conveniently select the saved stations with the push of a button. Saving stations manually • Set the desired station as described above. • Press the “Program” button 28. The number of the first available memory slot will blink on the display panel 4 and on the screen. • Enter the desired two-digit memory slot number using the number buttons 30 “1...0”. The memory slot number will stop blinking. The station has now been stored. Saving stations automatically • Push the button 52 “Search/Auto Scan”. Station scanning will start immediately. The radio will now search for stations with adequate transmission power and automatically save them. Previously saved stations will be deleted in the process. 18 • IP 7000 BR Selecting stations from the memory You can select the saved stations in sequence using the navigation buttons 33 “▲” and “▼” or the skip buttons 11 ” and “ ” or directly with the number buttons or 42 “ 30 “1...0”. Deleting saved stations Press the button 31 “DELETE/CLEAR” to delete the currently set station memory. BD/DVD/CD mode Suitable BDs/DVDs/CDs • Only use commercially-available BDs/DVDs/CDs, which have one of the adjacent symbols. • BDs/DVDs/CDs containing the files in the following formats are readable: CD audio, VCD, SVCD, DVD video, BD video, MP3 and JPEG. • The device plays DVDs with the country code “2”. • Normal BDs/DVDs/CDs with a diameter of 80 and 120 mm can be used. • Individually burned BDs/DVDs/CDs are normally readable, but an excessively high burning speed or “poor” blank-CDs may result in problems. The only solution is trial and error in this case. • CDs produced for commercial purposes cannot always be read. 54 OSC Handling BDs/DVDs/CDs Every BD/DVD/CD has a resistant plastic layer, which protects it against outside influences. However, you must always protect the disc against dirt and scratches. 33 34 Your receiver can compensate minor damages to the BD/ DVD/CD. Larger scratches or other damagesmay result in “hanging” or similar errors. Please also observe the notes for proper handling BDs/DVDs/CDs on the CD case! Playing BDs/DVDs/CDs ZOOM 46 Attention Risk of damage! Do not in any case insert multiple BDs/DVDs/ CDs on top of one another. Do not insert any other objects than BDs/DVDs/CDs. 1.Access the main menu by pressing the “MAIN MENU” button 54. 2.Press the button 8 or 46 “ ”. The tray 6 will eject to the front. 3.Carefully insert the BD/DVD/CD with the labelled side up in the tray recess. 4.Press the button 8 or 46 “ ” or the playback button 9 or 41 “ ”. The tray 6 will close and the disc will be read. Depending on the setting and the disc, playback will automatically start after a few seconds or a menu will appear (see “File selection” on page 24). If you load a disc, which was already played, a window will appear where you can select whether you want to continue from the last position viewed or from the beginning. • If the main menu appears, select the item “My media” with the navigation buttons 33 “◀” and “▶” and press the select button 34 “ENTER”. • Now select the item “BluRay disc”, “DVD video” or “CD-DA” with the navigation buttons 33 “▲” and “▼” and press the select button 34 “ENTER”. 8 6 You can navigate through the BD/DVD menus with the navigation buttons 33 “▲▼◀▶” and the select button 34 “ENTER”. The playback functions for disc, USB and DLNA are identical and are described in the section “Playback functions” on page 22. Ejecting BDs/DVDs/CDs 1.Press the button 8 or 46 “ ”. The tray will eject to the front. 2.Remove the BD/DVD/CD from the tray. 3.Press the button 8 or 46 “ ”. The tray will close. • IP 7000 BR 19 USB mode Your new receiver can read USB memory sticks and USB hard drives with a USB 1.0 and 2.0 specification and play back JPEG and PNG photos, MP3 and WMA music files and videos in the formats MP4, AVI, WMV, Ts/M2TS, DivX/DivXHD, VOB, MPG/MPEG and MKV which were saved there. It is also possible to directly connect various camcorders and play back AVCHD movies saved on them. 10 Handling mobile storage devices 2 USB sticks are sensitive electronic devices and must be handled accordingly. If you do not use your memory, you should be absolutely sure to close it with a protective case or cap. Important Do not use any storage devices with mechanical damages or which have fallen in a liquid. Do not expose such storage devices to direct sunlight. Improper handling may result in data loss! If possible, create backup copies of your music on your PC. 54 OSC Connect and play back the USB device 1.Insert the USB stick or the plug of your USB device in the jack 2 “ ”. The plug only fits the jack in one position. A USB symbol will briefly appear on the screen. 2.Access the main menu by pressing the button 54 “MAIN MENU”. 3.Select the item “My media” with the navigation buttons 33 “◀” and “▶” and press the button 34 “ENTER”. 4.Now select the item “USB1” with the navigation buttons 33 “▲” and “▼” and press the button 34 “ENTER”. File selection (see page 24) with the items Image, Music, Video and AVCHD will appear shortly thereafter. 33 34 The playback functions for disc, USB and DLNA are identical and are described in the section “Playback functions” on page 22. ZOOM Removing a USB device Attention Risk of damage! Never remove the USB device while the receiver is still accessing it! 1.Press the button 10 or 45 “ ”. 2.Wait until the playback has stopped. 3.Pull the USB plug out of the jack 2 “ 20 • IP 7000 BR ”. 45 DLNA mode The Digital Living Network Alliance (DLNA) is a trade organisation formed by companies from the computer and entertainment industry, which develop common standards for connecting these devices. The IP 7000 BD is a “Digital Media Player” (DMP) certified according to DLNA and can connect with any local DLNA Digital Media Server (DMS) via the network and play any media available there. 54 OSC DMS programs are available for all PC operating systems and certain network hard-drives (NAS) also feature corresponding functions. You require such a server on your network for DLNA operation and DLNA operation must be activated (see “dlna” in the “Network” menu on page 14). The IP 7000 BD automatically searches for DLNA servers on the network and displays them in the “My media” menu. 33 1.Access the main menu by pressing the button 54 “MAIN MENU”. 3.With the navigation buttons 33 “◀” and “▶”, select the item “My media” and press the “ENTER” button 34. DLNA servers are listed with this symbol and their name. 4.Now select the DLNA server with the navigation buttons 33 “▲” and “▼” and press the “ENTER” button 34. Shortly afterwards, the file selection (see page 24) with the items Image, Music, Video and AVCHD will appear. 34 ZOOM The playback functions for disc, USB and DLNA are identical and are described in the section “Playback functions” on page 22. • IP 7000 BR 21 Playback functions General playback • Pause playback: Press the button 9 or 41 “ ”. • Continue playback: Press the button 9 or 41 “ ” again. • Play the next track or next chapter: Tap the button 11 or 42 “ ”. • Play the track or chapter from the beginning: Briefly tap the button 11 or 42 “ ”. • Play the previous track or previous chapter: Briefly tap the button 11 or 42 “ ” twice. • Fast track playback: Tap the button 44 “ ” or “ ”. Each tap will increase the playback speed: 2x, 4x, 8x, 16x, 32x. Playback is without sound; you will see the elapsed time for the track on the display panel 4. Press the button 9 or 41 “ ” to continue normal playback. • Stop playback: Press the button 10 or 45 “ ”. OSC 53 30 52 Only with video playback: • Switch the audio track (language): Press the button 40 “AUDIO” several times if applicable. • Switch or deactivate subtitles (if available on the BD/ DVD): Tap the button 37 “SUBTITLE”. • Access the BD/DVD menu: Press the button 53 “DISC MENU”. • Access the popup menu (if available on the BD/DVD): Press the button 29 “POPUP MENU”. Continue playback: Press the button 29 “POPUP MENU” again. Displaying information You can display an info window at the top of the screen with the “DISPLAY” button 36: b c f 33 34 51 BD and DVD playback a d 50 ZOOM 40 41 44 42 e g Press the “DISPLAY” button 36 again to hide the info window. • IP 7000 BR 36 37 46 45 a Active function, playback in this case b Media type (BD, DVD, VCD, data disc) and video file format c Current track / number of tracks on the disc d Current chapter / number of chapters in the track e Total elapsed time for the current track (can be switched to the elapsed time for the chapter, see video playback menu, page 23) f Current audio track/number of audio tracks, language, signal type g Subtitles, deactivated in this case 22 28 29 11 10 9 Video playback menu Searching You can access a menu with the “Program” button 28 during video playback. Depending on the type of video, not all menu items are available. • With the navigation buttons 33 “▲” and “▼”, select the desired item and press the button 34 “ENTER” or the navigation button 33 “▶”. • With the navigation buttons 33 “▲” and “▼”, you can now select an option and trigger it with the “ENTER” button 34. With the search function, you can select a specific time, chapter and/or track (if available on the disc). • Press the “SEARCH” button 52. The info window will appear and the area e (elapsed time) is indicated by a blue rectangle: Number of the current file/number of files in this folder – you can select another file for playback. Current track/ number of tracks – you can select another track. Current chapter/total chapters – you can select another chapter. Elapsed time – you can switch between track and chapter time and between elapsed time and remaining playback time. (Playback) mode – select between normal or random playback, for everything, for a chapter (“CH”) or for tracks (TT). Audio – you can switch the audio track here (to the extent there are several tracks contained in the video). Angle of view – you can select another angle of view for the camera here (if available in the video). Subtitles – you can switch the subtitles here (if there are multiple subtitles available in the video) or completely deactivate them. Subtitle style – to the extent available on the BD, you can select how the subtitles will appear here. Second video – to the extent available on the BD, you can start a second instance of video playback (picture in picture). Second tone – to the extent available on the BD, you can activate a second audio track (e.g. comments). a b c f d e g • Select the desired area (c, d or e) with the navigation buttons 33 “◀” and “▶”. You can switch between the total elapsed time (“TT” in the clock symbol) and the elapsed chapter time (“CH” in the clock symbol) in the area e with the navigation buttons 33 “▲” and “▼”. • Press the button 34 “ENTER”. Yellow arrows will appear in the selected area. Switch between hours, minutes and seconds in the e area with the navigation buttons 33 “◀” and “▶”. Change the value with the navigation buttons 33 “▲” and “▼” or enter a desired value with the number buttons 30 “1...0”. • Finish by pressing the “ENTER” button 34. Playback will start from the selected position. • To abort, press the button 51 “ ” or 52 “Search” several times until the info window disappears. It automatically disappears after you press “ENTER” (in the previous step) or after 10 seconds of inactivity. Repeat function Switch the repeat functions by tapping the “REPEAT” button 50; you will see the selected function on the top left of the screen: • Off (no symbol) – normal playback, no repeat • repeat current file • repeat current chapter (only BD/DVD) • repeat current track (only BD/DVD) • repeat everything Bit rate – displays the current transfer rate for the audio and video stream is (switch with the navigation buttons 33 “▲” and “▼”). Immediate search – will fast forward 30 seconds without audio. Immediate playback – the movie will be reset by 8 seconds. • IP 7000 BR 23 File selection The content of discs and USB sticks, on which media files are saved, will appear in a browser on the screen. OSC • The left column will display the folders “Images”, “Music” and “Videos”, also “AVCHD” with USB storage devices. • Details concerning the selected media file will appear in the right column. Navigate through the folders with the buttons 33 “▲▼” and open the desired folder or initiate playback of a media file by pressing the “ENTER” button 34. will take you back one folder. You The highest folder can also use the navigation buttons 33 “◀” or the button 51 “ ” for this. Video playback • Open the “Video” folder and the desired sub-folder if necessary. • Open the desired video file. Playback will start. The possible functions are described in the section “Playback functions” on page <?>. 28 29 30 52 33 34 51 50 ZOOM 36 Music playback • Open the “Music” folder and the desired sub-folder if necessary. • Open the desired music file. The track and all subsequent music tracks located in the folder will be played. The following information will appear on the screen during playback: • Using the number buttons 30 “1...0”, you can enter the number of a track, which will immediately begin to play then. Track number/number of tracks, elapsed time, file type, total time and, to the extent present, track name, artist, album, genre and picture of the album. 24 • IP 7000 BR The other functions are described in the section “Playback functions” on page 22. Image playback Playlist • Open the “Image” folder and the desired sub-folder if necessary. • Open the desired image file. The image and all following images from the folder will be shown in sequence as a slide show on the TV set. • With the “RDS/Display” button 36, you can display an info window: You can save multiple files from USB and disc media on the playlist, which are played in order. As soon as the USB or disc medium is removed, the corresponding files are deleted from the playlist. • Rotate image: Press the buttons 33 “►” or “◄”. • Flip the image vertically or horizontally: Press the buttons 33 “▲” or “▼”. • With the button 34 “ ”, you start and interrupt automatic playback (slide show). • With the number buttons 30 “1...0”, you can enter the number of an image, which is then immediately shown. With the “PROGRAM” button 28, you can access the slide show menu: • Select the desired item with the navigation buttons 33 “▲” and “▼” and press the “ENTER” button 34. • With the buttons 33 “▲” and “▼”, you can now select an option and trigger it with the “ENTER” button 34. Number of the current file/number of files in this folder – you can select another file for playback. (Playback) mode – choose between normal or random playback. Slide show– image display duration: 3, 9, 18 seconds: Select with the “ENTER” button 34 Transition (only when the slide show is running): Select with the “ENTER” button 34 AVCHD playback The video format AVCHD (“Advanced Video Codec High Definition”) is a recording format for digital cameras developed by Sony and Panasonic. If your camcorder records videos in AVCHD format and has a USB port, you can connect the device directly to the IP 7000 BD (please consult the operating instructions of the device for this). You can also play AVCHD archives on the USB stick or USB hard-drives: • Open the “AVCHD” folder. Playback will start. If a menu movie exists, it will be the first to be played, then the saved recordings will play in order. • You can access the menu movie with the “DISC MENU” button 53. Including files in the playlist • Select the desired image, music or video file in the file selection (do not start playback yet). • Press the “POPUP MENU” button 29. A small menu will appear. Select the options with the navigation buttons 33 “▲” and “▼”. • Select “Add to playlist” and press the “ENTER” button 34. The file has now been added to the playlist. If you press the “POPUP MENU” button 29 again, you have the following possibilities: • With “Select all”, you select all files in the current folder with a red checkmark. • You can activate and deactivate the mark for individual files with the navigation button 33 “►”. • You can remove all marks with “Delete everything”. • You can perform the function “Add to playlist” for all marked files as described above. In this way, you can add more files to the playlist. Then press the button 51 “ ” several times until the main menu appears on the screen. Playing the playlist 1.Select “My media” on the main menu and press the “ENTER” button 34. 2.Select “Playlist” in the file selection and press the “ENTER” button 34. 3.Select the desired folder “Image”, “Music” or “Video” with the navigation buttons 33 “▲” and “▼” and press the “ENTER” button 34. 4.Select the first file and start playback with the “ENTER” button 34. The file and all subsequent files located in the folder will be played back. Removing files from the playlist • Select a file in the playlist or mark several files as described above. • Press the button 29 “POPUP MENU”. • Select the item “Delete from playlist” in the small menu and press the button 34 “ENTER”. The file/files have now been removed from the list. The files are not deleted from the USB stick in the process. The IP 7000 BD is also capable of playing AVCHD folders on discs (CD, DVD), so-called AVCHD discs or miniBDs. The movie is automatically played after the disc has been inserted. After it stops, a “AVCHD” disc symbol will appear on the main menu under the “My media” item. The other functions are described in the section “Playback functions” on page 22. • IP 7000 BR 25 Care and cleaning Clean your receiver regularly with a soft, damp microfiber cloth. Please be absolutely sure to observe the following notes in the process: Danger Risk of electric shock! In contact with live parts, water can lead to electric shock or short circuit. • Make sure that no liquids penetrate the unit. • Disconnect the mains plug before cleaning. Attention Risk of damage! Using the wrong cleaning materials may damage the delicate surface of the case. • If possible, only use plain water without any additives. In case of stubborn marks, a mild soap solution may be used. • In no circumstances should caustic cleaning products, white spirit, thinners, petrol or similar be used for cleaning. 26 • IP 7000 BR To clean your BluRays/DVDs/CDs Only use cleaners, which have been exclusively approved for CDs, to clean your CDs. If necessary, carefully wipe off the CD with a soft, lint-free cloth from the center to the edge. In the process, hold the CD between your index finger and thumb of your other hand. If your hand comes in contact with the playback side of the CD, this may cause playback problems. Troubleshooting The following notes and further detailed information on our website should help you to rectify malfunctions. If this does not lead to success, please contact our hotline 00800 - 200 300 40 (toll-free). Please also observe the warranty notes. Problem Device is not working, the display is dark. Possible cause No power supply. Fuse is defective. Solution Make sure the power plug is properly positioned. Check the function of the socket with another device. 1. 2. Disconnect the power cord. Carefully pull the fuse holder out of the mains connection. No playback of CD/DVD/ BD. No picture. Picture is fuzzy/distorted. “No disc” on the display. Skipping to the next track or chapter does not work. Push the old fuse down and out. Insert a new fuse (6.3 A delayed action) and push the holder back. No disc has been inserted. Disc has been inserted upside down. Insert a CD/DVD/BD. Insert the disc with the labelled side facing up. The region code of the DVD/BD does not Insert a DVD/BD with a corresponding region correspond to that of the device. code (2). The CD/DVD/BD is damaged or dirty. Clean or change the disc. Condensation in the device. Take out the disc and do not use the device for one to two hours while activated. The television set has not been turned on. Turn on the television set. An incorrect AV input has been selected Select a suitable AV input on the television on the television set. (e.g. HDMI 1). Incorrect HDMI resolution has been config- Check the settings and change if applicable ured on the receiver. (see page 19 “Resolution button” and page 13 “Display menu”). To obtain a picture, create a video connection to the TV set with the VIDEO jack 14 (see page 9) if necessary. The connector cable is incorrectly wired or Correct the cable connections. loose. Connector cable is damaged. Replace the connector cable. CD/DVD/BD is damaged or dirty. Clean or change the disc. The incorrect colour standard (PAL/NTSC) Reset the colour standard (PAL/NTSC) (page has been set on the television set or 13). PAL is the correct standard in Germany receiver. and Western Europe (except from France). Disturbance caused by intermediary deConnect the devices directly. vices, e.g. video recorder. The image format of the receiver is incorCorrectly configure the image format (see rectly configured. page 13). CD/DVD/BD is damaged, dirty, incompat- Clean or change the disc. ible or inserted upside down. Some BD/DVDs do not permit skipping, for Continue playback. example during the initial warning notice. The BD/DVD only has one chapter. Alternative: Fast playback. • IP 7000 BR 27 Problem No sound or not all audio channels are audible. Possible cause Speaker wired incorrectly. Audio settings are not correct. Incorrect disc audio track selected. Receiver muted (“MUTE”). No or disrupted music playback. The remote control is not working. BD Live function disrupted. Playback speed has been accelerated or slowed down. Files with a format other than MP3 or WMA are located on the storage device. File damaged. No clear line of sight between the remote control and the device. Remote control not properly aligned. Batteries have been inserted in the remote control with improper polarity. Batteries in the remote control have been used up. No Internet connection. No USB stick has been inserted. BD Live storage full. There are many parameters in the menu functions, which complicate or even prevent normal operation if the settings are incorrect. If you receiver is acting “unusually”, you can restart the device: 1.Press the button 12 “ ” on the device to turn it off. 2.Wait until the button 12 “ ” is illuminated in red. 3.Disconnect the power plug. 4.Wait 10 seconds, then insert the mains plug back in the socket. 5.Press the button 12 “ ” again to turn on the device. If that doesn't help, you can reset the receiver to the default settings. This will reset all parameters to the default values (see the “System” menu on page 15). 28 • IP 7000 BR Solution Check the wiring and correct it. Correctly configure the audio (see page 13 and 16). Press the button 40 “Audio” and select another audio language. Press the button 35 “ ” to disable the mute function. Switch to normal playback with the button 41 “ ”. Delete or skip the incorrect files. Remove the obstacle. Point the remote control towards the device. Insert the batteries the right way around (see visual explanation in the battery compartment). Insert new batteries. Test the network settings and correct them if necessary (page 14). BD Live requires a USB stick with 1 GB of capacity. Check the storage and clear if necessary (page 14). Index Symbole I S 16:9/4:3 13 Images 24 Internet 10 IP address 14 Saving stations automatically 18 manually 18 Selecting a source 11 Sensor buttons 11 Setting the radio stations automatically 18 manually 18 Slide show 23 Sound control 15, 17 Source devices 9 Speakers 13 Station memory 18 Subnet mask 14 Surround 17 Surround sound 17 synchronous 15 A Activating 11 Audio Delay 15, 17 Audio transmission 16 B Batteries insert 10 BD 19 BD Live memory 15 BUDA folder 15 C CD 19 Child lock 15 coaxial 9 Component 9 Connecting 8 Television 9 Connection to the grid 10 Country code 19 D Deactivating 11 Default settings 15 Digital Media Server 14 Distances 15 DLNA 14 DVD 19 Country code 19 Ejecting 19 E Enlarge the image 17 Ethernet 14 F Faults 27 FBAS 9 File selection 24 Firmware 14 L Letterbox 13 M MAC address 14 Media files 24 Media server 14 Music 24 Mute 11 N Network 10, 14 NTSC 13 O T optical 9 Optical 9 Test tone 15 TV aspect ratio 13 TV standard 13 P U PAL 13 Pan Scan 13 Password 15 Pillar box 13 Playback 22 Product contents 5 Update 14 USB 20 USB stick Inserting 20 Playing back 20 Removing 20 Q V Quick setup 10 Videos 24 Volume 11 relative 15, 17 R Radio 18 RDS 18 Rear center 8 Remote control 7 Inserting batteries 10 Repeat 23 Repeat function 23 Resolution 17 W Wide screen 13 Z Zoom factor 17 H HDMI 9, 16 HDMI audio output 16 HDMI Out 9 HD resolution 13 • IP 7000 BR 29 Protecting the environment Batteries and rechargeable batteries Disposal of the unit Batteries and rechargeable batteries must not be disposed of with household waste! Every consumer is required by law to bring all batteries and rechargeable batteries, whether they contain harmful substances*) or not, to a collection point run by the communal authority or borough or run commercially, so that they can be disposed of in an environmentally friendly manner. Please only hand in fully discharged batteries and rechargeable batteries! Used units must not be disposed of with household waste! If the unit is no longer operational, every consumer is required by law to dispose of used units separately from household waste, e.g. at a collection point run by the communal authority/ borough. In this way it is ensured, that used units are properly recycled and that negative consequences on the environment are avoided. For this reason, electrical equipment is labelled with the icon shown here. *) labelled with: Cd = Cadmium, Hg = Mercury, Pb = Lead Technical data Operating voltage: 220–240 V~, 50/60 Hz Dimensions (W x H x D): Net weight: 38.5 x 38.5 x 10.7 cm 4.7 kg Technical changes reserved! You can find further technical data on our website. This product complies with the directives of the Council of the European Community 2004/108/EC and 2006/95/EC. 30 • IP 7000 BR • IP 7000 BR 31 For questions, suggestions or other issues please contact our customer service department: Lautsprecher Teufel GmbH Gewerbehof Buelowbogen - Aufgang D1 10783 Berlin (Germany), Buelowstr. 66 Tel.: 00800 200 300 40 (toll-free) Fax: +49 (0)30 - 300 930 930 www.teufelaudio.com No liability is accepted for the accuracy of this information. Technical changes, typographical errors and other errors reserved. Instruction No. 92308 GB 20130610