1
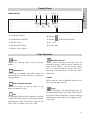
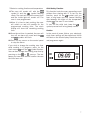
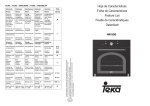
Feature List
Hoja de Características
Foglio funzionalità
Feuille de Caractéristiques
Datenblatt
F45 CONXT
Control Panel
1
2
3
4 5 6 7
ENGLISH
Model HK-800
9 8
11 Cooking Functions
16 Sensor
12 Temperature Indicator
17 Sensor
13 Electric Clock
18 On / Off
14 Temperature Sensor
19 Inside Light
/ Child Safety Function
15 Electric Clock Sensor
Oven Functions
Pizza
Special for cooking pizzas, pasty and fruit
cakes.
Conventional
It is used for sponges and cakes where the
heat received must be uniform to achieve a
spongy texture.
Grill and Lower element
Special for roasts. It can be used for any
piece, whatever its size.
Grill
For preparing dishes with superficial roasting.
It allows the outer layer to be browned without
affecting the inside of the food. Ideal for flat
food, such as steaks, ribs, fish, toast.
MaxiGrill with fan
Allows uniform roasting at the same time as
surface browning. Ideal for grills. Special for
large volume pieces, such as poultry, game
etc. It is recommended to put the item on a
rack with a tray beneath to collect the stock
and juices.
Caution
While using the Grill or MaxiGrill with fan, the
door must be kept closed.
Turbo
The fan distributes the heat produced by an
element located at the rear of the oven. Due to
the uniform heat distribution, it allows roasting
and baking to take place at two heights at the
same time.
3
Conventional with fan
Appropriate for roasts and cakes. The fan
spreads the heat uniformly inside the oven.
Defrosting
Lower element
Heats only from beneath. Suitable for heating
dishes and raising pastry and similar.
Recommendations for thawing out frozen food
Frozen food can be thawed out using a system
of hot air with two power levels: HI for all kinds
of meat and LO for fish, pastry and bread.
When the thawing function has been chosen,
the HI and LO levels can be selected with the
temperature selection control. The level chosen appears on the temperature display.
• Unpacked food should be placed on the
oven tray or in a receptacle suitable for use
in ovens.
• Large pieces of meat or fish should be thawed out on an oven rack, placing the oven
tray underneath to collect the resulting
liquid.
• Meat and fish do not need to be thawed out
completely before cooking, and can be cooked when the surface is soft enough for
seasoning.
• Once thawed out, food should always be
cooked.
Consult the following table for thawing times and the required thawing level:
LO LEVEL
HI LEVEL
FOOD
Weight
Time
Weight
Time
Bread
1 lb
35 min
Cakes
1 lb
25 min
Fish
1 lb
30 min
Fish
2 lb
40 min
Chicken
2 lb
75 min
Chicken
3 lb
90 min
T-bone steak
1 lb
40 min
Minced meat
1 lb
60 min
Minced meat
2 lb
120 min
The times given above are only an indication. Thawing times depend on room temperature, the
weight of the frozen food and the degree to which it is frozen.
4
Caution
The electronic clock features Touch-Control
technology. To operate, simply touch the glass
control symbols with your fingertip.
Caution: this preheating function turns on the
turbo motor at the back of the top oven cavity.
The touch control sensitivity continuously
adapts to changing conditions. Ensure that the
glass front of the control panel is clean and free
of any obstacles when turning on the oven.
6 Press on the Off sensor
If the clock does not respond correctly when
you touch the glass, you will need to turn off
the oven for a few seconds and then turn it
back on. By doing this, the sensors adjust
automatically and will react once more to
fingertip control.
Setting the Electronic Clock
When turning your oven on, you will see the
clock flashing 12:00
. Set the clock by
touching the
or
symbols on the glass.
You will hear 2 beeps confirming the time has
been set.
If you want to change the time, touch the clock
sensor
until the indicator flashes
.
Change the time by touching the
or
sensors. The two beeps you hear after that
will confirm the new time has been set.
Manual Operation
After setting the clock, the oven is ready for
use:
1 Press the On sensor
.
2 Press on the desired cooking function
symbol.
3 The temperature display
will show the
preset temperature for that cooking
function. Press on the temperature sensor
to change it. Select the desired
temperature by pressing on the
or
sensors.
4 The top oven cavity will start to heat up.
will start
Functions
and)
the fast preheating function for a few
minutes. The oven will beep when it reaches
the selected temperature.
5 During oven heating, the o display will flash
to show that the food is being heated.
to stop cooking.
Caution
When cooking has finished, you will notice that
oven cooling feature will work until the temperature inside the oven has been suitably lowered.
Oven Lighting
The inside light will go on:
–When the oven door is open. If the door is not
closed after a certain time, the light will turn off
to reduce power consumption.
–When any cooking function is selected. The light
will turn off after a certain time.
If you want to turn the light on during cooking,
just touch the Oven Light sensor
. If you keep
your finger on this sensor for a few seconds, the
light will stay on throughout cooking.
Electronic Clock Functions
Cooking Time: This function allows you to
programme cooking time length, after which the
oven will turn off automatically.
Cooking Stop Time: This function allows you to
programme the time for cooking to stop, after
which the oven will turn off automatically.
Cooking Time and Cooking Stop Time: This
function allows both cooking time length and the
stop time to be programmed. With this function,
the oven switches on automatically at the set
time and operates for the cooking time it has
been programmed for. It switches itself off
automatically at the entered stop time.
Timer Alarm: A beep will go sound when the set
time has finished, whether the oven is on or off.
Child safety: This function locks the oven,
preventing small children from playing with it.
5
ENGLISH
Using the oven
Programming the Timer Alarm
Programming the Cooking Stop Time
1 Press on the clock sensor
several times
until the symbol
lights up.
1 Press on the clock sensor
several times
until the symbol
lights up.
2 Select the length of time after which you
want the alarm to sound by pressing on the
or
sensors.
2 Select the cooking stop time by pressing the
or
sensors.
3 You will then hear two beeps, the display will
show the time left before the alarm sounds
and the symbol
will flash slowly,
indicating that the timer has been set.
4 Once the programmed time has passed, an
alarm will sound and the symbol
will
begin to flash more quickly.
5 Press on any sensor on the control panel to
stop the alarm.
You can change the programmed time
whenever you want by touching the clock
sensor
until the symbol
flashes, and
then touching the
or
sensors. The two
beeps you hear after that will confirm the new
time has been set.
3 Two consecutive beeps will then sound and
the display will show the remaining cooking
time. The
symbol will flash slowly to indicate that the oven will switch itself
automatically.
4 Select a cooking function and temperature.
5 Once it is the set time, the oven will turn off,
an alarm will sound and the
symbol will
flash more quickly.
6 Press on any sensor on the control panel to
stop the alarm.
You can change the programmed cooking stop
time at any moment by pressing on the clock
sensor
until the
symbol flashes and
then by pressing on the
or
sensors. The
two beeps you hear after that will confirm the
new time has been set.
Programming Cooking Time
1 Press on the clock sensor
will light up.
. The symbol
2 Select the cooking time by pressing the
or
sensors.
3 Two consecutive beeps will then sound and
the display will show the remaining cooking
time. The symbol
will flash slowly to indicate that the oven will switch itself
automatically.
4 Select a cooking function and temperature.
5 Once the cooking time is complete, the oven
will turn off, an alarm will sound and the
symbol will flash more quickly.
6 Press on any sensor on the control panel to
stop the alarm.
You can change the programmed time
whenever you want by touching the clock
sensor
and then on the
or
sensors.
The two beeps you hear after that will confirm
the new time has been set.
6
You can use this function even if you are
already cooking with the oven. If this is the
case, follow all of the above instructions
except No. 4.
Programming Cooking Time and Cooking
Stop Time
11 Press on the clock sensor
will light up.
. The symbol
12 Select the cooking time by pressing the
or
sensors.
13 Two consecutive beeps will then sound,
and the display will show the remaining
cooking time. The
symbol will flash
slowly.
14 Press on the clock sensor
several times
until the symbol
lights up.
15 Select the cooking stop time by pressing
the
or
sensors.
16 This will be confirmed by two beeps. The
current time will show on the display and
the
symbol will remain lit.
Child Safety Function
18 The oven will remain off, with the
symbol lit and the
symbol flashing
slowly. The clock will show the current time
and the inside light will remain off. The
oven is now programmed.
This function locks the oven, preventing small
children from playing with it. To turn on the
function, press on the
symbol until you
hear a long beep and see several flashing
dots between the digits of the temperature
display . The oven is now locked.
19 When it is time to start cooking, the oven
will switch on and will operate for the
programmed cooking time. The clock
display will show the remaining cooking
time.
10 Once the set time is reached, the oven will
turn off, an alarm will sound and the
and
symbols will flash.
11 Press on any sensor on the control panel
to stop the alarm.
16)
To turn off the child lock, keep the
symbol pressed until a long beep sounds.
Caution
In the event of power failure, your electronic
clock timer settings will be erased and 12:00
will flash on the clock display. Reset the clock
and programme again.
If you wish to change the cooking stop time
while cooking is in progress, press on the
clock sensor
until the
symbol flashes.
You can then change the cooking stop time by
pressing on the
or
sensors. The two
beeps you hear after that will confirm the new
time has been set.
7
ENGLISH
17 Select a cooking function and temperature.
Nuestra aportación a la protección del medio-ambiente: utilizamos papel reciclado.
A nossa contribução para a protecção do ambiente: utilizamos papel reciclado.
Our contribution to enviromental protection: we use recycled paper.
Notre contribution à la protection de l’environnement : nous utilisons du papier recyclé.
Unser Beitrag zum Umweltschutz: wir verwenden umweltfreundliches Papier.
Cod.: 3172551-000