1
TPM
User's Guide
Revision 1.0a
The information in this user’s guide has been carefully reviewed and is believed to be accurate.
The vendor assumes no responsibility for any inaccuracies that may be contained in this document,
and makes no commitment to update or to keep current the information in this manual, or to notify
any person or organization of the updates. Please Note: For the most up-to-date version of this
manual, please see our web site at www.supermicro.com.
Super Micro Computer, Inc. ("Supermicro") reserves the right to make changes to the product
described in this manual at any time and without notice. This product, including software and documentation, is the property of Supermicro and/or its licensors, and is supplied only under a license.
Any use or reproduction of this product is not allowed, except as expressly permitted by the terms
of said license.
IN NO EVENT WILL SUPER MICRO COMPUTER, INC. BE LIABLE FOR DIRECT, INDIRECT,
SPECIAL, INCIDENTAL, SPECULATIVE OR CONSEQUENTIAL DAMAGES ARISING FROM THE
USE OR INABILITY TO USE THIS PRODUCT OR DOCUMENTATION, EVEN IF ADVISED OF
THE POSSIBILITY OF SUCH DAMAGES. IN PARTICULAR, SUPER MICRO COMPUTER, INC.
SHALL NOT HAVE LIABILITY FOR ANY HARDWARE, SOFTWARE, OR DATA STORED OR USED
WITH THE PRODUCT, INCLUDING THE COSTS OF REPAIRING, REPLACING, INTEGRATING,
INSTALLING OR RECOVERING SUCH HARDWARE, SOFTWARE, OR DATA.
Any disputes arising between manufacturer and customer shall be governed by the laws of Santa
Clara County in the State of California, USA. The State of California, County of Santa Clara shall
be the exclusive venue for the resolution of any such disputes. Supermicro's total liability for all
claims will not exceed the price paid for the hardware product.
FCC Statement: Refer to Supermicro's website for FCC Compliance Information.
California Best Management Practices Regulations for Perchlorate Materials: This Perchlorate
warning applies only to products containing CR (Manganese Dioxide) Lithium coin cells. “Perchlorate
Material-special handling may apply. See www.dtsc.ca.gov/hazardouswaste/perchlorate”.
WARNING: Handling of lead solder materials used in this
product may expose you to lead, a chemical known to
the State of California to cause birth defects and other
reproductive harm.
Manual Revision 1.0a
Release Date: Feb. 4, 2015
Unless you request and receive written permission from Super Micro Computer, Inc., you may not
copy any part of this document.
Information in this document is subject to change without notice. Other products and companies
referred to herein are trademarks or registered trademarks of their respective companies or mark
holders.
Copyright © 2014 by Super Micro Computer, Inc.
All rights reserved.
Printed in the United States of America
Preface
Preface
About This User's Guide
This user's guide is written for system integrators, IT professionals, and knowledgeable end users who wish to add additional data security levels to their systems to
protect highly sensitive applications. It provides detailed information on configuring,
provisioning, and using the trusted platform module (TPM).
User's Guide Organization
Chapter 1 provides an overview of the trusted platform module (TPM), including
its features and uses.
Chapter 2 provides detailed instructions on installing, provisioning, and using the
TPM.
Conventions Used in This User's Guide
Pay special attention to the following symbols for proper TPM configuration.
Warning: Important information given to avoid TPM configuration errors.
Note: Additional information given to ensure correct TPM configuration
setup.
iii
SMT IPMI User's Guide
Contacting Supermicro
Headquarters
Address:
Super Micro Computer, Inc.
980 Rock Ave.
San Jose, CA 95131 U.S.A.
Tel:
+1 (408) 503-8000
Fax:
+1 (408) 503-8008
Email:
[email protected] (General Information)
[email protected] (Technical Support)
Website:
www.supermicro.com
Europe
Address:
Super Micro Computer B.V.
Het Sterrenbeeld 28, 5215 ML
's-Hertogenbosch, The Netherlands
Tel:
+31 (0) 73-6400390
Fax:
+31 (0) 73-6416525
Email:
[email protected] (General Information)
[email protected] (Technical Support)
[email protected] (Customer Support)
Website:
www.supermicro.nl
Asia-Pacific
Address:
Super Micro Computer, Inc.
3F, No. 150, Jian 1st Rd.
Zhonghe Dist., New Taipei City 235
Taiwan (R.O.C)
Tel:
+886-(2) 8226-3990
Fax:
+886-(2) 8226-3992
Email:
[email protected]
Website:
www.supermicro.com.tw
iv
SMT IPMI User's Guide
Table of Contents
Preface............................................................................................................ 3
About This User's Guide................................................................................................ 3
User's Guide Organization............................................................................................. 3
Conventions Used in This User's Guide........................................................................ 3
Contacting Supermicro................................................................................................... 4
Chapter 1 Introduction...............................................................................1-1
1.1
Overview of the Trusted Platform Module (TPM)............................................ 1-1
1.2
Supermicro TPM Features............................................................................... 1-2
1.3 Intel® TXT........................................................................................................ 1-2
1.4 Motherboards Supported................................................................................. 1-3
1.5 An Important Note to the User......................................................................... 1-3
Chapter 2 Deploying and Using the TPM................................................ 2-1
2.1
Installing the TPM Onto the Motherboard........................................................ 2-1
2.2
Enabling TPM in the BIOS............................................................................... 2-2
2.3
Setting Up TXT Support................................................................................... 2-3
2.4
Intel Provision Utility......................................................................................... 2-4
vi
Chapter 1: Introduction
Chapter 1
Introduction
1.1 Overview of the Trusted Platform Module (TPM)
The Trusted Platform Module (TPM) is a special add-on module that may be installed
onto most Supermicro X9, all Supermicro X10, and some Supermicro AMD motherboards. It holds computer-generated encryption keys used to bind and authenticate
input and output data passing through a system.
A. Types of TPMs
Supermicro makes available two lines of TPMs, each of them divided into four
distinct products.
Note: Currently, all TPMs must be provisioned before they can be used.
Contact Supermicro technical support to get the Intel® Provisioning Utility.
The TPM-9655 series uses TCG (Trusted Computing Group) version 1.2 firmware,
which is the most commonly supported.
The following SKUs are available:
• AOM-TPM-9655V-S, a vertical server-side TPM
• AOM-TPM-9655H-S, a horizontal server-side TPM
• AOM-TPM-9655V-C, a vertical client-side TPM
• AOM-TPM-9655H-C, a horizontal client-side TPM
Horizontal vs. Vertical: Generally, whether you should use a TPM with a horizontal
or vertical form factor depends on the physical space available. Horizontal TPMs
are used in 1U chassis. Vertical TPMs are used in 2U or taller chassis heights; they
are also designed with a smaller footprint to occupy less space on the motherboard.
Server-Side vs. Client-Side: Each TPM is predesignated as a server-side or a clientside TPM. Be sure to use the appropriate TPM for your needs. The server-side TPM
is designed to run on Intel Xeon® E5 and E7 processors. It has a 96-byte memory.
The client-side TPM is designed to run on Intel Core™ i5, Core i7, and Xeon E3
processors. It has a 48-byte index memory.
1.2 Supermicro TPM Features
1. TCG 1.2 compliance
1-1
SMT IPMI User's Guide
2. Microcontroller in 0.22/0.09-µm CMOS technology
3. Compliant embedded software
4. EEPROM for TCG firmware enhancements and for user data and keys
5. Hardware accelerator for SHA-1 and SHA-256 hash algorithm
6. True Random Number Generator (TRNG)
7. Tick counter with tamper detection
8. Protection against dictionary attack
9. Infineon's TPM 1.2 is Common Criteria certified at Evaluation Assurance
Level (EAL) 4 Moderate
10. General-purpose I/O
11. Intel® Trusted Execution Technology (TXT) support
12. AMD® Secure Virtual Machine Architecture support
13. Full personalization with Endorsement Key (EK) and EK certificate
14. Power-saving sleep mode
15. 3.3V power supply
16. WHQL dual-mode 1.1b + 1.2 TPM Windows Kernel Mode Driver
1.3 Intel® TXT
The Intel TXT is a software tool that may be used in conjunction with the TPM to
provide additional security for pre-launch firmware of clusters and clouds, including
the BIOS, IPMI, SAS firmware, CMM firmware, and more. It is optional, but the TPM
is required for it to be provisioned. It further increases system security by protecting
firmware against malicious attacks to vulnerable areas.
It works by matching hypervisor measures with encryption keys upon system launch.
If the hypervisor does not match the keys, then the hypervisor will be prevented
from starting up.
To use the TXT, you need to enable TXT support after provisioning the TPM.
1-2
Chapter 1: Introduction
A. How the TXT Works
The Intel TXT, when enabled, follows a step-by-step process to ensure security of
pre-launch components.
1.
Measures the hypervisor launch upon system startup
2.
Checks for a match
3.
If matched: The TXT signals "trusted," and the launch is allowed to proceed.
4.
If mismatched: The TXT signals "untrusted," and the launch is blocked.
1.4 Motherboards Supported
Please refer to the Supermicro website (http://www.supermicro.com/) for a complete and most up-to-date list of the motherboards that can support the TPM. As a
general rule, these are most X9 motherboards, all X10 motherboards, and some
AMD motherboards. Such motherboards will have a specially designated JTPM1
connector, which will be listed in the respective motherboard's manual.
1.5 An Important Note to the User
The graphics shown in this user's guide were based on the latest information
available at the time of publishing of this guide. The TPM screens shown on your
computer may or may not look exactly like the screen shown in this user's guide.
1-3
TPM User's Guide
Chapter 2
Deploying and Using the TPM
Follow the instructions below to begin using the TPM.
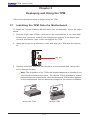
2.1 Installing the TPM Onto the Motherboard
To install the Trusted Platform Module onto your motherboard, follow the steps
below.
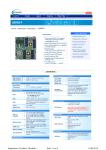
1. Find the 20-pin male JTPM1 connector on the motherboard. If you need help
locating this connector, consult your motherboard manual. If the board does
not have this feature, then it does not support the TPM.
2. Using the key pin as a reference, orient and align your TPM with the connector.
FAN6
JTPM1
BMC
key pin
VGA
LAN CTRL
CPU2 SLOT7 PCI-E 3.0 X8
CPU2 SLOT6 PCI-E 3.0 X8
CPU2 SLOT5 PCI-E 3.0 X8
CPU2 SLOT4 PCI-E 3.0 X16
CPU1 SLOT3 PCI-E 3.0 X8
LEDM1
CPU1 SLOT2 PCI-E 3.0 X8
JI2C2 JVRM2
JPME2
J23
JI2C1JVRM1
CPU1 SLOT1 PCI-E 3.0 X8
JBR1
I-SATA5
I-SATA1 I-SATA3 USB7/8
(3.0)
JPG1
TPM/PORT80 JPB1JPL1 COM2
LE1
UID
3. Carefully insert the TPM into the connector on the motherboard, taking care
not to damage the pins.
USB2/3 I-SATA0 I-SATA2
(2.0)
JIPMB1 of the TPM to be installed depends on whether it has
Note: The orientation
a horizontal or vertical form factor. The vertical TPM is intended to "stand"
perpendicular the motherboard, while the horizontal TPM lies flat (parallel)
on the motherboard. See the below two images for the correct orientation.
BT1
I-SATA4
BIOS
Horizontal TPM
P2 DIMMF2
P2 DIMMF1
P2 DIMME2
P2 DIMME1
BAR CODE
Battery MAC CODE
BIOS
LICENSE
Vertical TPM
P1 DIMMD2
P1 DIMMD1
P1 DIMMC2
P1 DIMMC1
USB6
(3.0)
I-SGPIO2
I-SGPIO1
PCH
S-SATA
CLOSE 1st
2-1
LEDS6
LEDS5
JBT1
TPM User's Guide
2.2 Enabling TPM in the BIOS
The steps below describe the proper procedure on how to enable the TPM in the
BIOS. This process is necessary to activate support in the system before you can
start using the TPM.
1.
Enter the BIOS setup screen. You may do this either from the IPMI remote
console or from the server directly using KVM. Reboot the system, and press
the <Del> key as the system boots until you reach the BIOS screen.
2.
You will be presented with the BIOS Setup main screen. Using your arrow
keys, navigate to the Advanced tab. From there, navigate down and select the
"CPU Configuration" option, as shown below. Press <Enter>.
3.
You will be taken to the CPU Configuration page. Using your arrow keys, navigate down to the "Intel Virtualization Technology" option, and press <Enter>.
Select "Enable" and press <Enter>.
4.
Once you have enabled virtualization support, press your <Esc> key until you
are back to the Advanced tab. Navigate down to the "Trusted Computing"
option and press <Enter>.
5.
The Trusted Computing window will appear. Select "TPM State," and press
<Enter>.
6.
From the window that pops up, select "Enabled," as shown on the next page,
and press <Enter>.
2-2
TPM User's Guide
7.
You must save your changes and reset for the changes to take effect. Scroll
to the Save & Exit tab and select "Save Changes and Reset." The TPM is
now enabled.
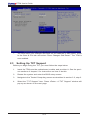
2.3 Setting Up TXT Support
Before you begin using the TXT, you must follow the steps below.
1.
Insert the TPM onto the motherboard, enable, and provision it. See the previous sections of chapter 2 for instructions on how to do this.
2.
Restart the system and enter the BIOS setup screen.
3.
Navigate to the Trusted Computing screen as described in section 2.2, step 2.
4.
Select the "TXT Support" item. Press <Enter>. A "TXT Support" window will
pop up as shown on the next page.
2-3
TPM User's Guide
5.
Select "Enabled," and press <Enter>.
6.
Save changes and reset to save your changes and allow them to take effect.
The TXT is now enabled.
7.
Use a third-party tool to test the hypervisor launch.
2.4 Intel Provision Utility
To lock the TPM, you must run the Intel Provision Utility.
1.
Save a copy of the utility to a USB flash drive, and plug the drive into your
sytem. To download the utility, contact Supermicro support.
2.
Boot into the UEFI shell. There are two ways you can do this, described below:
•
Option 1: From the BIOS, scroll to the Save & Exit tab. Select the option
"UEFI: Built-in EFI Shell" under Boot Override, as shown in the screenshot
on the next page. Press <Enter>. If a window pops up that prompts, "Save
configuration and reset?" select "Yes" and press <Enter>.
2-4
TPM User's Guide
•
Option 2: Reboot the system. As the system boots up, press the <F11>
key. The following list will appear. Using your arrow keys, select "UEFI:
Built-in EFI Shell." Press <Enter>.
3. You are now in the EFI shell. If a line prompts you to press <Esc> to skip
startup.nsh, do so.Type map to find out your USB ID. A list of devices
2-5
TPM User's Guide
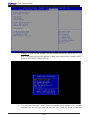
4. Type fs0: to enter the flash drive directory.
5. Type cd serverTPMTool.
6. Type cd Executable.
7. Type DefaultTPMProvisionNPW-Locked.nsh.
8. You should see the screen shown below indicating that the TPM is now
locked.
9. To check that the TPM has been successfully locked, type
ServerTPMTool.efi.
2-6
TPM User's Guide
10. From the menu that appears, press <1> ("Display TPM Status"), as shown
above, and press <Enter>.
11. From the TPM Status Menu that appears, press <3>, and press <Enter>.
12. You should receive an output log. The "nvLocked" item, indicated by the arrow
below, should be set to 1. This shows that the TPM has been successfully
locked.
13. If you come across any error messages along the way, or if the "nvLocked"
item is still set to 0 despite your following the instructions above, try the following troubleshooting tips:
•
ake sure that the CPU you are using is compatible. It should be an
M
Intel® Xeon® E5-2600 C2 or later model.
Note: AOM-TPM-9655V-S and AOM-TPM-9655H-S are compatible with
Xeon E5/E7 processors. AOM-TPM-9655V-C and AOM-TPM-9655H-C are
compatible with Intel Core i5/i7 and Xeon E3 processors.
•
Make sure that TXT support is enabled in the BIOS. (See section 2.3.)
•
If the problem persists, contact Supermicro's technical support.
2-7
TPM User's Guide
Notes
2-8
(Disclaimer Continued)
The products sold by Supermicro are not intended for and will not be used in life support systems, medical equipment, nuclear facilities or systems, aircraft, aircraft devices,
aircraft/emergency communication devices or other critical systems whose failure to perform be reasonably expected to result in significant injury or loss of life or catastrophic
property damage. Accordingly, Supermicro disclaims any and all liability, and should buyer use or sell such products for use in such ultra-hazardous applications, it does so
entirely at its own risk. Furthermore, buyer agrees to fully indemnify, defend and hold Supermicro harmless for and against any and all claims, demands, actions, litigation, and
proceedings of any kind arising out of or related to such ultra-hazardous use or sale.