1
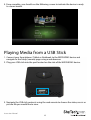
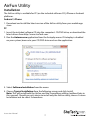
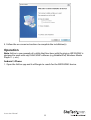
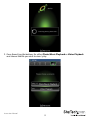
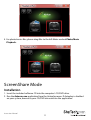
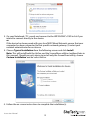
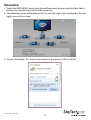
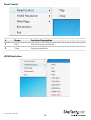
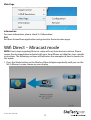
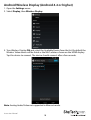
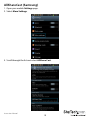
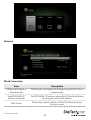
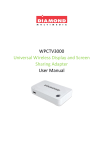
Wireless Display Adapter for Mobile Devices
WIFI2HDMC / WIFI2HDMCGE
*actual product may vary from photos
DE: Bedienungsanleitung - de.startech.com
FR: Guide de l'utilisateur - fr.startech.com
ES: Guía del usuario - es.startech.com
IT: Guida per l'uso - it.startech.com
NL: Gebruiksaanwijzing - nl.startech.com
PT: Guia do usuário - pt.startech.com
For the most up-to-date information, please visit: www.startech.com
Manual Revision: 12/11/2013
FCC Compliance Statement
This equipment has been tested and found to comply with the limits for a Class B digital
device, pursuant to part 15 of the FCC Rules. These limits are designed to provide reasonable
protection against harmful interference in a residential installation. This equipment generates,
uses and can radiate radio frequency energy and, if not installed and used in accordance with
the instructions, may cause harmful interference to radio communications. However, there
is no guarantee that interference will not occur in a particular installation. If this equipment
does cause harmful interference to radio or television reception, which can be determined by
turning the equipment off and on, the user is encouraged to try to correct the interference by
one or more of the following measures:
• Reorient or relocate the receiving antenna.
• Increase the separation between the equipment and receiver.
• Connect the equipment into an outlet on a circuit different from that to which the receiver
is connected.
• Consult the dealer or an experienced radio/TV technician for help.
Use of Trademarks, Registered Trademarks, and other Protected Names and Symbols
This manual may make reference to trademarks, registered trademarks, and other
protected names and/or symbols of third-party companies not related in any way to
StarTech.com. Where they occur these references are for illustrative purposes only and do not
represent an endorsement of a product or service by StarTech.com, or an endorsement of the
product(s) to which this manual applies by the third-party company in question. Regardless
of any direct acknowledgement elsewhere in the body of this document, StarTech.com hereby
acknowledges that all trademarks, registered trademarks, service marks, and other protected
names and/or symbols contained in this manual and related documents are the property of
their respective holders.
Instruction Manual
Table of Contents
Product Diagram.....................................................................................1
Rear View....................................................................................................................................................... 1
Side View....................................................................................................................................................... 1
Introduction.............................................................................................2
Packaging Contents.................................................................................................................................. 2
System Requirements............................................................................................................................... 2
Preparing Your Site.................................................................................2
Initial Setup..............................................................................................4
Playing Media from a USB Stick............................................................6
AirFun Utility............................................................................................7
Installation.................................................................................................................................................... 7
Operation...................................................................................................................................................... 8
ScreenShare Mode .................................................................................11
Installation.................................................................................................................................................... 11
Operation...................................................................................................................................................... 13
Wifi Direct – Miracast mode...................................................................17
Android Wireless Display (Android 4.2 or higher).......................................................................... 18
AllShareCast (Samsung)........................................................................................................................... 19
Intel WiDi Application............................................................................................................................... 20
Windows 8.1 Wireless Display................................................................................................................ 21
Advanced Setup Menu...........................................................................22
Instruction Manual
i
Specifications...........................................................................................28
Technical Support...................................................................................29
Warranty Information.............................................................................29
Instruction Manual
ii
Product Diagram
Rear View
HDMI Out
Analog Audio/Video out
RJ45 LAN
Power
On/Off
(For included 4 position
A/V cable only)
Side View
Mode Select
Button
USB Media
Input
Instruction Manual
1
DC
Jack
Introduction
Packaging Contents
• 1x Wireless Display Adapter
• 1x Universal Power Adapter (NA/UK/EU)
• 1x USB Cable to Power Adapter Port (optional for USB Power source)
• 1x 4 position A/V cable
• 1x Software Installation Disc
• 1x Quick Installation Guide
System Requirements
• HDMI enabled display device (i.e. television, projector)
• 802.11n/g Wireless enabled video source device (i.e. Smartphone, computer)
• HDMI cable
• Available AC electrical outlet or USB power source
Preparing Your Site
1. Determine where the display will be located and place/ mount the
display appropriately.
NOTE: The maximum distance of the display adapter is limited to the distance of your
802.11n/g Wireless network device. If the wireless signal is obstructed by walls, or other
interference the signal quality and maximum distance will likely be reduced.
Ensure the Receiver Unit is situated near an available AC electrical outlet.
Instruction Manual
2
Hardware Installation
1. Connect an HDMI video cable from the HDMI out port on the Wireless Video
Adapter to the HDMI in port on the HDMI enabled display device.
2. Connect the power adapter from an available AC outlet to the power adapter port
on the Wireless Video Adapter.
or
Connect the USB to power cable from an available USB power source to the power
adapter port on the Wireless Video Adapter.
3. Press the Power button to the in position to turn on the device, the Power LED will
be activated.
4. (Optional) If you intend to use the device for Screen sharing over a wired LAN
Network, connect an Ethernet cable from the RJ45 LAN port on the Rear of the
WIFI2HDMC, to an available LAN port on your local network gateway device
(router/hub).
5. (Optional) If you intend to output to an analog audio or video source, connect
the included “4 Position A/V cable” from the Analog Audio/Video out port to
Component video/RCA Audio input source on your analog audio or video device.
Note: Analog output will only work with the included 4 Position A/V cable. Analog
Audio/Video is not supported in Miracast mode.
Instruction Manual
3
Initial Setup
Once the WIFI2HDMC device is connected to your TV and powered on, the following
screen will show on the display.
1. Connect your Smartphone / Tablet or Notebook to the SSID of the device. By default
the SSID for the device is “WIFI2HDMC xxx” with no security key.
2. Once you have connected to the device, open your web browser and enter the
Setup IP address listed on the display which will bring up the remote control
interface. The default is http://192.168.59.254/remote
3. Select OK on the remote interface.
Instruction Manual
4
4. From the Initial Setup menu, modify the following options to suit your application.
Language: Select your desired language for the interface.
TV System: Configure WIFI2HDMC to use a specific resolution if needed. Note: It is
recommended to leave this option as HDMI Auto
WiFi Connection (optional): You may want to connect the device to your WiFi
network for one of the following reasons.
a. Create a network bridge. When your mobile device is connected to the WIFI2HDMC
SSID directly, this option enables you to still browse the internet or access your LAN,
through the WIFI2HDMC device.
b. Enable the WIFI2HDMC to access DLNA servers on your network.
c. Access the WIFI2HDMC remote interface from your LAN instead of a direct
connection to WIFI2HDMC SSID.
Virtual AP Bridge: Select one of the following options.
a. Bridge to Wireless – This will bridge the WIFI2HDMC network with your wireless LAN
so that you can access the internet or LAN devices through the WIFI2HDMC.
b. Bridge to Ethernet– This will bridge the WIFI2HDMC network with your wired LAN so
that you can access the internet or LAN devices through the WIFI2HDMC.
c. Virtual AP only – Devices connected to the WIFI2HDMC network can only access the
WIFI2HDMC device.
Save Change: Saves all changes.
Instruction Manual
5
5. Once complete, you should see the following screen to indicate the device is ready
to stream media.
Playing Media from a USB Stick
1. Connect your Smartphone / Tablet or Notebook to the WIFI2HDMC device and
navigate to the Setup (remote) page using a web browser.
2. Plug your USB stick into the port located on the side of the WIFI2HDMC device.
3. Navigate the USB stick contents using the web remote to choose the video, music or
picture file you would like to view.
Instruction Manual
6
AirFun Utility
Installation
The AirFun utility is available for PC (on the included software CD), iPhone or Android
platforms.
Android / iPhone
1. Download and install the latest version of the AirFun utility from your mobile app
store
PC
1. Insert the included software CD into the computer’s CD/DVD drive, or download the
latest drivers from http://www.starTech.com.
2. Run the Autorun.exe application from the Autoplay menu. If Autoplay is disabled
on your system, browse to your CD/DVD drive and run the application.
3. Select Software Installation from the menu.
4. Choose Typical Installation from the following screen and click Install.
Note: This will install both the AirFun and the ScreenShare utilities (outlined later in
this manual). Should you only desire to install only the AirFun utility, choose Custom
Installation and de-select Screenshare.
Instruction Manual
7
5. Follow the on screen instructions to complete the installation(s).
Operation
Note: AirFun is one example of a utility that functions with the device; WIFI2HDMC is
designed to work with any DLNA/UPnP software (e.g. BubbleUPnP, Windows Media
Player 11+, etc.).
Android / iPhone
1. Open the AirFun app and it will begin to search for the WIFI2HDMC device.
Instruction Manual
8
2. Once found, tap the buttons for either Photo/Music Playback or Video Playback
and choose the file you wish to view / play.
Instruction Manual
9
PC
1. Double-click the AirFun icon from your Desktop or Start Menu.
2. The AIRFUN utility will begin to search for the WIFI2HDMC device. If the device is not
found before the timeout period, it will display “No device found”.
3. If successfully connected, you should be able to see your PC screen on the TV.
4. Drag the video/photo/music file to the Airfun main menu directly. For video files,
please drag files to the right folder marked Video Playback.
Instruction Manual
10
5. For photo/music files, please drag files to the left folder marked Photo/Music
Playback.
ScreenShare Mode
Installation
1. Insert the included software CD into the computer’s CD/DVD drive.
2. Run the Autorun.exe application from the Autoplay menu. If Autoplay is disabled
on your system, browse to your CD/DVD drive and run the application.
Instruction Manual
11
3. On your Notebook / PC, search and connect to the WIFI2HDMC’s SSID in list if you
intend to connect directly to the device.
or
If the device has been pared with your local WIFI/Wired Network, ensure that your
computer has been connected to that specific network gateway. (Contact your
network administrator for assistance
4. Choose Typical Installation from the following screen and click Install.
Note: This will install both the AirFun and the ScreenShare utilities (outlined later in
this manual). Should you only desire to install only the ScreenShare utility, choose
Custom Installation and de-select AirFun.
5. Follow the on screen instructions to complete the installation(s).
Instruction Manual
12
Operation
1. Switch the WIFI2HDMC device into ScreenShare mode by pressing the Mode Select
Button twice (located next to the USB connector).
2. The following screen will display on the TV, note the Login Code displayed in the top
right corner of the screen.
3. On your Notebook / PC, search and connect to the device’s SSID in wifi list.
Instruction Manual
13
4. Double-click the ScreenShare icon from your Desktop or Start Menu.
5. ScreenShare will auto detect the WIFI2HDMC device, please input login code as
noted from instruction page (Step 2), then click OK.
6. If login code is correct, application software will appear.
Instruction Manual
14
#
Name
Function Description
1
Play
Start / pause presentation. When pausing a progressing
presentation, the displayed image will freeze; press play
button again to resume.
2
Stop
Stop a presentation and go back to the instruction page.
3
Mute
Mute volume.
4
Volume up/
down
Volume up/down.
5
Minimize/
Close
Minimize and close the Application Software window.
6
Information
Show the application information.
7
Menu
Show the application information.
Menu Options
Instruction Manual
15
Panel Control
#
Name
Function Description
1
Play
Star/Pauses presentation
2
Stop
Stop presentation
HDMI Resolution
Instruction Manual
16
Web Page
Information
For more information, please check 3-2 Information.
Exit
Exit from ScreenShare application and go back to the instruction page.
Wifi Direct – Miracast mode
NOTE: Exact steps regarding Miracast setup will vary from device to device. Please
review the documentation included with your SmartPhone or tablet for steps specific
instructions. The following sections will indicate a few examples of how to connect in
this mode.
1. Press the Mode button on the Wireless Video Adapter repeatedly until you see the
Wi-Fi Miracast screen shown on your display.
Instruction Manual
17
Android Wireless Display (Android 4.2 or higher)
1. Open the Settings menu.
2. Select Display, then Wireless Display
3. Turn Wireless Display ON and select the Available Device from the list. By default the
Wireless Video device will be listed as the MAC address shown on the HDMI display.
Tap this device to connect. The device should connect after a few seconds.
Note: Analog Audio/Video not supported in Miracast mode.
Instruction Manual
18
AllShareCast (Samsung)
1. Open your mobile Settings page.
2. Select More Settings.
3. Scroll through the list and select AllShare Cast.
Instruction Manual
19
4. Turn AllShare Cast ON and select the Available Device from the list. By default the
Wireless Video device will be listed as the MAC address shown on the HDMI display.
Tap this device to connect. The device should connect after a few seconds.
Intel WiDi Application
1. Open the WiDi software included with your Wi-Di enabled computer system.
2. The adapter will be listed under detected adapters, select the adapter and
click Connect.
3. Your computer screen will now be shared wirelessly on the display.
Instruction Manual
20
Windows 8.1 Wireless Display
1. Launch the charm window and select Devices (or search for Device Settings
from Metro).
2. Select Project, then Add a wireless display (or Add a Device).
3. Select the WIFI2HDMC from the list of devices (the MAC address will be listed).
Instruction Manual
21
4. Enter the PIN code on the WIFI2HDMC screen, then click Next.
5. The device should connect after a few seconds.
Note: Some Windows 8.1 machines may have problems connecting in Miracast
mode. Please ensure you are using the latest Graphics drivers and Wireless drivers
for your computer. Contact your manufacturer for support.
Advanced Setup Menu
To access the advanced setup menu for WIFI2HDMC, type the address on the TV
screen with a web browser of a PC / Notebook / Smartphone or Tablet connected to
WIFI2HDMC to enter the virtual remote page, and click the Setup button.
Once on the setup page, Use the Left/Right navigation arrows on the virtual remote
and select OK to enter the desired settings page for Network / Audio / Video / System.
Use the Return button to go to the previous page or standby screen.
Instruction Manual
22
Network
Wired Connection
Item
Description
Obtain an IP address
Automatically
WIFI2HDMC will obtain an IP address from DHCP server
automatically.
Set WIFI2HDMC IP
address manually
Set WIFI2HDMC IP address manually. Fill the fields below
to setup your desired IP address.
DNS Server
Please input the IP address of the DNS (Domain Name
Service) server.
Instruction Manual
23
Device Name
Item
Description
Device Name (SSID)
Input the Device Name of presentation gateway here.
Default is “WIFI2HDMC”.
WiFi Connection
Click WiFi connection button to display a list of available Wireless APs on the screen,
and choose the AP you wish to connect to. This will bridge WIFI2HDMC to the Internet
via another Wireless AP.
Virtual AP Setup
Item
Description
Set the Radio band to 2.4GHz or 5GHz.
Radio Band
Note: Please confirm that your PC/Notebook supports
5GHz operation before you set the radio band to 5GHz.
Encryption: Disabled - Disables wireless encryption.
Security
Encryption: WPA +WPA2 - Enable WPA + WPA2
encryption. Wireless clients must support WPA encryption
and know the encryption passphrase you set here.
Region
Choose your region.
Save Change
Save the configuration.
Instruction Manual
24
Virtual AP Bridge
Item
Description
Virtual AP only
Ad-hoc mode
Bridge to Wireless
Connect to Internet via Wireless AP router (outlined below)
Bridge to Ethernet
Connect to Internet via Wired AP router (outlined below)
Bridge to Wireless connection
1. Change Virtual AP Bridge to “Bridge to Wireless” and click Apply.
2. Click Wireless connection button. The Wireless AP list will display on the screen.
3. Choose the AP you want to connect to.
Bridge to Ethernet / Wired Connection
1. Connect a LAN cable from WIFI2HDMC to the AP router.
2. Change Virtual AP Bridge to “Bridge to Ethernet” and click “Apply”. Then you can
bridge WIFI2HDMC to Internet.
Note: WIFI2HDMC must connect to an AP router and can’t connect to WAN directly.
Instruction Manual
25
Audio
Adjust advanced audio settings such as Night mode, HDMI Audio output format, SPDIF
output format, Surround sound setting and Lip Sync setting from this page.
Video
Adjust Aspect Ratio, TV out video format, and other video settings from the video
setup page.
Instruction Manual
26
System
Set the OSD Language, reset to Factory Default, check the firmware Version, and
perform a firmware upgrade from the system setup page.
Instruction Manual
27
Specifications
Audio Support
Yes
Cabling
Wireless Ethernet
Output Signal
HDMI
Number of Ports
1
1 - 3.5 mm Mini-Jack (3 Position) Female
1 - HDMI (19 pin) Female
Connector(s)
1 - RJ-45 Female
1 - USB 3.0 A (9 pin; SuperSpeed) Female
Wireless N (IEEE 802.11n)
Maximum Digital Resolutions
1920x1080 / 1080p
Wide Screen Supported
Yes
OS Compatibility
Windows® 8 (32/64), 7(32/64), Vista (32/64)
LED Indicators
1 - Power/Activity LED
Power Adapter
5V, 1A
Enclosure Material
Plastic
Operating Temperature
0°C to 45°C (32°F to 131°F)
Storage Temperature
-20°C to 60°C (-4°F to 140°F)
Humidity
20%~80% RH
Dimensions
133 x 71 x 27 mm
Weight
140 g
Instruction Manual
28
Technical Support
StarTech.com’s lifetime technical support is an integral part of our commitment to
provide industry-leading solutions. If you ever need help with your product, visit
www.startech.com/support and access our comprehensive selection of online tools,
documentation, and downloads.
For the latest drivers/software, please visit www.startech.com/downloads
Warranty Information
This product is backed by a two year warranty.
In addition, StarTech.com warrants its products against defects in materials
and workmanship for the periods noted, following the initial date of purchase.
During this period, the products may be returned for repair, or replacement with
equivalent products at our discretion. The warranty covers parts and labor costs only.
StarTech.com does not warrant its products from defects or damages arising from
misuse, abuse, alteration, or normal wear and tear.
Limitation of Liability
In no event shall the liability of StarTech.com Ltd. and StarTech.com USA LLP (or their
officers, directors, employees or agents) for any damages (whether direct or indirect,
special, punitive, incidental, consequential, or otherwise), loss of profits, loss of business,
or any pecuniary loss, arising out of or related to the use of the product exceed the
actual price paid for the product. Some states do not allow the exclusion or limitation
of incidental or consequential damages. If such laws apply, the limitations or exclusions
contained in this statement may not apply to you.
Instruction Manual
29
Hard-to-find made easy. At StarTech.com, that isn’t a slogan. It’s a promise.
StarTech.com is your one-stop source for every connectivity part you need. From
the latest technology to legacy products — and all the parts that bridge the old and
new — we can help you find the parts that connect your solutions.
We make it easy to locate the parts, and we quickly deliver them wherever they need
to go. Just talk to one of our tech advisors or visit our website. You’ll be connected to
the products you need in no time.
Visit www.startech.com for complete information on all StarTech.com products and
to access exclusive resources and time-saving tools.
StarTech.com is an ISO 9001 Registered manufacturer of connectivity and technology
parts. StarTech.com was founded in 1985 and has operations in the United States,
Canada, the United Kingdom and Taiwan servicing a worldwide market.