1
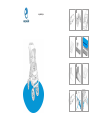
1
2
3
4
5
6
7
8
9
10
11
12
easywalker june
13
14
15
25
26
27
37
38
39
16
17
18
28
29
30
40
41
42
19
20
21
31
32
33
43
44
45
22
23
24
34
35
36
46
47
Content
2
3
4
6
8
8
9
10 11 Easywalker june
How to assemble and use the easywalker june
Using the easywalker june
Carrycot
How to assemble and use the easywalker june carrycot
Using the easywalker june carrycot
Accessories
Maintenance
Warranty conditions
EN - 1
Easywalker june
Congratulations on the purchase of your easywalker june! The easywalker june has
been carefully created with comfort, safety, ease of use and design in mind. Assembly
and use of the easywalker june are comprehensively explained in the instructions. To
get the most out of your easywalker june please follow the instructions provided.
The easywalker june meets the following standards:
• EN1888:2005
• EN1466:2007
Do not forget to complete the warranty form on the website. (www.easywalker.eu).
Then you can be sure of the best service and warranty from easywalker.
We wish you a great deal of enjoyment with your easywalker june.
Easywalker.
IMPORTANT! KEEP THE MANUAL FOR FUTURE REFERENCE.
IMPORTANT! Read the instructions carefully before use and keep them for
future reference. Your child’s safety may be affected if you do not follow these
instructions.
WARNING! A CHILD’S SAFETY IS YOUR RESPONSIBILITY. Children should be harnessed
in at all times and should never be left unattended. The child should be clear of
moving parts while making adjustments. This vehicle requires regular maintenance
by the user. Overloading, incorrect folding and the use of non-approved accessories
may damage or break this vehicle. Read the instructions.
WARNING! This product is only suitable for children from newborn up to 4 years up to
a maximum weight of 30 kg / 66 lbs.
WARNING! Never leave your child unattended.
WARNING! Ensure that all the locking devices are engaged before use.
WARNING! The parking device shall be engaged during the loading and unloading of
your child
WARNING! The maximum load that can be stored in the storage basket is: 5 kg / 11
lbs.
WARNING! This product is only suitable for one child.
WARNING! Accessories or replacement parts which are not approved by the
manufacturer shall not be used.
WARNING! Any load attached to the handle bar may affect the stability of the stroller.
WARNING! Always use the restraint system.
WARNING! Always use the crotch strap in combination with the waist belt when
carrying your child in the seat.
WARNING! Check that the carrycot or seat unit attachment devices are correctly
engaged before use.
EN - 2
WARNING! This product is not suitable for running or skating.
WARNING! Carelessness causes fire.
WARNING! Incorrect folding/overloading and the use of non approved accessories
may break or damage this product.
WARNING! Keep this plastic cover away from children to avoid suffocation.
Contents of the box
The following items must be contained in de easywalker june box:
• Frame
• 4 wheels
• Seat
• Sun canopy
• Storage basket
• Instruction manual
If items are missing, immediately contact the shop where you purchased the stroller.
The easywalker june is supplied with the storage basket already fitted to the frame.
Be aware of environmental considerations. When disposing of packaging, carefully
separate rubbish for recycling.
How to assemble and use the easywalker june
TIP: If the instructions say left or right, this is always meant when looking from behind
the easywalker june push-bar.
IMPORTANT!: When assembling the easywalker june there should not be a child in the
seat or carrycot.
IMPORTANT!: Avoid dangerous situations. Take your child out of the easywalker june if
you go up or down stairs, escalators or steep hills.
IMPORTANT! The easywalker june should only be used with the accompanying seat
and accessories. Only use the easywalker parts and accessories approved for use by
easywalker on the easywalker june.
IMPORTANT!: Do not use the easywalker june if any part is broken, torn, incomplete or
does not seem to be functioning correctly.
IMPORTANT!: The easywalker june is not designed for use when jogging or roller
skating.
EN - 3
Assembling the easywalker june
Frame
Take the easywalker june out of the box and place it on its carton, on the ground, in
front of you (image 10). Unfold the easywalker june. If you hear a “click” the easywalker
june has unfolded correctly (image 11).
Wheels
Flip the parking brake upwards (image 12). Insert the rear wheel into the frame (image
13). If you hear a clear “click” the wheel is locked (image 14). Repeat this process on the
opposite side with the second rear wheel. To remove the rear wheel, press the button
on the inside of the frame while pulling the wheel out.
To attach the front wheel, insert the axle of the front fork in the appropriate opening of
the frame. If you hear a “click” the wheel is locked (image 15). Repeat this process on
the opposite side with the second front wheel. To remove a front wheel, pull the locking
device backwards and the wheel, together with the fork, will come off easily (image 16).
IMPORTANT!: The ideal maximum tyre pressure is 1,4 Bar.
Using the easywalker june
Frame
When folding or unfolding the easywalker june make sure the parking brake is engaged
(image 17).
To fold the frame of the easywalker june, adjust the sun canopy and the handle bar to
the lowest position (image 18+19). Then push the red safety-buttons on the left and
the right side (image 20). While pushing the red safety-buttons, pull the black knobs
upwards. When lifted, the easywalker june will fold (image 21).
Unfold the easywalker june. If you hear a “click” the easywalker june has unfolded
correctly (image 11).
Parking break
Always engage the parking brake (image 17) when the easywalker june is not in use. And
also when you put your child in the stroller, when you adjust or (un)fold the stroller. And
when it’s parked.
Push bar
To adjust the push bar in height, unlock the clips on both sides of the push bar. Move the
push bar to the desired height, hearing clicking sounds for the different positions, and
lock the clips (image 19). Protect the foam on the push bar against friction and sharp
EN - 4
objects.
Wheels
To change the front wheels from swivelling to fixed position, place the front wheel
straight under the stroller and push down the locking device (image 22). Repeat this
process on the opposite side with the second front wheel.
Pull the locking device upwards to put the front wheel in the swivelling position (image
23). Ensure that both front wheels always have the same setting: either swivelling or
fixed.
IMPORTANT!: The ideal maximum tyre pressure is 1,4 Bar.
Suspension
The easywalker june has suspended rear wheels (image 24). This suspension gives extra
comfort for your child.
Seating
WARNING!: Use a harness as soon as your child can sit unaided.
WARNING!: Do not change the direction of the seating while the child is in it.
The seat of the easywalker june can be used facing forward or backward. In both
directions the seat has three different positions.
To place the seat facing forward:
Keep the seat folded. Place the two hooks under the seat over the middle bar (image
25). Push until both hooks have made a “clicking” sound (image 26). Open the seat by
pulling the back of the seat upwards until both hooks at the back of the seat (image 27)
are attached to the two knobs on the frame (image 28). After a “clicking” sound the
hooks are attached. Attach the foot plate to the frame by pushing the clamps on both
sides inwards (image 29). The seat is now ready for use.
Detaching the seat:
Detach the footplate by pushing the clamps on both sides inwards (image 30). Pull the
grip under the seating towards you (image 31). Lift the seating while pulling the seat and
the back of the seat in the same time (image 32).
To place the seat facing backwards:
Repeat the steps under “To place the seat facing forward:” in opposite position: facing
backward.
To change the position of the seat:
Press the lever under the seat and move the back of the seating to the required position
(image 33). Support the back of the seating for your child’s comfort. When in place,
EN - 5
release the lever. The seating is now in position.
Five-point safety harness
WARNING! Always use the restraint system.
WARNING! Always use the crotch strap in combination with the waist belt and
shoulder belts when carrying your child in the seat.
Adjusting the height of the shoulder straps:
The shoulder straps are standard in the lowest position. You can adjust the height of
the shoulder straps by opening the rear of the seating (image 34) and adjust the height
of the shoulder straps by choosing different openings (image 35). Make sure that both
sides have the same height. Close the rear of the seating.
Adjusting the length of the straps:
You can use the sliding buckles on the shoulder straps, the waist straps and the crotch
strap to adjust the five-point safety harness (image 36). Always make sure that the
harness fits your child exactly.
Sun canopy
IMPORTANT!: A small child has a very sensitive skin. Never leave your child unattended
in the sun.
IMPORTANT!: Always use the sun canopy.
Attach the sun canopy on the easywalker june by placing the sun canopy hinges over
the knobs on the frame of the rear part of the sun canopy. Then use the zipper to fasten
the hood (image 37).
The sun canopy is height adjustable. Grab the bar at the back of the sun canopy and
move it up or down until it is in the desired position (image 18). With the extra extension
(image 38) you can provide extra shade for your child. For a compact fold put the sun
canopy in lowest position.
The sun canopy is exchangeable between the easywalker june and the carrycot. In order
to detach the sun canopy from the easywalker june unzip the hood (image 37).
Storage basket
Under the seat of the easywalker june is a storage basket. This storage basket can be
used for groceries up to 5 kg / 11 lbs (image 39). You can take the basket off, using the
Velcro straps.
Carrycot
Congratulations on the purchase of your easywalker june carrycot. The easywalker june
carrycot has been carefully created with comfort, safety, ease of use and design in mind.
EN - 6
Assembly and use of the easywalker june carrycot are comprehensively explained in
the instructions. To get the most out of your easywalker june carrycot please follow the
instructions provided.
The easywalker carrycot meets the standards:
•
•
EN1888:2005
EN1466:2007
IMPORTANT! KEEP MANUAL FOR FUTURE REFERENCE
IMPORTANT! Read the instructions carefully before use and keep them for
future reference. Your child’s safety may be affected if you do not follow these
instructions.
WARNING! This product is suitable for a child who cannot sit up unaided, roll over and
cannot push itself up on its hands and knees. Maximum weight of the child: 9 kg /
19,8 lbs.
WARNING! Never leave your child unattended.
WARNING! Ensure that all the locking devices are engaged before use.
WARNING! Never use a mattress thicker than 35 mm / 1,9 inch.
WARNING! Carrying handles shall be left out of the carrycot during use.
WARNING! Never use this carrycot on a stand.
WARNING! Use only on a firm, horizontal level and dry surface.
WARNING! Do not let other children play unattended near the carrycot.
WARNING! Do not use if any part is broken, torn or missing.
WARNING! Use only replacement parts supplied or approved by the manufacturer.
WARNING! Be aware of the risk of open fire and other source of strong heat, such as
electric bar fires, gas fires, etc., in the near vicinity of carrycot.
WARNING! Keep the plastic cover away from children to avoid suffocation.
NOTE: Check the handles and bottom of the carrycot regularly for signs of damage and
wear.
Contents of the box
The following items must be contained in the easywalker june carrycot box:
• 1 carrycot
• 1 mattress with air mesh
• 1 rain cover
• 1 mosquito net
• 1 instruction manual
If items are missing, immediately contact the shop where you purchased the carrycot.
Be aware of environmental considerations. When disposing of packaging, carefully
separate rubbish for recycling.
EN - 7
How to assemble and use the easywalker june carrycot
WARNING!: Do not lift the carrycot by the sun canopy. Use the handles on the sides.
IMPORTANT!: Only use the easywalker june carrycot or accessories approved for use
by easywalker on the easywalker june.
IMPORTANT!: When assembling the easywalker carrycot there should not be a child in
the carrycot.
Assembling the easywalker june carrycot
Carrycot
Take the easywalker june carrycot out of the box, take the cover off the carrycot and
remove the accessories, the mattress and the bottom plate (image 40).
Pull the fastener nearest to the head-end in the direction of the head-end until it “clicks”
(image 41). Pull the fastener nearest to the foot-end in the direction of the foot-end
until it “clicks”.
Replace the bottom plate and the mattress in the carrycot.
Sun canopy
IMPORTANT!: A small child has a very sensitive skin. Never leave your child unattended
in the sun.
IMPORTANT!: Always use the sun canopy.
The sun canopy is exchangeable between the easywalker june and the easywalker june
carrycot. In order to detach the sun canopy from the easywalker june unzip the hood
from the back (image 37).
Attach the sun canopy to the carrycot by placing the sun canopy hinges over the knobs
on the frame of the carrycot. Then use the zipper to fasten the hood (image 42).
With the extra extension (image 38), you can provide extra shade for your child.
Using the easywalker june carrycot
Attaching the easywalker june carrycot onto the frame
Engage the parking brake of the easywalker june (image 17). Remove the seating from
the frame (see the manual of easywalker june).
Lift the carrycot by the two handles on the sides and place it on the four bolts at the
inside of the frame (image 43). If you hear four clear “clicks” the carrycot is attached
correctly.
EN - 8
Always check whether the four connections are fixed. Put the handles back into the side
pockets of the carrycot.
Detaching the easywalker june carrycot from the frame
Engage the parking brake of the easywalker june (image 17).
To remove the carrycot from the frame, pull the grip under the head end of the carrycot.
Carefully lift the carrycot by the handles. The carrycot will come off (image 44).
TIP: The carrycot can be used as a cot without a supporting frame.
Mattress
The mattress of the easywalker june carrycot has been specially designed to let your
child sleep hygienically and safely. It consists of a foam layer and an air-flow layer.
Always put the air-flow layer on top of the mattress and cover it with the fitted sheet
provided (image 45).
Mosquito net
The easywalker june carrycot is supplied with a mosquito net.
Place the mosquito net over the carrycot so that it connects properly to the carrycot
(image 46).
Rain cover
IMPORTANT!: The rain cover has ventilation holes. These ensure fresh air to circulate,
so do not block them.
IMPORTANT!: Do not let your child sit under the rain cover unnecessarily. Ensure that
your child does not get too hot.
The easywalker june carrycot is supplied with a rain cover.
Place the rain cover so that the ventilation window is by the opening of the carrycot
(image 47).
Make sure it connects properly to the carrycot.
Tip: The rain cover has reflective stitching so that you are visible to other road users in
the dark and during bad weather.
Accessories
The easywalker june and the easywalker june carrycot have been carefully created with
comfort, safety, ease of use and design in mind. The easywalker june and the easywalker
june carrycot are supplied, as standard, with the most important accessories. In
addition to the standard, easywalker also offers a wide range of accessories. Go to www.
easywalker.eu for the options.
EN - 9
Accessories for the easywalker june:
•
•
•
•
•
•
•
•
•
•
•
•
easywalker june carrycot
easywalker june car seat adapters
easywalker june rain cover
easywalker june UV-protective mosquito net
easywalker june inlay
easywalker foot muff
easywalker nursery bag
easywalker june bumper bar
easywalker cup holder
easywalker parasol
easywalker mini pump
easywalker june travel bag
Maintenance
Check your easywalker june or easywalker june carrycot regularly.
Regularly clean the easywalker june. Use a damp cloth and a mild cleaning solution if
necessary.
The swivel wheel holders and the front wheel axles get dirty. Take the wheels off on
a regular basis and clean them with lukewarm water. Ensure that all parts are dried
thoroughly and oil the axles lightly with oil or silicone spray before replacing the wheels.
Avoid exposing the easywalker june and easywalker june carrycot to extreme
temperatures.
The easywalker june is not resistant to salt water.
Never bleach, dry-clean.
Fabrics used on the easywalker june and easywalker june carrycot are removable and
washable. Wash the fabrics at maximum 30 degrees Celsius and never dry in the tumble
dryer. Before washing always remove the fastenings, foam, plastic or metal parts. Always
refer to the washing label on each part.
During wet weather always use the rain cover. If the easywalker june and the carrycot
are wet due to cleaning or rain do not fold but leave to dry, opened out, in a well
ventilated room.
Parts of the easywalker june and the easywalker june carrycot can slightly discolour
or become worn as a result of weather conditions and usage. This can also occur with
normal usage.
EN - 10
Warranty conditions
In its capacity as manufacturer, easywalker provides a warranty for the easywalker june
and the easywalker june carrycot produced by them, under the following conditions:
The warranty commences on the date stated on the proof of purchase and is valid
for two years. This is in accordance with the manufacturer’s (importer’s) specification
concerning correct use of the product or what may be expected as normal when using
it.
The guarantee for rims, outer tires, inner tubes, foam, spokes, covers and accessories
only relates to construction and/or material faults. If you have any doubts about the
state of one or more of the components, contact the shop where you purchased the
product. The retailer will assess the product and carry out simple repairs. The retailer
will always contact the manufacturer should there be serious problems. You cannot
demand an exchange or refund. Repairs do not allow the warranty period to be
extended. Easywalker is never liable for damage other than to the product produced
by easywalker.
Warranty is not provided if:
•
The product is provided to the manufacturer/importer without a copy of the
original purchase receipt.
• Defects have been caused by incorrect use or maintenance, deviating from what is
stated in the instructions or what can be expected as reasonable when using the
product.
• Repairs to the product have been carried out by third parties without prior
consent from the manufacturer.
• The defect has been caused by neglect.
• The defect was caused as a result of an accident.
• It involves normal wear and tear that may be expected with daily use.
• It concerns the loss of parts.
• Damage caused by using accessories of another brand.
• Otherwise not conforming with the aforementioned warranty conditions.
In the latter situation, the ultimate decision as to whether the part falls under the
warranty will be taken by the manufacturer’s service department. Above warranty
conditions are supplementary to legal rights. The warranty only applies to the first
owner and is not transferable.
IMPORTANT!: Keep your proof of purchase and the instructions safely.
IMPORTANT!: The serial number of the easywalker june can be found on the inner
side of the horizontal tube between the two rear wheels. The batch numbers of
the covers and other fabric parts can be found on the washing labels. The batch
number for the easywalker carrycot can also be found on the washing label.
If you have any questions contact the shop where you have purchased the easywalker
EN - 11
june and the easywalker june carrycot. Ensure you have the following details to hand:
• Type of easywalker and the serial and batch numbers of the frame and covers.
• Purchase receipt
In order to improve the easywalker june and the easywalker june carrycot we would
love to hear your opinion. This may concern design, use, materials and instructions.
Mail your ideas to [email protected]
We wish you a great deal of pleasure when using your easywalker june.
easywalker
The utmost care was exercised in designing and compiling these instructions. The
content however, is subject to change without notice. Easywalker shall not be liable for
technical errors or omissions contained in this manual.
The purchased product may differ from the product as described in this manual. Check
for the most recent manuals the easywalker website. www.easywalker.eu
BeNeLux & UK
Easywalker BV
[email protected]
www.easywalker.eu
EN - 12