1
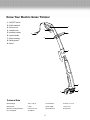
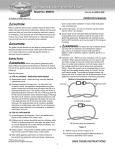
3-Amp 9.45-Inch Electric Grass Trimmer
Model No. TRJ609E
Form No. SJ-TRJ609E-880E
OPERATOR’S MANUAL
A Division of Snow Joe® , LLC
IMPORTANT!
removed or changed or when the trimmer is being moved
from one place to another.
Safety Instructions
• Children and other spectators, including pets, should be
kept at least 50 feet (15 meters) away from the work area.
When the grass is cut, stones and debris contained in the
grass can be picked up by the trimmer and subsequently
dispersed into the air. These flying projectiles can cause
blindness or other bodily injury.
All Operators Must Read These
Instructions Before Use
• Remain in a stable and secure position when operating
the trimmer.
mCAUTION!
• Keep the cutting area free of wires, stones, and debris.
Before using this electric tool, carefully read and observe the
safety rules and instructions listed below. Before starting work,
make sure that you know how to stop the machine in case of
an emergency. The incorrect use of this machine could cause
serious injury. Keep these instructions in a safe place and on
hand so that they can be consulted when required.
• Do not cut against hard objects. This could cause injury or
damage the trimmer.
• Use the edge of the guard to keep the trimmer away from
walls, surfaces, delicate objects and other miscellaneous
items.
mCAUTION!
mCAUTION!
The electric grass trimmer should only be used for cutting
lawns and for trimming along the borders of flower beds. Other
uses of the trimmer that are not indicated in these instructions
could damage the trimmer or seriously injure the operator.
The safety guard is critical to the safety of the operator and the
safety of people standing within a safe distance of the trimmer.
The safety guard keeps the trimmer in good working order and
must always be in place during operation. Failure to have the
guard in place during operation is dangerous and will void the
warranty.
GENERAL Safety Rules
• The electric grass trimmer must not be used by anyone
under the age of 16.
• Keep away from the cutting line – It can seriously injure
the skin.
• Always make sure the trimmer is in proper working
condition before use.
• Avoid accidentally starting – Do not carry plugged-in tool
with finger on the trigger. Make sure the switch is off before
plugging in the tool.
• Before connecting the trimmer to the electric outlet, make
sure that the rotating parts are not damaged.
• Do not use the trimmer if the cutting device is not secured
properly or is damaged.
• Do not force the tool – It will do the job better and with
less likelihood of injury if it is used at the rate for which
it is designed.
• Before starting the trimmer, make sure that the trimmer line
is not touching stones or debris.
• Use the right tool – Do not use this tool for any job except
that for which it is intended.
• Always wear suitable clothing when using the trimmer to
prevent head, hand, and/or feet injuries. Use a helmet,
safety spectacles or goggles at all times when operating
this tool. High boots (or sturdy shoes and trousers) and
work gloves are recommended.
• Do not overreach – Keep proper footing and balance at
all times.
• Do not try to stop the cutting device with your hands –
Always let it come to a stop by itself.
mCAUTION!
• When the trimmer is in operation, keep the cutting section
away from all parts of the body.
The trimmer line spool will continue to rotate after turning the
trimmer OFF. Wait until the trimmer line spool has completely
stopped before making contact.
• Do not start the trimmer when it is upside down or when it
is not in the proper working position.
• Turn the trimmer off and disconnect the plug when:
the trimmer is not in use; it is left unattended; it is being
examined because it is not working correctly; the power
supply cable is damaged; the trimming line spool is being
• Only use the same type of line originally provided with the
trimmer.
• Do not use the trimmer to cut grass that is not in contact
with the ground.
© 2013 by Snow Joe, LLC
All rights reserved. Original instructions.
SAVE THESE INSTRUCTIONS
1
• Damage to cord – Keep power cord away from the rotating
line. If you damage the cord, unplug it from the power
supply before moving the tool or examining the damage.
A damaged cord must be replaced before further use.
• Do not switch the grass trimmer on in enclosed or poorly
ventilated spaces or in the presence of flammable and/or
explosive substances such as liquids, gases, and powders.
• The user of the grass trimmer is responsible for any damage
sustained by third parties that has been caused by the
grass trimmer within the working area.
• Disconnect the tool – Turn the trimmer off and disconnect
the plug when the trimmer is not in use, when replacing the
line, or prior to performing any maintenance task.
• Only cut during broad daylight or with adequate artificial
light.
• Avoid dangerous environmental conditions – Do not use
electric tools in damp or wet locations. Do not use the tool
in the rain. Follow all instructions in this manual for proper
operation of your tool.
• Do not cross roads or gravel paths while the trimmer
is still running.
• When the trimmer is not in use, store it in a dry place and
out of the reach of children.
• Do not operate portable electric tools in a gaseous or
explosive atmosphere – Motors in these tools normally
spark, and the sparks might ignite fumes.
• The trimmer must be operated in a vertical position,
perpendicular to the ground.
• Store idle tools indoors – When not in use, tools should
be stored indoors in a dry, locked-up place out of the reach
of children.
• Check regularly that all screws are properly secured.
Electrical Safety Rules
• Ground fault circuit interrupter (GFCI) protection should
be provided on the circuits or outlets to be used for this
gardening appliance. Receptacles are available having built
in GFCI protection and may be used for this measure of
protection.
• The voltage must correspond to the one marked on the
technical data plate (120 V~60 Hz). Do not use other
sources of power.
• The power line should have a circuit breaker no lower than
10 A. Consult an electrician if this is not the case.
• Secure extension cord – Use the cord retainer shown in
Figure 4.
• Do not abuse the cord – Never carry the tool by the cord
or yank the cord to disconnect it from the receptacle. Keep
cord away from heat, oil, and sharp edges.
• STAY ALERT – Watch what you are doing. Use common
sense. Do not operate the trimmer when you are tired or
under the influence of alcohol or drugs.
• Never pass the grass trimmer over the extension cord when
the grass trimmer is in use as this could cut the cord. Make
sure you know where the cord is at all times.
• Maintain appliances with care – Follow instructions for
lubricating and changing accessories. Inspect extension
cords periodically and replace if damaged. Keep handles
dry, clean and free from oil and grease.
• Use the special cord holder to connect the extension cord.
• Never use the trimmer when it is raining or when
excessively moist and humid conditions present. Do not
cut damp grass or leave the trimmer outside overnight.
• Check for damaged parts – Before further use of the
appliance, a guard or other part that is damaged should be
carefully checked to determine that it will operate properly
and perform its intended function.
• The power supply cable should be checked regularly to
make sure it is perfectly intact without any signs of wear or
damage. If the cable is not in good condition, do not use
the trimmer.
Check for alignment of moving parts, binding of moving
parts, breakage of parts, mounting, and any other condition
that may affect the trimmer’s operation. A guard or other
part that is damaged should be properly repaired or
replaced by an authorized service center unless indicated
otherwise in this manual.
• Only use an extension cable that is rated for outdoor use.
Keep the extension cord away from the cutting area, sharp
edges, heat, fuels and damp, oily surfaces.
• mWARNING! To reduce the risk of electric shock, use only
with an extension cord intended for outdoor use, such as
an extension cord of cord type SW-A, SOW-A, STW-A,
STOW-A, SJW-A, SJOW-A, SJTW-A, or SJTOW-A.
• Damage to unit – If the trimmer strikes a foreign object
or becomes entangled with it, stop the tool immediately.
Unplug it, check for damage and have any damage repaired
before further operation is attempted. Do not operate the
trimmer with a broken hub or spool.
2
Extension Cords
• Make sure your extension cord is in good condition. When
using an extension cord, be sure to use one heavy enough
to carry the current your product will draw. An undersized
cord will cause a drop in line voltage resulting in loss of
power and overheating. Table 1 shows the correct size
to use depending on cord length and nameplate Ampere
rating. If in doubt, use the next heavier gauge. The smaller
the gauge number, the heavier the cord.
• Ground Fault Circuit Interrupter (GFCI) protection should
be provided on the circuits or outlets to be used for this
electric trimmer. Receptacles are available with built-in
GFCI protection and may be used for this measure of
safety.
• Use only UL listed extension cords. Inspect the extension cord before use and never use damaged or altered
extension cords. Follow the extension cord manufacturer’s safety instructions.
• To prevent the appliance cord from disconnecting from the
extension cord during operation, use the plug-receptacle
retaining straps provided or make a knot with the two cords
as shown in Table 2.
Table 1. Minimum Recommended Extension Cord Gauge
(AWG) Chart
Total length of cord in feet
Volts
120V
100
150
AWG
(Extension Cord Gauge)
Ampere Rating
0–6
6 – 10
10 – 12
12 – 16
50
25
18
18
16
14
16
16
16
12
16
14
14
14
12
12
Not Recommended
Table 2. Method of Securing Extension Cord
Cord set
Appliance cord
(A) Tie cord as shown
(B) Connect plug and receptacle
3
Safety Symbols
The following table depicts and describes safety symbols that may appear on this product. Read, understand, and follow all
instructions on the machine before attempting to assemble and operate.
Symbol
Description
SAFETY ALERT – Indicates a precaution, a warning
or a danger.
READ THE OPERATOR’S MANUAL(S) – Read,
understand and follow all instructions in the manual(s)
before attempting to assemble and operate.
WARNING! Keep out of rain and away from wet areas.
For protection against injury, wear safety goggles
and ear protection.
Wear protective gloves and non-slip footwear when
using the machine and handling debris.
DANGER! Beware of thrown objects to bystanders. Keep
bystanders at least 15 m (50 ft) away from the machine.
WARNING! Remove the plug from the mains if cable is
damaged or cut and replace damaged cord immediately.
DOUBLE INSULATION – When servicing, use only
identical replacement parts.
4
Know Your Electric Grass Trimmer
1. ON/OFF switch
2. Cable restraint
1
3. Power cord
2
4. Handle knob
5. Auxiliary handle
5
3
6. Upper handle
4
7. Motor housing
8. Safety guard
9. Spool
6
7
9
8
Technical Data
Rated Voltage
120 V – 60 Hz
Line Diameter
0.055 in. (1.4 mm)
Rated Power
3 amp
Spool Length
16.4 ft (5 m)
Maximum Cutting Diameter
9.45 in. (24 cm)
Spool Advance
Bump Feed
No Load Speed
12,000/min
5
2. Secure the safety guard onto the trimmer head with the
screws provided (Fig. 3).
Assembly
Before assembly, make sure that the tool is switched off and
unplugged.
Fig. 3
Fitting the handle
1. Insert the motor housing into the handle until it locks
securely in place (Fig. 1).
2. Secure the handle with the screws provided (Fig. 1).
Fig. 1
Screws
Secure with screws
Preparing the trimmer for use
Mains supply cable strain relief
Fig. 4
Fitting the safety guard
mWARNING! The guard must be properly installed. The
guard provides partial protection to the operator and other
bystanders from the risk of thrown objects.
1. Fix the safety guard to the trimmer head, making sure the
sides are located along the grooves on the trimmer head
(Fig. 2).
Fig. 2
1. In order to reduce strain on the cable inlet, form a loop and
hook the cable around the strain relief arm (Fig. 4).
Operation
mWARNING! Remove stones, loose pieces of wood
and other objects from the cutting area. The blade continues
to rotate for a few seconds after the trimmer is switched off.
Let the motor come to a complete stop before switching the
trimmer back on. Do not rapidly switch the trimmer off and on.
mCAUTION! Always wear eye protection.
6
2. Slowly swing the trimmer from side to side (Fig. 7).
On/off switch
1. To switch on the trimmer, press and hold the trigger.
Release the trigger to stop (Fig. 5).
Fig. 7
Fig. 5
On/off switch
Trimming
1. Hold the trimmer at an angle of approximately 15-degrees
to the working area (Fig. 6).
3. Do not overload your trimmer; instead, take small “bites”
of grass, working from the top to the bottom.This will
keep the machine operating at high speed and will greatly
improve its cutting efficiency (Fig. 8).
Fig. 6
15°
Fig. 8
7
Application
Starting for the first time and operation
1. You will need to exert a certain force to pull out the line
when the trimmer is used for the first time. To do so, press
on the push button (Fig. 9) and pull out the line to the edge
of the guard hood.
Replacing the spool
mWARNING! Unplug the mains supply cable before
changing the trimmer line.
Fig. 9
NOTE: A dual-line factory wound spool (Model TRJ609ERS) is
available for easy spool replacement on the TRJ609E electric
grass trimmer. Visit www.snowjoe.com to purchase.
1. Disconnect the main plug.
2. Press together both locking device tabs on the spool cover
and remove the cover (Figs. 11-12).
3. Remove the spool from the spool cover (Fig. 13).
4. Remove the spring and clean out any dirt or grass residue.
Fig. 11
Spool cover
2. The line will be cut to the correct length the first time the
cutting head is started. A short, worn nylon line will result
in poor cutting performance.
Spool
3. To restore the correct line length, press the trimmer against
the ground while the cutting head is running.
Locking devices
4. The length of the line will then adjust automatically
(Fig. 10).
Fig. 12
Fig. 10
8
Fig. 15
Fig. 13
Spool
3. Firmly place the white cover on the spool and pull the
two ends approximately 3.5 inch (9 cm) out of the spool
(Fig. 16)
Fig. 16
Winding the line
NOTE: A dual-line factory wound spool (Model TRJ609ERS) is
available for easy spool replacement on the TRJ609E electric
grass trimmer. Visit www.snowjoe.com to purchase. Should
you wish to wind the line yourself, the instructions are provided
below. Self-winding, however, is NOT recommended because
if the line is not wound properly it can cause the trimmer’s
bump feed system to malfunction. For this reason, users are
strongly urged to purchase the pre-wound spool.
1. The spool can hold 16.4 ft (5 m) of line. Remove the white
cover. Holding the loose ends of the line together with
one hand, find the center of the line with the other hand
and hook this center loop into the groove on the spool as
shown in Fig. 14.
4. Along the groove, slide the line into the hole in the spool
cover (Fig. 17).
Fig. 14
Fig. 17
2. Wind the line following the directional arrows on the
spool housing and hook the two ends into the side
grooves (Fig. 15).
5. Prepare to assemble the spool into the trimmer.
9
mCAUTION! Catapulted pieces of nylon line may
Assembling the spool
NOTE: Users are strongly urged to purchase the pre-wound
spool. A dual-line factory wound spool (Model TRJ609ERS) is
available for easy spool replacement on the TRJ609E electric
grass trimmer. Visit www.snowjoe.com to purchase. When
using the factory wound spool, keep the protective white cover
encasing the line in place, then follow the directions below to
feed the line into the grass trimmer.
cause injury.
NOTE: The maximum recommended length of line in the spool
is 8 ft (2.5 m) per slot.
mWARNING! Pay attention to the winding direction.
1. Always replace the spool with a new pre-wound spool.
Visit www.snowjoe.com to purchase the pre-wound
spool (Model TRJ609ERS) for this electric trimmer.
Fig. 18
2. Insert the end of the line through the eyelet in the
cutting head.
IMPORTANT: Keep all areas of the cutting head cover and
cutting head clean. Place the cap back by pushing it firmly
onto the cutting head. To ensure that the cutting head cover
is correctly fitted, try to remove it without depressing the two
latches. If it is correctly fitted, it should not move.
Maintenance
mWARNING! Make sure to unplug your trimmer
before inspecting its parts.
Be sure the tool is unplugged.
• Your grass trimmer requires no additional lubrication or
maintenance. There are no user serviceable parts in your
power tool.
Spring
• Your trimmer line can dry out over time. To keep your line in
top condition, store spare pre-wound spools or bulk line in
a plastic, resealable bag with a tablespoon of water.
1. Insert the spring into the shroud and thread the line into
the hole as shown in Fig. 18.
• Never use water or chemical cleaners to clean your grass
trimmer. Wipe it clean with a dry cloth.
2. Place the spool cover on the spool and press it firmly
down until the locking devices of the spool cover securely
click into place (Fig. 19).
Fig. 19
Spool cover
• Plastic parts may be cleaned by using mild soap and a
damp rag.
• Always store your grass trimmer in a dry place. Do not allow
any liquid to get inside it.
Locking
devices
• Keep the motor ventilation slots clean.
• If you see some sparks flashing in the ventilation slots, this
is normal and will not damage your power tool.
• There are no user serviceable parts in the trimmer. If a
fault is suspected, return the trimmer to an authorized
dealer for repair.
IMPORTANT:
Spool
To ensure product safety and reliability, repairs, maintenance
and adjustment should be performed by authorized service
centers or other qualified service organizations, always using
identical replacement parts.
10
Storage
Service and Support
Follow these recommendations for storing the grass trimmer.
If your Electric Grass Trimmer requires service or maintenance,
please call 1-866-766-9563 for assistance.
• Clean the grass trimmer thoroughly before storing.
• Store the trimmer in a stable and safe position out of the
reach of children. Keep the trimmer in a dry place where the
temperature is not too hot or too cold.
• Do not store the grass trimmer resting against the floor.
Hang it by the upper handgrip so that the guard does not
touch anything. If the guard rests against a surface, its
shape and dimensions could be permanently altered, and
could render the machine unsafe to use.
Troubleshooting
Model and Serial Numbers
When contacting the company or reordering parts, you will
need to provide the model and serial numbers of your product.
These are found on the decal affixed to the housing or guard
of your Electric Grass Trimmer. Copy these numbers into the
space provided below.
Record the following numbers from the housing or handle of your
new product:
Model #:
T R J 6 0 9 E
If your tool does not seems to operate properly, follow the
instructions below. If this does not solve the problem, please
contact your local dealer’s authorized service center.
Serial #:
• Unplug the tool before checking its correct functioning.
Tool runs slowly
• Check that the spool housing can rotate freely.
Carefully clean it if necessary.
• Check that the cutting line does not protrude. If it does,
cut it off so that it just reaches the line trimming blade.
Bump line feed does not work
• Keep the tabs depressed and remove the spool cover
from the housing.
• Pull the cutting line until it reaches the trimming blade.
If insufficient cutting line is left on the spool, install a
new spool of cutting line as instructed.
• Align the tabs on the spool cover with the holes in
the housing.
• Push the cover onto the housing until it snaps securely
into place.
• If the cutting line protrudes beyond the trimming blade,
cut it off so that it just reaches the blade.
11
A Two-Year Full Warranty
for residential use
in the United States and Canada
General Conditions:
Snow Joe®, LLC warrants this product to the original purchaser for two years against defects in material or workmanship when used
for normal residential purposes. Snow Joe®, LLC will repair any defect in material or workmanship, and repair or replace any defective
part, subject to the conditions, limitations, and exclusions set forth herein. Such repair or parts replacement will be free from charge to
the original purchaser except noted below.
The duration of the warranty applies only if the product is put to personal use around the household or residence. If the product is put
to any business use, commercial or industrial, then the duration of this warranty is 90 days from the date of original purchase. If any
product is rented or leased, the duration of the warranty is 90 days from the date of original purchase.
It is the owner’s responsibility to perform correctly all maintenance, and minor adjustments explained in the owner’s manual.
Electric Products:
To obtain a replacement electric powered unit or repair the existing electric powered unit, you must return the complete unit and
postage prepaid to: Snow Joe Return Center, 86 Executive Avenue, Edison, NJ 08817.
Gasoline / Battery Products:
Limitations
• Batteries are warranted only for the period of 12 months after the date of purchase on a prorated basis. Rechargeable batteries
will be replaced free from charge during the first 90 days. After the initial 90 days, batteries will be replaced at a prorated cost to
the customer.
• Idlers, cables, and electrical components are warranted to the original purchaser for use at household or residence for a period
of two years.
Exclusions
• Snow Joe® brand engines are covered under this warranty. All other engines and engine accessories are covered only by the
engine manufacturer’s warranty and are not covered by this warranty.
• Parts used that are not genuine Snow Joe® parts are not covered by this warranty.
• Damages resulting from misuse, alteration, improper assembly, improper adjustment, neglect, or accident which requires repair
is not covered under this warranty.
• Belts, augers, and tines are not covered under warranty – belts, augers, and tines wear out and can be purchased at
www.snowjoe.com or by calling 1-866-766-9563.
Snow Joe®, LLC may from time to time change the design of its products. Nothing contained in this warranty shall be construed as
obligating Snow Joe®, LLC to incorporate such design changes into previously manufactured products, nor shall such changes be
construed as an admission that previous designs were defective.
This warranty is intended to cover product defects only. Snow Joe®, LLC is not liable for indirect, incidental, or consequential damages
in connection with the use of the Snow Joe® Products covered by this warranty. This warranty does not cover any cost or expense
incurred by the purchaser in providing substitute equipment or service during reasonable periods of malfunction or non-use of this
product, while waiting for completion of repairs under this warranty. Some states do not allow exclusions of incidental or consequential
damages, so the above exclusions may not apply in all states. This warranty may give you specific legal rights in your state.
If you wish to contact Snow Joe®, please direct inquiries to the:
Customer Service Department
Snow Joe Center
86 Executive Avenue
Edison, NJ 08817
Customers who have purchased Snow Joe® products exported from the United States and Canada should contact their Snow Joe®
Distributor (Dealer) to obtain information applicable for your country, province, or state. If for any reason, you are not satisfied with the
distributor’s service, or if you have difficulty obtaining warranty information, contact your Snow Joe® seller. If in the event your efforts
are unsatisfactory, please write to the Snow Joe® Center at the above address.
If you have any questions about your product warranty, please call 1-866-SNOW-JOE or visit us online at www.snowjoe.com.
12