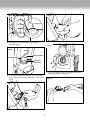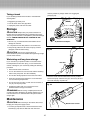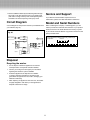
1
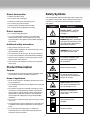
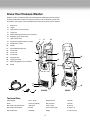
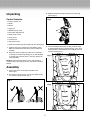
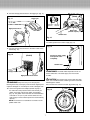
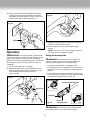
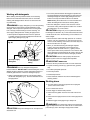
1740 PSI/1.59 GPM Electric Pressure Washer
Model No. SPX2000
Form No. SJ-SPX2000-880E
OPERATOR’S MANUAL
A Division of Snow Joe®, LLC
• Stay alert – Watch what you are doing. Use common
sense. Do not operate the pressure washer when you are
tired, or under the influence of alcohol or drugs.
IMPORTANT!
Safety Instructions
• Do not overreach – Keep proper footing and balance at
all times.
All Operators Must Read These
Instructions Before Use
• Avoid unintentional starting – Do not carry plugged-in
machine with finger on the trigger. Make sure the switch is
off before plugging in the machine.
Safety Alert Symbols
• Do not abuse the cord – Never carry the machine by the
cord or yank the cord to disconnect it from the receptacle.
Keep the cord away from heat, oil, and sharp edges.
Always follow these safety guidelines. Failure to do so may
result in serious bodily injury or death.
• Use safety glasses – Also use safety footwear, snug-fitting
clothing, protective gloves, hearing and head protection.
mWARNING! This indicates a hazardous situation, which,
• Water temperature – Pressure washer is not meant to
pump hot water. NEVER connect it to a hot water supply as
it will significantly reduce the life of the pump.
if not avoided, could result in death or serious injury.
m
CAUTION! This indicates a hazardous situation, which,
if not avoided, could result in minor or moderate injury.
mDANGER! This indicates a hazardous situation, which, if
not followed, will result in death or serious injury.
• Store indoors – NEVER store the pressure washer
outdoors or where it could freeze. The pump will be
seriously damaged.
Safety Rules
mWARNING! This appliance is not intended for use
• Ground Fault Circuit Interrupter (GFCI) – Protection
should be provided on the circuits or outlets to be used for
this pressure washer. Receptacles are available having builtin GFCI protection and may be used for this measure
of safety.
by children or by unassisted, unsupervised persons whose
physical, sensory or mental capabilities prevent them from
using it safely. Children should be supervised to ensure that
they do not play with the appliance.
• The insulation of the power cord should be faultless and
without any cracks. If the power cord is damaged, an
authorized distributor should replace it.
mWARNING! Do not use this appliance without reading
Before starting up your machine please check it carefully for
any defects. If you find any, do not start up your machine and
contact your distributor.
this instruction manual.
mWARNING! This appliance has been designed for
mWARNING! When using the pressure washer, basic
use with cleaning agents that are recommended by the
manufacturer. The use of other cleaning agents or chemicals
may adversely affect the safety of the appliance.
safety precautions should always be followed to reduce the
risk of fire, electric shock, and personal injury, including the
following:
mWARNING! Do not use the appliance within range of
persons unless they are wearing protective clothing.
• Know your product – Know how to stop the machine
and bleed pressure quickly. Be thoroughly familiar with the
controls.
mWARNING! High pressure jets can be dangerous if
subject to misuse. The jet must not be directed at persons,
pets, live electrical equipment or the appliance itself.
• Keep bystanders away – All visitors and pets should be
kept a safe distance away from the work area.
• Do not direct the jet against yourself or others in order to
clean clothes or footwear.
• Use the right product – Do not use this machine for any
job except that for which it is intended.
• Risk of explosion – Do not spray flammable liquids.
• Dress properly – Do not wear loose clothing or jewelry.
They can get caught in moving parts. Protective rubber
gloves and non-slip footwear are recommended when
working outdoors.
• Disconnect tool – Disconnect from the electrical power
supply before performing any maintenance task.
• Keep children away – High pressure washer must not be
used by children or untrained personnel.
• Caution! – Exercise caution to avoid slipping or falling.
Wear protective footwear that will protect your feet and
improve your footing on slippery surfaces.
• To ensure appliance safety, use only original replacement
parts from the manufacturer or approved by the
manufacturer.
© 2013 by Snow Joe®, LLC
All rights reserved. Original instructions.
SAVE THESE INSTRUCTIONS
1
mWARNING! Water that has flown through backflow
Electrical Safety
mWARNING! During cleaning, maintenance or when
ATTENTION: If there are problems with the electrical
preventers is considered to be non-potable.
mWARNING! High pressure hoses, fittings, and couplings
MAINS, short voltage drops may appear when starting the
equipment. This can, in turn, influence other equipment (e.g.
cause a lamp to blink). If the MAINS-IMPEDANCE Zmax <
0.335 OHM, such disturbances are not expected. (In case
of assistance, contact your local supply authority for further
information.)
• Check for damaged parts – Do not use the appliance if the
supply cord or other important parts of the appliance are
damaged (e.g. safety devices, high pressure hoses, trigger
gun).
WARNING! Electrical Shock Hazard
Before starting up your machine, please check it carefully for
any defects. If you find any, do not start up your machine and
contact your distributor.
replacing parts, the machine must be disconnected from its
power source by removing the plug from the socket outlet.
are important for the safe operation of the appliance. Use
only hoses, fittings, and couplings recommended by the
manufacturer.
m
mWARNING! If an extension cord is used, the plug and
The following should be observed when connecting the high
pressure washer to the electric installation:
socket must be of watertight construction.
mWARNING! Inadequate extension cords can be
• The electric supply connection should be performed by a
qualified person.
dangerous.
• The electric supply to this appliance should include either
a residual current device that will interrupt the supply if the
leakage current to the earth exceeds 30 mA for 30 ms or a
device that will interrupt the earth circuit (GFCI).
• This high pressure washer must not be used at
temperatures below 32ºF (0°C).
mWARNING! Power cords on drums should always be
completely unwound to prevent the cord from overheating.
IMPORTANT: Only use water without any impurities.
If there is a risk of running sand into the inlet water (i.e. from
your own well), an additional filter should be installed.
• Power cord connections should be kept dry and off the
ground.
• Comply with the below requirements for length and cord
specs (Table 1):
Total length of cord in feet
Volts
120V
25
100
50
Ampere Rating
More than
Not more than
0–6
6 – 10
10 – 12
Safety devices
The unloader valve can reduce pressure if it exceeds preset
values. The spray gun features a locking device. When the lock
is activated, the spray gun cannot be operated.
150
• Thermal sensor – A thermal sensor protects the motor
against overloading. The machine will restart after a few
minutes when the thermal sensor has cooled.
AWG
18
18
16
16
16
16
16
14
14
12
• Double insulation – In a double-insulated product, two
systems of insulation are provided instead of grounding.
No grounding means are provided on a double-insulated
product, nor should a means for grounding be added to
the product. Servicing a double-insulated product requires
extreme care and knowledge of the system, and should be
performed only by a qualified service person. Replacement
parts for a double-insulated product must be identical to the
parts they replace. A double-insulated product is marked
with the words “DOUBLE INSULATION” or “DOUBLE
INSULATED”. The symbol “ ” may also be marked on the
product.
Not Recommended
Table 1
• If the power cord is damaged, it must be replaced by the
manufacturer or his service agent or similarly qualified
person in order to avoid a hazard.
• Keep the machine on a stable, flat surface during operation,
handling, transportation, and storage. Sudden overturn of
the machine can cause bodily injury.
• In the event of an accident or breakdown, switch off the
machine immediately. (If contact with detergent occurs,
rinse with an abundance of clean water.)
• Ground Fault Circuit Interrupter (GFCI) – This pressure
washer is provided with a ground-fault circuit-interrupter
(GFCI) built into the plug of the power-supply cord. This
device provides additional protection from the risk of
electric shock. Should replacement of the plug or cord
become necessary, use only identical replacement parts
that include GFCI protection.
2
Safety Symbols
Risk of electrocution
• Inspect cord before using.
The following table depicts and describes safety symbols that
may appear on this product. Read, understand, and follow all
instructions on the machine before attempting to assemble
and operate.
• Do not use if cord is damaged.
• Keep all connections dry and off the ground.
• Do not touch plug with wet hands.
• Keep cord away from heat and sharp edges.
Symbol
• Do not spray electrical apparatus and wiring.
Description
SAFETY ALERT – indicates
a precaution, a warning or
a danger.
Risk of explosion
• Do not spray flammable liquids.
• Do not use acids, bases, solvents, or any flammable
material in this product. These substances can cause
physical injuries to the operator and irreversible damage to
the machine.
READ THE OPERATOR’S
MANUAL(S) Read, understand
and follow all instructions in the
manual(s) before attempting to
assemble and operate.
Additional safety instructions
• High pressure: keep clear of nozzle.
• Injection hazard: equipment can cause serious injury if the
spray penetrates the skin.
WARNING! Keep out of rain
and away from wet areas.
• Do not point the gun at anyone or at any part of the body.
• In case of skin penetration, seek medical aid immediately.
For protection against injury,
wear safety goggles and
ear protection.
• Before servicing, cleaning or removing any parts, shut off
the power and relieve pressure.
• This machine is not suitable for connection to the potable
water mains.
Product Description
Electrical shock hazard.
Purpose
• The high pressure cleaner is intended for residential use to
clean vehicles, machines, buildings, facades, etc.
To reduce the risk of injury,
user must keep all bystanders
at least 15 m away.
Areas of application
• Never use the machine in potentially explosive areas under
any circumstances!
SWITCH OFF! Remove plug
from outlet immediately if the
cord is damaged or cut.
• The operating temperature must be between 32ºF (0ºC) and
104ºF (+40ºC).
• The machine consists of an assembly with a pump, which
is encased in a shock-absorbing housing. To provide the
operator with an optimal working position, the machine is
equipped with a spray wand and a non-slip handle grip,
whose shape and configuration comply with applicable
regulations.
Machine not suitable for
connection to the potable
water mains.
Sound power level is
96 dB(A).
• Do not cover or modify the spray wand or the spray nozzles
in any way.
• The high pressure washer is designed to be used with cold
or lukewarm water; higher temperatures can damage the
pump.
Double insulation.
• Do not use water that is dirty, gritty or contains any
chemical products, as these could impair operation and
shorten the life of the machine.
3
Know Your Pressure Washer
Read the owner’s manual and safety rules carefully before operating the pressure washer.
Compare the illustration below to the pressure washer in order to familiarize yourself with
the location of the various controls and adjustments. Save this manual for future reference.
1.
Safety lock
2.
Trigger
3.
High pressure hose connection
4.
Trigger gun
5.
Water outlet (high pressure hose connection)
6.
Adjustable spray wand nozzle
7.
High pressure hose
8.
Garden hose adaptor (female coupler)
9.
Needle clean out tool
10.
Handle
11.
Removable detergent tank
12.
Hose holder
13.
Power cord
14.
Cord holder
15.
Detergent tube
16.
Trigger gun holder
17.
Water inlet (garden hose connection)
18.
Wheel
1
2
10
3
11
15
4
12
14
16
13
5
6
7
8
9
18
17
(FRONT)
(REAR)
Technical Data
Rated Voltage
120 V ~ 60 Hz
Rated Pressure
1160 PSI
Motor
12.5 amp (1500 W)
Max. Pressure
1740 PSI
Max. Water Inlet Temperature
104ºF/40ºC
Hose Length
20 ft (6 m)
Max. Water Inlet Pressure
0.7 MPa
Power Cord Length
35 ft (10.7 m)
Max. Rated Flow
1.59 GPM
Weight
17.4 lbs (7.9 kg)
4
3. Slide the handle into position and secure it with 2 long
screws (Fig. 2).
Unpacking
Carton Contents:
Fig. 2
• Pressure washer unit
• Handle
• Manual
• Trigger gun
• Adjustable spray wand
• Removable detergent tank
• Needle clean out tool
• 2 long screws
• 2 small screws
• High pressure hose
• Garden hose adaptor (female coupler) with two sealing rings
4. Insert the detergent bottle (top end first) under the ridge
of its designated storage compartment (Figs. 3 & 4). Then
snap the bottom of the bottle into the V-shaped groove to
secure it in place (Fig. 5).
1. Carefully remove the contents from the shipping carton.
Make sure that all items listed in the carton contents are
included.
2. Inspect the product carefully to make sure no breakage
or damage occurred during shipping. If you find damaged
or missing parts, DO NOT return to the store. Please call
1-866-766-9563.
Fig. 3
NOTE: Do not discard the shipping carton and packaging
material until you are ready to use your new Electric Pressure
Washer.
Assembly
1. Position the washer as CLOSE as possible to the
water supply.
2. The washer must be used on a secure and stable surface
in a standing, upright position (Fig. 1).
Fig. 1
Fig. 4
5
Fig. 5
Fig. 8
5. Connect the PVC detergent tube to the detergent
connection (Fig. 6).
Fig. 9
Fig. 6
Detergent tank
Detergent tube
Detergent
connection
7. Fit the spray wand into the gun and rotate it until the two
parts are completely locked (Fig. 10).
6. To assemble the hose holder, slide the holder into position
(Figs. 7 & 8) and secure it to the unit with two small screws
(Fig. 9).
Fig. 10
Fig. 7
6
8. Connect the high pressure hose to the trigger gun (Fig. 11).
(REAR)
Fig. 11
Trigger gun
Garden hose
(male end)
This end to
water inlet
High pressure hose
Water inlet
(female coupler)
Garden hose
Fig. 13
11. Attach garden hose to water supply (Fig. 14).
Fig. 14
9. Connect the high pressure hose to the water outlet on the
washer (Fig. 12).
Fig. 12
Connect to water supply
and open the valve
completely
(FRONT)
Garden hose
mWARNING! The intake water temperature must not
High pressure hose
exceed 104ºF/40ºC. The water supply must not exceed
0.7 MPa.
High pressure water outlet
m
CAUTION! The washer must only be used with clean
water; use of unfiltered water containing corrosive chemicals
will damage the washer.
mWARNING! Keep hose away from sharp objects.
Bursting hoses may cause injury. Examine hoses regularly and
replace if damaged. Do not attempt to mend a damaged hose.
12. Push the motor switch to the OFF (0) position (Fig. 15).
10. Connect the garden hose adaptor (female coupler) to
the water inlet of the pressure washer, then thread your
garden hose (male end) into the garden hose adaptor
(Fig. 13). The garden hose must have an internal diameter
of at least 13 mm (1/2 in.) and must be reinforced. The
water supply must be at least equal to the washer delivery
capacity.
OFF
ON
OFF 0
1
ON
Fig. 15
NOTE: The machine is not suitable for connection to the
potable water main.
7
13. Check that the electrical supply voltage and frequency
(Volt/Hz) correspond to those specified on the washer
rating plate. If the power supply is correct, you may now
plug the washer into the power outlet (Fig. 16).
Fig. 18
Fig. 16
GFCI
3. Keeping the trigger pressed, turn the switch to the ON (1)
position to start the pressure washer.
4. When re-starting the motor, always keep the trigger
pressed.
Operation
mIMPORTANT! This pressure washer is equipped with
NOTE: The motor only runs when the trigger is operated
and shuts off when the trigger is released.
Using the accessories
a micro-switch sensitive to water flow. This Total Stop System
(TSS) senses water flow in the pump. When the trigger is
released, water stops flowing through the pump. The TSS then
automatically turns the motor off to protect the pump from
overheating.
mWARNING! High pressure jets can be dangerous if
subject to misuse. The jet must not be directed at persons,
pets, live electrical equipment or the appliance itself.
• The washer is equipped with an adjustable nozzle.
1. Turn the water supply tap on completely.
• The water pressure can be adjusted from low pressure (–) to
high pressure (+) by turning the pressure adjustment knob.
(Fig. 19).
2. Release the safety lock, then press the trigger for a few
seconds until water flow is steady to allow air to escape
and to discharge residual pressure in the hose
(Figs. 17 and 18).
• The nozzle tip can be adjusted from stream (wide open tip)
to fan (narrow tip) by turning the nozzle tip adjustment knob
as indicated by the directional arrows (Fig. 19).
Fig. 17
Open
Safety lock
Pressure adjustment knob
Stream
Close
Nozzle tip
Trigger
Fig. 19
Nozzle tip
adjustment knob
Fan
mWARNING! Do not adjust the nozzle while the trigger
is squeezed. Failure to do so could result in damage.
8
• Turn on the pressure washer. Pull trigger to operate unit.
The liquid detergent will automatically mix with water and
discharge through the nozzle. Apply detergent from the
bottom to the top of the DRY surface to be cleaned.
Working with detergents
When cleaning with the pressure washer, some cleaning
tasks can be solved with water alone, but for most tasks
cleaning with detergent allows the user to remove the dirt
more effectively.
NOTE: Wetting the surface first is not recommended as it
dilutes the detergent and reduces its cleaning ability.
mWARNING! To apply detergents you must be operating
• Allow the detergent to remain on the surface for a short
time before rinsing with the pressure washer. Do not allow
the detergent to dry on the surface.
at low pressure. This provides a gentle application of the
detergent, with the pressure equivalent to a low-set garden
hose. The high pressure setting is used for cleaning. You
cannot apply detergents when working at high pressure.
m
CAUTION! Damage may occur to painted surfaces if
the detergent is allowed to dry on the surface. Wash and rinse
a small section at a time. Avoid working on hot surfaces or in
direct sunlight.
• Set the pressure adjustment knob to the low pressure
(–) setting and turn the nozzle tip adjustment knob wide
open to apply detergent. (Fig. 20).
• Rinse with clean water under high pressure. On a vertical
surface, rinse from the bottom up, then rinse from the top
down to avoid streaking. Hold nozzle 6-8 inches away from
the work surface at a 45° angle.
Fig. 20
• When you have finished using the detergent injection
system, remove the detergent suction tube from the
detergent bottle and insert it into 5 L (1 gallon) of fresh
water. Siphon water at low-pressure for one minute so that
all the detergent is flushed through the system. Remove the
detergent bottle and rinse it until it is thoroughly cleaned.
Op
e
n
m
Open tip to apply
detergents
CAUTION! Failure to clean properly will cause the
injection system to become clogged and inoperable.
Turn to negative (–)
for low pressure
setting
mIMPORTANT! NEVER USE:
• Bleach, chlorine products and other corrosive chemicals.
• Liquids containing solvents (e.g. paint thinners, gasoline,
oils).
mWARNING! Use only detergents designed for
Pressure Washers. DO NOT USE household detergents, acids,
alkaline solutions, bleaches, solvents, flammable material, or
industrial grade solutions. These can damage the pump.
• Tri-sodium phosphate products.
• Ammonia products.
• Acid-based products.
• Gently pull the detergent tank out of its storage position
and fill with detergent (Fig. 21). Push the tank back into its
storage position.
• These chemicals will harm the unit and will damage the
cleaning surface.
Shutting down
Fig. 21
1. Turn the switch to the OFF (0) position and unplug the
power cord from the outlet.
2. Turn off the water source.
3. Press trigger to release water pressure.
4. Disconnect the garden hose from the water inlet on the
unit.
5. Disconnect the high pressure hose from the high pressure
outlet.
6. Release trigger and engage the gun safety lock.
Detergent tank
mWARNING! Turn off the water supply and squeeze the
trigger to depressurize the unit. Failure to do so could result in
personal injury due to discharge of high pressure water.
mCAUTION! Always test detergent in an inconspicuous
area before use.
9
water to prevent any foreign matter from clogging the
pump (Fig. 23).
Taking a break
If you are taking a break of five minutes or more between
cleaning tasks:
Fig. 22
• Engage the gun safety lock.
(REAR)
• Turn the switch to the OFF (0) position.
• Unplug the power cord from the outlet.
Storage
mCAUTION! Always store your pressure washer in a
location where the temperature will not fall below 32ºF (0ºC).
The pump in this machine is susceptible to permanent damage
if frozen. FREEZE DAMAGE IS NOT COVERED BY THE
WARRANTY.
Water inlet filter
• Store in a dry, covered area where the weather cannot
damage the machine.
Garden hose adaptor
• It is important to store this product in a frost-free area.
• Always empty water from all hoses, the pump, and the
detergent container before storing.
Fig. 23
m
CAUTION! The use of a pump protector is
recommended to prevent cold weather damage during storage
over the winter months.
Winterizing and long-term storage
If you must store your pressure washer in a location where
the temperature is below 32ºF (0ºC), you can minimize the
chance of damage to your machine by utilizing the following
procedure:
Inlet filter
• Disconnect all water connections.
• Turn on the machine for a few seconds until the remaining
water in the pump exits. Turn off immediately.
• Do not allow the high pressure hose to become kinked.
• Clean the nozzle with the needle clean out tool provided.
Remove the spray wand from the gun; remove any dirt from
the nozzle hole (Fig. 24) and rinse.
• Store the machine and accessories in a room that does
not reach freezing temperatures.
• Do not store near a furnace or other sources of heat as it
may dry out the pump seals.
Fig. 24
• Operate the washer with non-corrosive/non-toxic
antifreeze before storing for the winter.
mWARNING! Before reusing, completely flush the unit
out with plain water. Antifreeze can damage paintwork so you
must ensure there is no antifreeze left in the system before
using it again.
Maintenance
mCAUTION! Before working on the washer, disconnect
Needle clean out tool
the plug from the power supply socket.
• To ensure good performance, check and clean the water
inlet filter (Fig. 22). Remove filter and rinse with warm
10
Service and Support
• Remove additional debris by back flushing water through
the nozzle. To do this, place the end of your garden hose
(with water running) to the tip of the nozzle pushing water
and debris out the back opening of the spray wand.
If your Electric Pressure Washer requires service or
maintenance, please call 1-866-766-9563 for assistance.
Circuit Diagram
Model and Serial Numbers
A circuit diagram for the pressure washer is provided below for
your reference (Fig. 25).
When contacting the company or reordering parts, you will
need to provide the model and serial numbers of your product.
These are found on the decal affixed to the housing or guard
of your Electric Pressure Washer. Copy these numbers into the
space provided below.
Fig. 25
Record the following numbers from the housing or handle of your
new product:
Model #:
Micro-switch
Power cord
S P X 2 0 0 0
Serial #:
Motor
On/off switch
Capacitor
Disposal
Recycling the washer
• Do not dispose of electrical appliances as unsorted
municipal waste. Use separate collection facilities.
• Contact your local government agency for information
regarding the collection systems available.
• If electrical appliances are disposed of in landfills
or dumps, hazardous substances can leak into the
groundwater and get into the food chain, damaging your
health and well-being.
• When replacing old appliances with new ones, the retailer
is legally obligated to take back your old appliance for
disposal at least free of charge.
11
Troubleshooting
• Disconnect from the electrical power supply before carrying out user maintenance or checking its correct functioning.
• To avoid unnecessary disappointments, you should check the following before contacting the service organization:
Problems
Machine refuses
to start
Fluctuating pressure
Possible Cause
Possible Solution
• Power failure/machine not plugged
into a working receptacle.
• Check to make sure machine is plugged into
a working outlet.
• Defective socket.
• Replace fuse. Switch off other machines.
• Fuse has blown.
• Try without the extension cord.
• Defective extension cord.
• Check the power cord and reset the GFCI.
• Pump sucking air.
• Check the hoses and connections are airtight.
• Valves dirty, worn out or stuck.
• Clean and replace or refer to local distributor.
• Pump seals worn out.
Machine stops
• Check that the mains voltage corresponds to
specification on the model tag.
• Fuse has blown.
• Incorrect mains voltage.
• Leave the washer for 5 minutes to cool down.
Clean the nozzle.
• Thermal sensor activated.
• Nozzle partially blocked.
Fuse blows
• Fuse too small.
• Change to an installation higher than the amp
consumption of the machine. You may try without the
extension cord.
Machine pulsating
• Air in inlet hose.
• Allow machine to run with open trigger until regular
working pressure resumes.
• Inadequate supply of mains water.
• Check that the water supply corresponds to
specifications required.
• Nozzle partially blocked.
• Water filter blocked.
• WARNING! Avoid using long, thin hoses (min. 1/2 in.).
• Hose kinked.
• Clean the nozzle.
• Clean the filter.
• Straighten out hose.
Machine often starts
and stops by itself
• Pump/spray gun is leaking.
• Please call 1-866-766-9563 for assistance.
Machine starts, but
no water comes out
• Pump/hoses or accessories frozen.
• Wait for pump/hoses or accessories to thaw.
• No water supply.
• Connect inlet water.
• Water filter blocked.
• Clean the filter.
• Nozzle blocked.
• Clean the nozzle.
12
NOTES
13
A Two-Year Full Warranty
for residential use
in the United States and Canada
General Conditions:
Snow Joe®, LLC warrants this product to the original purchaser for two years against defects in material or workmanship when used
for normal residential purposes. Snow Joe®, LLC will repair any defect in material or workmanship, and repair or replace any defective
part, subject to the conditions, limitations, and exclusions set forth herein. Such repair or parts replacement will be free from charge to
the original purchaser except noted below.
The duration of the warranty applies only if the product is put to personal use around the household or residence. If the product is put
to any business use, commercial or industrial, then the duration of this warranty is 90 days from the date of original purchase. If any
product is rented or leased, the duration of the warranty is 90 days from the date of original purchase.
It is the owner’s responsibility to perform correctly all maintenance, and minor adjustments explained in the owner’s manual.
Electric Products:
To obtain a replacement electric powered unit or repair the existing electric powered unit, you must return the complete unit and
postage prepaid to: Snow Joe Return Center, 86 Executive Avenue, Edison, NJ 08817.
Gasoline / Battery Products:
Limitations
• Batteries are warranted only for the period of 12 months after the date of purchase on a prorated basis. Rechargeable batteries
will be replaced free from charge during the first 90 days. After the initial 90 days, batteries will be replaced at a prorated cost to
the customer.
• Idlers, cables, and electrical components are warranted to the original purchaser for use at household or residence for a period
of two years.
Exclusions
• Snow Joe® brand engines are covered under this warranty. All other engines and engine accessories are covered only by the
engine manufacturer’s warranty and are not covered by this warranty.
• Parts used that are not genuine Snow Joe® parts are not covered by this warranty.
• Damages resulting from misuse, alteration, improper assembly, improper adjustment, neglect, or accident which requires repair
is not covered under this warranty.
• Belts, augers, and tines are not covered under warranty – belts, augers, and tines wear out and can be purchased at
www.snowjoe.com or by calling 1-866-766-9563.
Snow Joe®, LLC may from time to time change the design of its products. Nothing contained in this warranty shall be construed as
obligating Snow Joe®, LLC to incorporate such design changes into previously manufactured products, nor shall such changes be
construed as an admission that previous designs were defective.
This warranty is intended to cover product defects only. Snow Joe®, LLC is not liable for indirect, incidental, or consequential damages
in connection with the use of the Snow Joe® Products covered by this warranty. This warranty does not cover any cost or expense
incurred by the purchaser in providing substitute equipment or service during reasonable periods of malfunction or non-use of this
product, while waiting for completion of repairs under this warranty. Some states do not allow exclusions of incidental or consequential
damages, so the above exclusions may not apply in all states. This warranty may give you specific legal rights in your state.
If you wish to contact Snow Joe®, please direct inquiries to the:
Customer Service Department
Snow Joe Center
86 Executive Avenue
Edison, NJ 08817
Customers who have purchased Snow Joe® products exported from the United States and Canada should contact their Snow Joe®
Distributor (Dealer) to obtain information applicable for your country, province, or state. If for any reason, you are not satisfied with the
distributor’s service, or if you have difficulty obtaining warranty information, contact your Snow Joe® seller. If in the event your efforts
are unsatisfactory, please write to the Snow Joe® Center at the above address.
If you have any questions about your product warranty, please call 1-866-SNOW-JOE or visit us online at www.snowjoe.com.
14