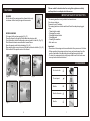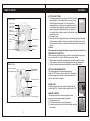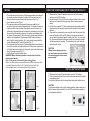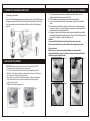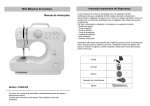
1
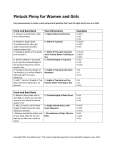
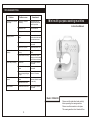
TROUBLESHOOTING
Problem
No power or the machine
runs slowly
Problem cause
Amendment
·Batteries are installed
incorrectly
·Reinstall the batteries
making sure they are the
correct way around
·Batteries are low
·Use new batteries
Mini multi-purpose sewing machine
Instruction Manual
·Adaptor power inadequate ·Use compatible adaptor
Skipping stitches
Bobbin thread cannot be
drawn up
Thread keeps breaking
·Needle eye not in the
middle
·Remove and re-insert the
needle with the flat side of
the needle to the back
·Needle bent
·Remove and re-insert a
new needle
·Presser foot too loose
·Tighten the presser foot
·Lower thread has been
used up
·Replace with new full
bobbin
·Needle threaded incorrectly
·Re-thread the needle,
making sure it is threaded
from the front to the back
·Needle bent
·Remove and re-insert a
new needle
·Needle shank not properly
seated
·Remove and re-insert a
new needle
·Thread tension dial, thread ·Loosen the thread tension
guide or thread pulling bar between 3-5 number
too tight
Stitches too loose or
uneven
·Thread blocked by upper
bobbin
·Upper thread too loose
Needle breaks
·Needle bent or deformed
·Pull out the spool pin and
make the bobbin or thread
run smoothly
·Remove and re-insert a
new needle
Model: FHSM-505
Please read the instruction book carefully
before operating the sewing machine.
Please save this manual in a safe place.
This sewing machine is for Household Use.
10
FEATURES
ADJUSTING STITCHING
1. As shown in the picture A, normal stitching shall have top and
bottom threading neither over tight or loose.
Top thread
Cloth
Bottom thread
Fig.A
2. If the bottom threading looks like a straight line, which indicates
the top thread is too loose. Please turn in thread damp clock wise to
increase pressure until the stitching returns to normal.
Fig.B
3. However, when the top thread looks like a straight line indicating
an over-tight top thread, slowly turn the thread clamp anti clock wise
to reduce pressure until the stitching back to normal.
Fig.C
Correct Disposal of this product
This marking indicates that this product should not be disposed
with other household wastes throughout the EU. To prevent
possible harm to the environment or human health from
uncontrolled waste disposal, recycle it responsible to promote
the sustainable reuse of material resources. To return your used device,
please use the return and collection systems or contact the retailer
where the product was purchased. They can take this product for
environmental safe recycling.
9
Please read all instructions before using this appliance carefully
and keep them in a safe place for future use.
FEATURES
DRAWER
On the side of the sewing machine (towards the rear)
is a drawer for the handy storage of accessories
BOBBIN WINDING
Put a spool of thread on spool pin (Fig.11).
Place the thread to the right of the bobbin wider tension disk
Push the bobbin into the bobbin wider pin and push it to the left. (Fig.13)
Wind thread clockwise around bobbin several times.
Open the speed switch to start winding.(Fig.14)
Stop winding after correct volume of thread is winded on bobbin. (Fig.15)
Take bobbin off the spindle and cut the thread.
IMPORTANT SAFETY INSTRUCTION
This sewing machine is only suitable for domestic use.
Do not use outdoors.
Powered by an AC adaptor.
The sewing machine must be switched off and the adaptor unplugged
when:
- Threading the needle
- Changing the needle
- Changing bottom bobbin
- Changing parts
- Cleaning the machine
- After each use
Important:
- Never leave the sewing machine unattended in the presence of children.
- When operating the sewing machine, keep your hands away from the
needle, hand wheel, thread pulling bars and pattern selection dial.
- To clean the sewing machine, simply wipe it with a soft cloth and never
use any harsh chemical solutions.
ACCESSORIES
Fig.11
Fig.14
Fig.12
Fig.13
Fig.15
8
Foot controller
1
Thread spool
2
Bobbin
2
Needle threader
1
Needle
1
1
NAME OF PARTS
FEATURES
Front view
Take up lever
Upper thread
tension dial
Pattern
selection dial
Handwheel
Thread Cutter
Light
Needle clamp
screw
Reverse button
Power off &
speed switch
Drawer
Bottom bobbin
8 STITCH FUNCTIONS
1. The sewing machine has a choice of 8 different stitch
types /lengths. To select the stitch you require, look
at the diagrams numbered 1-8 on the front of the
sewing machine, choose the corresponding number
on the dial is lined up with the arrow. For example, to
select zigzag stitch (diagram number 2), simply turn
the selector dial until the number 2 on the dial is lined
up with the arrow.
2. Proceed to sew.
3. When you wish to change stitch type, turn the hand wheel on the side
of the sewing machine to raise the needle to the highest point and set
the pattern selection dial to the desired stitch type in the same way as
above.
Caution:
When you wish to change stitch type, you must carry out step 3 first.
REVERSE STITCH BUTTON
Reverse sewing (back stitching) is useful for reinforcing the beginning
and end of seams. To use this function proceed as follows:
1. Sew forwards as normal, and then press and hold down the reverse
stitch button on the front of the sewing machine to sew backwards.
2. To sew forwards again simply release the reverse stitch button.
Back view
Bobbin winder pin
Bobbin winder
tension disk
Bobbin winder stop
SETTING THE SEWING SPEED
This sewing machine has two sewing speeds.
Push the ‘OFF ’button, into the right, to the ‘H’ position
and the sewing speed will be increased, while in the ‘L’
position will reduce the speed.
Presser foot lifter
Presser foot
AC/DC input
Foot pedal input
2
WORK LIGHT
If additional light is needed, press the light switch to
turn the light ‘On’. Press the switch again to turn it ‘Off’.
SEWING SLEEVES
This sewing machine has been designed to sew
sleeves or any narrow openings in garment.
1. Lift the presser foot.
2. Position the garment over the sewing arm.
3. Lower the presser foot and follow the regular sewing
instructions.
7
SEWING
CONNECTING THE SEWING MACHINE TO THE MAINS POWER SUPPLY
1. Turn the hand wheel on the side of the sewing machine anticlockwise
to raise the needle to its highest position. Lift the presser foot and
place the fabric you wish to sew under the presser foot (Fig.7).
2. Lower the presser foot (Fig.8).
3. The sewing machine can be operated in two ways: with the foot
controller or with the “power off/speed switch”. To operate the sewing
machine with the foot controller simply press your foot down on the
pedal and to stop sewing at any time simply by releasing your foot from
the controller. Alternatively, when you are ready to start sewing slide
the “power off/speed switch” left to the low (L) position and the sewing
machine will automatically start sewing slide the“power off/speed
switch”right to the high position (H). In order to stop sewing slide the
“power off/speed switch” to the off position (Fig.9).
4. Turn the hand wheel on the side of the sewing machine anticlockwise
to raise the needle to the highest position. Lift the presser foot and pull
out the thread tension release bar, then gently remove the fabric away
from the sewing machine (Fig.10).
5. Cut the thread using the thread cutter.
WARNING: When the sewing machine is in use do not touch the
pattern selection dial.
Note: Thickness of cloth sewed by this model: 0.3mm
Best to use the machine to sew double layers of cloth, thus every stitch
is available. Best to use No.6, No.7, No.8 stitch to sew soft cloth
(thickness 0.3mm) or silk instead of other stitch patterns.
1. Make sure the “power off/speed switch on the front of the sewing
machine is in the OFF position.
2. Connect the jack (A) to the DC input socket on the back of the sewing
machine,and connect the three-pin plug (B) into the mains power
supply.
3. Connect the foot pedal “C” to the sewing machine by inserting the AC
power jack into the foot pedal input socket on the back of the sewing
machine.
4. To operate the sewing machine you can either use the foot pedal (the
power off/speed switch is in OFF position) for manual operation, or
you can slide the“power off/speed” switch to the left (L) or to the right
(H). Please note that both settings will switch on the sewing machine
and allow automatic operation. The low setting (L) is slow, while the
high setting (H) is fast.
CAUTION:
Whenever the sewing machine is
not in use make sure it is switched
off and unplugged from the mains
power supply.
INSTALLING THE BATTERIES
1. Make sure the “power off/ speed switch” is on the “Off” position.
2. Turn the sewing machine over on a flat surface and remove the battery
compartment cover.
3. Insert 4×AA batteries into the compartment and put the battery cover.
Fig.7
Fig.8
Fig.9
Fig.10
6
CAUTION:
To prevent accidental start up of the sewing machine, always make sure
that the “power off/speed switch” is in the “Off” position when inserting,
or changing the batteries.
3
THRENDING THE SEWING MACHINE
REPLACING THE BOBBIN
Threading upper thread
Caution: When threading the sewing machine make sure that the“power
off/speed switch” is in the OFF position and follow the steps 1-6 below.
Turn hand wheel counter clockwise until the needle is in the highest
position.
1. Turn the hand wheel counter clockwise until the needle is in the
highest position. Raise presser foot lifter.
2. Pull the slide plate forward and remove the empty bobbin
3. Leave 10cm thread tail from the new bobbin and put it in the bobbin
case
4. Hold needle thread loosely with your left hand. Turn the hand wheel
toward you with you, first lowering the needle and continuing until the
needle comes to its highest position
5. Lightly pull up the needle thread and pick up the bobbin thread which
will appear through the needle plate slot. Then pull both threads to the
back of the machine, leaving 10cm thread tail.
Caution:
It is essential that both top and bottom threaded correctly.
Check carefully and do practice stitch before beginning to sew.
Very Important:
Make sure you always use a metal bobbin, as otherwise the
magnetized bobbin case will not be activated and there will not be
tension on your bobbin thread.
Fig.4
Fig.3
NEEDLE REPLACEMENT
CAUTION: Remove the batteries and/or disconnect the AC/DC
adapter before starting to replace the needle.
1. Turn the hand wheel to raise the needle to its highest position.
2. Hold the old needles and loosen the needle clamp screw. Remove
the old needle and discard responsibly.
3. Insert the new needle into the clamp with the flat side toward the
right. Be sure to push the needle clamp before tightening the
needle clamp screw.
4.Tighten the needle clamp screw.
Fig.1
Fig.5
Fig.2
4
5
Fig.6