1
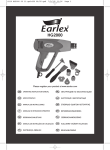
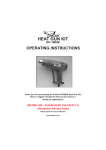
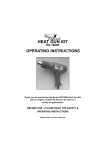
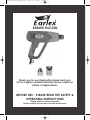
G136.qxd:G29 09/05.qxd
28/7/11
09:31
Page 1
EARLEX HG1200
Thank you for purchasing the Earlex heat gun.
This is a highly versatile tool that can be used in a
variety of applications.
BEFORE USE - PLEASE READ THE SAFETY &
OPERATING INSTRUCTIONS
Please retain for future reference
Please register your product at www.earlex.com
G136.qxd:G29 09/05.qxd
!
28/7/11
09:31
Page 2
SAFETY OPERATING INSTRUCTIONS
PLEASE READ BEFORE USE
DO NOT
Touch the nozzle.
Change/rotate the nozzle while the unit is
turned on.
Leave the heat gun unattended when it is
switched on.
Allow children to operate or play with the
heat gun.
Carry the heat gun by the power cable.
Allow heat to be directed onto the power
cable.
Use the heat gun as a hair dryer.
Restrict air flow from the nozzle outlet or
fan inlets.
Allow the heat gun to become damp or be
operated in damp conditions.
Use the heat gun close to inflammable
materials because heat may be conducted
to combustible materials which are out of
sight.
Apply to the same place for a long time.
Under any circumstances aim the heat gun
at another person or animal.
Use when explosive vapor or dust is in
the air.
Danger of burns - We recommend
wearing a pair of heavy grade, non
PVC type work gloves. Danger of fire
or explosion if the appliance is not
used with care.
When changing the nozzle, switch off and
allow the accessory and nozzle to cool.
After use stand the heat gun up vertically
(on its rear end) and allow to completely
cool down.
A hot nozzle can cause damage.
Before every use check the condition of
the plug and cable. If these are damaged in
any way do not use. Repairs must be
carried out by a fully qualified electrician.
Always ensure there is adequate
ventilation as gases and vapors may be
given off when stripping paint. Ensure that
protective goggles and masks are used.
Poisonous or inflammable gases may be
produced when working with paints
(especially older type lead paints),
varnishes, plastics and similar materials.
Ensure the heat gun switch is in the center
off position when connecting to the power
supply.
Ensure children and pets are kept away
from the work area.
It is recommended that a suitable circuit
breaker to UL489 is fitted between the
power supply and product for added
protection against electric shock.
This product is intended for ʻhouseholdʼ
use only.
This appliance is not intended for use by
persons (including children) with reduced
physical, sensory or mental capabilities,
or lack of experience and knowledge,
unless they have been given supervision
or instruction concerning use of the
appliance by a person responsible for
their safety.
Thermal cut out – This heat gun is fitted with a self-resettable thermal cut-out. If you find the
fan is on but the heating element is off, hold the gun away from the work piece and allow the
fan to cool the element. The heat gun should reset in approx. 1min.
TECHNICAL SPECIFICATION
Power supply
120V~ 60Hz
Max. output
1200 Watts
Temp at outlet
Position 1) 626°F*
Position 2) 950°F*
Weight
(excl. nozzles)
750g
TO OBTAIN THE BEST RESULTS FROM
YOUR HEAT GUN PLEASE READ THE
INSTRUCTIONS CAREFULLY BEFORE
USE.
HEAT SETTINGS
*MAX. temperatures achieved with concentrator
nozzle.
ABOUT THE HG1200
The HG1200 is a highly versatile electric
heat gun which can be used for many
different applications, such as:
Removal of paint
Defrosting metal water pipes
Forming and welding plastic
Reducing heat shrinking tubing
Soldering
The heat gun has two settings:
1. Low heat (switch down) - for use
where the work surface or
surroundings must not be allowed to
get too hot.
Setting~626°F.
2
2. High heat (switch up) - for faster heat
up time of the work surface where
you can also operate the gun at a
greater distance.
Setting~950°F.
G136.qxd:G29 09/05.qxd
28/7/11
09:31
Page 3
OPERATION
Before starting work it is advisable to test the
work surface for the ideal temperature to
use. The table below gives an indication of
the likely heat settings required but always
start with the low heat setting. All
applications, with the exception of removing
paint from window frames, can be performed
without using a nozzle, however for best
results nozzles are recommended.
Low
Removing paint - general
Do not heat the paint for too long as this
will burn the paint, making it difficult to
remove.
1.Choose the required nozzle and fit
onto the heat outlet.
2.Hold the gun with nozzle approximately
50mm (2”) from surface of paintwork.
3.Starting with the low heat setting, move
the gun slowly backwards and forwards
until the paint blisters and bubbles.
4.Immediately remove the paint with a
scraper or shavehook.
5.Aim to heat the paint just ahead of the
scraper so that you can develop a
continuous action.
Suggested Ratings
Welding plastic
Bending plastic
Heat shrinking
plastic
High
Paint stripping
Defrosting pipes
Removing paint from window frames
WARNING – Glass can break easily when
heated.
1.Use the glass protection nozzle.
2.Ensure the nozzle is facing the correct
way to deflect heat away from the
glass before you switch on the heat
gun.
3.Rotate the gun/nozzle 90º as you move
to horizontal or vertical bead (take care
it could be hot!).
4.Paint can be removed by using a
shavehook and/or a soft wire brush.
Removing vinyl
floor tiles
Soldering
Lighting BBQs
Nozzles
The gun is supplied with two different
shaped nozzles, which can be used as
follows:
Concentrator Nozzle - G84
Directs a
concentrated heat
flow to the work
surface.
Ideal for removing
paint in awkward
corners, crevices,
mouldings,
beading or
architraves.
G84
Deflects the heat
away from glass
or other fragile
areas.
Ideal for windowsills, ledges,
frames and
base boards.
Trouble Shooting
If a problem occurs always switch off the
unit immediately and disconnect from
power supply.
Concentrator nozzle
Glass Protection Nozzle - G89
Maintenance
Always allow the machine to cool down
(before storing) and disconnect from the
power supply. The heat gun should be
cleaned before being stored away by wiping
over with a clean damp cloth. DO NOT USE
CHEMICALS. Ensure that the ventilation
slots are not blocked.
My unit fails to work?
G89
If you are using an extension cable it must
be fully unwound and rated at 15 amps
capacity.
Refer to ʻThermal cut outʼ on page 2.
Glass
protection nozzle
3
G136.qxd:G29 09/05.qxd
28/7/11
09:31
Page 4
WARRANTY
This product is guaranteed for a period of 24 months against faulty materials and workmanship. While
every possible care is taken by Earlex to ensure that our products leave the factory in good working order,
Earlex cannot under any circumstances accept liability for problems or damage caused by their
subsequent use. It is the responsibility of the user to ensure that surfaces to be treated, cleaned or
stripped are suitable for this product. This warranty does not affect your statutory rights. This warranty
excludes the use for hire purposes. In the event of a fault occurring please contact our helpline before
returning the unit to our Service Department at the address below together with a copy of your purchase
receipt. All repairs will be dealt with promptly.
IF YOU REQUIRE FURTHER ASSISTANCE PLEASE CONTACT OUR HELPLINE ON:
Tel: 888-783-2612 email: [email protected]
Earlex reserves the right to modify or improve this product without prior notice.
Colors may vary from those shown.
For information on other products in the Earlex range, please contact us at the address below or visit our
website at: www.earlex.com
©Earlex Inc. 2011
Earlex Inc.
8261 Highway 73, Suite F,
Stanley, N.C. 28164, USA
Earlex Inc, Toll Free 888-783-2612
Email: [email protected] Website: www.earlex.com
G136 07/11