1
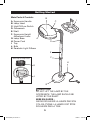
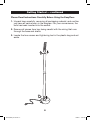
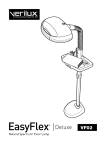
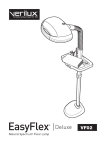
Model: VF02
VF02_MAN_Rev14.indd 1
12/29/11 4:24 PM
Dear Customer,
Thank you for purchasing the Verilux EasyFlex® Deluxe
Natural Spectrum® Floor Lamp. You have received
a quality product, backed by a one year limited
warranty. As a Verilux customer, your satisfaction
means everything to us. We look forward to serving
you now and in the future.
Many other healthy lighting products are available
through our catalog and online. Visit us on the web at
www.verilux.com to request a free catalog and learn
more about all our quality Verilux products, or call us
toll-free at 1-800-454-4408.
Have a bright day!
Nicholas Harmon
President, Verilux, Inc.
2
VF02_MAN_Rev14.indd 2
12/29/11 4:24 PM
READ ALL INSTRUCTIONS BEFORE USING
Important Safeguards
DANGER:
• Do not operate this lamp near a water source to avoid electrocution.
WARNING:
• Do NOT dismantle.
• Do not use with power supply voltage other than 120 VAC.
• Do not operate lamp in close proximity to flammable or combustible vapors,
such as aerosol spray products, or where oxygen is being administered.
• Do not cut or shorten the power cord.
• The bulb in this product contains a trace amount of mercury, a chemical
known to the state of California to cause birth defects or other reproductive
harm. This substance may also cause injury if inhaled or ingested.
CAUTION:
• For indoor use only.
• Always unplug lamp before performing bulb replacement or installation.
• This lamp is not for use with light dimmers, timers, motion detectors, voltage
transformers or extension cords.
• This product may cause interference with radios, cordless telephones or
devices that use a wireless remote control, such as televisions. If interference
occurs, move the product away from the device, plug the product or device
into a different outlet or move the lamp out of the line of sight of the remote
control receiver.
• Unplug lamp during lightning storms or when unused for extended periods of
time.
• Do not lift the lamp by the gooseneck. The lamp should be lifted by the shaft.
• Be very careful not to pinch any part of the cord between any metal pieces.
• Do not use solvents or cleaners containing abrasives, or ammonia based
cleaners on this product.
• All moisture should be properly wiped away and dried prior to restoring
power.
• Do NOT use lubricating agent in assembly; please see troubleshooting
section if you are having difficulty assembling your lamp.
• Unplug lamp before adjusting shaft extension.
• Dispose of bulbs per local regulations. For more information on clean-up and
disposal, see www.lamprecycle.org.
• Care should be taken to prevent bulb breakage.
SAVE THESE INSTRUCTIONS
3
VF02_MAN_Rev14.indd 3
12/29/11 4:24 PM
VEUILLEZ LIRE L’INTÉGRALITÉ DES INSTRUCTIONS AVANT TOUTE UTILISATION
Mesures de sécurité importantes
DANGER :
• N’utilisez pas cet appareil à proximité d’une arrivée d’eau pour éviter tout
risque d’électrocution.
AVERTISSEMENT :
• Ne pas démonter.
• Avant de brancher la lampe, vérifier que la tension de la prise murale ne
dépasse pas 120 volts.
• Ne pas faire fonctionner la lampe à proximité de vapeurs inflammables
ou combustibles, tels que les produits aérosol, ou lorsque l’oxygène est
administré.
• Ne pas couper ou raccourcir le cordon d’alimentation.
• Ce produit contient du mercure dans son ampoule suivre les reglements
locaux pour la mise au rebut de l’ampoule.
MISE EN GARDE :
• Pour usage intérieur seulement.
• Ne pas utiliser avec des gradateurs de lumière, des minuteries, des détecteurs
de mouvement ou des rallonges.
• Ce produit peut causer des interférences avec des radios, des téléphones
sans fil ou des appareils utilisant une télécommande sans fil, telle qu’une
télévision.
• Si des interférences se produisent, éloigner le produit de l’appareil, brancher le
produit ou l’appareil dans une autre prise ou encore déplacer la lampe hors de
la ligne de visée du détecteur de télécommande.
• Débrancher de la prise électrique lorsque le produit ne sert pas pendant de
longues périodes ou lors d’orages électriques afin d’assurer la protection des
pièces électroniques.
• Ne pas soulever la lampe par son col-de-cygne. La lampe doit être soulevée
par la tige.
• Prendre soin de ne pas pincer le cordon dans des pièces métalliques.
• Toujours débrancher la lampe avant de remplacer ou de poser l’ampoule.
• Ne PAS utiliser de produit lubrifiant lors de l’assemblage; voir la section de
dépannage en cas de difficulté lors de l’assemblage de la lampe.
• Ne pas utiliser de solvants ni de nettoyants contenant des abrasifs ou de
l’ammoniaque.
• Toute humidité doit être essuyée et séchée avant de remettre la lampe sous
tension.
• Débrancher la lampe avant d’effectuer son alignement.
CONSERVEZ CES INSTRUCTIONS
4
VF02_MAN_Rev14.indd 4
12/29/11 4:24 PM
Getting Started
Main Parts & Controls
B
A. Ergonomic Handle
B. Lamp Head
C. High/Off/Low Switch
D. Gooseneck
E. Shaft
F. Ergonomic Height
Adjustment Lever
A
G. Lamp Base
H. Power Cord
I. Tray
J. Bulb
K. Parabolic Light Diffuser
I
C
D
E
F
Close-up of Lamp Head
H
K
J
G
CAUTION:
CAUTION:
DO NOT LIFT THE LAMP BY THE
GOOSENECK. THE LAMP SHOULD BE
LIFTED BY THE SHAFT.
MISE EN GARDE :
NE PAS SOULEVER LA LAMPE PAR SON
COL-DE-CYGNE. LA LAMPE DOIT ÊTRE
SOULEVÉE PAR LA TIGE.
5
VF02_MAN_Rev14.indd 5
12/29/11 4:24 PM
Getting Started — continued
Please Read Instructions Carefully Before Using the EasyFlex®.
1. Unpack lamp carefully, removing all packaging material, and confirm
you have all parts shown in the diagram. For your convenience, the bulb has been inserted into the socket.
2. Remove all pieces from box being careful with the wiring that runs
through the base and shafts.
3. Locate the two screws and tightening tool in the plastic bag and set
aside.
6
VF02_MAN_Rev14.indd 6
12/29/11 4:24 PM
Assembly Instructions
1. Attach the lamp head gooseneck to
the shaft until the screw holes line up
as shown in Fig. 1. Use care when
tucking the wire into the shaft. Insert the
screw using the tightening tool and turn
clockwise to tighten.
Close-up of screw hole in
the lamp head
Fig. 1
2. Hold the upper shaft with one hand
and release the ergonomic height
adjustment lever by gently pulling it
upward as shown in Fig. 2. Extend
the upper shaft approximately
12". Lock the adjustment lever by
gently pushing it downward. Once
assembly is complete, raise or
lower the upper shaft to the desired
height by releasing and locking the
height adjustment lever.
Fig. 2
7
VF02_MAN_Rev14.indd 7
12/29/11 4:25 PM
Assembly Instructions — continued
3. Set the lamp base on the floor and insert
the lamp shaft over the base support unit
until the screw holes line up as shown in
Fig. 3. Insert the screw using the tightening
tool and turn clockwise to tighten.
Close-up of screw hole in
the lamp base
Fig. 3
4. Remove the light diffuser from
the protective plastic bag.
Insert the plastic pegs at the
bottom of the light diffuser into
the openings near the bulb
socket. Snap the tab
into place as shown
in Fig. 4.
Note: Be sure all
styrofoam packing
is removed from the bulb
area prior to installing the
light diffuser.
Fig. 4
8
VF02_MAN_Rev14.indd 8
12/29/11 4:25 PM
Bulb Replacement
Removal
1. Unplug the lamp from the power source
and allow bulb to cool.
2. To access the bulb, remove light diffuser
by depressing the tab and lifting it out
(Fig. 7).
3. Firmly hold the bulb base (B) and pull
bulb (C) from the socket (A) in an outward
motion (Fig. 8).
Fig. 7
Installation
B
1. Unplug the lamp from the power source.
2. Firmly hold the base (B) and push bulb (C)
into the socket (A).
3. Be sure the bulb is firmly seated in the
socket (Fig. 9) and snapped into the
metal bulb clip (D).
4. Replace the light diffuser.
Attention: Do not grip the bulb by the
glass tubes. Only touch the base when
removing or inserting the bulb.
Correctly Seated Bulb
D
C
A
Fig. 8
Incorrectly Seated Bulb
Notice
Large
Gap
No Gap
Fig. 9
9
VF02_MAN_Rev14.indd 9
12/29/11 4:25 PM
Troubleshooting
Before requesting service on your Verilux® lamp, please read the
following:
• Make sure all power connectors, cords and plugs are inserted fully
and securely.
• Be sure the bulb is securely seated into the socket (see page 9).
• Make sure there is power to the wall outlet or try another outlet.
Be sure the bulb is securely seated into the socket, repeat the bulb
installation process. CAUTION: ALWAYS UNPLUG LAMP BEFORE
PERFORMING BULB REPLACEMENT OR INSTALLATION.
10
VF02_MAN_Rev14.indd 10
12/29/11 4:25 PM
Care & Cleaning
Your lamp is made from high quality materials that will last for many
years with minimum care. You may want to periodically clean the lamp,
using a mild non-abrasive cleaner and soft cloth. When cleaning, make
sure you have turned off and unplugged the unit, and allowed sufficient
time for the unit to cool. All liquid should be properly wiped away and
dried prior to restoring power.
CAUTION: DO NOT USE SOLVENTS OR CLEANERS
CONTAINING ABRASIVES, OR AMMONIA BASED CLEANERS.
MISE EN GARDE : NE PAS UTILISER DE SOLVANTS NI DE
NETTOYANTS CONTENANT DES ABRASIFS OU DE L’AMMONIAQUE.
CAUTION: All moisture should be properly wiped away and dried
prior to restoring power.
MISE EN GARDE : Toute humidité doit être essuyée et séchée avant
de remettre la lampe sous tension.
CAUTION:
MISE EN GARDE :
ALWAYS lift your
lamp by the shaft
DO NOT lift the lamp
by the gooseneck
Toujours soulever
votre lampe par
l’arbre
Ne soulevez pas la
lampe par le col de
cygne
11
VF02_MAN_Rev14.indd 11
12/29/11 4:25 PM
One Year Limited Warranty
ATTENTION! ONCE OPENED, PLEASE DO NOT RETURN THIS PRODUCT TO THE
STORE WHERE IT WAS PURCHASED FOR REPAIR OR REPLACEMENT!
Many questions may be answered by visiting www.verilux.com, or you may call our
Customer Service Department at 800-786-6850 during normal business hours.
This limited warranty is provided by: Verilux, Inc., 340 Mad River Park, Waitsfield, VT 05673
Verilux warrants this product to be free from defects in material and workmanship for a
period of one year from the date of the original retail purchase from Verilux or an authorized
Verilux distributor. Proof of purchase is required for all warranty claims. During the
limited warranty period, Verilux, Inc. will, at its option, repair or replace defective parts of
this product, at no charge to the customer, subject to the following limitations: This limited
warranty does not include any postage, freight, handling, insurance or delivery fees. This
warranty does not cover damage, defect or failure caused by or resulting from accident,
external destruction, alteration, modification, abuse, misuse or misapplication of this
product.
This warranty does not cover damage to the product resulting from return shipping or
handling. The use of shipping insurance is recommended to help protect your product.
Return Authorization is required for all returns. To obtain a Return Authorization, please
contact the Verilux Customer Service Department at 800-786-6850.
If, during the first year of ownership, this product fails to operate properly, it should be
returned as specified at www.verilux.com/warrantyreplacement or as instructed by a Verilux
customer service representative at 800-786-6850.
Note: Verilux recommends using a quality surge suppressor on all electronics equipment.
Voltage variations and spikes can damage electronic components in any system. A quality
suppressor can eliminate the vast majority of failures attributed to surges and may be
purchased at electronics stores.
Due to ongoing improvements, actual product may have slight variations from the product described in this manual.
Please visit our website at www.verilux.com or call our Customer Service Department at
1-800-786-6850
Representatives are available Monday — Friday, 9am — 5pm ET
340 Mad River Park, Waitsfield, VT 05673
VF02-MAN-Rev14
Printed in China for Verilux, Inc.
© Copyright 2012 Verilux, Inc. All rights reserved.
12
VF02_MAN_Rev14.indd 12
12/29/11 4:25 PM