1
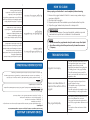
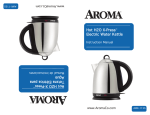
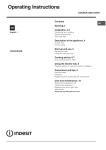
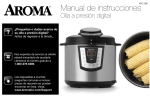
www.AromaCo.com
AYM-606
Utensilio Digital
para Hacer Yogurt
Manual de instrucciones
Instruction Manual
Digital
Yogurt Maker
www.AromaCo.com
AYM-606
¡Felicidades en la compra de su Utensilio Digital para Hacer Yogurt
!
El Utensilio Digital para Hacer Yogurt Aroma le permitirá crear deliciosos y
saludables yogures caseros, fácilmente y en minutos, pudiendo hacerlos a su
gusto en cuanto a sabores, textura y acidez, para deleite de usted y de sus
familiares.
!
© 2010 Aroma Housewares Company All rights reserved.
Las tasas selladas, y libres de BPA, son ideales para almacenar el yogurt y
transportarlo a los almuerzos escolares o bien para un aperitivo a la carrera.
Este manual contiene instrucciones para el uso de su Utensilio Digital para Hacer
Yogurt y algunas recetas sugeridas. Para aun más recetas, reemplazo de partes y
otras sugerencias gastronómicas, por favor visítenos en: www.AromaCo.com.
Por favor lean todas las instrucciones antes de su primer uso.
Aroma Housewares Co.
6469 Flanders Drive
San Diego, CA 92121
U.S.A.
1-800-276-6286
www.AromaCo.com
Published By:
Please read all the instructions before first use.
Publicado Por:
This manual contains instructions for the use of your new yogurt maker and a few
suggested yogurt recipes. For even more recipes, replacement parts and other
kitchen solution ideas, please visit us online at www.AromaCo.com.
Aroma Housewares Co.
6469 Flanders Drive
San Diego, CA 92121
U.S.A.
1-800-276-6286
www.AromaCo.com
The included leak-resistant, BPA-free yogurt cups are ideal for storing the yogurt
and transporting it for school lunches or a healthy snack on-the-go.
The Aroma Digital Yogurt Maker will allow you to make delicious, healthy yogurt at
home in just a few easy steps. And you can have fun customizing the flavor,
texture and tartness of your yogurt to perfectly suit your family’s tastes!
© 2010 Aroma Housewares Company Todos los derechos reservados.
Congratulations on your purchase of the
Digital Yogurt Marker!
1
SAVE THESE INSTRUCTIONS
12. Do not use the yogurt maker in a
confined area or near a heat
source.
13. Place the yogurt maker in a clear
area to allow for proper air
circulation. Avoid using the yogurt
maker near flammable materials.
14. Use only with a 120V AC power
outlet.
15. Always unplug from the base of the
wall outlet. Never pull on the cord.
16. The yogurt maker should be
operated on a separate electrical
circuit from other operating
appliances. If the electric circuit is
overloaded with other appliances,
this appliance may not operate
properly.
17. To disconnect, turn any control to
"OFF," then remove the plug from the
wall outlet.
18. To reduce the risk of electric shock,
cook only in the removable cups
provided.
19. To avoid escaping steam, keep face
and hands away from the top of the
yogurt maker when opening or
during operation.
20. This appliance is not designed to
function in a humid environment.
21 Do not touch hot surfaces.
22. Caution: the sides will get hot. Use
oven mitts if moving the appliance
while in operation.
23. This appliance is designed for
domestic use only.
Important: Read all instructions
carefully before first use.
2. Use only on a level, dry and
heat-resistant surface.
3. To protect against electrical shock,
do not immerse cord, plug or the
appliance in water or any other
liquid.
4. Close supervision is necessary when
the appliance is used by or near
children.
5. Unplug from outlet when not in use
and before cleaning. Allow unit to
cool before putting on or taking off
parts and before cleaning the
appliance.
6. Do not operate any appliance with
a damaged cord or plug or after the
appliance malfunctions or has been
damaged in any manner. Contact
Aroma Housewares customer
service for examination, repair or
adjustment.
7. The use of accessory attachments
not recommended by Aroma
Housewares may result in fire,
electric shock or injury.
8. Do not use outdoors.
9. Do not let cord touch hot surfaces or
hang over the edge of a counter or
table.
10. Do not place on or near a hot
burner or in a heated oven.
11. Do not use the appliance for other
than its intended use.
1.
Basic safety precautions should always be followed when using electrical
appliances, including the following:
IMPORTANT SAFEGUARDS
MEDIDAS IMPORTANTES DE SEGURIDAD
Cuando se usen aparatos electricos, siempre deberán observarse las
precauciones básicas de seguridad, incluyendo las siguientes:
1. Importante: Le recomendamos que
lea todas las instrucciones antes de
usarse por primera vez
2. Úsese únicamente sobre una
superficie nivelada, seca y resistente
al calor.
3. Para protección contra un choque
eléctrico, no sumerja el cordón, el
enchufe o el aparato, en agua u
otro líquido.
4. Una supervisión muy cercana es
necesaria si se utiliza el aparato por
niños, o cerca de ellos.
5. Desenchúfese cuando no se use y
antes de limpiarse. Permita que se
enfrié la unidad antes de poner o
quitar partes y antes de limpiarse.
6. No se opere ningún aparato
cuando su cordón o enchufe se
encuentren dañados, o cuando
este haya funcionado mal o haya
sido dañado de alguna manera.
Póngase en contacto con el
Servicio a Clientes de Aroma
Housewares, para una revisión,
reparación o ajuste de su aparato y
de sus partes.
7. El uso de refacciones o aditamentos
no recomendados por Aroma
Housewares puede resultar en
fuego, en un choque eléctrico o en
una lesión.
8. No se use a la intemperie.
9. No permita que el cordón tenga
contacto con superficies calientes o
que cuelgue de una mesa o
mostrador.
10. No lo coloque sobre, o cerca, de un
calentador.
11. No se use el utensilio para otros usos
que el especificado.
12. No utilice el utensilio en un área
cerrada o cerca de una fuente de
poder caliente.
13. Coloque el Utensilio Digital para
Hacer Yogurt en una zona donde
haya circulación de aire.
14. Úsese únicamente con una fuente
de poder de 120V AC.
15. Siempre desenchufe de la base del
muro, nunca jale el cordón.
16. El Utensilio Digital para Hacer
Yogurt debe de ser operado en un
circuito eléctrico diferente y
separado de otros utensilios
electrodomésticos. Si el circuito
eléctrico se sobrecarga con otros
aparatos, este no operará
adecuadamente.
17. Para desconectarlo, coloque la
manija de control en ‘OFF’
(apagado), y desprenda el cable
del muro; no lo jale.
18. Para evitar el riesgo de un choque
eléctrico, cocine exclusivamente en
las tazas removibles, incluidas en el
paquete.
19. Para evitar el vapor que emana del
utensilio, mantenga la cara y las
manos a distancia cuando se abra,
o bien durante la operación.
20. Este utensilio no está diseñado para
funcionar en un ambiente húmedo.
21. No toque las superficies calientes.
22. Precaución: los lados conseguirán
calientes. Utilice los mitones del
horno si movar la aplicación en
funcionamiento.
23. Este aparato es para uso doméstico.
GUARDE ESTAS INSTRUCCIONES
1
INSTRUCCIONES DE CABLE CORTO
1. Se proporciona un cable eléctrico corto con el propósito de reducir el
riesgo de tropezarse o enredarse con un cable más largo.
2. Hay cables de extensión más largos disponibles y deben ser usados con
sumo cuidado.
3. Si se usa un cable de extensión más largo:
a. La clasificación eléctrica marcada en el cable de extensión debe ser
por lo menos igual que la clasificación eléctrica del aparato.
b. El cable más largo debe ser colocado de manera que no cuelguepor
el borde del mostrador o mesa en donde pudiera ser jalado por un
niño o alguien pudiera tropezarse con el cable sin querer.
¡NO DEJE QUE EL CABLE
CUELGUE!
2
This appliance is for household use only.
If the supply cord is damaged, it must be replaced by the manufacturer or its
service agent or a similarly qualified person in order to avoid a hazard.
To reduce the risk of electric shock, this plug is intended to fit into a polarized
outlet only one way. If the plug does not fit fully into the outlet, reverse the plug.
If it still does not fit, contact a qualified electrician. Do not attempt to modify the
plug in any way.
This appliance has a polarized plug (one blade is wider than the other); follow
the instructions below:
POLARIZED PLUG
KEEP FROM
CHILDREN!
¡MANTÉNGALO
LEJOS DE LOS
NIÑOS!
PLOYA POLARIZADA
Si este aparato tiene ploya polarizada:
Para reducir el riesgo de descarga eléctrica, este ploya intencionalmente solo
debe de enchufar un lado en enchufes de luz de ploya polarisada. Si la clavija
no entra completamente, da vuelta a la clavija. Si aun la clavija no puede entrar, llame a un electricista calificada. No intente de modificar la clavija, es muy
peligroso.
Si esté estropeado el cordón eléctrico, hay que ser reemplazado por el fabricante o su agencia de servicio u otra persona calificada para hacer que se evita
cualquier peligro.
ESTE APARATO ES PARA USO DOMÉSTICO.
2
DO NOT DRAPE CORD!
1. A short power-supply cord is provided to reduce the risks resulting from
becoming entangled in or tripping over a longer cord.
2. Longer extension cords are available and may be used if care is exercised in
their use.
3. If a longer extension cord is used:
a. The marked electrical rating of the extension cord should be at least as
great as the electrical rating of the appliance.
b. The longer cord should be arranged so that it will not drape over the
counter top or tabletop where it can be pulled by children or tripped over
unintentionally.
SHORT CORD INSTRUCTIONS
IDENTIFICACION DE LAS PARTES
1
2
3
10
9
1.
2.
3.
4.
5.
6.
7.
8.
9.
10.
3
Yogurt Maker Lid
Leak-Resistant Cup Lids
Sealable Cups
Yogurt Maker Body
Digital Display
START Button
POWER Button
MINUTE Button
HOUR Button
Cook Indicator Light
8
7
6
5
4
5
10
3
4
9
7
6
8
1. Cubierta del Utensilio Digital para Hacer
Yogurt
2. Tapa de tazas resistentes al goteo
3. Tazas selladas
4. Bastidor del Utensilio Digital para Hacer
2
5.
6.
7.
8.
9.
10.
1
PARTS IDENTIFICATION
Yogurt
Indicador digital
Botón de ARRANQUE
Botón de ENCENDIDO
Botón de MINUTOS
Botón de HORAS
Luz indicadora de cocimiento
3
COMO USAR SU APARATO
Antes de usarse por primera vez:
1. Lea todas las instrucciones y las medidas de seguridad.
2. Deshágase de los materiales de empaque y cerciórese que todos los aditamentos
vengan en buenas condiciones.
3. Deshágase de todas las bolsas de plástico, ya que pueden ser nocivas para los
niños.
4. Lave la tapa o cubierta del Utensilio Preparador de Yogurt, así como las tazas
selladas con sus tapas, en agua jabonosa y caliente y séquense bien.
5. Pase un paño húmedo por las cubiertas de todos los aditamentos y accesorios.
•
•
NOTA:
No utilice limpiadores o trapos raspantes.
No sumerja en agua el cuerpo del utensilio, sus cordones o el enchufe.
Seleccionando la leche indicada:
La leche es un factor sumamente importante cuando prepare sus yogurt. Para r
esultados óptimos:
• Seleccione leche entera (Whole) o desnatada y baja en calorías (Low-Fat)
• La leche orgánica debe de hervirse para eliminar bacterias. Permita que se
enfrié para deshacerse de las natas.
• Si utiliza leche que ha sido esterilizada a muy altas temperaturas, no debe de
hervirse antes de usarse y le ofrecerá un yogurt firme y sin natas.
• La leche en polvo funciona muy bien para nuestros propósitos. El yogurt hecho
con leche en polvo le ofrecerá un producto muy fino y terso.
NOTA:
• Para mejores resultados, use un cultivo y leche con los mismos contenidos de
grasa.
CONSEJO ÚTIL:
• La leche entera le resultará en yogures más suaves y aromáticos.
• Para un yogurt mas espeso, agregue dos o tres cucharadas de leche en polvo
a la leche que está usando, y mézclela a conciencia.
Seleccionando el cultivo indicado:
Va a necesitar de un cultivo para hacer yogures, y éstos puedes encontrarse en:
• Cualquier tienda donde vendan yogures (preferiblemente un yogurt de leche
entera).
• Un yogurt previamente elaborado en casa.
• Un cultivo de yogurt desecado al vacío, el cual puede conseguirse en muchas
farmacias o tiendas de alimentos saludables. Si usa un cultivo de yogurt desecado
al vacío, agréguele dos horas al tiempo estimado.
NOTA:
• No utilice una hornada de yogurt más de diez veces ya que los resultados del
cultivo pueden disminuir.
• Para mejores resultados, use un cultivo y leche con los mismos contenidos de
grasa.
NOTE:
HELPFUL HINT:
NOTE:
NOTE:
4
4
• Do not use a batch of yogurt more than ten times for the starter culture as
the results will diminish.
• For best results, use a starter culture and milk with similar fat contents.
You will need a starter culture in order to make yogurt. A starter culture can be
found in:
• A plain store-bought yogurt (preferably whole milk yogurt)
• A previously home-made yogurt
• A freeze-dried yogurt culture, which can be purchased at many pharmacies or
health food stores. If using a freeze-dried yogurt culture add two hours to the
yogurt making time.
Choosing the Proper Starter Culture:
• Whole milk will result in yogurt that is smoother and more aromatic.
• For thicker yogurt, add two to three tablespoons of powdered milk to the
milk used, taking care to mix it in completely.
• For best results, use a starter culture and milk with similar fat contents.
The milk used is an important factor when making yogurt. For best results:
• Regular or organic pasterurized whole, low-fat or skim milk are all fine choices,
but must be brought to a near boil before being activated.
• Milk should be boiled to eliminate any additional bacteria. Allow the boiled milk
to cool to eliminate any skin that may develop.
• If using milk that has been sterilized at an ultra-high temperature (UHT), milk will
not need to be boiled before use and will result in a firm, skinless yogurt.
• Powdered milk works very well. Yogurt made with powdered milk is very smooth.
• Unflavored soy milk is also an excellent choice for making yogurt.
Choosing the Proper Milk:
• Do not use abrasive cleaners or scouring pads.
• Do not immerse the yogurt maker body, cord or plug in water at any time.
1. Read all instructions and important safeguards.
2. Remove all packaging materials and make sure items are received in good
condition.
3. Tear up all plastic bags as they can pose a risk to children.
4. Wash the yogurt maker lid, sealable cups and leak-resistant cup lids in warm,
soapy water. Rinse and dry thoroughly.
5. Wipe the yogurt maker body clean with a damp cloth.
Before First Use:
USING YOUR YOGURT MAKER
USING YOUR YOGURT MAKER
5
CONTINÚA EN LA PÁGINA SIGUIENTE
To Make Yogurt:
• No mueva el Utensilio Digital para Hacer Yogurt durante el proceso, ya que si
lo hace se interrumpirá el ciclo.
Ratios and amounts may vary depending upon individual recipe directions and
the type of milk and starter culture used.
The following directions are for Aroma’s suggested method of utilizing organic milk
and plain, store-bought organic yogurt as the starter.
1. Measure 3 tablespoons of plain yogurt to use as a starter culture and set aside
in a small bowl.
NOTE:
• If using a freeze-dried yogurt culture, refer to package directions for the
proper amount of culture to use.
2. Heat 5 cups milk to 180ºF, stirring consistently to prevent scorching.
3. Place heated milk in the refrigerator and allow to cool to 115ºF.
4. In the small bowl with the yogurt, mix in 2 teaspoons of cold milk, until the
consistency has thinned.
5. Mix the thinned plain yogurt into the heated milk, until thoroughly mixed.
NOTE:
• Depending upon the recipe being used, flavoring may be added into the
yogurt starter/warm milk mix. Refer to “To Add Flavors” on page 6 for
further instructions on adding flavors.
6. Fill each of the sealable cups ¾ full with the yogurt/milk mixture. Leave each
cup open, DO NOT place the leak-resistant lids on each cup. Place the open
cups into the yogurt maker.
7. Place the yogurt maker lid onto the Aroma Yogurt Maker.
8. Plug the yogurt maker into an available power outlet.
8. Turn on the Aroma Yogurt Maker by pressing the POWER button. The yogurt
maker will chime, and the digital display will turn on.
10. Press the HOUR button until 9 hours is displayed on the digital display screen (8
hours is the minimum recommended, but 9 hours will ensure the proper
consistency is reached).
HELPFUL HINT:
• For tarter yogurt, increase the cook time.
11. Press the START button. The cook indicator light will illuminate and the yogurt
maker will begin cooking the yogurt. Allow to run until time expires.
NOTE:
• Do not disturb or move the Aroma Yogurt Maker during the yogurt making
process, as it will terminate the cycle.
12. Once the programmed time has elapsed, the yogurt maker will chime and
automatically shut off.
13. Remove the sealable cups, screw the leak-resistant lid onto each cup and
place them into the refrigerator. Allow to cool for approximately 8 hours. Add
in flavors as desired once yogurt has cooled. Enjoy!
5
NOTA:
11. Presione el botón de Arranque (START). El indicador de Cocinando (Cooking) se
encenderá y empezará el proceso de cocimiento del yogurt. No lo apague antes
del tiempo programado.
• Para un yogurt más agrio, aumente el tiempo del cocinero.
CONSEJO ÚTIL:
10.
7.
8.
9.
6.
Llene ¾ partes cada una de las tazas selladas con la mezcla del yogurt y la leche.
Deje las tazas abiertas, NO selle las tapas de las tazas y colóquelas en el Utensilio
Digital para Hacer Yogurt.
Coloque la tapa o cubierta en el utensilio.
Enchufe el utensilio a la corriente.
Prenda el Utensilio Preparador de Yogurt presionando el botón de Poder (Power). El
utensilio emitirá una campanada y se prenderá el dispositivo digital.
Presione el botón de la Hora (HOUR) hasta que aparezca ‘9 horas’ en la pantalla
del controlador (8 horas es el mínimo recomendado, pero 9 horas asegurarán una
consistencia ideal).
• Dependiendo de la receta que se esté usando, el sabor se le puede agregar a
la mezcla de leche caliente y el cultivo. Vaya a la sección de “Para Agregar
Sabores” en la página 6 para instrucciones adicionales de cómo agregar
saborizantes.
NOTA:
5. Mezcle el yogurt adelgazado con la leche recalentada hasta que se hayan
mezclado al gusto.
que la consistencia se haya adelgazado.
2. Caliente 5 tazas de leche orgánica a 180°F, remueva consistentemente para evitar
que se quemen.
3. Coloque la leche caliente en el refrigerador y permita que se enfríe hasta 115°F.
4. En el pequeño tazón con el yogurt mézclelo con 2 cucharadas de leche fría hasta
• Si usa un cultivo de yogurt desecado al vacío, consulte las instrucciones del
paquete para usar la cantidad correcta del cultivo.
NOTA:
1. Mida tres cucharadas de yogurt sencillo para ser usado como cultivo base y
sepárelo en un pequeño tazón.
Las siguientes instrucciones son para el método de Aroma en cuanto a utilizar leche
orgánica y un ‘cultivo base’ comprado en cualquier tienda.
Las proporciones y las cantidades pueden variar dependiendo de las instrucciones de
las recetas individuales y del tipo de leche y del cultivo que se va a utilizar.
Para hacer un yogurt:
COMO USAR SU APARATO
COMO USAR SU APARATO
Para hacer un yogurt:
6
12 Una vez el tiempo programado ha finalizado, el aparato emitirá una campanada y
se apagará automáticamente.
13 Remueva las tazas selladas, cierre con seguridad las tapas de cada una de ellas y
métalas al refrigerador por aproximadamente unas 8 horas. Una vez se haya
enfriado el yogurt, agréguele los sabores…!y disfrútelos!
Para agregarle sabores:
Recomendamos que el yogurt se haga simple y sencillo en su Utensilio Digital para
Hacer Yogurt; y que se le agreguen los sabores una vez estos se hayan enfriado las 8
horas recomendadas en el refrigerador. Después puede agregarle los sabores a cada
una de las tazas en forma individual.
Sin embargo algunos saborizantes pueden agregarse antes de hacer el yogurt.
Consulte su recetario.
Sabores recomendados:
Jarabes de frutas
• Mezcle su sabor favorito de jarabe de frutas con el yogurt ya terminado, o bien con
la leche caliente que contiene el cultivo antes de llenar las tazas selladas.
Café
• Mezcle azúcar y granos de café con la mezcla de la leche caliente con el cultivo, y
después llene las tazas selladas.
Mermelada o gelatina de frutas
• Disuelva mermelada o gelatina en una cacerola a fuego lento. Agréguele un
poquito de leche y permita que se enfríe. Una vez que se hayan enfriado la
mermelada o la gelatina, mézclese con leche tibia y el cultivo y llene las tazas
selladas.
Conservas de fruta enlatada
• Rebane las frutas en trocitos. Guarde el jugo para agregarle aun más sabor de
frutas. Mezcle los trozos de frutas y el jugo con el yogurt ya terminado y frío en las
tacitas.
Frutas frescas
• Corte las frutas en pequeños pedazos. Mezcle las piezas de frutas con el yogurt frío
ya terminado en cada una de las tazas selladas.
NOTA:
• La fruta fresca únicamente puede agregársele al yogurt frío y terminado,
de lo contrario la fruta deberá de cocinarse para asegurarnos de que no
contiene bacterias que puedan afectar el cultivo del yogurt.
Varias de las recetas favoritas para yogures vienen incluidas en este manual en la
página 8. Para más ideas, más recetas, o bien para someter las suyas, por favor
visítenos en: www.AromaCo.com.
NOTE:
6
Several of Aroma’s favorite yogurt recipes are included in this manual beginning
on page 8. For more recipe ideas, or even to submit your own, visit
www.AromaCo.com.
• Fresh fruit should only be added to cooled, finished yogurt. If attempting to
add fresh fruit to yogurt before it is finished, the fruit should be cooked to
ensure no outside bacteria will affect the yogurt culture.
• Cut fruit into small pieces. Mix the cut fruit pieces with cooled, finished yogurt in
each sealable cup.
Fresh Fruit
• Cut preserved fruit into small pieces. Save the juice from the can for even more
fruit flavor. Mix the cut fruit pieces and juice with cooled, finished yogurt in each
sealable cup.
Preserved Canned Fruit
• Melt jam or jelly in a saucepan over low heat. Add in a bit of plain milk and
allow to cool. Once jam/jelly has cooled, mix with warm milk/starter culture mix
and add to sealable cups.
Fruit Jams or Jellies
• Mix sugar and coffee grounds thoroughly with warm milk/starter culture mix prior
to adding it to the sealable cups.
Coffee
• Mix a desired fruit syrup flavor in with either the finished yogurt or the warm
milk/starter culture mix prior to adding it to the sealable cups.
Fruit Syrups
Recommended Flavors:
However, some flavorings may be added prior to yogurt being made. Refer to the
recipe being used for information on when to add in flavors.
It is recommended yogurt be made plain in the Aroma Yogurt Maker with flavors
added once yogurt has cooled. After yogurt has cooled the recommended 8
hours in the refrigerator, mix desired flavors into each individual sealable cup.
To Add Flavors:
USING YOUR YOGURT MAKER
7
There is an abundance of
liquid on the surface of the
yogurt.
• The yogurt may have stayed in the
yogurt maker too long.
• The sealable cups may have been
moved too early.
• The milk used was not properly cooled
before adding it to the yogurt maker.
The yogurt is liquidy.
• The starter culture and milk used may
have had different fat contents.
• The yogurt had excessive maturation
time in the yogurt maker. Reduce cook
time.
• The starter culture used was not fresh
enough.
COMO LIMPIAR EL APARATO
Desconecte siempre la unidad y deje que se enfríe completamente antes
de limpiarla.
1. Quite la tapa del utensilio, lávela en agua caliente, jabonosa y use una esponja o
un trapo de limpieza.
2. Enjuague y séquese a conciencia.
3. Repita este proceso con las tazas y sus tapas.
4. Seque y limpie la coraza del utensilio con un trapo húmedo.
CONSEJO ÚTIL:
• Para una limpieza más a fondo y más fácil, todos los aditamentos pueden
lavarse en el lavaplatos.
•
•
Yogurt is too lumpy.
• The milk used may have been too hot.
• The ingredients may have not been
properly mixed. Ensure that all
ingredients are mixed thoroughly prior
to adding them to the yogurt maker.
• The milk used may have soured. Be
sure to use fresh milk that is far from its
expiration date.
TROUBLESHOOTING
• Never immerse the yogurt maker body in water or any other liquid.
• Any other servicing should be performed by Aroma Housewares
Company.
NOTE:
• For even faster cleanup, the yogurt maker lid, sealable cups and
leak-resistant cup lids can be washed in the dishwasher!
HELPFUL HINT:
1. Remove the yogurt maker lid. Wash it in warm, soapy water using a
sponge or dishcloth.
2. Rinse and dry thoroughly.
3. Repeat process with the sealable cups and leak-resistant cup lids.
4. Wipe the yogurt maker body clean with a damp cloth.
NOTA:
Nunca meta al Utensilio Preparador de Yogures al agua u otros líquidos
Cualquier otro servicio de mantenimiento o reparación, deben de llevarse a
cabo por nuestros técnicos de Aroma Housewares Company.
SOLUCIONANDO PROBLEMAS
• El yogurt pudo haber estado en el
utensilio demasiado tiempo.
• Las tazas selladas se movieron
demasiado rápido.
• La leche usada no fue enfriada lo
suficiente antes de mezclarse.
Hay líquido en la superficie
del yogurt.
• La leche usada pudo haber estado
demasiado caliente.
• Los ingredientes no fueron mezclados
de acuerdo a las instrucciones.
• La leche utilizada pudo haber estado
agria. Cerciórese de usar leche fresca,
lejos de su fecha de caducidad.
Si el yogurt salió grumoso y
apelmazado.
El yogurt está muy acuoso.
Always unplug unit and allow to cool completely before cleaning.
HOW TO CLEAN
• El cultivo y la leche pueden haber
tenido diferentes contenidos de grasa.
• El yogurt tuvo demasiado tiempo de
maduración en el utensilio.
• El cultivo de yogurt no estaba lo
suficientemente fresco.
7
RECETAS
Yogurt de fresa
de leche orgánica
de yogurt orgánica(para un cultivo de inicio)
fresas
de jarabe de fresa
Siga los pasos del 1 al 5 en “Para hacer un yogurt” de la página 5.
Mezcle mermelada de fresa con la combinación de la leche con la base
del cultivo. Agregue esta mezcla a cada una de las tazas y siga las
instrucciones de “Para hacer un yogurt.” Una vez que el yogurt
terminado ha sido enfriado durante el tiempo recomendado en el
refrigerador, corte las fresas en pequeños trozos y distribúyalos
proporcionalmente en cada una de las tazas selladas.
Yogurt de piña
5 tazas
de leche orgánica
3 cucharadas de yogurt orgánica(para un cultivo de inicio)
1 lata
de trozos de piña
Siga los pasos del 1 al 5 en “Para hacer un yogurt” de la página 5. Para
agregarle más sabor de piña, mezcle 4 cucharadas de jugo de piña de
la lata con la combinación de la lecha caliente y la base del cultivo.
Agregue esta mezcla a cada una de las tazas y siga las instrucciones de
“Para hacer un yogurt.” Una vez que el yogurt terminado ha sido
enfriado durante el tiempo recomendado en el refrigerador, corte las
piñas en pequeños trozos y distribúyalos proporcionalmente en cada una
de las tazas selladas.
CONSEJO ÚTIL:
• Puede añadir cualquier otra fruta, mermelada o jarabe siguiendo las
mismas instrucciones. Experimente con otras frutas para encontrar su sabor
favorito.
HELPFUL HINT:
organic milk
plain organic yogurt (for a starter culture)
strawberries
strawberry syrup
5 tazas
3 cucharas
10
4 cucharadas
8
• Additional fruit/syrup combinations may be used following similar
instructions. Experiment with favorite fruits and syrups to find the best flavor
for you.
Follow steps 1 to 5 of “To Make Yogurt” on page 5. To add extra
pineapple flavor, mix in 4 tablespoons pineapple juice from the
pineapple chunks can with warm milk/yogurt starter mixture. Add this
yogurt mixture to each sealable cup and complete the instructions of “To
Make Yogurt.” Once finished yogurt has cooled for the recommended
time in the refrigerator, cut pineapple chunks into small cubes. Distribute
the pineapple cubes evenly among the yogurt in each sealable cup.
5 cups
organic milk
3 tablespoons plain organic yogurt (for a starter culture)
1 can
pineapple chunks
Pineapple Yogurt
Follow steps 1 to 5 of “To Make Yogurt” on page 5. Mix in strawberry syrup
with warm milk/yogurt starter mixture. Add this yogurt mixture to each
sealable cup and complete the instructions of “To Make Yogurt.” Once
finished yogurt has cooled for the recommended time in the refrigerator,
cut strawberries into small cubes. Distribute the strawberries evenly
among the yogurt in each sealable cup.
5 cups
3 tablespoons
10
4 tablespoons
Strawberry Yogurt
RECIPES
8
9
RECETAS
Yogurt de vainilla
5 tazas
de leche orgánica
3 cucharadas de yogurt orgánica(para un cultivo de inicio)
3 cucharadas de extracto de vainilla
For more recipe ideas, or even to submit your own, visit
www.AromaCo.com.
The night before making the yogurt (or at least one hour prior), finely
grate the lemon and mix grated lemon into the milk to be used. Follow
steps 1 to 5 of “To Make Yogurt” on page 5. When mixing the lemonzested milk to the yogurt culture starter mix, add in sugar, to taste. Add
this yogurt mixture to each sealable cup and complete the instructions of
“To Make Yogurt.” After finished yogurt has cooled for the recommended
time in the refrigerator, each yogurt cup should be stirred to evenly
distribute flavoring prior to serving.
5 cups
3 tablespoons
1
-
organic milk
plain organic yogurt (for a starter culture)
lemon, grated
Sugar, to taste
Lemon Yogurt
Follow steps 1 to 5 of “To Make Yogurt” on page 5. Mix in vanilla extract
with warm milk/yogurt starter mixture. Add this yogurt mixture to each
sealable cup and complete the instructions of “To Make Yogurt.” After
finished yogurt has cooled for the recommended time in the refrigerator,
each yogurt cup should be stirred to evenly distribute vanilla flavoring
prior to serving.
5 cups
organic milk
3 tablespoons plain organic yogurt (for a starter culture)
3 tablespoons vanilla extract
Siga los pasos del 1 al 5 en “Para hacer un yogurt” de la página 5.
Mezcle extracto de vainilla con la combinación de la leche caliente y la
base del cultivo. Agregue esta mezcla a cada una de las tazas y siga las
instrucciones de “Para hacer un yogurt.” Agregue esta mezcla a cada
una de las tazas y siga las instrucciones de “Para hacer un yogurt.” Una
vez que el yogurt terminado ha sido enfriado durante el tiempo
recomendado en el refrigerador, cada taza de yogurt debe agitarse
para distribuirle el sabor de vainilla antes de servirlo.
Yogurt de limón
5 tazas
3 cucharadas
1
-
de leche orgánica
de yogurt orgánica(para un cultivo de inicio)
limón rallado
Azúcar al gusto
La noche anterior a hacer el yogurt (o al menos una hora antes), ralle un
limón y mézclelo en la leche. Siga los pasos del 1 al 5 en “Para hacer un
yogurt” de la página 5. Cuando mezcle la leche con el limón rallado con
la mezcla del cultivo, agregue azúcar al gusto. Agregue esta mezcla a
cada una de las tazas y siga las instrucciones de “Para hacer un yogurt.”
Una vez que el yogurt terminado ha sido enfriado durante el tiempo
recomendado en el refrigerador, cada taza de yogurt debe agitarse
para distribuirle el sabor de vainilla antes de servirlo.
Para mas ideas y recetas, o aun para someter las suyas,
visítenos en www.AromaCo.com.
Vanilla Yogurt
RECIPES
9
GARANTÍA LIMITADA
10
Aroma Housewares Company garantiza que este producto no
tenga defectos en sus materiales y fabricación durante un período
de un año a partir de la fecha comprobada de compra dentro de
la parte continental de los Estados Unidos.
Dentro de este período de garantía, Aroma Housewares Company
reparará o reemplazará, a su opción, las partes defectuosas sin
ningún costo, siempre y cuando el producto sea devuelto, con el
flete prepagado, con comprobación de compra y $12.00 dólares
para cargos de envío y manejo a favor de Aroma Housewares Company. Antes de devolver un producto, sírvase llamar al número telefónico gratuito que está más abajo para obtener un número de
autorización de devolución. Espere entre 2-4 semanas para recibir el
aparato nuevamente.
Esta garantía no cubre la instalación incorrecta, el uso indebido,
maltrato o negligencia por parte del usuario. La garantía también es
inválida en caso de que el aparato sea desarmado o se le dé mantenimiento en un centro de servicio no autorizado.
Esta garantía le da derechos legales específicos los cuales podrán
variar de un estado a otro y no cubre áreas fuera de los Estados
Unidos.
AROMA HOUSEWARES COMPANY
6469 Flanders Drive
San Diego, California 92121
1-800-276-6286
L-V, 8:30 AM - 4:30 PM, Tiempo del Pacífico
Sitio Web: www.aromaco.com
AROMA HOUSEWARES COMPANY
6469 Flanders Drive
San Diego, California 92121
1-800-276-6286
M-F, 8:30 AM - 4:30 PM, Pacific Time
Website: www.AromaCo.com
This warranty gives you specific legal rights, which may vary from state to
state, and does not cover areas outside the United States.
This warranty does not cover improper installation, misuse, abuse or
neglect on the part of the owner. Warranty is also invalid in any case that
the product is taken apart or serviced by an unauthorized service station.
Within this warranty period, Aroma Housewares Company will repair or
replace, at its option, defective parts at no charge, provided the product
is returned, freight prepaid with proof of purchase and U.S. $12.00 for
shipping and handling charges payable to Aroma Housewares
Company. Before returning an item, please call the toll free number
below for a return authorization number. Allow 2-4 weeks for return
shipping.
Aroma Housewares Company warrants this product free from defects in
material and workmanship for one year from provable date of purchase
in the continental United States.
10
LIMITED WARRANTY