1
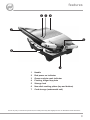
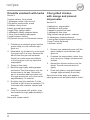
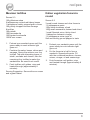
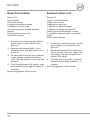
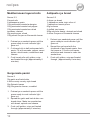
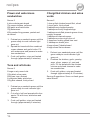
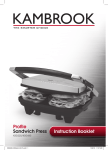
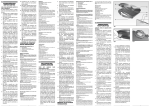
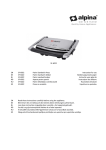
®
café style
sandwich press
instruction booklet
selection of recipes included
product safety
READ CAREFULLY AND KEEP FOR FUTURE REFERENCE
This product can be used by children aged 8 years and above, and persons
who require supervision, provided:
• they are familiar with the hazards associated with the product, and,
• they receive instruction by a competent person on how to safely use the
product.
Children must not play with the product. Cleaning and user maintenance
must not be done by children unless they are aged 8 or older and are
supervised.
Keep the appliance and its cord out of reach of children less than 8 years
old.
Bread can burn therefore do not use the appliance near or below
combustible materials such as curtains. Never use the appliance below wall
cupboards or shelves.
Never operate the appliance by means of an external timer or separate
remote-control system.
Do not touch the metal parts of the appliance during use as they may
become very hot.
If the supply cord is damaged, it must be replaced by the manufacturer, its
service agent or similarly qualified persons in order to avoid a hazard.
!!Never use this appliance for anything other than its intended use. This appliance is for
household use only. Do not use this appliance outdoors.
!!Always ensure that hands are dry before handling the plug or switching on the
appliance.
!!Always use the appliance on a stable, secure, dry and level surface.
!!Care is required when using the appliance on surfaces that may be damaged by heat.
The use of an insulated pad is recommended.
!!This appliance must not be placed on or near any potentially hot surfaces (such as a
gas or electric hob).
!!Never let the power cord hang over the edge of a worktop, touch hot surfaces or
become knotted, trapped or pinched.
!!Do not use the appliance if it has been dropped or if there are any visible signs of
damage.
!!Ensure the appliance is switched off and unplugged from the supply socket after use
and before cleaning.
!!Always allow the appliance to cool before cleaning or storing.
!!Never immerse any part of the appliance or power cord and plug in water or any other
liquid.
!!Never leave the appliance unattended when in use.
2
features
we r
q
t
y
u
1Handle
2
Red power on indicator
3
Green ready-to-cook indicator
4
Floating, hinged top plate
5
Storage lock
6
Non-stick cooking plates (top and bottom)
7
Cord storage (underneath unit)
Due to our policy of continuous improvement, the actual product may differ slightly from the one illustrated in these instructions.
3
before using your sandwich press
Before use
Never immerse any part of the appliance or power cord and plug in water or any
other liquid.
Before connecting to a power source, make sure your supply voltage is the same
as the one indicated on the appliance.
1. Remove any promotional labels and/or stickers from your sandwich press before use.
2. Place your sandwich press on a flat, level surface. Open the storage lock to release
the top plate and open it.
3. Check that the cooking plates are clean and free of dust. If necessary, wipe over with
a damp cloth.
Storage lock
The storage lock must be unlocked before using the sandwich press otherwise the lid
cannot be opened. When storing or transporting the sandwich press, the storage lock
must be locked.
The storage lock must not be used to clamp down the top plate when the sandwiches
are in your sandwich press or for pre-heating. The weight of the top cooking plate will
gradually press down the sandwich during cooking.
4
using your sandwich press
Take care around hot surfaces. The hot plates get VERY HOT. DO NOT touch
any parts until completely cooled.
Steam will escape from all around the sandwich press during cooking and when
opening the lid.
Never leave your sandwich press unattended while in use.
Note: During first use there may be a small amount of smoke and a slight burning odour.
This is completely normal and will clear within a few minutes.
1. Always fully unwind the power cord from the cord storage area of the appliance
before use. Insert the plug into a mains supply socket and switch the socket on.
2. Check that the cord is not overhanging the work surface. The power light (red) and
the ready-to-cook light (green) will both illuminate.
3. Allow your sandwich press to preheat in the closed position until the green ready-tocook indicator light goes out. The green ready-to-cook indicator light will turn on and
off during use.
4. During this time, prepare the sandwich. When ready, place it onto the bottom cooking
plate. Always place sandwiches towards the rear of the bottom cooking plate.
5. Close the top cooking plate which has a floating plate that is designed to evenly
press down on the sandwich. The lid must be closed for cooking.
6. Toasting should take approximately 5-8 minutes. The exact toasting time will be a
matter of taste. It will also depend on the type of bread and the type of filling used.
7. When the sandwich is cooked, open the lid. Remove it using a plastic or wooden
spatula. Never use metal tongs or a knife as these can cause damage to the nonstick coating.
5
using your sandwich press
Bread
Most types of bread can be used; white, wholemeal, kibbled wheat, wholegrain, raisin
loaf and so on. Your sandwich press is ideal for toasting foccacia, Turkish bread, bagettes
as well as bread rolls. Raisin bread, brioche or other sweet breads which contain a high
sugar content will tend to brown quicker.
Fillings
Try to use canned or pre-cooked fruit as fresh fruit may give off excessive juices when
heated. Be careful when biting into sandwiches containing fillings such as cheese and
tomato or jam as they retain heat and can burn if eaten too quickly.
Toasting bread
The unique flat plate design makes your sandwich press ideal for toasting plain breads,
and Turkish bread, without any fillings or spreads. Try toasting Turkish Bread with jams
for a great alternative to standard breads at breakfast.
Reheating
If the sandwich is not being eaten immediately, place it on a paper napkin to absorb
condensation. To keep for longer, place on a rack in an oven-proof dish to keep warm in a
low oven, about 100ºC. The sandwich will keep hot for up to 20 minutes this way, but will
then begin to dry out.
Fat free snacks
Due to the non-stick cooled flat plate design, it is not necessary to use any butter or
margarine on the outside of your toasted snacks.
6
care and cleaning
Always unplug your appliance before cleaning it.
Never immerse any part of the appliance or power cord and plug in water or any
other liquid.
Never use harsh abrasive cleaners or cleaning materials.
1. Switch off and unplug the sandwich press from the mains supply.
2. Allow your sandwich press to cool slightly. The unit is easier to clean when slightly
warm.
3. Always clean your sandwich press after each use to prevent a build up of baked on
foods.
4. Wipe the cooking plates with a soft cloth. If cooked on food is not removed by this
method, reheat the unit for 1-2 minutes, then brush with a little oil or melted butter.
Allow to stand for five minutes then wipe with a damp cloth.
5. To clean the outside of the sandwich press wipe over with a damp cloth. Polish with a
soft dry cloth.
To avoid damaging the non-stick coating on the cooking plates, do not use harsh or
abrasive cleaning materials.
Do not use spray-on non-stick coatings because they will affect the performance of the
non-stick coatings on the cooking plates.
Storage
1. Allow the sandwich press to cool fully before storing and ensure that the unit is clean.
2. Wrap the cord in the cord storage area below the unit.
3. Lock the plates together using the storage lock by first lowering the top plate and
then pressing the clip into the handle. This will secure the plates together.
4. Store the unit on a flat, level surface, away from the edge and where it cannot be
easily knocked over.
7
recipes
Omelette sandwich with herbs Char grilled chicken
Serves 2
with mango and pinenut
3 bacon rashers, thinly sliced
mayonnaise
1 tablespoon extra virgin olive oil
100g button mushrooms, sliced
2 shallots, thinly sliced
Freshly ground black pepper
3 eggs (60g), lightly beaten
1 tablespoon freshly chopped herbs
1 thinly sliced roasted red pepper
1 large focaccia, halved
125g sliced Gruyere or Emmental cheese
1. Preheat your sandwich press until the
green ready-to-cook indicator light
goes out.
2. Meanwhile, fry the bacon in a non-stick
frying pan until it is crisp. Remove the
bacon from the pan and set aside.
Sauté the mushrooms and shallots
in the frying pan until any liquid has
evaporated.
3. Remove from heat.
4. Beat the eggs lightly adding pepper
and herbs. Pour the mixture over the
mushrooms in the pan. Return the
pan to a medium heat and cook until
the eggs are set but soft in the centre,
approximately 3-5 minutes.
5. Roughly chop the omelette. Cut the
focaccia in half to form a sandwich. Fill
focaccias with omelette, cheese and
bacon.
6. Cook the focaccia until golden, crisp
and heated through (approximately 8
minutes).
Serve with a green salad.
8
Serves 2-3
1 tablespoon mayonnaise
½ tablespoon chilli salsa
1 teaspoon grated lime zest
½ tablespoon lime juice
125g canned mango pieces - drained
1½ tablespoon toasted pinenuts
1 char-grilled chicken breast sliced thinly
1 large Turkish flat bread
1 avocado, sliced
1. Preheat your sandwich press until the
green ready-to-cook indicator light
goes out.
2. Combine the mayonnaise, salsa, lime
zest, lime juice, mango, pinenuts and
chicken.
3. Spread the chicken mixture over the
bread. Top with avocado and roll
tightly.
4. Cook until golden, crisp and heated
through (approximately 8 minutes).
Serve sliced at an angle with peppery
salad greens such as watercress or rocket.
recipes
Mexican tortillas
Serves 2-3
Italian vegetarian focaccia
round
125g Mexican salsa
2 tablespoons cooked red kidney beans
1 tablespoon freshly snipped garlic chives
100g finely chopped chorizo sausage
8 tortillas
100g tatziki
100g avocado dip
125g grated mozzarella
125ml sour cream
Serves 2-3
1. Preheat your sandwich press until the
green ready-to-cook indicator light
goes out.
1. Preheat your sandwich press until the
green ready-to-cook indicator light
goes out.
2. Combine the salsa, beans, chives and
sausage. Spoon the mixture over four
tortillas. Top with alternating layers of
tatziki, avocado and cheese, then the
remaining four tortillas to make four
sandwiches. Be careful not overfill.
3. Cook tortillas until golden, crisp and
heated through (approximately 8
minutes).
3 small round cheese and olive focaccia
1½ tablespoons pesto
125g Italian tomatoes, sliced
100g small mozzarella, drained and sliced
1 small Spanish onion, thinly sliced
1 tablespoon balsamic vinegar
1½ tablespoons extra virgin oil
Salt and freshly ground pepper to taste
2. Cut the focaccia in half to form a
sandwich. Spread with pesto. Fill
with the combined tomatoes, cheese,
onions, vinegar, oil and seasonings.
3. Cook focaccias until golden, crisp
and heated through (approximately 8
minutes).
Serving Suggestion: Serve with sour cream
and a green salad.
9
recipes
Roast beef kebabs
Smoked salmon roll
Serves 2-3
Serves 2-3
2 pitta breads
70g cream cheese
3 teaspoons seeded mustard
½ tablespoon lemon juice
one third cup grated cooked beetroot,
drained
100g sliced rare roast beef
70g sliced avocado
1 large Turkish flat bread
100g cream cheese
1 tablespoon lime juice
½ tablespoon drained capers
½ tablespoon freshly chopped dill
Freshly ground black pepper to taste
2 courgettes, ribboned with a vegetable
peeler
200g smoked salmon
1. Preheat your sandwich press until the
green ready-to-cook indicator light
goes out.
2. Heat the pitta bread slightly in your
sandwich press and split open to form
a pocket.
3. Fill each pitta bread with the combined
cream cheese, mustard and lemon
juice. Top with beetroot, roast beef and
avocado.
4. Cook the pitta bread until golden, crisp
and heated through (approximately 10
minutes).
Serving Suggestion: Serve sliced.
10
1. Preheat your sandwich press until the
green ready-to-cook indicator light
goes out.
2. Spread the bread with the combined
cream cheese, lime juice, capers, dill
and pepper. Top with courgette and
salmon. Roll tightly.
3. Cook the rolls until golden, crisp and
heated through (approximately 5 - 8
minutes).
Serving Suggestion: Serve sliced.
recipes
Spicy lamb in pitta
Warm caesar sandwich
Serves 2-3
Serves 2
1 tablespoons oil
125g ground lamb mince
2 tablespoons finely chopped onion
2 diced tomatoes
1 tablespoon freshly chopped mint
¼ teaspoon ground coriander
Pinch ground ginger
½ teaspoon ground cumin
¼ teaspoon turmeric
Salt and freshly ground black pepper to
taste
3 pitta breads
3 slices Gruyere or Emmental cheese
150ml tatziki
3 bacon rashers, thinly sliced
2 round Turkish breads
1 char-grilled chicken breast fillet, thinly
sliced
1 hard boiled egg, peeled and sliced
A handful of prepared garlic croutons
30g baby spinach leaves
60g freshly grated Parmesan cheese
Caesar salad dressing
1. Preheat your sandwich press until the
green ready-to-cook indicator light
goes out.
2. Heat the oil in a non-stick frying pan.
Sauté the lamb mince, onions, tomato,
mint, spices and seasonings until
browned and cooked. Drain.
3. Heat the pitta bread slightly in your
sandwich press and split them open
to form a pocket. Fill with the lamb
mixture and insert a cheese slice into
each.
1. Preheat your sandwich press until the
green ready-to-cook indicator light
goes out.
2. Meanwhile heat a non-stick frying
pan and fry the bacon until crispy.
Cut the Turkish bread in half to form
a sandwich. Fill with the combined
bacon, chicken, eggs, croutons,
spinach and cheese.
3. Cook Turkish bread until golden, crisp
and cooked through (approximately 6
minutes).
Serving Suggestion: Serve drizzled with
Caesar salad dressing.
4. Cook the pittas until golden, crisp and
heated through.
Serving Suggestion: Serve with tatziki
sauce.
11
recipes
Mediterranean layered rolls
Antipasto rye bread
Serves 2-3
Serves 2-3
2 bread rolls
2 tablespoons pesto
100g marinated roasted aubergine
125g marinated roasted red pepper
100g marinated roasted sun dried
tomatoes, drained
60g mushrooms, sliced
100g sliced Gruyere or Emmental cheese
4 slices rye bread
½ tablespoon extra virgin olive oil
1 tablespoon tomato puree
60g hummus
4 stuffed vine leaves
200g artichoke hearts, drained and sliced
4 slices Gruyere or Emmental cheese
1. Preheat your sandwich press until the
green ready-to-cook indicator light
goes out.
2. Cut bread rolls in half and spread with
pesto. Fill with avocado, pepper, sweet
potato, dried tomato, mushrooms and
cheese.
3. Cook bread rolls until golden, crisp
and heated through (approximately 8
minutes).
Gorgonzola panini
Serves 2
30g garlic and herb butter
4 slices crusty country style bread
50g Spinach leaves
60g Gorgonzola cheese, crumbled
1. Preheat your sandwich press until the
green ready-to-cook indicator light
goes out.
2. Spread the garlic and herb butter over
bread slices. Make two sandwiches
with bread, spinach and cheese.
3. Cook until golden, crisp and heated
through (approximately 6 minutes).
12
1. Preheat your sandwich press until the
green ready-to-cook indicator light
goes out.
2. Spread the rye bread with the
combined oil and tomato paste, then
the hummus. Fill with vine leaves,
artichokes and cheese to make two
sandwiches.
3. Cook until golden, crisp and heated
through, (approximately 8 minutes).
recipes
Goat’s cheese and roasted
courgette
Parma ham baguette
Serves 2
2 small-medium baguette rolls
80g Italian parma ham (or prosciutto)
75g mozzarella cheese, thinly sliced
4 basil leaves
Freshly ground black pepper
1 tablespoon extra virgin olive oil
1 large foccacia
90g softened goat’s cheese
½ tablespoon roughly chopped parsley
½ tablespoon roughly chopped fresh basil
1 clove garlic, thinly sliced
1 tablespoon drained capers
1 tablespoon lemon juice
½ tablespoon sweet Thai chilli sauce
60g marinated roasted courgette
1. Preheat your sandwich press until the
green ready-to-cook indicator light
goes out.
2. Cut the focaccia in half to form a
sandwich. Spread with the combined
goat’s cheese, parsley, basil, garlic,
capers, lemon juice and chilli sauce.
Fill with courgettes.
Serves 2
1. Preheat your sandwich press until the
green ready-to-cook indicator light
goes out.
2. Cut baguette in half. Fill with layers
of parma ham (or prosciutto), cheese
and basil. Season to taste and drizzle
with oil.
3. Cook baguettes until golden, crisp and
heated through (approximately 6-8
minutes).
3. Cook focaccias until golden, crisp
and heated through (approximately 8
minutes).
13
recipes
Prawn and watercress
sandwiches
Chargrilled chicken and salsa
verde
Serves 2
Serves 2
4 slices wholegrain bread
70g cream cheese, softened
60g garlic and herb butter
75g watercress
400g cooked king prawns, peeled and
de-veined
1 char-grilled chicken breast fillet, sliced
1 clove garlic, thinly sliced
2 tablespoons chopped parsley
1 tablespoon finely chopped sage
1 tablespoon stuffed pimento green olives,
roughly chopped
1 tablespoon drained capers
1 tablespoon extra virgin olive oil
½ teaspoon freshly grated lime zest
½ tablespoon lemon juice
4 large slices Ciabatta bread
4 large slices Swiss cheese
1. Preheat your sandwich press until the
green ready-to-cook indicator light
goes out.
2. Spread the bread with the combined
cream cheese and garlic butter. Fill
with watercress and prawns to make
two sandwiches.
3. Cook until golden, crisp and heated
through (approximately 8 minutes).
Tuna and artichoke
Serves 2
2 large crusty round rolls
100g black olive paste
200g can tuna, drained
6 marinated baby artichokes
125g Brie cheese, thinly sliced
1. Preheat your sandwich press until the
green ready-to-cook indicator light
goes out.
2. Cut rolls in half and spread with olive
paste. Fill with tuna, artichokes and
cheese.
3. Cook until golden, crisp and heated
through (approximately 8 minutes).
14
1. Preheat your sandwich press until the
green ready-to-cook indicator light
goes out.
2. Combine the chicken, garlic, parsley,
sage, olives, capers, oil, zest and
juice. Fill the bread with the chicken
mixture and sliced cheese to make
two sandwiches.
3. Cook until golden, crisp and heated
through (approximately 8-10 minutes).
Serving Suggestions: Serve on fresh green
salad leaves.
recipes
Toasted chocolate panini
Serves 2
80g cream cheese, softened
4 slices textured country style bread
150g dark chocolate, coarsely grated
Vanilla ice-cream
1. Preheat your sandwich press until the
green ready-to-cook indicator light
goes out.
2. Spread cream cheese over the
bread slices and sprinkle with grated
chocolate. Sandwich together.
3. Cook until golden, crisp and heated
through (approximately 6 minutes).
Serving Suggestion: Serve with Ice cream.
Crispy brioche with berries
and ice cream
Serves 2
½ punnet strawberries, hulled
½ punnet blueberries
½ punnet raspberries
¼ cup port
1 loaf brioche
Vanilla ice-cream
Icing sugar, sifted
1. Preheat your sandwich press until the
green ready-to-cook indicator light
goes out.
2. Puree the berries and port until
smooth. Set aside. Cut four slices from
the brioche and cook until toasted
(approximately 5 minutes).
3. Arrange toasted brioche on two large
plates. Top with ice-cream and drizzle
with berry sauce.
Serving Suggestion: Serve immediately,
dust with icing sugar.
15
recipes
Crisp berry and mascarpone
sandwiches
Sweet fig focaccia
Serves 2
2 small plain rounds of focaccia
80g fresh ricotta cheese
3 fresh figs, thinly sliced
6 small fresh mint leaves
1 tablespoon caster sugar
4 slices country style bread
100g Mascarpone cheese
½ punnet strawberries, hulled and sliced
½ punnet raspberries
1 tablespoon runny honey
1. Preheat your sandwich press until the
green ready-to-cook indicator light
goes out.
2. Spread the cheese over the bread
slices. Fill with berries and drizzle with
honey to make two sandwiches.
3. Cook until golden, crisp and heated
through (approximately 8 minutes).
Sweet nectarine sandwich
Serve 2
40g unsalted butter, softened
4 slices multi grain bread
2 nectarines, peeled and sliced
1 teaspoon ground cinnamon
2 tablespoons caster sugar
1. Preheat your sandwich press until the
green ready-to-cook indicator light
goes out.
2. Spread butter over bread slices. Fill
with sliced nectarine and sprinkle with
combined cinnamon and sugar to
make two sandwiches.
3. Cook until golden, crisp and heated
through (approximately 8 minutes).
16
Serves 2
1. Preheat your sandwich press until the
green ready-to-cook indicator light
goes out.
2. Cut focaccias in half to form a
sandwich. Spread with ricotta cheese.
Fill with figs, mint leaves and a
sprinkling of caster sugar.
3. Cook until crisp, golden and heated
through (approximately 8 minutes).
connection to the mains supply
This appliance must be earthed.
This appliance is fitted with either a moulded or rewirable BS1363, 13 amp plug. The fuse
should be rated at 13 amps and be ASTA approved to BS1362.
If the fuse in a moulded plug needs to be changed, the fuse cover must be refitted. The
appliance must not be used without the fuse cover fitted.
If the plug is unsuitable, it should be dismantled and removed from the supply cord
and an appropriate plug fitted as detailed below. If you remove the plug it must not be
connected to a 13 amp socket and the plug must be disposed of immediately.
The wires of the mains lead are coloured in accordance with the following code:
GREEN/YELLOW = EARTH
BLUE = NEUTRAL
BROWN = LIVE
The wire which is coloured GREEN/YELLOW must be connected to the terminal in
your plug which is marked with an E or by the earth symbol ( ) or coloured GREEN or
GREEN /YELLOW.
The wire which is coloured BLUE must be connected to the terminal in your plug which is
marked with the letter N or coloured BLACK.
The wire which is coloured BROWN must be connected to the terminal in your plug which
is marked with the letter L or coloured RED.
If any other plug is used, a 13 amp fuse must be fitted either in the plug or adaptor or at
the distributor board.
Plug should be BS1363 approved
Fit a 13 Amp Fuse
GREEN/YELLOW
(Earth)
BLUE
(Neutral)
13 Amp
Fuse
BROWN
(Live)
Ensure that the outer sheath of the cable
is firmly held by the clamp
17
after sales service
These appliances are built to the very highest of standards. There are no user serviceable
parts. Follow these steps if the unit fails to operate:
1. Check the instructions have been followed correctly.
2. Check that the fuse has not blown.
3. Check that the mains supply is functional.
If the appliance will still not operate, return the appliance to the place it was purchased for
a replacement. To return the appliance to the Customer Service Department, follow the
steps below:
1. Pack it carefully (preferably in the original carton). Ensure the unit is clean.
2. Enclose your name and address and quote the model number on all correspondence.
3. Give the reason why you are returning it.
4. If within the guarantee period, state when and where it was purchased and include
proof of purchase (e.g. till receipt).
5. Send it to our Customer Service Department at the address below:
Customer Service Department
Jarden Consumer Solutions (Europe) Limited
Middleton Road
Royton
Oldham
OL2 5LN, UK.
Telephone: 0161 621 6900 Fax: 0161 626 0391
e-mail: [email protected]
18
guarantee
Please keep your receipt as this will be required for any claims under this guarantee.
This appliance is guaranteed for 1 year after your purchase as described in this
document.
During this guaranteed period, if in the unlikely event the appliance no longer functions
due to a design or manufacturing fault, please take it back to the place of purchase, with
your till receipt and a copy of this guarantee.
The rights and benefits under this guarantee are additional to your statutory rights, which
are not affected by this guarantee. Only Jarden Consumer Solutions (Europe) Limited
(“JCS (Europe)”) has the right to change these terms.
JCS (Europe) undertakes within the guarantee period to repair or replace the appliance,
or any part of appliance found to be not working properly free of charge provided that:
•
you promptly notify the place of purchase or JCS (Europe) of the problem; and
•
the appliance has not been altered in any way or subjected to damage, misuse,
abuse, repair or alteration by a person other than a person authorised by JCS
(Europe).
Faults that occur through, improper use, damage, abuse, use with incorrect voltage, acts
of nature, events beyond the control of JCS (Europe), repair or alteration by a person
other than a person authorised by JCS (Europe) or failure to follow instructions for use
are not covered by this guarantee. Additionally, normal wear and tear, including, but not
limited to, minor discoloration and scratches are not covered by this guarantee.
The rights under this guarantee shall only apply to the original purchaser and shall not
extend to commercial or communal use.
If your appliance includes a country-specific guarantee or warranty insert please refer
to the terms and conditions of such guarantee or warranty in place of this guarantee or
contact your local authorized dealer for more information.
Waste electrical products should not be disposed of with household waste. Please recycle
where facilities exist. E-mail us at [email protected] for further recycling and WEEE
information.
Jarden Consumer Solutions (Europe) Limited
Middleton Road
Royton
Oldham
OL2 5LN
UK
19
VST025_VST054_VST055_VST056_Iss_3
08/13
93222-2