1
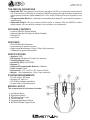
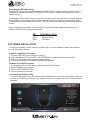
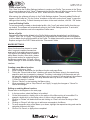
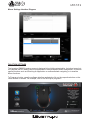
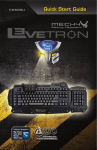
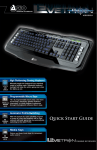
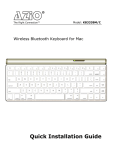
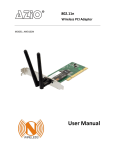
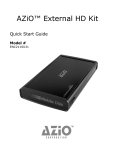
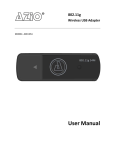
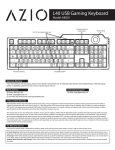
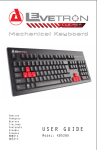
GM533U
GM533U
THE GM533U ADVANTAGE
•Adjustable DPI: As a general rule of thumb, the higher the DPI on a mouse the more accurate
it is. At a maximum of 5,000dpi, the Levetron GM533U ensures ultra-high precision during those
critical gaming moments. Adjust between 800, 1600, and 5,000dpi right at your fingertips in real
time.
•3 Programmable Buttons: 3 dedicated programmable buttons designed to record single key presses or
complex macros.
•Adjustable Weight: Like your mouse a little bit lighter or heavier? With the GM533U custom
weight system, you can adjust the weight of your mouse to your preference.
PACKAGE CONTENTS
•Levetron GM533U Gaming Mouse
•Adjustable Weight Cartridge (x6 Ballast Weights)
•Software CD
•User Guide
FEATURES
•800/1600/5000dpi Adjustment
•Laser tracking for optimal accuracy
•Weight adjustable between 134g to 164g in 5g increments
•3 Dedicated programmable buttons
SPECIFICATIONS
•Interface: USB
•OS Support: Windows XP/Vista/7 (all versions)
•Tracking Method: Laser
•Sensitivity (DPI): 800/2000/5000
•Buttons: 9
•Dedicated Programmable Buttons: 3 Buttons
•Cable Length: 6 feet
•Dimensions: 4.72” x 2.95”x 1.58” inches (LxWxH)
•Weight: 164g (adjustable to 134g, in 5g increments)
SYSTEM REQUIREMENTS
•PC with built-in USB ports
•Windows XP, Vista, or 7
•CD ROM for software installation
•At least 35mb of hard disk space
MOUSE LAYOUT
The components of this mouse includes:
1.Left Mouse Button
2.Right Mouse Button
3.DPI Setting Status Light
4.Tilt/Scroll Wheel
5.Programmable Macro Buttons
6.800/2000/5000dpi Toggle Switch
GM533U
GETTING STARTED
Adjusting the Mouse Weight:
1.
2.
3.
4.
Open the weight cartridge compartment on the bottom side of the mouse by turning the
cover 90 degrees counter-clockwise.
Remove the weight cartridge.
Remove the desired amount of ballast weights from the cartridge to reduce the weight of the
mouse.
Replace the weight cartridge into the compartment and then replace the cover.
Connecting the Mouse:
Connect the USB plug of the gaming mouse into an available USB port on your computer. For
maximum stability, we recommend connecting it directly to the computer. For maximum stability,
we recommend connecting it directly to the computer (as opposed to through a USB hub). The
operating system will automatically recognize the new hardware and install the required drivers.
This gaming mouse is fully plug & Play and software is not required for basic operation.
However, to access all functions of the mouse including macro button programming, please install
the included software.
GM533U
Changing the DPI (Resolution)
Press the DPI button (6) to toggle between 800/2000/5000dpi. A higher tracking rate will increase
the speed of the mouse pointer on the screen. This function is useful for changing the tracking
rate on-the-fly.
Increasing the DPI will also improve the accuracy of the mouse. We recommend using the highest
DPI available on the hardware side and then use the Windows or game mouse sensitivity setting
to decrease the mouse speed to your liking. This will give you the maximum performance from the
mouse.
When changing the resolution, the control light (3) will blink briefly at different frequency as a
visual indicator of the current speed selected.
DPI
800
2000
5000
CONTROL LIGHT
Slow Blinks
Medium Blinks
Fast Blink
SOFTWARE INSTALLATION
To install the software, please insert the software CD or visit our website to obtain the latest version of the mouse software.
Software Installation Procedure:
1.Plug the USB cable into a USB port of the PC.
2.Insert the software CD into the CD or DVD ROM drive (or download from our website).
3.Follow the on-screen setup wizard to install software.
4.Click the finish button to complete the software installation.
Software Un-install Procedure:
1.To un-install, click the “Start menu” and navigate to Control Panel.
2.Select “Add/Remove Programs”.
3.Click on “AZiO GM533U Driver”.
4.Click on Remove or Uninstall.
Accessing the Software Help
•To use the application help, first double-click the software Icon to launch the software. The help
section is accessed by clicking on the question mark in the upper right corner of the software
interface.
GM533U
USING THE SOFTWARE
The functions of the software can be broken down to 3 sections:
1. Profile Settings: Create specific profiles for all users and applications.
2. Macro Settings: Create strings of custom Macro functions to program to different buttons.
3. Button Customization: Select a button and program it to a different key, a special function
or a custom Macro string from step 2.
PROFILE SETTINGS
All user created Macros and user customized settings are saved to Profiles. The information in each Profile is saved to a corresponding file in your computer. “Default
Profile” is the default profile and contains
no customized settings of the mouse. Click
on it to access the Profiles Settings page
to add or edit your own profiles.
The Profiles Settings page is divided into three columns – Active, Name, and Path. Each row
represents one Profile.
Active: Put a checkmark next to the Profile that you want to make active.
Name: This column displays the name of the Profile.
Path: This shows the filename and location of where the Profile is saved to.
If no profiles are selected to be active, the system will revert to the default profile. Please note that
the default profile does not contain any customized functions and cannot be programmed. Other
functions on this page include:
New: Click here to create a new Profile. Enter the file name. The filename will also be the name of
the Profile. This information is displayed under the “Name” column of this page.
Load: Load a previously saved Profile.
Delete: Delete a Profile.
WARNING: After making any changes, remember to click on “OK”, “Cancel” or “Apply”. “OK” will
save all setting and exit Profile Settings interface. “Cancel” will exit without saving any changes.
Clicking “Apply” will save the changes without exiting the interface.
GM533U
Create a New Profile
Click “New” from the Profiles Settings interface to create a new Profile. Type a name in the “Save
as” pop-up window and click “Save.” Please note that the file name will also be used as the Profile
name. This profile will be saved in the “AZiO” folder within the “Documents” folder.
After saving, the software will return to the Profile Settings window. The newly added Profile will
appear in the Profile list. Tick the “Active” checkbox on the left to active it and “apply” to save the
settings without exiting. To finish the setup and return to the main interface, click the “OK” button.
Load an Existing Profile
To load a previously created or downloaded profile, click “Load” and select the file from the popup window. The software will automatically return to the Profile Settings window. To activate it,
please tick the checkbox next to the respective Profile name.
Delete a Profile
Unwanted Profiles can be deleted in the Profile Settings window by selecting it and clicking on
“Delete”. Click “OK” or “Apply.” This operation will only delete the Profile data from this software,
it will not delete the physical saved file of the Profile. To delete the save file, please use Windows
Explorer and go to the “AZiO” folder within the “Documents” folder.
MACRO SETTINGS
Macro functions allow players to create
short, long and complex command sequences for their applications and games.
This section will illustrate how to create or
edit a Macro function. After which, please
see the next section for assigning keys to
the Macros created here. For now, click on
“Macro Settings” to enter the Macro settings
interface.
Creating a new Macro function:
1. Start by clicking on “New”.
2. Enter a name or description for this Macro function and press Enter.
3. Ticking the “Record interval time” checkbox will record the Macro string in the same timing
sequence each key is pressed or released. The delay is calculated in milliseconds and can
be manually entered or edited after the Macro string is created. If left unchecked, the software
will assign it a default value of 1ms delay between each key actions. Please note that
1,000ms is equal to 1 second.
4. Click on “Record” to start entering the Macro string.
5. When completed, click on “Stop Record” and “Apply” to apply the changes or “Cancel” to
cancel the changes.
Editing an existing Macro function:
Please refer to the diagram on the next page.
1.
2.
3.
4.
5.
6.
In the top section, select the Macro to be edited.
On the bottom section, double-click on the portion of the Macro string to be modified. For
example, double-click on the Delay value, or Action value to make changes.
Clicking on “Delete” will delete that line and clicking on “Clear” will clear all strings of that
Macro.
Clicking on “Record” will allow you to add more commands to the Macro.
To move a specific string of the Macro up or down, highlight the respective string and use the
navigation buttons to the right.
Click on Ok, Cancel, or Apply when completed.
GM533U
Macro Settings Interface Diagram
FUNCTION SETTINGS
The Levetron GM533U gaming mouse is designed to be highly customizable. Just about every button (besides the DPI setting) can be programmed to have a different button assignment, to perform
special functions such as launching an application or multimedia/web navigating, or to execute
Macro functions.
To Program a button, open the software interface and simply click on the respective button on the
virtual mouse on-screen. For example, click on the M3 key to program it.
GM533U
Button Settings Interface
Once a button have been chosen for programming, the Key Settings interface (on the right)
will be displayed. Please click on the button
which corresponds to the function of your
choice. After which, please click on “OK” or
“Cancel” to return back to the main interface.
WARNING: After changing any key settings,
you will still need to click on the “Apply” button
on the MAIN software interferface in order for
the change to take effect.
•
•
•
•
•
•
•
Default Function: This is the default setting and basically means there is no changes.
No Function: This option turns OFF the button (thus, No Function).
Assign New Key: Click here to give this button a new assignment or function. This includes
web browser functions as well as multimedia functions such as play/pause, next track, back
track, etc. Scroll through the drop-down list to see all available options.
Run…: Set this button to launch a program or application of your choice.
Play Macro: Use this option to assign to the button a Macro function which was created in
the “Macro Settings” section.
Stop Playing Macro: Click here to stop the Macro function once it has been activated but
not yet completed. For example, if a very long Macro was executed, use this function to stop
it half way through. Alternatively, right-click on the system-tray icon and select “Stop playing
macro.”
Say String: This function allows users to preset a commonly used text and instantly recall
the text. This can be used in many different ways. Here are a couple of usage examples: (1)
Use it during gaming to say commonly used phrases such as “good luck, have fun!” or “heads
up, incoming!”, etc. Or use it for commonly used commands. For example, in StarCraft 2, program one of your keys as “/dance” or “/cheer” so you can instantly taunt your opponent on the
fly! We’re confident that you will find even more creative ways to use these functions than us.
When finished programming individual buttons, from the main user interface, please make sure to
click “Ok” or “Apply” to make the changes effective. From the main interface, in order to distinguish
the keys, all customized buttons will be displayed in ORANGE. BLACK color keys indicates default
function and the BLUE mouse roll-over indicates that the button is customizable.
GM533U
SUPPORT & WARRANTY
Support
If you need assistance with this product, please visit our website at www.aziocorp.com for
frequently asked questions and troubleshooting tips. Otherwise, please contact our dedicated
customer care team.
There are several ways to reach us:
North America
By Phone: (866) 468-1198
By eMail: [email protected]
On Live Help: http://www.aziocorp.com/support/helpdesk.htm
International Support
By eMail: [email protected]
Limited 3-Year Warranty
AZiO Corporation warrants only to the original purchaser of this product, when purchased from an
AZiO-authorized reseller or distributor, that this product will be free from defects in material and
workmanship under normal use and service for 3 years after purchase. AZiO reserves the right,
before having any obligation under this warranty, to inspect the damaged AZiO product, and all
costs of shipping the AZiO product to AZiO for inspection shall be borne solely by the purchaser. In
order to keep this warranty in effect, the product must have been handled appropriately and must
not have been misused in any way.
This warranty does not cover any damage due to accident, misuse, abuse or negligence. Please
retain the dated sales receipt as evidence of the original purchaser & date of purchase. You will
need it for any warranty service. In order to claim under this warranty, purchaser must make claim
to AZiO and obtain an RMA# which is to be used within 15 days of issuance and must present
acceptable proof of original ownership (such as original receipt) for the product. AZiO, at its option,
shall repair or replace the defective unit covered by this warranty. This warranty is non-transferable
and does not apply to any purchaser who bought the product from a reseller or distributor not
authorized by AZiO, including but not limited to purchases from internet auction sites. This warranty
does not affect any other legal rights you may have by operation of law. Contact AZiO through
email, chat, or through one of the technical support numbers listed for warranty service procedures.
For Warranty Service
In the event that warranty repair or replacement is necessary, please provide proof of purchase
(store receipt or invoice) in order to receive warranty service.
•
•
•
In North America: Within the first 60 days after purchase, please return your product to
your dealer or reseller for a replacement. If the product is still within warranty and you can
no longer return it to your dealer, please contact AZiO Customer Support (see above) for
assistance and instructions. AZiO will not accept returns without prior approval and an RMA
number.
In Europe: Within the first year after purchase, please return the product to your dealer or
reseller for a replacement. If the product is still within warranty and you can no longer return it
to your dealer, please contact AZiO Customer Support (see above) for assistance and instructions. AZiO will not accept returns without prior approval.
Outside North America and Europe: If your product needs to be returned within the
warranty period, please do so through the retailer or distributor from whom you purchased the
product.
GM533U