1
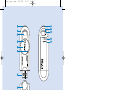
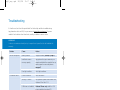
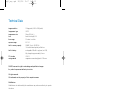
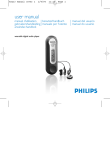
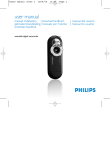
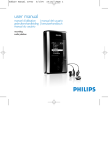
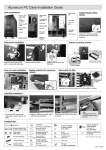
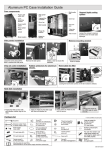
key10 manual cover 1
2/2/04
15:54
Page 1
user manual
manuel d’utilisation | benutzerhandbuch
gebruikershandleiding | manuale per l'utente
användar-handbok
wearable digital camera
| manual del usuario
| manual do usuário
key10 manual cover 1
2/2/04
System requirements:
Système requise:
Systemanforderungen:
Requisitos sistema:
Systeemvereisten:
Requisiti del sistema:
Requisitos do sistema:
System krav:
·
Windows 98SE / 2000 / ME / XP
·
Mac OS9 and 10
15:54
Page 2
key10_eng .qxd
28/1/04
15:17
Page 1
CONTENTS
ENGLISH
FRANÇAIS
DEUTSCH
ESPAÑOL
NEDERLANDS
ITALIANO
PORTUGUÊS
SVENSKA
We hope you enjoy your wearable digital camera
Please visit:
www.philips.com/support
and enter your product name to view:
· FAQ, Frequently Asked Questions
· Latest user manuals
· Latest PC software downloads
The model and production numbers can be found next to the USB port
(please remove the USB cover to see)
1
1
13
25
35
45
55
65
75
key10_eng .qxd
2
28/1/04
15:17
Page 2
key10_eng .qxd
28/1/04
15:17
Page 3
ENGLISH
Name of parts
1 Shutter button: tests light, memory capacity and power conditions and takes pictures
2 Strap hole: attaches supplied neck strap
3 Viewfinder: frames picture subject
4 Lens
5 Lens cap and Power On / Off dial: protects lens and switches camera on / off
6 Grip: positions thumb to power on / off
7 USB port: connects to PC
8 USB cover: protects USB port
9 Light level indicator: provides light information
0 Power level indicator: provides battery information
! Memory capacity level indicator: provides memory capacity information
3
key10_eng .qxd
28/1/04
15:17
Page 4
Preparation
Attaching the neck strap
Thread the neck strap through the hole as shown in the picture.
Power Supply
Your camera has a built-in USB rechargeable battery. To charge
your camera, switch on your computer. Detach the USB cover.
Connect your camera to your computer's USB port. Charge
your camera until the POWER indicator lights up and stop
blinking (approximately 4 hours).
IMPORTANT!
WINDOWS 98SE users:
DO NOT CONNECT your camera to the PC BEFORE driver installation. Please insert
the by-packed CD into your CDROM drive and follow on screen instructions to complete
driver and software installation.
MAC users:
DO NOT CONNECT your camera to your keyboard's USB port. It doesn't have sufficient
power to detect your camera.
4
key10_eng .qxd
28/1/04
15:17
Page 5
ENGLISH
Taking pictures
Turn Power on / off dial clockwise to power ON.
Hold the camera upright in your hand.
Make sure the lens is not obstructed / covered when you take pictures.
Look through the viewfinder to frame your subject.
Keep the camera steady and press the shutter halfway down to
test picture conditions.
For best results, check the status of all 3 indicators on the camera
when you take a picture. (See Indicators on your Camera, page 6)
Press the shutter button fully down to take your pictures.Your
camera beeps after you take a picture.
➔
TIP
Your camera automatically powers off if there is no operation within 60
seconds.Turn the Power on / off dial anti-clockwise to power OFF and
clockwise to power ON again.
5
key10_eng .qxd
28/1/04
15:17
Page 6
Indicators on your camera
Your camera tells you various information by LEDs and beeps:
User action
USB Connection
Powering on
Meaning
Camera charging
Green LED blinks
Camera charging
Green LED on
Camera fully charged
Double beep
Camera on
All LEDs blink
Wrong file format detected. Camera will
auto format and be ready for use in 5
seconds. (See page 7 for more information)
Taking picture
(Lighting level)
Single beep
Picture taken
Red LED blinks
External light low
Red LED on
External light too dark
(Battery level)
Green LED on
Battery full
Green LED blinks
Battery low
(Memory capacity level)
6
Signal
Double beep
Green LED off
Insufficient battery
Yellow LED on
Sufficient camera memory capacity for
new pictures
Yellow LED blinks
Almost insufficient camera memory
capacity for new pictures
Yellow LED off
Insufficient camera memory capacity for new
pictures
key10_eng .qxd
28/1/04
15:17
Page 7
ENGLISH
USB Connection
Using your camera as a mass storage
You can use your camera as a mass storage for any data files. Your camera will appear as a
new USB mass storage in Windows Explorer on PC or Finder on Mac when USB connected.
Viewing your pictures
Connect your camera to your computer's USB port. From Windows Explorer or Finder,
click on the mass storage folder and then the DCIM folder. You can view your pictures from
the subfolder 100PHDSC.
Transferring files and pictures
Click and highlight one or more files or pictures to transfer between your camera and your
computer. Use drag and drop actions to complete your transfer.
Disconnect camera safely from your PC by clicking
on the task bar to avoid file error.
(WINDOWS 98SE users: there is no
icon. Simply disconnect camera after file transfer
completes. MAC users: drag and drop
to
.)
Formatting your camera
Only format your camera with FAT16 file system.Your camera will auto-format during power
ON when wrong file system is used. Data files and pictures saved on your camera will be
erased after auto-format.
IMPORTANT! RETAIN YOUR ORIGINAL FILES!
Please ensure that you retain the original files transferred to your camera. Philips is not
responsible for any loss of content in the case if the product becomes damaged or the mass
storage not readable.
7
key10_eng .qxd
28/1/04
15:17
Page 8
Troubleshooting
If a fault occurs, first check the points listed. For further help and other troubleshooting
tips, please also check out FAQ for your camera at www.philips.com/support. If you are
unable to find a solution from these hints, consult your dealer or service center.
WARNING:
Under no circumstances should you try to repair the set yourself, as this will invalidate the
warranty.
Problem
Cause
Solution
Cannot take picture
Battery drained
Charge the battery (see step 1, page 2)
Insufficient camera
memory capacity
Copy pictures from your camera to your
computer and delete the original to free up
memory space for more new pictures.
(see page 7)
USB doesn't work
8
Poor light condition
Check light conditions
Loose connection
Check connection
Wrong OS version
Your operation system must be later than
Windows 98 or Mac OS 9
USB driver not installed
Windows 98 user only: install the USB
driver provided in by-packed CD
Camera connected
to Mac keyboard
Connect your camera to another USB
port
key10_eng .qxd
28/1/04
15:17
Page 9
ENGLISH
Safety and maintenance
Take care when using the camera
· Traffic safety: do not use while driving or cycling as you may cause an accident.
· Child safety: the camera neck strap is not a toy. Special care should be taken if
handled by young children. Avoid placing the neck strap around the neck of a
child to prevent strangulation!
To avoid damage or malfunction:
· This product is not waterproof: do not allow your camera to be submersed
in water, avoid exposing the USB socket to water. Water entering the camera
may cause major damage and rusting.
· Do not use any cleaning agents containing alcohol, ammonia, benzene, or abrasives
as these may harm the set.
· Avoid touching the lens and viewfinder with your fingers.To remove fingerprints,
use a soft damp cloth.
· Prevent damage to your eyes: do not look at the sun through the viewfinder!
· Avoid sudden changes of temperature as this may cause condensation on the
lens and viewfinder. Allow the camera to adjust to the surrounding temperature.
· Do not drop your camera or allow objects to fall on camera. Strong shocks and
vibrations may cause malfunction.
· Active mobile phones & strong magnetic fields in the vicinity may cause interference.
· The supplied software CD-ROM is not an audio CD. Playing CD-ROMs on audio
equipment may damage your audio equipment!
9
key10_eng .qxd
28/1/04
15:17
Page 10
Technical Data
image resolution
Image sensor type
image sensor size
lens
focus range
exposure range
built-in memory capacity
built-in battery
PC interface
casing material
2 Mega pixels (1600 x 1200 pixels)
CMOS
13mm (1/2 inch )
fixed focus length, F3.0
1.5 meter to infinite
EV 7-14
128MB* (Up to 320 JPEGs)
* Actual formated capacity will be less
rechargeable 180mAh Li-polymer (via USB),
fully charged in approximately 4 hours
USB 1.1
magnesium camera body, plastic USB cover
PHILIPS reserves the right to make design and specification changes
for product improvement without prior notice.
All rights reserved.
All trademarks are the property of their respective owners.
Modifications
Modifications not authorized by the manufacturer may void users authority to operate
this device.
10
key10_eng .qxd
28/1/04
15:17
Page 11
ENGLISH
Note:
This equipment has been tested and found to comply with the limits for a Class B digital device,
pursuant to part 15 of the FCC Rules.These limits are designed to provide reasonable
protection against harmful interference in a residential installation.This equipment generates,
uses, and can radiate radio frequency energy and, if not installed and used in accordance with
the instruction manual, may cause harmful interference to radio communications.
However, there is no guarantee that interference will not occur in a particular installation.
If this equipment does cause harmful interference to radio or television reception, which can
be determined by turning the equipment off and on, the user is encouraged to try to correct
the interference by one or more of the following measures:
· Relocate the receiving antenna.
· Increase the separation between the equipment and receiver.
· Connect the equipment into an outlet on a circuit different from that to which the
receiver is connected.
· Consult the dealer or an experienced radio/ TV technician for help.
Notice for the USA
Notice for Canada
This Class B digital apparaatus complies with Canadian ICES-003.
Cet appareil numérique de la classe B est conforme à la norme NMB-003 du Canada.
11
key10 manual cover 1
2/2/04
15:54
Page 3
This set complies with the radio interference requirements of the European Union.
Cet appareil est conforme aux normes de la Communauté européenne en matière d’interférences radio.
Dieses Gerät entspricht den Funkentstörungsvorschriften der Europäischen Gemeinschaft.
Este reproductor cumple las normas para interferencias de radio establecidas por la Comunidad Europea.
Dit apparaat voldoet aan de radio-ontstoringseisen van de Europese Unie.
Questo prodotto è conforme ai requisiti sulle interferenze radio dell’Unione Europea.
Este aparelho está de acordo com os requisitos da Comunidade Europeia relativos à interferência de rádio.
Denna apparat uppfyller EU:s krav beträffande radiostörningar.
Environmental information
We have reduced the packaging to its minimum and made it easy to separate into mono
materials: cardboard, polystyrene and PET.
Your set consists of material which can be recycled if disassembled by a specialized company.
Please observe the local regulations to dispose of packaging, and old equipment.
key10 manual cover 1
2/2/04
© Koninklijke Philips Electronics N.V.
All rights reserved.
www.philips.com
15:54
Page 4