1
EN
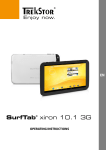
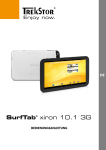
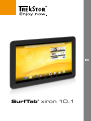
SurfTab® xiron 10.1
bOPERATING INSTRUCTIONS
We hope you have a lot of fun with your TrekStor SurfTab xiron 10.1. Please
read the following instructions carefully to learn about the features and
functions of this product.
Current product information can be found at the TrekStor website
www.trekstor.de.
Other products and accessories are available at www.trekstor-onlineshop.de.
1) General
It is essential to follow the safety and usage instructions listed in Chapter 2
of this manual.
Keep this manual and hand it over to the next owner of the device.
Use the device only for its intended purposes (see Chapter 3). The manufacturer
accepts no liability for any damage resulting from nonintended use of the
device. Furthermore, the manufacturer accepts no liability for damaged or
lost data and all consequential damages.
The manufacturer retains the right to continually improve the product. The
changes maybe made without being directly described in these operating
instructions. For this reason, the information provided in this operating
instructions may not reflect the current state of the art.
2) Instructions for Safety and Use
a
a
a
a
Attention: Do not use or charge the device if the battery
is damaged or leaks.
Attention: Do not cover the device during operation or while
charging it. It can lead to overheating.
Attention: If it gets wet, turn the power off immediately.
Have the device checked for safe operation before using it again.
Attention: This device is capable of high volumes. In order to avoid
hearing damage, which can occur immediately,later, or gradually
over time, you should not listen at high volumes for a long period.
Please be aware that permanent damage to your hearing can
also appear at a later point of time. Sometimes you can become
acclimatized to higher volumes over time. This may appear normal
for you; your hearing, however, may already have been adversely
affected. Higher volumes can lead your hearing to be damaged faster.
EN 2
Only qualified persons may perform technical work on the product.
The product may not be opened or changed. The components
cannot be serviced by the user.
d
e m
j Never expose the device to moisture, condensation and liquids.
Never place the device close to a source of heat, and protect it from
direct sunlight.
Protect the device from extremely high and low temperatures and
temperature fluctuations. Use the device within an ambient
temperature of 10º C until 40º C.
h
g
p
Make sure that the surroundings are as dust-free as possible when
you use and store the device.
Never clean the surface of the device with solvents, paint thinners,
cleansers or other chemical products. Instead, use a soft,
dry cloth or a soft brush.
In certain circumstances, exposing the device to an electrostatic
discharge may interrupt the data transfer between the device and
the computer and impair the functions of the device. If this occurs,
the device should be unplugged from the USB port and then
plugged in again. If necessary, re-activate the WiFi function.
o
q
Do not use USB cables longer than 3 meters.
The capacity indicated by your operating system can be different
than the actual capacity of your device. Like most manufacturers
of computer hardware, TrekStor uses the prefixes for units
System of Units (SI). Unfortunately, many operating systems
do not comply with this norm and display a lower capacity
because they base their calculations on the assumption that
1 GB = 230 bytes = 1.073.741.824 bytes.
3 EN
3) About SurfTab® xiron 10.1
The TrekStor SurfTab xiron 10.1 is a tablet PC with an IPS touch screen for
surfing the Internet and using applications, music, videos and games.
4) Package Contents
•
TrekStor SurfTab xiron 10.1
•
USB cable (Micro-USB / USB-A)
•
Mains adaptor 100-240 V
•
Cleaning cloth
•
Quick guide
5)Specifications
Dimensions (W x H x D) 260 x 173 x 11.1 mm
Weight 678 g
Prozessor (CPU) Cortex A9 quad core, 1.6 GHz
Grafic Unit (GPU) Mali-400 MP4
Battery Li-Polymer
Type of housing Aluminium, Plastic
Display type 10 point multitouch capacitive IPS screen
Display size 10.1" (25.7 cm)
Aspect ratio 16:10
Screen resolution 1280 x 800
Interface Micro-USB (incl. host function), Mini-HDMI™,
audio out, microfone, camera, card reader,
Wi-Fi, Bluetooth®
Supportes card formats microSD, microSDHC (max. 32 GB)
Camera 5.0 MP (autofocus) / 2.0 MP
Operating system Android™ 4.2.2 (Jelly Bean)
EN 4
A
B
C
D
E
F
G
HI
J
K
L
5 EN
6) Controls and Connections
A) On/OFF switch
B) Volume control
C) Back to the previous screen
D)Speaker
E)Microfone
F) microSD-/microSDHC card slot
G) Mini-HDMI connector
H) Micro-USB connector
I)Reset
J) Audio-Out connector
K) Camera rear
L) Camera front
7) Charging SurfTab
Fully charge your SurfTab before you use it for the first time. Use the supplied
mains adaptor for charging via socket. The SurfTab is fully charged when the
charging status indicator in the status bar on the home screen is full.
i The maximum battery runtime is reached after about 10 battery charging cycles.
8) Switching on SurfTab
After charging your SurfTab you can switch it on. In order to start the device,
press the on/off switch for 3-5 seconds. As soon as the device is switched on
the lock screen appears. Tap on the lock symbol and drag it to the open lock
on the right. Your SurfTab will now show the home screen.
iIf you are using your new SurfTab for the first time, a configuration assistant
appears which helps you to adjust the first important settings on your SurfTab.
The settings you make here (for example language) can also be altered
again under "Settings" in the application menu.
EN 6
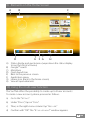
9) Elements on the Home Screen
A
C
B
D
E
F G
H
A) Status display and quick menu (wipe down the status display
to see the shortcut menu)
B) Google™ search
C)Microfone
D) Quick launch bar
E) Back to the previous screen
F) Application menu
G) Home-Icon (Back to the home screen)
H) View all open elements
10)Using the multi-user function
The SurfTab offers the possibility to create up to 8 user accounts.
To create a new account, please proceed as follows:
a) Go to the "Settings".
b) Under "Device", tap on "Users".
c) Then, in the right menu column tap "Add user."
d) Confirm with "OK". The "Set up user now?" window appears.
7 EN
e) Confirm with "Set up now". The lock screen appears.
f ) Once you have unlocked the screen, a configuration wizard appears
that guides you through the creation of the new user account.
i To move to the individual user account tap on the appropriate icon
below the screen lock and unlock the screen.
i Only the main user of the tablet can manage user accounts!
11) Using the Touch Screen
Scrolling
The home screen of your SurfTab reaches past both the right and left sides
of the middle window. In order to reach these sides, slide your finger from
left to right (or the reverse) across the screen.
In an open window (for example in a menu, browser, in an application or in
folders), you "drag" the screen in by sliding in the direction desired with your finger.
i Use your fingers or a suitable display pin (available in stores) to operate the
touch screen. Never use ordinary pens or other objects not designed for this
purpose (display can be damaged)!
Selecting Items
Tap the screen once to open an element or select an option.
i If you want to close a recently-used element (application, widget, menu),
tap on the display of all open elements (9 I). Put your fingertip on the
element you want to close and drag the item down to close it.
Expanding or reducing the View
In order to expand the display, touch two points on the screen and move your
fingers away from each other or tap the display twice in quick succession.
Conversely, move two fingers towards each other in order to reduce the screen.
Using the Display Keyboard
If you touch a text field in order to enter text (e.g. a web address) the display
keyboard is shown. Enter the text with the keyboard as usual. In addition use
buttons "?123" and "~\{", in order to enter numbers and special symbols.
For entering alternative letters (for example those with accents) press on a
particular letter for a prolonged period in order to see the alternative available.
i At "Settings" + "Language & Input" + "keyboard & input methods" you can make
further alteration to the display keyboard settings.
EN 8
12) Personalizing the Home Screen
You can set up the home screen (as well as four additional pages) in accordance
with your wishes by adding or deleting connected apps and widgets and
altering the background.
Adding Applications to the Home Screen
a) Tap the application menu in the Quick Launch bar on the Home screen.
A screen opens which shows the applications currently available to you.
b) Continue pressing on the application selected until the start screen appears.
c) Drag the icon selected to a free position of your choosing within the blue
frame. If you pull the icon up to the page edge, you can place it on the
next page of the home screen.
i You can move an icon placed on the home screen at any time. Put your
fingertip on the icon you want to move, until a thin blue border appears on
the screen. Now you can place the selected icon on any empty place within
the blue edge (or on the next page of your display).
Adding Widgets to the Home Screen
In addition to applications, you can add widgets to your start screen.
a) Touch in the upper left corner of the application menu on "Widgets".
b) Continue pressing on the widget selected until the start screen appears.
c) Drag the icon selected to a free position of your choosing within the
blue frame. If you pull the icon up to the page edge, you can place
it on the next page of the home screen.
Removing Applications and Widgets from the Home Screen
a) In order to remove a widget or application from the start screen,
press the relevant icon until "Remove" or "X" appears.
b) Continue pressing the icon and drag it to "Remove" or "X".
i This action deletes the connections to the start screen, though not
the applications itself. You can find out how to completely delete
an application from your SurfTab under 17.
9 EN
Changing the Desktop Background
a) Touch the screen background at a free point until a window with
the message "Choose wallpaper from" appears.
b) Choose by touching the relevant icon if you wish to use the background
setting from the "Gallery", the "Wallpapers" or the "Live Wallpapers"
(moving pictures) by touching the relevant icon.
c) Touch the chose folder on the picture desired and confirm your choice
with "Set wallpaper".
i If you choose a background from the gallery you also have the additional
possibility of choosing a particular area of the chosen picture as your
background motive. Push the window selected onto the picture and
touch the selection window onto the image and tap the picture top
right on "OK", as soon as you have chosen the selected area of the image.
13)The use of multi-window function
If you enable this feature, you have the option to operate more than one
application at the same time. The applications are displayed simultaneously
in separate small windows, as you know it from your desktop PC.
Activation and use of the multi-window function
a) Via the application menu go to "Settings". IIn the left menu column you
find "Multi window".
b) Tap on "Multi window". The menu item is now highlighted.
c) Slide the on/off-switch for for multi-window in the right part of the
colored background from "Off" to "On".
d) The multi-window icon appears at the right corner of the screen. Now
the multi- window function is enabled.
If you open an application, it is first shown as usual in full screen size.
e) Tap the multi-window icon to apply the multi-window mode to the
opened application. The application is now reduced to 1/ 4 of the
screen size, it appears in the foreground.
i By tapping the multi-window icon, you can now change the arrangement
of the open applications from “tiled” to “overlapping”.
i You can operate this way up to four applications simultaneously. Any
additional open application runs in the background.
EN 10
Select applications in the multi-window mode (move and resize)
a) Simultaneously tap with one finger on the application and with another
on the screen outside of the application.
b) Tighten the two fingers towards each other. The application is
highlighted in grey and selected now.
c) Now you can move the application to any other position on the screen
or change the size of its display.
i Zoom in and out by pinching your fingers together and apart on the application.
i While an application is selected, it cannot be operated. You must first clear
the selection.
Clear the selection and operate the application.
a) Simultaneously tap with one finger on the application and with another
on the screen outside of the application.
b) Pinch your fingers apart. The grey mark disappears and the application
is no longer selected.
c) You can now operate the application as usual.
14) Connecting to a Wireless Network
With the SurfTab you have the possibility to access the Internet via Wi-Fi. If you
want to establish a connection to a new network, please proceed as follows:
a) Go to the application menu to "Settings". In the left menu column,
you will find the option "Wi-Fi".
b) Tap "Wi-Fi". The menu option now appears backed with colour.
c) Tap the on/off-switch for Wi-Fi at the right part of the colour highlighted
option from "Off" to "On".
d) The Wi-Fi function becomes activated and all available wireless
networks are shown in the right menu column.
e) Tap the network with which you wish to be connected. An entry
window appears. Enter the network password of the network
selected and tap "Connect".
f ) The SurfTab now connects to the wireless network and beyond that
with the internet. Via a browser you can surf the internet as usual.
i If you have once established a connection to a Wi-Fi network, the SurfTab
automatically connects to it as soon as it is within reach. You do not
have to re-enter the Password.
i To save power, it is advisable to turn off the wireless function, if you do not need it.
11 EN
15) Using the Camera
The camera of the SurfTab can be activated via the application menu or the Quick
Launch bar on the home screen. The following screen appears:
A
B
C
D
Taking a Photo
Autofocus
Move your SurfTab with the rear camera in the desired direction. The camera
focuses automatically; you only need to release the shutter (15 B).
Adjust the focus manually
a) Move your SurfTab with the rear camera in the desired direction.
b) Tap your finger on the area of the display that you want to focus. A thin
circle with two white trapezoids appears in the tapped area.
c) As soon as the color of the two trapezoids has changed from white to
green, the tapped area is focused.
d) Release the shutter (15 B) to take a photo.
Access further setting options of the camera
a) Tap an empty space on the display or the lightning icon (15 A) in the
camera controls. A white circle appears on the screen (15 D).
b) Along the circle, you will find a selection of available options.
c) Tap the option that you want to select, or to access the sub-options.
EN 12
Post-processing of captured images
a) Open your last captured images by sliding your finger from right to left
across the screen.
b) Tap the image you want to edit. At the bottom left of the screen the
following icon
c) Tap this icon. Now you can choose different lighting techniques and
other options to edit the image.
d) Tap the desired option and save the changes by tapping the
"back to the previous screen" key.
i
The SurfTab then stores a new image; the original image is not overwritten!
Recording a Video
a) Tap the camera icon (15 C) at the edge of the screen, and then tap
the video camera icon.
b) Now, a red dot appears in the controls of the camera.
c) To start and stop recording a video, tap the red dot.
i
There are further setting options of the camera available in the video mode
as well (see above: "Access further setting options of the camera").
Taking a panorama picture
a) Tap the camera icon (15 C) on the screen and then the panorama icon.
b) Move your SurfTab with the rear camera in the desired direction.
c) To start the panorama shot, tap the blue circle in the camera controls.
d) Move the tablet slowly from left to right or vice versa. Once the status
bar at the bottom of the screen is full, the recording is finished and the
panorama picture is saved.
i
The status bar at the bottom of the display also tells you whether your move
is smooth enough for a successful panorama picture. Adjust your movement
speed if the bar is red.
13 EN
Zooming
Both in photo and in video mode, you can zoom in or out on your subject.
Simultaneously pull two fingers apart on the screen to zoom in, and back
together to zoom out.
i To leave the camera mode, briefly touch the lower frame of the display
in order to bring up the task menu.
16) Creating/removing an Email Account
Creating an Email Account
a) Make sure that the SurfTab is connected to the Internet.
b) Return to "E-Mail" via the application menu (9 G).
c) Enter a valid email address into the entry field in the appropriate
password into the field below.
d) Press "Next", to confirm your details.
e) In the next steps you can make further adjustments to your account
settings. Confirm the adjustments made with "Next". As soon as your
account is set up in accordance with your wishes, the email application
is ready for use.
Removing an Email Account
To remove the email account, choose "Email" via the applications menu and
then proceed as follows:
a) Press above right on the three vertically stacked dots and finally on "Settings".
b) Now touch the account in the left menu column which you wish to remove.
c) Pull the right menu right up to the top and touch "Remove account".
d) Confirm your choice with "OK" and the account is deleted.
EN 14
17)Installing/uninstalling Applications
Downloading and installing Applications
Via Google Play™ access, your SurfTab offers you the possibility to add further
to the pre-installed apps, widgets, programs and ebooks. To install new
applications please follow the instructions of Google Play.
After you install an application it will be visible in the application menu.
Either run the application from there or add it to your start screen.
i In order to download programs, applications or books, your SurfTab has
to be connected to the Internet.
i Certain applications require payment before they can be downloaded.
Google Play offers instructions about choosing the correct payment system
and about making payment.
Unistalling Applications
To uninstall applications from your SurfTab, please proceed as following:
a) Choose "Settings" on the applications menu.
b) Drag the left menu to the top right until the option "Apps" is visible.
Choose "Apps".
c) Drag the right menu left or right until you see the category "All".
d) Now drag the right menu upwards until the application to be removed
becomes visible.
e) Select the application which you wish to uninstall and choose the
option "Uninstall" in the options provided.
i You can only uninstall those applications which you installed yourself.
Applications which have been integrated into the system at factory level
can only be "Deactivated". The deactivation of applications integrated into
the system can impede the functionality of your SurfTab!
15 EN
18) Connecting other Devices
Connecting a USB Device
External USB devices such as, for example, USB sticks, can be connected
directly to the SurfTab via the micro USB socket, or by using a micro-USB
host cable (available from our Online Shop).
i In order to drag files between your SurfTab and an external memory
device you need an application with the function of a data browser
(for example "ES Explorer" or "FileBrowser").
a) Connect the external USB storage device to the SurfTab.
b) After a short while, the memory is available.
c) Via your data explorer app you can load, copy, delete and move files
as usual.
i In certain circumstances the energy supply of the SurfTab is not sufficient
in order to affect all functions of the USB device attached. For this reason,
supply additional power to external USB devices via a mains cable.
Connecting Devices via Bluetooth®
a) Go to the application menu to "Settings". In the left menu column, you
will find the option "Bluetooth".
b) Tap "Bluetooth". The menu option now appears backed with colour.
c) Tap the on/off-switch for Bluetooth at the right part of the colour
highlighted option from "Off" to "On".
d) Activate the Bluetooth function of the device to be connected,
and if necessary, enter the visibility of the device to be connected
to other Bluetooth devices. Follow the instructions of the device.
e) Tap "Search for devices" at the top right. A list of all available Bluetooth
devices appears.
f ) Tap the device to be connected and confirm by tapping "Pair"
in the right menu column.
g) If necessary, confirm the pairing on the device to be connected.
EN 16
19) Activating the Standby Mode
If you do not want to use the SurfTab for a while, briefly press the power
button to put the tablet in the standby mode and save energy. To exit
the standby mode, briefly press again the power button.
Once you have reactivated the screen, the SurfTab first displays the screen
lock. Tap the lock icon and pull the icon to the right edge of the circle onto
the open lock. Your SurfTab shows the home screen.
i The SurfTab is locked automatically when it is not used for a certain
time. A change of the interval, from when the SurfTab is supposed to go
automatically into the standby mode, can be individually adjusted under
"Settings" + "Display" + "Sleep".
20)Reset
If your SurfTab no longer responds, you can restart it by pressing the reset
button on the back of the device. To do this, you will need a small pin or
a paper clip.
i Please do not use needles or similar sharp objects, because you can damage
your SurfTab.
21) Turning off SurfTab
a) Press the on the on/off switch for about 2 - 4 seconds.
b) The following message appears: "Do you want to shut down?". Press "OK",
to turn the SurfTab off.
17 EN
22)Copyright and Trademark Notices
Copyright laws prohibit copying any data of this product or the contents of this manual
(illustrations, related documents etc.) in whole or in parts without the permission of the
copyright holder.
Android is a trademark of Google Inc. Use of this trademark is subject to Google permissions.
Google Play is a trademark of Google Inc. Use of this trademark is subject to Google Permissions.
HDMI, the HDMI Logo and High-Definition Multimedia Interface are trademarks or registered
trademarks of HDMI Licensing LLC.
The Bluetooth® word mark and logos are registered trademarks owned by Bluetooth SIG, Inc.
and any use of such marks by TrekStor GmbH is under license. Other trademarks and trade
names are those of their respective owners
TrekStor and SurfTab are registered trademarks of TrekStor Ltd. in the European Community
and other countries.
Copyright © 2013 TrekStor GmbH. All rights reserved. Other cited product or company names
may be trademarks or brand names of the respective owner.
EN 18
Akku-Entsorgung
Informationspflicht gemäß Batterieverordnung (BattV)
Batterien und Akkus gehören nicht in den Hausmüll. Der Verbraucher ist dazu verpflichtet,
nicht mehr verwendete Batterien und Akkus ordnungsgemäß zurückzugeben. Lassen Sie
diese bitte nur über den Fachhandel oder durch Batteriesammelstellen entsorgen. Hier
leisten Sie einen konkreten Beitrag zum Umweltschutz.
Seit 1998 verpflichtet die Deutsche Batterieverordnung alle Bürgerinnen und Bürger, verbrauchte
Batterien und Akkus ausschließlichüber den Handel oder speziell dafür eingerichtete Sammelstellen
zu entsorgen (gesetzliche Rückgabepflicht).
Handel und Hersteller sind verpflichtet, diese Batterien und Akkus unentgeltlich
zurückzunehmen und ordnungsgemäß zu verwerten oder als Sondermüll zu beseitigen
(gesetzliche Rücknahmepflicht).
Der verbaute Li-Polymer Akku dieses Geräts ist mit dem nebenstehenden Zeichen,
bestehend aus einer durchgestrichenen Mülltonne und der Art des verwendeten
Akkus gekennzeichnet.
Akku ausbauen
aBevor Sie Ihr ausgedientes Gerät zur Entsorgung geben, muss der Akku aus dem Gerät
entfernt werden.
Battery disposal
Reporting requirement according to the Battery Directive (BattV)
Batteries are not part of the domestic waste. The consumer is obliged to return no longer used
batteries properly. Please dispose of them by a specialized trade or a battery collection point.
Hereby you make an important contribution to environmental protection.
Since 1998 the German Battery Directive compels all citizens to dispose of used batteries
exclusively through the trader or specially equipped departments (legal return obligation).
Trade and manufacturers are committed to take back batteries for free and to exploit it
properly or to remove it as special waste (legal take-back obligation).
The built-in lithium-polymer battery of this device is marked with the adjoining
symbol, consisting of a crossed out bin and the used battery type.
Remove battery
aBefore you return a disused device for disposal, the battery has to be removed from the device.
E C D E C L A R AT I O N O F C O N F O R M I T Y
As manufacturer and importer respectively:
TrekStor GmbH
Kastanienallee 8 - 10
D-64653 Lorsch, Germany
■ ■ ■ ■ ■ ■ ■ ■ ■ ■ ■ ■ ■ ■ ■ ■ ■ ■ ■ ■ ■ ■ ■ ■ ■ ■ ■ ■ ■ ■ ■ ■ ■ ■ ■ ■ ■ ■ ■ ■ ■ ■ ■ ■ ■ ■ ■ ■ ■ ■ ■ ■ ■ ■ ■ ■ ■ ■ ■ ■ ■ ■ ■ ■ ■ ■ ■ ■ ■ ■ ■ ■ ■ ■ ■ ■ ■ ■ ■ ■ ■ ■ ■ ■ ■ ■ ■ ■ ■ ■ ■ ■ ■ ■ ■ ■ ■ ■ ■ ■ ■ ■ ■ ■ ■ ■ ■ ■ ■ ■ ■ ■ ■ ■ ■ ■ ■ ■ ■ ■ ■ ■ ■ ■ ■ ■ ■ ■ ■ ■ ■ ■ ■ ■ ■ ■ ■ ■ ■ ■ ■ ■ ■ ■ ■ ■ ■ ■ ■ ■ ■ ■ ■ ■ ■ ■ ■ ■ ■ ■ ■ ■ ■ ■ ■ ■ ■ ■ ■ ■ ■ ■ ■ ■ ■ ■
herewith declares that the products
Product:
SurfTab® xiron 10.1 (ST10416-1)
■ ■ ■ ■ ■ ■ ■ ■ ■ ■ ■ ■ ■ ■ ■ ■ ■ ■ ■ ■ ■ ■ ■ ■ ■ ■ ■ ■ ■ ■ ■ ■ ■ ■ ■ ■ ■ ■ ■ ■ ■ ■ ■ ■ ■ ■ ■ ■ ■ ■ ■ ■ ■ ■ ■ ■ ■ ■ ■ ■ ■ ■ ■ ■ ■ ■ ■ ■ ■ ■ ■ ■ ■ ■ ■ ■ ■ ■ ■ ■ ■ ■ ■ ■ ■ ■ ■ ■ ■ ■ ■ ■ ■ ■ ■ ■ ■ ■ ■ ■ ■ ■ ■ ■ ■ ■ ■ ■ ■ ■ ■ ■ ■ ■ ■ ■ ■ ■ ■ ■ ■ ■ ■ ■ ■ ■ ■ ■ ■ ■ ■ ■ ■ ■ ■ ■ ■ ■ ■ ■ ■ ■ ■ ■ ■ ■ ■ ■ ■ ■ ■ ■ ■ ■ ■ ■ ■ ■ ■ ■ ■ ■ ■ ■ ■ ■ ■ ■ ■ ■ ■ ■ ■ ■ ■ ■
Type:
Mobile Internet Device
■ ■ ■ ■ ■ ■ ■ ■ ■ ■ ■ ■ ■ ■ ■ ■ ■ ■ ■ ■ ■ ■ ■ ■ ■ ■ ■ ■ ■ ■ ■ ■ ■ ■ ■ ■ ■ ■ ■ ■ ■ ■ ■ ■ ■ ■ ■ ■ ■ ■ ■ ■ ■ ■ ■ ■ ■ ■ ■ ■ ■ ■ ■ ■ ■ ■ ■ ■ ■ ■ ■ ■ ■ ■ ■ ■ ■ ■ ■ ■ ■ ■ ■ ■ ■ ■ ■ ■ ■ ■ ■ ■ ■ ■ ■ ■ ■ ■ ■ ■ ■ ■ ■ ■ ■ ■ ■ ■ ■ ■ ■ ■ ■ ■ ■ ■ ■ ■ ■ ■ ■ ■ ■ ■ ■ ■ ■ ■ ■ ■ ■ ■ ■ ■ ■ ■ ■ ■ ■ ■ ■ ■ ■ ■ ■ ■ ■ ■ ■ ■ ■ ■ ■ ■ ■ ■ ■ ■ ■ ■ ■ ■ ■ ■ ■ ■ ■ ■ ■ ■ ■ ■ ■ ■ ■ ■
comply with the following directive(s):
1999/5/EC
Radio Equipment and Telecommunications Terminal Equipment
2004/108/EC EMC Directive: Electromagnetic Compatibility
2006/95/EC
Low Voltage Directive
■
■
■
■ ■ ■ ■ ■ ■ ■ ■ ■ ■ ■ ■ ■ ■ ■ ■ ■ ■ ■ ■ ■ ■ ■ ■ ■ ■ ■ ■ ■ ■ ■ ■ ■ ■ ■ ■ ■ ■ ■ ■ ■ ■ ■ ■ ■ ■ ■ ■ ■ ■ ■ ■ ■ ■ ■ ■ ■ ■ ■ ■ ■ ■ ■ ■ ■ ■ ■ ■ ■ ■ ■ ■ ■ ■ ■ ■ ■ ■ ■ ■ ■ ■ ■ ■ ■ ■ ■ ■ ■ ■ ■ ■ ■ ■ ■ ■ ■ ■ ■ ■ ■ ■ ■ ■ ■ ■ ■ ■ ■ ■ ■ ■ ■ ■ ■ ■ ■ ■ ■ ■ ■ ■ ■ ■ ■ ■ ■ ■ ■ ■ ■ ■ ■ ■ ■ ■ ■ ■ ■ ■ ■ ■ ■ ■ ■ ■ ■ ■ ■ ■ ■ ■ ■ ■ ■ ■ ■ ■ ■ ■ ■ ■ ■ ■ ■ ■ ■ ■ ■ ■ ■ ■ ■ ■ ■ ■
The following norms were consulted to assess conformity:
■
■
■
■
EN 300 328 V1.8.1
Electromagnetic compatibility and Radio spectrum Matters (ERM); Data transmission equipment
operating in the 2,4 GHz ISM band and using wide band modulation techniques
EN 301 489-1 V1.9.2 EMC and ERM
EMC standard for radio equipment and services; Part 1: Common technical requirements
EN 301 489-17 V2.2.1
Electromagnetic compatibility and Radio spectrum Matters (ERM);
ElectroMagnetic Compatibility (EMC) standard for radio equipment; Part 17:
Specific conditions for 2,4 GHz wideband transmission systems.
EN 60065:2002/AC:2007
Audio, video and similar electronic apparatus – Safety requirements
■ ■ ■ ■ ■ ■ ■ ■ ■ ■ ■ ■ ■ ■ ■ ■ ■ ■ ■ ■ ■ ■ ■ ■ ■ ■ ■ ■ ■ ■ ■ ■ ■ ■ ■ ■ ■ ■ ■ ■ ■ ■ ■ ■ ■ ■ ■ ■ ■ ■ ■ ■ ■ ■ ■ ■ ■ ■ ■ ■ ■ ■ ■ ■ ■ ■ ■ ■ ■ ■ ■ ■ ■ ■ ■ ■ ■ ■ ■ ■ ■ ■ ■ ■ ■ ■ ■ ■ ■ ■ ■ ■ ■ ■ ■ ■ ■ ■ ■ ■ ■ ■ ■ ■ ■ ■ ■ ■ ■ ■ ■ ■ ■ ■ ■ ■ ■ ■ ■ ■ ■ ■ ■ ■ ■ ■ ■ ■ ■ ■ ■ ■ ■ ■ ■ ■ ■ ■ ■ ■ ■ ■ ■ ■ ■ ■ ■ ■ ■ ■ ■ ■ ■ ■ ■ ■ ■ ■ ■ ■ ■ ■ ■ ■ ■ ■ ■ ■ ■ ■ ■ ■ ■ ■ ■ ■
The CE symbol confirms that this product conforms with the above mentioned norms and regulations.
■ ■ ■ ■ ■ ■ ■ ■ ■ ■ ■ ■ ■ ■ ■ ■ ■ ■ ■ ■ ■ ■ ■ ■ ■ ■ ■ ■ ■ ■ ■ ■ ■ ■ ■ ■ ■ ■ ■ ■ ■ ■ ■ ■ ■ ■ ■ ■ ■ ■ ■ ■ ■ ■ ■ ■ ■ ■ ■ ■ ■ ■ ■ ■ ■ ■ ■ ■ ■ ■ ■ ■ ■ ■ ■ ■ ■ ■ ■ ■ ■ ■ ■ ■ ■ ■ ■ ■ ■ ■ ■ ■ ■ ■ ■ ■ ■ ■ ■ ■ ■ ■ ■ ■ ■ ■ ■ ■ ■ ■ ■ ■ ■ ■ ■ ■ ■ ■ ■ ■ ■ ■ ■ ■ ■ ■ ■ ■ ■ ■ ■ ■ ■ ■ ■ ■ ■ ■ ■ ■ ■ ■ ■ ■ ■ ■ ■ ■ ■ ■ ■ ■ ■ ■ ■ ■ ■ ■ ■ ■ ■ ■ ■ ■ ■ ■ ■ ■ ■ ■ ■ ■ ■ ■ ■ ■
The manufacturer also declares the conformity of the product according to the following directives:
■
2001/95/EC
■
2002/95/EC
RoHS: Hazardous substances in electrical and electronic equipment
■
2009/125/EC
Ecodesign requirements for energy-using products
Lorsch,
General Product Safety
08.10.2013
Thorsten Koroscha, LPM
Supportinformationen
Sollten Sie Fragen zu Ihrem TrekStor Produkt haben, gehen Sie bitte wie folgt vor:
• Überprüfen Sie anhand der Produkteigenschaften und der Funktionen Ihres Gerätes
(auf der Verpackung ersichtlich), ob Sie die richtigen Einstellungen vorgenommen haben.
• Lesen Sie aufmerksam die gesamte Bedienungsanleitung.
• Informieren Sie sich auf unserer Website www.trekstor.de über aktuelle
Informationen zu Ihrem Produkt (z. B. neu verfügbare Firmware-Updates).
Wenn Sie weitergehende Fragen zu Ihrem Produkt haben, beachten Sie bitte die folgenden
TrekStor Supportoptionen:
FAQ
Der FAQ-Bereich unserer Website bietet Ihnen vielfältige Problemlösungshinweise. Hier erhalten Sie Antworten zu den am häufigsten gestellten Fragen zu
unseren Produkten.
E-Mail
Füllen Sie das Supportformular auf unserer Website aus oder senden Sie
eine E-Mail an [email protected]. Telefonsupport
Von Deutschland aus wählen Sie bitte 01805-TREKSTOR*, 01805-87357867*. Die Nummer der Supporthotline für andere Länder finden Sie auf unserer Website unter "SERVICE".
* 14 Cent/Min. aus dem deutschen Festnetz der DTAG, max. 42 Cent/Min. aus Mobilfunknetzen.
Support information
If you have any questions regarding your TrekStor product, please proceed as follows:
• Check the features as well as the functions of your device (apparent on the packaging),
in order to use the correct settings.
• Read the manual carefully.
• Inform yourself on our website www.trekstor.de/en about the up-to-date information
concerning your product (e. g. available most recent firmware releases).
In the case you have further questions regarding your product, please note the following
TrekStor support options:
FAQ
The FAQ area of our website offers you a wide range of problem solving hints.
Here you can obtain answers to the most frequently asked questions
concerning our products.
E-Mail
Please fill in the support form on our website or send an E-Mail to
[email protected]. You can find mailing addresses for other
countries when you click "SERVICE" at the menu bar on our website.
Phone support Please find the number of the support hotline for your country on our
website under "SERVICE" as well. TrekStor GmbH
Kastanienallee 8-10
D-64653 Lorsch, Germany
www.trekstor.de
BA-STX101-V1-10-EN-131213