1
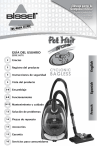
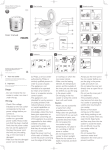
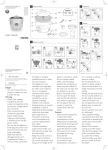
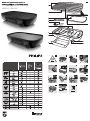
1
HD6323, HD6320
2
3
4
5
6
7
8
9
10
11
12
13
14
15
16
17
4222.005.0221.3
English
Introduction
Congratulations on your purchase and welcome to Philips!
To fully benefit from the support that Philips offers, register
your product at www.philips.com/welcome.
Before first use
1Remove packaging materials and stickers.
2Clean the appliance (see chapter ‘after use’).
Using the appliance
1Put the appliance on a stable, flat worktop.
General description (Fig. 1)
1Supports
2 Drainage groove
3 Grilling plate
4 Cord clip
5 Mains cord and plug
6 Plate fixation points
7 Heating element
8Appliance
9 Grease tray
10 Temperature control
11 Indicator light
2Put the grease tray in the appliance.  (Fig. 3)
Important
Read this user manual carefully before you use the appliance and save it for
future reference.
7Preheat the appliance until the indicator light switches off: the
Danger
-- Do not immerse the appliance or the mains cord in water or any
other liquid.
9Turn ingredients from time to time. Never cut the ingredients while
Warning
-- Check if the voltage indicated on the appliance corresponds to the local
mains voltage before you connect the appliance. Check the type plate
on the appliance for information on voltage and wattage.
-- If the mains cord is damaged, you must have it replaced by Philips, a
service centre authorised by Philips or similarly qualified persons in
order to avoid a hazard.
-- This appliance can be used by children aged 8 or over and by persons
with reduced physical, sensory or mental capabilities, or lack of
experience and knowledge, provided they have been given supervision
or instruction concerning use of the appliance by a person responsible
of their safety.
-- Children should be supervised to ensure that they do not play with
the appliance.
-- Keep the appliance and its mains cord out of the reach of children
younger than 8 when the appliance is switched on or is cooling down.
-- Keep the mains cord away from hot surfaces.
-- Do not let the appliance operate unattended.
Caution
-- Only connect the appliance to an earthed wall socket.
-- Put the appliance on a flat, stable surface with sufficient free space
around it.
-- Always preheat the grilling plate before you put any food on it.
-- The accessible surfaces may become hot when the appliance is
operating (Fig. 2).
-- Be careful of spattering fat when you grill fatty meat or sausages.
-- Always turn the temperature control on 0 before unplugging the appliance.
-- Always unplug the appliance after use.
-- Always clean the appliance after use.
-- Let the appliance cool down completely before you remove the grilling
plate, clean the appliance or put it away.
-- Never touch the grilling plate with sharp or abrasive items, as
this damages the non-stick surface.
-- This appliance is intended for normal household use only. It is not
intended for use in environments such as staff kitchens of shops, offices,
farms or other work environments. Nor is it intended to be used
by clients in hotels, motels, bed and breakfasts and other residential
environments.
-- Never connect this appliance to an external timer switch or remote
control system in order to avoid a hazardous situation.
-- If the appliance is used improperly or for professional or semiprofessional purposes or if it is not used according to the instructions in
the user manual, the guarantee becomes invalid and Philips refuses any
liability for damage caused.
Electromagnetic field (EMF)
This Philips appliance complies with all standards regarding electromagnetic
fields (EMF). If handled properly and according to the instructions in this
user manual, the appliance is safe to use based on scientific evidence
available today.
3Put the grilling plate on the appliance (Fig. 4).
Note: Make sure the flush drainage groove is at the front.The drainage groove
with the rim pointing upwards has to be seated properly on the two plate
fixation points at the back.
4Unwind the cord.
5Put the plug into an earthed wall socket.
6Choose the temperature setting on which you would like to grill: see
the food preparation table for an indication on temperature setting
and grilling time. The indication light will switch on (Fig. 5).
appliance is ready to be used.  (Fig. 6)
8Put the ingredients on the hot grilling surface.
on the grilling plate. Do not use metal utensils to turn or retrieve
the ingredients from the grilling plate as this may damage the nonstick surface.
10When the ingredients are done to your taste, retrieve the ingredients
from the grilling plate.
Note: Do not move or transport the appliance during use or when still hot.
Note:When you turn the reversible grilling plate to grill on the other side, let
the plate cool down and clean the plate thoroughly. If the plate is not cleaned
before using the other side, grease or food particles may burn on the heating
element (Fig. 7).
Note:When you turn the grilling plate to use the other side, make sure the
flush drainage groove is at the front.The drainage groove with the rim pointing
upwards has to be seated properly on the two plate fixation points at the
back.  (Fig. 8)
Tip: For more inspiration, visit our My Kitchen website: www.kitchen.philips.com.
After use
1Unplug the appliance.
2Remove excess grease and residue from the plate with a wooden or
plastic spatula and push it into the grease tray (Fig. 9).
3Allow the appliance to cool down before moving and cleaning it.
4Use kitchen paper to remove the grease and residue on the grilling plate.
5Wash the grilling plate in hot water with some washing-up liquid or
clean it in the dishwasher.  (Fig. 10)
Note: If residue has caked on the plate, first soak the plate in hot water. Do not
use any abrasive cleaning agents or methods to clean the grilling plate.
6Remove grease and residue from grease tray.  (Fig. 11)
7Wash the grease tray in hot water with some washing-up liquid or
clean it in the dishwasher.  (Fig. 12)
8Clean the appliance with a damp cloth. Never immerse the appliance
in water or put in the dishwasher (Fig. 13).
9Dry all parts of the appliance thoroughly.
Storage
1Put the grease tray in and the grilling plate on the appliance.  (Fig. 14)
2Wind the cord and use the cord clip to fasten it.  (Fig. 15)
3Place the appliance in the box to protect the non-stick surface.
4Store the appliance in a dry place.
Environment
-- Do not throw away the appliance with the normal household waste
at the end of its life, but hand it in at an official collection point for
recycling. By doing this, you help to preserve the environment (Fig. 16).
Guarantee and service
If you need service or information or if you have a problem, please visit
the Philips website at www.philips.com or contact the Philips Consumer
Care Centre in your country. You find its phone number in the worldwide
guarantee leaflet. If there is no Consumer Care Centre in your country,
go to your local Philips dealer.
Food preparation table (Fig. 17)
Campos electromagnéticos (CEM)
Este producto Philips cumple con todas las normativas sobre campos
electromagnéticos. Si se emplea correctamente y de conformidad con las
instrucciones de este manual, el uso del artefacto es seguro de acuerdo con
las evidencias científicas disponibles en la actualidad.
Antes del primer uso
1Retire el embalaje y los autoadhesivos.
2Limpie el artefacto (consulte el capítulo «Después del uso»).
Español
Introducción
Felicitaciones por su compra y bienvenido a Philips. Para disfrutar de todos
los beneficios que Philips tiene para ofrecerle, registre su producto en
www.philips.com/welcome.
Descripción general (Fig. 1)
1 Compatible con
2 Canal de drenaje
3 Placa del grill
4 Clip para cable
5 Cable de alimentación y enchufe
6 Puntos de fijación de la placa
7 Placa de calentamiento
8Artefacto
9 Bandeja recolectora de grasa
10 Control de temperatura
11 Luz indicadora
Importante
Antes de usar la unidad, lea atentamente este manual del usuario y
consérvelo para futuras consultas.
-----
----------------
---
Peligro
No sumerja el artefacto ni el cable de electricidad en agua u otros líquidos.
Advertencia
Antes de conectar el artefacto, verifique que el voltaje indicado en
el artefacto coincida con el voltaje de su red local. Para obtener
información acerca del voltaje, revise la placa de tipo del artefacto.
Si el cable de alimentación está dañado, deberá ser sustituido por Philips
o un taller autorizado Philips para evitar riesgos.
Este aparato no debe ser usado por niños menores de 8 años ni por
personas con capacidades físicas, psíquicas o sensoriales reducidas, ni
por quienes carezcan de los conocimientos y la experiencia necesarios,
a menos que una persona responsable de su seguridad los supervise o
les ofrezca instrucciones acerca del uso del aparato.
Asegúrese de que los niños no jueguen con este artefacto.
Mantenga el artefacto y su cable de alimentación fuera del alcance de los
niños menores de 8 años cuando esté encendido o mientras se enfría.
Mantenga el cable de electricidad alejado de superficies calientes.
Nunca deje el artefacto en funcionamiento sin vigilancia.
Precauciones
Conecte la unidad solamente a un tomacorriente de pared con
descarga a tierra.
Coloque el artefacto sobre una superficie plana y estable con suficiente
espacio libre alrededor.
Siempre caliente la placa del grill antes de colocar los alimentos.
Las superficies accesibles pueden calentarse mientras el artefacto está
en funcionamiento (Fig. 2).
Tenga cuidado con las salpicaduras de grasa al cocinar carnes grasosas
o embutidos.
Siempre coloque el control de temperatura en la posición “0” antes de
desenchufar el artefacto.
Desenchufe siempre el artefacto después de usarlo.
Siempre limpie el grill después de usarlo.
Deje que el grill se enfríe por completo antes de retirarle la placa,
limpiarlo o guardarlo.
Para evitar dañar la superficie antiadherente, no toque la placa del grill
con objetos afilados ni abrasivos.
Este producto ha sido diseñado sólo para uso doméstico y no para
ser utilizado en cocinas de comercios, oficinas, granjas u otros ámbitos
laborales. Tampoco fue ideado para que se utilice por huéspedes de
hoteles, moteles, pensiones y otros ámbitos residenciales.
Para evitar situaciones de peligro, nunca conecte este artefacto a un
interruptor con timer externo ni a un sistema de control remoto.
Si el artefacto se utiliza de forma incorrecta, con fines profesionales
o semiprofesionales o de un modo distinto del que se indica en las
instrucciones de este manual, la garantía quedará anulada y Philips no se
hará responsable por los daños ocasionados.
Uso del artefacto
1Coloque el artefacto sobre una superficie estable y plana.
2Coloque la bandeja recolectora de grasa en el artefacto.  (Fig. 3)
3Coloque la placa del grill en el artefacto (Fig. 4).
Nota: Asegúrese de que el canal de flujo del drenaje esté ubicado en la parte
delantera. El canal de drenaje con el borde apuntando hacia arriba debe
colocarse apropiadamente en los dos puntos de fijación de la parte trasera.
4Desenrolle el cable.
5Introduzca el enchufe en un tomacorriente con conexión a tierra.
6Seleccione el ajuste de temperatura del grill. Consulte la tabla de
preparación de alimentos para conocer los ajustes de temperatura y
el tiempo de cocción. La luz indicadora se encenderá (Fig. 5).
7Precaliente el artefacto hasta que la luz indicadora se apague (está
listo para usar).  (Fig. 6)
8Coloque los ingredientes sobre la superficie caliente del grill.
9Dé vuelta los ingredientes regularmente. Nunca los corte mientras
están sobre la superficie del grill. Para evitar dañar la capa
antiadherente, no use utensilios de metal para girar ni retirar los
alimentos de la placa.
10Cuando los ingredientes estén en su punto de cocción ideal, retírelos
del grill.
Nota: No mueva ni transporte el artefacto mientras todavía está caliente.
Nota: Cuando gire la placa del grill reversible para asar en el otro lado, deje
que la placa se enfríe y límpiela a fondo. Si la placa no está limpia antes de
usar el otro lado, la grasa o restos de comida pueden quemarse en la placa de
calentamiento (Fig. 7).
Nota: Cuando gire la placa del grill para usar el otro lado, asegúrese de que
el canal de flujo de drenaje esté ubicado en la parte delantera. El canal de
drenaje con el borde apuntando hacia arriba debe colocarse apropiadamente
en los dos puntos de fijación de la parte trasera.  (Fig. 8)
Sugerencia: Para inspirarse más, visite el sitio web Mi cocina: www.kitchen.philips.com.
Después del uso:
1Desenchufe el artefacto.
2Elimine el exceso de grasa y los restos de alimentos de la placa
con una espátula de madera o de plástico y arrójelos en la bandeja
recolectora de grasa (Fig. 9).
3Deje que el artefacto se enfríe antes de moverlo o limpiarlo.
4Use papel de cocina para eliminar la grasa y los restos de alimentos
de la placa del grill.
5Lave la placa del grill con agua caliente y detergente o lávela en el
lavavajillas.  (Fig. 10)
Nota: Si hay residuos endurecidos en la placa, enjuáguela con agua caliente.
No utilice agentes limpiadores abrasivos ni otros métodos para limpiar la
placa del grill.
6Retire los restos de alimentos y la grasa de la bandeja
recolectora.  (Fig. 11)
7Lave la bandeja recolectora de grasa con agua caliente y detergente
o lávela en el lavavajillas.  (Fig. 12)
8Limpie el artefacto con un paño húmedo. Nunca sumerja el artefacto
en agua ni lo coloque en el lavaplatos (Fig. 13).
9Seque a fondo todas las piezas del artefacto.
Guardado
1Coloque la bandeja recolectora de grasa y la placa del grill en el
artefacto.  (Fig. 14)
2Enrolle el cable y utilice el clip para sujetarlo.  (Fig. 15)
3Coloque el artefacto en la caja para proteger la superficie
antiadherente.
4Guarde el aparato en un lugar seco.
Medioambiente
-- Cuando finalice la vida útil del artefacto, no lo deseche junto con los
residuos domésticos habituales. Llévelo a un centro de recolección
oficial para su reciclado. De esta forma, ayudará a proteger el medio
ambiente (Fig. 16).
Garantía y servicio técnico
Si necesita información o tiene algún problema, visite la página Web de
Philips en www.philips.com o póngase en contacto con el Servicio de
Atención al Cliente de Philips en su país. Hallará el número de teléfono en
el folleto de la garantía mundial. Si no hay Servicio de Atención al Cliente
de Philips en su país, diríjase a su distribuidor local Philips.
Tabla de preparación de alimentos (Fig. 17)