1
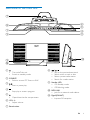
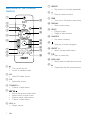
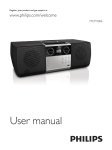
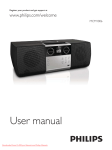
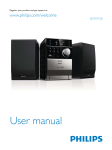
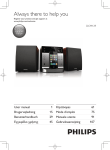
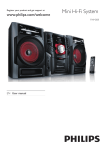
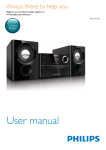
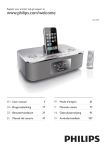
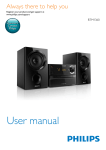
Always there to help you
Register your product and get support at
www.philips.com/welcome
Question?
Contact
Philips
User Manual
TCM350
Contents
1Important
8 Product information
12
9Troubleshooting
13
Specifications
3
Safety3
Care for your product
3
Care of the environment
4
Compliance4
Copyright4
Warranty5
2 Your Micro Hi-Fi System
5
3 Get started
8
4 Play disc
9
12
Introduction5
What's in the box
5
Overview of the main unit
6
Overview of the remote control
7
Place on a flat surface
Prepare the remote control
Connect power adapter
Switch on
Play options
8
8
8
9
9
5 Adjust volume level and sound
effect10
Adjust volume level
Enhance bass
Mute sound
10
10
10
6 Listen to the radio
11
7 Other features
12
Tune to a radio station
Program radio stations automatically
Program radio stations manually
Select a preset radio station
Listen to an external device
11
11
11
11
12
EN
2
1Important
•
•
Safety
Never place the product or any objects
on power cords or on other electrical
equipment.
If the product is transported in
temperatures below 5°C, unpack the
product and wait until its temperature
matches room temperature before
connecting it to the power outlet.
Risk of electric shock or fire!
• Never expose the product and accessories
to rain or water. Never place liquid
containers, such as vases, near the product.
If liquids are spilt on or into the product,
disconnect it from the power outlet
immediately. Contact Philips Consumer
Care to have the product checked before
use.
• Never place the product and accessories
near naked flames or other heat sources,
including direct sunlight.
• Never insert objects into the ventilation
slots or other openings on the product.
• Where the mains plug or an appliance
coupler is used as the disconnect device,
the disconnect device shall remain readily
operable.
• Disconnect the product from the power
outlet before lightning storms.
• When you disconnect the power cord,
always pull the plug, never the cable.
Risk of overheating!
• Never install this product in a confined
space. Always leave a space of at least four
inches around the product for ventilation.
Make sure that curtains or other objects
never cover the ventilation slots on the
product.
Risk of short circuit or fire!
• Before you connect the product to the
power outlet, ensure that the power
voltage matches the value printed on the
back of the product. Never connect the
product to the power outlet if the voltage
is different.
• Never expose the remote control or
batteries to rain, water or excessive heat.
• Avoid force coming onto power plugs.
Loose power plugs can cause arcing or fire.
•
Risk of injury or damage to the product!
• Visible and invisible laser radiation when
open. Avoid exposure to beam.
• Do not touch the disc optical lens inside
the disc compartment.
3
EN
Risk of contamination!
• Remove the battery if it is exhausted or if
the remote control is not to be used for
an extended period of time.
• Batteries contain chemical substances, they
should be disposed of properly.
Care for your product
•
•
•
Do not insert any objects other than discs
into the disc compartment.
Do not insert warped or cracked discs into
the disc compartment.
Remove the discs from the disc
compartment if you are not using the
product for an extended period of time.
Only use microfiber cloth to clean the
product.
Warning
•• Never remove the casing of this apparatus.
Care of the environment
This product complies with the radio
interference requirements of the European
Community.
This apparatus includes this label:
Your product is designed and manufactured
with high quality materials and components,
which can be recycled and reused.
Class II equipment symbol:
When this crossed-out wheeled bin symbol is
attached to a product it means that the product
is covered by the European Directive 2002/96/
EC.
Please inform yourself about the local separate
collection system for electrical and electronic
products.
Please act according to your local rules and
do not dispose of your old products with your
normal household waste. Correct disposal of
your old product helps to prevent potential
negative consequences for the environment and
human health.
Your product contains batteries covered by
the European Directive 2006/66/EC, which
cannot be disposed with normal household
waste.Please inform yourself about the local
rules on separate collection of batteries
because correct disposal helps to prevent
negative consequences for the environmental
and human health.
Compliance
This symbol indicates that this product has a
double insulation system.
Note
•• The type plate is located on the back of the apparatus.
Copyright
This item incorporates copy protection
technology that is protected by U.S. patents
and other intellectual property rights of
Rovi Corporation. Reverse engineering and
disassembly are prohibited.
2013 © Koninklijke Philips Electronics N.V.
Specifications are subject to change without
notice. Trademarks are the property of
Koninklijke Philips Electronics N.V or their
respective owners. Philips reserves the right
to change products at any time without being
obliged to adjust earlier supplies accordingly.
EN
4
Warranty
•
•
•
•
Never attempt to repair the product, this
could lead to the risk of injury, damage to
the product and will void your warranty.
Use the product and accessories only as
intended by the manufacturer. The caution
sign printed on the back of the product
indicates risk of electric shock.
Never remove the cover of the product.
Always contact Philips Customer Support
for service or repairs.
Any operation expressly prohibited in
this manual, or any adjustments and
assembly procedures not recommended
or authorized in this manual shall void the
warranty.
2 Your Micro HiFi System
Congratulations on your purchase, and
welcome to Philips! To fully benefit from the
support that Philips offers, register your product
at www.Philips.com/welcome.
Introduction
With this unit, you can:
• enjoy audio from discs and other external
devices
• listen to radio stations
You can enrich sound output with the
following sound effect:
• Dynamic Bass Boost (DBB)
The unit supports the following media format:
What's in the box
Check and identify the contents of your
package:
• Main unit
• Remote control (with battery)
• Base bracket
• Printed materials
5
EN
Overview of the main unit
g
h
f
a
d
b
c
e
k
i
j
a
MP3 LINK
• Turn on/off the unit.
• Switch to standby mode.
b SOURCE
• Select a source: CD, Tuner, or AUX.
c
d
e
• Start or pause play.
h
•
•
•
•
/
Skip to the previous/next track.
Search within a track or disc.
Select a preset radio station.
Search for a radio station.
i Standby LED
• On: Standby mode.
• Off: Working mode.
• Stop play or erase a program.
j MP3-LINK
• Jack for an external audio device.
• Open/close the disc compartment.
k Pigtail(FM ANT)
• Improve FM reception.
f VOL +/• Adjust volume.
g Base bracket
EN
6
g REPEAT
• Play a track or all tracks repeatedly.
Overview of the remote
control
h
a
q
b
c
FM
CD
d
TUNING
MP3LINK
p
o
e
TUNING
f
VOL
g
REPEAT
h
i
PRESET
SHUFFLE
PROG
DBB
DISPLAY
n
m
l
k
j
• Mute or restore volume.
i DBB
• Turns on or off dynamic bass boost.
j DISPLAY
• Show current status.
k PROG
• Program tracks.
• Program radio stations.
l SHUFFLE
• Play tracks randomly.
m
• Stop play or erase a program.
n PRESET +/• Select a preset radio station.
o
• Start or pause play.
p MP3-LINK
• Select external audio device source.
a
q
• Turn on/off the unit.
• Switch to standby mode.
b FM
• Select FM radio source.
c CD
• Select disc source.
d TUNING +/• Tune to a radio station.
e
•
•
•
•
/
Skip to the previous/next track.
Search within a track or disc.
Select a preset radio station.
Tune to a radio station.
f VOL +/• Adjust volume.
7
EN
• Open/close the disc compartment.
3 Get started
Always follow the instructions in this chapter in
sequence.
If you contact Philips, you will be asked for the
model and serial number of this apparatus. The
model number and serial number are on the
rear of the apparatus. Write the numbers here:
Model No. __________________________
Serial No. ___________________________
Tip
•• You can also mount the unit on a wall.
Prepare the remote control
Caution
•• Risk of explosion! Keep batteries away from heat,
sunshine or fire. Never discard batteries in fire.
•• Risk of decreased battery life! Never mix different
brands or types of batteries.
Place on a flat surface
Before you place the micro Hi-Fi system on a
flat surface, attach the supplied base bracket.
1
2
3
Place the micro Hi-Fi system face-down on
a flat surface.
Insert the base bracket into the two slots
on the bottom of the unit.
•• Danger of explosion if battery is incorrectly replaced.
Replace only with the same or equivalent type.
To replace the remote control battery:
1
2
3
Open the battery compartment.
Insert one AAA battery with correct
polarity (+/-) as indicated.
Close the battery compartment.
Push the bracket downward to fit into the
slots until it locks into place.
Connect power adapter
Caution
•• Risk of product damage! Make sure that the power
supply voltage corresponds to the voltage printed on
the back or the underside of the Micro Hi-Fi system.
•• Risk of electric shock! When you unplug the power
adapter, always pull the plug from the socket. Never
pull the cord.
Connect the power adapter to the wall socket.
»» The red standby indicator turns on.
»» The unit is ready to be set up for use.
EN
8
4 Play disc
Caution
•• Do not place any objects other than discs into the disc
compartment.
•• Do not touch the disc optical lens inside the disc
compartment.
Switch on
Press .
»» The unit switches to the last selected
source.
To switch on and select a source directly,
• Press CD, FM or MP3-LINK on the
remote control.
Switch to standby mode
Press to switch to standby mode.
»» The red standby indicator turns on.
»» The backlight on the display panel turns off.
1
2
3
4
Press CD on the remote control to select
the disc source.
Press on the unit to open the disc
compartment.
Insert a disc with the printed side facing
outward.
Press to close the disc compartment.
• To pause/resume play, press
.
• To stop play, press .
Play options
Skip to a track
During play, press
track.
/
to select another
Search within a track
1
2
During play, press and hold
/
.
Release to resume normal play.
Display play information
During play, press DISPLAY repeatedly to select
different play information.
9
EN
Program tracks
You can program a maximum of 20 tracks.
1
2
3
4
In CD mode, in the stop position, press
PROG to activate the program mode.
»» [P01] (program) is displayed.
Press
/
to select a track number,
and then press PROG to confirm.
Repeat step 2 to select and store more
tracks to program.
Press
to play the programmed tracks.
To erase the program,
• Press twice.
• Switch to another mode.
• Switch off the micro Hi-Fi System.
Repeat play
1
2
During play, press REPEAT repeatedly to
select:
• [r1]: play the current track repeatedly.
• [rA]: play all tracks repeatedly.
To return to normal play, press REPEAT
repeatedly until repeat mode is no longer
displayed.
Shuffle play
You can play all tracks in random order.
1
2
5 Adjust volume
level and sound
effect
Adjust volume level
During play, press VOL +/- to increase/decrease
the volume level.
Enhance bass
During play, press DBB repeatedly to turn on or
off dynamic bass enhancement.
»» The current DBB setting is displayed.
•
•
[dbb-0]: The Dynamic Bass Boost (DBB)
function is off.
[dbb-1]: The DBB function is on.
Mute sound
During play, press
volume.
to mute or restore the
During play, press SHUFFLE.
• [SH]: play tracks randomly.
To return to normal play, press SHUFFLE
again.
EN
10
6 Listen to the
radio
Program radio stations
manually
Note
Tune to a radio station
1
2
3
Press FM on the remote control to select
FM source.
Press and hold
/
for more than 2
seconds.
»» The radio tunes to a station with
strong reception automatically.
Repeat step 2 to tune to more stations.
• To tune to a weak station, press
TUNING +/- repeatedly until you find
optimal reception.
• To improve FM reception, extend and
position the pigtail fully.
•• You can program a maximum of 10 preset radio
stations.
1
2
3
4
Tune to a radio station.
Press PROG to activate program mode.
»» [P01] is displayed.
Press PRESET +/- to allocate a number to
this radio station, and then press PROG to
confirm.
»» The preset number and the frequency
of the preset station are displayed.
Repeat the above steps to program other
stations.
Tip
Program radio stations
automatically
•• To overwrite a programmed station, store another
station in its place.
Note
•• You can program a maximum of 10 preset FM radio
stations.
In tuner mode, press and hold PROG for more
than 2 seconds to activate automatic program
mode.
»» [AUTO] (auto) is displayed.
»» All available stations are programmed in the
order of waveband reception strength.
»» The first programmed radio station is
broadcast automatically.
11
EN
Select a preset radio station
In tuner mode, press PRESET +/- to select a
preset number.
7 Other features
8Product
information
Listen to an external device
You can listen to an external device through this
micro Hi-Fi system.
1
2
3
Press MP3-LINK on the remote control to
select AUX source.
Connect an MP3 link cable to:
• MP3-LINK jack (3.5 mm) on the unit
• the headphone jack on an external
device
Start to play the device (see the device
user manual).
Note
•• Product information is subject to change without prior
notice.
Specifications
Amplifier
Rated Output Power
Frequency Response
Signal to Noise Ratio
Aux Input
2 x 2 W RMS
60 Hz - 20 kHz
>57 dBA
0.6 V RMS 22 kohm
STANDBY
MP3 LINK
Disc
Laser Type
Disc Diameter
Support Disc
Audio DAC
Total Harmonic
Distortion
Frequency Response
S/N Ratio
Semiconductor
12 cm/8 cm
CD-DA, CD-R, CD-RW
24 Bits / 44.1 kHz
<1% (1 kHz)
60 Hz -20 kHz (44.1 kHz)
>57 dBA
Tuner
Tuning Range
Tuning grid
Sensitivity
- Mono, 26dB S/N Ratio
- Stereo, 46dB S/N Ratio
Search Selectivity
Total Harmonic Distortion
Signal to Noise Ratio
FM: 87.5 - 108 MHz
50 KHz
<22 dBf
<48 dBf
>28 dBf
<3%
>55 dB
EN
12
Speakers
Speaker Impedance 4 ohm
Speaker Driver
2.5" full range
Sensitivity
>82 dB/m/W ±3 dB/m/W
9Troubleshooting
Caution
•• Never remove the casing of this apparatus.
General information
Adapter
Operation Power
Consumption
Standby Power
Consumption
Dimensions
- Main Unit (W x H x D)
Weight
- With Packing
- Main Unit
9 V, 1.5 A
10 W
< 0.5 W
400 x 202 x 80 mm
3.82 kg
1.4 kg
To keep the warranty valid, never try to repair
the system yourself.
If you encounter problems when using this
apparatus, check the following points before
requesting service. If the problem remains
unsolved, go to the Philips web site
(www.philips.com/support). When you contact
Philips, ensure that the apparatus is nearby
and the model number and serial number are
available.
No power
•• Ensure that the AC power cord of the unit
is connected properly.
•• Ensure that there is power at the AC
outlet.
•• As a power-saving feature, the system
switches off automatically 15 minutes after
track play reaches the end and no control
is operated.
No response from the unit
•• Disconnect and reconnect the AC power
plug, and then turn on the system again.
No sound or poor sound
•• Adjust the volume.
Remote control does not work
•• Before you press any function button, first
select the correct source with the remote
control instead of the main unit.
•• Reduce the distance between the remote
control and the unit.
•• Insert the battery with its polarities (+/–
signs) aligned as indicated.
•• Replace the battery.
•• Aim the remote control directly at the
sensor on the front of the unit.
13
EN
No disc detected
•• Insert a disc.
•• Check if the disc is inserted upside down.
•• Wait until the moisture condensation at
the lens has cleared.
•• Replace or clean the disc.
•• Use a finalized CD or correct format disc.
Poor radio reception
•• Increase the distance between the unit and
your TV or VCR.
•• Fully extend the antenna.
EN
14
Specifications are subject to change without notice
© 2013 Koninklijke Philips Electronics N.V.
All rights reserved.
TCM350_12_UM_V1.0